I need to be sure and thank Keane Pardiso and Andy Svaboda who both helped with this project.
Keane provided the programmable torch, heavy welders used to do the main assembly and the radial arm drill used to drill and counter bore the holes for the hardy inserts.
Andy provided the burners used to preheat the anvil prior to hard facing.
- Patrick
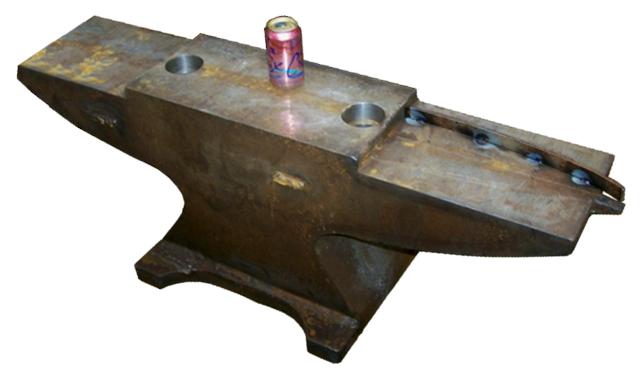
Dimensions:
Length: 52-9/16" (1335mm)
Face: 9-1/2" x 19-5/8" (241 x 499mm
Square horn: 17" (432mm) long. 6"(152mm) wide at widest
Round Horn: 16" (406mm) long
Base: 15-3/4" x 19-3/4" (400 x 502mm )
Height: 17-13/16" (478mm)
Hardys: 1.5" (38mm) square centered 2" (41mm) from each end of the face.
Weight: 1050 pounds (476.3 kg)
 Welds finished flat and holes drilled and counter bored for square hardie hole inserts.
These intermediate machining operations required machine tools capable of handling such a heavy part plus the lifting and hauling to and from the shop.
Welds finished flat and holes drilled and counter bored for square hardie hole inserts.
These intermediate machining operations required machine tools capable of handling such a heavy part plus the lifting and hauling to and from the shop.
An option on a two or three plate anvil like this would have been to mill half the hardie hole in each half of the anvil, or leave spaces in the middle plate prior to welding.
Always make the bottom of the hole larger so that things that go in the top can always drop through.
See 3 MORE Hardy (Hardie) Holes for details. . .
A Torch Guide is tacked to the horn prior to cutting.
Simple torch guides can be used for many purposes and while they do not cure bad torch handling they do a good job of controlling the line to be cut.
Reusable guides can be clamped on as well as being tacked.
The base of the feet have been welded on at this point. These help determine the shape to be built up.
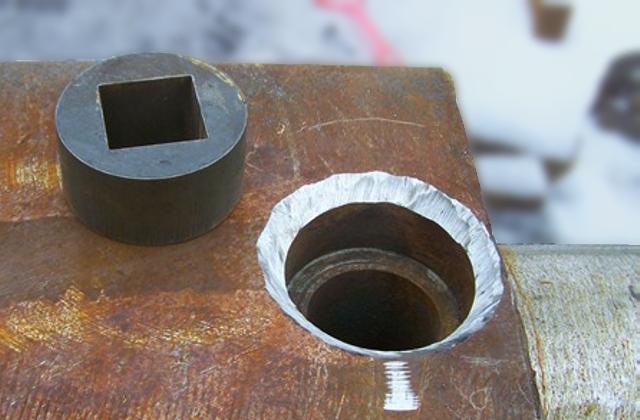
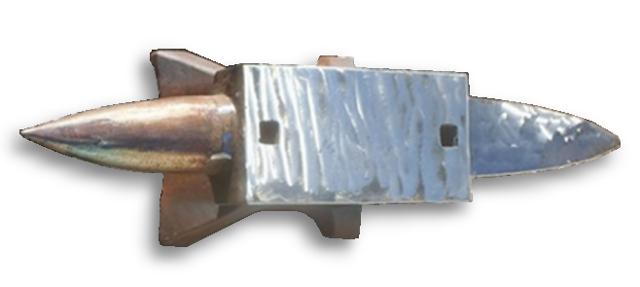
Holes preped for welding in the waterjet cut square hardie hole inserts.
Note that the drilled holes must be bigger than the diagonal of the square holes.
Large socket wrench sockets could be used for inserts for this purpose.
Note the horn has been ground round (heavy hand grinder sculpture) and the rust compared to the photo with the torch guide.
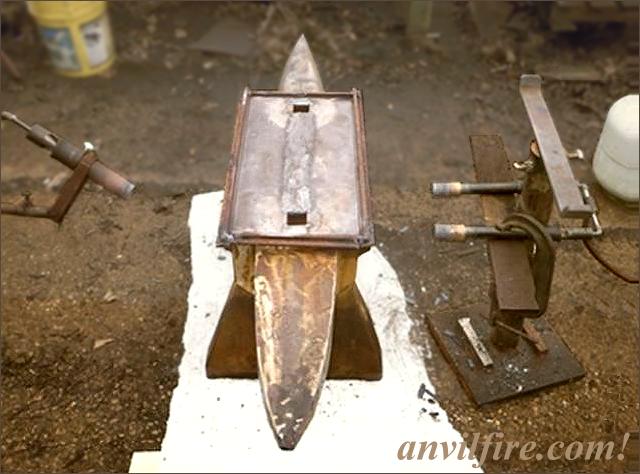
Hard Facing Preheat Setup
To hardface this large mass the anvil is setting on a piece of
Kaowool blanket and three propane forge burners are rigged to heat the thousand pound mass.
More kaowool was used during heating and after welding.
The anvil was still to hot to touch some 12 hours later.
The anvil face and square horn was hard faced with Hobart Hardalloy 58.
That alone took about 35 pounds of rod and 12-15 hours of welding and grinding.
- Patrick
You can see the finished feet in these views.
They have been built up from pieces and then ground to shape.
Again, heavy sculpture by grinder.
 The finished product after much welding and hand grinding.
The double step shape is the English style of making a double horned anvil and was copied by some US makers for export to Europe.
The blended feet on a slightly pyramidal body is typical of the Old English style.
However, the old anvils have a slightly more "organic" shape due to being build up and shaped entirely by hand.
The finished product after much welding and hand grinding.
The double step shape is the English style of making a double horned anvil and was copied by some US makers for export to Europe.
The blended feet on a slightly pyramidal body is typical of the Old English style.
However, the old anvils have a slightly more "organic" shape due to being build up and shaped entirely by hand.
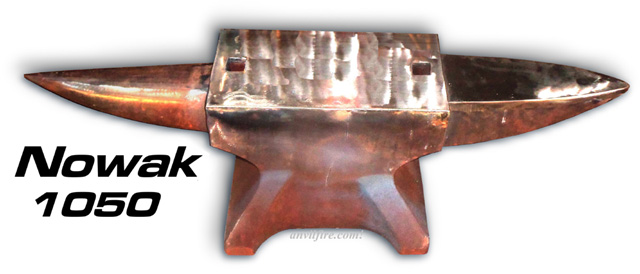
This anvil rings as loud as any I've ever run across. - Patrick
Thie was a fantastic project with a huge amount of effort and expense put into it.
The results are the REAL thing.
Years from now, with some use and wear it will be difficult to tell this from a genuine old English anvil.
It is both a work of art and a fine tool.
Analysis of the Project
I don't have an exact count of the hours going into this project but I wouldn't be a bit surprised if its close to 100.
In the last week alone I've put in about 30.
The cost is tough to pin down as I was able to get the steel for less than scrap prices and the hard facing rod and other filler rods and grinding consumables were picked up cheap off of Ebay and from sales at the local welding shop.
Actual cost on the project is probably close to $1000, but would have easily doubled or even tripled that if I'd had to buy the material, welding supplies and grinding consumables at new/standard prices.
- Patrick
Two expenses that are often forgotten in such a project is the cost of abrasives and the electric bill.
We had one correspondent write to us that his wife had complained that his electric bill had more than doubled the month he was building a power hammer.
He wanted us to tell his wife there was no way that little arc could use of hundreds of dollars in electricity. . . It did.
Using scrap materials can be cost effective depending on the actual cost.
Accounting for time searching and the fuel or delivery costs of scrap is easily overlooked.
But its easy to remember, "I only paid $50 for that".
EFFICIENCY: Even if you have "free" material, a consideration on such a project is material efficiency.
The initial flame cutting of a horned anvil shape wastes over 40% of the initial slab of material.
In a "split" anvil design such as the above there could be some savings from nesting the two parts but losses would still be close to 30% for the initial cutting.
In this case the horns which ended up close to half the width of the anvil could have been cut from a single thickness of the plate.
Doing this could have reduced initial losses to 10% and possibly left enough material for two anvils from the same material.
Even if the intention was for the horns to be wider than 50% this could have been achieved with the addition of small slabs.
Conical horns carved from solid waste 2/3 of the original material.
There is nothing one can do about that other than forge the horns. . .
However, two horns cut side by side reduce about 25% of this loss.
Even curved bottom horns will nest well enough to save considerable material.
The trade off to welding on the horns is a possible loss of strength due to welding them on.
But this should not be a problem with good modern welding practices.
Another advantage to welding on the horns is machining the hardy holes as slots in them.
While this is still a machining operation it is a reasonable one and can be done on much smaller parts than the body of the anvil.
Alternatively slots can be machined in the body, which prior to adding the horns is a much more compact rectangular shape that could be more easily handled and setup on a machine.
References and Links
| 

Projects like these often do not look like much but every move on an anvil this size requires moving 500 to 1000+ pounds. On our anvilfire power hammer project we have relied on a 4,000 pound fork lift for dozens of moves on each hammer. At a minimum I would want a good overhead hoist.
Photos, even with something for scale do not nearly do justice to the scale of this anvil but the children playing on "Daddy's project" is worth a thousand words!
The varying degrees of rust in the photos as well as seasonal changes indicate how long this project took. Note the summer green in the adjacent photo and the snowy background in the square hole insert photo. Our own "long" project started with nice new steel which has rusted, was de-rusted and rusted AGAIN several times. Even parts that were painted as they were made needed cleaning and painting for final assembly.
This anvil started out as two 4-1/4" thick and one 1" thick machine flame cut anvil shapes. The 1" was smaller and created a gap for welding together at the center line of the anvil. The weld alloy color difference can be seen in the photos.