|
| |||||||||
| |||||||
| |||||||
| |||||||
|
| ||||||
|
| ||||||
| |||||||
| |||||||
| |||||||
| |||||||
| |||||||
| |||||||
| |||||||
| |||||||
| |||||||
| |||||||
| |||||||
| |||||||
| |||||||
| |||||||
|
| |||||||

|
|
Blacksmithing and metalworking questions answered.
|

|
Hardy (Hardie) Holes:Purpose, Sizes and Fits
The hardy, or hardie, hole is the square hole in the top of a blacksmiths anvil designed to receive tooling such as a hardie.
A hardie is a short heavy chisel that has a shoulder and a square shank to fit the square hole of the anvil.
Other tools with square shanks are also used in the hardie hole and are sometimes called "hardie tools".
These include, "bottom sets" with round grooves that match handled "top sets", fullers, forming tools and anything else the blacksmith finds convenient to put a square shank on to be supported on the anvil.
In early anvils the hardie hole was only about 1/2" square and sometimes placed at the side of the face of the anvil with the bottom curving out of the side of the anvil. Later they were moved to the center line at the heel of English and American anvils and just at the horn on most European anvils. The French kept the side exit hardie hole on some style anvils.
Until the Modern Era (After Mousehole, Hay-Budden, Fisher Etal) almost every size anvil had a different hardy hole size. There was no standard. Many of the punched hardy holes were crooked, diamond shaped, tapered. Cast holes are more uniform but cores often have burn-in and end up with ugly obstructions or rough areas protruding into the hole. All were sold as X size by what they were supposed to be but most seem to have a little oversize for fit. Many old anvils had fairly even fractional sized hardy holes (5/8, 3/4, 7/8, 1"). One of the last makers to use progressive hole sizes is Kohlswa who uses metric sizes. There are other makes with metric hardy holes. In this case a 25mm hole is 0.9843". Old factory hardy shanks that I have measured were as-marked with no allowance for fit. A number of modern anvils (Peddinghaus, Nimba. . .) have drilled and broached hardy holes. The tooling for this is expensive so the manufacturers have "standardized" on 1 inch (25.4 mm). I do not believe there is a fit allowance (I currently have neither or I would go measure). However, being a machined hole a piece of standard stock with just a few thousandths ground or sanded off off should drop in.
What size tools should I purchase for my anvil? You should buy on-size tools and do the little dressing it takes. If you are picky and buying tooling you should also KNOW what size your hardy hole actually is. This means measuring it with dial calipers and/or testing it with a piece of on-size stock. As far as I know most 1" shanks on tools are 1" +/- .005" (normal production tolerances in this size). WE ARE BLACKSMITHS - We should be able to make this fit in less time than it takes to write about it! Everyone has a preference to hardy fits. Those that are picky make all their tools from scratch to FIT and they often fit so snug they only fit one way. I hate hardy tools that only fit one way. I like those that drop in and pop out smoothly without consideration for alignment. On anvils with crooked hardy holes this can mean a tapered shank that fits a little loose. I am not picky about my hardy hole tooling. I could not tell you what size hardy hole either of my anvils have. I have a collection of several dozen bottom tools and even those that all came from one shop had various sized shanks. EXCEPT for the hardy that was made especially for my Hay-Budden (about 1-1/16) they all fit loose or are too big. Many have 3/4" or 7/8" shanks and have fit loose OR about right in my old 100 pound anvils that I no longer have. On those the only snug fitting tool was the hardy. Some folks make bushings for their hardy holes. I would just make a small set of common tools that fit and let any other I have go. Most bottom tools only need the shank in order to not bounce off the anvil while in use. If they need to be held very tight then use a vise. There are two problems that occur with tight or tapered hardy shanks. One is that they occasionally get stuck and break off in the anvil. I have removed several for people and about the only way is with a cutting torch. The other is that tapered shanks MAY cause the heel of the anvil to break off. The same goes for tools with too much overhang. Also do not use sheet metal stakes with tapered shanks in hardy holes. They can wedge into the anvil becoming stuck or even breaking the anvil. These should be used in a stake holder, stake plate or mounted in a heavy wood block. There are a number of stake type tools tools currently in production that are large and unwieldly that have very small shanks that LOOK like they could be use in an anvil. Do not do it. Make special stands for these tools or avoid them altogether. Old stake anvils had stake ends the same size as the body of the tool for good reason, not little undersized shanks. The small shanks are bad design. These are prone to breaking off OR damaging the anvil. There are many small tools that are well designed for use in the hardie hole but those with overhang (bick or beak tools) should be used lightly. Small cone mandrels work well and do not over stress the anvil. Use common sense about the tools you use in the hardie hole.
Hardie Hole Edges
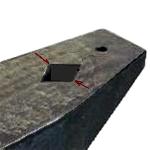
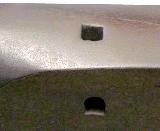
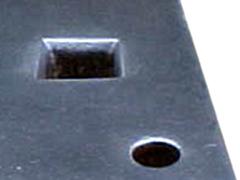
As Frank Turley noted you have to be careful not to have too much fillet on the tool that fits or it will not fit well. However, the most common problem is that there is insufficient or no radius at all on the hardie hole. This requires hand work that is rarely being done today and was sometimes glossed over in the past. Even old anvils that have had the face heavily dressed will now have sharp edges. On new Peddinghaus anvils the hole looks chamfered but in fact only the round drilled hole was chamfered heavily before broaching. Afterwards the corners are knocked off but not much. These leaves a partially chamfered hole. So we are often left to do this ourselves in many cases. Since the face of the anvil is quite hard and difficult to file we are left with a die grinder or Dremmel and strips of sand paper. To get even radii I find that it is easiest to make a heavy chamfer first, then knock off its corners and then theirs. The width of the first 45 degree chamfer is a little over 80% the radius (2r * sqr(2)). This is the same process as forging square to round. You can also use a little convex curved grinding stone but these do not last long and should be saved for final dressing. To get a nice polish and smooth curve on the radius strips of sanding belt can be used and pulled through the hole. Before doing this you may want to check and clean up the bottom of the hard hole as this is often quite sharp and ragged. This may snag and rig your abrasive strip. This is all part of anvil repair an maitenance. If you dress the face and edges you should also inspect and dress the hardy and pritchell holes. While there is significant debate about radiusing anvil edges there should be no question about properly dressing the edges of the hardy and pritchell holes. A good healthy radius on the hardie hole lets tools fit better, reduces stress on the anvil and reduces marking of work done over the hole. The Diagonal Hardy (Hardie) Hole I would have thought this was a joke if I had not actually seen it.
This is what happens when the foundry and pattern makers have more say than a manufacturing engineer OR a device is made by people with absolutely no expertise in that area of manufacturer. Due to the significantly weakened area at the hardy hole anvils frequently break off at this point. Turning the hole diagonally greatly increases this possibility. This feature is bad from both usability and engineering reasons. The diagonal hole results in two points of stress concentration at a highly stressed location on the anvil. Turning the hole diagonally increases the reduction in cross section by 40%. NO anvil designer with any sense would do this. However, a pattern maker copying anothers design and trying to make it cheaper and easier to produce would do this. There are also serious usability issues. There are no hardy tools manufactured with diagonal shanks. All standard hardy tools are made to be used along and perpendicular to the anvil. As smiths we learn to use them on one axis or the other. Changing this goes against hundreds of years of tradition and intelligent anvil design. Do not purchase an anvil with a diagonal hardy hole. References and Links
| ||||||||||||||||||||||||||||||||||||||||||||||||||||||||||||||||||||||||||||||||||||||||||||||||||||||||||||||||||||||||||||||||||||||||||||||||||||||||||||||||||||||||||||||||||||||||||||||||||||||||||||||||||||||||||||||


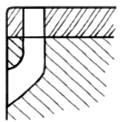
 Besides the fit the chamfer or radius of the top edge is important.
On an old anvil detail drawing I have it calls for hand filing a significant radius on the edge.
This is usually more than 1/16" and less than 1/8" but 1/8" to 3/16" on large anvils with large hardie holes.
More is better than less for the purpose of the hole.
This also applies to pritichel holes with proportionately smaller radii.
städ, incus, aambeeld, batente