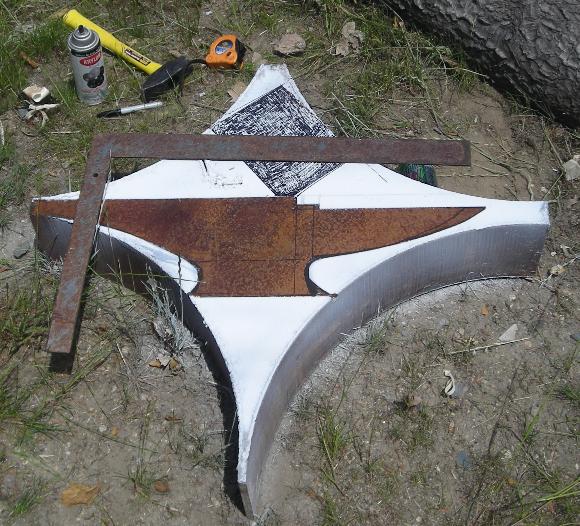
This project starts with a huge 600 pound (180kg) piece of steel scrap 5.75" (146mm) thick.
An anvil shape is laid out on the steel. The two long striaght cuts are made (top and bottom).
Cutting was done with friction wheels and a Sawzall with bi-metal blades.
At that time it was decided that the curve of piece was a better way to go for under the heel.
I wound up using an arsenal of hand tools.
I started with my skill saw with abrasive blades on both sides.
The original flame cuts were square so it was easy to transfer my cuts to the other side to meet in the middle.
I soon realized that the blades were going to come up short so I cut as deep on both sides as I could and borrowed a 14 inch demo saw from a friend.
The demo saw worked good on the short cut along the bottom but was eating blades on the long cut.
What happened is that the blades on the demo saw were so much wider than the skill saw blades that the original cut was just powdering the wider blade.
I wound up going and getting some good sawzall blades which were no good for more than an inch at a time.
I stopped for a day to think.
The only saw I had with blades long enough to cut through was my sawzall so I got another 5 pack of blades.
My saw is variable speed but it is hard to hold on slow so I wired an outlet to a sewing machine peddle and put a rubber band around the trigger which worked great.
I also bought a bottle of 90 wt. gear oil and kept the cut wet.
After burning up all the blade I had and a 5 pack of Lenox white metal blades I was able to finish the rest of the cuts on the entire piece with three blades and 3/4 of a bottle of oil.
For the grinding which there was plenty I used my 4.5 inch grinder and a 6 inch.
The rectangle piece was going to be the base but it was no wider than the bottom of the main mass and knowing roughly what I was going to wind up with for weight I didn't think it would do anything for me except make it taller and more unstable,
so I decided against it.
There is a LOT of scrap left over from this piece that could also be used to make a less traditional anvil, swage block or armourer's anvil.
(See
Skeleton Anvils)
After the major cutting the horn was cut. This is one of the most difficult parts of of making an anvil.
A question was asked on our forums about the normal width for a horn but without reference to why or what material was already in use.
The answers were "about 4" (100mm)".
In this case the starting width of the horn should have been the width of the body.
A lot of material was removed needlessly.
Horns that are narrower than an anvil body were either added on with a butt weld as were early anvils OR
are cast to this shape based on the style resulting from early add-on.
Later forged and cast anvils have the horn the full width or it is only reduced a slight amount from dressing the shape.
The hardy hole was made by drilling multiple holes then chiseling out the remaining material and dressing with a file.
See
Making Square Holes, Stake Plates and Bolsters.
Like many DIY projects this one is labor intensive as well as requiring various tools.
TOOLS Used:
1) Portable abrasive saw
2) Sawzall (HD reciprocating saw) and many blades
3) Demolition Saw (Super HD reciprocating saw)
4) Angle grinder(s) 4.5" and 6".
5) Arc welder
6) Drill Press
7) Assorted drill bits, saw blades, files and chisels.
References and Links


städ, incus, aambeeld, batente