|
|
| |
| |
|
|
|
|
|
|
|
|
| |
| |
| |
| |
| |
| |
| |
| |
| |
| |
|


| |
| |
|
Tell them you found it on anvilfire.com!
|
Blacksmithing and metalworking questions answered.
|
Anvil Making,
Amboß, Amboss,
l'enclume,
incudine,
el yunque, bigornia,
städ,
incus,
aambeeld,
batente
|
|
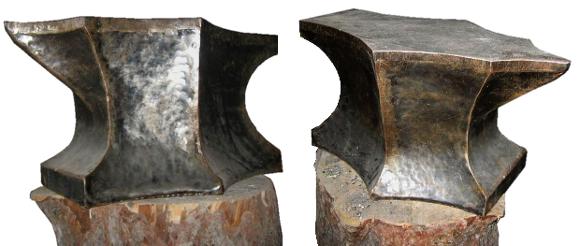
Daniel Boettger's first anvil was a medieval pentagonal French reproduction made of 1" grader plate for the top and and a concrete filled sheet metal or plate body.
The body had support plates and ribs with thin plates hammered to shape to fit the curved sides.
While the use of concrete is not recommended it does quiet the hollow sound when using the anvil.
Daniel says the concrete is holding up well and greatly improved the rebound of the anvil to 65%.
It is quite a work of art.
(New) I do not think it is French, that was what I thought I would make before I
built the German double horn instead. I copied the shape of the anvil in
the painting from the 1600's of "Venus at the Forge of Vulcan" by Jan
Brueghel. I have also since then found at least 10 similiar pentagonal
anvils in different medieval paintings, woodcuts and manuscripts.
- Daniel
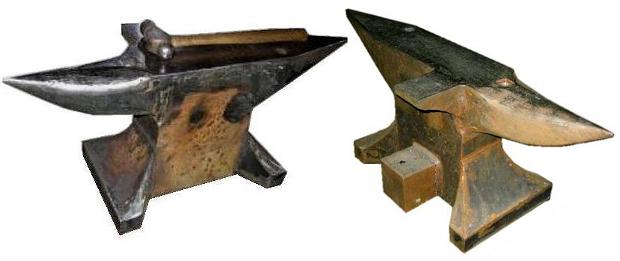
Daniel's second anvil, a German style (above and below) was made from a solid block for the body and more grader plate for the top including the two horns.
Feet were added and rib's and sides welded shaped under the horns.
The feet are hollow, made of 3/8" bar plus thin plate fillets and fillers to produce that sculpted look.
The side shelf and upsetting block are solid steel.
With a coat of paint you would think this is a commercial anvil.
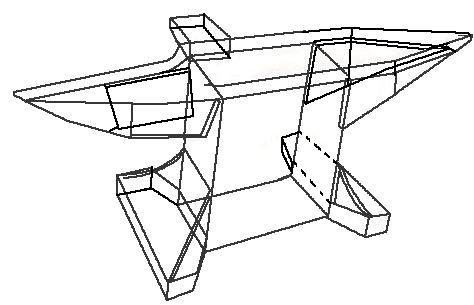
The drawing above, shows approximately how the plates were assembled around the large central block.
The top plate extends from horn tip to tip giving the anvil a tough hard work surface.
The following is the correspondence Daniel and I had about making the anvils.
I live in Canada, and am 16 years old.
I do some blacksmithing and armouring and I enjoy making medieval or renaissance tools, especially anvils.
I am working on my 2nd large anvil.
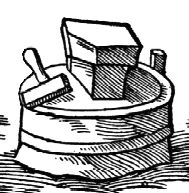 My first was a massive pentagonal armouring anvil from the mid 1600s that originally would have weighed close to 900 lbs. I made mine out of steel filled with concrete so my copy weighs 309 lbs.
The anvil that I am working on now is a French double horn from Diderot's Encyclopedia plate 165.
And I am wondering if it is historically correct to put a hardie hole in it.
The engravers did draw handling holes in several anvils but I could not find a single hardie hole.
Is it possible that the engravers did not consider hardie holes important enough to put in?
Or were there simply not anvils with hardie holes at that time? It would be from the late 18th century.
Thank you for any help you can give me,
Daniel
This is a difficult question but I am fairly sure that many did and many did not.
The earlier the anvil the more likely it did not.
First, consider that in many modern shops we have anvils that are some 150 to 200 years old.
It was no different in the 18th century French shops that Diderot illustrated.
His images are a wonderful snapshot of that moment in time but that moment certainly included tools and equipment from earlier eras.
Many 17th and 18th century shops augmented their heavy hornless forging anvils with lighter bickerns or stake anvils.
Some of these had small punching holes as do jewelers anvils of the same pattern today.
Examples of early European anvils often had the hardie hole along one side of the face.
The hole curved outward and exited the side of the anvil.
I believe it was the English that originally put the hardie hole centered over the heel but I may be wrong.
http://couteaux.free.fr/enclumes/enclumes_jojo.html
In the 18th century the hardie hole was quite small, typically about 1/2" (13mm).
It was not the big tooling hole that it is today.
It may have been easy to overlook by the engraver.
If you put one in your French reproduction anvil it should be on the side.
Are you making these to use or as sculpture?
Concrete fill seems solid at first but will not hold up long.
I would love to see some photos of your anvils.
Jock Dempsey
Hello Jock Dempsey (or Guru),
Thank you very much for answering all my questions, and providing much more information than I asked for. I was amazed at the number of old French anvils at the web site you directed me to. I think I will put at least two small hardie holes in my French double horn anvil that will exit out the side and possibly a punching hole in the tail.
To answer your question, my first large anvil and the French anvil I am making are built to be used.
My first first large anvil I built by welding 7 steel support ribs (see the pictures in the attachments) to a curved hexagonal base that was open in the middle.
Next I took a scraper cutting edge that was 7' long, 10" wide, by 1" thick and had my older brother (both my older brothers are professional welders) cut out the anvil face shape (the holes in the anvil face in the attachment were the bolt holes in the cutting edge, which I plugged).
Next my older brother welded on two extensions to the anvil face to make it 15 inches wide instead of the original 10 inches.
Then I welded the anvil face to the 7 support ribs.
Next I welded five pieces of 5/8ths inch rebar 12 inches each to the bottom of the anvil face, 4 under the center of the anvil and 1 at an angle welded inside the tail.
Then I hammered out 6 pieces of 16 gauge steel plate and welded them to the ribs to close the anvil in.
And lastly I flipped the thing over and filled it with concrete.
I am quite pleased with how it turned out.
It has about 65% rebound and so far has stood up pretty well.
I will send some pictures of my French double horn when it is done.
The first couple pictures are of my finished anvil, the next picture is the anvil being built showing the support ribs etc., and the last picture is the dimensions and shape of my French double horn (in case you can't read it the face is 31" long, the height is 17", and the base is 20" long).
By the way, my first name is Daniel
Thank you again, and if the pictures don't work let me know and I will resend them.
Wonderful pieces of work. You are on your way to being quite a sculptor.
For light work your anvils will do well.
However under heavy use the concrete will break away underneath as well as shrink with age.
If you can find heavier plate for the tops it would be better.
Occasionally you can find heavy plate as scrap or drops from service centers.
However, steel prices both new and scrap have gone up outrageously in the past year making some of this harder to get.
You may want to try designing your own fantasy anvils.
The kind of thing used by Th0r, Zeus or Hespestos.
See the attached drawing of mine.

It was designed to be made from solid and VERY heavy.
It has the character of an old anvil yet is unique.
Working in sheet metal you could do some repousse' for the sides.
Many old French anvils, especially the type with two feet had a face on the side of the anvil with the chin making the point between the two feet.
Other decoration included coats of arms and various symbols.
In France up until relatively modern times there were many small regional makers that each had their own character much like French wines.
Throughout Europe there were so many small makers they are impossible to track.
In Spain the heavy stake anvil was popular.
These were similar to common stake anvils except they were very heavy in comparison.
Then there were the Masterpiece anvils that had faces supported by columns, surfaces with doors and windows as if part of a building.
These were quite elaborate.
The older anvils get the more unique they get.
Up into the 17th century almost every anvil was unique.
So designing your own faux historical anvil is not far fetched.
You may also want to consider making your own stands to go with a fantasy or reproduction anvil.
Stone, rock crystal, stalagmite or architectural element like a column cap or base are all applicable themes.
There are a lot of ways to go with this line of art.
I wish I had time to work on such projects.
Enjoy yourself while you can.
Jock D.
I received your E-mail, thank you. I see what you mean by my anvil only standing up to light work over time.
I have used it fairly heavily off and on because my favorite hand hammer is a 1700 gram (3.6 lb) cross pein and I
have straightened 1/4 inch steel plates with a 10 lb sledge on it.
My plan is to use it till it powders, cracks, or breaks and then possibly fill it
with molten aluminum. Do you think that would work?
I would like my French double horn anvil to be able to stand up to heavy work
all day without showing it. I am planning on making the waist almost solid
by welding two pieces of 12 inch channel iron (8 inches long each) together
to form a rectangle 6" by 12". And then welding a 5" by 10 or 11" by 16"
tall solid piece of steel into the center of that so the waist is virtually
solid. The horn and heel I am planning on making solid and then weld them
to the solid waist so I have a solid "T" of steel inside the anvil that is
taking the stress. I would then weld pieces of plate in to brace the face
that is not supported by the "T" back to the "T" and the 3/16ths inch thick
anvil "skin".
And finally flip it over and fill it with concrete or molten aluminum.
By the way you said that the hardie holes on old anvils were often no more
than 1/2 inch square. Did blacksmiths still have hardies, bottom fullers,
bottom swages etc. but they were much smaller than they are today?
Thank you for your help,
Your double channel design with the solid top will make a very solid anvil.
anvil "skin". And finally flip it over and fill it with concrete or molten aluminum.
The aluminium would be great except for ONE thing.
Melted metal shrinks a LOT when it cools.
If you poured layers, maybe an inch at a time letting each layer cool to where it was cool enough to touch it might work.
Note that zinc and zinc alloys are much heavier than aluminum and melt at lower temperature (pours at 900 to 1,000 F). Many white metal auto parts like carburetors are made of zinc. However the large parts are mostly aluminum.
In fabricated machine tools frames that need solidity and vibration dampening they fill the housings with epoxy resin "concrete". Sometimes the fill is sand, sometimes gravel, other times metal shot or powder. It is stronger than concrete and can be as heavy or heavier with metal fill.
When you want heavy concrete you can add metal shot or small scraps even old nuts and bolts rather than gravel. However this weakens the concrete because the bond to steel is not as good as stone.
By the way you said that the hardie holes on old anvils were often no more
than 1/2 inch square. Did blacksmiths still have hardies, bottom fullers,
bottom swages etc. but they were much smaller than they are today?
I THINK the only tool used in the early era was a hardie but smiths are very inventive and make use of every thing they can.
However, that little hole is a bit limiting to the size of the tool it can support.
To be historically accurate a 1/2" hole would be used but a 1" hole would be much more useful.
Places like Historic Williamsburg Virginia had reproduction 18th century anvils made but had larger hardie holes to make them more useful.
Jock D.
Thank you for answering my questions. Today my older brother bought a
piece of steel for me from the scrap yard in town. It is 4.75" thick by
almost 10" wide by over 18" long with four 1.5" holes in it.
On Monday I tack welded the stepped base for my French double horn together out of two
layers of 2" angle iron 1/4" thick. I also welded the waist together out of
two pieces of 12" channel iron 8" long each. Then I tacked the waist to the
stepped base. Tonight both my older brothers unloaded the piece of steel
and then slid it into the waist of channel iron. It fits nicely. The chunk
of steel weighs about 240 lbs and it is almost all I can do to lift it. For
the tail or the square horn I think I will weld a 1" thick support down the
center of the anvil face that will be welded back to the solid waist. To
form sides on the square horn and to support the outside edges I think I
will weld two 1/2" thick supports one on each side.
Do you think the horn should be solid? Or possibly be built up of about 3 thick supports of steel
welded to the solid waist.
For light work your anvils will do well. However under heavy use the
concrete will break away underneath as well as shrink with age. If you can
find heavier plate for the tops it would be better."
I use scraper cutting edges for anvil faces because they are the only things
that I have found that are flat and very hard yet not brittle. The one I
have is 1" thick so that is what I will use but I will have it well supported
by the 240lb block of steel.
Don't feel you have to answer the questions if you don't have time.
Thank you again,
will weld two 1/2" thick supports one on each side. Do you think the horn
should be solid? Or possibly be built up of about 3 thick supports of
One piece is better.
I would think that you have enough material in that thick plate to carve the horn from the solid.
You may want to weld a blended rib underneath for appearances but the horn would be plenty strong if part of the large plate.
Jock D.
Thank you for the information on the triangular shaped horns.
I added another inch of steel on underneath the round horn on my anvil, and now it is almost the right shape.
I also filled in the square horn with lots of pieces of round bar welded perpendicular to the face plate.
Then I just welded up the gaps and didn't use a cover plate at all.
I am sending some pictures with this email and one shows the size difference between my 340 lb German anvil and my 900 lb (if it was solid steel instead of concrete) pentagonal anvil!
Hope you can use some of the pictures for your article.
Daniel
References and Links
|
|
|




 My first was a massive pentagonal armouring anvil from the mid 1600s that originally would have weighed close to 900 lbs. I made mine out of steel filled with concrete so my copy weighs 309 lbs.

städ, incus, aambeeld, batente