 |
|
Forge Welding II
Demonstration by Jock Dempsey
May 16, 2001
With commentary by Frank Turley
|
|
|
|
|
- GURU
|
In the previous demo we discussed general forge welding techniques. Tonight we are going to look at some details, history and joint design.
|
| |
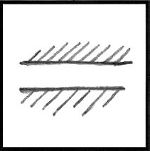
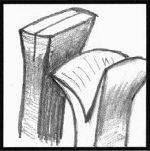
Figure A |
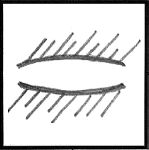
Figure B |
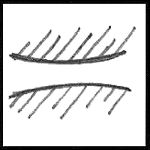
Figure C |
- GURU
|
In 1845 James Nasmyth (the inventor of the steam hammer and shaper) was asked to be on a British Naval committee to investigate material failures in anchor chain.
Nasmyth did some testing and determined the problem to weld failures in most cases and the type of weld that caused the failure.
Figures A-C show some of the possible scarf surfaces that randomly occur.
Those in B and combinations of A and B always failed at the weld.
C with two convex surfaces was determined to to prevent slag and flux inclusions.
This seems obvious today but hadn't been discovered or understood in nearly 3,000 years of blacksmithing!
|
| |

Figure D |
Figure C above or the combinations in Figure D all work to allow flux and scale to squeeze out of the joint.
Flat welds can work but require more care and technique.
|
| |
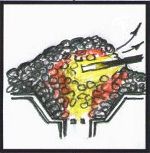
Figure 1 |
The common welding fire in many books is the "beehive" fire at left.
This is made by stacking up a pile of good quality coking coal.
When it is burning, poke a vent in the front of the fire.
Then increase the air until the center of the fire is white hot.
To feed coal into the fire you pat the mound down with the flat of a shovel then add more coal on top.
This produces a very hot but relatively small fire.
This style fire does not work if the coal doesn't melt and stick together to form a roof in the fire.
|
| |

Figure 2 |
The more common fire used by professionals is a large deep fire.
You get this fire burning very hot, let it form some coke and then back of on the air so that it is just the gentlest breeze.
This makes a hot carburizing fire that doesn't burn the steel.
It is also better for large work.
|
| |
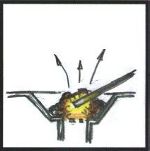
Figure 3 |
This fire looks ridiculous.
However, using top grade coal I've seen Steve Kayne forge weld with fresh green coal in a clean firepot using no more than two handfuls of coal.
Good fuel makes a big difference, but so does skill and practice.
Few of us can forge weld in a fire like this (I can't).
|
| |

Figure 4 |
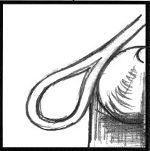
Figure 5 |
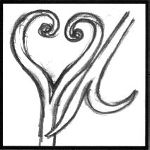
Figure 6 |
- GURU
|
After the faggot weld shown last week this is the next easiest forge weld to practice.
It starts with an upset and scarf.
After making the weld and finishing the joint the loop can be used as-is or split on the hardy to make a poker,
heart, rams head scroll. . .
|
| |
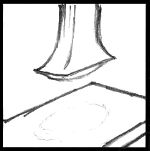
Figure 7 |
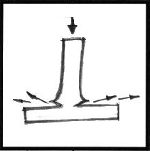
Figure 8 |
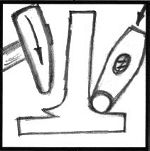
Figure 9 |
- GURU
|
A jump weld to a flat surface needs an upset to scarf.
In this case the weld filets are created by the scarf.
Besides making a smooth joint this increases the surface area of the weld making a strong joint.
This weld is started with a gentle blow of the sledge.
Then you must move quickly to close the fillet edges.
This weld works best on heavy stock that retains heat as there are no second chances.
|
- GURU
|
A bottom radius fuller is used to close and dress the weld.
A cross peen of the type shown or a straight peen can also be used.
|
| |
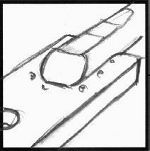
Figure 10 |
Some forge weld joints are not very fancy.
This one was found on the treadle of a 1918 100# Little Giant power hammer.
The 1" round bar was just welded directly to the 3/4" thick flat bar.
LG used flux with iron turnings as these were found still stuck around the weld area.
|
| |
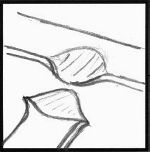
Figure 11 |

Figure 12 |
|
- GURU
|
In a "T" weld in flat or square bar a scarf is pulled out of the side of the cross part.
The mating part is upset then scarfed to match.
Remember, the upset is intended to provide EXTRA material so that the finished joint is not undersized.
If your scarf in the above joint is too flat it can be cupped to provide that mating curve to allow dross to escape.
|
| |
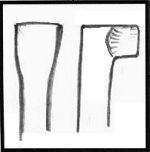
Figure 13 |

Figure 14 |
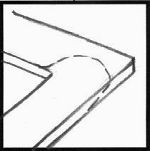
Figure 15 |
- GURU
|
Corner joints are done similarly.
Both pieces are upset then one piece is scarfed to the side and the other straight.
This joint is very common in old carpenters squares.
YES they welded that joint in 3/32" flat iron!
You know you have a really OLD square when you find one that you can detect the weld lines.
|
| |
Figure 16 |

Figure 17 |
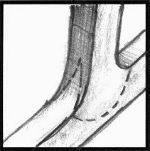
Figure 18 |
- GURU
|
In heavy stock and for making items like "T" stakes and bickerns a split joint is used.
The middle of the cross bar is upset a little and the scarf pulled out from both sides.
The vertical is upset, split and then flared.
This joint should dress very clean due to all the extra material.
|
| |
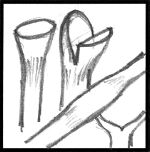
Figure 19 |
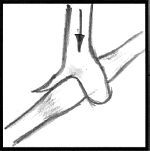
Figure 20 |
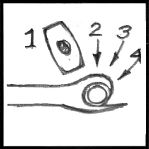
Figure 21 |
- GURU
|
Another similar joint is made for round bar.
Both bars are upset.
When closing the split scarf around the bar you need to work very quickly.
It helps to let the thin part on the bottom overhang the edge of the anvil to keep from cooling it.
You would think you would want to close the thin quickly cooling part first but you want to remember to push out that dross.
So you quickly close as above and then flip it over and close again. You may need to take a second heat on small stock.
|
| |
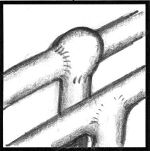
Figure 22 |
This joint can be finished two ways.
It can be dressed to leave a ball or knot.
Or it can be dressed and blended in to hide the joint.
|
| |
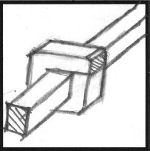
Figure 23 |
On fireplace tools I like to put a square collar on square stock.
The "ring" is formed on a long bar to fit snuggly and then the extra is sawn off.
This is another very easy forge weld to make.
|
- GURU
|
There are dozens more joints types but they all follow the same basic rules.
Upset, scarf to make a joint dross can escape from, weld and dress.
See Welding Demo I for heats and fluxing.
|
- GURU
|
Questions, Comments?
|
Jim C.
|
Really good art work; clear demo. Thanks
|
P-F
|
APPLAUSE! E xcellent demo !
|
Ntech
|
Is there any situation where a forge weld is not recommended, or will not work?
|
Ceridwen
|
Gives me lots to try, Thanks
|
P-F
|
How does the strength of a forge weld compare to a torch weld?
|
|
have you forge welded Stainless steel???
|
- GURU
|
Long flat joints are near impossible. That is why they riveted ship plate. If seen little thin 1/32" thick decorative hinges welded and they commonly forge welded huge ship anchors and shafts. .
|
- GURU
|
I've never forge welded SS. However, laminated steel (Damascus) makers doe it every day.
That is where that Fluorspar comes in added to the flux.
|
- GURU
|
A forge weld is generally stronger than a torch weld. However, welds are almost always the weak point no matter the method.
|
- GURU
|
I did some research on the Fluorspar. Besides being used in steel making it is an important ingredient in SS welding rods. So it is used in both arc and forge welding SS, chrome and nickel alloys.
|
- GURU
|
There is a respiratory warning but it is no more critical than the boron. So, in either case, always have GOOD ventilation in your shop!
|
Ntech
|
Should the weld be done in as few heats as possible, or does reheating effect the weld, or welding process?
|
- GURU
|
All forge work should be done in as few heats as possible.
Forge welds that that are not mostly completed in the first heat are hard to redo.
Often when you have to reheat it is necessary to open the unwelded portion of the joint so you can clean and reflux it before taking a second heat.
|
Ntech
|
Great demo and valuable information. Thank you.
|
FRANK
TURLEY
|
Forge Welds:
Mike & All, A couple of thoughts. I have had students who were accomplished pattern welders, but had one heck of a time with a lap weld (two separate pieces coming together). It's a dance; the movements have to be right.
Ideally, when welding bar shoes and chain links and such like, the two inner faces of the scarfs should be making contact. You can flux in between if you want, but then hit each quarter of the shoe on opposite sides which will cause a closure. Sometimes, depending on the heat location, a separation will STAY SEPARATED WHILE you're trying to hammer it closed at the welding heat. I don't think it has anything to do with spring back, but you're asking the metal to bend and weld without any leverage support under the bend. Sometimes, the gap just stays a gap and laughs at you.
If, on such a weld, you do not flux between faces, you can still get the weld. Some of the external flux, especially borax will enter the shut area by capillary attraction while you're taking the welding heat. However, the Hammering needs to be correct, the blows being directed toward the middle of the weld first. You want to squeeze the "fleece" (soup) out while hammering.
About the above, there seems to be two schools of thought. Some skilled smiths flux in between the faces and close. Others don't; they flux outside. Fluxing the outside is faster.
In thinking about a lap weld, in the early shops, there was almost always one or more helpers, and the helper held the one piece which belonged on the other side of the anvil. So, this "drop the tongs" idea was almost unheard of. But now, we mostly work on our own, and we need to drop the tongs. Of course, sometimes we don't need the tongs if we can handhold the piece.
A handy work support for the side opposite the smith can be made from an anvil length of stock by forging a round section to fit the pritchel hole and to act as a pivot. At its base, a right angle bend is made and the remainder, being horizontal, can swing around in order to support long or short pieces. The support can be curved, if need be. I first saw this "third hand" in use at a Francis Whitaker workshop.
A final note.
Use the near and far edges of the anvil as rests and fulcrums. These points also help with your aim.
Frank Turley
- Hammer-In Sunday, 12/19/04 12:09:00 EST
|
| |
Welding Part I Basic forge or "fire" welding
|


Demonstration by Jock Dempsey
May 16, 2001
With commentary by Frank Turley
Figure A
Figure B
Figure C
Figure D
Figure 1
Figure 2
Figure 3
Figure 4
Figure 5
Figure 6
Figure 7
Figure 8
Figure 9
Figure 10
Figure 11
Figure 12
Figure 13
Figure 14
Figure 15
This joint is very common in old carpenters squares. YES they welded that joint in 3/32" flat iron! You know you have a really OLD square when you find one that you can detect the weld lines.
Figure 16
Figure 17
Figure 18
Figure 19
Figure 20
Figure 21
Figure 22
Figure 23
Often when you have to reheat it is necessary to open the unwelded portion of the joint so you can clean and reflux it before taking a second heat.
TURLEY
Mike & All, A couple of thoughts. I have had students who were accomplished pattern welders, but had one heck of a time with a lap weld (two separate pieces coming together). It's a dance; the movements have to be right.
Ideally, when welding bar shoes and chain links and such like, the two inner faces of the scarfs should be making contact. You can flux in between if you want, but then hit each quarter of the shoe on opposite sides which will cause a closure. Sometimes, depending on the heat location, a separation will STAY SEPARATED WHILE you're trying to hammer it closed at the welding heat. I don't think it has anything to do with spring back, but you're asking the metal to bend and weld without any leverage support under the bend. Sometimes, the gap just stays a gap and laughs at you.
If, on such a weld, you do not flux between faces, you can still get the weld. Some of the external flux, especially borax will enter the shut area by capillary attraction while you're taking the welding heat. However, the Hammering needs to be correct, the blows being directed toward the middle of the weld first. You want to squeeze the "fleece" (soup) out while hammering.
About the above, there seems to be two schools of thought. Some skilled smiths flux in between the faces and close. Others don't; they flux outside. Fluxing the outside is faster.
In thinking about a lap weld, in the early shops, there was almost always one or more helpers, and the helper held the one piece which belonged on the other side of the anvil. So, this "drop the tongs" idea was almost unheard of. But now, we mostly work on our own, and we need to drop the tongs. Of course, sometimes we don't need the tongs if we can handhold the piece.
A handy work support for the side opposite the smith can be made from an anvil length of stock by forging a round section to fit the pritchel hole and to act as a pivot. At its base, a right angle bend is made and the remainder, being horizontal, can swing around in order to support long or short pieces. The support can be curved, if need be. I first saw this "third hand" in use at a Francis Whitaker workshop.
A final note. Use the near and far edges of the anvil as rests and fulcrums. These points also help with your aim.
Frank Turley - Hammer-In Sunday, 12/19/04 12:09:00 EST
Welding Part I Basic forge or "fire" welding
iForge is an Andrew Hooper Production
HTML Copyright © 2000 2011 Jock Dempsey, www.anvilfire.com
Webmaster email: webmaster at anvilfire.com