|
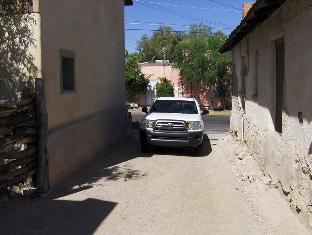
Weekend #1 (7/24/10). Parked in the Presidio main service ramp. You can probably see exposed adobe in the flanking structures here. It's the real deal; the Presidio is surrounded by 19th century buildings from Arizona Territorial days, and many of them were adobe-built before other materials became cheap and available. I'm transporting about 45 bricks in this load, nearly 1000 lbs. Adobe is heavy!
|

|
|
Starting the foundation. The city regulations require us to make this a non-permanent structure; it has to be capable of disassembly and "no-trace" removal within a day. No concrete footer or excavation of any kind is permissible. But we need a bottom treatment of some sort, because the Presidio courtyard (hard-packed soil and gravel) is nowhere close to level. We'll just make a mud pad. I pre-made a simple rectangular form of scrap 2x3 lumber, a couple of inches bigger than the forge footprint, to make laying the pad easier.
|

|
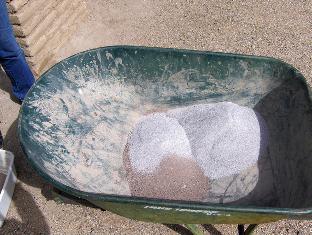
Dry ingredients for a batch of our mortar mix: 6 liters of adobe soil, 6 liters of sand, and 1.5 liters of mortar cement. This makes a 4:4:1 mixture that John Acton recommended for adobe mortar. (What you don't see here: I decided to modify the foundation pad mix by substituting 2 liters of gravel for 2 liters of adobe, tossed in after the photo. I thought this aggregate would strengthen the mortar a bit, making a more stable foundation. Time will tell.) We add water, start stirring. We are making the pad mortar pretty stiff, with the barest glisten of moisture when squeezed in the hand.
|


|
|
We dump almost the whole barrow of mix into the form, and push it around with our hands until it looks kind of level. We lay the bricks in, check for level, then shove mortar around and re-fit until the first course of bricks is fairly true. We then pack the joints with gobs of left-over mortar. (Buttering the ends of the bricks before fitting is a bit over my skill level, and joint-packing works fine.)
|

|
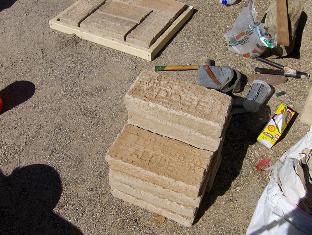
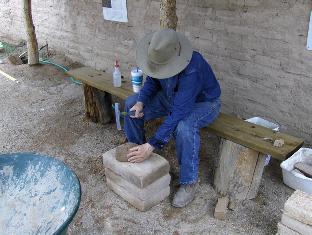
We let the foundation course dry in the morning sun for about half an hour while doing some material prep. Our puddled adobe bricks have slightly raised edges and corners on the top side, and I want them smoothed to make laying the courses easier. Some of the soldados pitch in to knock off the edges of several dozen bricks with a mason's hammer. Prepped bricks are stacked for laying up.
|

|
|
Second and third courses are nearly done. Each course is six bricks, and it turns out that my 6:6:1.5 liter mortar batch is just enough to lay 10 bricks -- not quite two courses -- with a few gobs left over for joint packing.
|
|
Typical bricklaying sequence: We start by dipping each brick in a water tub for a few seconds, pull it out and stand it on end to drain. (I hear the collective gasp. But it doesn't hurt cement-stablized adobe, and having the outer few millimeters of each brick damp really extends the working time on mortar joints. Out here in Arizona, the bricks get absolutely parched, and will suck the moisture right out of freshly-laid mortar.)
|

|
We throw down a gob of mortar, spread and squish out sort of flat with a trowel (just about any spreading tool will do; I used a tile thin-set trowel). This mortar, unlike the foundation pad stuff, we mix really wet and loose, so it's very easy to spread. We lay down a damp brick, check for level quickly; then slap down a bit more mortar on the low end, or rake off excess mortar from the high end, whichever seems appropriate. We lay down the brick again, press down hard. We scrape away mortar oozing from joints, and use it for packing other joints.
|

|
|
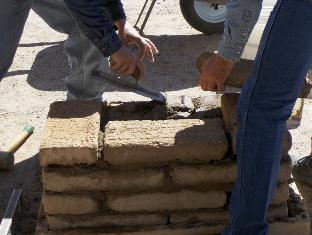
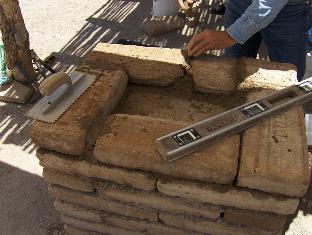
About every other course, we pause to check the sides of the forge body for plumb. As in all measurements for this project, precision is not necessary, but we want to make sure we don't build in an overall pronounced lean to either side or end. Here Bill is tapping out a freshly-laid brick to meet a carpenter's level, held plumb.
|

|
|
Mid-way through course #7. Note the increased area of shade; the Presidio unit has rigged an awning, using some canvas, ropes, and a couple of lances. It's a blessed relief. It's now about noon, and the temperature is approaching 100 degrees. The 50-60% humidity (July is in our rainy season) is actually a help; it makes us pretty miserable, but keeps the mortar from drying too fast.
|

|

|
Eight courses done; height about 26 inches. This is the final "base" course; the next one has to allow for the geometry of the hearth, which will be built next week. We take a bit more care in leveling this course, and pack all the joints well with spare mortar.
|
|
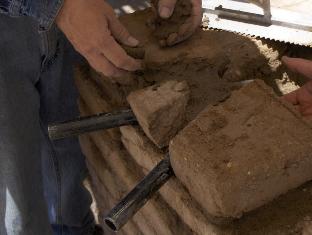
The ninth course starts with a dry run of bricks that are beveled by chipping their inner top edges back about two inches. This accomodates the slope of the future hearth. The tuyere is put in position, and two bricks are cut to fit it on either side.
|
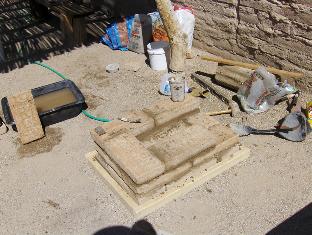
A close look at the tuyere, before it is buried in the forge body. I used 3/4" black pipe. The design is drop-dead simple: hacksaw off a section of one end of each pipe, so they meet at an angle, forming an oval mouth. Guess by eye, and grind a bit after sawing, so the pipes meet well at about a 40-degree angle. Tack the pipes together with a very short weld on either side. Weld on a piece of strap on one side to strengthen the joint, if deemed necessary. Then cut and roll a cone out of 12 gauge steel so that, when flattened a bit, the cone comfortably shrouds the joint.
The merged joint, I thought, would make a sort of air-valve, where the air stream running through one pipe would flow across the end of the other, creating a mild venturi effect and stifling back flow. (Thanks to Bruce Blackistone, Jock Dempsey, and other folks on Anvilfire, for advice on alternating-blast tuyere physics.) I added the conical nozzle so that it would actually be closest to the forge fire; the V-pipe would be shielded from the worst heat, and the angled air blast would be a bit buffered and straightened before going into the pan.
|


|
|
Ninth course laid, with all joints and inner corners well-packed with mortar. This course has no center brick; the space will be filled with the hearth layer of clay/grog mix.
|
|
|
Mortaring in the tuyere. It's set so that about 1 inch of the nozzle will be exposed.
|
|
|
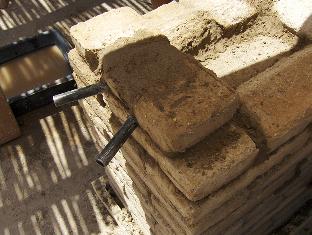
Tuyere fully buried, ready for the cap brick to ensure it stays that way.
|
|
Cap brick now laid atop the tuyere wall, and everyone stuffing leftover mortar into hungry joints around the forge body.
|

|
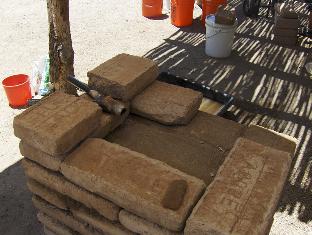
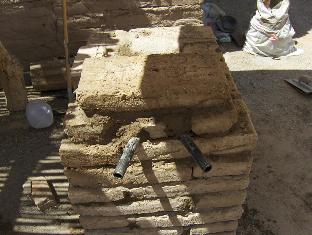
End of build for the day. Two views of the forge body. There still remains some adobe work to do: a rim of brick fragments to continue the slope of the hearth cavity up three more inches. One prospective chunk of the rim is resting on the forge in the photo. I want to give the hearth a bit more depth than just one thickness of brick. But finishing the forge will have to wait for next weekend.
|

|
Weekend #2 (7/31/10). Today we will finish the adobe work, making the top rim. This morning (about 9 AM), we are blessed by overcast and mid-eighties temperature. Humidity is very high, so the mortar will stay workable a long time.
|
|
We start by splitting several bricks into quarters and eighths, and chopping bevels on their inner edges.
|
|

|
Dry run for the rim. Some of the brick splits have broken corners; its hard to be precise on small pieces of adobe, but it's no big deal. Note that we are leaving a 3" wide gap on both sides of the rim, to allow long work to lay across the hearth.
The forge, by the way, has endured a couple of rainy days without a tarp, which is why some of the brick is damp all over. Note the split on the right side with the creamy center; it was cut from a dry brick soaked for 2-3 minutes. This shows the depth of moisture penetration in these stabilized bricks after a short soak.
|

|
We make about about 2 gallons of 4:4:1 mix, and lay the splits in a good thick mortar bed.
|
The rim is laid in, all joints well-stuffed. (Note the shadows: the Sun peeped out very briefly!) We had a lot of leftover mortar, so we used it filling incomplete joints around the body from the last weekend's build. A light wirebrushing of the forge body smoothed the joint surfaces out pretty well. We decided to let the rim dry out thoroughly, and clay the hearth next weekend.
|


|
Weekend #3 (8/7/10). Today we clay the hearth. I estimate that about 8 liters of clay mix will do the job, so I start by dumping 4 liters each of screened Vail clay and coarse grog (the white stuff) into my wheelbarrow. I mix the ingredients dry, then mix water in by hand. Clay mixes are very sticky, and a hoe does not work very well for wet mixing. After a few minutes of kneading, we have a nice, heavy-bodied mixture. I make it fairly stiff, with almost no moisture shine.
|

|
|
With a spray bottle, we dampen the adobe pan, figuring just a touch of moisture will help the clay adhere a bit better.
|

|
|
In goes the clay! We lay down a thick (about 1.5") bed on the hearth bottom.
|

|

|
Then we build up the sides, up to, but not onto, the rim bricks. We're very careful around the tuyere nozzle, making sure it's completely shrouded in clay, but protruding out a bit from the finished clay "wall". We "pat" the clay into place, moistening it a bit from time to time with the spray bottle if we think it's getting stiff too fast (the day is pretty warm). This Vail clay, by the way, worked great. This is the first time I've used it in a project; I used commercial fireclay in earlier test forges, and although it worked OK, and was a great refractory, it was sort of slimy when wet, and did not adhere well to a subsurface. This clay was very malleable and sticky, and grabbed well. (I sure hope it resists heat and cracking! After all, they did make bricks out of the stuff...)
|
|
The claying is done. We left the pan shallow; the fuel may be built right up to the top of the rim bricks, but we left them uncoated. I believe that the rim of the forge will not experience great heat; the fire should sort of "hang in space" in the center of the fuel mass just in front of the tuyere. In a couple of test forges, I found bits of unburned starter newspaper just inches away from the fire volume. (Coke is a great insulator.) Of course, one of the great virtues of a forge like this is that you can slap in more stuff if you have to. If we need more clay, we'll add it later.
|

|
|
The forge is essentially completed. Next step is to fire it up, after the clay dries for a few days. Bill will bring his concertina bellows next weekend, and some coal, and we'll try it out. In place of the truly ugly plastic tarp we were using, I just placed some pine boards and bricks over the wet hearth; this makeshift cover doesn't look too out of place in the Presidio courtyard. We will build a nicer forge cover in time for the tourist season.
|

|
Weekend #4 (8/21/10). Whoops! Had to skip a week due to some personal business. As can be seen, during the two-week hiatus, the clay hearth shrank and cracked, but this was expected. We just take it easy this session, and fill up the big cracks with fresh mix. We'll let it dry, and fire up next weekend.
|


|


Dry ingredients for a batch of our mortar mix: 6 liters of adobe soil, 6 liters of sand, and 1.5 liters of mortar cement. This makes a 4:4:1 mixture that John Acton recommended for adobe mortar. (What you don't see here: I decided to modify the foundation pad mix by substituting 2 liters of gravel for 2 liters of adobe, tossed in after the photo. I thought this aggregate would strengthen the mortar a bit, making a more stable foundation. Time will tell.) We add water, start stirring. We are making the pad mortar pretty stiff, with the barest glisten of moisture when squeezed in the hand.
We let the foundation course dry in the morning sun for about half an hour while doing some material prep. Our puddled adobe bricks have slightly raised edges and corners on the top side, and I want them smoothed to make laying the courses easier. Some of the soldados pitch in to knock off the edges of several dozen bricks with a mason's hammer. Prepped bricks are stacked for laying up.
We throw down a gob of mortar, spread and squish out sort of flat with a trowel (just about any spreading tool will do; I used a tile thin-set trowel). This mortar, unlike the foundation pad stuff, we mix really wet and loose, so it's very easy to spread. We lay down a damp brick, check for level quickly; then slap down a bit more mortar on the low end, or rake off excess mortar from the high end, whichever seems appropriate. We lay down the brick again, press down hard. We scrape away mortar oozing from joints, and use it for packing other joints.
A close look at the tuyere, before it is buried in the forge body. I used 3/4" black pipe. The design is drop-dead simple: hacksaw off a section of one end of each pipe, so they meet at an angle, forming an oval mouth. Guess by eye, and grind a bit after sawing, so the pipes meet well at about a 40-degree angle. Tack the pipes together with a very short weld on either side. Weld on a piece of strap on one side to strengthen the joint, if deemed necessary. Then cut and roll a cone out of 12 gauge steel so that, when flattened a bit, the cone comfortably shrouds the joint.
The merged joint, I thought, would make a sort of air-valve, where the air stream running through one pipe would flow across the end of the other, creating a mild venturi effect and stifling back flow. (Thanks to Bruce Blackistone, Jock Dempsey, and other folks on Anvilfire, for advice on alternating-blast tuyere physics.) I added the conical nozzle so that it would actually be closest to the forge fire; the V-pipe would be shielded from the worst heat, and the angled air blast would be a bit buffered and straightened before going into the pan.
End of build for the day. Two views of the forge body. There still remains some adobe work to do: a rim of brick fragments to continue the slope of the hearth cavity up three more inches. One prospective chunk of the rim is resting on the forge in the photo. I want to give the hearth a bit more depth than just one thickness of brick. But finishing the forge will have to wait for next weekend.
Weekend #2 (7/31/10). Today we will finish the adobe work, making the top rim. This morning (about 9 AM), we are blessed by overcast and mid-eighties temperature. Humidity is very high, so the mortar will stay workable a long time.
The forge, by the way, has endured a couple of rainy days without a tarp, which is why some of the brick is damp all over. Note the split on the right side with the creamy center; it was cut from a dry brick soaked for 2-3 minutes. This shows the depth of moisture penetration in these stabilized bricks after a short soak.
The rim is laid in, all joints well-stuffed. (Note the shadows: the Sun peeped out very briefly!) We had a lot of leftover mortar, so we used it filling incomplete joints around the body from the last weekend's build. A light wirebrushing of the forge body smoothed the joint surfaces out pretty well. We decided to let the rim dry out thoroughly, and clay the hearth next weekend.
Weekend #3 (8/7/10). Today we clay the hearth. I estimate that about 8 liters of clay mix will do the job, so I start by dumping 4 liters each of screened Vail clay and coarse grog (the white stuff) into my wheelbarrow. I mix the ingredients dry, then mix water in by hand. Clay mixes are very sticky, and a hoe does not work very well for wet mixing. After a few minutes of kneading, we have a nice, heavy-bodied mixture. I make it fairly stiff, with almost no moisture shine.
Weekend #4 (8/21/10). Whoops! Had to skip a week due to some personal business. As can be seen, during the two-week hiatus, the clay hearth shrank and cracked, but this was expected. We just take it easy this session, and fill up the big cracks with fresh mix. We'll let it dry, and fire up next weekend.
NEXT Building the Adobe Forge Part III Testing the Forge and Bellows
Building the Adobe Forge Part I Introduction and Materials
Adobe Forge Update 2015 Modifications and Improvements
References and Links