| |
 |
 |
 |
 |
-GURU
|
 |
Tonight's demo is about a question I am asked often.
What can I do when I do not have an anvil with a hardie hole?
|
 |
-GURU
|
 |
To make a hardy hole the hard way you need to be able to make a square hole. If you are not hot punching it you can make it with a drill press, chisel and a file. If you have a milling machine things go a LOT faster.
The most common modern hardie hole is 1" square so that is what we will discuss.
|
 |
 |

Figure 1 |

Figure 2 |
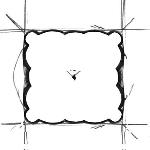
Figure 3 |
 |
-GURU
|
 |
Above are the basic steps for making a square hole by machining.
|
 |
 |

Figure 1
Click for Detail |
Step one is to layout the hole using a straight edge and a pair of dividers.
You can scribe the lines on a smooth bright surface or use machinists layout fluid like "Dykum", felt tip marker or just plain spray paint.
You want to draw a 1" circle, then center a 1" square on the circle, then layout four centers for 3/16" holes that are tangent to the corners of the square.
(The real step one is to make a pair of dividers).
|
 |
 |

Figure 2
Click for Detail |
Step two is to drill the four corner holes and the center hole.
I use 3/16" because I have good luck drilling deep holes with them and it is about the largest radius you want in the corners.
Step three is to cut out the parts between the holes.
This can be done with a cold chisel (the hardest way), a hack saw (if the hole is in a piace of plate) OR a milling machine.
Using a milling machine with a 3/8" or 1/2" end mill it is easy to clean up the corners.
3/8" leaves less to dress but is only good for a 1" deep or less hole.
A 1/2" (13mm) end mill will do a 1-1/2" (~40mm) deep hole.
|
 |
 |

Figure 3
Click for Detail |
Using a cold chisel is tough but it CAN be done.
You will need a plain 1/2" wide cold chisel and a way to resparpen it often.
It will help to also have a corner or "cape" chisel.
After drilling, milling, sawing or chiseling the hole will need to be filed and scraped.
A 1" hole in 1" material is not too difficult, the deeper it gets the more dificult it is.
A double depth is the maximum for this method.
|
 |
 |
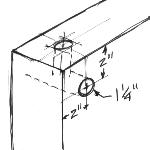
Figure 4
Click for Detail |
In a block anvil a cross hole must be drilled. This should be larger than the hardie hole. The center of this hole should be no more that two inches from the face and no less than 1-1/2".
Because you cannot get to the back of this style hardie hole it is tough to make. But it can be done if you are stuborn enough.
|
 |
 |
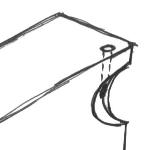
Figure 5
Click for Detail |
A pritchel hole can be done with a cross hole like the hardie hole above OR part of the corner under the face can be cut away diagonaly. Drill the hole first then torch the notch.
|
 |
 |
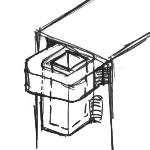
Figure 8
Click for Detail |
Then next best alternative for a square hardy hole is to weld a 3" length of 1-1/4" .090 wall square steel tubing to the side of the anvil then add a flange at the top made of bent 1/2" square bar or cut from plate.
Weld all around and then grind flush. This will not take a heavy beating but it will take what the heal and hardie should take on a regular anvil.
The tubing listed is a very common size of square structural tubing and 1" bar slips into it nicely.
|
 |
 |
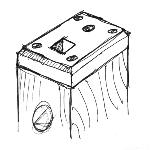
Figure 7
Click for Detail |
Another option is to make a "stake" or bolster plate and attach it to a heavy post or stump near your anvil. The plate can be made of (min.) 3/8" to 1" steel. Drill and make the square hole as above. Drill punching holes and in the corners drill and counter sink for flat head screws.
The wood under the holes should be drilled out and if you are going to do hot punching cross drilled so the biscuit can roll out. It would
not hurt to put a piece of steel in the bottom to prevent starting a fire.
|
 |
 |
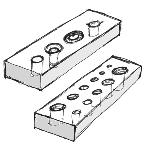
Figure 6
Click for Detail |
Bolster plates are steel bar or cast iron with one or more holes. Often the holes are the same size but have different openings, counter sinks for making flat head rivets, radiused holes for squareing shoulders, and raised edge holes for relieving shoulders. These are simple but handy tools and can be placed over the hardie hole for a good fit to the work. They are also simple to make if you have a drill press and easier to come by than a swage block.
|
 |
 |
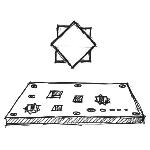
Figure 9
Click for Detail |
A true stake plate has holes for various size stake shanks. They can also be used to hold a hardie and for punching if made of steel.
Stake plates often have a double square hole so that stakes can be held in eight different possitions on the plate.
Commercial stake plates are expensive and are actually cost effective to make. Square holes should vary from 7/8" up to 1-1/2" in 1/8" increments to fit most most hardies and stakes. Round holes can also be drilled for bending, punching and riveting.
|
 |
-GURU
|
 |
|
 |


Click for Detail
Demonstration by Jock Dempsey
Wednesday September 10, 2003
What can I do when I do not have an anvil with a hardie hole?
The most common modern hardie hole is 1" square so that is what we will discuss.
Figure 1
Figure 2
Figure 3
Figure 1
Click for Detail
You want to draw a 1" circle, then center a 1" square on the circle, then layout four centers for 3/16" holes that are tangent to the corners of the square.
(The real step one is to make a pair of dividers).
Figure 2
Click for Detail
Step three is to cut out the parts between the holes. This can be done with a cold chisel (the hardest way), a hack saw (if the hole is in a piace of plate) OR a milling machine.
Using a milling machine with a 3/8" or 1/2" end mill it is easy to clean up the corners. 3/8" leaves less to dress but is only good for a 1" deep or less hole. A 1/2" (13mm) end mill will do a 1-1/2" (~40mm) deep hole.
Figure 3
Click for Detail
After drilling, milling, sawing or chiseling the hole will need to be filed and scraped. A 1" hole in 1" material is not too difficult, the deeper it gets the more dificult it is. A double depth is the maximum for this method.
Figure 4
Click for Detail
Because you cannot get to the back of this style hardie hole it is tough to make. But it can be done if you are stuborn enough.
Figure 5
Click for Detail
Figure 8
Click for Detail
Weld all around and then grind flush. This will not take a heavy beating but it will take what the heal and hardie should take on a regular anvil.
The tubing listed is a very common size of square structural tubing and 1" bar slips into it nicely.
Figure 7
Click for Detail
The wood under the holes should be drilled out and if you are going to do hot punching cross drilled so the biscuit can roll out. It would
not hurt to put a piece of steel in the bottom to prevent starting a fire.
Figure 6
Click for Detail
Figure 9
Click for Detail
Stake plates often have a double square hole so that stakes can be held in eight different possitions on the plate.
Commercial stake plates are expensive and are actually cost effective to make. Square holes should vary from 7/8" up to 1-1/2" in 1/8" increments to fit most most hardies and stakes. Round holes can also be drilled for bending, punching and riveting.
iForge is an Andrew Hooper Production
HTML Copyright © 2003-2017 Jock Dempsey, www.anvilfire.com
Webmaster email: anvilfire webmaster