| |
 |
|
|
JOCK D -
|
Hugh McDonald is best known as the inventer of the McDonald Rolling Mill.
Hugh also has a great imagination and manages to come up with an original twist on all his work.
This demo is no different.
This is our 129th iForge demo.
|
|
HUGH M
|
. . . Tong making, I may have mentioned, is my thing and I often make them just for fun.
Takes all sorts. . . Some time ago I worked out a quick and easy method of making heavy tongs.
It uses a mix of traditional and modern techniques for those who get withdrawal symptoms away from their electric welders.
The following was original published in our local blacksmithing magazine, FORGE TALK. (Extra figures here and below added by Jock Dempsey for this demo).
|
|
|
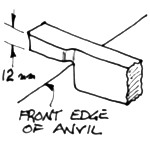
Figure 1 |
Forge 25 or 30mm (1 to 1-1/4") of a 20 x 10mm (~3/4" x 3/8") mild steel bar to 12mm (~7/16) on the front edge of the anvil.
|
|
|

Figure 2 |
Cut off enough length for the jaws using the hardy. Make two for each set of tongs.
|
|
|
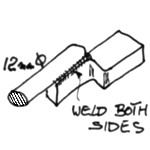
Figure 3 |
Electric weld 450mm (~18") or more of 12mm (3/8 or 7/16") diameter rod as shown.
|
|
|
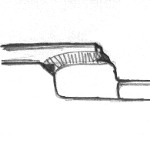
Figure 3b |
Hugh says "both sides" but I would use heavy tack welds on the ends then weld the sides to get as near full penetration all around as I could.
|
|
|
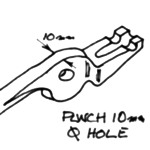
Figure 4 |
Forge the resulting end as you would normal tongs. If the welds are sound they can be forged, punched and finished without loss of strength. For heavier tongs go to 25 x 12mm (~1" x 1/2") bar and 14mm (1/2 to 9/16") for the reins.
|
|
|
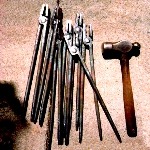
Figure 5 |
Two points about tong making that do not seem to get a mention in the "how to" instructions.
Make sure there is a decent gap between the reins just behind the pivot so that they hang neatly on a rack. Look at photographs of a professional smithy where the tong handles hang straight down and are not splayed out in a tangle in all directions.
When you have forged the two halves, hopefully, reasonably similar, do not fiddle with them but leave all the final adjustments until they are rivetted together.
|
|
|
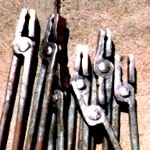
Figure 6 |
Take a good heat and tweak the width, alignment, jaw angle and set before plunging them into the water tub while opening and shutting them rapidly to make them work freely.
These are tongs I made for a local art school.
|
|
|
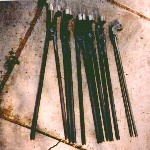
Figure 7 |
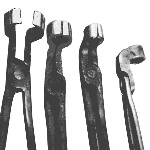
Figure 8 |
|
|
HUGH M
|
These are tongs made for use with a bolt heading machine.
|
|
|

Figure 9 |
And theses are pickup tongs made for a local foundry. All these tongs were made using similar methods.
|
|
|
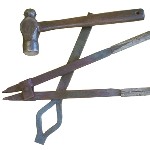
Figure 10 |
Figure 12 |
|
|
HUGH M
|
REVERSE TONGS: These gadgets I made for a special job; opening the handle away from the blade of a herb cutting knife I designed. (See Photo). The 3/16" thick high carbon steel strip was rolled down from 3/8" thick old car leaf spring in my Roller Mill. It was partly hot slit down the middle and I had trouble opening up the slit without battering the edges of the relatively thin but tough metal. It is a difficult place to grind smooth again.
|
|
|
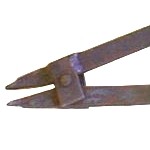
Figure 11 |
The tongs in the photograph are 24" overall with a mechanical advantage of about nine to one but I feel the handles need to be 8" or 10" longer. From the pivot to the jaw points is2 1/4" The opened up steel shown with the tongs is 1"x1/4" and after slitting was opened up in one grunt. It is easiest to do this by dropping the metal on to the floor, pushing the closed points into the centre of the slit and closing the handles.
|
|
|

Figure 11b |
Hugh didn't give details on the joint shown. SO here are two options.
This takes a little finess and picky fitting. The side plates are both welded to the top jaw.
|
|
|
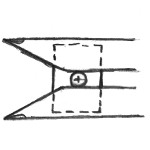
Figure 11c |
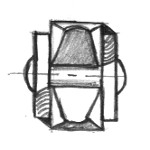
Figure 11d |
|
|
JOCK D
|
The second method is functional but a little sloppy.
The two side plates are welded on oposite pieces.
The jaws are spaced exactly the same distance apart as the rivet or pin.
Then the hole is drilled where lines extended from the inner surface of the jaws intersect.
Rivet lightly as the rivet is not supported in the center.
|
|
| |
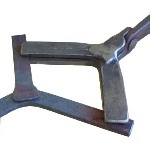
Figure 13 |
WELDING TONGS: We looked at these last week where they were used to make the joint in the three legs of the Tulip Candle Stand.
These tongs were a pair I made by traditional methods, fire welded reins and all, but never used much so I arc welded two right angled pieces of 1"x1/4" to the jaws for holding small pieces of steel in the fire for welding. The pieces in the tongs are 3/4"x1/4"and have been bent and scarfed ready for fluxing while the legs in front have been welded, side tapered then rolled out in my Roller Mill to 3/16" thick.
|
|
HUGH M
|
Behind these are a set of legs curved and with the penny feet forged and set.
It is much easier to fire weld heavier steel. If you have a Roller Mill that is.
The jaws may need to be made wider apart for your coal fires which I am not familiar with.
We have no suitable coal here in Western Australia but can get good hardwood charcoal quite cheaply.
With charcoal it is easy to build a small very high temperature fire.
|
|
JOCK D
|
Comments? Questions?
|
|
Jerry
|
I like the welding tongs.
The comment on the reins sticking out on the tong rack because of the spacing BEHIND the rivet is helpful too.
|
|
|
Do you realy think a welded up tong is as strong as a forged tong ???
|
|
JOCK D
|
Traditional tongs were forge welded a few inches up the reins.
Normaly they don't break but if they are abused the weld sometimes fails.
I suspect this method is much stronger due to the size of the weld (compared to welding the reins).
|
|
Firewalker
|
I don't think the gap of the jaws makes any difference, whether coal or charcoal.
As long as you can hold on to the item being forged.
|
|
JOCK D
|
Hugh was talking about the distance between the two pairs of jaws.
They need to be far enough apart that they don't get to a red heat while holding the work getting a welding heat.
|
|
Jerry
|
Is the piece welded on for the jaw or rein?
|
|
JOCK D
|
The round bar welded on (shown short) is a long piece for the rein.
|
|
Jerry
|
Thanks jock, every little thing learned makes a big book after awhile.
|
|
JOCK D
|
OTHER TONGS
|
|


By Hugh Mcdonald
Gooseberry Hill, Western Australia
Presented by Jock Dempsey
March 20, 2002
This is our 129th iForge demo.
The following was original published in our local blacksmithing magazine, FORGE TALK. (Extra figures here and below added by Jock Dempsey for this demo).
Figure 1
Figure 2
Figure 3
Figure 3b
Figure 4
Figure 5
Make sure there is a decent gap between the reins just behind the pivot so that they hang neatly on a rack. Look at photographs of a professional smithy where the tong handles hang straight down and are not splayed out in a tangle in all directions.
When you have forged the two halves, hopefully, reasonably similar, do not fiddle with them but leave all the final adjustments until they are rivetted together.
Figure 6
These are tongs I made for a local art school.
Figure 7
Figure 8
Figure 9
Figure 10
Figure 12
Figure 11
Figure 11b
This takes a little finess and picky fitting. The side plates are both welded to the top jaw.
Figure 11c
Figure 11d
Rivet lightly as the rivet is not supported in the center.
Figure 13
These tongs were a pair I made by traditional methods, fire welded reins and all, but never used much so I arc welded two right angled pieces of 1"x1/4" to the jaws for holding small pieces of steel in the fire for welding. The pieces in the tongs are 3/4"x1/4"and have been bent and scarfed ready for fluxing while the legs in front have been welded, side tapered then rolled out in my Roller Mill to 3/16" thick.
The jaws may need to be made wider apart for your coal fires which I am not familiar with. We have no suitable coal here in Western Australia but can get good hardwood charcoal quite cheaply. With charcoal it is easy to build a small very high temperature fire.
iForge is an Andrew Hooper Production
HTML Copyright © 2001 Jock Dempsey, www.anvilfire.com
Webmaster email: webmaster@anvilfire.com