Repoussé and Chasing Tools:
Making tools for the art of repousse' and chasing
Repousse' and chasing tools vary in size according to the scale of the work and the fineness of detail.
The fineness of detail is limited by the thickness of the plate so there must be a balance between the work and the tools.
Shape varies according to the needs of the work and the technique of the user.
Repousse' work can be performed with the simplest tools, a few punches and tracers, hammers. . .
However, the work can go faster with tools that fit the work.
While simple work can be done with less than a dozen tools many sets include 100 or more.
Daps alone (simple spherical or ball end tools) are available in sets of different sizes that include as many as 50 pieces.
Because much of the work is a personal vision so are the tools.
Unless one is lucky enough to obtain a massive collection of these tools, making them is a necessity for the committed artist.
There are several ways to make these tools:
- From scratch using tool steel bar stock.
- From prehardened and tempered blanks.
- From existing commonly available tools.
The first method is not difficult but requires a few more tools and a clear understanding of the heat treatment of tool steel.
New tool steel bar stock is also relatively expensive.
The second method is quite common when the blanks are available.
These come with the struck end finished and the working end hardened and tempered.
To make a tool only requires grinding and finishing as described in this article.
However, while blanks are listed in old catalogs I have not seen them for sale in recent years.
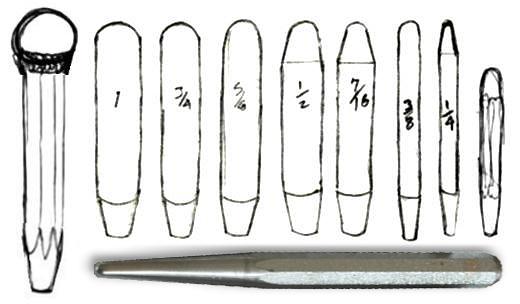
The last method, using existing tools, is available to almost anyone and is the most economical.
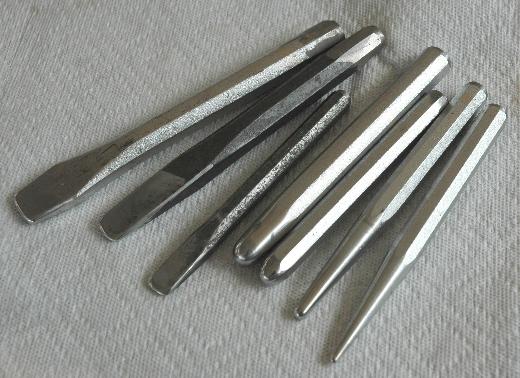
The raw materials are old or new, cold chisels, punches, drifts, pry bars, screw drivers or Allen wrenches such as shown below.
To convert them to repousse' and chasing tools requires a bench grinder, files, sand paper, polishing equipment AND the knowledge and skill to shape them.
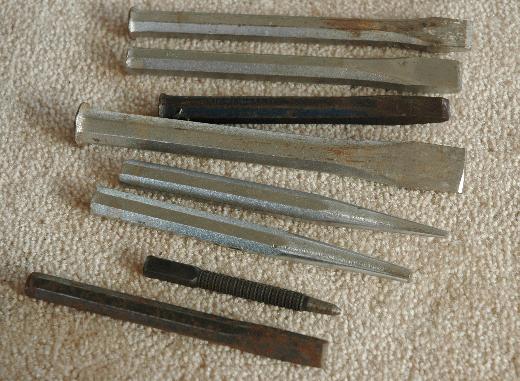
A selection of used tools suitable for conversion.
These tools can be purchased at hardware stores and flea markets.
Often new tools of the common types above are no more expensive than new tool steel bar.
Used tools are just as good or sometimes better. Used toots cost a small fraction of new.
However, it is good to check prices of new tools prior to shopping for used.
Occasionally dealers will be asking as much for used tools as new.
They SHOULD be from 1/10th to 1/4 of new.
Most tools made from octagon or hex stock are good candidates.
This includes pry bars (wrecking or crow bars) down to hex keys (Allen wrenches).
While standard hex key wrenches are short they make long ones that are quite suitable.
Pry bars are made of 5/8" and 3/4" (16 and 19mm) stock.
They are long enough to make a number of tools from but will require cutting into pieces.
Some may be soft enough to cut with a hacksaw and new blade, but may require cutting with an abrasive saw.
Occasionally cold chisels are made of square bar.
If long enough to cut off they are best set aside for rectangular and square punches.
Other suitable tools are hammer drill or air hammer bits.
Tool Making Tools
Of necessary tools the first used, a bench grinder is the most important.
While other tools can be substituted (hand grinder, Dremel or Foredom tools) the bench grinder or a belt grinder/sander is the best and easiest to use.
These tools have a rest to support the work as well as let one hold the work with both hands.
This enables steady accurate shaping of the tools.
The last tool used is a buffing setup. This can be a cotton buff on the bench grinder or a separate setup.
Between the first and last processes (rough grinding and polishing) the tools can vary.
However, a good smooth 8" of 10" file, some 100 grit cloth backed sanding abrasive and some 240 Wet-Or-Dry, is recommended.
Other tools could include a Dremel or Foredom tool with small grinding burrs or fine paper for a belt grinder.
And as always, wear safety glasses, especially when using any grinding or chip making machinery.
Large and medium sized tools can be made under normal conditions but small tools may need the use of a magnifier.
When grinding under a magnifying lens it should be protected by a piece of replaceable polycarbonate ("eye" protection for the lens).
The Shaping Progression

In making every tool that has a specific sculptural shape care must be taken in its creation.
Shaping in clear defined steps starting with its outline in the simplest geometric form.
This allows you to see the shape in the corners.
This is particularly important when making curved lining tools where the shape should be checked against radius gauges.
Converting cold chisels to tracers and blocking tools is one of the easiest conversions.
When converting tools such as chisels with sharp edges to tracers they must first be blunted nice and square.
Then thinned to the desired width. The width is normally the same as the edge curve diameter.
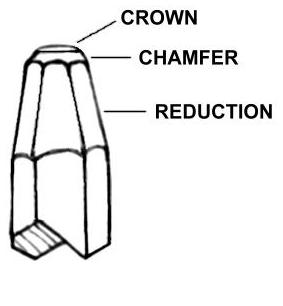
Once the most basic shape is defined there are two ways to progress.
One is to make a simple profile, the other to form the crown and rounded shoulders before rounding.
Making a simple profile, then adding crown and shoulders tends to be the easiest.

Simple profiles are made by chamfering the corners to 45° flats equal in width to the remaining end flat.
This is usually done with a grinder. Then those flats are halved again with a file.
Then the file is rolled across those slight corners.
Coarse sandpaper on a soft surface will also help form a smooth curve.
After forming the simple profile the tool can have crown added or not.
Crown is formed by slightly dropping the sides leaving about 1/3 in the middle at the original profile on narrow tools and more on wider tools.
Then the corners are dressed by chamfering about the same width as the first.
Then the slopped sides rounded shoulders and working edge are all blended with a fine file, coarse sandpaper, fine sandpaper and polishing.
Polishing is only done after fine sanding until all file marks are removed.
Sanding on a resilient surface (carpet, the palm of your hand or rubber) can help further define a graceful elliptical form.
Polishing can be done by hand using automotive rubbing compound like Dupont Orange rubbing compound but is best done on a
motor rotated sewn cotton buff with black emery buffing compound.
On soft tools orange Tripoli compound will also work or leave a smoother polish than the emery.
Spherical and elliptical shapes are done the same way but in the round.
The basic shape, the chamfer, splitting the chamfers then smoothing.
The Struck End
Traditionally the struck end of repousse' and chasing tools is much smaller than the shank or of a similar sized tool.
This helps keep the force of the blow in alignment with the working end.
It also reduces mushrooming.
Forged tools have a long taper forged on them.
Ground tools should have a taper about an inch or more long ground on them.
This can match the flats on octagon or hex stock or be round.
The struck end should have a healthy 45° chamfer and then a slight crown.
All this can be done on the bench grinder.
However, used mushroomed tools can be rough dressed using an angle grinder.
If cracked the ends should be cut off using an abrasive chop saw then dressed.
As soon as mushrooming shows up on struck tools it should be dressed off for safety.
Shapes and their Uses
Common Punches
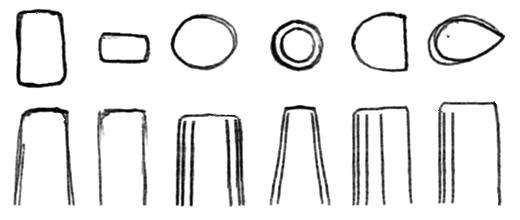
The basic repousse' tools are the lining tools like dull chisels (photo above), punches (above), set down tools (below), and special shapes.
Punches are made in whatever shape is needed to push the metal out and to refine shapes.
Common shapes are square and rectangular, round, triangular and tear drop as above.
Daps or spherical end tools are used to push out metal like small hammers or to form spherical surfaces (raised OR depressed) and "hammered" texture.
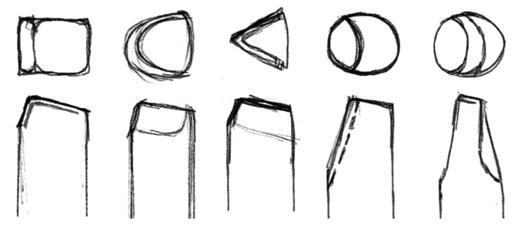
Set down tools
Set down tools are used to push back the areas previously defined with one or more edging grooves.
The working edge is slightly sloped and the face flat with a small radiused edges and slightly more radiused corners.
To follow along traced lines it helps if the set has both concave and convex curves.
The tool to the right above has a large radius face profile to fit into a dip or deep groove.
Daps, Spherical Steel Doming Punches
Daps are one of the easiest repousse' tools to make and are also economical to purchase.
As an easy to define geometrical shape that can be turned on an automatic lathe they can be made with little or no hand work, thus are cheap to manufacture.
The sphere is the most universal of and useful of sinking shapes.
As a smooth even shape they are often a starting place for forming other shapes.
A range of sizes will fit almost any form.
The easiest way to make a graduated set of daps is from graduated bar stock.
However, it is expensive to purchase every size round bar stock needed just for a 6 to 8" (150 to 200mm) length of each.
So several sizes are made from each bar size.
Sets of pin punches can also be converted to small round daps.
Very small rounds are used for texturing or details like eyes.
For large daps a steel ball can be welded on a shank.
To arc weld a steel ball bearing it must be preheated quite hot, welded then cooled slowly (perhaps in annealing medium).
While this looks like an easy method steel balls over an inch are hard to come by.
But if you happen to obtain some they are handy for making daps and hammers.
The spherical tip of these tools is easy to polish shape smooth by rotating it in a lathe or chucking it in a hand or machine drill (press).
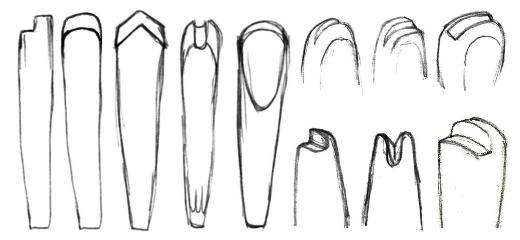
Non-geometric tools, sets and more.
The more specialized tools can be top (chasing), bottom (repousse'), or shoulder tools to clamp in a vise, support in an anvil or tool horse.
These tools can have steps, V's, and U's either straight or curved in one or more axis.
They are made for specialized work as needed.
Due to their shape with inside corners and compound curves they are difficult to make and finish.
To do a good job making these more files such as riflers and needle files are needed.
A die grinder such as a Dremel or Foredom tool is almost an absolute necessity.
More hand work with sandpaper is required.

Besides forming tools, there are texturing tools of infinite variety similar to those used in leather work.
Pyramid shapes, balls in ranks or random order, straight and wavy lines.
There are also decorative punches such as flowers, leaves and symbols like hearts, crosses and the suits of cards.
Making these, like making character punches, is a technical art. For some basics see:
iForge demo, Matrix Punches (Making steel stamps)
References and Links


Repoussé and Chasing Tools:
Making tools for the art of repousse' and chasing
Repousse' and chasing tools vary in size according to the scale of the work and the fineness of detail. The fineness of detail is limited by the thickness of the plate so there must be a balance between the work and the tools. Shape varies according to the needs of the work and the technique of the user. Repousse' work can be performed with the simplest tools, a few punches and tracers, hammers. . . However, the work can go faster with tools that fit the work.
While simple work can be done with less than a dozen tools many sets include 100 or more. Daps alone (simple spherical or ball end tools) are available in sets of different sizes that include as many as 50 pieces. Because much of the work is a personal vision so are the tools. Unless one is lucky enough to obtain a massive collection of these tools, making them is a necessity for the committed artist.
There are several ways to make these tools:
- From scratch using tool steel bar stock.
- From prehardened and tempered blanks.
- From existing commonly available tools.
The first method is not difficult but requires a few more tools and a clear understanding of the heat treatment of tool steel. New tool steel bar stock is also relatively expensive.The second method is quite common when the blanks are available. These come with the struck end finished and the working end hardened and tempered. To make a tool only requires grinding and finishing as described in this article. However, while blanks are listed in old catalogs I have not seen them for sale in recent years.
The last method, using existing tools, is available to almost anyone and is the most economical. The raw materials are old or new, cold chisels, punches, drifts, pry bars, screw drivers or Allen wrenches such as shown below. To convert them to repousse' and chasing tools requires a bench grinder, files, sand paper, polishing equipment AND the knowledge and skill to shape them.
A selection of used tools suitable for conversion.
These tools can be purchased at hardware stores and flea markets. Often new tools of the common types above are no more expensive than new tool steel bar. Used tools are just as good or sometimes better. Used toots cost a small fraction of new. However, it is good to check prices of new tools prior to shopping for used. Occasionally dealers will be asking as much for used tools as new. They SHOULD be from 1/10th to 1/4 of new.
Most tools made from octagon or hex stock are good candidates. This includes pry bars (wrecking or crow bars) down to hex keys (Allen wrenches). While standard hex key wrenches are short they make long ones that are quite suitable. Pry bars are made of 5/8" and 3/4" (16 and 19mm) stock. They are long enough to make a number of tools from but will require cutting into pieces. Some may be soft enough to cut with a hacksaw and new blade, but may require cutting with an abrasive saw.
Occasionally cold chisels are made of square bar. If long enough to cut off they are best set aside for rectangular and square punches. Other suitable tools are hammer drill or air hammer bits.
Tool Making Tools
Of necessary tools the first used, a bench grinder is the most important. While other tools can be substituted (hand grinder, Dremel or Foredom tools) the bench grinder or a belt grinder/sander is the best and easiest to use. These tools have a rest to support the work as well as let one hold the work with both hands. This enables steady accurate shaping of the tools.The last tool used is a buffing setup. This can be a cotton buff on the bench grinder or a separate setup.
Between the first and last processes (rough grinding and polishing) the tools can vary. However, a good smooth 8" of 10" file, some 100 grit cloth backed sanding abrasive and some 240 Wet-Or-Dry, is recommended. Other tools could include a Dremel or Foredom tool with small grinding burrs or fine paper for a belt grinder. And as always, wear safety glasses, especially when using any grinding or chip making machinery.
Large and medium sized tools can be made under normal conditions but small tools may need the use of a magnifier. When grinding under a magnifying lens it should be protected by a piece of replaceable polycarbonate ("eye" protection for the lens).
The Shaping Progression
In making every tool that has a specific sculptural shape care must be taken in its creation. Shaping in clear defined steps starting with its outline in the simplest geometric form. This allows you to see the shape in the corners. This is particularly important when making curved lining tools where the shape should be checked against radius gauges.
Converting cold chisels to tracers and blocking tools is one of the easiest conversions. When converting tools such as chisels with sharp edges to tracers they must first be blunted nice and square. Then thinned to the desired width. The width is normally the same as the edge curve diameter. Once the most basic shape is defined there are two ways to progress. One is to make a simple profile, the other to form the crown and rounded shoulders before rounding. Making a simple profile, then adding crown and shoulders tends to be the easiest.
Simple profiles are made by chamfering the corners to 45° flats equal in width to the remaining end flat. This is usually done with a grinder. Then those flats are halved again with a file. Then the file is rolled across those slight corners. Coarse sandpaper on a soft surface will also help form a smooth curve.
After forming the simple profile the tool can have crown added or not. Crown is formed by slightly dropping the sides leaving about 1/3 in the middle at the original profile on narrow tools and more on wider tools. Then the corners are dressed by chamfering about the same width as the first. Then the slopped sides rounded shoulders and working edge are all blended with a fine file, coarse sandpaper, fine sandpaper and polishing.
Polishing is only done after fine sanding until all file marks are removed. Sanding on a resilient surface (carpet, the palm of your hand or rubber) can help further define a graceful elliptical form. Polishing can be done by hand using automotive rubbing compound like Dupont Orange rubbing compound but is best done on a motor rotated sewn cotton buff with black emery buffing compound. On soft tools orange Tripoli compound will also work or leave a smoother polish than the emery.
Spherical and elliptical shapes are done the same way but in the round. The basic shape, the chamfer, splitting the chamfers then smoothing.
The Struck End
Forged tools have a long taper forged on them. Ground tools should have a taper about an inch or more long ground on them. This can match the flats on octagon or hex stock or be round.
The struck end should have a healthy 45° chamfer and then a slight crown. All this can be done on the bench grinder. However, used mushroomed tools can be rough dressed using an angle grinder. If cracked the ends should be cut off using an abrasive chop saw then dressed.
As soon as mushrooming shows up on struck tools it should be dressed off for safety.
Shapes and their Uses
Common Punches
The basic repousse' tools are the lining tools like dull chisels (photo above), punches (above), set down tools (below), and special shapes. Punches are made in whatever shape is needed to push the metal out and to refine shapes. Common shapes are square and rectangular, round, triangular and tear drop as above. Daps or spherical end tools are used to push out metal like small hammers or to form spherical surfaces (raised OR depressed) and "hammered" texture.
Set down tools
Set down tools are used to push back the areas previously defined with one or more edging grooves. The working edge is slightly sloped and the face flat with a small radiused edges and slightly more radiused corners. To follow along traced lines it helps if the set has both concave and convex curves. The tool to the right above has a large radius face profile to fit into a dip or deep groove.
Daps, Spherical Steel Doming Punches
Daps are one of the easiest repousse' tools to make and are also economical to purchase. As an easy to define geometrical shape that can be turned on an automatic lathe they can be made with little or no hand work, thus are cheap to manufacture. The sphere is the most universal of and useful of sinking shapes. As a smooth even shape they are often a starting place for forming other shapes. A range of sizes will fit almost any form.
The easiest way to make a graduated set of daps is from graduated bar stock. However, it is expensive to purchase every size round bar stock needed just for a 6 to 8" (150 to 200mm) length of each. So several sizes are made from each bar size. Sets of pin punches can also be converted to small round daps. Very small rounds are used for texturing or details like eyes.
For large daps a steel ball can be welded on a shank. To arc weld a steel ball bearing it must be preheated quite hot, welded then cooled slowly (perhaps in annealing medium). While this looks like an easy method steel balls over an inch are hard to come by. But if you happen to obtain some they are handy for making daps and hammers.
The spherical tip of these tools is easy to polish shape smooth by rotating it in a lathe or chucking it in a hand or machine drill (press).
Non-geometric tools, sets and more.
The more specialized tools can be top (chasing), bottom (repousse'), or shoulder tools to clamp in a vise, support in an anvil or tool horse. These tools can have steps, V's, and U's either straight or curved in one or more axis. They are made for specialized work as needed. Due to their shape with inside corners and compound curves they are difficult to make and finish. To do a good job making these more files such as riflers and needle files are needed. A die grinder such as a Dremel or Foredom tool is almost an absolute necessity. More hand work with sandpaper is required.
Besides forming tools, there are texturing tools of infinite variety similar to those used in leather work. Pyramid shapes, balls in ranks or random order, straight and wavy lines. There are also decorative punches such as flowers, leaves and symbols like hearts, crosses and the suits of cards. Making these, like making character punches, is a technical art. For some basics see:
iForge demo, Matrix Punches (Making steel stamps)
References and Links