Making a Norman Helm
Part 1: Introduction, Design Considerations, Material Preparation
Forward to Part 2: Initial
Sinking of the Bowl
Back to Table of Contents
|
Introduction: |
|
For several years now, I have had a passion for Medieval helmet-making. I can't really explain why. I find all armor, of almost any era, appealing; I've made breast-and-back plates, a few examples of arm and leg harness -- even a full suit of Turkish mail-and-plate. However, I've spent most of my time on helmets. Helmets can really stand by themselves as a single, complete demonstration piece of armor from a given era. (A single piece of arm harness, by contrast, looks rather forlorn without the rest of the suit it belongs to.) I sometimes give demos at public schools on Medieval subjects, and you can turn a 6th-grader into a plausible Medieval soldier in ten seconds by just slipping a wool tunic on him, and plunking a helmet on his head -- since a great proportion of participants on Medieval battlefields probably had a helmet and nothing more for defense. I also find most helmets to be beautiful pieces of sculpture, quite apart from their function as head defenses. The "one-piece" fabricated types I find especially appealing: late Norman helms, 14th-century bascinets, 15th-century Italian barbutes and German sallets. For about 15 years, I have struggled to learn how to make such helmets using fabrication techniques similar to those the Medieval smiths may have used, such as sinking and raising single plates of steel. I had to develop tools and techniques as I went along, and my failures and dead ends were many. I would like to share a little bit of what I have learned. Developing period armor fabrication techniques is often made difficult because of the dearth of detailed information from the Medieval and Renaissance eras. I have read dozens of popular titles on the subject of arms and armor over the past two decades, and have not had much satisfaction finding detailed "here's how they did it" accounts of how plate iron and steel were formed into armor elements. Of course, our Medieval forbears did not seem to show much interest in writing down step-by-step description of how common items were made. Lettered people were few, books hard to produce and expensive, and (I am sure) tradesmen of all sorts were probably very closemouthed about the mysteries of their craft. This article is a record of my attempt to follow Medieval methods in the construction of a simple "Norman" conical-style helm of about 1100 AD. For a look at the shape I am trying to duplicate, find a copy of "Arms and Armour of the Medieval Knight" by David Edge and John Miles Paddock, Crescent Books, 1988. On page 21 is a good picture of the "Olmutz" helm, one of the tiny handful of helmets preserved from this era. Christopher Gravett's Warrior Series book, "Norman Knight" (Osprey, 1993) also has a picture of this helm. Both books also have pictures of the "Wenceslaus" helm, now in Prague Cathedral. I wanted to make a helmet that mixed features from both these pieces: having a tall, ogival skull like the Olmutz, but a separate, riveted-on nasal like the Wenceslaus. I managed it. In the main, I'm satisfied. I took notes and pictures along the way, to enable me to share the experience. (An acknowledgment, here: about half of the photos you will see in this document were taken by a friend of mine, Earl Billick. The photos he took are pretty easy to spot-- they are all the good ones.) A few hundred more helmets like this one, and maybe I'll get the hang of it. |
|
Design considerations: |
|
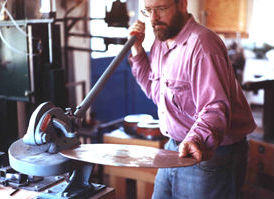
For my last few helmet projects, I've used US 12-gauge cold-rolled mild steel sheet. This gauge is about .105 in thick, or a little under 1/8 in, and makes reasonably thick stock for a helmet skull. Cold-rolled steel seems to be more consistent and better in its working properties than hot-rolled, especially nowadays with the growing proportion of hot-rolled steel being manufactured in mini-mills, which often use heavily mixed scrap as starting material. In the future, I may try 10-gauge (about .130 in thick), to give me even thicker material to work with in a helmet's critical areas. I have also considered using higher-carbon steels, such as SAE 1040 or 1050, to make armor, with or without heat treatment after forming. Such material would make a helmet much tougher, without needing an increase in thickness. I may give such steels a try, someday. First question: how big to make the blank? This depends, of course, on what I want the final dimensions to be. This project will be a "high-profile" Norman helmet, about 9" front-to-back, 7" to 7.5" side-to-side, and 7" tall. The shape is ogival, or "bullet" shaped, with a fairly well-defined peak. I use 9"x7" base rim dimensions because they fit my head fairly well; my head is 8"x6" at the brow line, so I add 0.5" all around for Medieval padding clearance. I sometimes add a half-inch to the side-to-side dimension to better accommodate my ears! Using the classic silversmith's formula, we should add the helmet's final width at its widest point (the rim), and its height, and use this as the diameter of the starting blank. Using the front-to-back measure as the width - we'd better take the longest width, to be safe - this yields a starting blank diameter of 9" + 7" = 16". It turns out that this formula does not work too badly for small, open helmets like the Norman style. For taller helmets, like the Italian "barbute" (also called the Venetian sallet), I've found the formula yields too small a blank. I would advise adding about 10% to the blank diameter for helmets that reach down to cover the neck and face. Why does the silversmith's formula come up short for big helmets? I'm not sure, but to guess: steel is much harder and stronger than the noble metals, such as silver and copper. I've raised a couple of copper vessels, and I find copper paradise to work with in many respects: it flows like butter, can be worked with light hammers -- and can be worked at room temperature, with periodic annealing. Since the material is soft, usually thin, and a uniform low temperature all over, it works more "overall"; as the walls of the vessel come up to the vertical, the vessel stretches in height consistently with every pass. Helmet steel is very strong, very thick, and is worked hot in small areas. The hammered area, being hot, is very soft, and is surrounded by cold, strong metal. I think this makes the metal tend to compress more locally, without making the whole piece stretch much, especially in the later stages, when the helmet "walls" are nearly vertical. Speaking of heat -- did the Medieval craftsmen use heat to forge helmets, or did they work with cold material with frequent annealing, as silver- and coppersmiths did (and do)? I'm not sure. I've heard and read arguments for both methods. I work hot, for two main reasons. First, I haven't anywhere near the strength to raise heavy steel cold -- I've tried, and nearly wrecked my arms and hands. Second, sinking and raising cold steel makes a deafening racket. My shop is attached to my house in a residential area, and the noise would probably cause an ugly neighborhood incident in short order. Hitting hot steel is much easier on the arms and ears. Now, as to the shape of the starting blank: in the past, I have actually tried elliptical blanks, reasoning that since the final product had an oval rim - the human head is not circular in horizontal section, obviously - the blank could be oval, saving me some extra hammering. This idea worked, but just barely worked, for simple and small helmet shapes. I once made a 9"x7" rim, 6" tall Norman type using a 15"x13" ellipse. There was just enough metal, it turned out, to pull this off; but for simplicity's sake, I now use circular blanks. The helmet stays circular in its early stages, and then the sides are "taken in" during the later steps. I don't need patterns for marking such blanks either. I just use a compass! So, I will start this helmet with a 16" diameter circular blank.
It should provide me with more than enough material. |
| Preparing the Blank: | |
 |
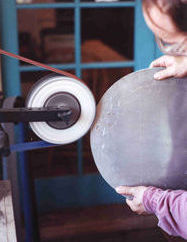
I mark and cut out a 16" diameter circle from a piece of 12-gauge cold-rolled steel sheet. I use a Beverly B-3 throatless shear. This is a valuable tool for sheet metal work, allowing curves to be easily cut. |
| The B-3 is the biggest model of hand-operated Beverly shear; a B-2 can also handle 12-gauge fairly well, and costs about $200 less. There are more economical alternatives to the Beverly. Straight-cut shears (considerably cheaper than a throatless) can be used, making straight cuts closer and closer to the circular outline (square, octagon, etc) until the remaining metal outside the perimeter can be filed or ground off. A jigsaw with a metal-cutting blade can also be used, although it is slower, and noisy. | |
| I pass the edge on a belt grinder to take out any nicks or splinters left by the shearing. This step is a convenience, and can be skipped if you have no such grinder; it just saves me much extra filing in the next step. You can also use a regular import-type bench grinder with a fine wheel, to take the big irregularities out. |
 |
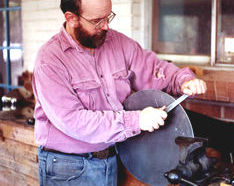 |
I now file the edge smooth. When I feel no nicks or rough spots with a fingertip, the blank is ready to begin sinking. I take care to make the edge smooth because I don't want a nick to provide an origin for a stress crack later, during the severe forming this blank will experience. The blank now weighs 6.5 lb, or a hair less than 3 kg. |
| Filing the edge is a silversmith's precaution. I'm not sure it's necessary in steel raising, but I never want to find out the hard way! | |