|
I sink the blank before starting raising, to give the blank a shallow
bowl shape; I find a flat disk a little nasty to begin raising with. The
bowl shape give a "positive poise" to the piece, and just makes
it easier for me to control on a raising stake. It may also save one or
two raising courses.
Did Medieval helmet-smiths sink their material first? I have no
idea. But sinking, especially with a multiple-man striking team, is easy
and quick. You can punch out a shallow bowl in minutes with trained strikers.
Did period workers do this hot or cold, and did they use dish-shaped sinking
anvils? Again, I can't say. I have had a chance to see some Mexican coppersmiths
form vessels from scrap chunks of copper by hand, and they worked hot,
with flat anvils, angling the work to achieve a shallow bowl shape.
One objection to starting with sinking is that it thins the material.
The rims of my raised helmets get so thickened during subsequent raising
that this is not an issue for the "lower" areas of a helmet,
but for the top and sides of the skull, it is a bit worrisome. As I mentioned
earlier, some day I will try very heavy plate, say 1/8" or so, as
starting material, to assure that the skull stays thick enough.
|
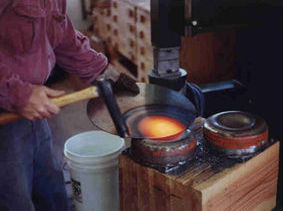
| I fire up the sheet metal gas forge. The gas forge is clean, can be used
indoors (ventilation must be good; my shop has a 600 cfm evaporative cooler
mounted on the roof), and has the great advantage of holding the work during
heats, freeing me to do other things. |
|
| Details concerning the construction of the sheet
metal forge may be forthcoming in another article. Of course, any intense
heat source can be used; a large, rosebud-type oxyacetylene torch, or even
a forge using solid fuel, such as coal or charcoal. I have used a coal forge
to raise a helmet, and it is a bit of a hassle - it also needs a chimney,
or has to be used outdoors. If you want to tackle a plate-metal project
like this, consider building a gas forge. Depending on how good you are
at scrounging, you may be able to build a useable one for under $200. This
figure assumes that you have welding equipment, or access to such. |
|
|
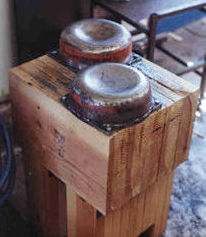
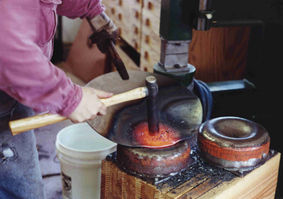
Sinking blocks. These are bottoms from old high-pressure
gas bottles, cut off with a big bandsaw, at low speed and with plenty
of coolant. They have been ground and sanded to smoothness on the striking
surface, then arc-welded to 1/4" steel plate, and lag-screwed to a big
laminated wood block. The cavities left inside the sinking blocks have
been filled with (dry!) sand, to muffle the ringing a little.
|
| Always use great care when performing any operations
on old gas bottles! You must be sure they are empty, and never flame-cut
them. |
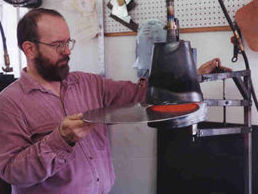
| I start from the rim inwards; this just feels more natural to me. When
a 5" or so spot on the rim gets to an orange heat, I can begin. The sinking
hammer shown here is my current favorite: an 8" piece of scrap car axle,
with an eye drifted near one end -- a sort of "Japanese" configuration.
Hammer head weight is about 3 lb. |
 |
| I find that long head length for sinking and bossing hammers
is a good idea; it keeps my hand farther away from a hot surface, and allows
the head to reach into deep forms. |
|
|
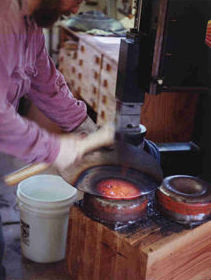
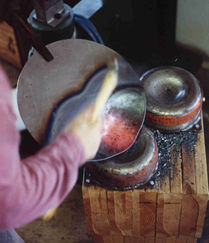
I pound the first heated spot into the shallow sinking block. No enormous
force is needed. I want to just feel contact with the block face. As I strike,
I "pick up" the opposing edge of the blank. This causes the rim to curl
up, hastening the bowl-forming process. |
| The first sinking "bite", or (for all you silversmiths out there)
the first "stanza". |
|
|
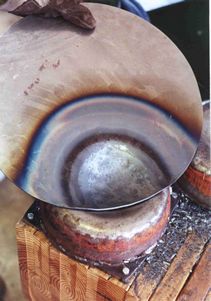
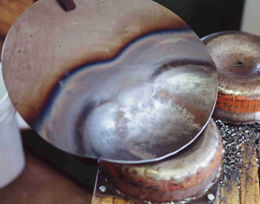
Another spot is heated and hammered the same way...
|
|
|
|
| ...then the "ridge" left between the two spots is heated and
hammered down, making the two depressions flow into each other. |
|
|
|
|
|
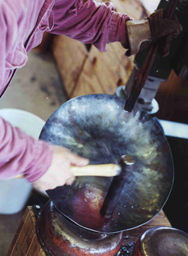
Work proceeds around the rim in this manner. The edge may wrinkle a bit
while I am hammering, but this is no problem; I just gently hammer the wrinkles
down. A complete circuit around a workpiece is called a "pass".
After the first pass around the rim, I'll start another pass inside the
first, continuing until I reach the center. |
| This blank is quite small, so only a 6" or so diameter region
in the center will be left untouched after only one sinking pass. Very large
blanks, such as for barbutes and other such "tall" helms, may be 22" or
more in diameter, and may require two or three passes to get to the center. |