| |
 |
|
|
|
-GURU
|
|
This is Rich's first iForge demonstration. Rich is a police officer in the U.S, Virgin Islands, thus the handle "vicopper". He is also a CSI member.
Rich is quite an artist and craftsman as you will see from his beautiful drawings used in this demo. This is our 137th iForge demo.
|
|
RICH
|
|
Thanks for the nice intro, Jock.
And thanks for the opportunity to share this.
I've learned a great deal from other demos!
|
|
RICH
|
|
Tonight’s demo is lost wax casting. For sharp, accurate detail and relative simplicity, it’s hard to beat this process.
A few words on safety. We’ll be dealing with metal that is hot enough to become fully liquid and that means hot enough to burn through clothing, skin, and muscle and into the bone. A Band-aid and Mommy’s kiss won’t fix that kind of damage, so it’s better to not incur it at all. Wear boots, long pants, long sleeves, and leather apron, gloves and face protection. A full-face shield is far superior to goggles, since it protects more and sweats less. Knowledge is a big part of safety, too. Read books, check the Web, ask questions, etc. One other thing I strongly recommend is that you make a sandbox just like the kind you played in as a kid. This will be the arena for the casting, so that any spills stop immediately and don’t cause concrete explosions or noxious fumes as rubber soles start smoldering! Keep the sand dry!
|
|
RICH
|
|
The process of cire’ perdue or "lost wax" casting derives its name from the fact that the model is created from wax that is cast into plaster and then burned out of the plaster leaving a cavity that exactly matches the model. That cavity is then filled with molten metal to create the final piece, simply and accurately. With the finest quality investment plaster, it is possible to faithfully reproduce microscopic detail too small to be seen.
|
|
RICH
|
|
The first step is to create the wax model. To do this, you can either purchase carving wax from a jeweler’s supply, or use sculptor’s modeling wax. Nearly any kind of wax will work, even the paraffin for sealing Grandma’s home-canned peaches. It doesn’t matter if the model is carved from the block of wax or built up by adding melted wax. I have successfully used models made of Styrofoam, too. Remember that this process will reproduce the model exactly, so finish the model as well as you can, even to polishing with Q-tips and alcohol. This will save you a lot of filing and buffing time later. Carving and modeling tools can be made from knives, nails, used dental picks, whatever.
|
|
|
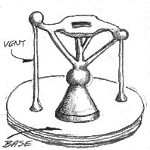
Figure 1 |
Once the model is made, (in this demo I show a guard for a sword), the next step is to attach the sprues and pouring cup. These are nothing more that wax wires or rods that burn out to leave passages in the plaster for the metal to travel through.
|
|
|
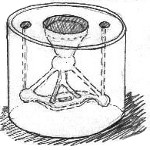
Figure 2 |
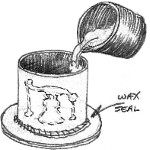
Figure 3 |
|
|
RICH
|
|
Remember when attaching the sprues that the metal will be cooling as it flows, so the sprues have to be big enough not to become stopped. The air in the cavity has to escape, too. Most of the air will pass through the somewhat porous plaster investment, but in complex pieces it may be appropriate to add vents, small sprues that give the air somewhere to go. These are the two wires that extend from the balls at the ends of the guard to the base. You’ll notice that I’ve formed a ball at the junction of the pouring cone and the sprues. This creates a reservoir of molten metal that can be pulled into the mold as the cooling metal shrinks, to keep from having voids in deeper areas. The model and sprues are assembled on a metal or plastic plate, as shown. This plate becomes the bottom of the flask when we pour in the investment material. The flask ring is nothing more than a scrap piece of pipe large enough to leave ˝” clearance all around the model. It is sealed to the base plate with a little molten wax to keep it in place when the investment is poured in. Before placing the flask ring, paint the entire model with either a solution of medical Tincture of Green Soap or jeweler’s de-bubblizer. This isn’t absolutely necessary, but it helps the investment plaster to “wet” the model and get the best detail. It also helps prevent air bubbles from becoming trapped on the model.
|
|
RICH
|
|
The investment plaster can be as simple as Plaster of Paris with 50% fine silica sand added, or you can get dental investment plaster such as Kerr Satincast from a dental or jeweler’s supply house. The better the quality of your materials, the better your finished product will be. The investment should be mixed to the consistency of heavy cream and free of any lumps. It is poured into the flask, being careful to pour at a rate that doesn’t incorporate a lot of air bubbles. It’s a good idea to jiggle the flask a bit during this process to dislodge any air bubbles that may be trapped. After the flask is full, let it stand for at least a couple of hours to harden. When it’s hard, pull off the base plate, exposing the pouring cup. Let it dry overnight with the ends exposed to the air. Next, the burnout.
|
|
|

Figure 4 |
The finished flask needs to have all the wax and wax residues burned out completely, or they will vaporize when the molten metal hits them, causing all kinds of problems and risks to your personal safety. The plaster wants to be heated slowly so as to allow the water in it to escape without cracking the mold. For a flask the size of a bean can, it should probably take at least three hours for the burnout. Rule of thumb is: one hour to get up to 250 degrees f., another hour to get to 500f, and ten minutes per hundred degrees until you reach 1200f. (This is about a cherry red heat, if you’re not using a thermometer.) At 500 degrees the plaster calcines and at the final temp all of the wax is totally vaporized. This process is going to create some noxious fumes, so do it with plenty of ventilation! The drawing shows how this can be done over a coal or charcoal fire, using a clay firepot for an “oven.” Firebrick stacked to create an oven work even better. The flask should be kept at its final heat until the metal is poured.
|
|
|
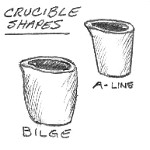
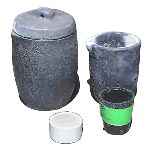
Figure 5 |
Once the flask is burned out, start melting the metal.
Brass, bronze, silver, copper and gold can all be melted easily in a forge.
The same borax you use for welding flux is great for fluxing when melting the alloys mentioned. You should use a clay, graphite or silicon carbide crucible. Forget cast iron, the non-ferrous alloys will deteriorate it too quickly. Proper crucibles are a safety factor. Silicon carbide is the best, and the most expensive. Clay and graphite are both okay, but more fragile than the carbide. Crucibles come in two basic shapes, as shown.
Whichever you select, make a set of tongs as shown to handle it.
Photo: #10 (10 pounds aluminium) graphite crucible with lid,
#6 crucible, #1 - (3.2 pounds brass) silicon carbide crucible and a
7-1/2 oz. fuzed silica jewler's crucible
|
|
|

Figure 6 |
For small crucibles holding less than a pound of metal, the same tongs you make for the flask will be fine. Just make sure they're a good fit! You can't afford to drop anything here.
|
|
|
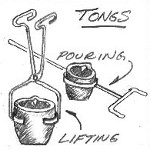
Figure 7 |
For larger crucibles, a pouring shank, as shown, makes it possible for two people to control a sizeable flask with safety. Nothing I know of will ruin your day quicker than a load of molten metal splashing all over you. It takes months for those burns to heal, if they don’t kill you. Always think safety first!
|
|
|

Figure 8 |
The hot flask is placed on the dry sand bed and the molten metal poured in one steady, smooth stream into the sprue cup. The metal should be heated to a temperature a couple hundred degrees above its melting point to ensure that it is liquid enough to pour and hot enough to stay molten until the pour is finished. Skim any dross off the top of the melt using a steel wire or fire poker, flux lightly with borax and pour. Keep the metal running, but don’t pour faster than the metal can run into the mold. When you see metal rise to the top of the vents, the pour is full. Any metal left in the crucible can be poured into an ingot mold of welded steel to be used later. Don’t leave it in the crucible or it may crack it when re-heated.
|
|
|
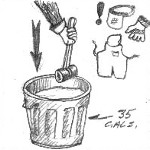
Figure 9 |
At this point, you can wait thirty minutes and then quench the whole flask by plunging it deeply into a trash can full of water. Shove it straight down as deep as you can reach, all at once. It will bubble and hiss and rumble. When it’s all done with the theatrics, most of the plaster should have been dissolved and the model can be cleaned and cut from the sprues. The sprues and sprue cup can be re-melted the next time you cast.
|
|
RICH
|
|
After the water and heat has done as much of the cleaning as its going to do, the next step is just patience with small picks and wire brushes to get the last bits of investment out. I don't cut it off the sprue until I've done most of the cleaning; that way I have a convenient handle to hold it by.
|
|
RICH
|
|
For castings that aren’t too big, say the size of the bean can, one way to get a much denser casting, (suitable for forging), is centrifugal casting. Spinning the molten metal into the mold compacts it and forces out the air faster for better detail.
|
|
|
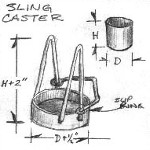
Figure 10 |
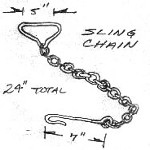
Figure 11 |
|
|
RICH
|
|
Jeweler’s use spring-powered centrifuges to do this, but it can be done simply by sling casting. To do this, you need to make a sling cradle and sling, as shown. Weld it up from plate, pipe and rod at least 1/8”. The chain needs to be about like a dog chain.
|
|
|
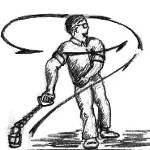
Figure 12 |
The hot flask is placed in the cradle and poured, and then the fun begins. Grasp the handle of the sling firmly and in one smooth motion, lift the cradle and swing it around your head for a minute or so. This generates plenty of centrifugal force to create an excellent casting. Safety note: This step doesn’t have any bystanders or flammables within fifty feet all around. While it isn’t any different in principle than the old trick of swinging a bucket full of water over your head without spilling any, this isn’t water we’re dealing with.
|
|
RICH
|
|
After half a minute, or when you start to get dizzy :-), set the cradle down to cool for twenty or thirty minutes. Then plunge the flask into the bucket to break out the investment. One reason I recommend a very large trash can for that process is that if you should get burned while casting, that can is large enough to shove a whole leg or arm into instantly. Safety factors, again. I still have all my body parts and you should do your best to keep yours, too!
|
|
RICH
|
|
One last word of advice, and then I’ll take your questions.
Like forge welding, wasted time and false steps result in failure. When the actual casting starts, there won’t be any time to run get something you forgot, so before you do this for real, practice each of the steps in the casting process. Call it a dress rehearsal. This will help you to discover where everything should be set up for your particular situation. Then, have fun!
|
|
RICH
|
|
Questions? I hope this has all made sense, but if not, now is the time to ask.
|
|
PPW
|
|
Rich, for the sling casting (a good idea for dense work)I'd strongly suggest a hard hat, full face shield, and full coverage clothing.
|
|
PPW
|
|
I've had molten lead explode a couple of times. Been fortunate both times, but it still isn't any fun at all!
|
|
NTECH
|
|
Excellent demo. How large in diameter should the vent holes be ? Is there a minimum size not to get clogged ?
|
|
JOCK D
|
|
Rich, I have a small ceramic crucible (one of those cylindrical things with a hemispherical dish).
A fellow recommended heating and fluxing it with borax before use. Have you ever heard of this?
|
|
JIM C..
|
|
Rich, very good demo. Could you or Jock post sources for the wax and plaster?
|
|
RICH
|
|
PawPaw...I'll second that! Fortunately, when sling casting, most of the hot stuff flies away from you...usually!
|
|
BROGAN
|
|
Great Demo Rich. It filled in a lot of gaps for my first try at casting.
|
|
RICH
|
|
Glenn - About 3/32" is a minimum.
Jock - Yes...I should have mentioned that. Always a good idea to pre-condition your crucible.
|
|
MILT
|
|
Rich --- Thanks for the interesting demo.Guess I've heard of sling casting, but your drawings & description are more vivid. How about steam casting for small stuff? I've seen it done, but never tried it.
|
|
RICH
|
|
Jim- I'll see what I can find that is current, and then add it as an addendum later.
|
|
JOCK D
|
|
Wax can be almost any type that is suitable for making the master.
Bee's wax has been used for millinia for modeling.
I've used parrafin but it works rather strange. Melted crayons work and so does machinable wax.
|
|
RICH
|
|
Milt - I have done steam casting, but it is really not nearly as good as sling casting, and has a higher risk factor, actually.
|
|
PPW
|
|
One source for good detail plaster is your local dentist.
He can either sell you some, or put you on to a good source.
|
|
RICH
|
|
I like the brown sculptor's wax (mostly beeswax) for modeling with hot tools, and the hard jeweler's wax for carving.
|
|
PPW
|
|
I've used dental plaster for casting tire tracks. Works great.
|
|
RICH
|
|
If you have a dental lab, where they make crowns and such, they have all the goodies. They also get a better price than you can...work with them.
|
|
RICH
|
|
Jeweler's supplies can be found in any major city and on the internet, too. They have all the things you need.
|
|
MILT
|
|
Investment plaster ad in 'Lapidary Journal' www.KerrLab.com
|
|
JOCK D
|
|
Many waxes are mixtures of bee's wax, parafin and other waxes to get the desired hardness. We have used melted and recast crayola crayons and found them to have an excellent consistancy for carving. . . Color ends up odd.
The last casting I did I used plaster of Paris and about 20% talcum powder. The talc is refractory and makes a very fine surface. Good investment plaster also has some wood flour to make it porous.
The above suggestions are for you do-it-your selfers. . .
|
|
|
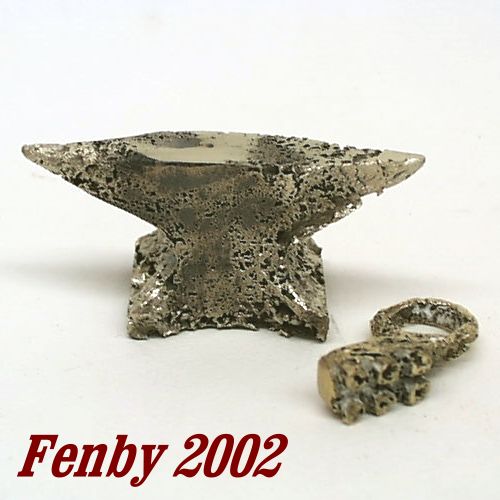
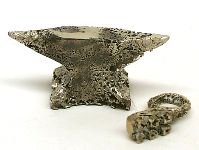 Figure 13, Failed castings. Click for detail
|
What Can Go Wrong:
At the 2002 Camp Fenby weekend I was listed under "experimental casting" and THAT it definitely was.
It was also a comedy of errors.
|
|
|
JOCK D
|
|
We had parrafin to carve. Some that I had worked, but another batch of the
same brand was very crystaline and almost impossible to work. Bees wax is better and professional carving
wax even better still. In the VERY hot weather you only had to hold the wax a few minutes before it became soft
like plasticine clay. Ice water was required to cool the wax while carving it. But we DID manage to get some
waxes made. However, while spruing and venting them, they kept slumping over from the heat.
The next hot weather problem was the plaster. It was setting as fast as I could mix it. I threw away more than I
used and more batches hardened before or WHILE pouring. Cold (nearly ice) water was used but did not help.
I've poured plaster many times before and never experianced this. The difference between working at 75-80°F
and +90°F makes a huge difference in thermalsetting materials. I got very testy while dealing with this and I
appologize to all involved. So, most of our molds had defects from air bubbles at best. But it got worse.
Time was a problem. We worked all day to get the waxes made and plaster poured.
Casting would be the next day. The plaster had no time to dry naturaly.
This was my first lost wax casting and I took on too many molds at once. I figured it would be best to do burn out in the coal forge as melted wax would run into the coal. At one time I had all eight molds in the forge.
Some got burned out and calcined nicely, others not so nicely and at least one got burned and cracked.
AND, I did not know that a couple didn't get all the wax burned out, much less calcined properly!
The melting was no problem and went smoothly. The planned furnace I spent a week building and could not
finish on time was abandoned before going to Fenby. The night before traveling to Fenby I built a crucible
furnace from a small Freon-12 tank, a half fire brick and some Kaowool. ITC-100 was used for glue to hold the
Kaowool in the lid and line the vent. A #1 or 1 pound crucible fit just right. I used a T-Rex burner. This was a
little big for this furnace but worked flawlessly. Melt times were surprisingly short. The cheap and dirty furnace
probably worked better than the more complicated one.
We used brass from several sources. Initialy it was some cut up brazing rod material then later several hundred
brass door keys were melted. Borax was used as flux. About 1/2 tsp per crucible.
The pouring initialy went well. We had three open face molds. But one was not leveled and the result was a
thick lump on one side. Then I poured a couple of the bigger molds. They still had some wax in them! The result
was the hot liquid brass spitting back out of the mold. There was also some steam and the resulting parts were
full of holes and porosity (photos later). There was enough wax in the largest mold (a 4-1/2" long German
pattern anvil) that more metal sprayed out than went in. . but I kept pouring. The result was a VERY porous part
that was almost hollow. A great show of what NOT to do. The hot brass was still smoking off parafin when
broken out of the plaster!
The last two pours were an experiment that Atli wanted to do. He had made two pommel patterns in styrofoam
with risers. They were buried in dry sand box "play" sand (a bad choice) with the sprues flush to the surface of
the sand.
Metal (brass keys) were melted, and the pieces poured. There was a little puff of flame and a bit of smoke but
the pours went smoothly. Nothing exciting like the earlier pours. The first pour I got straight down the spruce
and we got a VERY good sound casting . the texture was mostly that of the styrofoam. We DID get a little
burn-in into the sand on a couple corners. The second pour also produced a vairly good piece except I missed
the center of the sprue and ended up with brass cutting into the sand and the pour being a little short. But the
part looked very good except for an unfilled hole in one side.
At the end of the day we got the best castings from a non-traditional modern method using poor materials. The
play sand had been selected to be a work surface for the molds and to set the hot crucible. But for molding, the
sand should be "sharp" not worn down (rounded) beach sand.
On our first melt with a clean NEW crucible we had no smoke or zinc flare. In subsequent melts brass burnt off
the upper parts of the crucible. I was glad we had a good breeze and VERY good ventilation. Breathing burning
zinc fumes can result in "metal fume fever" a kind of metal poisioning. It is not a good thing.
This was the second time I had cast brass and both times I was in a hurry and the molds were not properly calcined.
This is critical in using plaster molds. If I were to do it again I would do it in stages and alow plenty of time.
Before calcining I would let the plaster air dry. Plaster will air dry given enough time (several days). It will not be calcined but it will be very dry.
We learn more from our mistakes sometimes than from our successes.
Hopefully it will be easier for you to learn from MY mistakes!
Plaster Notes:
From the plastermaster.com/usg/ site US Gypsum says,
Cure C: If excessive alum, chlorine or sulfate are present in the water, plaster mix will set too quickly (flash set).
Check set by making a mix with distilled water. Plaster should always be mixed with water fit to drink.
Problems A and B were contamination. But I think it was a combination of the heat and hard water.
A graph showed setting time of plaster to be fastest at 100°F and slower at both higher and lower temperatures.
But the minimum time given was 15 minutes, not the 20-30 seconds I was experiancing above.
Salt (sodium chloride) will accelerate setting but is not recommended. Alum is also listed.
Suitable accelerators are sold.
Sugar and organic acids (vinegar) will slow the setting time and are also not recommended.
The plaster chemical reaction:
2(CaSO4 * 1 H2O) 2H20 = (2CaSO4 * 2H20) heat
I have mixed talcum powder (20%) with plaster to increase its refractoryness and improve surface quality without a problem.
Some casting mixes recommend addition of fine sand to strengthen the plaster.
Wood flour is also used to increase the porosity so that any steam generated during calcining or pouring has a better chance of escaping.
For the historians out there USG claims casting plaster has been in use for 5,000 years.
- guru
|
|
JOCK D
|
|
Other related demos and articles:
Patterns and Molds I
Patterns and Molds II
NEWS Vol. 25, p.5 Pewter Casting at Camp Fenby, 2001
Foundry 101 Small Foundry Learning Site from the "casting cowboy".
|
|