| |
 |
|
|
|
-GURU
|
|
Tonight's demo is of almost the identical candlestick as last week's by Genia Burch.
However, the methods used here are completely different
Tonight's Demo is by Jr. Strasil. This is his first iForge demonstration. Our 157th.
|
|
|
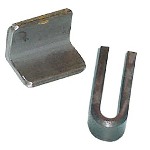
Figure 2
Click for Detail |
The parts to make a simple bottom V swage that will make the forming of the petal easy and will also be useful for other projects. It is 1-1/2 inches of 3/16 by 1-1/4 inch angle iron with all the edges and corners rounded slightly with a piece of 1/4 by 3/4 bent 180 degrees to fit the Hardy Hole.
|
|
|
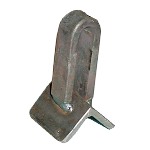
Figure 3
Click for Detail |
The V swage arc welded together.
|
|
|
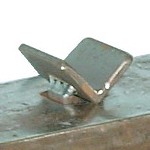
Figure 4
Click for Detail |
The V swage setting in the Hardy Hole ready to be used.
|
|
|
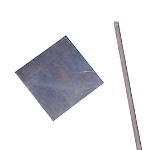
Figure 5
Click for Detail |
The two parts of the lilly, in this case a piece of 16 gauge material 3 inches square, and an 18 inch piece of 1/4 inch hot rolled round bar.
|
|
|
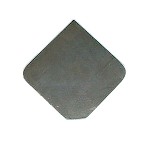
Figure 6
Click for Detail |
The piece of 16 gauge with the two outside corners rounded, and the cut off for attachment to the stem, the length of the bottom cut should be 1-1/2 times the circumfrence of the rod.
|
|
|

Figure 7
Click for Detail |
The rod welded to the petal in the middle of the bottom cut.
|
|
|
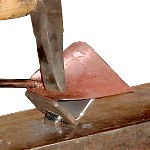
Figure 8
Click for Detail |
Working the bottom edge of the petal first with a cross-pein hammer, the far edge has been rolled some already, do not work so much of the first edge that you have to straighten some of it back out to get to the second edge.
Do this at a red heat to prevent putting hammer dings in
the petal.
|
|
|
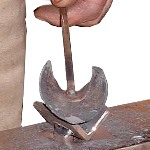
Figure 9
Click for Detail |
What it should look like with the edges rolled and the center worked a little.
|
|
|

Figure 10
Click for Detail |
This is a 1 pound hammer with one flat face and one rounded face. If you do not have one you can round the face of a ball pein hammer of about 1 pound and polish it, it will come
in quite handy at times.
|
|
|
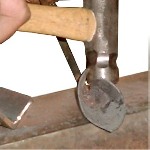
Figure 11
Click for Detail |
Use the flat face of the hammer to finish rolling the edges around, they should overlap some. Make sure to work the the bottom of the petal close around the stem, do not work all in one place, try to keep the edges as straight as possible.
|
|
|
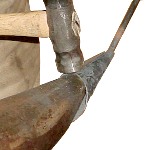
Figure 12
Click for Detail |
Work the edges together on the horn of the anvil using the flat face of the hammer.
|
|
|
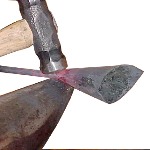
Figure 13
Click for Detail |
Using the horn of the anvil as a bottom fuller and the round face of the hammer to finish closing the base of the petal around the stem, this is done at a red heat.
The stem should also be aligned with the petal at this time and the stem straightened.
|
|
|

Figure 14
Click for Detail |
This is what the project should look like at this stage.
|
|
|
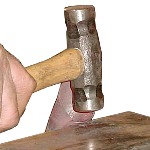
Figure 15
Click for Detail |
At a red heat, roll the edge of the petal over on the round edge of the anvil, but do not go all the way to the back, then do the other side the same way, using a round face hammer.
|
|
|
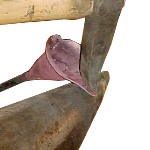
Figure 16
Click for Detail |
Using a cross pein hammer roll the the tip of the petal over the anvil horn.
|
|
|
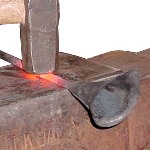
Figure 17
Click for Detail |
Lightly hammer the stem to give texture if you wish.
|
|
|

Figure 18
Click for Detail |
Wire brush with steel wire brush to remove scale and while petal is at a black heat, highlite the edges of the petal with a brass wire brush both inside and out.
|
|
|
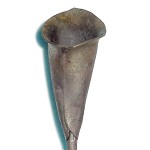
Figure 19
Click for Detail |
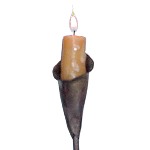
The finished Calla Lilly Candle cup.
|
|
|
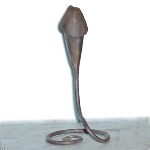
Figure 20
Click for Detail |
This is a large Calla Lilly made from a 5 inch square piece, with a snub end scroll base for larger candles.
I hope you enjoyed this demo, the Lilly demoed took me approxiametly 15 to 20 minutes to make, including the V swage. - irnsrgn
Questions, Comments?
|
|
Paw Paw
|
|
Nice demo, Irnsrgn! I especially like the use of the brass brush at the end.
Always adds a bit to the piece and the price.
|
|
|
irnsrgn
|
|
Thank you Paw Paw
|
|
Paw Paw
|
|
Could the end of the stem be forged into a c--- (can't remember the name) in the middle of the lily? Sort of like a Jack In The Pulpit?
|
|
irnsrgn
|
|
You can try it paw paw, I always tell people to not be afraid to expierement, don't see why not.
|
|
irnsrgn
|
|
Thank you all for letting me do a demo for you.
|
|
Milt
|
|
Thanks Irn-- another neat project. Good photos too, easy to see steps.
|
|