
Rose
Demonstration by Bill Epps.
http://www.besmithy.com
August 11, 1999

Rose
Demonstration by Bill Epps.
http://www.besmithy.com
August 11, 1999
BillEpps : |
Tonight we are going to make a rose. These are always a big hit with the ladies, and they never wilt. | |||||
BillEpps : |
|
|
||||
BillEpps : |
|
|
||||
BillEpps : |
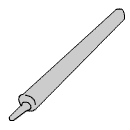
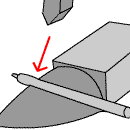
The first thing we want to do is make the stem. I start with a piece of 3/8" round and make a 3/16" tenant on the end about 3/8" long. I use a monkey tool to square up the shoulder of the tenant so that the discs will rivet down securely (monkey tool is just a rod with a hole in it). | |||||
BillEpps : |
 |
 |
 |
|||
BillEpps : |
After I have the tenant good a square I start drawing the stem down. I leave a knot just under the tenant.. Using the horn of the anvil, and either a rounding hammer or a cross-pien, draw the stem down to about 1/4" x 10 to 12" long. Don't worry about being too smooth at this point. The hammer marks gives the illusion of a rose stem. | |||||
BillEpps : |
 |
 |
 |
|||
BillEpps : |
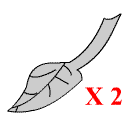
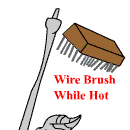
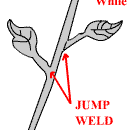
I make up a couple of those raised vein leaves and jump weld them on to the stem. Wire brush to keep the metal clean and the more you brush it the better it looks. | |||||
BillEpps : |
|
|||||
BillEpps : |
You stem should look something similar to this. Set this aside for now. | |||||
BillEpps : |
|
|
||||
BillEpps : |
These rose petal discs that are available from several of the suppliers If you enlarge these and print them out, it will make a good pattern. These are 18 ga. sheet metal. I prefer 14 or 16 ga. myself. The heavier the metal the better texture on your petals. But the 18 ga. is a lot easier to deal with. These are numbered 1 through 6. 1 goes on first, 6 on last. | |||||
BillEpps : |
|
|
|
|||
BillEpps : |
I pulled these up out of order. Bear with me. just skip these for now. | |||||
BillEpps : |
|
|
||||
BillEpps : |
|
|
|
|||
BillEpps : |
I crosspien the petals to give them a texture, then I use a ballpien on a cupping tool or hardy to cup each petal just a little and roll the edge down some. | |||||
BillEpps :20:47:16 |
|
|
|
|||
BillEpps : |
Starting with #1 set it over the tenant and use the monkey tool to drive it down tight. | |||||
BillEpps : |
|
|
|
|||
BillEpps : |
After you have all the petals textured and cupped, assemble,#1 first, #2, etc. | |||||
BillEpps : |
After putting on each petal, I set over the tenant and drive down tight with the monkey tool. | |||||
BillEpps : |
Heat the end of the tenant and rivet it down with a ballpien hammer. | |||||
BillEpps : |
|
|
|
|||
BillEpps : |
This picture is misleading because the discs are all on the stem, but you start in the center and work one at a time using a pair of rat tail tongs or scrolling pliers to curl the petals inward around itself. | |||||
BillEpps : |
|
|
||||
BillEpps : |
Starting in the center working your way out, you curl each petal around the one in front of it. The piece on the bottom is folded down around the stem. There is a name for it, but I can't remember what it is. | |||||
BillEpps : |
|
|
|
|||
BillEpps : |
|
|
||||
BillEpps : |
After I get them all curled around themselves and standing up, I start at the outside working inward, heating the top edge of the petal and curl it down. By cupping it a little at first, this gives a real neat effect. By starting at the outside and working your way inward, you see the rose bloom in front of your eyes. | |||||
BillEpps : |
|
|
||||
BillEpps : |
After you get through it should look something similar to this. Put a (single) drop of roseoil in the center, and the ladies love them. | |||||
BillEpps : |
Questions? |
|||||
Paw-Paw : |
Bill, May I interject something at this point? | |||||
BillEpps : |
Yes, go ahead. (I forgot brass brush. | |||||
Paw-Paw : |
Before you put the rose oil inside the rose. Sand blast it to give it a satin finish. Take it into the house and pre-heat the oven to 450 degrees. Put the rose in the oven for an hour. Take it out and quench it in transmission fluid. When it's cool, glue a small piece of black velvet over the rivet. Add the rose oil Horticulturists have be been trying to breed a blue rose for hundreds of years. Blacksmiths can do it! | |||||
BillEpps : |
Great Idea Paw-Paw. Have to try that. Thanks. | |||||
BillEpps : |
Sorry I got things a little out of order, but I think you gist of it. | |||||
tom : |
if you don't have access to a sandblaster, will it still look ok ? Paw Paw? | |||||
Ntech : |
Bill, what is the selling price? | |||||
dimag : |
Do you use a torch for tweaking the petals? | |||||
BillEpps : |
A good pair of scrolling and/or rat-tail tongs makes all the difference in the world. On this one I did use a torch, it is easier of course, but have done several in just the forge You have to pay real close attention to your heats because the metal is so thin. | |||||
tom : |
Bill, you said to cup the petals before rolling them out , is that something different than the original cupping process a few steps back ? | |||||
BillEpps : |
Yes, I keep the discs flat and cup petals down before I rivet them together together. | |||||
BillEpps : |
On the finish of these you can brass brush them, which gives gold highlights at a black heat, I am anxious to try what pawpaw suggested. I usually spray mine with clear spray paint after I am through with them and use the rose oil to cover up the smell of the spraying or lacquer. | |||||
iForge is an Andrew Hooper Production
Copyright © 1999 Bill Epps
HTML Copyright ©
1999 Jock Dempsey, www.anvilfire.com
Webmaster email: webmaster@anvilfire.com