| |
 |
|
|
|
TUTOR BOT
|
|
Ntech While there is a Demonstration being run you are invited to ask questions, But PLEASE DO NOT
INTERUPT unless you have one to ask.... THANK YOU and Enjoy your stay.
|
|
GURU
|
|
(An illustrous start to a demo, the demonstrator gets attacked by the rogue "tutor bot")
Glenn was kind enough to do this demo while the rest of us were on the road to Flagstaff for the ABANA conference.
|
|
NTECH
|
|
For tonight's demo, how to photograph YOUR black smithing projects without a major cash investment, I will refer to YOUR artwork as the "project" .
|
|
NTECH
|
|
You will need 3 or 4 garage work lights, the kind with the spring clamp, 100 watt light bulbs, a plain blanket or sheet, and some light weight string, nylon or cotton, doesn't matter. The 300 watt or 500 watt
quartz-halogen work lights with tripods will work also. Just be aware that the grill on the front will cast some goofy
shadows.
|
|
|
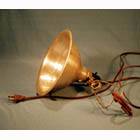
Figure 01 |
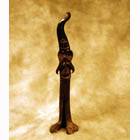
Figure 03 |
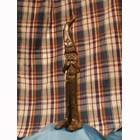
Figure 04 |
|
NTECH
|
|
The color of the blanket should be of medium shade, too light and it washes out, too dark and you can not see the subject. The two colors I use most often are Wedgewood china blue and light gray, the color gray used on the borders of a lot of Windows software. Avoid the heavy patterns as the pattern competes with the subject
visually. Also avoid white as it will cause the black or dark color of the project to produce a silhouette.
|
|
|
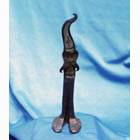
Figure 02 |
The end of the blanket can be hung over a door, draped over a small table or chair, then over a flat surface where the project is placed. Just make a long sweep with the cloth so a "hard edge" does not show.
Wrinkles can add to the effect as long as they do not interfere visually with the project being photographed. For small projects, the blanket can be draped over a chair or couch.
|
|
|
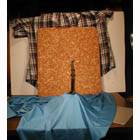
Figure 05 |
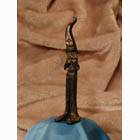
Figure 06 |
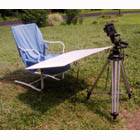
Figure 07 |
|
NTECH
|
|
Cut the piece of string at least 12 feet long. Tie a small loop in the end of the string. From the knot at the loop, tie additional knots at the following lengths: 1'-5", 2'-10",. 4', 5'-7", 8', and 11 feet
|
|
NTECH
|
|
To adjust the light falling on the subject move the work light from say the 4' knot to the 2'-10" knot and it will give twice (2x) the amount of light on the project. Move the work light from the 4' knot to the 5'-7" knot and it will give half (�) the amount of light.
|
|
NTECH
|
|
The string gives you something to actually measure with, or just eyeball it to look good.
|
|
NTECH
|
|
Place one work light left and one work light right of the camera. Turn on one work light at a time, and adjust the distance and angle to the subject, trying to bathe the subject in light, without any "hot" spots.
|
|
NTECH
|
|
The third work light is positioned high above and behind the subject. It produces a halo effect and visually separates the subject from the background.
|
|
|
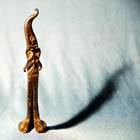
Figure 08 |
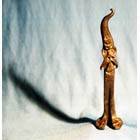
Figure 09 |
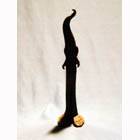
Figure 10 |
|
NTECH
|
|
Work with the setup to get the most even lighting. Remember to turn out the "room" lights, as they will add light and cast shadows. Very soft shadows or no shadows are preferred.
|
|
NTECH
|
|
If you still have trouble, use the 4 th work light to "fill in" any shadow areas. Also Gator-board, Foam-Core, matt board or any white surface can be used to reflect light into a shadow areas.
|
|
|
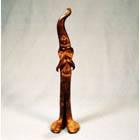
Figure 11 |
The background color is controlled by the subject to the background distance. Increase the distance for a darker color, decrease the distance for a lighter color background.
|
|
NTECH
|
|
Camera position should be level with and a little above the subject. This will give the viewer the ability to
see the work. When someone comes to your sales table, they pick up an item then hold it up to see it better.
|
|
NTECH
|
|
Show them the same view with the photo, and fill the frame with the subject.
|
|
|
Figure 07 |
The 100 watt bulbs should work for digital cameras. With film, there will be a yellow cast. (The film is balanced for daylight). A filter (80 A) placed on the camera lens is designed to correct the yellow cast, and can be purchased at a camera store.
|
|
NTECH
|
|
When you get the film images developed ask about having them put on a disk at the time of printing. No scanner needed that way.
|
|
NTECH
|
|
For larger items, wait for an overcast day. The lighting will be even and nondirectional but still put the sun behind you anyway. The blanket can still be used, just throw it over a clothes line, swing set, frame, or whatever is handy.
|
|
NTECH
|
|
Use the quartz-halogen work lights or large white reflectors to fill in the shadows. If you need a more light, crumple and smooth some aluminum foil and attach it to the reflector. Mirrors can be used to fill in the deep shadows.
|
|
|
Figure 07 |
This shot was taken outside about 1 PM with an overcast f/8 sky. A brick is placed on the chair and the background cloth is placed over the chair. The Troll sits on the brick.
|
|
NTECH
|
|
The foam-core is supported by two flower stakes, and reflects light into the shadows.
|
|
|
Figure 02 |
This shot was taken outside about 6 PM during a heavy rain storm. Rain stopped for about 15 minutes, photos were taken and rain started again.
|
|
|
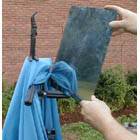
Figure 12 |
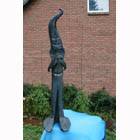
Figure 13 |
|
|
NTECH
|
|
When the project contains mirrors or glass, tilt the mirror to the side so the camera and lights do not show in the reflection.
Just be careful to look one last time at what IS being reflected before you push the button. If the project contains a candle, be sure to light it before the photograph.
|
|
|
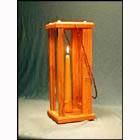
Figure 14 |
There are other backgrounds that can be used, grass, chip board, or brick. Photographic background paper is available in many colors, is inexpensive, and can be ordered from most camera stores.
|
|
|
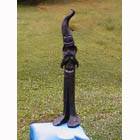
Figure 15 |
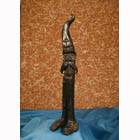
Figure 16 |
Figure 13 |
|
NTECH
|
|
Look at other photos and choose the ones you like. Look at the shadows. Draw a line from the shadow to the project and extend it back to where the light was placed.
|
|
NTECH
|
|
Sometimes a very large light source (4x4 feet or larger) is used to flood the project with light. Several of these large light sources used in combination, create directional light but little or no shadows.
|
|
|

Figure 17 |
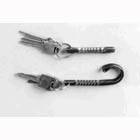
Figure 18 |
|
|
NTECH
|
|
This is just a place to start. Do not be afraid to move the lights, change the background, or change the set up to suite your needs. By using the work lights, you can see the changes made in the lighting as you move the work lights.
|
|
NTECH
|
|
Your project always requires the specific lighting needed to make it look as interesting as possible.
When you get too many lights, cords, reflectors and other stuff involved, go back to the K.I.S.S. system. Keep It Simple and Stupid - it works !!
|
|
NTECH
|
|
Questions?
|
|
TEN-HAMMERS
|
|
Thanks for the Demo Ntech. Good ideas.
|
|
BBB
|
|
Do you need to filter the yellow from the quartz lites?
|
|
NTECH
|
|
On film the quartz is usually close or able to br corrected in printing. On digital I have not seen the difference.
|
|
SHARRON EPPS
|
|
Glenn, this was really good, what i got to see of it. Hope to print it all out, cause most of us never get the chance to talk w/a "Real Photographer", and it is just like a finish, you can sell your work better if it looks good:)
|
|
KIWI
|
|
How about B&W stuff, do you use the same methods?
|
|
|
Figure 17 |
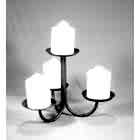
Figure 20 |
|
|
NTECH
|
|
b/w is a little less forgiving. The image has NO color to assist it. Same technique
|
|
SHARRON EPPS
|
|
Glenn, I think people think if they get a digital camera, it is the answer to all prayers, that they will just
automatically make great pictures, "wrong", you need to know how to photograph things, period. This willhelp
everyone w/a webpage, etc. if they know the basics. Thanks:)
|
|
KIWI
|
|
Sharon, Digital cameras in my expereance are a little harder to use than normal cameras, sure they are point and click and you instantly have the image on the computer.. but then you need to remove the grain, smooth the image and sortout the little things like colour ballance.
|
|
TONY-P
|
|
Glenn, if photographing say a collection of candlesticks, would it be necessary to add more worklights to avoid shadows ??
|
|
NTECH
|
|
The candle light will add some light - and also some shadows. Use work light to just fill in what the candles do not illuminate. Use a piece of screen wire in front of the lens to give the "star" effect.
|
|
KIWI
|
|
What happens if the item we are photographing is reflective?, whats the best thing to do there, reflect
colour light off it or just use the natural reflections?
|
|
NTECH
|
|
Contrast can be adjusted. More detail because you do not "see" the color in b/w images. You "see" the detail.
|
|
SHARRON EPPS
|
|
Kiwi, we don't even have a digital camera, we have borrowed one before, and frankly you can't really tell from the digital screen what your picture really will look like. I think folks get the mistaken impression that they are
different than real cameras that you have to make all the adjustments (ie, 35 mm.), but since most folks, like me,
neer took a photography course, we are continually rephotographing things once we get the pictures back from developers, cause they are just plain Not Very Good.
|
|
NTECH
|
|
With chrome or stainless, you can use a matt spray to kill the brightness, or hang a white sheet for it to reflect as an image. Reflection will be white (the sheet).
|
|
NTECH
|
|
With the work lights, you can adjust them and "watch" the shadows move. You can fill in the shadows created from one light with the second work light, Very little shadow that way. The remaining shadows are very
soft also.
|
|
TOM STOVAL
|
|
Glenn, sometimes I backlite a sheet to cut down on shadows. Sounds crazy, but it works. :)
|
|
SHARRON EPPS
|
|
Glenn, in Bill's shop(s) it has always been a problem to find anything that is a light colored background, cause everything gets coal dust/ grinding dust, etc. all over it if left there for a week or so. Also, someone once told
me that you need to paint a spot on a wall as well as on your floor white, and always photograph there. Is this a
good idea?
|
|
NTECH
|
|
Sharon, start with one background, one set up, and one project. Photograph it the way you thinks it looks
best and then correct what you think is wrong. Photograph it again to be sure. Then advance to the next project.
|
|
NTECH
|
|
Photographic background paper is inexpensive and available in many colors. The roll paper can be ordered from most camera stores or The Stock House 1-800-333-8124. It comes in two sizes, 53"wide x 12 yards long for less than $29.00 and 107" x 12 yards long for less than $39.00.
|
|
BRYAN
|
|
And you can use the background paper as your floor as well as your backdrop!
|
|
NTECH
|
|
Bryan, you unroll it and make a long sweep. That way there are no hard edges where the floor joins the wall. Floor has to be super clean as a grain of sand will emboss the paper when you walk on it .
|
|
BRYAN
|
|
Your best bet is not to walk on it! ...even if the floor IS super clean!
|
|
SHARRON EPPS
|
|
Well, there you go, Our floors at shops can't ever be clean enough. and stopping long enough to clean a spot, then get your set up done, then photograph, can take at least 30-40 minutes, and Bill is rolling out of
driveway, w/paint still drying most of the time.:)
|
|
TOM STOVALL
|
|
Miz Sharon, skylighting something is using the sky for a background. I do it with my screens and weathervanes because it's such a "natural" setting and I work a lot with silhouettes. Amen Sister Epps. Glenn, Slim is a freelance pro, so I get the dubious benefit of her not-so-gentle instruction when I screw up the lighting on something.
|
|