Souvenir Horse Shoe AND Belt Buckle
Demonstration by Jock Dempsey.
http://www.anvilfire.com
September 15, 1999
guru : |
Tonight's demo will be a (yea we DON'T make horse shoes!) Souvenir Horse Shoe AND Belt Buckle. I thought this would round out our horseshoe collection. So far we have two sculptures made from shoes and an ACTUAL shoe. This one is for the kids. | |||
guru : |
First, I want you to know that I AM NOT a farrier but have spent 100's of hours doing demos for the public. The public has a short attention span and will NOT watch you for more than 5 minutes. The other thing is that the public THINKS all we make is horse shoes. So why disappoint them. |
|
||
guru : |
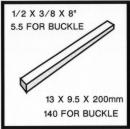
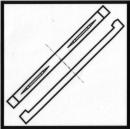
This shoe is made from a piece of 1/2 x 3/8 x 8-10" mild steel. |
|
||
guru : |
You can use a shorter piece to make a belt buckle. | |||
guru : |
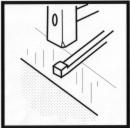
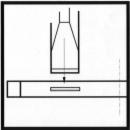
Heat an end and bend about an inch then upset to form a heal. |
|
|
|
guru : |
Do the same to both ends. This looks simple but is harder than it looks and is good forging practice. |
|
||
guru : |
Now you have an option. You can make a plain shoe or one a little more decorative. | |||
guru : |
|
|||
guru : |
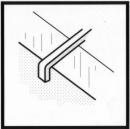
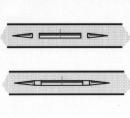
I use a 1" cold chisel to make a short square ended crease. | |||
guru : |
Then I take the same chisel and make two fading creases about 1/4" from the ends of the first. |
|
||
guru : |
Afterwards a sharp chisel is used to make connecting cuts. These give the appearance of nails. This chisel can be rolled a little at the ends to make the "nail" look like a separate piece. The creasing is done hot but this step is done cold. |
|
||
guru : |
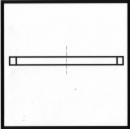
When done with both ends the straight "shoe" should look like this. |
|
||
guru : |
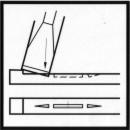
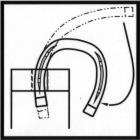
The last step is to bend the shoe. A good long even heat makes it easier. I bend the shoe in the hardy hole while gripping the bar at the far end with tongs. Adjust afterwards on the horn. |
|
||
guru : |
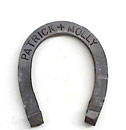
Note the gap in the creasing at the toe. This is so you can stamp initials on the shoe. People will watch you make a shoe, but they will BUY one with their kids name or initials. | |||
guru : |
I use 1/4" metal stamps on this size shoe. |
|
||
guru : |
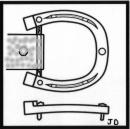
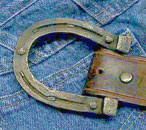
This "decorative" shoe is also good for making belt buckles. |
|
||
guru : |
The buckle is made using a shorter piece of stock. The cross bar and "hook" is made of 3/16" round. The "hook" pin has a shoulder filed on it and then is riveted in place. | |||
guru : |
Questions. . . |
|||
vince : |
do you still use the 1/2 x 3/8 stock? | |||
guru : |
Thanks, I'll have photos to post with the demo on the iForge page next week. I know this is not REAL exciting but I've made a ton of these things. . . Yes, I use the rectangular stock. Its only available in cold drawn. | |||
Ntech : |
What is the selling price? | |||
guru : |
$$$ You don't want to know how cheap I was making them. . . Today I'd ask at LEAST $5 :) | |||
guru : |
$15 anyone? $10? ? ? ? | |||
Tedd-Harris : |
How much for the buckles? | I made 15 of these as a special order for a customer. The one pictured is serial #1 of 15. It has some flaws as it was the first trial. The rest were much cleaner. It was too long ago for the price to have relevance | ||
tom : |
we used to make a small shoe at demos for a buck , I know we made hundreds of them over a six year period | |||
tom : |
used round 3/8 or 1/4 rod (makes them come out real slick and they look better than square stock | |||
guru : |
I was selling them plain without the crease for $2. BUT, they HAD to watch me make them if they wanted one with their initials on it. Otherwise you'd get so back logged you couldn't keep up. | |||
guru : |
One weekend at a buy show I thought I was RICH. Had a pocket STUFFED with bills! Counted them after the show. . . Had all of $98! Yep, I forged a little set to go with an "apple head" doll out of 1/16" rod! | |||
Bobby Hart: |
How is the rivet, that goes in the belt hole, "fastened" on the belt buckle | |||
guru : |
A 3/16" hole was drilled. A piece of 3/16" rod was put in the hole and clamped in the vise to support it for riveting. When the head was upset cold the shank supported in the vise also expanded a little. Afterwards the extra 3/16" rod was cut off and a very slight bend and curve was put in the pin to make it hold better. Then the pin was dressed with a file to round the end and give it a little taper. | |||
iForge is an Andrew Hooper Production
Copyright © 1999, 2002 Jock Dempsey
HTML Copyright ©
1999 Jock Dempsey, www.anvilfire.com
Webmaster email: webmaster@anvilfire.com