| |
 |
|
|
|
-GURU
|
|
Tonight's demo is a short one on hinge basics. part 2 will be hinge benders and fixtures.
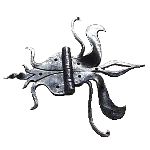
The illustration above is a hinge by Tom Boone shown in Volume 17 - Page 12 of the anvilfire NEWS.
|
|
-GURU
|
|
In this session we will look at basic hinge types and then some self closing geometry.
|
|
|

Figure 1 |
The standard traditional American hinge is wrapped from the back and welded. These are used for everything from big barn door strap hinges to little 1/32" (1mm) thick box hinges.
|
|
|
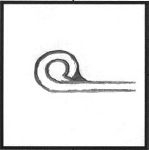
Figure 2 |
An alternative to forge welding is arc welding. This requires carefull dressing not to look obviously welded.
|
|
|
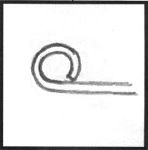
Figure 3 |
Many light duty hinges are just wrapped. These can be made in a bender or a press. We will cover the methods next week.
|
|
|

Figure 4 |
In Europe it is common NOT to weld hinges. Heavy hinges have the gap on the back where it doesn't show. Most smith made hinges are so much stronger than necessary that welding is not really needed. The hinge at the top by Tom Boone is made this way.
|
|
|
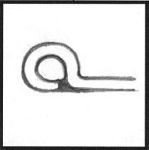
Figure 5 |
Alternatively you can arc or forge weld this type too. Some smiths prefer this style (with preparation like #1) for forge welding because the weld is on the back.
|
|
|
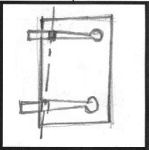
Figure 6 |
Doors can be made self closing by offsetting the top hinge outward. This illustration is exagerated but about 1/4" works well. A set of hinges can be made with the angle in the joint and the pivot offset so that they appear straight.
|
|
|
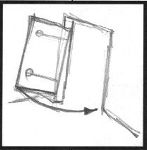
Figure 7 |
Again the illustration is exagerated. What happens is the door swings uphill when opened. Gravity will cause it to close. The lifting of the door also helps it clear the sill but the top of the frame must also be fitted with extra clearance. Be sure you and the carpenter both understand the logic. If special hinges are made they need to be marked TOP and BOTTOM (or middle). I provide an installation drawing for specials like this.
|
|
|
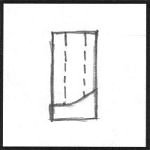
Figure 8 |
Simple pintle hinges can be made to be self closing. The bottom of the pintle must be shaped before before welding in the pin. It gets a little tricky.
|
|
|
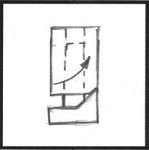
Figure 9 |
Here the hinge is rotated and the door lifts. Gravity does the job again. Be sure to keep this type lubed.
|
|
|

Figure 10 |
Fireplace cranes are "sort-of" a type of hinge.
They can also be made self returning (so they don't swing OUT of the fireplace on their own.
Note the installation method.
The long tennon at the top allows the crane to be lifted ot of the bottom pivot and then removed (or installed).
Again an installation drawing is a good idea.
|
|
|
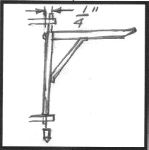
Figure 11 |
To make the crane "self returning"
The top pivot needs to be set toward the center line of the fireplace.
The mason needs to use a plum-bob and offset the top about 1/4".
Be sure he understands the spacing. I test the parts and give the mason as wide a tolerance as possible.
|
|
|
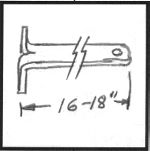
Figure 12 |
The above geometry can be built into a single bracket but heavy cranes need the anchors set deep into the fireplace. The one to the left is a typical style. These can be provided to the mason well in advance of making the crane.
|
|
-GURU
|
|
Questions? Comments?
|
|
Steve C
|
|
I always see these huge hinges.. do they normally make the hinge and forge weld the other parts to them?
|
|
sleepingbear
|
|
Great demo, how'd you know I was thinking about building hinges?
|
|
Leah
|
|
By leaning the top of the fireplace crane towards the center of the fireplace, are you changing the center of gravity?
|
|
-GURU
|
|
Steve, They are normally made in one piece (each) and the pin put in last if they are not hung on a pintle.
|
|
Ntech
|
|
1/4" offset for a full size door and 1/4" offset for fireplace crane. Is the distance between hinges a factor?
|
|
-GURU
|
|
Leah, NO, but the center of gravity is not swinging "level" it move up hill when the crane (or door) is moved off the installed axis. Because it is uphill it wants to go back to where it started.
|
|
-GURU
|
|
The amount of offset can vary. This just happens to be a convienient amount. It takes some effort for the system to overcome friction, otherwise less would do. With goos brass hinges or heavy hinges with ball thrust bearings (like on a gate) less will do.
|
|
Jerry
|
|
Thanks Jock, hinges have been a time consuming order for a long time. I love doing them but I can't make any profit with them.
|
|
-GURU
|
|
Center of Gravity, Leah, actually YES. It is lower at the installed position than it would be if hung level. Had to think about that one!
|
|
Steve C
|
|
Is there a rule of thumb on how big a hinge pin should be? How much weight can each one hold?
|
|
-GURU
|
|
Jerry, hinges are like everything else we make. You either have to make real fancy ones and charge a LOT or make simple ones in high production.
Steve, Most smith made hinges are larger than standard size hinges and are not a problem.
If you are making a large gate then the pin needs to be stressed no more than 9,000 psi in shear.
Stress = Load / Cross sectional area of pin
When designing gates remember that there is a multiplier due to the width of the gate AND that someone might put their weight on the end of the gate.
|
|
Mills
|
|
I am curious as to the best way to roll the eye so that the hinge lays flat.
|
|
-GURU
|
|
Mills, I'll cover benders next week, but in strap hinges I put in a drift and then FLATTEN it!
|
|