| |
 |
|
|
|
-GURU
|
|
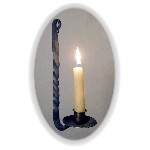
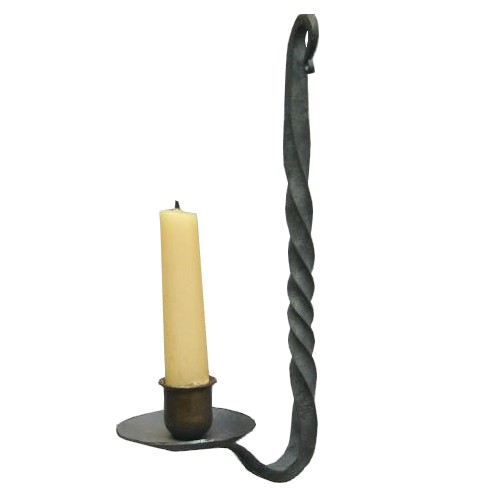
Tonight's demo is a simple scounce that I came up with for a Boy Scout merit badge project. It meets all the requirements for a forging project including a riveted joint.
Only basic smithing tools are needed, hammer, anvil, forge, tongs and a punch or drill.
|
|
|
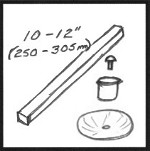
Figure 1 |
Materials required are:
(1) 7/16" or 1/2" (11 - 13mm) square bar 10 to 12" (250 to 300mm) long.
(1) 3" (76mm) diameter drip pan
(1) candle cup
(1) 3/16 x 1/2" (5mm x 12mm) round head rivet.
|
|
|

Figure 2 |
Forge a long point on one end of the bar.
Flatten the bar a little one direction then rotate the bar 90° and work it that direction and so on until you have a point. The taper needs to be about 2" (50mm) long.
|
|
|
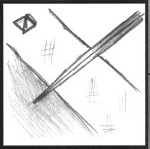
Figure 3 |
Long tapered point.
|
|
|
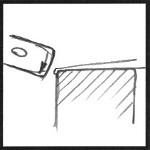
Figure 4 |
Start the end scroll by supporting the slightest bit off the edge of the anvil and giving it a gentle brushing blow.
|
|
|
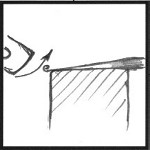
Figure 5 |
Flip the end over and with similar upward brushing blows scroll the end toward you.
|
|
|
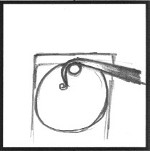
Figure 6 |
Bend the end downward over the horn of the anvil.
|
|
|
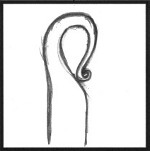
Figure 7 |
The finished rat tailed scroll should look like this.
|
|
|
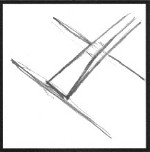
Figure 8 |
Now flatten a long taper (about 3" - 75mm) on the other end of the bar. Thin the end out to about 1/16" thickness (1.6mm).
|
|
|
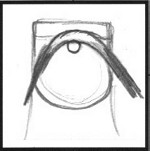
Figure 9 |
Bend a gentle 90° curve in the bar about 4" (100mm) from the end.
|
|
|
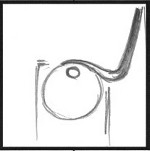
Figure 10 |
That should have been a little more than a 90° bend.
Now curve the far end just past perpendicular to the vertical part.
|
|
|
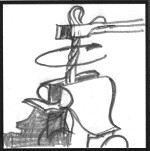
Figure 11 |
Take a good long heat in the middle, clamp in the vise and twist 180° or more if needed to orient the bottom "arm" 90° to the hole formed by the rat tail scroll.
|
|
|
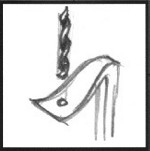
Figure 12 |
Drill or punch a hole to fit the rivet at the high point of the reverse curve in the arm.
|
|
|
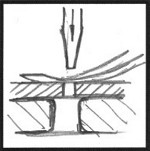
Figure 13 |
To punch the small hole you will need a "punch plate" to put over the hardy or pritichel hole as they are too big. The hole in the punch plate should be about one size bigger than the punch.
Punch or drill matching holes in the drip pan and candle cup if needed.
|
|
|
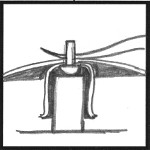
Figure 14 |
Assemble candle cup, drip pan and arm and support on a short piece of round bar as shown.
|
|
|
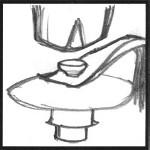
Figure 15 |
Start the rivet with one heavy blow. Small rivets like these can be set cold and it is much easier.
|
|
|
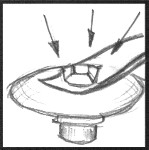
Figure 16 |
Then finish the rivet with four blows to make a pyramid and a last one to tighten.
|
|
|

Figure 17 |
Two views of the finished sconce.
|
|
|

Figure 18
Click for detail |
Sample made from the demo by Glenn Conner AKA "NTECH"
Blackstone Forge
|
|
-GURU
|
|
NOTE: The drip pans and candle cups can be ordered from numerous blacksmiths suppliers for a few dollars.
Questions? Comments?
We previously did a series on candle sticks. Now would be a good time for those of you that have unique sconce designes to do a demo (hint hint).
|
|
Brogan
|
|
Nice Demo... easy and straight forward! Thanks!
|
|
mike-hr
|
|
Is the rivet backer round rod dimpled, or flat?
|
|
-GURU
|
|
Mike the rivit support can be either. Flat works easier and doesn't have to fit the rivet.
|
|
Ntech
|
|
Very nice projects for scouts. Thanks !
|
|
Ntech
|
|
Is the hanging hole off center to the twist and in line with the wall ?
|
|
-GURU
|
|
Yes, it should be flush to the wall.
I had a scout make one of these and it turned out very nice but I failed to get a photo of it. . . :(
|
|
Ntech
|
|
About what size if the hanging hole when finished ?
|
|
-GURU
|
|
About 3/8 inch wide (9-10mm). It should fit over a good sized nail head.
|
|
Ntech
|
|
Then just enough to fit over a nail head. Looked larger.
|
|
mike-hr
|
|
Does the BSA have smithing in their merit manual? does this satisfy the reqs?
|
|
-GURU
|
|
The new metalworking merit badge is much more in depth than the old one. After a series of general projects they can select from sheet metal, casting or forging and do two projects. This meets the final project requirements for forging. There are also some excersizes the boy must complete.
|
|