| |
 |
|
|
|
-GURU
|
|
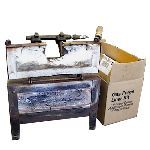
This past weekend Paw-Paw, Jojo Rotenberry and I refurbished our three NC-TOOL forges using
ITC-213, ITC-100 HT and Kaowool as well as a complete reline kit on one forge.
Although all three of these forges are NC-TOOL brand the techniques apply to other brands of similar construction.
This was a first time for all of us, we learned a lot and thought we would share it with you.
Jojo's forge shown above had been well used and abused.
Jojo is a farrier and among other things he had melted lead, brazed and forge welded in his forge.
It had been run very hot with a failed door lining and the upper part of the case was sagging and burnt.
We considered repairing the soft Kaowool lining of this forge but the floor was pretty far gone and Jojo had already purchased a reline kit from NC-TOOL.
Paw-paw and my forges had not seen much use but there was already some poking damage, burnt doors and some rust.
These two just got a little patching done to the Kaowool, the oxidized doors and rusted frames coated with ITC-213 and the interiors coated with ITC-100 to increase their life and improve the forges' efficiency.
High temperature black paint was used to touch up all three forges to prevent rust and extend their life.
|
|
-GURU
|
|
Tools and Supplies needed
- 9/16 and 1/2" Wrenches to remove burners.
- 5/16" nut driver, or socket and ratchet, or electric screwdriver.
- Electric Drill and 3/16" masonary bit.
- Wide blade putty knife
- Utility or pocket knife
- Wire brush to remove rust.
- 14" Cabinette or C clamps
- 24" Cabinette (pipe bar clamps)
- 3/8" Paint brush
- 1" Paint Brush
- Tools for straightening forge shell
- Hammer
- Torch
- Bucking blocks
Supplies:
- Coarse sand paper or cloth to remove rust.
- Forge Reliner Kit
- ITC-100 HT
- ITC-213 (to coat/prime metal)
- ITC-148 (if floor needs repair)
- Scrap Kaowool cereblanket
- High temperature black paint
- bleach/water cleaning solution
- Spray bottle and water.
- Vacuum cleaner.
|
|
-GURU
|
|
THINNING ITC-100:
Before starting a large project it is best to thin the ITC-100 and let it set for several hours or overnight.
The entire 1 pint container was put into another larger container.
I used a plastic Ragu sauce jar.
A plastic ice creme scoop worked perfectly for scooping out the dense ITC-100.
Add a 1/2 pint of water to the ITC-100.
Mix, then cap and shake. Apply with a brush or spray with HD spray gun (large areas - a textured ceiling gun is recommended).
Store in sealed container.
Jars with broken or dirty seals can be stored in zip-lock plastic bags to prevent losing moisture.
|
|
|
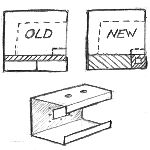
Figure 2
Click for Detail |
The NC-TOOL instructions don't say much, assuming you know how the forge is assembled.
In our case the forge refractory design had changed.
The original floor was 1/2" thick fired refractory that sat on 1" thick high density kaolin boards.
The replacement floor was a 1-1/2" thick block of castable refractory.
The refractory liner slides in and out of the end of the shell as an assembly.
|
|
-GURU
|
|
The first step is to remove the burners and the door.
Loosen the manifold clamping screws on one end before removing the hold down bolts and pulling the burners out.
Straighten the cotter pin and remove the hinge pin and door.
|
|
-GURU
|
|
If the forge has back doors or ports remove the screws holding the cast door frames in place and remove the frames.
On a back door unit like the one we rebuilt you cannot remove the lining without removing the back port and door.
|
|
|
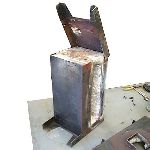
Figure 3
Click for Detail |
Remove the body screws and the end plates come off as shown. The lining is supposed to slide out. However, rust, case warpage and refractory warpage makes it very tight and it takes some work with putty knives, screw drivers and such to free up the insulation.
In this case some melted lead had run down into the the little space at the back of the floor and jamed things up pretty good.
|
|
|
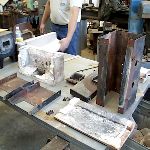
Figure 4
Click for Detail |
Here the forge is completely disassembled and the parts laid out.
|
|
|
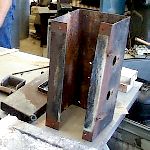
Figure 5
Click for Detail |
The shell had a lot of rust and the top front edge had been burned and was sagging.
Heat had also distorted the back around the rear port.
When we straightened the sagging top it caused the front to buckle.
It had to be heated and tapped down to upset and straighten the front.
The back also had a buckle in it. We clamped a heavy steel bar to the back and heated the buckled place and drove it down too.
|
|
-GURU
|
|
This helped the twist in the shell but did not fix it.
We just had to fight the twist on reassembly.
|
|
|
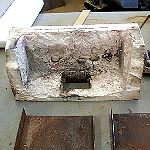
Figure 6
Click for Detail |
As bad as this liner looks it COULD have been repaired with some scraps of kaowool and some ITC-100 as glue.
Notice the broken up loose insulation. DO NOT blow the loose stuff out with air.
Kaowool is a possible carcinogen if enhaled or can cause silicosis. It is an irritant like fiberglass and will make skin itch.
If you have lots of loose refractory material brush it out carefully with a brush or use a vacuum cleaner.
If using a vacuum a HEPA filter type is recommended.
|
|
|
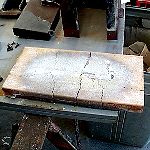
Figure 7
Click for Detail |
This is the bottom side of the floor refractory.
Although it looked bad from the top you could not see the cracks.
Melted scale welded to the top surface is all that was holding these pieces together.
Since the reline kit had been purchased it was decided to go ahead and do a complete reline.
|
|
|
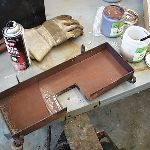
Figure 8
Click for Detail |
After removing the kaowool door insulation and screws that retain the insulation the rust was wire brushed off and the inside of the door given a coat of ITC-213.
In this case it is hard to tell the rust from the ITC-213 because they are identical in color.
After the ITC-213 had dried it was cooked on with a propane torch.
All it takes is enough heat that you do not want to touch it.
This cures the ITC-213 enough that that ITC-100 can be used over it to glue in the Kaowool.
|
|
-GURU
|
|
The kaowool is not glued in from the factory and generaly it is not a problem.
This forge is hauled around in the back of a pickup truck so things tend to come loose.
Glueing in the kaowool was just a little extra.
The ITC-213 should help prevent the door from rusting inside.
|
|
|
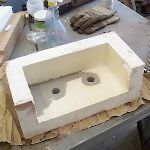
Figure 9
Click for Detail |
The upper forge liner is formed kaolin refractory similar to kaowool but it is higher density for strength.
Here we are beginning the coating with ITC-100.
This seals the refractory so that it does not produce airborne dust in use and also gives it a slightly more damage resistant skin.
|
|
|
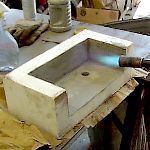
Figure 10
Click for Detail |
The first coat of ITC-100 was cured with a big propane torch (a forge burner). A small torch would work as well.
After curing the first coat, a second coat can be applied.
All the ITC-100 was applied with paint brushes.
|
|
|
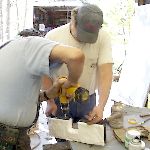
Figure 11
Click for Detail |
Here Paw-Paw and Jojo are installing the screws into the door that retain the kaowool.
The NC-TOOL reline kit came with a complete set of new screws.
Many rust out and on this door a number had been burned up due to missing kaowool.
|
|
-GURU
|
|
Missing is a set of photos of us putting the liner in the shell.
It took all hands to pry open the warped shell and pack the refractory in.
Clamps boards and judicious use of a hammer were required.
I suspect the fit is very tight at the factory but it is much worse when the shell is warped with a twist.
|
|
|
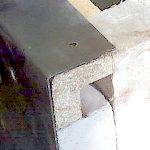
Figure 12
Click for Detail |
After installing the refractory we realized the the new design required drilling clearance holes in the hard refractory.
In the original design the sheet metal screws (see hole) penetrated into soft kaolin board or air space.
Now they go into solid refractory.
|
|
|
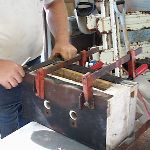
Figure 13
Click for Detail |
After getting the refractory installed the shell had to be clamped to hold it straight while holes were drilled and for assembly.
This job would be nearly impossible (or VERY frustrating) without the big clamps we used.
|
|
|
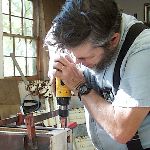
Figure 14
Click for Detail |
Here Paw-Paw is drilling a hole in the refractory.
This takes a small masonary bit that won't oversize the hole in the sheet metal.
|
|
|
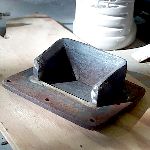
Figure 15
Click for Detail |
The port/door frames get fairly well oxidized.
This one had much of the surrounding kaowool missing and the bottom edge had cracked and expanded.
Corners had to be ground off so that it would fit into the forge.
The door above and the ends of the burners were coated with ITC-213 to protect them from heat and rust.
The forge shell was painted inside with some high temperature black paint.
We were short on paint and could have done a better job.
Don't forget to get paint before starting this job.
|
|
|
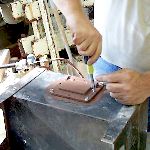
Figure 16
Click for Detail |
NC-TOOL's reline kits fit all series of one model forge.
They do not come with port cutouts.
These must be cut after the forge is partialy assembled.
More ITC-100 was applied to repair our mess. . .
Here the back port/door is being installed.
|
|
|
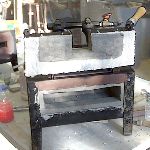
Figure 17
Click for Detail |
The completed job.
The interior liner pieces had been coated with ITC-100 before assembly and they were coated again after assembly.
The front door is coated with ITC-100 but NOT on the sealing surface.
The soft Kaowool blanket is used on the door to produce a gasket and it needs to remain pliable.
The ITC coating on the door will need to be touched up from time time to time.
So will the coating on the rest of the liner.
By occasionaly patching up the ITC-100 surface the life of the liner should be greatly increased.
|
|
|
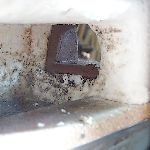
Figure 18
Click for Detail |
Paw-Paws forge had seen much less use but it had typical "picking" damage from long bars being put in through the end ports.
My Whisper baby has the same problem under the back port.
First the bare metal surfaces of the end port frames were coated with ITC-213 using a small (3/8") artists brush.
|
|
-GURU
|
|
Then the loose kaowool was brushed out (this is a good time to use a vacuum cleaner).
A coat of ITC-100 applied to the damaged area using the small 3/8" brush.
A ball of kaowool torn off some scrap was stuffed in the hole under the port shelf while the ITC-100 was still wet.
Then ITC-100 was applied over the patch to hold it in place.
|
|
|
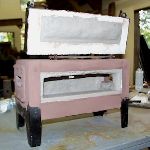
Figure 19
Click for Detail |
The interior of the forge was moistened with a spritz of water from an old Windex bottle
and then the entire interior was coated with ITC-100 and the non-gasket surface of the door.
Some black high temperature paint will finish the job.
After firing to a good full heat another coat of ITC-100 can be applied to make a more durable surface.
|
|
|
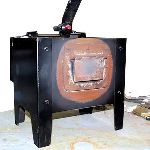
Figure 20
Click for Detail |
My little Whisper Baby's most noticable need was the rust around the rear port. The loose rust and scale was removed with a wire brush and ITC-213 applied.
Then ITC-100 was applied to the entire interior using a brush. The long handled artist's brush works well to get into tight corners and behind the front "hearth" ledge working through the back port.
|
|
|
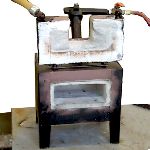
Figure 21
Click for Detail |
The finished Whisper Baby.
Immediately on firing some scale popped off the rear port and door.
After the forge cooled I touched it up.
Once the ITC-213 is fired onto the metal parts they can be coated with ITC-100 for better reflectance, reducing oxidation.
|
|
-GURU
|
|
It took us about 5 to 6 hours to rebuild one forge and apply maintainance coats of ITC products to two others.
One pint of ITC-100 thined with a 1/2 pint of water was sufficient for all the above. Much less than 1oz of ITC-213 was required for all the above.
After drying over night when these forges were fired up there was a LOT of water driven out or condensing and running out. So much steam came out that the Whisper Baby would not burn properly until the forge was dried.
Jojo reported that his forge is operating much better and on much less fuel.
Paw-Paw reports that his seems to runs hotter and heat faster.
My Whisper Baby sounds different than it did before. It is hard to tell if there was an improvement in this small forge.
But the life of its liner has been extended considerably.
The reline kit for these forges is about 1/4 the cost of the new forge and will last 3 to 5 years under heavy use. Perhaps longer with some upkeep using ITC-100.
On large four burner forges there is a problem with the ceiling weakening and sagging. I recommend screws with fender washers set half way through the kaolin insulation and the hole reinforced with ITC-100 and then filled with kaowool and then sealed with ITC-100. This will support the insulation when it gets hot.
In the future we may be offering patch kits including, kaowool, stainless screws, washers and instructions.
|
|
-GURU
|
|
Comments, Questions?
|
|
Bryan
|
|
What is the function of the ITC-100, and the ITC-213?
|
|
Brogan
|
|
Greaat demo. I learned alot.
|
|
-GURU
|
|
The ITC-100 seals the surface of the Kaowool preventing the spread of dust.
There is some concern about inhaling Kaowool dust and it being a possible carcinogen.
Kaowool Product Safety Label
The ITC-100 also makes a more durable surface AND it is a better IR reflector than other ceramics.
So the forge should be more efficient.
The ITC-213 is high temperature protectant for metal.
It is thinner and finer than the ITC-100 and sticks well to metal. It reduces the oxidation of esposed metal in the forge as well as reducing rust on part that get too hot to keep paint on them. It is also used as a primer for gluing kaowool to metal surfaces.
|
|
-GURU
|
|
On several small furnaces I've used ITC-213 and ITC-100 as the only thing to hold kaowool in place. It works quite well.
|
|
Bryan
|
|
Thanks!!! Great demo! Makes me want to upgrade my gasser to a better design!
|
|