| |
 |
 |
 |
 |
JOCK D -
|
 |
Hugh McDonald is best known as the inventer of the McDonald Rolling Mill.
Hugh also forges a wonderful series of animal heads.
His kangaroo heads are shown at the end of our review of his plans for his Rolling Mill.
This is Hugh's third iForge demo.
Due to the time difference and a slow old computer Hugh has asked me to present his demo.
|
 |
HUGH M
|
 |
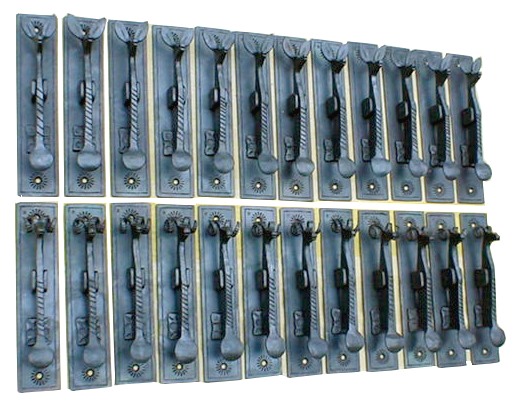
The human leg door knocker is an intresting project on several counts.
The design this one is based on is fifteenth century French.
Hardly anyone who sees it can can resist tweaking its toes and rapping its heel.
There are at least three methods of making the foot end and the plan to work from is no further away than the end of your leg.
|
 |
 |

Figure 1 |
The most logical (and the most difficult) method is to put 1" (25mm) of 1/2" (13mm) square bar over the far edge of the anvil and make a right angle bend. However, if you have your shoe and sock off now you will see a solid piece of your heel extends behind the line of your leg. You will have to work the metal back the way old smiths made those sharp bends with a good inside radius before you can start to shape the foot.
|
 |
 |

Figure 2 |
The second method is to put 1" (25mm) of the 1/2" (13mm) square bar over the front (near) edge of the anvil and drive it down about half way.
|
 |
 |
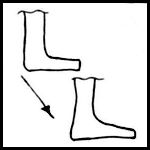
Figure 3 |
Forge this tongue forward. The sideways spread of this projection will give you a good start for the wider part of the foot. Bend it forward and square up as shown.
|
 |
 |
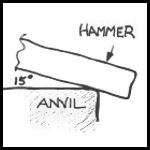
Figure 4 |
The third is my prefered method after making these knockers for about ten years.
Put about 1" (25mm) of 1" x 5/16" (25 x 8mm) of flat bar on edge over the for side of the anvil, holding it at about 15 degrees and drive it down about half way taking care not to hit the heel down too far.
|
 |
 |
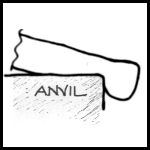
Figure 5 |
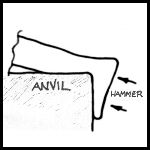
Figure 6 |
 |
 |
HUGH M
- jdd
|
 |
Now hammer the bottom of the foot against the side of the anvil on the same heat and at the same setting (position), dressing the sides occasionaly.
|
 |
HUGH M
- jdd
|
 |
Remember the foot is thicker on the big toe side.
|
 |
 |
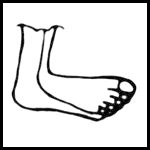
Figure 7 |
In all three methods round the lower leg as you revolve the piece over the far edge of the anvil, again taking care not to hit the heel. Chop the extra material off the foot at the appropriate angle, right or left as you fancy.
Give the leg a slight bend at the knee. Four chisel cuts (cold), delineate the toes and the toe nails ar punvhed (also cold) using a round flat faced punch with sharp edges; 5/16 (8mm) diameter for the big toe and 3/16 (4mm) for the others. Soften all the edges and tidy the toes with a triangular file before wire brushing.
|
 |
HUGH M
- jdd
|
 |
Originally I made only what my Swedish friend called "left hand feet", but now they seem to decide for themselves to be right or left. I recommend the second method to start with. All the work except decorating the toes is done at a high heat but be careful not to burn the thin parts.
|
 |
 |
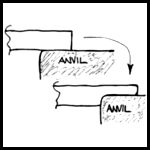
Figure 8 |

Figure 9 |
 |
 |
HUGH M
- jdd
|
 |
The top pivot end offers choices too. Punch or drill the clearance hole for the rivet or flatten the end and roll it up round a suitable piece of rod. See figures 8 and 9 above.
|
 |
 |
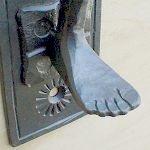
Figure 10 |
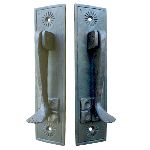
Figure 11 |
 |
 |
HUGH M
- jdd
|
 |
As with all door knockers, make sure the knocker hangs back against the anvil block by gravity otherwise the wind will make it swing and drive the houseowner nuts.
|
 |
HUGH M
- jdd
|
 |
Materials: The back plate is 2" x 1/8" (50 x 3mm) with a chisle cut border (cold), and hot punched screw hole decorations. The punch for this is made from half a VW rear torsion bar cut square with a cut off wheel without overheating it. The design is easily filed into the end and no heat treatment is necessary. It has punched hundreds of these patterns without showing any sign of wear. The pivot bracket is folded from 1" x 1/8" (25 x 3mm) and riveted on (using holes countersunk from the back). The anvil (striking) block is made of 1" x 3/16" (25 x 4mm) and also riveted onto the back plate.
Hugh McDonald. 30th Dec 2001
|
 |
JOCK D
|
 |
Questions? Comments?
|
 |
Dave L
|
 |
Thanks Hugh and Jock
|
 |
Gator
|
 |
Very cool piece...suggested finish?
|
 |
Pete F
|
 |
Yeah!! great timing for me, thanks!
|
 |
Rodriguez
|
 |
The strike plate, is it just a square piece decorated cold? How is it attached by rivet? Is the rivet hidden by he heel?
|
 |
Darkstar
|
 |
Nice demo, thank you.
|
 |
big dan
|
 |
What is the estimated time to do this?
|
 |
PF
|
 |
Somehow,iron toes are always funny
|
 |
JOCK D
|
 |
Clean and paint as usual for out door items. A coat of cold galvanizing primer is a good start. As a knocker it will always have some bare spots that will rust. The zinc will slow that down.
|
 |
Ntech
|
 |
Hugh has some great ideas. Thanks
|
 |
JOCK D
|
 |
Hugh's strike plate or "anvil" has a countersunk hole in the front and the base plate is countersunk fron the back and the rivets are flush.
|
 |
Rodriguez
|
 |
How tall is the back plate?
|
 |
JOCK D
|
 |
Not sure on time. Hugh has lots of practice as this is a regular item he makes and his time will be much less than yours or mine. I suspect the leg is forged and finished in about 5 minutes since he does it in one heat. The rest of the parts probably take much longer.
|
 |
MIKE-HR
|
 |
I guess if you burn the toes off you could round it up a little and call it the human spleen door knocker
|
 |
PF
|
 |
1 heat!!! awwwk!
|
 |
JOCK D
|
 |
Height is 9" to 10" judging from the proportions.
|
 |
JOCK D
|
 |
Depending on your skill and time with a file it could be a sexy womans leg (hose and garters) or a hairy ogres leg. .
|
 |
Milt
|
 |
Thanks Guru --- it would look neat on someone's beachside door
|
 |
Rodriguez
|
 |
...and installed with what kind of screws? Those beveled flush mount screws? Plated?
|
 |
PF
|
 |
Rodriguez....my advice is to do each one differently.
|
 |
JOCK D
|
 |
Rodriguez, This one has countersunk holes for flat head screws but you could use plain holes and decorative pyramid head screw. Click the image at the top for a better view.
|
 |
Rodriguez
|
 |
Groovy, thanks. Cool stuff.
|
 |
JOCK D
|
 |
ADDITIONS:
These are some additions to Hugh's demo covering details resulting from the above questions.
|
 |
 |

Figure 12 |
The strike plate or anvil is a decorated piece similar to a rosett. Hugh has used a classic design forging the piece to a low pyramidal shape then using a chisel to incise the work and a flat ended pin punch to make the flat circular decorations. There are lots of variations you can apply to this piece to make it your own.
|
 |
 |

Figure 13 |
The anvil is attached by drilling or punching a rivet hole and countersinking it from the top of the anvil and the back of the plate.
A plain piece of round rod can be used or commercial rivets if you have them.
|
 |
 |

Figure 14 |
Here a common round head rivet is being used. The head forming into the countersink. You could also use a large decorative rivet for the entire part OR with the anvil.
Another option is to use a flathead screw from the back and rivet the top. This is not the best method but it works.
|
 |
 |
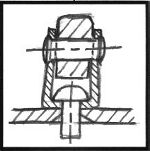
Figure 15 |
The pivot is atached the same way but the rivet head can protrude up between the sides of the bracket. The pivot pin is also headed into shallow countersinks in the thin bracket material
|
 |
 |
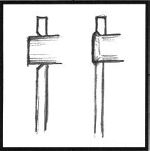
Figure 16 |
Hugh uses a low head that is almost flush to the sides of the bracket. Again, this could be a fully headed round, pyramid or decorative rivet depending on your own style and how fancy you want to make the whole design. See our iForge demo on riveting for more ideas and details.
|
 |
 |
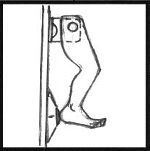
Figure 17 |
Even you when follow someone else's plan you should strive for your own style or try to make the design your own.
The leg in this knocker can be as stylized or a realistic as you want. It could have a boot, shoes other embelishment. You can file or finish is smoothly or keep a rough hammered look. You could also make it of brass or stainless steel. Use your imagination.
|
 |


