
| Paw-Paw :
20:38:13 |
 |
|
| Paw-Paw :
20:39:59 |
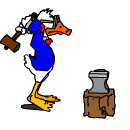
Let's take a look at Dippy. First of all, unlike some folks, he is wearing his safety glasses. His weight is nicely balanced on his toes, and counter balanced by the weight of the hammer. HOWEVER, when he swings the hammer forward in front of his body, he is going to over balance, and bust his beak on the bick. This will not be a good thing! | |
| Paw-Paw :
20:41:48 |
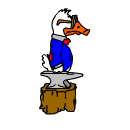
There is a reason why certain phrases become cliches. There is also a reason why some things become known as conventions. Notice the height of the anvil compared to Dippy. His curled knuckles are just resting on the face of the anvil. Why is this? |
 |
| Paw-Paw :
20:43:36 |
Here the anvil is mounted too high. Notice that the heel of the hammer is below the face of the anvil. So is Dippy's hand! He's not going to be able to hit the work squarely, and he's headed for a case of Carpal Tunnel Syndrome. |
 |
| Paw-Paw :
20:45:52 |
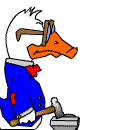
Now the Anvil is mounted too low. The toe of Dippy's hammer is on the face of the anvil. Again, he is not going to be able to hit the work squarely, and again his wrist is in a strain. More Carpal Tunnel Syndrome coming up. |
 |
| Paw-Paw :
20:47:33 |
At last! Now the anvil is mounted where it was in the first picture. The hammer is flat on the face of the anvil, and there is no strain on Dippy's wrist. That's the reason for the convention. Lets look at the correct setting of the anvil with relation to Dippy one more time before we go on. |
 |
| Paw-Paw :
20:47:44 |
 |
|
| Paw-Paw :
20:49:29 |
Now, no one knows any better than I do that as we get older, our eyes change. So on one end of my anvil, I have a place where I can step down a couple of inches. So when I need to get a little closer to the work to see what I'm doing, I can do so. | |
| Paw-Paw :
20:51:22 |
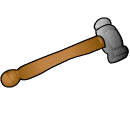
Here is a digitized drawing of a hammer that I favor. I've got one hammer with this handle, and I'm making more handles as I have time. One of the most serious mistakes many beginning blacksmiths make is squeezing the hammer handle too hard. They're afraid that it'll slip out of their hand. |
 |
| Paw-Paw :
20:52:35 |
With this handle, you can allow your hand to slip back to the knob on the back. That gives you a longer handle, and more impact with each stroke. OR, you can allow your hand to slip up closer to the hammer head and strike a little more accurately! | |
| Paw-Paw :
20:53:32 |
 |
 |
| Paw-Paw :
20:55:50 |
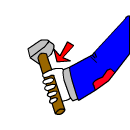
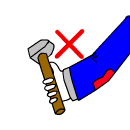
Notice in the first picture that Dippy's thumb is wrapped around the hammer handle. But in the second, his thumb is on top of the hammer handle. This is a very common mistake, and it WILL hurt you. Yes, you can strike a little more accurately this way, but look what is happening. | |
| flatthumb :
20:56:39 |
Yup, learned the hard way on that one. | |
| Paw-Paw :
20:56:40 |
If you have a hammer handy, or a ruler, or a yard stick, pick it up and hold it the same way that Dippy is holding the hammer in the second picture. |
 |
| Paw-Paw :
20:59:00 |
See how your thumb and wrist make a straight line all the way from the tip of your thumb back to your elbow? There is no place for the shock of the hammer's impact against the work to go! Every bit that doesn't go into the work is going to bounce on the joint of your thumb, wrist, and elbow! Almost instant carpal tunnel syndrome OR Tennis elbow OR both! | |
| Paw-Paw :
20:59:23 |
 |
 |
| Paw-Paw :
21:01:00 |
Look at the first picture again. Now there is a bend at the wrist. So now there is someplace for the shock to go. We buy anvils with a good rebound so they'll give us the hammer back, then we put our thumb on top of the hammer handle (picture 2) and fight the rebound! | |
| Paw-Paw :
21:04:19 |
Pick up a cheap wooden mallet and reshape the head to match your favorite hammer. Get a block of hardwood the same size as the face of your anvil. Buy some modeling clay (some folks call it plasticene). Roll it out till it's half inch thick, cut it into half inch strips and practice hammering. Learn where the best position is for YOUR anvil. What is perfect for me (29 inches off the floor) PROBABLY is not perfect for you! Our arms may not be the same length, we're not likely to be the same height. | |
| Paw-Paw :
21:04:38 |
 |
 |
| Paw-Paw :
21:07:55 |
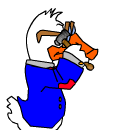
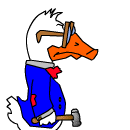
Notice in the first picture that Dippy's hammer head is about even with his eyes, and is along side of his head. NEVER hammer in front of your face. I've come close to cold decking myself a couple of times! When you miss the hot steel (and we all do occasionally) and the hammer rebounds, I'd rather have it brush my ear than my eye, thankyouverymuch! Wouldn't You? | |
| kiwi :
21:18:54 |
If you noticed, Dippy has bent his elbow on the up stroke, and extended it on the down stroke!, It is advisable NOT to lock your arm or shoulder and use just one of the joints, this can also lead to carpal tunnel syndrome . | |
| Paw-Paw :
21:08:05 |
|
|
| J-J :
21:09:44 |
That hole in the floor sounds a bit strange, Paw Paw. | |
| flatthumb :
21:10:24 |
Paw-Paw do you just grind a knob on a standard handle or do you start from scratch? | |
| Ntech :
21:11:31 |
PawPaw, if the force of the hammer generated entirely by the arm and elbow, or is there a snap in the wrist also? | |
| Paw-Paw :
21:11:40 |
Don't have a hole in the floor. Have the anvil mounted higher than the floor. Have a platform between the anvil and the forge! | |
| J-J :
21:12:17 |
I often use EMT conduit with new people. Lay it on the anvil, and let them go. You'll see the hammer marks and offsets very easily. The stuff is soft. | |
| Paw-Paw :
21:13:45 |
Ntech, I try to just let my wrist ride along. It does give some snap, but if you TRY to make it snap, you'll strain the wrist. JJ. Good thought, should work well. Any thing that will show the hammers strike, with out damage to the student, anvil, or hammer. | |
| Bill :
21:14:00 |
/Paw-Paw how do you go about making a short point on the end of a bar | |
| J-J :
21:14:44 |
I don't understand something. thought you said you could step down a couple inches to get a better look at work on the anvil. How you do that without a hole in the floor? | |
| Jock-D :
21:14:54 |
J-J, I like that idea. . . Ntech, the hammer should be held as lightly as possible and given a little snap but not forced. Over time the little snap will become a lot. | |
| Paw-Paw :
21:15:12 |
Bill. I've got a 1/4 radius on both side of my anvil from the table about three inches back. | |
| J-J :
21:16:01 |
EMT hammering was an accidental find....while I was making leg supports for a forge. | |
| Paw-Paw :
21:16:20 |
I strike the bar with a "sliding" stroke from where I want the point to start and let the stroke go toward the end of the bar. The radius is to keep me from chipping the anvil at that point. | |
| Paw-Paw :
21:17:30 |
JJ, my forge and anvil both are on a platform sitting about 3 and a half inches above ground level. At the anvil, I can step down to the ground and gain 3 1/2". Makes sense now? | |
| dimag :
21:18:51 |
Do you let the hammer slip in your hand thru the stroke? | |
| Paw-Paw :
21:21:11 |
Dimag, normally no. I move my hand on the handle between strokes. | |
| R-L :
21:21:59 |
Paw-Paw do you use a farriers rounding hammer? | |
| J-J :
21:22:17 |
Paw Paw, you use a standard length hammer handle? | |
| Paw-Paw :
21:23:13 |
Bill, I've had other folks tell me the same thing, but I can't seem to get the hang of it. I have always used the sliding stroke. May look strange, but works for me. RL, yes, I have two Diamond rounding hammers that I use more than any of the others. JJ, On anything less than a two pound hammer, I like a 16" handle. Preferably hickory, but ash is also a good handle wood. | |
| flatthumb :
21:24:49 |
Paw-Paw do you just carve or grind a knob on a standard handle or do you shape the entire handle from scratch? | |
| kiwi :
21:24:54 |
What type of wood makes a good handle?, something with Flex? or something Hard? | |
| Jock-D :
21:25:00 |
I use ax handling technique. Between close work and heavy I let the hammer slide out on the up stroke to get more power on the return. Come from chopping too much wood. . . | |
| R-L :
21:25:05 |
I've ground finger knobs on the handle of mine so that they are on the flat side down. I don't have to look | |
| Paw-Paw :
21:26:18 |
Flatthumb, the first one I carved from a standard handle. I've going to try turning a couple on the lathe and see if I can get them the way I want them. | |
| Jock-D :
21:27:43 |
Kiwi, American Ash and Hickory are both hard and very springy. Blanks should be split out rather than sawn so the grain runs perfectly straight to the handle. Not sure what you have down there. | |
| Paw-Paw :
21:28:42 |
Jock's technique works for him, mine works for me, Bill's works for him. But the important point is to stay loose. When you tighten up, you are trying to do the work. let the hammer do the work! Just guide the hammer. If YOU want to do the work, throw the hammer away and use your fist. Kiwi, I've heard folks say that Gum works well, but I've never tried it. | |
| Sharon-Epps :
21:30:09 |
Hurray for Paw Paw. Trouble with most folks, if they used their fist, they'd just bust it or burn it. ;) | |
| Paw-Paw :
21:30:35 |
Dimag, You can change your technique, or you can plan on carpal tunnel syndrome surgery. | |
| joel :
21:31:02 |
Try persimmon wood, it is very tough and hard for handles | |
| Jock-D :
21:31:03 |
I think Ash is the preferred wood for baseball bats. Could be reworked into a couple handles. | |
| Sharon-Epps :
21:33:05 |
Dimag, he's right, if you don't get carpal tunnel, you will have messed up tendons in your elbow. Even I learned the hard way to keep my thumb wrapped around the handle just like it was a golf club, cause I had some pain and I didn't like it. | |
| Paw-Paw :
21:34:12 |
BTW, most of the things I've been talking about, I learned as a carpenter. Hammering is hammering, no matter what you're hitting. | |
| flatthumb :
21:37:34 |
Paw-Paw tell more about this sliding stroke your using. | |
| dimag :
21:37:49 |
I haven't noticed any problems,except,when I don't warm up or when I'm using a heavy hammer.I am going to change anyway cause I know that stuff can sneak up on a guy.I'll just practice more and the accuracy will come, hopefully. | |
| Paw-Paw :
21:39:40 |
Flatthumb. I have a hard time describing it. I just let the hammer stroke slide as I hit the work. Can't describe it, could show you. | |
| flatthumb :
21:41:21 |
Thanks Paw-Paw. My hammer strokes all slide one way or the other but it's not on purpose. | |
| Bill :
21:42:49 |
The mass will move away from the force always. | |
| Paw-Paw :
21:43:55 |
Bill. On the money! That's why tipping the hammer helps to draw out. But when I try tipping the hammer, I just dent the work. Doesn't move as well for me as when I use the sliding stroke. Dunno what the problem is. | |
| Bill :
21:45:14 |
How the force is applied determines where the mass will move. | |
| Paw-Paw :
21:46:21 |
Bill, we may be DOING the same thing, but describing it differently. I'm not sure. | |
| kiwi :
21:56:22 |
 |
 |
| Bill :
21:57:03 |
It doesn't take muscles when you have technique. | |
| kiwi :
22:00:40 |
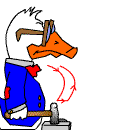
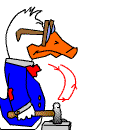
The red line is actually the path of the hammer, you can see the line closest to Dippy is the down stroke , the point of impact is then slid across the work and the hammer is returned back to the top position again... | |
| Bill :
22:25:07 |
Should be able to guide the hammer with just thumb and fore finger the handle next to the head has been trimmed down to make it more lively (gives more rebound) | |
| dimag :
22:27:54 |
The guy who told me to use my thumb as a guide,called it the rule of thumb.It did really help my accuracy but I can see now that it wasn't the best advice. | |
i
Forge is an Andrew Hooper Production