| |
 |
|
|
|
-GURU
|
|
Another demo by (now) 11 year old Sean Conner and his father Glenn. Photos by Glenn Conner.
This is actually 3 demos in one with NO scraps. Also no fire :)
Anybody with a jig saw can make this one.
|
|
SEAN &
GLENN
|
|
Tonight’s demo is on how to make a 12 point star. Layout by Glenn Conner, Blacksmithing by Sean Conner.
|
|
|

Figure 1
Click for Detail |
Get out the safety equipment. Ear and eye protection are required for this project. Vise grips, or “C” clamps are a good idea to hold the metal in place. A leather apron for general protection.
|
|
|
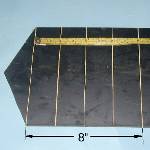
Figure 2
Click for Detail |
Locate a piece of plate steel. You need 3 square pieces the same size.
I had some 11 ga plate steel laying about.
Because the plate was 8" wide I used that width.
The rest of the demo will be based on that material and that size - just because it was handy.
Take the square and divide it into 4 vertical sections. This worked out well for 8" and I drew lines at 2", 4", 6" and 8".
|
|
|
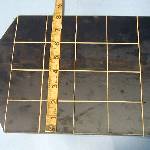
Figure 3
Click for Detail |
Now divide it into 4 horizontal sections. Again I drew lines at 2", 4", 6" and 8".
|
|
|
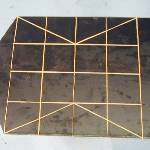
Figure 4
Click for Detail |
Draw “cut” lines as shown
|
|
|
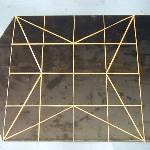
Figure 5
Click for Detail |
Draw “cut” lines as shown
|
|
|
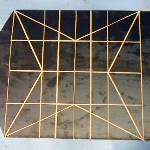
Figure 6
Click for Detail |
Divide vertical sections 2 and 3 (reading left to right) into equal sections. This was at 3" and 5" for my piece of metal. Check the photo for how this is done.
This is your BASE LAYOUT for all 3 squares of metal.
|
|
|
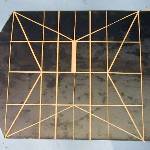
Figure 7
Click for Detail |
Draw a slot as shown, the width of the metal stock This is the first base layout (BASE #1).
|
|
|
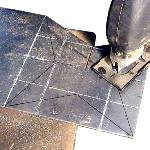
Figure 24
Click for Detail |
The way the drawings look on the metal
|
|
SEAN &
GLENN
|
|
Cut the first square of metal on the cut lines, and then cut out the slot. A hacksaw is slow but a jig saw works well. This is where the ear and eye protection is a must. It does get rather loud, and the jig saw throws little pieces of hot metal everywhere.
The vise grips or “C” clamps help hold the metal to the table and keep it from moving. Also clamping cuts down on some of the noise. (Clamps were removed for the photograph)
It is important to get the slot as close to the right dimensions as possible. Too loose and you will have a sloppy fit. Too tight and it won’t fit together. You will be surprised just how accurate you can cut a line with a jig saw.
|
|
|
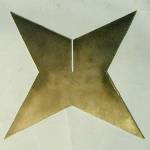
Figure 8
Click for Detail |
The BASE #1 layout should give you a piece of metal that looks like this.
|
|
|

Figure 9
Click for Detail |
Set up the second layout (BASE #2). Draw the slots as shown the width of the metal stock.
|
|
|
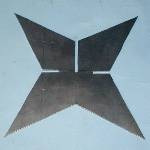
Figure 10
Click for Detail |
The BASE #2 layout should give you a piece of metal that looks like this.
|
|
|
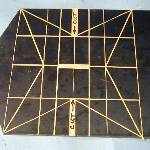
Figure 11
Click for Detail |
Set up the third layout (BASE #3).
|
|
SEAN &
GLENN
|
|
Notice on this one that you cut the material in half on the “cut” lines as indicated in the drawings. This will also allow you to cut the slot easily
|
|
|
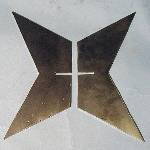
Figure 12
Click for Detail |
The BASE #3 layout should give you a piece of metal that looks like this.
|
|
SEAN &
GLENN
|
|
Smooth all the rough edges of the metal. Use a file to clean up any saw marks.
|
|
|
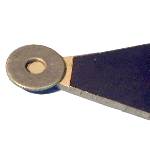
Figure 13
Click for Detail |
Use a metal washer (this one is 1/4") to mark the tips of the points.
|
|
|
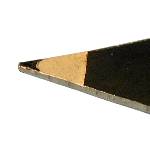
Figure 14
Click for Detail |
Grind or file the tip to prevent anyone from getting hurt on the sharp points. This is also a good time to dress up the slots in order to obtain a close fit with the metal.
|
|
|
Figure 8
Click for Detail |
If you are going to hang this star, drill a small hole (1/8" or so) in the North West corner of the star as shown in this photo.
|
|
SEAN &
GLENN
|
|
Drill the hole in the BASE #1 layout only.
|
|
|
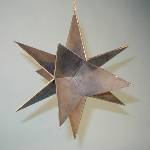
Figure 15
Click for Detail |
Assemble the star by sliding the long slots of Base #1 and BASE #2 together. Then slide the short slots of BASE #3 into the short slots of BASE #2.
|
|
|

Figure 16
Click for Detail |
Finished assembly of the star
|
|
SEAN &
GLENN
|
|
If you want to get fancy, you can cut designs into the body of the star points.
|
|
SEAN &
GLENN
|
|
This is a great demo for the beginner that wants to make an impressive project. It also does not need a forge, a fire, an anvil, or tongs, just a hacksaw or jig saw.
|
|
SEAN &
GLENN
|
|
It is not just a metal project but works well with art board, Foam-Core, Gador-Foam and other materials, including wood.
|
|
SEAN &
GLENN
|
|
Again this demo was given without dimensions, as the dimensions are based on the material at hand.
|
|
|
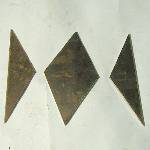
Figure 17
Click for Detail |
These are the scraps of metal left over from this project. Most would throw it into the scrap bin, I did, it was scrap.
Whitesmith decided that they were not scrap, but could be useful. He drilled a hole in the top of the diamond shape and made a plum bob. Fits flat against the wall, or other object.
|
|
|
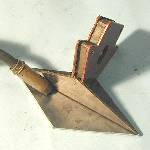
Figure 18a
Click for Detail |
Then Whitesmith wanted to borrow the welder, and a welding magnet. OK .. .. Who am I to object?
That 90* welding magnet is the perfect tool for this job. A weld here, a weld there .. .. ..
|
|
|
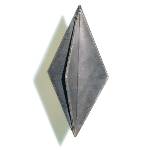
Figure 19
Click for Detail |
And a star is born.
|
|
SEAN &
GLENN
|
|
Questions? Comments?
|
|
Leah
|
|
Do you need to weld it or will it stay together without it?
|
|
SEAN &
GLENN
|
|
Leah, the 12 point star does not need welded. It assemables easily and is taken apart for storing flat.
The star from the scraps does need welded together.
|
|
Leah
|
|
Thanks, Ntech and Whitesmith, both stars are very nice. And the triangle is a good idea for a wall hugging plum bob.
|
|
Sharon Epps
|
|
Wow, that looks spiffy.
Could paint 1 in copper, other in silver, other in gold, and it would really be shiney, eh?
|
|