| |
 |
 |
 |
 |
J-J
|
 |
OK, tonights demo is a Freesia flower (old type before the hybrids)...an albus.
|
 |
 |
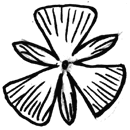
Figure 1 |
This is a single piece cutout of the general shape shown here. It can be anywhere from 4 to 5 inches in dia.
After making the cutout from something like 18 or 20 ga. material with tin snips, drill or punch a hole dead center of about 1/8" dia.
|
 |
J-J
|
 |
Next, lay the punched cutout on the anvil and using a welders hammer, strike in the texture with light taps all around the flower. As you double up on the hammer marks the pedals will begin to form nice scallops.
|
 |
 |
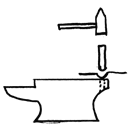
Figure 2 |
This next step comes from Rob Gunter, to help form the center of the flower cup without kinking the metal as the cup is turned up.
Lay the center hole over the pritchel hole of the anvil. Strike lightly with a hammer onto the top os a 6" section of rifle barrel rounded on the bottom. a section of 1/4"d gas pipe will also work.
|
 |
J-J
|
 |
This will give you a small, rounded cup at the base of the blossom without splitting the hole out as a solid runded punch tends to do.
|
 |
 |
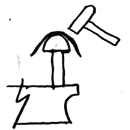
Figure 3 |
Now, turn the flower cutout upside down, over a properly sized mushroom stake and form the round into the lower area of the cutout and just a bit up into the leaves.
|
 |
 |
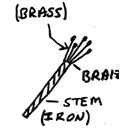
Figure 4 |
Now, lay the flower aside for a bit, and make the stem and pestal. I use brass brazing rod for the pestal stems. Just hit the tips of each 1 1/4" to 11/2" piece with a torch to melt the little blob on the tip, which becomes the top.
Then, flux your textured 1/4" steel stem, and lay some braze on the end to receive the pestals.
|
 |
J-J
|
 |
Now, brazing the two pieces will be a matter of just a bit of heat, since they are already brass coated, or brass itself.
|
 |
 |
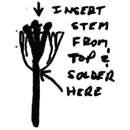
Figure 5 |
Add a bit of brazing over flux or solder the meet of the blossom and stem.
|
 |
 |
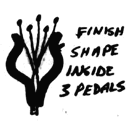
Figure 6 |
That last pic showed the blossom already turned up in final shape. of course, we now have that to do...
Heat lightly with an oxy/acet torch or propane torch each SMALL stem, one at a time and bend them into the shape indicated here in the drawing.
|
 |
 |
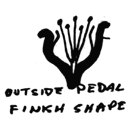
Figure 7 |
Now do the same heat and bend procedure to the 3 outside (large) blossom pieces. I use a pair of round nose pliers, with all edges and grip marks ground off.
Where the pedals over lay one another, roll the edges out not just on top, but all the way down to the bottom, so it appears they are un furling like a flag being unwrapped.
|
 |
 |
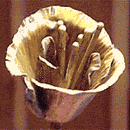
Figure 8 |
To achieve the nice yellow color inside, assuming you made the flower with copper, heat with a torch until the color run brings gold inside. Then quench.
Next, take a bit of muriatic acid on a q-tip or small paint brush (flux brush) and gently bring the outside of the pedals to bright copper.
|
 |
J-J
|
 |
Now, you are ready to place a clear coat over the flower if you want it to remain pristine.
This flower was shown me by Glenn Houston of Mt. Shasta, Calif, who took one apart and made the pattern.
|
 |
J-J
|
 |
Any Questions?
|
 |
PETE FELLS
|
 |
Smells sweet JJ, dont forget to neutralize the acid tho, nice job.
|
 |
ANVHIL
|
 |
Did you say whar size rod that you use to mount the flower on?
|
 |
J-J
|
 |
Oh, one last thing, you can add a small kalex, or however it's pronounced just like a rose. Some of these I've seen have them, others don't.
|
 |
TTINKER
|
 |
1/8 inch hole in the petal and a 1/4 stem?
|
 |
J-J
|
 |
PF is right of course. ALWAYS, ALWAYS ALWAYS neutralize any acid you use. baking soda and water work well.
|
 |
J-J
|
 |
Makes a nice puckered taper around the stem Tinker.
|
 |
J-J
|
 |
Someone asked what i do with these. I'm a blacksmith. I sell them! Or make them for my woman when i'm away too long blacksmithing. :)
|
 |
JNEWMAN
|
 |
Welding hammer you use to texture. do you round the sharp edge?
|
 |
J-J
|
 |
JN, I really do not round the sharp end. But I do work over a steel block, not wood. And I don't hit so hard as to cut through, I just want the sharp and crisp rise the sharp hammer gives.
|
 |
TEN-HAMMERS
|
 |
Top fuller JJ ?
|
 |
J-J
|
 |
Ten, I use a mushroom stake tool about 5/8" dia for the inside of flowers this size.
|
 |

