| |
 |
|
|
|
JIM
|
|
Braided Steel Handle From 1/4 Inch Round Bar
By Jim Carothers as taught to me by Mr. Wilda
As Mr. Wilda, friend and mentor, told me, “I can teach you how to make this handle in about 15 minutes”. These handles look complicated; but are easy to make, feel good in the hand, and will add considerably to the value of the piece your are making.
|
|
JIM C
|
|
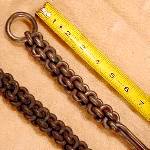
I like a handle that has about 5-1/2” of clear length for the grip. The difference between the two handles shown here is the placement of Bar Two at the start of the braid. More about that later.
The stock cut measurements and notes as given here will make a handle with about
5-1/2” of clear length for the grip. There is some extra material at the end to allow you to make the handle-to-tool joint as best suits you.
|
|
JIM C
|
|
Start by cutting two pieces of 1/4 inch round bar to:
Length One = 34 Inches
Length Two = 32 Inches
|
|
|
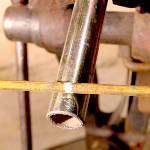
Figure 2
Click for Detail |
Begin with the bending of Bar One.
Find the center (Photo No. 2).
|
|
|
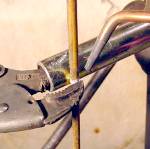
Figure 3
Click for Detail |
Using an oxy-acetylene gas welder for heat, bend Bar One around a 1” OD bar, tube, or pipe used as a mandrel (Photo No. 3).
|
|
|
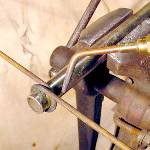
Figure 4
Click for Detail |
A cutting torch tip will work; the gas-welding tip seems to work better for me.
Keep the bending of the 1/4" bar even around the mandrel; each leg is wrapped 180 degrees from the center mark. Complete the wraps as shown (Photo No. 4) to form the ring for your handle. The two free ends should be about the same distance from the center of the ring. There is a little extra material in the layout so this is not critical.
|
|
|
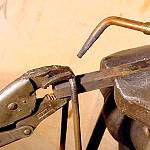
Figure 5
Click for Detail |
Next bend Bar Two:
Find the center and again using the oxy-acetylene gas welder for heat, bend Bar Two around a 1/2" square bar mandrel (Photo No. 5)
These bends are a little less than 90 degrees each.
|
|
|
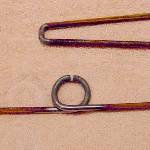
Figure 6
Click for Detail |
At this point you should have two bars bent to look like those shown in Photo No. 6.
|
|
|
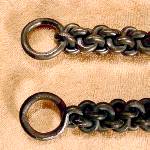
Figure 7
Click for Detail |
Now is the time to decide if you want to make the end of your handle like the one at the top of Photo No. 7 or at the bottom of Photo No. 7.
|
|
|
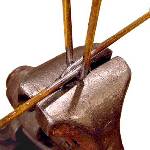
Figure 8
Click for Detail |
The difference in the two handles is the placement of Bar Two inside the ring or on top of the ring. If you are working by yourself and do not have an electric welder, putting Bar Two inside the ring may be the easiest way to start -- Photo No. 8.
|
|
|
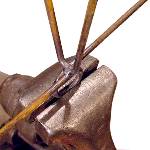
Figure 9
Click for Detail |
Putting Bar Two on top of the ring, in my opinion, makes a cleaner looking finished end. Working by myself, I use a small tack weld on each side of Bar Two to hold it in place on top of the ring – Photo No. 9.
|
|
|
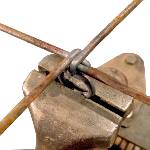
Figure 10
Click for Detail |
With the two assembled bars clamped in a vise, use the oxy-acetylene welding tip to heat the first bar to be bent into the braid – Photo No. 10. I try to keep the heat concentrated in the bend area and after the two bends in one braid are formed, I tap the braid down and tap the two bars together lightly with a small hammer. This helps to keep the braid tight.
|
|
|

Figure 11
Click for Detail |
Continue to heat, braid, and hammer the two bars (Photo No.11) for a total of about 10 to 12 braids; you can do fewer if you want a shorter grip length. I try to keep the braids aligned and straight as I go. This may require a little bending, hammering, and twisting, but usually the braid goes pretty straight. Note in Photo No. 11 the spacer in the vise jaws. The spacer is good for the vise and helps to keep the braid aligned visually.
|
|
|
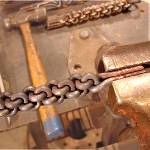
Figure 12
Click for Detail |
End the braiding by bringing the four bars to center – Photo No. 12.
This will take a little heat and some bending into position. I use tongs or pliers and finish by clamping the parts in the vise until they are cool. Notice that you have one long and one short pair of bars to make the weld scarf for a lap type joint to the fire tool shaft.
|
|
|

Figure 13
Click for Detail |
Photo No. 13: (Weld Prep)
The bars have been cut to length (using a hacksaw) for the lap weld to the fire tool shaft. The “valley” between the bars has been filled with the electric welder; the welds have been ground smooth.
|
|
|
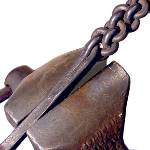
Figure 14
Click for Detail |
Photo No. 14: (Completed weld – braided handle to fire tool shaft)
The shaft shown here is 3/8” square bar. I upset the end for about 1” back and forged it to 1/2" square to match the braided handle end.
|
|
JIM C
|
|
Next the shaft end is scarfed with half face hammer blows at the edge of the anvil. This makes a matching lap like that on the end of the braided handle.
|
|
JIM C
|
|
The braided handle and the tool are tack welded together with the electric welder; forge welding then finishes the joint.
Alternately the parts can be fully electric welded and then hammered to complete the connection.
|
|
JIM C
|
|
That's how I was taught to braid round steel bar. Are there any questions?
|
|
B-W
|
|
This could also be done in the forge right? (for those of us wihtout gas welders at home)
|
|
Alan B
|
|
Excellent demo Jim
|
|
PPW
|
|
Nice demo, Jim. Good pictures. It helps if you've got a grand son to operate the torch for you. (grin)
|
|
Ralph
|
|
Jim, nice demo... now all I need do is convert it to non-gas and elec techniques
|
|
Dodge
|
|
Nice Jim. attractive handle
|
|
Possum
|
|
Jim, fantastic job, looks like something I might try
|
|
JIM C
|
|
B-W: I don't think you can get the concentrated heat and tight bends by using the forge for heating.
|
|
|
|
Great Demo Jim
|
|
bob tal
|
|
Great demo jim
|
|
Katherine
|
|
Beautiful piece. Thank you for showing it.
|
|
Ntech
|
|
Excellent demo and great photos. Very well done.
|
|
JIM C
|
|
Check with the more experienced smiths, but I think you can add at least $35 over the price of a plain handle for the braided one.
|
|
Dodge
|
|
Reminds me of the lanyards we used to make in Scouts. Looks like a Fun project
|
|
irnsrgn
|
|
You do an excellent job Jim. Its really simple the way you explain it, thank you.
|
|
Katherine
|
|
Would thicker stock be too hard to heat this way or would it turn out the same? Would the length be the same for thicker rod?
|
|
JIM C
|
|
Snow-Smith: I have tried the braid shown to us by Bill in Demo #22. I have trouble making nice even twists.
|
|
JIM C
|
|
Katherine: You can use larger stock. This handle has about 66" of 1/4" bar in it, so it is pretty heavy. Make one and try the feel of it. Then decide if you want to try 5/16" or 3/8" bar.
|
|
irnsrgn
|
|
Has anybody tried this with 1/4" square?
|
|
Snow Smith
|
|
Jim , I agree yours is more even and ends and start more precise! Also the loop is very nice!
|
|
JIM C
|
|
Irnsrgn: I've only done round. Remember your or someone else's bare hand will be on the iron.
|
|
irnsrgn
|
|
just curious and you just answered my question. thanks again Jim great demo
|
|
|
|
Forge a version that is easier to do in the forge see demo #22
Braiding Iron
by Bill Epps for a different method that produces results that look the same.
|
|