Claton Knot
Demonstration by Bill Epps.
http://www.besmithy.com
April 31, 2000
Claton Knot
Demonstration by Bill Epps.
http://www.besmithy.com
April 31, 2000
Bill-Epps : |
Tonights demo is a "Claydon's Knot". | |
Bill-Epps : |
|
|
Bill-Epps : |
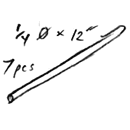
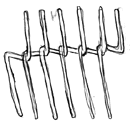
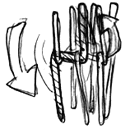
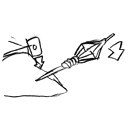
This can be made w/any "Odd number" of bars. I used 7 pieces of 1/4" round X 12" long. I put it in the vice w/4" sticking out and bend it 90 degrees. Please no more talking until the demo is over, thanks:). | |
Bill-Epps : |
|
|
Bill-Epps : |
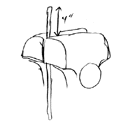
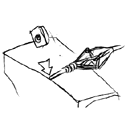
Several people make jigs for making this bend, but I wasn't able to find mine, so I used the vice. I use a bending fork to start it with, and hammer to a crisp bend, just past the 90 deg. | |
Bill-Epps : |
|
|
Bill-Epps : |
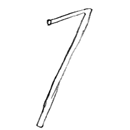
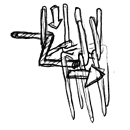
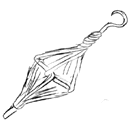
I decided to show it this way cause most folks have a vice, and not everyone has a bending jig. After making the first bend, go to the other using the bottom of the vice jaw for a stop, make the second bend, and you should end up w/a piece looking like a "Z". | |
Bill-Epps : |
|
|
Bill-Epps : |
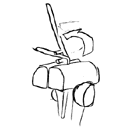
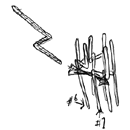
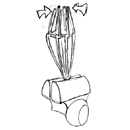
Now that we have all 7 pieces "BENT THE SAME", start interlocking them. | |
Bill-Epps : |
|
|
Bill-Epps : |
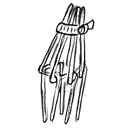
Now, if you can't see for yourself, This is where it gets "Tricky". I have the short end up, as I hook the pieces together to make a circle. The last piece, I insert upside down, hooking over the last the piece and under the first piece. This locks the whole thing together. The tricky part is to keep from dropping it. | |
Bill-Epps : |
|
|
Sharon-Epps : |
Got the boot on the other puter, will continue on this one. | |
Sharon-Epps : |
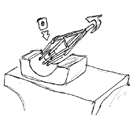
I gather the long end up, and put a hose clamp on it. | |
Sharon-Epps : |
|
|
Sharon-Epps : |
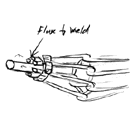
w/7 pieces of 1/4" round, you end up with a hole in the middle, so I make a short piece of 1/2" round about 3" long, w/slight taper on 1 end and insert it in the end and tighten down the clamp. We heat this enough to flux and then put back in the fire and bring up to welding temperature. | |
Sharon-Epps : |
|
|
Bill-Epps : |
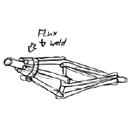
After we have welded this end, go to the other end and bend the pieces downward slightly until you can get the hose clamp around it. (If you have a problem w/forge welding, just tack the thing together and flux and bring up to a welding heat. Hammer out the weld and no one will ever know the difference.) | |
Bill-Epps : |
|
|
Bill-Epps : |
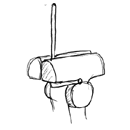
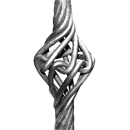
When you get to this stage here, both ends are welded up on the 1/2" round bars. | |
Bill-Epps : |
|
|
Bill-Epps : |
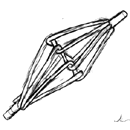
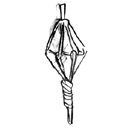
I start taking a good hot heat on long end, and start twisting. | |
Bill-Epps : |
|
|
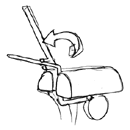
Bill-Epps : |
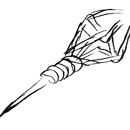
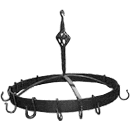
I am going to use this as a center piece for a round pot rack, so I bring this twisted end up to a welding heat, and I start drawing it out to a point. This will make my hook. | |
Bill-Epps : |
|
|
Bill-Epps : |
We draw this end out to make the hook that the pot rack will hang from. As I am drawing it out, I am also turning it into the twist. The other end, I do the same thing and left this end as a tenant to connect to the center bars of the pot rack. | |
Bill-Epps : |
|
|
Bill-Epps : |
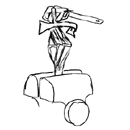
This is what it ends up looking like. I made this piece while J-J was here, and he was a big help w/making the piece as well as photographing the pieces for me. (Thanks J-J):) | |
Bill-Epps : |
Any Questions? |
|
Steve-C : |
Bill,, did you say how far down the second bend is? | |
Paw-Paw : |
Nice job, Bill. Does the pot rack tip to the heavy side since it's only hanging from one point? | |
Bill-Epps : |
This is just one application for this clayton knot. I've it as curtain rod finnels, handles for fire tool sets, and bed poster finnels. | |
Fred : |
Is that a one way twist or will it work in the other direction? | |
Bill-Epps : |
Steve, after making the first bend use the bottom of your vice jaw as a stop w/the rest of the piece sticking up, and make the second bend so as to form a "Z". Pawpaw, yes it will hang to the heavy side. | |
Paw-Paw : |
Bill, if the center of the knot is open, would it be possible to put a large marble, rock, crystal, whatever into the center after the knot has cooled some? | |
Bill-Epps : |
yes, if you could keep it back far enough from the heat when forge welding it. Hadn't tried it, but sounds like a good idea:) | |
Paw-Paw : |
Could you put it in AFTER you had finished the piece? Just move one, maybe two bars enough to get it in, let it drop to the other end, and move the bars back? | |
Tom-stovall : |
Centaur sells a jig for making the knot: I like Bill's more pragmatic approach a lot better. :) | |
Kial : |
Bill what kind of finnish would you put on a piece like this | |
Steve-C : |
Bill the bends are done cold at first? | |
sharon : |
Bill didn't say when you are supposed to remove the clamps, but he probably tack welded it, removed the clamp and then forge welded it. | |
sharon : |
Yes, Steve the bends are done cold at first. | |
sharon : |
Kial, he just painted it black cause the whole potrack was painted black. | |
iForge
is an Andrew Hooper Production
Copyright © 2000 Bill Epps
HTML Copyright ©
2000 Jock Dempsey, www.anvilfire.com
Webmaster email: webmaster@anvilfire.com
![]()