| |
 |
 |
 |
 |
-GURU
|
 |
This is part one of our series on locks and keys.
- Lock Basics
- Wards and Bits
- Lever Tumblers
- Padlocks
Our recent Masterpiece Lock coverage in Volume 26 of the anvilfire NEWS
suggested this series on locks and keys.
Locks are relatively simple mechanical devices if you understand how they work.
Many years ago I took a course in Locksmithing that covered a great deal more than simple bolt locks in order to learn some of this. As a result I am a Certified Locksmith albiet non-practicing.
Locks can be sold by the smith as part of a gate or a seperate works to mount on doors.
Due to the fact that these locks are no longer in style they have relatively good security since no one practices picking them or even carries tools to do so.
I always thought that selling "castle" locks and keys to the rich and famous would be a good business.
Another one of my ideas that I never followed through with. . .
|
 |
 |
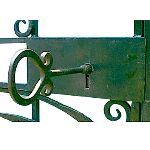
Figure 2 |
This is a lock I made for the gate on my protable forge trailer. The gate kept my oxy-acetylene equipment secure so I wanted a pretty good lock. As I was making it for myself I could not affords to get fancy.
|
 |
 |
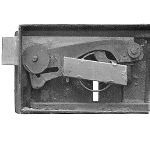
Figure 3 |
The insides of this lock are pretty ugly. When the gate is open the insides of the lock are exposed so you can see how they work. When closed there is a steel plate that covers the back. This is a warded lever tummbler lock.
|
 |
 |
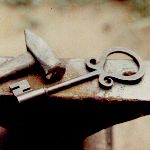
Figure 4 |
The key for this lock is rather large. I called it my "castle key". However, the shank could have been much shorter and the bow (handle) much smaller. If you make big "castle" locks for a customer that is going to use on dwelling doors you should probably provide a lighter weight key perhaps made of aluminium for daily use on a key chain. It would make a fancy "fob".
|
 |
 |
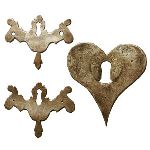
Figure 5 |
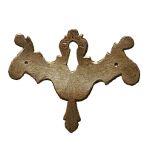
Figure 6 |
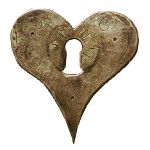
Figure 7 |
 |
JOCK D
|
 |
Lock making open up other areas of hardware to supply. This are replacement drawer pull plates and matching lock plate I made for an 18th century dower chest. The original pull plates had all the little tabs that stick out broken off and heart lock plate was missing. Its shape was determined from the bleaching of the wood.
|
 |
 |
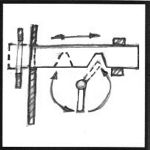
Figure 8 |
The part of the lock that slides and engages the strike plate is the "bolt". The bolt is moved directly or indirectly by the key which is a rotating lever. The key engages a notch in the bolt as it is rotated moving the bolt.
|
 |
 |
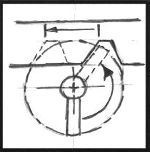
Figure 9 |
To design and build a lock you need to make a little layout like this. The closer the bolt is to the key the farther the bolt moves and the deeper the notch in the bolt needs to be. The notch is symmetrical so that the key can engage the notch and push the bolt from both directions.
|
 |
 |
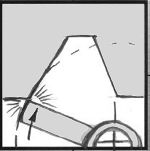
Figure 10 |
IF the bolt should move out of position due to vibration or someone "trying" the door, it is possible for the bolt to move a small amount.
As shown in figure 10 this can prevent the lock from being operated in either direction.
|
 |
 |
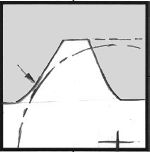
Figure 11 |
To prevent the problem above the notch should have a gentle curve at the bottom. When the key passed the curve there is significant clearance. If the bolt should slide back a little the key can push it out of the way easily.
Bolts have a friction spring, sometimes with a "detent" to hold it in proper position. However, you always need to alow for wear and tolerances.
|
 |
 |
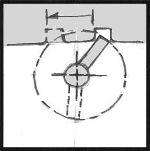
Figure 12 |
The bolt notch can also be a shallow square cut with rounded corners. This reduces the throw of the bolt a little but may have other design advantages. In any case, you need to make a scale layout using a compase and ruler. For small locks you may want to make an oversized layout say 2 or 4 times size to be easier to draw.
|
 |
 |
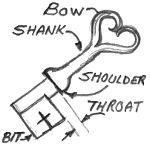
Figure 13 |
The parts of a key are the bow (handle), shank, shoulder, throat and bit. The shoulder is optional depending on the type of key. Most barrel keys do not need a shoulder but may have one for decorative purposes. Modern bit keys that work from both sides of a lock need a shoulder to position the bit in the lock.
|
 |
JOCK D
|
 |
The bow of keys has been a place to show off all kinds of work, forging, casting, graving. In fancy lock and key sets the bow is often a work of art.
|
 |
 |
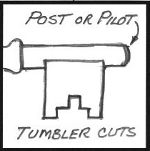
Figure 14 |
Modern bit keys have a "post" to help steady the key and a shoulder to position it. It may have ward cuts but it will always have tumbler cuts except on the cheapest of cabinet locks. The tumbler cuts are different heights as each tumbler must be raised a certain height to operate the lock. The tumbler and ward cuts are symmetrical on keys that operate from both sides of a lock
|
 |
 |
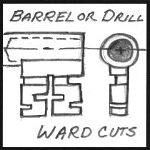
Figure 15 |
Keys with hollow ends are called "barrel" or drill keys. The hole fits over a pin in the lock. The pin acts as an obstruction to picking tools and a guide to keep the key centered.
The ward cuts must clear obstructions in the lock. Wards are usualy circular and the key must clear them during most of its rotation. Making the wards is much more difficult than making the key to fit.
Like my "castle key" locks and keys can use both warding and lever tumblers for security.
|
 |
JOCK D
|
 |
Antique lock and keys only security was the "ward". A ward is an obstruction that the key must get past. Wards are both thin flat plates and cylinders attached to the ward plates and lock body. The separated spaces are where we get the word ward as used in "hospital ward". Flat thin files called "warding files" were originally made for cutting wards in keys.
|
 |
 |
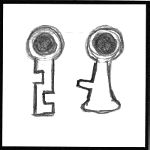
Figure 16 |
Wards also consist of obstructions to putting the key in the lock.
Slots were often cut in keys just as they are today to fit around tabs in the ward plates and the lock's escutcheon plate. Keys also had various protrusions to prevent them from fitting in the wrong lock. The same lock could be made that had a ward on the right and another on the left. A key that could get past both was a "master" key.
If you are making sets of locks and keys to multiple doors or gates then you may need to consider your designs carefully so that keys only fit their one lock BUT the master key fits all.
|
 |
 |
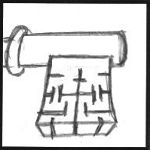
Figure 17 |
Medieval and Renaissance locks and keys were veritable mazes of complex wards. The cuts in the keys being very fine and made with a jewler's saw. However, the security of a warded lock was so low that during this time locksmiths created many locks that used trickery such as valse and hidden keyholes as well as booby traps that would cut the fingers off a would be lock picker!
Locks of this period were often great works of art and less security devices. The ABANA 2002 Masterpiece Lock is this type of device.
|
 |
 |
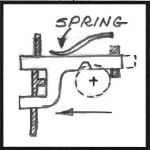
Figure 18 |
Double bolts are actually a single bolt as shown. Make your layout carefully to be sure there is room for all the parts.
The spring adds friction to the bolt so it does not jiggle out of position OR is thrown out by a swinging door. The bolt may want a slight depression at each stopping point for the spring to engage into so that it stays in place.
Lever tumbler locks do not need a spring or detents as the tumplers hold the bolt securely in both end positions.
|
 |
 |
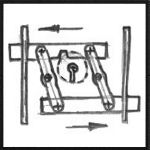
Figure 19 |
Two directional bolts generaly use simple lever mechanisms. However from this point onwards locks can have gears, racks and all sorts of mechanical devices that we are not going to get into.
|
 |
 |
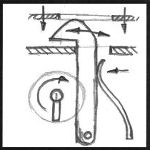
Figure 20 |
Another common lock made by smiths is the spring or "bear claw" lock. These are used on boxes, trunks and cabinets where you want the lid or door to automaticaly lock when closed. A simple leaf spring holds the bolt in position. The key just pushes the bolt to one side.
These type locks can be warded and or have lever tumblers.
|
 |
JOCK D
|
 |
Next week, Wards and bits, Details of designing and making.
Comments, Questions?
|
 |
Jim C.
|
 |
Is there a basic how-to lock book? Something like The New Edge of The Anvil but about locks?
|
 |
JOCK D
|
 |
UPDATED! Jim, It was pointed out to me that Professional Blacksmithing by Donald Streeter has a lock section.
It has diagrams of "stock" (wood body) locks and a simple English lock.
More recently (1999) the Spruce Forge Manual of Locksmithing was published. See link to our review below.
It
|
 |
Brogan
|
 |
What method would you use for a pad lock?
|
 |
PF
|
 |
Thumbs up...looking forward to next installment
|
 |
wolfsmithy
|
 |
Great demo, very informative, did you make the bow of the key and weld it to the shank or is it one peice?
|
 |
Bryan
|
 |
Neat Demo! Any clue as to when the warded lock was in its heyday? And about what time period did they start moving away from this style to the tumbler style of lock?
|
 |
JOCK D
|
 |
Bryan the lever tumbler lock was invented in 1778 by Robert Barron of England. After that lock technology changed by leaps and bounds.
Prior to that warded locks were pretty sophisticated from the Medieval period up.
|
 |
JOCK D
|
 |
Pad locks are generaly specialized designs. However, many are just simple warded locks, something we will get into detail about next week.
|
 |
Brogan
|
 |
Cool... thanks for the GREAT demo!!
|
 |
Jim C.
|
 |
This was a great one; looking forward to next week. Thanks very much.
|
 |
Bill
|
 |
verry intersting Demo Jock
|
 |
JOCK D
|
 |
Yes, I made my key in multiple pieces. The barrel is a piece of 3/8" pipe, the bit and shank welded on, then the bow welded to that. However, many very fancy keys are forged in one piece then finished with files and chisles.
|
 |
JOCK D
|
 |
Thank you Bill, Jim, Brogan, Pete. . .
|
 |
JOCK D
|
 |
Continued in Part II
|
 |
|
 |
Links
|
 |


Lock Basics
Demonstration by Jock Dempsey
June 19, 2002, update August 2011
- Lock Basics
- Wards and Bits
- Lever Tumblers
- Padlocks
Our recent Masterpiece Lock coverage in Volume 26 of the anvilfire NEWS suggested this series on locks and keys.Locks are relatively simple mechanical devices if you understand how they work. Many years ago I took a course in Locksmithing that covered a great deal more than simple bolt locks in order to learn some of this. As a result I am a Certified Locksmith albiet non-practicing.
Locks can be sold by the smith as part of a gate or a seperate works to mount on doors. Due to the fact that these locks are no longer in style they have relatively good security since no one practices picking them or even carries tools to do so.
I always thought that selling "castle" locks and keys to the rich and famous would be a good business. Another one of my ideas that I never followed through with. . .
Figure 2
Figure 3
Figure 4
Figure 5
Figure 6
Figure 7
Figure 8
Figure 9
Figure 10
As shown in figure 10 this can prevent the lock from being operated in either direction.
Figure 11
Bolts have a friction spring, sometimes with a "detent" to hold it in proper position. However, you always need to alow for wear and tolerances.
Figure 12
Figure 13
Figure 14
Figure 15
The ward cuts must clear obstructions in the lock. Wards are usualy circular and the key must clear them during most of its rotation. Making the wards is much more difficult than making the key to fit.
Like my "castle key" locks and keys can use both warding and lever tumblers for security.
Figure 16
If you are making sets of locks and keys to multiple doors or gates then you may need to consider your designs carefully so that keys only fit their one lock BUT the master key fits all.
Figure 17
Locks of this period were often great works of art and less security devices. The ABANA 2002 Masterpiece Lock is this type of device.
Figure 18
The spring adds friction to the bolt so it does not jiggle out of position OR is thrown out by a swinging door. The bolt may want a slight depression at each stopping point for the spring to engage into so that it stays in place.
Lever tumbler locks do not need a spring or detents as the tumplers hold the bolt securely in both end positions.
Figure 19
Figure 20
These type locks can be warded and or have lever tumblers.
Comments, Questions?
Links
iForge is an Andrew Hooper Production
Copyright © 2002, 2011 Jock Dempsey, www.anvilfire.com
Webmaster email: webmaster at anvilfire.com