Would S7 be better for punches?
|
|
philip in china
- Friday, 10/01/10 01:09:55 EDT
|
Be careful Steve,Ric might make you a straight razor but, he might also want to make it from actual Wootz steel that is made by the historically correct method from historically correct components from a certain time period of his choosing.
And he'll do it right there in his shop from scratch.
I spent two hours talking to him and an armour making friend of his at the Janesville knife show two years ago.
The man is very deep...
|
|
- merl
- Friday, 10/01/10 01:40:06 EDT
|
Philip,
Yes - S-7 is just about the top of the line for punches. If you want them for hot punching, H-13 would have a slight edge and holding shape when hot, but S-7 will handle anything other than very thin hot chisel work if properly heat treated.
|
|
- Rich
- Friday, 10/01/10 01:58:24 EDT
|
S7 is a favorite among smiths because it is fairly easy to heat treat and is both heat and shock resistant. You have to be careful when forging it not to overheat but not to work too cold either. Frank Turley says tool steel laughs at you and will crack if cold steel is heated too fast or worked too cold. Warm the steel to uncomfortable to handle by hand before putting in the forge then stop forging at a red heat.
|
|
- guru
- Friday, 10/01/10 10:58:06 EDT
|
Any one got any information on restoring a worn plough share . cheers Barry
|
|
barry
- Friday, 10/01/10 12:26:25 EDT
|
Milne; did you read my post? I said I thought it might be cast iron. If it was cast iron the price would be way out of line. Do you not agree that that is too high a price for a cast iron anvil?
I also qualified it that I wasn't sure it was cast iron and I spent some "quality time" last night with "Anvils in America".
As a cast STEEL anvil that is quite a good price!
Thomas who doesn't hide behind aliases and stands behind what he says and admits when he is wrong.
|
|
Thomas P
- Friday, 10/01/10 12:30:55 EDT
|
Barry; I'd check "Practical Blacksmithing" as it has a lot of infor from the period when reforging plowpoints was a standard job in farm country blacksmithing shop.
As I recall though the angle you want to end up at is actually dependent on local soils and made a difference with underpowered hand controlled plows. Modern are more likely to be set to a general setting and bull it's way through.
Thomas
|
|
Thomas P
- Friday, 10/01/10 12:35:15 EDT
|
Thanks guys - is there a simple, quick, and easy way to determine if it is cast iron or cast steel?
Thanks!
dbk
|
|
David Knapp
- Friday, 10/01/10 13:03:37 EDT
|
David, A steel anvil will ring brightly when taped with a hammer or hard object. Cast iron may give a little ring but it will be more of a "clunk". These are definitely a steel anvil but there are Mexican foundries making cast iron anvils using old anvils as patterns.
The reason Thomas thought CI is the rust and general roughness. But I think the texture was due to the poor quality of the photographs.
|
|
- guru
- Friday, 10/01/10 14:02:13 EDT
|
Barry, Plow repair generally requires welding on a new steel edge to replace the worn off missing material (which can be a considerable amount) then reshaping to as much the original as possible. The "art" is recreating the shape. It helps a LOT to have an unworn example.
|
|
- guru
- Friday, 10/01/10 14:04:39 EDT
|
May I commend to your attention the ball bearing test that is described under the Anvils 5 as the Rebound Test.
This test will do more than differentiate between materials it will indicate if the face is hard enough and not one that has been annealed in a fire or refaced with a welder using mild rod...
Thomas
|
|
Thomas P
- Friday, 10/01/10 15:28:15 EDT
|
David:
Check "Testing Anvil Rebound" in the AnvilFire FAQ section. Just doing a little hammer bounce has saved me from some unfortunate errors.
|
|
Bruce Blackistone (Atli)
- Friday, 10/01/10 15:36:07 EDT
|
Thomas: Great minds... and almost equal speed... ;-)
|
|
Bruce Blackistone (Atli)
- Friday, 10/01/10 15:37:31 EDT
|
I have a enco wood cutting bandsaw. It's slowest speed is 700 inches/min. I tried a lenox die master metal cutting saw blade to cut 1/4 inch annealed flat stock but the blade stopped cutting after profiling 4 knives. Was the stock not fully annealed or what? I am wondering if I should buy one of the portable bandsaw and set it on a bench to profile a knife. How would I set it up on a bench securely?
Michael
|
|
Michael
- Friday, 10/01/10 16:18:24 EDT
|
Thanks, one last question - I'm in the middle of nowhere - where would one typically go to buy a 1/2" ball bearing? Home depot or lowes?
Some kind of specialty store?
Thanks!
dbk
|
|
David Knapp
- Friday, 10/01/10 16:21:51 EDT
|
David, Neither, you need a 1" ball or close. Send me $10 and I'll mail you one (including postage).
|
|
- guru
- Friday, 10/01/10 17:25:44 EDT
|
The specialty store is called a scrap yard, or a place they work on cars and you can ask them for a ball bearing from a junked part or where they work on farm equipment, or cranes, oilfield equipment, or...
You can buy ball bearings new but WHY? (and for this usage the "out of spec" ones are a lot cheaper!)
Where is your nowhere? If it's Antarctica I can check with a friend and get a lead on possibilities....
Thomas
|
|
Thomas P
- Friday, 10/01/10 17:35:02 EDT
|
Band Saw Blades: Michael, Is that inches per minutes OR Feet per minute. All American band saws and machinery are rated in FPM. 700 IPM = 58 FPM. . That is creepy slow and the only problem would be the hours it would take to cut the blanks. But if its 700 FPM you are running 3 to 6 times too fast for the best HSS metal cutting blade.
Wood cutting machines are for wood, metal cutting for metal. VERY few are made to do both OR do both well. Many years ago Rockwell (I think) made a dual purpose band saw. In wood cutting mode it was direct belt driven, but in metal cutting mode it ran through a worm gear drive. That is the only way to get the 20:1 difference between efficient wood cutting and slow enough for metal.
Other problems if it is not speed are how tight a curve you are cutting and lubrication. The normal Die Master blades are for cutting straight lines and will cut a very gentle curve. To cut tight curves requires a blade that proportionally fat, short in depth with a wide set. This provides clearance for making the cuts. Too deep a blade and you trash the teeth while making curves. You can use light lubrication on your blade but wood saws are no designed for the run off. I would spray WD-40 on the blade as it runs then clean up the tires and wheel areas after each use. The oil is good for most everything else.
|
|
- guru
- Friday, 10/01/10 17:45:11 EDT
|
Middle of No-Where While it is a long way to the neighbors and can be quite a distance in some places there is no-where in the U.S. that is THAT far out. If you have Internet service (and you must to be reading this), with a couple key strokes you can have almost anything you can imagine delivered anywhere in the U.S. I'm pretty much out in the sticks but I can get that ball bearing to you on the other side of the U.S. (to another place in the sticks) in 3 days for a couple dollars. It would actually be harder to get it to you in a big city. . .
Now. . In California, where the little anvil in question is located, there is NO place far enough from civilization unless you think that entails 24 hour taxi and pizza delivery service.
|
|
- guru
- Friday, 10/01/10 17:55:12 EDT
|
Wood-cutting bandsaws for metal:
I have been using, quite successfully, a knock-off of a Rockwell Model 14 for thirty years now. Th elowest speed on it is 700 sfpm and the Lenox Diemaster 2 blades hold up quite well. I do use a lubricant, specifically a tallow stick or wax/graphite stick. Cutting 1/4 annealed medium carbon steel is no problem. Cutting annealed high-carbon alloy steel does shorten blade life noticeably.
When using the Diemaster blades you must follow Lenox's break-in procedure to get maximum blade life. Proper tension is important as is choosing the appropriate tooth pitch for the stock you're cutting. For 1/4" stock a 10/14 pitch Varipitch blade would be my choice, followed by a 14/18 pitch. If cutting curves, I'd choose a 3/16" wide blade or 1/4" - any wider and you'll strip the corners off the teeth very quickly when cutting anything tighter than about a 10" radius curve. It is important to have your blade guides set properly and I find that the ceramic guides are superior to other solid guides and also superior to ball bearing guides for metal cutting.
|
|
- Rich
- Friday, 10/01/10 19:02:32 EDT
|
One key thing about sawing annealed tool steels is to MAKE CHIPS. If you let the cutter rub the work it will work harden a spot that will wreck even carbide cutters. So either cut or don't, no inbetween.
|
|
- guru
- Friday, 10/01/10 20:27:09 EDT
|
Thomas P,
Roger that brother...
|
|
- Milne
- Friday, 10/01/10 21:53:14 EDT
|
Cast Iron VS Cast Steel. I have to admit to learning something about this topic by experience. Not all cast iron is bad and not all cast steel is good. Cast DUCTILE (nodular) iron that has been properly heat treated makes a pretty good anvil. TFS anvils are cast ductile iron. They ring like a bell, too. Cast steel anvils that are low carbon and not heat treated are marginal anvils at best. The old Russian cast steel anvils were soft and also rang like a bell. An irritating, high pitched bell. Which is best is a funtion of what alloy is used and how well the manufacturer heat treats it. Like anything else, generalizations fall apart when you get to specifics.
|
|
quenchcrack
- Saturday, 10/02/10 08:49:16 EDT
|
Where the serious issues come into play in the current market is those that call cast iron, steel, and junk anvils (no matter WHAT they are made of) "professional" quality anvils. In past years this was rampant on ebay along with outright forgery (one dealer has been caught several times stamping "Peter Wright" on vises and tools).
In the ;ate 19th and early 20th century they had cheap cast iron anvils with heat treated faces ("chilled cast iron"). But they were honestly sold as what they were along side other better grades of anvils. The difference was price and honest representation. But the thing to always remember is, just how many of those cheap anvils survived? Out of the thousands of anvils I've seen I have only seen one or two.
|
|
- guru
- Saturday, 10/02/10 16:49:43 EDT
|
Guru, yep, I remember Johnny8Acres and his many incarnations with those Russian Anvils he found in car trunks, garages, and maybe Egyptian Tombs, too. What a loser!
|
|
quenchcrack
- Saturday, 10/02/10 19:20:44 EDT
|
Rich,
How do I break in the lenox diemaster blade on a enco woodcutting band saw. The instructions on the site talk about reducing the ratelforce 20-50 percent and then gradually increasing it to normal. I don't know what that means.
Thanks
|
|
Michael
- Saturday, 10/02/10 19:26:02 EDT
|
Ferrofiles, especially Quenchcrack, The Guru Hisself, and Chris.
Thanks for your comments on Tumblers and removing scale. I sorta nodded off after reading the first few comments on my question, I finally woke up and will respond
First off, you gotta know someone called Quenchcrack would call out a liquid bath solution.
The comments about angles axis is well taken, I think I will stick with a roung horiz tumbler. I have seen angle iron used as flippers to keep the stuff moving. What was that about noise? I can't hear ya? The comment about an enclosure
is also well taken. Dang though, I have been collection small scraps (including punch plugs) for several years now.
I have seen garden tools, I call em hokers, but the short handled 3 prong soil stirers work good for finding your stuff in the chaff. I will invistigate centrifical extractor fans (the spell checker hates that one)
Once again Thanks for the info, Advante
Tim in Orygun
|
|
- Tim in Orygun
- Saturday, 10/02/10 19:57:53 EDT
|
Thanks for your answer Guru. Now I know I can straighten my vise, and even more important I know how it should be adjusted properly. I am glad I red the daily comic so I knew what a shop gorilla means.
Merci, Donald
|
|
donald
- Saturday, 10/02/10 21:01:34 EDT
|
Michael,
The break-in procedure for the Lenox Diemaster blades indicates that you should use reduced *feed* pressure on the stock for the first several minutes of cutting. The purpose of this is to allow the teeth of the blade to lose the "wire" edge from sharpening and to work harden the teeth a bit. You don't want to reduce the pressure so much that you're not making chips, of course - therein lies the road to ruin on saw blades if you're cutting anything that work hardens. I recommend that the initial cutting for break-in be done on mild steel only. No stainless, chrome/moly steels or high carbon stuff.
|
|
- Rich
- Sunday, 10/03/10 00:35:50 EDT
|
DUCK'S BILL FORGE NOZZLE
Guru, and others. I appreciate this forum for it's down to earth experience. I am a hobby blacksmith for a couple of years. I have made my own charcoal, and used one home made forge during that time. My forge is a small coal style forge with a bottom draft. I may use a piece of angle iron in the bottom to diffuse the air for a larger fire, and add fire brick around the pot for deeper fire. Recently I went to a marine museum with a blacksmith shop. The blacksmith" talked a much bigger story then he could hammer. I would like to run one comment past you. He said the only way you can use charcoal is with a side draft forge and a ducks bill tweer (sp?). I would like your input on that. Needless to say, I do know it is not 100% true.
Thank you, Milton
|
|
Milton
- Sunday, 10/03/10 13:19:32 EDT
|
Never heard of a "duck's bill tuyere". I've heard of "duck's nest tuyere" but these are bottom blast.
The British use a water cooled side blow tuyere. This is a tube within a tube that passes through a water tank. Circulation is by convection.
A charcoal fire needs to be a little deeper than a coal fire but generally it works in any solid fuel forge.
|
|
- guru
- Sunday, 10/03/10 14:42:58 EDT
|
DUCKS NEST TUYERE
Guru, thanks for your previous response. So, what is a "Duck's nest tuyere?
Milton
|
|
Milton
- Sunday, 10/03/10 16:53:20 EDT
|
It is either a heavy round cast iron ring OR a heavy cast iron water cooled ring with ash dump (for a bottom blown forge). It is not a side blown forge part (so no matter what, your guy was blowing smoke). They are no longer manufactured as correctly shaped commercial fire pots are much more efficient and generally work better.
|
|
- guru
- Sunday, 10/03/10 16:59:09 EDT
|
Rich,
I broke in the bandsaw blade. I had some tube stock lying around. The walls were about .1 inch thick. The bandsaw cut it like butter. Then I had leaf springs from a 95 plymouth voyager van. I annealed the leaf springs and afterwards I could bend them fairly easily. The springs were flat, strieght and .220 inch thick. The saw cut them no faster than an inch a minute. The springs also ate up a 36 grit belt pretty quick and rounded the wheel on an 8
|
|
- Michael
- Sunday, 10/03/10 19:56:28 EDT
|
Rich,
I broke in the bandsaw blade. I had some tube stock lying around. The walls were about .1 inch thick. The bandsaw cut it like butter. Then I had leaf springs from a 95 plymouth voyager van. I annealed the leaf springs and afterwards I could bend them fairly easily. The springs were flat, strieght and .220 inch thick. The saw cut them no faster than an inch a minute. The springs also ate up a 36 grit belt pretty quick and rounded the wheel on an 8" table grinder. Did I anneal the springs wrong?
Thanks
|
|
Michael
- Sunday, 10/03/10 19:56:57 EDT
|
Michael, If the spring steel bent (not just spung) easily then it was annealed well enough to saw. Sawing thin wall tubing is not a good way to break in a blade. Its the hardest thing there is on blades.
An inch a minute sounds like too little feed pressure or two fine a blade. You should be running a minimum of an 8-10 pitch blade.
Cutting fairly thick metal, especially alloy steel, requires a LOT of feed pressure and careful guidance. Besides metalworking saws running MUCH slower than what you are running they also come with either power feeds or weight assist (both for hand sawing) because it is difficult to keep the proper feed pressure.
The difference in being able to cut on too fast a saw and the right speed saw is a lot of skill and the right touch. It is not a recommended way to do the job. For what several blades are going to cost you there is a good chance you can slow that saw down with a couple different pulleys on the drive.
I tried to look up your saw on the Enco site and they have several. Nothing rated at 700 IPM. Their saw that comes with a floor stand has the speed ratings on line and the slowest speed is in FPM (not IPM). The small bench saw does not have a speed rating on-line (not in the manual either). If you have that saw I would bet you are running 700 FPM. Don't trust the translated from Chinese name plate, do the math.
|
|
- guru
- Sunday, 10/03/10 21:11:27 EDT
|
700 Feet Per Minuet blade speed is way too fast for any kind of metal I can think of.
What ever kind of blade you have in there you need to slow it down to around 200 or less for that spring steel, annealed or not.
Any heat created by not keeping up your feed rate to match the higher blade speed, will result in a hard spot that gets progressively bigger and harder until you can no longer saw through it.
All cutting actions create heat. The trick is to have the heat go out with the chips. In order for this to happen the mass of the chips must be great enough to actually carry that heat away as it is produced. If they are not then the heat builds up in the cut were it quickly breaks down the sharp edge of the cutting tool that in turn generates more heat even faster. It all turns into a rapid death spiral for the cutting tool whether it is a saw blade, drill bit, end mill or, what ever.
If you look up the recommended surface footage for HSS cutting tools on spring steel, you'll find it is probably less than 120 SFM (Surface Feet per Minuet)
Saw blades are a little different because of the way they can dissipate heat, even without coolant but, 700 SFM is way too fast.
As the Guru says, you need to mechanically slow the SFM of the blade down to match the material you are working with.
Don't even bother with one of those "dimmer switch" type motor controllers either. It's just going to greatly reduce the HP of your motor while destroying it at the same time.
There is no quick way around an actual industrial metal cutting band saw.
I also strongly recommend some kind of stick wax cutting lubricant even though it's messy.
|
|
- merl
- Sunday, 10/03/10 23:18:10 EDT
|
I used 1/8 inch mild steel to break in the saw and yes it is 700fpm. The spring steel was being cut at slower than an inch a minute and I was using alot of force; at least 20 pounds of preasure. I tried working with some of the annealed spring steel and it wore out a 36 grit belt on my grizzly knife belt sander in a couple hours and it rounded of an 8" grinding wheel. The tube stock got cut like it was butter. So I am not sure what is going on. I would be thankful for any ideas.
|
|
Michael
- Monday, 10/04/10 03:56:44 EDT
|
I use a cutting oil for all my slow cutting tools. This includes bandsaw, drill press, tap and die, etc. On the bandsaw, just put a few drops directly where the blade meets the stock AS its cutting. On thicker cuts, I put a few more drops of the lubricant every so often... this is also messy, but gives me clean cuts and saves blade life.
|
|
- Nippulini
- Monday, 10/04/10 08:31:43 EDT
|
I have a old anvil that has been passed down for generations in my family and was trying to find the name of it , The letters are very hard to read but this is what i managed to get if anyone can help solving this puzzle .
BUEDEN
ACTUPNC
00KLA
78
THANKS !
|
|
JAMES
- Monday, 10/04/10 09:17:47 EDT
|
Michael,
I can't give you any real good advice on cutting stock like spring steel on a bandsaw, because I don't do that on mine. That's possibly something like 5160 steel and has alloying ingredients that make it abrasion resistant and tough to cut like that. I do cut it sometimes on my horizontal bandsaw, because that has constant pressure and lubricant feed - it still wears out blades faster than I like. If you want to profile blades in that steel you're going to have to slow the saw down and possibly work out a way to more completely anneal the stock. Blacksmith shop annealing isn't the same thing as controlled furnace annealing by any stretch of the imagination. To check this out, call a spring shop in your area and see if you can get some drops of factory-annealed stock to try out - might well surprise you.
|
|
- Rich
- Monday, 10/04/10 10:30:50 EDT
|
Band Saw Issues: MICHAEL! (Yes I AM YELLING) You CANNOT cut steel at 700 FPM with a saw. Feed rate and pressure have nothing to do with it. It is the speed the blade is traveling creating too much heat and wrecking the blade. No amount of coolant or skill will change that fact.
My FIRST reply was that your saw was running TOO fast and that the machine was not designed for metal. Rich's reply was referring to a different machine with a wider operating range. But in general wood working machines CANNOT be used for metalworking except occasionally on aluminium.
To modify a wood working band saw to metal working usually requires a worm gear reducer with 10 to 30 to one reduction or more (it would take 44:1 one on my band saw). You can do this with belts and pulleys but it requires several steps (back shafts) as the greatest practical reduction with belts is 5:1 and generally 3:1 is best.
|
|
- guru
- Monday, 10/04/10 10:31:23 EDT
|
BUEDEN? ANVIL James, Send me photographs of it if you can. "Generations" (avg. 25 years) now means from about 1900 which is not that old as anvils go. However, it may be an unusual anvil that had been brought over from Europe and thus the apparently strange markings.
On reading the markings: 1) Clean the anvil side. Use a hand wire brush or, a soft wire brush in an electric drill, OR one of those plastic bristled paint strippers in the same. Then try reading the markings in good light. DO NOT let your eyes try to fill in the blanks. Read only what is absolutely there.
2) Take a rubbing. Use tracing paper or heavy tissue paper and the side of a soft pencil (large carpenter's pencils work best).
In the end, I'll bet it says HAY-BUDDEN, Manufacturing Co. Brooklyn, NY. USA. This is the most misread anvil logo in the world.
|
|
- guru
- Monday, 10/04/10 10:44:07 EDT
|
Thanks guru , looking at the anvil page it sure looks like the HAY- BUDDEN anvils , I will do as you say and see if I can get a better reading .I know it is around 1900 or so as far as age from what i have gathered from family members .
|
|
JAMES
- Monday, 10/04/10 10:49:31 EDT
|
James, Hay-Budden made anvils from the late 1880's until about 1928 (the depression put a LOT of companies out of business). They were considered one of the best of the American made anvils. Many anvils were warehoused and sold new into the late 1930's.
Generations: My Grandfather Dempsey was born about 1908. At least one of his tools is now in my son's possession. So there are four generations of ownership in that tool. Often folks have tools that were old and used when their grandparents purchased them. Add an additional one or two generations. Anvils are one of those tools that outlast many generations of owners if not abused. I have at least one (very worn out) anvil from the 1700's. It may have gone through 8 to 12 or more owners. A lot of history.
|
|
- guru
- Monday, 10/04/10 11:49:08 EDT
|
Guru , There is something special about using old tools that your parents , grandparents and great grandparents have used ,I make knives and this anvil will sure outlast me and hopefully my son will use it during his lifetime . It is in very good shape for its age and has normal wear marks on the face and edges .I will try to get a picture and clean those markings up tonight, I would assume the 78 on the lower part would indicate the weight ? It is a smaller anvil .
Thanks for all the help and the history .
|
|
JAMES
- Monday, 10/04/10 14:13:57 EDT
|
Numbers on the side are weight, in this case 78 is probably pounds. Othe numbers such as on the feet (under the horn) are serial numbers.
|
|
- guru
- Monday, 10/04/10 14:17:49 EDT
|
Thanks guys. Rich had said he used a woodcutting bandsaw on metal and I had heard it could be done with a lenox diemaster blade.
I have an electric furnace wich I annealed the spring steel with. I heated the steel to about 1430f and it lost magnitism at that point. I reduced the heat and and it dropped to 1200f after twenty minutes. It got to 500 about an hour latter and after two hours it was pretty cold. Am I doing it right?
|
|
Michael
- Monday, 10/04/10 14:45:34 EDT
|
Michael, I've got a Ford truck, I can easily carry 10,000 pounds on it. Just because you have a truck it doesn't mean you can carry more than 500 pounds on it . . . I've got a wood working bandsaw, I can resaw up to 12" lumber on it and rip 20" strips of plywood using a little 1/4" skip tooth blade. . The blade travels 5,500 feet per minute (nearly 60 MPH). It makes sparks cutting WOOD!
Not all machines are alike.
While the annealing point on most steels is close to the same, medium and lower carbon steels need to be heated a couple hundred degrees hotter (according to the general chart). The non-magnetic point is a straight line, the heat treating temperatures are curves. In this case Junkyard steel rules apply.
Cooling from the A3 point to just below critical (the A1 point or about 1350 F) is what is important. Cooling rates below that do not effect the hardness of the steel. Again, the rate depends on the type of steel. This can be as slow as 50 degrees F per hour. Also note that temperature measurement equipment (like all measuring equipment) can be off a significant amount.
|
|
- guru
- Monday, 10/04/10 16:03:40 EDT
|
I don't think I will use the enco band saw for steel anymore, Guru. What would be a safe bet or guess to anneal these leaf springs? They lose magnetic properties between 1405-1430 f.
Thanks
|
|
Michael
- Monday, 10/04/10 17:29:13 EDT
|
Probably between 1550 and 1600°F if it a medium carbon steel.
My point about the saw is you need to know and understand your tools. All machine tools, even power hand tools have optimum speeds for various types of work. Often we are faced with setting them up with drives or motors and need to determine the correct HP and speeds. When you have machines with variable speeds you need to know the size work or the materials that the speeds are used for. A good place to learn this is the various machine shop references or standard references such as Machinery's Handbook.
If you are doing metal working of any kind you should have a copy (old or new).
|
|
- guru
- Monday, 10/04/10 18:19:57 EDT
|
I've read about folks cutting steel on a band saw using a very *high* speed and a dull blade. As I understand it, the heat of friction and the air pulled into the cut burns through the steel something like an O/A torch would. Probably isn't something you'd want to try on a decent saw, though.
|
|
Mike BR
- Monday, 10/04/10 19:13:21 EDT
|
Mike BR - What You read about is friction sawing. There are or were blades made for it, and it takes a heavy, powerfull machine. There are or at least were aplications where this worked well, but My guess is that water jet & laser cutting have pretty well made it an obsolete operation.
|
|
- Dave Boyer
- Monday, 10/04/10 19:41:39 EDT
|
Dave, back in the 60's my Dad's factory would drill a hole in a die, and weld a friction blade in the hole to friction saw the shape in the die to extrude aluminum. H-13 I would guess. Than hours and hours of power and hand filing. All of the dies were about 8" circles so the shape had to fit in a 6" inscribed circle. Only friction sawing operation I know of.
|
|
ptree
- Monday, 10/04/10 20:25:10 EDT
|
Mike BR, Michael, et al, I wanted to point out and remind those who already know, some important bit of band saw safety.
Some are talking about free hand cutting tubing, or any round stock for that matter, on a band saw.
Any time you cut round stock that is not held secure in a vise or some kind of fixture, you are almost certain to have the work piece get snaged in the blade and have your fingers smashed under the stock, possibly ruining the blade as well.
Whenever I have to cut a piece of round stock on the band saw I ALLWAYS hold one end in some kind of clamp or at least in a visegrip pliers.
Without it you'll be lucky to just get your fingers nubbed.
Mike BR, at one shop I worked at we had a big old band saw set up for friction sawing but, we only used it to cut 16ga. sheet metal tubing and, bothe sides of the part to be cut were held firmly in fixtures for making miter cuts.
Once the HAZ had formed the cut took about 3 seconds for a 4" piece of tubing.
It took longer for the band wheels to run up to speed than it took to make the cut.
|
|
- merl
- Monday, 10/04/10 22:29:05 EDT
|
I noticed that Harbor Freight has a 55 lb. anvil. I guess it would be good enough for hammering out knife blades ?
|
|
Mike T.
- Tuesday, 10/05/10 03:44:04 EDT
|
NO!!!!!!! That "anvil" is good for only lifting with my nipples in front of cameras for the Guinness people. They also make nice doorstops.
|
|
- Nippulini
- Tuesday, 10/05/10 08:59:10 EDT
|
Knife blades generally call for the best anvils, not Anvil Shaped Objects, AKA ASO's!
Now a large chunk of steel will work as a bladesmith's anvil and should be much cheaper too!
Those cast iron ASO's will *dent* under hot knife grade steels; then every dent will telegraph into your piece making possible cold shuts and taking a LOT more time to clean up a blade. (Forging is the fast part; expect to spend many more times the time finishing when doing knives!)
Many people have been claiming that such ASO's are "Professional grade" which is about as accurate as extolling a Yugo as a great Formula 1 racing car!
You don't need to spend a lot of money to get a decent knife smithing anvil; but research first to avoid throwing away money on something you will not want to use.
Thomas
|
|
Thomas P
- Tuesday, 10/05/10 13:37:34 EDT
|
ASO's and Deception: Back when one of these sites had photos of their 55 pound anvil on-line (Harbor Freight does not list them on-line), I noticed that the image was very dark and flat. So I copied the image (below) and lightened it. In big letters on the side was cast "INDIA 55 LBS". The image was very good when lightened which means it was close to that way starting out and someone darkened it to hide the lettering. A short time later I found the same anvil without the INDIA on the side.
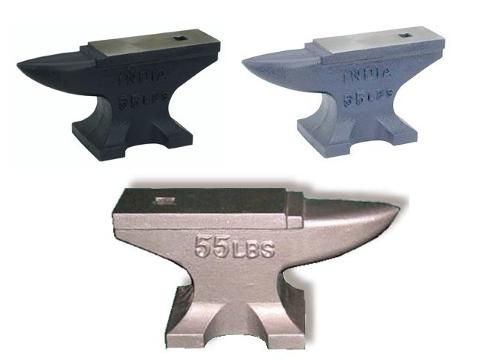
If there is nothing wrong with the quality of the product why are they hiding the country of manufacture and then having the country removed? One place honestly advertised these as top grade cast iron, another said "professional quality steel". Its a pretty casting, a well made but ugly pattern with flat topped squarish horn and faux top plate. But a cast iron ASO is a cast iron ASO is a cast iron ASO. . . More. .
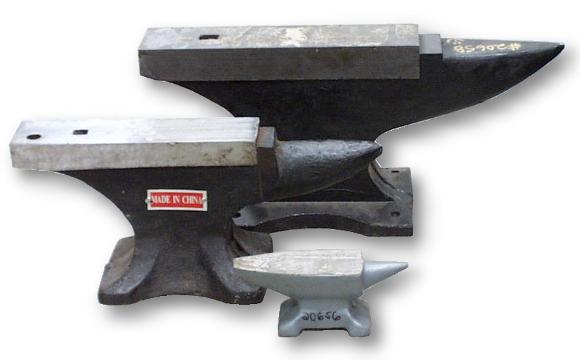
I photographed these in a farm supply. The two larger anvils are patterns that show up all over. Again, these have faux top plates and are ugly patterns. The small one is often sold as a jewelers' anvil. I was given this one as a gag gift. . the thick layer of plaster smoothing out the poor quality casting is not flaking off even though it has only sat in storage. We did a steel ball rebound test on these and they were softer than the concrete floor they were sitting on. Came close to getting thrown out of the store. . .
Study ALL of the above patterns. They show up from different suppliers with all kinds of descriptions but materially they are all the same. Junk.
As I mentioned recently, Cast iron anvils have been made for over a century. But you almost NEVER see an old one. . . There are good reasons why. They don't hold up and go to scrap or become lawn ornaments.
|
|
- guru
- Tuesday, 10/05/10 16:03:02 EDT
|
Got my ASO's from Northern Tool. Paid $29.95 for the 55 pounder, has CHINA cast into the side and looks suspisciously similar to the India one above. I only used them for my act. Someone here saw a picture of me lifting it on my site and made mention of it. Something along the lines of "hey check out this guy lifting an ASO from his nipples". I googled myself and found anvilfire.com. Have been here ever since!
|
|
- Nippulini
- Tuesday, 10/05/10 18:26:28 EDT
|
I have one of the small (in this case gray) anvils and it worked fairly well for jewelry and very light work, but like my old 100 kilo USSR anvil I bought it about 20 years ago. The 50 k. Russian, and then the 50 k. diamond hardy immitation Russian anvils, each stepped down in quality to the point of near uselessness. Probably the same thing happened to the lttle gray anvils. However, who knows what may turn up used in flea markets and such. The best defense there is to test for bounce. If someone objects, just take your money elsewhere! If they won't let you tap the face with a hammer or drop a ball bearing on it, what do they expect to happen when you actually use it?
TGN: ...and we're happy to have you here! I have to admit, your path here qualifies as "unique!" :-)
Chilly and scattered clouds on the banks of the lower Potomac.
Visit your National Parks: www.nps.gov
Go viking: www.longshipco.org
|
|
Bruce Blackistone (Atli)
- Tuesday, 10/05/10 21:08:28 EDT
|
How do I post pictures? I have some knives that are profiled and the bevels ground that I would like to show off.
|
|
Michael
- Wednesday, 10/06/10 21:35:30 EDT
|
Michael, We do not currently have public hosting for images.
|
|
- guru
- Wednesday, 10/06/10 21:38:49 EDT
|
Didn't know that about the pictures. I gave on cutting the leaf springs with the band saw. I cut out the general shapes with a cut off wheel on an angel grinder then I ground it the rest of the way with a grinding wheel on the angle grinder. Thanks for the tip on annealing guru it made the grinding easier.
|
|
Michael
- Thursday, 10/07/10 03:19:04 EDT
|
I found reference to a "MILL FROG" in a list of blacksmith tools in Maryland, USA ca 1800.
Any idea what this is/was?
|
|
Peter Himmelheber
- Thursday, 10/07/10 07:51:13 EDT
|
i have a 25 lbs murray brothers power hammer i am wanting to sell. i was just wondering were i could sell or where to post for sale?
thanks jake
|
|
- jake g
- Thursday, 10/07/10 13:30:48 EDT
|
jake g, the hammer-in is usually the place to place notice of a powerhammer for sale. Please do advise where in the world you are located as this is an international forum.
|
|
ptree
- Thursday, 10/07/10 15:17:51 EDT
|
"Knife blades generally call for the best anvils" LMAO
Maybe you meant to say: knife blades generally call for the best cutlers.
|
|
- happyknifenut
- Thursday, 10/07/10 23:13:28 EDT
|
happyknifenut,
I know, you threw some Mexican dirt weeds on the old forge, gotta watch out for those. ;)
|
|
Mike T.
- Thursday, 10/07/10 23:44:16 EDT
|
I recently had a job involving bronze. After I had made new bases for some bronze statuary and TIG welded them on. I was requested to make six fixings. Basically these were very large dome headed rivets. 6" long, 5/8" diameter shank, and a domed head 1 1/4" outside diameter and 3/8" high. Rather than turn them out of solid 1 1/4 inch bar I intended to forge down some 3/4" bar with swages under the power hammer and upset and forge the head. Attempts to forge anything were a failure as the material was very hot short. The grade of material was PB 101. Which I believe is about 93% copper about 7% tin. I'm not sure if there is a trace of lead for machinability. Has anyone got any advice both on forging and TIG welding bronze?
|
|
- Chris
- Friday, 10/08/10 03:08:38 EDT
|
If any of you knife pros want to help a novice I have a few knives profiled with the bevels ground. Any criticisms or tips would be appreciated. If I can email any pictures let me know. I have joined Britishblades.com, hopefully that is a good site to learn from.
|
|
Michael
- Friday, 10/08/10 03:16:50 EDT
|
Does anybody have any hints on using bone as a knife handle please?
|
|
philip in china
- Friday, 10/08/10 03:33:56 EDT
|
I'm wondering which modern anvil is considered to be the best out there; I have been looking at Peddinghaus, NC Tools, Delta Future, and Nimba anvils.
As far as hammers go: Are those 'ergonomic' hammers from Big BLU what they claim to be - ergonomic? I'm trying to see what the difference between a $20 hammer and a $120ish hammer is besides cost.
I'm also trying to figure out how to make a blacksmithing shed approx 10x10' in dimensions, and is easily knocked down for moving (should I need to move in the future), and also trying to figure out the best layout for that size shop. If I have an oxyacetylene setup, then the shop layout may have to be something like 10x14.
I'm just hoping that I get the house I'm trying to buy. :)
PondRacer
|
|
PondRacer
- Friday, 10/08/10 06:59:09 EDT
|
I would like to set up a smithy in my back yard. But the only good place i have is under a tree next to my shed. The tree has a fairly high crown. But i worry about how the heat coming off will affect the tree. I will probably be working small since i am just starting out. Any advice on whether this is a problem and what i can do about it? (other than cutting down the tree).
|
|
Russ
- Friday, 10/08/10 07:46:38 EDT
|
Hey Guys, YOu have probably heard me going on about the controlability of the Massey Hammers, We have eventually got round to putting a video on youtube! The hammer is a reuilt unit on test (hence the lack of a proper anvil, just a block to bump on!)
http://www.youtube.com/watch?v=P0up4GbiNa0
|
|
- John N
- Friday, 10/08/10 08:21:56 EDT
|
Philip,
I can only say about bone that many old farriers' knife handles were of bone, turn of the 20th century and before. I got a couple of tham at the flea, and the handles were still intact.
The native Americans used shaped scapulas to hold down their roach headdresses. Having looked at these, I can say that they are fairly thin and would make good slabs for a small knife handle.
|
|
Frank Turley
- Friday, 10/08/10 09:09:59 EDT
|
Chris - Bronze
Get your hands on some high silicon bronze, alloy C65500. It forges beautifully and tig welds with perfect color match.
Philip in China:
Best be when working with bone for handles is to first stabilize it. You can get the good stuff from a knifemaker's supply or just use thin-bodied cyanoacrylate and immerse the bone in it and then pull a vacuum on the whole works. This will pull all the air out of the bone and replace ti with cyanoacrylate, making the bone many times more durable and easier to work with.
|
|
- Rich
- Friday, 10/08/10 09:46:12 EDT
|
Hello , do you know where i can get any information on making and repairing plough shares. thankyou
|
|
Barry
- Friday, 10/08/10 10:04:42 EDT
|
Barry, I replied to your question when you first asked it. It is a general metal working problem. Books like Practical Blacksmithing touch on it but the actual "how-to" is just plain old blacksmithing.
|
|
- guru
- Friday, 10/08/10 10:37:31 EDT
|
There is not much written on dressing plow shares. The old book by Selvidge and Alton, "Blacksmithing" has some info. The metal-to-ground wear will remove the two "corners" on the point and make it rounding. Sometimes you can draw it out assuming there is enough stock. If very worn, a high carbon piece can be folded around the point and forge welded on. This normally requires a striker or trip hammer. The point and lower portion of the share is hardened and tempered. There are slightly different configurations on the curve of the point and landside depending on whether the soil is sandy, loamy, clayey, etc. It is best to have a finished share to copy.
|
|
Frank Turley
- Friday, 10/08/10 10:44:50 EDT
|
From a post Frank made and is in our FAQ on Brass and Bronze
"Forging Brass" UNS C37700
Copper 59.5%
Lead 2%
Zinc 38%
"Architectural Bronze" UNS C38500.
Copper 57%
Lead 3%
Zinc 40%
Forging brass is the material all other forgability ratings are based on. Its the easiest to forge and is rated a 100. Everything else is lower.
Note the UNS numbers with the specs above. These are the only alloy numbers you can rely upon.
There are forgeable alloys and those very difficult to forge. The working temperature is just below the melting point and difficult to judge. The brass I've worked was like working clay under the hammer. You can work it until quite cool as the heating anneals it to where it can be cold worked to a point.
|
|
- guru
- Friday, 10/08/10 10:51:11 EDT
|
philip in china, I was a cutler and feel free to stop over. I will be happy to show you anything you want to know about attaching bone handles and properly hafting them. you can contact me if you like.
|
|
happyknifenut
- Friday, 10/08/10 11:03:01 EDT
|
"Best" Anvils
For serious forging the heavy pattern with a long solid waist or no waist at all (like the Nimba or Catalan anvils are best for their size (more effective). Another super anvil with long support under most of the face are the German S&H anvils (no longer made). These forged anvils were probably the finest ever made anywhere on the planet and nothing like them will ever be made again. The one in link is for sale. Asking price is $3000. This is the only anvil I've had "anvil envy" over in decades. If you want to buy me a Christmas gift, THIS is the one. If someone wanted to resurrect an old pattern for casting, this is it. These have a narrow face relative to their size which a lot of people like.
After that I still believe in forged anvils so Peddinghaus is it. But they could be dressed better and the largest is 265-275 pounds. The TFS anvils are ugly but a good solid shape. All the cast anvils should be purchased from a reputable dealer. Once in a while there is a loser with serious defect and the only guarantee is WHO you purchase from.
Most of the anvils you listed are farriers anvils or standard American Pattern anvils from farrier anvil manufacturers. While these are what I have in my shop they are not what I would be out looking for today. These long horn, long heel anvils are springier than the others mentioned above and more noisy and inefficient as a result.
But in the end, ANY anvil is better than no anvil.
|
|
- guru
- Friday, 10/08/10 12:49:35 EDT
|
I have forged at least 5 different bronze alloys, and I would humbly disagree that any alloy with that much lead and zinc as C377 is "the easiest".
Silicon Bronze, C655, has NO lead and NO zinc. It is MUCH easier to get usable results with, although, technically, it is "harder" to forge in the sense that it takes more force, ie, harder hammer blows.
But any alloy with Lead and Zinc in it is hot short, has a smaller working temperature range, and is harder for any mere mortal like me to forge.
Not to say it cant be done- I have done plenty of it- but Silicon Bronze is by far the first choice for bronze forging.
Silicon Bronze is a darker brown color, which is sometimes not acceptable.
In the "golden" color range, I much prefer Naval Bronze, C464, as it has .07% Lead, and Lead is the killer in forging. Lead is what causes the dreaded crumbly cookie dough syndrome.
I have forged Forging Brass, and Architectural- and I wouldnt wish either on my worst enemy.
Naval and Silicon Bronzes would be, by far, my choices.
|
|
- Ries
- Friday, 10/08/10 12:51:26 EDT
|
With respect to forgability ratings, keep in mind that these have been developed for industrial processing like closed die forging rather than ornamental foring. In an application like closed die forging, foring brass probably is the easist since it will flow to fill a cavity more readily than other types. This is great if you can get your job made in single heat or single blow. When producing open die/hand forgings, the ability to be worked over a wide range of tempereatures is often more valuable than being super soft in a very narrow temperature range.
Patrick
|
|
Patrick Nowak
- Friday, 10/08/10 13:54:29 EDT
|
The yellow brass/bronze I've forged the most of is "low fuming bronze" or brazing alloy.
Cu 56-60%
Sn .8-1.1
Pb .05
Al .01
Fe .25-1.2
Si .04-.15
Zn (remainder) 43 to 48%
Very low lead, the zinc (a brass) doesn't seem to hurt the forgability. I agree that architectural bronze is terrible stuff to work. I've helped on a couple jobs that used a ton of it. . . all forged using a coal forge! I had the job of brazing and finishing many of the joints ans fixing the crumbled places. Lots of die grinder work.
If I had to make a bunch of big brass/bronze fasteners I think I would make waxes and cast them.
|
|
- guru
- Friday, 10/08/10 13:56:03 EDT
|
Forging Knives: Knife alloys can be quite "hot hard" and so on poor quality anvil they can telegraph the hammering into a dent on the surface. Knives are one item where having a very smooth anvil face is important as every mar or blemish on the face will show up in the work and can at worst cause problems with cracking or just increase the amount of time necessary to finish off a blade.
Note that a hard smooth surface does not necessarily mean a name brand anvil a good die block will have both these properties ---or even a large hammer head set in a stump.
This is what I was trying to convey: cast iron anvils are double plus ungood for forging knives.
Russ, you will often be working with your wedding tackle within 2 feet of the hot spot of your forge and you are worrying about stuff 8+ feet above it? If you are really worried put in a short stack with a diffuser on the top.
|
|
Thomas P
- Friday, 10/08/10 16:01:33 EDT
|
Thomas, fully agree on a decent hard smooth surface for bladesmithing ! ,
Jock, Watched a video on youtube from BigBlu where they show holding the dies in with screws, does this method really work? they squirt a bit of grease over the gap to keep the scale out. Everything in me screams this is a poor second to taper keys. I can only imagine a world of loose dies and misalignment, and it seems to take longer to fit the dies than with keys, Whats the Pros ?
|
|
- John N
- Friday, 10/08/10 16:10:30 EDT
|
Die Holding Systems Pros, Cheaper and easier to manufacture, no wedges to manufacture, dies do not need as tight of tolerances. SHOULD be easier to change - ask anyone that has tried to remove long installed wedges. . Also no wedges sticking out to snag on things, run into guide systems. . . A generally smaller form factor. The small form factor is a plus and produces good visibility and access.
Cons, Didn't cure the sticking die problem, that is what the grease is about. Not as "heavy duty" appearing as wedge systems. . . But they do not seem to have any loosening problem.
I liked it enough that I bought Big BLU holders and dies for my hammer building project.
Another popular option is bolt on dies (such as used by Phoenix). However, This requires a large piece of tool steel to get the accuracy needed for interchangeability. However, the advantage of the Phoenix system is that with a few extra holes you can rotate the dies to numerous angles.
The "sticking problem" . . Big BLU thought they were solving the sticking wedge problem. It turns out that what makes things stick is fine scale working its way into the crevices between die and dovetail. With every blow of the hammer these fits expand and dust works in, the expand again. . . It doesn't take much to make the fit impossibly tight.
It is a common problem with many types of tapered fits. You install at X force and it requires 8 to 10X the force to uninstall. Wedges installed with a firm wrap of a 4 pound hammer require a heavy blows with a 15 pound sledge to remove. . Tapered hubs (on autos, trucks and nuclear cooling pumps) creep UP the taper not off and require heat and a many ton press to remove as apposed to the small amount of torque on a nut used to install the hub.
We are working on a system where bolts can be removed (torched off if necessary)and replaced without damaging any of the other parts.
Meanwhile, I suggest the method Big BLU is using to reduce die sticking to be used on wedge systems as well. Pack the line around the joint with heavy grease, wipe off the excess.
|
|
- guru
- Friday, 10/08/10 17:46:01 EDT
|
Ive found that 95% of die wedge sticking problems are caused by temperature differetials, and badly fitting keys being driven in tight whilst the whole lot is hot.
Im a believer in wiping the keys with molly to help removal, I cant see the point in 'masking' the key with grease on a hammer that is going to get a decent session of use. The whole lot would end up as oil and scale sludge, making the potential problem you mention of scale ingress between key and die worse!
What do you mean by 'form factor'? is it just you dont have a bit of key sticking out?
|
|
- John N
- Friday, 10/08/10 18:19:05 EDT
|
Die keys. Safety men in forge shops hate them! At the drop forge shop for the valve and fitting company, we ran 1500# to 25,000# steam drop forges for closed die work. Often changed dies several times a day. We had more injuries from driving out wedges thjan any other single cause in that shop.
When Jock describes wedges that tighten he is right. Scale is a big issue, and John N's thoughts of the grease grabbing the scale is also true. In closed die work the dies get lubed alot, often for every forging if a difficult shape. That forge lube with scale is fantastic die glue.
Ever see the "torpedo" used to drive the 4' long keys out of a 25,000# hammer? Hung from an overhead crane, 4 men to swing it, say about 12" diameter at the head, and the crane trolly is moved to help with the swing, so that the Torpedo is moving through say 12' when it hits.
I built my home hammer with an odd try for a dovetail with bolts. It is a failure.
My next try will probably be a bolt on system, and I will use MolyKote Anti-seize 1000 on the bolts and MolyKote GN paste on the contact surfaces to allow easy seperation.
|
|
ptree
- Friday, 10/08/10 18:36:32 EDT
|
So I'm relatively new to this, and I'm starting by making a wooden sword. I'm reading through your "Sword Making: For Beginners" page and I'm wondering if there was a diagram of knife parts, because all I'm seeing is [ Diagram of Knife Parts ]. As well, I'm shaky on some terminology, is there somewhere I can check to refresh my memory?
|
|
Taylor
- Friday, 10/08/10 19:40:34 EDT
|
Russ; Overhanging Trees:
I had some tree limbs encroach over the chimney at my old forge. I would trim them back but they would sometimes get within two or thrre feet of the chiney stack. About all I ever got was whithered leaves from the heat. As Master Thomas noted, the heat tends to dissipate quickly just a little distance from the forge. Try it out, keep your eyes open, and see if there is any real damage. At least you have a starting point in that you know that most of us haven't had overhanging trees (spreading chestnot, or otherwise) die off or burst into flame.
Cool and clear on the banks of the lower Potomac.
Visit your National Parks: www.nps.gov
Go viking: www.longshipco.org
|
|
Bruce Blackistone (Atli)
- Friday, 10/08/10 20:22:27 EDT
|
Poof, then prost! 8-0
|
|
Bruce Blackistone (Atli)
- Friday, 10/08/10 20:27:30 EDT
|
Is there any kind of reference material available on Champion Power hammers? i saw a reprint of the blower and forge catalog and ther was nothing. thanks
|
|
coolhand
- Friday, 10/08/10 21:15:57 EDT
|
Where would I be able to find good ides for a 10x10' or 10x14' shop layout? All the layouts I have seen so far were like 15x15 or 15x20', thereabouts.
Just trying to figure out where things would go, as far as storage and actual work space.
PondRacer
|
|
PondRacer
- Friday, 10/08/10 23:46:04 EDT
|
10 by 10 feet ends up being all work benches (24" deep) and an isle between them. You can put your anvil in that 6 foot wide space, forge at the end with vise mounted on the forge or bench need the forge. Storage shelves over and under the benches.
I build shop wooden benches with framing lumber tops and at least one shelf under. Shelves should only be about half the depth of the benches.

To suggest any more would require your list of tools and goals. The construction of your building is also a question. There are many really flimsy cheap utility buildings these days that you can't hang a shelf on the wall or a stock rack. Shelving is expensive and the "standard" sizes will probably not make the best use of your space. I spent about $1000 on steel frame shelves a couple years ago and have needed to replace the chip board almost from the get-go. The so called "1500" pound rated shelves cannot support a hundred pounds without sagging and collapsing.
As noted on the sketch above, ventilation is critical in such a confined space. Will you have electricity? Water?. . . How high a building? TOO MANY QUESTIONS.
Start with a pencil and some paper. . .
|
|
- guru
- Saturday, 10/09/10 01:07:00 EDT
|
Champion Power Hammers: They made two sizes 30 and 65 pounds. They operate similarly to other Dupont linkage hammers. They are very compact. .
We have some catalog information and the hammer patent but both simply say "its a hammer" and are the best. . . Machines back in the day did not come with detailed instructions. You were either mechanically inclined enough to own and operate such machinery or you were not. . . If you need help setting one up you went to a millwright. But to most blacksmiths this would have been an embarrassment.
No. 0 = 30 lbs. 400 RPM 1 HP. Weight 1100 pounds
No. 1 = 65 lbs. 300 RPM 2 HP. Weight 1400 pounds
Other than die sizes and foot print that is all the data given. They came with and without motors. Clutching was by slack belt, they were designed to be operated from the sides.
As old machines they are often worn out and in need of adjustment and repairs.
The ram height adjustment should be set to just above the work height or a minimum of about 1" opening between dies. The stroke adjustment determines how hard the hammer hits and the practical speed limit. A long stroke should be run slow and a short stroke can be run fast.
|
|
- guru
- Saturday, 10/09/10 01:24:12 EDT
|
Pond Racer,
In "Edge of the Anvil" Jack Andrews explains the layout he uses when forging in a tipi. That's got to be the ne plus ultra of relocatable smithies.
I have to say I'm with John N. on using grease to prevent dies from sticking. If the space between the die and wedge works enough for scale to penetrate, I'd think it would pump grease (and the crud it collects) just as efficiently.
|
|
Mike BR
- Saturday, 10/09/10 10:16:28 EDT
|
That's already been a GREAT help for me to visualize. Being deaf, I'm a very visual person, and seeing an example of a smithy in a 10x10' space shows a lot, to the point where I can say, ok, let's see what a 10x14' space looks like.
A tipi is an interesting idea...but may look out of place in the neighborhood. I'm considering making the workshop out of a shed with wood or vinyl siding, where the structure is beefy enough to support shelves. I know I will be restricted to not-too-large items being worked on, in this space. If I had aluminum siding, or if the building is all-metal, it will amplify the sound rather than deaden it... and I want to deaden the sound so the the neighbors do not complain about the noise.
Right now I have in mind: anvil, coal forge, workbench with leg vise, tool rack or table. Then a little area for the coke and a little area for the metal stock. Slack tub is going to be on the other side, away from the fuel, I think.
I'll probably draw all this out in Solidworks...
PondRacer
|
|
PondRacer
- Saturday, 10/09/10 11:26:04 EDT
|
Have you got any information on resurficing an anvil or refurbishing the corners
|
|
Barry
- Saturday, 10/09/10 11:46:19 EDT
|
Any information on refacing a ball pein hammer, thankyou
|
|
Barry
- Saturday, 10/09/10 12:16:53 EDT
|
Anvil repair, dressing the corners (rounding them):
Anvil repair: http://www.anvilfire.com/FAQs/anvil-3.htm
Dressing anvil corners: http://www.anvilfire.com/FAQs/anvil-4.htm
PondRacer
|
|
PondRacer
- Saturday, 10/09/10 12:46:00 EDT
|
my question is if i wanted something created how would i go about getting created and how long does it usually takes
|
|
Melvin
- Saturday, 10/09/10 14:50:27 EDT
|
Melvin,
If you want a nail created it will take more time to start the forge than to make it. Then about 1 to 0.3 per minute of forging time depending on size and specifics. If you want a new World Trade Center, Space Shuttle or Nuclear Power plant it may take a couple decades. Now, something simple (HA!) like a muzzle loading rifle may only take a few months if a pro makes it working part time. Longer if all the parts are made from scratch.
HOW you go about it, is by communicating what you want, not pussy footing around. WHAT DO YOU WANT? A nail or a Space Shuttle?
|
|
- guru
- Saturday, 10/09/10 15:18:30 EDT
|
Dressing Anvils: My standard advise is NOT to do anything until you know something about the tool. Generally if you have to ask, you don't know enough. See our FAQs page or anvil gallery and read all the information.
Dressing Hammers Hammers, like anvils are tool steel, generally harder. You should not try to add material. Weld metal is difficult to match to the base metal and will not have the same properties. Repairs are made by grinding, filing, sanding, polishing. Any cracking should be cut off or ground out. If this removes too much material then the tool is scrap or needs to be considered raw materials for creating another tool.
Hammers generally should have smooth well rounded corners. See Dressing Hammers
Many good old hammers are worth putting some effort into but many new imported hammers are junk and not worth the effort. Its going to be a sad day when the bulk of the old tools are the junk tools of today. . .
|
|
- guru
- Saturday, 10/09/10 15:46:04 EDT
|
Shop furniture is often overlooked as an important tool. This includes benches, shelves, tool chests and stock racks. There never seems to be enough storage OR work space in a shop no matter how big. It always seems easier to accumulate more tools and not more tool chests. . . But the more tool storage you have the greater the likelihood you will have free bench space.
Wooden Work Benches: While wood is not ideal for the metalworking shop it is light, strong, durable (even in a metal working environment) and relatively inexpensive. It is the ideal material for general purpose work benches.
I build two types. One with vertical legs designed to bolt to a wall and those with angled legs for use free standing. My wood working bench is the freestanding type.
I edge glued the top on the wood working bench but I inherited a bench that used a combination of 2x4's and 2x6's for the top and had 3/8" gaps between the boards. Occasionally the gaps were handy and sometimes a pain. This two foot by six foot, three foot tall bench had been built by my brother-in-law and used to overhaul numerous motorcycle engines and I used it to build a couple small 4 cylinder automobile engines. Spilled oil soaked in over time to the point that you could not detect it.
Over time I used this bench bolted to a wall, free standing and then bolted to wall and floor. Bolting (even with a small 1/4" bolt or wood screw) the top corners of a bench to building framing makes the bench as sturdy as the building. One or two on the floor help make the building and bench one unit. I use small angle iron brackets (angle iron, not hardware angle brackets). This bench has a large vise on it that I made a anchor bracket that passes under the bench to the wall.
When I framed up the bench area of my shop I notched the studs and attached a strip of solid wood shelving at bench top height for attaching brackets. Its sort of like an internal chair rail. The wall above the bench also had pegboard from bench top to ceiling. This supported small shelves and individual items.
Tool chests have gotten like a lot of modern tools, cheap and flimsey. Those carried by many of the big box stores are miserable things that will NOT support the weight of tools that can easily fill them. It is easy to put 100 pounds or more of wrenches, drill bits, chisels. . .in a single drawer. It does not pay to buy these chests if you intend to fill them. Save your money and purchase Snap-On or Kennedy. You can also build your own but I find fitting and installing all those drawers to be a pain. . .
Think about it when planning a shop or buying tools. Its a necessary expense.
|
|
- guru
- Saturday, 10/09/10 17:04:18 EDT
|
Die Keys: Keys for our Bradley’s are made of mild steel bar stock by eye and hand ground on a 20" Disc Sander with a 1/8" per foot taper. Bradley dovetails are straight 5 degrees on both sides of the ram and sow block. The ram and sow block take (2) two keys each that are driven in opposing each other. We only use a 2-1/2 pound hammer to tighten and loosen our keys. If a larger hammer is needed and if the dies come loose it would suggest the taper is incorrect.
We wipe off our keys before installing them to remove any scale and then oil them liberally with straight 30 weight oil to help drive them home. We never change die while they’re hot. We’ll finish the day’s work with the dies in the hammer and then change them the next morning for new jobs. The ideal circumstance would be to have multiple hammers set up to do specific jobs and not change dies but change hammers for each job.
|
|
B R Wallace
- Saturday, 10/09/10 17:12:36 EDT
|
Hercules "Patented" Power Hammer made by the Champion Blower & Forge Company also made a NO. 2 hammer that had a 125 pound ram.
No. 2 = 125 lbs. 150 RPM 5 HP. Weight 4500 pounds
I've never seen one and only heard about a few. They are listed in The Champion Blower & Froge Company catalogue No. 56 January 1935 Edition.
|
|
B R Wallace
- Saturday, 10/09/10 17:23:04 EDT
|
For smaller tool storage it is hard to beat a Vidmar or similar chest. If You can find used ones, You probably won't pay any more than You would for an equal ammount of storage in new good quality mechanic's type chests. New ones are out of My price range.
|
|
- Dave Boyer
- Sunday, 10/10/10 00:00:15 EDT
|
I saw a commercial on TV the other day, mechanics were working on a car, the jack slipped and the car fell on the tool box, but was not a concern as the toolbox was holding the front end of the car. For the life of me, I can't remember the name of the tool chest company.
|
|
Mike T.
- Sunday, 10/10/10 01:58:17 EDT
|
Mike, that was for the "Stupid Mechanics Tool Box Company". Working under a car held up by a jack is not a safe practice even in an emergency.
|
|
quenchcrack
- Sunday, 10/10/10 08:50:01 EDT
|
In a country as litigious as USA I am surprised to hear of a commercial showing somebody working under a car held only by a jack.
|
|
philip in china
- Sunday, 10/10/10 20:29:01 EDT
|
Philip it is surprising, thought not surprising to see a Geely held up by two small children while being repaired in your country.
|
|
- Barn Burner
- Sunday, 10/10/10 21:00:41 EDT
|
I just came across a 400# Columbian anvil today< it is in pretty good shape. Any idea of what these are worth or any history on them? Thank you
|
|
Clint
- Sunday, 10/10/10 21:35:26 EDT
|
Clint, Columbian anvils were made in the early 1900's by Columbian Hardware Company, Cleveland, Ohio, who also made vises. They stopped making anvils about 1925. There are two types, forged in the US, and later cast in Sweden. Both are good anvils but the forged may be more valuable.
Pricing on anvils depends on the condition as judged by someone that knows anvils, the location and who's buying and selling. The going price is two or three dollars a pound or more. In very good condition (flat with some use evident but no damage from abuse) it may go for twice average condition (as much as $5 pound, more if pristine). In well used condition with some chipping, wear and some obvious damage the low end of the scale ($2/lb). In really terrible condition it may go for $1/pound. Repaired anvils may sell for more but I generally would not have one in my shop (so they are worth very little to me). I recommend that people never purchase repaired or resurfaced anvils due to the large number of hacks doing the "repairs".
On the West Coast these things are worth more but in the rust belt they still occasionally sell for near scrap (resale) prices. In places outside of North America including Alaska and Hawaii, prices will be higher but adjusted for the local economy and transportation costs. The fact that there are still good deals out there ($50 and $100 anvils) the higher prices are often take time to obtain. There is also the misconception that an "old" anvil has less value than new. In fact, old anvils, especially forged anvils are worth more than new anvils when in good condition. They are just as good a tool now and forever unless abused.
|
|
- guru
- Monday, 10/11/10 08:53:09 EDT
|
What is the website url to the young knife maker in Washington whos user namer here was vorpal and now known by something that begins with the letter P? He has an unusual name also. I lost his site and can't find it in the archives here.
|
|
- Big John
- Monday, 10/11/10 10:16:33 EDT
|
www.prometheanknives.com
|
|
- guru
- Monday, 10/11/10 11:37:55 EDT
|
I would like to purchase your kaowool 1/2" blanket,
can you send a quote including dimension and minimun sale and freigth charges to El Paso TX
|
|
Carlos S
- Monday, 10/11/10 13:25:27 EDT
|
Thanks...
|
|
- Big John
- Monday, 10/11/10 13:43:41 EDT
|
Buying a tool box. Check with your local garage on
his tool supplier schedule. The Mac, Snap-on, etc. trucks sometimes get trade-ins and like to move them cheap. If they need some repairs they can get you the parts.
|
|
S K Smith
- Monday, 10/11/10 14:23:51 EDT
|
designing your work space: the important thing to remember is your "work triangle": Forge Anvil Postvise. For small items you would like them all to be within a turn or a turn and 1 step. For large items you need to factor in material sizes.
For my knifemaking set up I have about 10'x10' space with my gas forge on top of a soapstone slab on a workbench across one end with a postvise mounted to the corner of the workbench and then a line of anvils down the side, (the travel ones get stored at the end of the big shop ones so I can make use of their smaller horns and thinner heels when necessary. (The pass through is at the end of the anvils)
The other side is the hammer, tong and tooling rack and across the other end is another workbench with a 6" jaw postvise---anything needing it has enough heat in it to withstand the several step walk to it and that end of the hammer rack has the *big* hammers
Having places where you can safely put down hot work is a must and having at least one where you can stick hot high carbon steel without worrying about it quenching from contact with cold stuff is great!
Now if you want to make gates you would probably be best off setting it up so that you could turn your forge around in the doorway or bring it outside and work outside. Even in the inner city I had an outdoor postvise---mounting bolts were all welded over to prevent unauthorized strolls and I got a damaged anvil that could stay outside without walking off too so I could work large items on a coal forge under the spreading locust tree.
Thomas
|
|
Thomas P
- Monday, 10/11/10 15:31:55 EDT
|
Work Triangles: Thomas, very nice layout. But they DO get better over time. .
My shop trailer had a very convenient work triangle. Anvil in front of forge about 4 to 5 foot distance, Vise to the left and forward from the forge. Tong rack on the triangular vise platform. Quench tank immediately to the left of the forge. Bellows handle operating station just to the left and beyond the vise JUST enough that someone could operate the bellows while some one worked at the vise.
This was carefully designed on paper with colored paths drawn using circles based on the average person's standing space and large circles based on a comfortable reach. The forge distance was based on reach PLUS 12" for average tong extension.
In use I often had my oxyacetylene torch or arc welding stinger (or both) hanging off the pull out forge stock rack. My angle grinder was piled on top of tools on the vise platform. All of this within an easy pirouette' or a single step.
|
|
- guru
- Monday, 10/11/10 16:00:49 EDT
|
how do you turn coal dust found at the bottom of your bag of coal into uesable metral
|
|
- clayton
- Monday, 10/11/10 17:52:14 EDT
|
Clayton:
You don't. It's not iron ore, it's coal. You can make it into a paste with water and use it on your fire, but that's about it.
|
|
Alan-L
- Monday, 10/11/10 17:56:00 EDT
|
Hi Guru
I see the Greenwood collected anvils are being offered on ebay from someone in Petersburg, VA. I am wondering if he previous sold off his collected anvils or if he is having someone here sell them?
|
|
- FW
- Tuesday, 10/12/10 00:40:56 EDT
|
Tool chest holding up front end of car....no need to get so serious, commercials are staged and manipulated, however,the tool chest was probably holding the front end.
Talking duck and talking gecko, yeah, I'd like to own one.
|
|
Mike T.
- Tuesday, 10/12/10 01:01:31 EDT
|
Could purchase used tool chests and repaint them with Rustoleum. I think it is a very good product. I have an old tool chest and think I will paint it John Deere green with a John Deere logo on it ( just to make it cool ).
|
|
Mike T.
- Tuesday, 10/12/10 01:07:33 EDT
|
Work triangle:
The propane forge tends to elongate the work triangle. That dragon's breath is no fun to stand in front of. What's working for me is I have my anvil maybe three feet in front of, and maybe at a 45-degree angle to, the forge. I stand on the other side of the anvil, so I basically reach over the anvil to get to pieces in the forge. Treadle hammer is to my right and swage block more to the right. The vise is to my left, probably further than the ideal distance, but the shop setup (stock rack, band saw, ...) is dictating that.
|
|
- Marc
- Tuesday, 10/12/10 10:17:06 EDT
|
Greenwood Collection Yes, that is Josh selling some of his anvils on ebay. Sadly, these private collections even when a large number are museum pieces do not stay in a collection. In fact, even museums buy sell and trade parts of their collections. Some of these anvils have gone to museum collections, but that does not mean they will stay there.
We are just lucky that Josh took the time to clean and photograph these for us to enjoy as a virtual museum collection.
|
|
- guru
- Tuesday, 10/12/10 11:08:36 EDT
|
Can you help me with finding the temper colors of copper? Thank you in advance.
|
|
Larry
- Tuesday, 10/12/10 11:48:27 EDT
|
I get my coal as "fines" and dump it into a 5 gallon bucket and add water to get a sludge that is then added to the sides opf a running fire to coke up. Same as my father did when he had a smithing lab in college on his way to becoming an EE back in the 50's.
Don't forget that a demo set up may have the anvil placed where people can see what's going on and so may have you with your back to the forge
Thomas
|
|
Thomas P
- Tuesday, 10/12/10 11:51:40 EDT
|
The French Locksmith hammers. I like the more centered mass they have and the cross peen and wanted to know the reason for its unique design. Doing locksmithing with a 3 lb+ hammer?? Always wondered why.
|
|
- Robert
- Tuesday, 10/12/10 12:45:43 EDT
|
The French Locksmith hammers. I like the more centered mass they have and the cross peen and wanted to know the reason for its unique design. Doing locksmithing with a 3 lb+ hammer?? Always wondered why.
|
|
- Robert
- Tuesday, 10/12/10 12:56:54 EDT
|
Copper Colors: Larry, Copper technically does not "temper". And while it can be made many different colors most of these are created by various chemical reactions with the copper besides plain oxidation.
While bright copper does turn some colors on the way to brown these are not a rainbow of colors like you get with bright iron or steel. The temper rainbow is unique to various metals, iron is one and titanium is another. Titanium temper colors are brilliant compared to those of steel.
|
|
- guru
- Tuesday, 10/12/10 13:19:24 EDT
|
French Locksmith Hammers: Robert, I do not know where this is coming from. I know not of a French "locksmiths" hammer. The traditional French blacksmiths hammer has a peen that is stepped on the top reducing the wedge angle. Spanish smiths used similar hammers. Back when both made lacks by hand their hammers were those of the technique they applied (smithing, repousse', engraving).
I frequently forge delicate scrolls, leaves and hooks from 1/4" and even 3/16" (5 mm) stock with a 3 pound (1.4 kg) hammer. Its all what you are used to. Unless the work is very delicate, has hard to reach places or needs a light touch most smiths do everything with the same hammer in whatever weight they are used to or consider their "normal" hammer.
While old locks had some small hand fitted and machined parts the majority of the working pieces, including keys were heavy enough to be eminently forgeable. Many were also cast in brass. After forging the part were often filed and scraped (white smithed) to their final shape and finish. Lots of the parts were cut from sheet stock using a chisel, a task that takes a fairly heavy hammer. But many parts were also engraved, requiring a very light hammer.
|
|
- guru
- Tuesday, 10/12/10 13:46:06 EDT
|
French Locksmiths' Hammer: OK, I see where the Kaynes have added this to their French hammer description. But you will also note that come in sizes down to 100 grams (4 oz.), a very small hammer.
|
|
- guru
- Tuesday, 10/12/10 14:19:59 EDT
|
Spreading Locust tree? That's Chestnut (horse)and I have it's decendant. Believe it or not; I bought my property from a retired english teacher. She visited Longfellows home/museum, in the yard was a Chestnut tree, she picked up a nut brought it home and planted it. Now it's about 18" across the butt and spreading. I believe her because she was also a Free Methodist minister. I don't live in a village, but on a dead end in the woods, but I've got the tree, my last name is Smith and now I am waiting for the karma to kick in and make me a better blacksmith. Ah ... the circle of life!
|
|
S K Smith
- Tuesday, 10/12/10 16:16:44 EDT
|
Complicating the Work Triangle A nifty solution to the dragon's breath issue is an air curtain. Larry Harley has these on both his gas forges and you can put your face right up to opening! They are simply a flat nozzle like a vacuum cleaner nozzle hooked to a blower. The air blows UP immediately in front of the forge opening. Add an exhaust hood and there won't be a wiff of forge fumes in the shop.
Other things that complicate the "work triangle".
A power hammer really messes things up and you often cannot put them exactly where you want due to power requirements, foundations, space. . . Multiple power hammers even complicate things more.
Weld platens need to be in the middle of the shop and are often where a vise gets attached due to being the most immovable object in the shop.
Other areas have their own requirements. Machine tools need space for tool chests or caddies to hold attachements and a nearby bench or workspace for measuring tools. Even in job shops and semi production environments carts are needed for stacks of blanks and finished parts. While being close together is not quite as critical as when dealing with hot iron it is helpful. So each machine becomes a focal point for the things needed to support its use.
In a hot iron environment the smaller the work the smaller the work triangle needs to be. The smaller the stock, the faster it cools and the less time the smaith has to work it. Large stock (such as 1" (25 mm) or more) is actually easier to work due to holding its heat longer. 1/4" (6 mm) stock needs to be worked quickly. Its easier to forge but you cannot afford to walk across the shop with it.
Lots of things to consider when planning a shop space.
|
|
- guru
- Tuesday, 10/12/10 16:50:35 EDT
|
I am tring to straighten boat struts and rudders made of navel bronze. How hot should they be heated and how long should they cool before bending.
Thank you Free Fetters
|
|
Free Fetters
- Tuesday, 10/12/10 17:53:26 EDT
|
These items are usually pretty soft and thus the reason they got bent. They often straighten without annealing.
The correct annealing is to heat to a low red in low light or darkness. In bright light the bronze will melt before you can see color. The parts can be bent while hot. You can also quench the parts with water and work them cold.
If these parts crack or melt due to being overheated they can be repaired by braze-welding with oxyacetylene and some boraz flux. It is an art to get the heat just right and manipulate the puddle (it is best horizontal) and I do not recommend learning on an expensive or difficult to replace part.
|
|
- guru
- Tuesday, 10/12/10 19:18:04 EDT
|
Wasn't there a French king who was an amateur locksmith?? BTW for some aspects of locksmithing a 3 pound hammer would be entirely too light.
|
|
philip in china
- Tuesday, 10/12/10 20:27:45 EDT
|
I think it was the last Phillip, Phillip 16. He had hobbies that included picking chastity belts.
|
|
- guru
- Tuesday, 10/12/10 20:35:57 EDT
|
Actually, I believe that was Louis XVI. I don't know about the chastity belt, though.
Don't feel bad, I messed up on a couple of my ancestors during an interview, and now the wrong information is published in a book on historic houses of Southern Maryland. (Arrrgh!)
|
|
Bruce Blackistone (Atli)
- Tuesday, 10/12/10 21:47:38 EDT
|
Yep, Louey. . . The belt thing may have been from some sort of fiction.
I've got a 19th century reprint of a 17th century French book on locks that Louis would have definitely had in his collection. We have it scanned and need to get it setup. The reprint is interesting as it is on old hand made rag paper with the rough as manufactured edges. The reprint duplicated the original down to the paper! Acid free rag paper is really good stuff.
|
|
- guru
- Wednesday, 10/13/10 01:47:20 EDT
|
I’m working on my LG #25 power hammer (new style). It is tuned well and the bearings are good, new clutch brakes and strikes well as in the Manzer video. All moving parts are free, not too loose and well oiled/greased. I also have referenced Sid’s DVD and the Kern book. I needed a new set of dies (combo) and I thought it would be prudent to get a new spring.
The new spring is ¼” shorter than my old spring and a proper set up requires that the crossarm ride all the way up and the tension on the spring off the toggle arm by about ½”. With this set up it strikes at 5:00 and the ram rises properly but the compression force of the blows are weak. I test the blows on mild steel and fresh sections of annealed 1084.
With the older spring I can lower the crossarm, lower the spring tension so the spring is just kissing the toggle arm and it strikes well.
My third option was using a ½” shorter lower die provided by Sid with another new spring. This required a little lower height on the crossarm but it still lacked the power.
I don’t want to risk using a spring of unknown age and use time (even with a guard) so I’m lost as to what to do next.
Any advice?
|
|
- deloid
- Wednesday, 10/13/10 13:01:29 EDT
|
True Confessions and Shame on Me. I junst now swept and shoveled up 38 years' accumulation of swarf from under the old drill press. The bundle weighed 20 pounds.
|
|
Frank Turley
- Wednesday, 10/13/10 14:45:02 EDT
|
Deloid, It sounds like Sid's replacement springs are an average fit for a number of models. Many things were changed on Little Giants over the years and not all was well recorded.
Even though the spring is shorter it may have a higher compression rate due to larger diameter wire. This will force the hammer to need to run faster to hit as hard as with a softer spring. While old springs can create problems it sounds like you've gone from good to bad.
Shorter than standard dies can be dangerous to the machine. On the down stroke there are parts such as the toggle arms that can crash into the ram guides. This can also let the machine extend into unworn areas of the ram and guides causing problems. Any change of this nature needs to be carefully investigated on the particular hammer. But it sounds like you've tested this.
The two critical adjustments on a Little Giant are spring tension and working height. The ram should hang just about the height of the material to be worked. 1/2" for 1/2", 1" for 1". On tall work the hammer cannot start at say 3" and work efficiently down to 1/2". You would need to stop and adjust the hammer. This is one area where air hammers work better.
The general rule is to adjust the spring tight enough that the toggle ends make a straight line. But this can be too tight for hard blows at low speed. A "sloppy" spring adjustment will hit harder at slow speed than a tight spring. But you have to be careful that the ram doesn't travel upward too far when run at high speed.
Any time the spring tension is adjusted the work height must be changed. While the general rule in trial and error adjustments is to make ONE change at a time. However, in this case one adjustment changes both. So when you readjust the spring you need to reset the work height each time. Once the spring gives you the performance you want then you can change the work height as needed.
Proper hammer performance has a different definition to many people. Many want good positive slow speed control, others want to run the hammer as fast as possible for heavy drawing. In the bladesmithing community they have been "hopping up" 25 pound Little Giants by putting heavier springs on them, higher HP motors and running them fast and furiously.
Try loosening up on the spring and see if it hits harder.
|
|
- guru
- Wednesday, 10/13/10 15:18:52 EDT
|
"Try loosening up on the spring and see if it hits harder."
I did but then there was sag as in your statement:
"The general rule is to adjust the spring tight enough that the toggle ends make a straight line"
This also led to extra movement of the ram upward into the spring (a little out of control as well).
The replacement spring is 1/4" shorter but the wire is the same diameter. I don't have the ability to measure the spring strength but in behavior it seems weaker as well.Manzer seemed to have advocated that but it doesn't seem to work on my machine. Someone else wondered if my toggle arms were from a transitional machine and that's why the spring that usually works for Sid isn't working for me.
I wish I could use the old spring but I've worked long enough with machinery to know better.
|
|
- deloid
- Wednesday, 10/13/10 16:24:34 EDT
|
Naughty Frank!! Guess it was time for you to do some spring cleaning...LOL
|
|
- happyknifenut
- Wednesday, 10/13/10 17:43:48 EDT
|
If the ram hits the spring the compression is too little OR the spring too short (and has insufficient compression).
Generally if the line of the toggle arms is as straight as it can get with the least compression the adjustment is right. When the adjustment is loose or sloppy there is some sag in the toggles. Generally when a little loose the ram should not hit the spring.
Is the spring the same diameter? Number of coils? Ends ground the same?
Years ago I detailed a 50# LG spring and the ends were not just ground flat but forged square. . An expensive spring.
#1 rule in steel springs, all steel has the same springyness (modulus of elasticity). So the variables of the spring are wire diameter, coil diameter, length and number of coils (or length of the bar used to make the spring). Coils on short heavy springs are counted in turns and fraction of turns. If the the ends of the wire are on the same line then the coils are whole turns. If they do not line up then there are fractional turns. You can calculate the wire length from the number of turns.
Any change in the spring is going to make a noticeable change in the character of the hammer.
If you have not run out of adjustment I don't think the toggles are the problem. The hammer worked to your satisfaction with them. So the problem is in the replacement spring or adjustments.
The so called "traditional" hammers were not a transition. They were a heavy duty design that was abandoned. They only made the 25's and 250's that way for a short time. I had a 250 with the heavy guide design. It was similar in design to the Fairbanks and Bradley guide systems. I suspect they dropped it due to cost of production. I wish I had hung onto it. . .
|
|
- guru
- Wednesday, 10/13/10 18:36:10 EDT
|
were can someone buy a tom clark pattern anvil?
|
|
- AL CONARD
- Thursday, 10/14/10 10:44:03 EDT
|
Tom Clark Anvils: http://ozarkschool.com/heavytools.htm
|
|
- happyknifenut
- Thursday, 10/14/10 10:54:37 EDT
|
"Is the spring the same diameter? Number of coils? Ends ground the same?"
Same diameter same number of coils but the new one is groundmore on the partial coil ends. This and a slight difference in -between the coil distance- accounts for the 1/4" difference.
I tried the new spring again in varying degrees of tension and it can't "reserve power" as the older spring can.
|
|
- deloid
- Thursday, 10/14/10 11:43:07 EDT
|
Al, Tom has passed away and so too his tool business. While the we site shows many tools the inventory Tom had when he died is being sold off from what I understand. The on-line store is gone and I think all that is left is the tons of small tongs.
The designer of that anvil was actually Uri Hofi but the pattern maker someone else. I've been told Uri is having anvils made in China but I cannot verify this, nor would I want a Chinese made anvil (my personal business prejudice).
For about the same money you can, today, purchase the absolute BEST anvil ever manufactured anywhere in the world on ebay. See ebay item number 200530001180. This is the anvil currently featured on our home page and in the anvil gallery. It is a No. 5 Soeding & Halbach made in 1895.
So why buy a modern cast anvil when you can purchase the absolute best forged anvil ever made or that will ever be made for about the same money?
(Note: This anvil was available directly a few days ago but is now on ebay and the price may, as auction prices do, go much higher than the reserve.)
|
|
- guru
- Thursday, 10/14/10 12:13:04 EDT
|
So I'm relatively new to this, and I'm starting by making a wooden sword. I'm reading through your "Sword Making: For Beginners" page and I'm wondering if there was a diagram of knife parts, because all I'm seeing is [ Diagram of Knife Parts ]. As well, I'm shaky on some terminology, is there somewhere I can check to refresh my memory?
|
|
Taylor
- Thursday, 10/14/10 12:22:29 EDT
|
Taylor:
Hit the library. Look for Ewart Oakshott's books on medieval swords, or Jim Hrisoulis’ books on making swords, or some other books on swords and edged weapons. Talk to the librarian and discuss interlibrary loans if they don't have the resources available locally.
Learn to comprehend not just the nomenclature, but the entire subject.
Good luck.
A drenching rain on the banks of the Potomac today!
Visit your National Parks: www.nps.gov
Go viking: www.longshipco.org
|
|
Bruce Blackistone (Atli)
- Thursday, 10/14/10 13:27:31 EDT
|
Are all the coils the same distance apart on both springs? A variable pitch spring has different characteristics than a constant pitch spring.
|
|
- grant
- Thursday, 10/14/10 15:53:40 EDT
|
"Are all the coils the same distance apart on both springs?"
No, the old spring varies from as narrow as 7.6mm to as wide as 9.2mm.
There is some variability in the new spring but not anywhere close to this amount.
|
|
- deloid
- Thursday, 10/14/10 16:21:47 EDT
|
Usually a variable pitch spring "firms up" faster as it is compressed than a similar constant pitch spring. As some coils compress and touch they are no longer active and the effective length of wire being twisted becomes shorter thus stiffer. Might be what you are experiencing if all the other variables are the same.
|
|
- grant
- Thursday, 10/14/10 17:07:21 EDT
|
Well, You've reduced the problem to being the replacement spring. You've got a spare, run the old spring.
As I mentioned earlier, I made a detailed drawing of spring from a old 50 pound Little Giant many years ago. I just happened to have found it the other day and was studying it. The ends of the spring were forged to a flat taper that became a rectangular section, not just cut and ground as are many springs today. I wasn't looking for variable pitch but the spring had been broken in several places and brazed back together. If it has it, I would not have seen it.
In any event, the spring was a bit different than the usual. When I spoke to a fellow in the spring business about making it he said that he could prepare the wire before rolling it. At the time it doubled the price from $50 to $100. That was around 1990. I did not have the spring made and sold the machine when I sold all my Little Giants. I should have kept one. . But I thought I was leaving blacksmithing behind at that point.
In any case, never underestimate old technology and unrecorded proprietary information that did not come with a company when it was sold.
|
|
- guru
- Thursday, 10/14/10 17:18:36 EDT
|
Thanks Guru and Grant.
|
|
- deloid
- Thursday, 10/14/10 18:01:15 EDT
|
Like PondRacer, I plan a hobby shop in a 10x12 backyard shed. So, I looked at your sketch with interest. I don't understand. You install an outside cheminey with the mouth just above the forge so, I assume it will work like a side draft. Then you install a hood connected to a turbine above the forge????? Why both ???? Isn't it easyer lower the hood close to the forge and use it alone??? What is the other turbine for???? An air intake maybe??? I am really confused! The tools layout looks like what I had planned.
Bonsoir Donald
|
|
donald
- Thursday, 10/14/10 20:48:40 EDT
|
The turbine ventilator is to exhaust hot air, dust and fumes. No forge hood system is 100% effective and there WILL be smoke in the air as well as increased levels of CO and CO2.
The smaller the work space the better the ventilation you need. Most of these little buildings have low ceilings and smoke collects right at head height. Use of an angle grinder fills the air with small fiberglass particles, buffing fills the air with cotton and metal dust. Sanding and wire brushing as well as woodworking fill the air with dust that is bad to breathe.
Along with the turbine ventilator you will need the door wide open or several windows.
If you are constructing your own building then you could use a raised ridge vent the full length of the building. And/or build it a little taller than norm. . .
|
|
- guru
- Thursday, 10/14/10 22:31:21 EDT
|
I am with the Guru on ventalation. All of the activities we do in a shop put stuff in the air that should not be in our lungs. I can strongly reccomend the turbine ventalator. I have one, a 24" size and the amount of air moved by that single turbine is pretty surprising. A ridge vent I can not reccomend. These are attic vents and are designed for slow, difuse venting. The turbine is going to move more air.
Always think about the make up air. A forge stack and a turbine are going to definetly need that make up air.
|
|
ptree
- Friday, 10/15/10 06:18:41 EDT
|
I can (cough!) also testify to (hrunch!) the importance of (Hrrrrungh!) ventilation. (Excuse me, I have to get another tissue...)
One of the few comforts in losing the old shop in the tobacco stripping house was the chance to provide a layout with good ventilation. The ridge vent may not be the best, but with the open eaves and the squirrel cage exhaust fan, the overall improvement is astonishing. No more smoky dark hovel!
I was planning a turbine ventilator, too, but it seems to be unnecessary in the new layout. However, the turbine vent, a taller chimney and an jury-rig exhaust fan in the window were what made the old stripping house at least tolerable, so starting with one or two turbine vents in place is a GOOD thing.
Sunny, cool and clear on the banks of the Potomac.
Visit your National Parks: www.nps.gov
Go viking: www.longshipco.org
|
|
Bruce Blackistone (Atli)
- Friday, 10/15/10 08:59:29 EDT
|
I have two ridge ventilators that are the roughly circular, galvanizied type with the bowed louvred sides. They twirl around when the wind blows. When the shop is smoky, I have watched and studied the activity of the ventilators. In no way, does the ball-bearinged, rotating motion draw air upward. I can see no induced draft. The smoke simply finds its way to the ventilators by accident, by gosh and by golly. Therefore, I am wondering why the louvres, why the rotation, why the ball bearings? Perhaps the ventilator keeps Mother Nature's wind from blowing smoke back into the shop; I can understand that.
I also have one stovepipe top, a sort of wind preventer, which had sheet metal curved on four sides in such a way that smoke can exit between the "folds." It is stationary with no rotation and seems to halt the wind's entrance. By the bye, my stove pipes are a minimum of two feet above the roof ridge.
|
|
Frank Turley
- Friday, 10/15/10 09:06:16 EDT
|
My workspace is in my cellar in a 250 year old colonial house. The fireplace is big enough to walk in. In the flue I put an exhaust fan designed to pull smoke, I got it from an old hookah bar that went out of business. You can literally watch any smoke in the room suck into the chimney. I also keep the back door open for more ventilation and light.
|
|
- Nippulini
- Friday, 10/15/10 09:30:13 EDT
|
Frank Turley. My turbine draws well, I have smoke tested with smoke from a smouldering cardboard. I looked at the spec's for mine a while back, and as I recall it induces about 5000CFM in a 5 mph breeze. The louvers on mine are airfoil shaped and clean. The produce "Lift" from movement of the airfoil. Perhaps yous are not airfoil shaped or have dirt and dust filling in the underside of the airfoils?
Mine draws so well that I installed an operable door to close off the intake in the winter when I am not running thngs that make smoke. I also have huge amounts of make-up air. The "free area" of my make-up is 100 square' minimum. Thats a 10'x10' door. In the summer, with operable louvers etc I am in the area of 200 square foot of free area to allow little or no resistance to make-up air.
|
|
ptree
- Friday, 10/15/10 10:25:04 EDT
|
Well there are "industrial" ridge vent systems that are much larger than the household attic varieties. Much more expensive too.
Right now I've just left the ridge open on my shop extension while waiting to find a good one cheap! Of course rain isn't much of an issue out here, wind is. I need to look into closing off the end trusses as we get into cold weather times. I hope to get some heavy plastic or fiberglass and fab some "windows" for the trusses to get the light and possibly allow the center ones to open for ventilation.
Currently I have a 10'x30' opening + the ridge and truss ends and front door area---working on scrounging a channel to mount the roll up doors to.
Thomas
|
|
Thomas P
- Friday, 10/15/10 12:57:15 EDT
|
Buildings with natural ventilation have to be properly designed to take advantage of naturally rising air or modest breezes.
In Costa Rica they have a lot of rain so vents are covered with overhangs. But they also have ferocious tropical sun. In well engineered buildings, to reduce heat build up they use grill covered vents along the top of walls just under the ceiling. This lets in fresh air from a protected place under the eves. This air flows along the ceiling and out a large ridge vent. The ridge vent is usually created by a large step or 18" to two feet where the two roof lines meet. Even in relatively warm weather these places are cool and comfortable without AC. I suspect it is important to orient this one sided vent so that the prevailing winds do the most good.
If you look at old industrial buildings built before AC or general ventilation large copula type ridge vents that included skylights were so prominent a part of the design that trusses with this feature are some of the "standard" types in structural engineering books. They also included high ceilings or roof lines.
Modern flat roofed, sealed window building are the worst sort of construction. But overly small work spaces are also a bad situation if not well ventilated.
|
|
- guru
- Friday, 10/15/10 13:15:33 EDT
|
Tom Clark Anvils ar still alive. Someone from BAM is having them cast. May want to check out the BAM website
|
|
Charles
- Friday, 10/15/10 13:38:22 EDT
|
Hello Sorry if this is off topic but i recently bought a gas furnace and an old anvil from a gentlemen in Denver, Colorado. It is rusted and worn and the only mark on it is the word "dempsey" the only thig I could seem to find a link to was here at anvilfire. I was just trying to find some history on it. I would appreciate it anyone could point me in the right direction.
|
|
shawn
- Friday, 10/15/10 14:58:31 EDT
|
As I just told one of our folks at Apostle Islands National Lakeshore up in Wisconsin ( www.nps.gov/apis ): "I hate flat roofs!" Snow loads, heavy rains, extreme weather events (...what? Extreme weather in a National Park? In the wilderness? Unheard of!), all sorts of things cause them problems; and once a leak starts, tracking them down is maddening. When stuck with a flat roof, my next question is: "How old is it; and do you have a shedule for replacement for the membrane?"
I know Frank, in Santa Fe, sees plenty of them; but hey, it never really rains or snows much out there anyway, and it's hard to fight tradition; but I did get some proper arches and pitches out in Tucson where they have the monsoons.
Okay, off the soapbox. :-)
|
|
Bruce Blackistone (Atli)
- Friday, 10/15/10 15:04:59 EDT
|
I blame the flat roof craze on Frank Lloyd Wrong!
Houses without attics?---where do you stash your crazy relations?
An anvil named Dempsey; reminds me of the one I bought because all I could make out on it was Powe turned out to ba a Powell and not a Powers---until I get the chisel out, bwahahahaha (already missing the heel so no "historical" loss)
Thomas
|
|
Thomas P
- Friday, 10/15/10 15:16:14 EDT
|
Dempsey Anvil: Well, Since I am THE Dempsey here and a bit of an anvil expert you think I would have heard of any anvil made under the brand name "Dempsey". I have not.
First thing to recognize is that if its hard to read then your eyes may be fooling you. You would not believe the things people have read out of a faint "HAY BUDDEN - BROOKLYN, NEW YORK". . . Lots of letters their to confuse. A friend of mine recently got VIII for King Henry the eighth out of R. HILL. So, read carefully.
THEN. . There were hundreds (HUNDREDS) of anvil makers in England where there are lots of Dempseys. Not as many as in Ireland whence we came, but a lot. So it is possible it may be from the British Isles as are 90% of all the old imported anvils.
THEN, for quite a long time there have been makers who would cast your name on the anvil for a small fee as long as you could wait for the anvil to be manufactured.
Note that their is a significant difference here. Old anvil markings are almost universally stamped INTO the anvil with chisel like stamps which leave a fine line. Cast marking are almost (but not always) raised block letters. But if not raised they are still broad letters compared to stamped. Cast anvils are generally 20th century and thus not considered very old.
"Old" in an anvil starts at 150 years and many folks are USING 200 year old anvils in their shops. But anvils tend to attract condensation and left on their own under certain circumstances with rust rapidly and a ten year old anvil MAY appear to have 100 years of rust on it.
If you can get a photograph or rubbing of the marking I would love to see it.
|
|
- guru
- Friday, 10/15/10 15:55:00 EDT
|
OK I'll admit I do like the 3+ lb French Hammer on small 1/4 stock letter openers with the back forged on the diamond and at an angle to get a nice long 'flat' triangle on it's sides. But what is the "wedge angle"? Thanks much
|
|
Robert
- Friday, 10/15/10 18:51:08 EDT
|
Jock, don't you want the "Dempsey" anvil? Huh? huh?? (nudge nudge)
|
|
- Nippulini
- Friday, 10/15/10 20:04:39 EDT
|
At this time the only anvils I can afford are digital . . .
|
|
- guru
- Friday, 10/15/10 22:03:13 EDT
|
Just commenting a little about New Mexico flat roofs. Taos Pueblo Indian village is 70 miles north of Santa Fe with an elevation of 6,950 feet. The average rainfall is 12"; the average snowfall is 35"; and the nearby ski valley has 321" per year. The pueblo consists of two 4 story adobe complexes dating from about 1,000 years ago. The Indians have maintained the structures by annual refurbishing and plastering. The structures were built before European contact, so that stone tools were used for felling the 'vigas' (roof beams) and door frames. The old roofs had a slight cant for drainage and the water exited via wooden, pitch lined 'canales.' The steeper, pitched roof idea may have been thought of, but it would have been difficult to execute without saws and other such tools. With the Spanish incursions and subsequent settling, the adobe style was much copied, but a few ridged roofs eventually appeared. Much later, after the Anglo-Americans came in, corrugated galvanized roofing became available and was often used on pitched roofs.
As a post script, Santa Fe is celebrating its Euro/Spanish quartocentennial, 1610 to 2010. Compare with Plymouth colony, 1620.
|
|
Frank Turley
- Friday, 10/15/10 22:18:54 EDT
|
I was confused, now I am devastated! My house is on a 7500 sqare feet lot with other houses all around. I made some test concerning the anvil noise and came to the conclusion that the shed's door and house's door must be closed in order to be quiet in the house. Same for others I guest. So my forging season needs cool wheather(mid october to end of may).Forging with the shed'door open does not meet my requirements for sound. I live in Québec, Canada,so the winter is cold. Forging door open is not great.
I saw on internet a picture of a farrier scool. They had 4 small forges equipped with tipi-like hood connected to a 6 inchs cheminey. The hood opening is small. I wanted to use my rivet forge with such a hood(already 50% completed).I will use charcoal for respect for my "neibergs". Make-up air is an open window. CO and CO2 detectors. That was the plan.....but all of you,experience people,are giving clear warnings. I would be fool not to listen. I want a fun hobby,not a deadly one. I will study the case for a while.
Thank you all. Donald
|
|
donald
- Friday, 10/15/10 22:28:56 EDT
|
Small spaces, hoods and noise.
Funnel type overhead hoods are very problematic. The hood must move practically all the air or a high percentage of it at the opening up the flue. This means a large amount of cold air mixed with the cold air reducing the force of the draft. VERY inefficient. They will work but only with VERY small fires.
This is why virtually all modern shops have side draft hoods with small openings. A little hot air creates a strong draft and the high velocity flow (like a vacuum cleaner) will such smoke and gases horizontally off the fire a foot and a half away.
If you put the outdoor side draft hood on the sunny (South) side of your building the sun will warn the sheet metal stack and start a draft without a fire. It was also put outside to increase the usable space inside the shop.
Note however, that I have been in small well ventilated shops in Costa Rica where they burn charcoal and have no hood OR stack.
NOISE: If anvil noise is your primary concern then look for a Fisher Norris Eagle anvil.
These cast iron steel faced anvils make very little sound and what they DO make is low frequency, not so harsh and travels less.
IF your shed has a wooden floor the sound of the pounding transmitted through the stand will be louder.
While sound waves go around corners their propagation is much weaker than in a straight line or when reflected off a hard surface.
A baffle wall (section of privacy fence) a few feet outside an open door will stop a high percentage of sound.
Break up the surface with trained vines or other plants ( a bush) and you will reduce noise transmission even more.
Covering the bare places on the walls of your shop (before you put up shelves) with old carpet will help sound proof the building.
The side of your privacy fence sound barrier that faces the door could also be covered with old indoor outdoor carpet or remnants and further increase its sound damping.
Common fiberglass insulation helps sound proof a building as well.
The sounds that annoy me in suburbia are skill or table saws (the sound travels miles), leaf blowers (a ridiculous invention) and motor cycles or three wheelers.
7500 sqft lot. . . my shop is half that size!
|
|
- guru
- Saturday, 10/16/10 00:06:46 EDT
|
If there are concerns about air quality, why can't a person wear an oxygen mask or a mask that would filter out harmful contaminants ? During World War One, soldiers wore masks to filter out mustard gas, chlorine gas etc. Surely masks have been improved since then. Just a thought.
|
|
Mike T.
- Saturday, 10/16/10 00:19:09 EDT
|
In my new shop here half of one of the long walls is open- I roll the steel doors right back whenever I am working in there. Also in the corner near the forge and welding bench I have 2 huge extractor fans in the wall. These are like the ones used in commercial kitchens. Once those start going they suck any smoke straight out. The noise doesn't bother me because I always wear ear protection. I might have to tie down the little 140 pound anvil, though, as I am expecting those fans to suck that up any day.
|
|
philip in china
- Saturday, 10/16/10 00:37:52 EDT
|
I killed the ring on my PW to a dull "klink", especially over the center mass. I use a three legged steel stand for this anvil. On the 3" x 3" steel pads on the legs I glued some old reinforced rubber (1/4") from an old tracker trailer mud flap. I had some pure lead that I saved from an old drain pipe, slit it and made a sheet to go between the anvil and the stand. I also put a sheet of very thin copper between the anvil and the lead to give the lead more durability. The more you use the anvil the more it beds and conforms itself into the lead. No more ring!! One advantage I had not planned on was that with the vibrations 90% eliminated the anvil and the stand stay planted and does not walk across the floor. For an anvil that only weights 130lbs. thats a big improvement.
|
|
- S K Smith
- Saturday, 10/16/10 13:16:55 EDT
|
Both my "ringy" anvils are on steel stands, bedded in high-durometer room-temperature vulcanizing (RTV) silicone construction sealant. One is a PW of 103# and the other is a cast steel anvil, both of which were painfully loud prior to bedding. Now, neither one is appreciably louder than my Fisher Norris.
Takes one full caulking gun-type tube of sealant to bed an anvil and well worth it.
|
|
- Rich
- Saturday, 10/16/10 14:45:57 EDT
|
Rats - I spent 6 hours hammering out a big meat cleaver in a 1500's pattern from one of those 1" dia train coil springs. This would be the first knife I've ever made. Not having a big oil quench available, I thought I'd try water... as a learning experience. Heat to critical, quench, temper at $50 for 1 hour twice, and it looks fine. I started grinding it into final shape, an then the little cracks became visible. Dozens of them. :( What the heck, I finished shaping and sharpening it anyway, going with a slicking hollow grind instead of a chisel/cleaver profile. Test slicing of tomatos and stewing beef went fine. I suspect it'll butcher next week's lamb just fine as long as I don't try cleaving through bone with it. Its been an excellent learning experience.
I have plenty more spring, so I just need to prepare an oil quench tank and try again.
Thanks again for all the knowledge you folks have offered up.
|
|
MikeM-OH
- Saturday, 10/16/10 17:25:38 EDT
|
Whoops, that's temper at 450, not $50
|
|
MikeM-OH
- Saturday, 10/16/10 19:07:31 EDT
|
Mike, those small cracks can also be caused by overheating the steel while working it, working too cold, quenching too hot or in too cold or wrong quenchant.
We live and learn. . .
|
|
- guru
- Saturday, 10/16/10 19:29:43 EDT
|
I was working at bright orange, which is all this forge will get to. At that color/temp, I was still having trouble moving the metal at first, having never hand forged 1" round down to 3/16 flat before.
In retrospect, I know one crack I induces by straightening a section when it was too cold, below dull red. That crack is exactly at the center of the arc I flattened. Impatience, I should have just taken another heat.
Most of the other cracks we not there before quenching, as I'd practiced grinding the surface a bit before I hardened it. I gave it a good polish just to get the hang of it and saw no cracks. Immediately after quenching, I polished again and saw cracks. I tempered anyway, ground the surface, and saw cracks clearly. :(
Today's lesson is PATIENCE.
|
|
MikeM-OH
- Saturday, 10/16/10 19:41:31 EDT
|
Carpet on Walls:
Fire Marshals and our safety inspectors hate this, the flame spread rate on vertical carpet is really different than that of horizontal carpet laying on the floor. Make sure that it is not anywhere in the way of random ignition sources.
Acoustic ceiling tile is not as durable, but sometimes the better choice, especially in reflective corners.
Cool and breezy on the banks of the lower Potomac. Actually got in some forging this afternoon. :-)
Visit your National Parks: www.nps.gov
Go viking: www.longshipco.org
|
|
Bruce Blackistone (Atli)
- Saturday, 10/16/10 21:14:48 EDT
|
Hi guys, I have a question about some weird lab results that I got. In the lab we hardened three samples of supposedly plain old carbon steel (I say supposedly because we weren't told and I never bothered to ask) at 0.17%,0.4% and 1%, then measured their hardness in rockwell C. According to the lab instructor our original results were wrong, which indicated that we didn't do it properly.
Original results:-before -after hardening -after tempering
0.17% -9,-11 26.5,27.1,27.2 32.2, 30.2
0.4% -1,1.5 49.6,42.8 35.3, 32.9
1.0% 7,8 51.6,51.1 42.2,45.7
I repeated the lab with the instructor directly guiding me and obtained much harder values the second time
Repeated results:-before -after hardening -after tempering
0.17% ------ 48,47.5 37.5,38
0.40% ------ 59,55.5,57.5 44.5,44
1.0% ------ 63,63.5 50.5,51.5
The second set of results don't match the temper color chart in the FAQ, the samples were hardened at 885C and tempered at 900F. The first set of results match the temper chart for the 0.4% and 1%, the 0.17% however becomes even harder after tempering. It should be noted that the first set of tests were done using a digital tester and the second set using an analog, we were told that both machines were set up properly for rockwell C. What ever conclusions we draw from this is also dependent upon the carbon % values actually being right (I have a sneaking suspicion that labs are designed to go wrong so that we have something interesting to talk about).
Whats your take on the data that we got, which one seems more correct? My group has compared the data to data of other groups and our original set matches more closely, they're concerned that the second set of data might be wrong, but I think other groups did the hardening wrong just like us originally.
|
|
Nabiul Haque
- Sunday, 10/17/10 00:35:20 EDT
|
Nabiul - a little more information please - size of the samples, what quenchant did you use, any agitation of quenchant? Where on the samples are you measuring hardness, and how are you prepping them for hardness measurement? Also, how long did you austenitize the samples and how long did you temper the samples.
Depending on times, the second set of 0.4 % C samples appear semi-reasonable. Most of my Q & T experience was 4140 bolting stock which had a minimum tempering temp of 1100 F for 1 hour per inch of thickness per ASTM. Sizes under 2 " round were an oil quench Hardness range was roughly 262 to 330 Brinell, say around 30 Rockwell C for mid range - so, higher temps, more alloy, lower hardness than your plain carbon, but makes me think that your second set of numbers look correct for a nominal 0.40% carbon steel. If they're correct, your other numbers for the 2nd try are probably also correct.
Negative Rockwell C might be possible with an annealed sample using a digital tester, and a .17 C steel that had been slow cooled or annealed when produced should be tested on the RBW scale - W for tungsten carbide 1/16" ball, and 100 KG load.
|
|
- Gavainh
- Sunday, 10/17/10 01:38:12 EDT
|
The samples were little cylinders, I'd guess about 3/4" in length and diameter. They were heated for 15 minutes before quenching and tempered for another 15. They were quenched in regular tap water at room temp, for tempering they were allowed to cool in air for 1 minute before dropping them into water without agitation. For quenching, they were swirled around the bucket until cooled.
Preparation involved grinding one of the faces until free of scale using a belt grinder and a little water.
The before hardness was provided by the lab instructor so I'm not really concerned about those numbers. Just if the second set of numbers seem too high, indicating that the hardness tester may not have been setup properly for rockwell C.
|
|
Nabiul Haque
- Sunday, 10/17/10 02:13:08 EDT
|
Cylinder samples. Speaking as a blacksmith and sometime toolsmith, if you're not sure of the carbon in the samples and you don't know whether they are straight carbon or alloyed, then you're empericism is lost from the gitgo. Assuming they are straight carbon and the carbon content is correct, you've got one "dead soft" piece, one medium carbon, and one high carbon. They all have different hardening temperatures to obtain optimum hardness. To me, 900ºF is a faint red incandescence in ordinary shop light and has nothing to do with surface oxide temper colors. When tempering a thick piece in a controlled furnace or oven situation, I would hold 15 minutes for each half inch of thickness.
|
|
Frank Turley
- Sunday, 10/17/10 07:49:13 EDT
|
Nabiul, first, look on your hardness conversion chart and find the CORRECTION FOR ROUND SAMPLE number. It is not going to make a huge difference but it may adjust the numbers by 1-2 points. Second, how did you hold those little samples? Tongs can cover up a lot of the surface and prevent the sample from being proprly quenched. Third, are you sure your temperature measuring and indicating equipment is correctly calibrated? How would you check that? Did you use a calibration block on the Rc testers to make certain they read correctly? The lesson your instructor may be trying to teach is "when in doubt, check it out". Don't trust everything somebody tells you about what you are dealing with. Learn how to test it and draw your own conclusions.
|
|
quenchcrack
- Sunday, 10/17/10 09:02:04 EDT
|
Lab Work: I agree with QC about the verify everything aspect. I would not have accepted the "before" numbers and tested for myself. If they could not be reproduced then everything after that is also in doubt. That is why you test on the calibration block as well.
Then there is your question which mixes Fahrenheit and Celsius temperatures. .
Besides the other questions I would want to know how square the parts were and the finish. If you are testing on the flat faces they need to be parallel to each other and both clean and smooth. ALSO, the more material you remove the softer the part is likely to be. But if held at temperature too long the surface can be decarburised and not harden well.
Did you observe the sparks when grinding the samples and record the differences? Did you try running temper colors on a bright surface? Alloy steels often run with two rainbows, not one. If you have two distinct bands then its not a plain carbon steel.
The data in my FAQ is from a mix of sources and some averaged. The hardness vs. temper data is from the most respected source I know, ASM. But much of the data had to be extrapolated from graphs and some converted from Brinell to HRc. This last conversion is tweeky because I have yet to find two references that had conversions that agreed.
At least one heat treating company liked my chart well enough that they stole it to use on their website. Even after the low life web master edited the chart he still left my foot note numbering! Proving he stole it!
One thing all this DOES do is reinforce what we have been preaching about Junk Yard Steels for a decade. . even when you THINK you know what you have there is always a possibility it is not.
|
|
- guru
- Sunday, 10/17/10 10:41:18 EDT
|
Well the truth behind this is that labs in all our courses are only there to familiarize us with some procedures and things that are done in actual testing. There is nowhere near enough time available to check everything, so a lot of things have to be taken at face value, and if the results are wrong at the end of the day, then we have to explain what sources of error caused this.
Especially for this lab, it was accidentally scheduled into a 1 hour time slot, so there is barely enough time to get the harderning and tempering done. So annealing is out of the question and testing them was out too because they were covered in a thick layer of oxide when we got them; the before numbers had been measured sometime before the semester started probably (all students taking materials science II have to do this experiment eventually, not enough time to anneal for each group).
Since this was being done in a group, observing things like the sparks was also out as different people would be observing for each sample, the angle of the surface also depended on who ground it. We don't have any way to check the actual furnace temperature, just have to trust the instruments already connected to it.
They were quenched using a long pair of tongs and were held by the sides so that the faces would be exposed. The shiny face took on a transparent grey oxide coating I noticed on the second hardening attempt, so probably not alloyed then.
The mixed temperatures...for some reason the furnace used for austenizing has a temperature meter in C while the furnce used for tempering is in F.
The purpose of this lab in my opinion is for the students to learn how hardenable steel is, how carbon content affects that and what temperature is required to get all the samples into the austenite phase. Which is why there is such leeway in how things are done. Also we're following a manual prepared by the department and the manual only states what is necessary to get the lab done (carbon content of samples).
|
|
Nabiul Haque
- Sunday, 10/17/10 12:56:59 EDT
|
Humm, considering how thick the oxide layer was when we got them... the surface may have originally been decarburized for us and other groups. I'll have to ask if all groups used the same three samples.
What about the original results for the 0.17%? How is it possible that it went from 27 after hardening to rougly 31 after tempering? This looks almost like age hardening, but steels don't do that?
|
|
Nabiul Haque
- Sunday, 10/17/10 13:16:53 EDT
|
I think you had such an uneven quench that you had hard and soft places. Heavy scale, decarb, tongs wrapped around a small part, short heating time, tap water. Way too many variables. Best lab conditions would be a de-barked test piece, controlled heating and a proper Jominy end-quench fountain. Also, all testing done on the same hardness tester. You probably learned something, but don't draw too many conclusions.
|
|
- grant
- Sunday, 10/17/10 15:28:07 EDT
|
The uneveness of the hardness is accounted for when we take readings from multiple points on the surface and see if we get a maximum variation of around 2, otherwise we keep taking points. Keep in mind though that we grind the same face every time, so it couldn't be harder inside than on the outside.
We use the jominy quenching fixture in a different lab, the "Jominy Hardenability Test", we'll probably be doing that one tomorrow. When the labs were made, they were designed to go along with the course material, starting off with metallography then going to various tests of physical metal properties and then ending with hardening of steel and aluminium. But in practice only a few students can do each lab at a time, so sections are broken up into enough groups do to all the labs in one session and the groups rotate between labs every session.
|
|
Nabiul Haque
- Sunday, 10/17/10 16:04:31 EDT
|
Nabuil,
At least you realized something was wrong. I remember a physics lab where we were to determine the refractive index (N) of paraffin (wax) at microwave frequencies. We got a big wedge of paraffin, a microwave beam transmitter and a microwave detector. The idea was to shoot the beam through the paraffin prism, detect it on the way out, then calculate the angle of refraction and the refractive index.
I don't know if the problem was interference from other experiments or what, but when we slid the detector around looking for the beam, the needle bounced like the speedometer on a Manhattan taxi. We finally guessed at the biggest peak and calculated an N of 1.1. Since the value was supposed to be 1.4 and N can never be lower than 1, I wasn't too happy with the result. But my lab partner tapped away on his calculator and declared that we were only off by 21%!
|
|
Mike BR
- Sunday, 10/17/10 17:56:24 EDT
|
Ah yes the loathed physics experiments where you try to verify already known and accepted formulas without being told about all other physical phenomena happening. Also without being told that the relationships require certain assumptions to be made so that it works in the ideal world.
I don't know if something with that big of a wavelength behaves like light, but there would be many beams with low intensity from the reflections that happen at the air/wax boundaries.
A good portion of everything I've been taught so far.. I'd guess maybe 80% is absolutley useless in the real world, always ignoring pesky things like friction and viscosity etc.
|
|
Nabiul Haque
- Sunday, 10/17/10 18:14:57 EDT
|
Well, I have no way of measuring ions, but according to "Welded Sculpture" circa 1960's, electric welding uses artificial high energy release phenomena that (by the book) puts out a massive amount of positive ionization around the user. This causes a negative effect on humans, making one feel dragged out, tired and fatigued. (Still, according to the book) Water creates negative ions, which rebounds this effect. It recommends a shower or dip in a pool (even splashing water on your face) after a good amount of welding.
Now I have no way of measuring this or even arguing the point, but I DO notice that it is true. Screw the formulas, live and learn by first hand experience.
|
|
- Nippulini
- Sunday, 10/17/10 19:47:45 EDT
|
In that case so as to live in harmony with nature I will try welding whilst I'm having a shower. Then at the end of the working day I will be refreshed, energised........... and clean!
|
|
- Chris
- Monday, 10/18/10 02:39:22 EDT
|
what a strange mix of science and magic this forum is!It is great.
|
|
we@nb
- Monday, 10/18/10 09:00:36 EDT
|
Actually studying the methods people used way back when to discover a lot of the basics of science can be a real eye opener, from Galileo timing experiments by his heartbeats to using graphical methods to get data out of extremely dirty results (using log graph paper to show that a relationship is a power one).
Only experiment I ever did that I was happy with the results was the photo-electric effect where our experimental result matched the expected results to 4 decimal places.
900 degF for a simple carbon steel sounds WAY too high to get high hardness numbers. Heavy scale sounds a warning too.
Of course students can make the instructor tear their hair out too---had one yesterday who wanted to harden a hawk he had forged from a ballpeen hammer---so he sticks the back end into the hot spot leaving the edge almost out of the propane forge. I asked him "what part of the hawk needs to harden?"---"the front edge". "What part are you heating?"....
Thomas
|
|
Thomas P
- Monday, 10/18/10 13:45:12 EDT
|
On experiments,
Having worked in 2 different companies R&D labs, for a total of something like 19 years, I have seen some very strange results. When doing tests to duplicate customers reported failure, where you only have the phone call to go by, you have almost no chance. They always leave out all the trees that are blocked by that forrest.
Another real difficulty is skewed results because you expect a certain result.
I set up a strict program, since I used engineering Student Co-op's, that you write down the results as you see them. Write down all of the result. Not just the first digit or so. When they wrote the test report, I had them write per a formal style, and included every variable they could think of, ie, day or second shift, temp in the lab, temp of the tap water if used, down to wrenchs used.
Once they wrote the report, I reviewed for completeness, but not anything about results, except if the results were very scattered, I had now repetitions run. Then the Cheif Engineer wrote a review. He had read the results, but not run the test. This tended to give a more objective review. He woul often see something and ask for more testing.
I had tests that were re-run and expanded and then re-run and ended up giving results that were totally not expected, but represented the true answer.
All that said, when a Co-op gave me a report with scattered, unexpected results, I always questioned the set-up and calibration first. The I questioned a data recording, then the data last.
|
|
ptree
- Monday, 10/18/10 14:03:51 EDT
|
We did tensile testing of aluminium,brass and steel today. This one is going to be real fun to work out; while I was trying to fix our current lab because some one missed something in the discussion, the other group members screwed up the testing of the steel and somehow ended the automated program before testing to failure was completed. The instructor had to unload the sample, now that it's already deformed, and re start the test. I have to estimate the 'new' crossectional area of the sample using the change in gauge length to calculate the correct Young's modulus and compare with the one from the first inturrupted test. I just realised that I might need the final width and thickness for this... No one thought to remeasure the sample before testing to failure.
Well anyways as for the last lab, it turns out that our repeated results agree with the ASM handbook tables. The instructor looked up a hardness vs tempering time table and for short times the results were much harder than those on the color chart. For 1040 at 15 minutes, there was a wide range of values but the average was somewhere around 400 Brinell which was rougly 44HRC, pretty much dead on with our results for the second attempt.
|
|
Nabiul Haque
- Monday, 10/18/10 14:23:20 EDT
|
When reporting software errors I always start with what machine, which build/load, what test, which user, etc. The error report should provide enough data that another tester can *exactly* reproduce the conditions!
Thomas
|
|
Thomas P
- Monday, 10/18/10 17:28:41 EDT
|
does anyone know if Larry Zoeller is still in business? I want to get jingle bell blanks from him if I can.
|
|
we@nb
- Monday, 10/18/10 18:27:09 EDT
|
I was gone for a spell and when I returned and read the posts I got all swimmy headed. Ya'll the talkingest bunch and I don't understand a word on account of your smarts. Ever think of changing the name to scientificfire or engineermagic?? Thinks it would be pretty neat.
|
|
- Popcorn
- Monday, 10/18/10 18:37:38 EDT
|
Failed tensile tests. . . I think our metallurgists will agree that once the piece has started to deform, allowances or not starting the test over again is a waste of time. Once the piece have started to permanently deform there is more going on than just a deduction in cross section.
I've got a little manual weld sample tester. It takes standard 1" wide test coupons 1/8" thick I believe. It has a crank and a gauge that reads out in pounds or PSI. This is a simple failure tester but with a dial indicator and some other measuring tools you could do tensile tests. Apply some load, record the stretch, apply some more, record the stretch. . . graph the results.
|
|
- guru
- Monday, 10/18/10 19:09:38 EDT
|
Popcorn, You will REALLY like this. . .
We used to do a ton of flow testing. We built flow meters and had to calibrate them. The usual method was a bucket and a stop watch. The biggest variable was the person on the stop watch. Even on events as long as 10 or 15 seconds the error between two different people on the watch was significant.
The last meter I proposed used a computer timed event and electronic weight measurement. This was the method I came up with to remove human error from the testing and ended up being a MUCH better flow measuring system on its own. Calibration only required checking the load cell based scale. The time was all internal to the computer clock which was hundreds of time more accurate than we needed. In other words, PERFECT. The system even measured changing temperature and averaged the changes in density to return flow at standard temperature. Best part, it generated a graph of the data at the end that the tech just had to sign as witness. . . All done in QuickBASIC.
Due to time limitations the last meter I built used two standard turbine flow meters with some fancy mathematical averaging at the cross over. No two flow meters EVER agree and the error is a pretty wide margin. The problem is that most measuring equipment has a range of a factor of 10 and we needed a factor of 100. As soon as both meters were in the cross over range I used a weighted calculation which placed higher value on one meter than the other to a given point where they supposedly agreed then put more weight on the other meter until the first was disregarded entirely. The crossover point was an internal software "calibration".
When collecting data the graphing and interpretation of it is an art. I graphed one set of data over and over for more than a week before I realized that it was a log/log "curve" that produced a straight line on the proper graph.
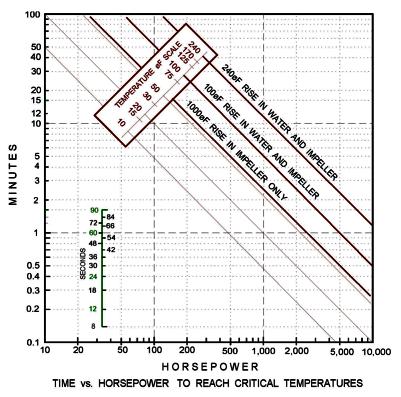
I don't think I would have discovered this if I had not been making my own graphs in CAD trying to find the formula that "fit" the curve.
The above is the heat up rate of a water pump with the discharge closed. This was for a report on a wrecked 10,000 HP make-up water pump in a nuclear power plant. It had only been run "a minute" after a complete rebuild and the plant wanted their money back. They said there was no-way the pump could be damaged in that time if it was in proper repair. As you can see by the graph the water has flashed to steam in just over 60 seconds. The bearings, seals and other running surfaces were both cooled and lubricated by the pump water. . . A few seconds after the water flashed to steam the bearing failed then the wear ring (the ring around the suction end of the impeller) seized up and melted. 10,000 HP is some serious business.
Anyway. . the real data matched my theoretical data. The problem was nobody believed the data until it laid perfectly on the graph above. Some idiot had ignored a valve closed red light and did a "test" run of the pump. The pump ran under power a total of 90 seconds and stopped REAL fast when turned off.
|
|
- guru
- Monday, 10/18/10 19:17:43 EDT
|
we@nb, As far as I know Larry is still selling his bits and pieces. I've stopped trying to keep up with his web presence since the addresses have changed at least 10 times that I know of.
|
|
- guru
- Monday, 10/18/10 19:23:32 EDT
|
we@nb, Here is the page from Larry's website:
http://www.zoellerforge.com/supplies.html
They are still shown.
|
|
- Dave Boyer
- Monday, 10/18/10 20:17:44 EDT
|
Guru, flashed water to steam has wrecked more pumps and valves then most will ever know. I built a flow rig to develp Cv factors for all the valves we made and for optimazation of any new designs. On a number of occasions I had the conditions to produce "Flashing flow". This is where water is flowing so hard, with so much pressure drop, that is flashs to steam, and then almost instantly condenses back to liquid. Sounds something like putting your head INTO a hornets nest. The noise is intense, and the errosion inside the valve is severe.
I have seen heavy wall valves that erroded thru over an inch of steel in a couple of hours.
But then I have seen the same valves erroded by a high pressure(2500 psi) internal leak across the seat eat Stellite out in an hour or so and thru the valve wall in minutes.
And yes, 10,000Hp is indeed serious business. So is 100,000 hp of live 2500 psi steam thru a valve:)
|
|
ptree
- Monday, 10/18/10 20:44:27 EDT
|
Grin...LOL
|
|
- Popcorn
- Monday, 10/18/10 21:09:14 EDT
|
Is there any way to repair a round sharping stone? I have located a old round stone and stand that has a crack in it and it is very cheap.
Thank You for your help.
|
|
Jim Evans
- Monday, 10/18/10 22:02:31 EDT
|
You'd think that people put in charge of running a nuclear reactor would understand that the power put into the pump has to go somewhere.
It's good to know that at least one of my courses will be useful in real world applications.
|
|
Nabiul Haque
- Monday, 10/18/10 22:06:48 EDT
|
looking to buy a double horned anvil for my shop. is there some that are better then other. i have too clif carols one 70lb for shoeing horse i also have a 125lb one in the shop, looking for something bigger. thanks for amy help. AL
|
|
AL CONARD
- Tuesday, 10/19/10 00:16:06 EDT
|
Al, Try fontaninianvilandtool.com.
|
|
Frank Turley
- Tuesday, 10/19/10 06:59:06 EDT
|
Double Horned Anvils: Al, You have a number of choices. Blacksmiths Depot (one of our primary sponsors) sells both Peddinghaus (the only forged blacksmith shop anvil made) and TFS blacksmiths anvils. Others include Nimba and Euroanvils.
|
|
- guru
- Tuesday, 10/19/10 09:34:00 EDT
|
does any one have plans for a home made trip hammer.
|
|
sonny surratt
- Tuesday, 10/19/10 12:08:52 EDT
|
does any one have plans for a home made trip hammer. thanks
|
|
- sonny surratt
- Tuesday, 10/19/10 12:15:07 EDT
|
DIY Power Hammer: Sonny, we have a page full of information on "Junk Yard Hammers". These are all brief but have as much information as the builders gave us or that we developed.
I am currently finishing up CAD detail drawings of a hammer we started building nearly 3 years ago. . . The project hasn't been THAT big. We are building two at once and have had limited time between the two of us working on the project. I'll make the plans available after the hammer has been tested. However, this machine may have more machined parts than you may want or have the capacity to make. On the other hand, most of the machine work has been done on a 6" hobby lathe and an old antique drill press. We did a little work on a Bridgeport type milling machine and paid someone to broach keyways for us. But we also have a magnetic based drill press and a fork lift. Needless to say, a saw, arc welding and oxyacetylene cutting equipment is also necessary.
The big problem with designing a DIY project is guessing what the builder's tool limitations are going to be. Very creative folks can do almost everything with a torch, grinder and arc welder. But what about drilling a dozen or so 3/4" holes in 3/4" plate? Turning some parts on a lathe? I like to be able to take a machine apart to make changes and while all welded construction is fast, easy and cost effective making changes can be difficult. I drill lots of holes and use lots of bolts.

Above are some of the parts we've made for our project hammer.
That is a 1-1/8 Acme screw that was press fit into the bearing block and then welded.
The green part is a nylon plastic guide - the only part made using a milling machine.
There are four of these on each hammer.
We bought trailer springs, pressed out the plastic bushings and replaced them with standard oilite motor bushings.
They fit 1/2" shoulder bolts.
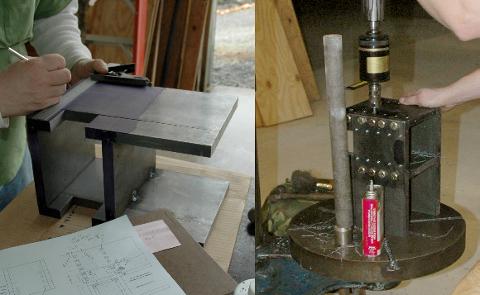
Above we are laying out the guide box assembly and to the right we are tapping holes on the drill press.
Much of our tapping was done by hand but in this case we had 24 quarter inch holes to drill on the guide block of each hammer.
So we went to the trouble of setting up the tapping head.
You can't tell here but the modern anodized aluminium tool looks out of place on the 100 year old drill press.
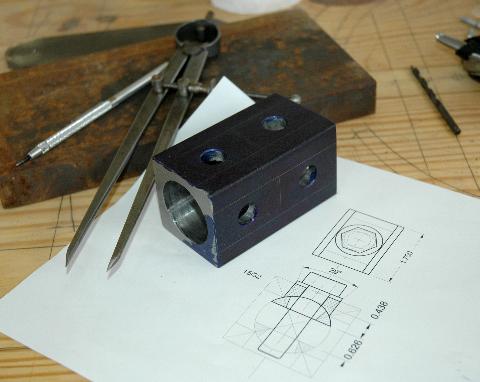
Above is a block of steel that has been drilled lengthwise with a 1-1/2" drill and then cross drilled four times for 1/2" bolts.
This part was then sawed up to make eight "rocker washers" shown in the drawing.
Both the concave top part and the convex bottom part were made using a drill press and a 4 x 6 cut off saw.
You would be surprised what you can make using such simple machines with some imagination
When I get this project done we are going to build some other machinery (belt grinder, vibratory finisher, forges) and may re-visit making a simpler DIY hammer.
|
|
- guru
- Tuesday, 10/19/10 16:17:50 EDT
|
Drilling Chips: One more picture! The part above was reduced in mass by 50% from drilling and then even more saw taken off by sawing.
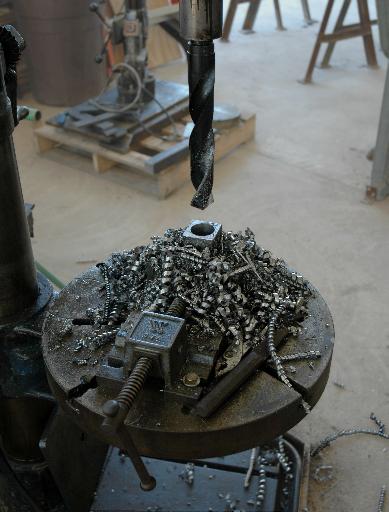
All that drilling makes a heck of a pile of chips (above). This is one of the few back gear operations I have ever used one of these drill presses for.
|
|
- guru
- Tuesday, 10/19/10 17:33:00 EDT
|
Sonny,
For sheer simplicity of construction, an air hammer is hard to beat. Self-adjusting, simple construction requiring only hand tools and a welder (if you're inventive), and very effective at moving metal. The kicker is you'll need a 5hp or better air compressor to run it. You should have one anyway, right?
One fairly simple air hammer design is the Kinyon-style hammer and you can get plans from ABANA. If you do that, I strongly recommend that you adjust the guide length and air cylinder stroke length so that you can end up with 10" of "headroom" between the top and bottom dies. This way you can easily use top tooling and also slip-on custom lower dies like ramp dies, swage dies, fullers, etc.
|
|
- Rich
- Tuesday, 10/19/10 17:36:17 EDT
|
Jock,
That's where those big old camelback drills really shine. I have to do those on the mill or lathe with a boring bar. No where near as quick as a heavy drill press.
|
|
- Rich
- Tuesday, 10/19/10 17:38:19 EDT
|
Where I needed precision holes I did them on the little 6" Craftsman lathe. I've really stretched the capacity of that little lathe. Boring a 3.5" diameter steel puley 3.5" long that weighs more than the headstock is a bit much. I REALLY need to get my bigger lathes in full running form.
I often do the roughing on the old back geared drill press then finish in the little lathe. Many folks do too much machining on the wrong machine. Rough sawing is slow BUT when you are not turning all that mass you are sawing off into chips it is MUCH faster in the long run. Drilling or any operation that is more efficient on another machine should be done there first. Faster also included forging and casting as well as fine flame cutting.
|
|
- guru
- Tuesday, 10/19/10 17:53:58 EDT
|
Guru, what speed did you use on the drill press for holes that size? My calculator says that you should be under about 300 rpm, right?
|
|
bajajoaquin
- Tuesday, 10/19/10 19:58:25 EDT
|
Guru,
That nylon guide looks like something one might be able to make on a router table. Maybe there's a reason it couldn't be, but that would eliminate one more machine tool.
|
|
Mike BR
- Tuesday, 10/19/10 20:06:38 EDT
|
Guru, in this modern age the plain twist drill at reasonable speeds is often overlooked as a hogging tool. At the valve shop, as late as 1990, we were still making a million fittings a month, most from shaped forgings. Most of those were machined from the solid forging on very stoutly built machines using twist drills at reasonable speed.
Imagine a dedicated pallet transfer machine, using twist drills to make a 2" pipe Tee. The Tee forging weighed 11.43# and the finished Tee weighed 2.42#. That is basically 9# of shavings each. We did taper ream and tap, but the mass removal was by twist drills. This particular machine produced 270 finished Tees per hour. In the very ductile C1023 these were made from you tended to get one corkscrewed shaving per drill flank per hole. The shavings filled a 42" cubed tube every 11 minutes.
But this was a still viable method of producing high grade forged steel pipe tees in 1990.
|
|
ptree
- Tuesday, 10/19/10 20:28:37 EDT
|
Al, a hint as to where you are might have helped. I have a double horn anvil here which you can have if you can collect it. Also what is your budget?? Vaughans in UK have a whole range of double bick anvils from babies upto 250Kg and will be happy to supply whatever you want.
|
|
philip in china
- Tuesday, 10/19/10 21:01:17 EDT
|
Big Champion 25" Drill Speed: I was using the next to the lowest speed on the drill press, probably about 75 RPM. While the machine has the low RPM capacity and the Horsepower it is limited by how much power the belt will deliver. On 1.5" (38 mm)and up the belt tends to slip so I was using slower speeds than possible with more HP. Now. . up to about 1.13" (29 mm) this machine will drill holes so fast you would think you are punching them! It will throw out long curling blue chips as fast as you can haul them away. Low speed straight gear works then (about 500 RPM).
The table has big gouges in it where someone was trepanning large holes about 5" in diameter. That may explain why the back gear pulley babbit is worn. It was run in back gear as a production machine for many years.
When I bought this drill press at auction it came with a rack of long Morse taper drill bits from just a little over an inch up to about 2" and numerous chucks and adaptor arbors. Everyone was sneering at the dust and dirt on the well oiled machine. . I bought it for $325 in 1984. Even then the drill bits alone were worth over $1500. The last time you could buy a machine like this one (in the 1960's) they sold for $2500. I got my money's worth!
When I put it into service I replaced the antique 3PH motor with a 1.5HP 1PH and traded the spindle thrust bearing out of an older similar machine. Someone had replaced the thrust bearing in this one with one that was too big which restricted the spindle travel. I also put a big Jacobs Ball Bearing chuck on it. I had bought the chuck to use on another similar machine but this one being the best in shop now gets the ball bearing chuck.
I love 100 year old technology. . .
|
|
- guru
- Tuesday, 10/19/10 21:31:24 EDT
|
Guru,
Just an elementary question. What is the difference between a TIG and a MIG welder ? Also a plasma cutter, what is plasma....hot gas ? Also, on a welding rod, is the outside coating the flux ?
|
|
Mike T.
- Wednesday, 10/20/10 01:16:13 EDT
|
Sonny, you can get plans for the Ray Klontz tire hammer from Clay Spencer. Clay@tirehammer.com They work well and are not too hard to build if you have cutting, welding and drilling equipment and cheap if you are a good scrounger.
|
|
- Ron Childers
- Wednesday, 10/20/10 09:06:47 EDT
|
TIG is an acronym for Tungsten Inert Gas, HeliArc was a tradename for the process that is in little use today but was the same.
In TIG a high frequency arc flows between the work and tungsten electrode that is held in a holder that has a ceramic "cup" nozzle where inert gas (Helium, Argon, Argon/CO2) flows to protect the work from oxidation. Small uinits are gas cooled, heavier ones use water. It is used to weld aluminium, brass, bronze, stainless and other metals with or with out a hand held filler rod. It is nearly the only way to weld aluminium. Using TIG is similar to welding with a torch but creates a much more focused intense heat. Those skilled with it can weld thin sheet metal as well as heavier pieces.
MIG is an acronym for Metal Inert Gas. MIG uses a wire feed to supply electrode material that passes through a copper tip making the electrical connection to the wire. Inert gas flows from a surrounding metal nozzle to the work area. There are several processes. Dip transfer is where the wire touches the work/puddle, melts the wire, then dips and melts over and over. Spray transfer is higher energy and the metal is vaporized in the arc and laid down with no noticeable contact. MIG is used for production welding of ferrous structures and by robotic systems. It is very fast compared to other welding methods and the lack of flux coating greatly reduced cleanup. It requires much cleaner metal than arc welding. Note however that they make a flux core wire that will weld dirtier surfaces than the plain gas cover type.
Plasma is a fourth state of matter where a gas has its atoms ripped apart into electrons and nuclei (disassociated). It only exists at very high energy levels thus is a very high temperature substance. Plasma torches can use a variety of gases including air for plasma depending on the application. The advantage of air plasma is that no gas tanks are required, only a small air compressor with filter and water trap. This is very handy when all you have available is electricity. Due to its very high heat plasma torches have a very small kerf and can cut stainless and non ferrous metals.
Stick Electrodes are coated by a mixture of materials that greatly change the characteristics of the rod. Generally all rods use the same wire stock except for stainless and specialty rods. It is the coating that makes the difference between an E6013 and an E7024. The coating contain cellulose (wood flour for smoke/gas), flux, iron powder (depending on type), and alloying ingredients (such as manganese) to modify the resulting weld. While there are "standard" coatings most are slightly modified proprietary mixes.
The flux in welding rods is a blend of boric acid, borax and fluorite (CaF2 - for stainless rods). The same as used in foundry work and forge welding. The flux helps clean the surface in advance of the liquid puddle and then covers the hot metal while it cools. The cellulose makes smoke which stabilizes the arc and protects the metal as it jumps across the arc.
NOTE: I do not teach welding, nor am I a professional welder and the above may have some slight errors. In general it is correct.
|
|
- guru
- Wednesday, 10/20/10 09:34:54 EDT
|
Is plasma the same as in a cutter and a TV? I mean to say "plasma flat screen" TV.
|
|
- Nippulini
- Wednesday, 10/20/10 13:16:25 EDT
|
Guru, I would add that MIG can be roboticly done as well as TIG.
In the automotive world, wher robots rule, many body parts are resistance welded, (Usually called spot welding). These resistance welded can be both spot and seam type done between rollers.
Also, many very thin body skin parts are "Plasma" welded. This would be a TIG type tourch, sometimes with often without filler.
Also big in the automotive world is friction welding. This is spinning the parts under load, increasing load to upset the hot zone and then a rapid stop to yeild a very high quality weld.
|
|
ptree
- Wednesday, 10/20/10 13:31:57 EDT
|
When you get into high production there are all kinds of unusual welding systems. Pressure welding, oven brazing. . . Even common resistance spot welding is high tech as small shops go unless they are doing high production work.
As for friction welding, my Dad's shop ran experiments on it back in the 1960's for welding caps on stainless nuclear reactor fuel tubes. . . I never heard the outcome. They were also doing TIG in a vacuum chamber that they built in the shop. Also machined a lot of exotic materials such as zirconium, halfnium. . I've still got a little sample of Zirconium. Looks like stainless steel.
|
|
- guru
- Wednesday, 10/20/10 14:28:03 EDT
|
In the automotive world, many smaller axles have the flange friction welded onto the shaft. Most big truck axle housings have the spindle bearing portion friction welded onto the stamped center of the differential housing as a finished part. Also many exhaust valves that are sodium filled are friction welded and have been since the 30's.
In the valve world, flanges were friction welded onto most of the flanged valves VOGT made except for the "N" stamp valves that required stick welding. Odd since 11% of pressure welds made by certified welders using stick are defective as made, and the friction process we used, Inertial welding yeilded a 100% good product. I can back those numbers up, since I looked at EVERY single returned product for reason etc and in 21 years, never ever got a single inertial welded valve back as failed. We also 100% shell tested all valves at 1.5 times the cold working pressure, and we never found one at production test either.
We too did some exotics as well including some titanium zirconium valves. We have to have a license from the feds to get and use that material, and had to send the shavings and scrap back as it was also used in Nuclear triggers.
|
|
ptree
- Wednesday, 10/20/10 15:27:30 EDT
|
A friend of mine, with whom I went to college, runs the two largest electron beam welders in the USA. They were made in Russia! He is welding parts for the F-22 Raptor. Did I mention he is a PhD. welding metallurgist? That's what I call critical welding.
|
|
quenchcrack
- Wednesday, 10/20/10 19:09:45 EDT
|
AH, electron beam welding. . One I left out.
|
|
- guru
- Wednesday, 10/20/10 19:59:18 EDT
|
Trip Air air hammers,
I have located from a fellow smith a couple of the hammers called Trip Air, after calling a hobby smith friend of mine he agreed to buy two of these hammmers, one to keep the other to maybe sell later, these will be his first hammer(s)These came from a factory forging furniture in NC.
What is the history on these hammers?
.
|
|
Greg S
- Wednesday, 10/20/10 20:05:19 EDT
|
My uncle helped design and run some of the electron beam welders at a local GE plant back in the 70's and 80's. For the life of me I can't get him to open up and tell stories about the cool stuff they must have done, although the first time I told him about forge welding and the interesting things folks are doing with damascus he got excited and asked lots of questions. Fairly early in his career he was promoted to management and became a suit, doomed forever to sit in meetings and never make anything real again. Much happier now that he's retired and can do stuff with his hands again, he even gave me his father's anvil a few years back.
|
|
Judson Yaggy
- Wednesday, 10/20/10 21:13:27 EDT
|
Trip Air These little hammers were being built in the late 1990's at the same time as the original "Old Blue", the Bull 75 with the pull down ram and the first KA-75's. Centaur was still selling Kuhns and Chambersburg was still alive and quoting hammers. The Trip Air, Bull and Old Blue were basically commercialized versions of the Ron Kinyon DIY air hammer.
I tried to get information on the Trip Airs in 1998 when I wrote my review of the "new" small hammers. They didn't want to talk or provide the simplest technical specs. But I also had trouble getting information out of the Kaynes about the Old Blues. I had never run into this attitude in the past when looking in to machinery. I did not have enough information to include the Trip Airs in the review so they got brief mention. They also were not interested in advertising on anvilfire. . . After that they faded from the scene and Big BLU took over the lion's share of the market.
So its been a long time since they were manufactured and I do not believe they have been supported in many years.
|
|
- guru
- Wednesday, 10/20/10 22:34:14 EDT
|
Chubb used to friction weld the bits onto vault keys at one time.
|
|
philip in china
- Thursday, 10/21/10 04:49:26 EDT
|
Couple thing to keep in mind with TIG welding:
* With the high frequency module, you could, on some models, have high-frequency (HF) start only, which uses the high-frequency to START the arc, then turns the module off once the arc is started and maintained; or HF continuous. HF continuous is used with any metal that has an oxide layer on top of it (such as aluminum), because it penetrates the layer and leaves you with a clean surface to weld/add feed metal.
* On automatic or semi-automatic TIG welding setups, there can be a spool of filler wire that is fed at a certain rate into the weld pool, similar to a MIG gun (but it does not carry the electricity like a MIG welder, the torch is similar to your TIG welding torch, but with robotic attachments).
* Some models of welders allow for pulsed TIG welding, which allows you to run lower general heat levels, but at the same time pulse in greater heat levels than what you would normally use on, say, stainless steel. An advanced welding technique, it is very useful when you have a relatively thick or intricate part, and you need to put more heat into the work but do not want to ruin the temper and make the part useless.
That being said, when I took introductory welding courses, I struggled like a with it, because it is kind of the equivalent of riding a unicycle while rubbing your belly and patting your head and doing the hula hoop. Especially on aluminum, where you will not see a change in color, you will only see a change in 'wetness' more akin to solder. I could not really get the hang of heat control, and would weld either cold or too hot. Too hot is when aluminum drops out from under you and sometimes leaves holes in the part.
MIG is, to take a line from Geico, so easy a caveman could do it. The proper settings is achieved when you get a sound similar to bacon frying, and your MIG gun has this slight pulsating sensation from the filler wire being fed into the weld pool at the proper rate.
Hope this helps a little bit. :)
PondRacer
|
|
PondRacer
- Thursday, 10/21/10 06:42:12 EDT
|
Should have had a (censored) in there after 'struggled with it' but I used the wrong characters (I guess it is interpreted as a literal html command container or something).
PondRacer
|
|
PondRacer
- Thursday, 10/21/10 07:41:53 EDT
|
MIG, so easy a caveman could do it...
http://www.anvilfire.com/gallery/comics/comic_of_the_week.php
That's why we call them "squirt guns"
|
|
- Nippulini
- Thursday, 10/21/10 08:15:23 EDT
|
I was thinking of the TIGger cartoon as well. . . ;)

T.I.G.ger
|
|
- guru
- Thursday, 10/21/10 10:47:58 EDT
|
Boeing has / had an electron beam welder made for the SST program back in the 70's. The chamber was roughly 12 by 12 by 24 feet long. It was used to weld the 6 inch thick titanium hydrofoil front left and right hand "wing" to the center strut block. Did it in one pass (about 3 feet long on each side) in just a few minutes. It took a lot longer to pull the needed vacuum than to weld. The safety protocol requied each person that went into the chamber to take a key from a bank of interlocks; nothing would work until all the keys were back in their lock slot.
|
|
Bob Johnson
- Thursday, 10/21/10 13:24:31 EDT
|
What is the outlook of getting a job as a blacksmith? Is there some sort of special education that I need to get?
~Future Blacksmith,
Mckenna Mears
|
|
Mckenna Mears
- Thursday, 10/21/10 14:21:16 EDT
|
I am new to blacksmithing and am trying to learn a few tricks of the trade. I have created some decorative pieces and want to know how to keep them from rusting. I don't want to paint or clear coat. How can I preserve that rustic look? Is there a recipe for some solution that a warm piece of metal can be quenched in to prevent rust? Any advice is greatly appreciated.
|
|
- Chad
- Thursday, 10/21/10 15:00:36 EDT
|
Chad, iron and steel start as iron ore in the ground, where the Fe is intimate with its beloved Oxygen. We dig it up, and force a divorce of the two lovers. From that moment forward they yearn and plot for the time they cn again be intimate. The only way for a blacksmith to prevent rust on outdoor work is to paint or galvanize.
Indoor work can be waxed but will slowely degrade.
|
|
ptree
- Thursday, 10/21/10 15:25:00 EDT
|
Chad, As a blacksmith, making decorative work, you are a manufacturer. Painting is PART OF THE JOB. Get over it.
IF you want the iron to look fresh out of the forge then learn to PAINT it so it looks fresh out of the forge. I've been telling smiths for decades that if Hollywood can make wood and plaster look like brick, chrome, wrought iron. . . then blacksmiths should know how to make iron look like iron.
Finishing includes cleaning by sand blasting, tumbling, vibrating or power wire brushing. Finishing includes primers, base coats, glazes and top coats. It can be an ART and those that are successful in the trade understand its importance.
If you want your work to hold up long enough to avoid a bad reputation, don't just paint it, paint it RIGHT.
Finishes can be brushed, dipped, sprayed and hand rubbed. Very subtle effects can be created with spraying as well as hand rubbing. For an example go to
BlacksmithsDepot.com/
Supplies,
Finishing,
Guilders Paste.
|
|
- guru
- Thursday, 10/21/10 16:27:54 EDT
|
EDUCATION: McKenna, The vast majority of Blacksmiths are self employed and those that have other working for them have more welders, fitters and machinists working for them than 100% blacksmiths.
To be a useful blacksmith/employee you need more education than you would expect. Even in the most traditional of shops modern welding equipment is used. If for nothing else spot heating, building tools, fixtures and machines. A full series of welding courses focusing closely on the industrial safety aspects of the task is highly recommended.
The most productive shops, that is, those doing the bulk of the architectural work such as railings are what is known as "fabricators". They do little or no forge work, buying pre-made components, assembling them and some bar stock, top rail and what have you by welding. The guys that do the assembly need good mathematical skills, the ability to read drawings as well as measure and layout accurately fast and efficiently.
Blacksmith and Fabrication shops are more similar to modern machine shops than a romantic smithy. There are drill presses, power saws, shears, punch presses, welding equipment of all kinds, fork lifts and cranes. Forges are more likely to be gas than coal. Many shops have lathes and milling machines. All this machinery requires knowledge to run and good mechanical skills to maintain. Most basic metal working courses give a brief familiarization with some of these tools. Knowing how to work on hydraulics and engines is also helpful. Knowing how to rig and lift heavy loads (an industrial rigging and crane safety course) is helpful.
Many shops build lighting devices and have various equipment to hook up and maintain. Knowing how to wire simple appliances is helpful but knowing about 3PH motors, starters and control circuitry can make you indispensable. .
THEN there is Shop Chemistry. This should be a course somewhere but I doubt it is. Not a typical high school or college chemistry course concentrating on moles and Avogadro's number. . . Blacksmiths use and occasionally formulate chemicals for cleaning, descaling, derusting, finishing, lubricating, heat treating. . . Knowing how to properly dilute acids, what chemicals are alkalies and acids so you know not to mix them OR how to neutralize them. Knowing what anhydrous and sublimation means.
Industrial Safety IS a course you can take but is generally taught in industry. We have touched on some of it about (rigging safety, chemical safety, welding safety). Most small shops do not require or teach it but you SHOULD know it.
Depending on the type of blacksmithing you are interested in the majority outside of industrial smithing is the realm of the Artist Blacksmith. Many people think its "craft" and no art is involved. They are wrong. To be an artist blacksmith you need to know how to draw a scroll as well as make one. More importantly you need to know why one scroll does not go with another and why an element is too light or too heavy. You need to be able to draw free hand, in perspective, on a drawing board AND in CAD. "Mechanical" drawing is part of everything mechanical and today many machines, notable cutting and engraving tables are controlled by computer using CAD drawings. Besides the skills to draw there is general design as well as architectural history and design.
If you go out on your own include bookkeeping, promotion or advertising, business. . .
You don't have to learn it all at once but there is at LEAST a 4 year Masters of Science degree's worth of things to learn outside of working hot iron.
|
|
- guru
- Thursday, 10/21/10 16:35:35 EDT
|
Thanks for the replies so far. However, I can sandblast, paint, etc. What I am trying to find out is how to not cover up the "character" of the forged metal for inside pieces like towel racks, pot racks, and drawer pulls. I was to find out more about how old timers would "blue" steel to prevent rust. Any and all info is greatly appreciated.
|
|
Chad
- Thursday, 10/21/10 17:05:44 EDT
|
And now for an opposing view: forge the items out of stainless and passivate or electro-polish them!
More expensive metal, harder to work both on you and your tools; but if you refuse to finish your work...
Bluing does not rust proof steel---otherwise there would be millions of much happier gun owners out there! You need to keep the blued items oiled, waxed, siliconed, etc.
Traditionally iron wasn't iron coloured---it was generally painted or varnished. (Unless you were wealthy enough to own armour and have a hoard of servants to keep it polished and oiled!)
Thomas
|
|
Thomas P
- Thursday, 10/21/10 18:46:54 EDT
|
Chad, Blueing is a surface color treatment, sometimes an oxide. In and of itself it will rust. The military uses "Parkerize" a brand name for phosphate conversion coating that uses multi-step vats of hot acids and caustics to produce a VERY shallow iron-phosphate crystal surface. The phosphate coating in and of itself provides little protection. It does hold a thin film of oil, that protects the steel under the coating. It is not a very attractive coating but done right can provide very good indoor protection, especially if the oil is replaced regularly.
A blued surface is even less protective, and needs constant oil renewal. Ask any one who has carried a weapon daily about blueing vs parkerize, and you will find that daily maintenance is often needed on blued weapons. Stainless is now often the choice for carry weapons due to that high maintenance factor.
The Guru is correct that paint is the one low maintenance coating to consider for anything you want to last more than a short time. And then the paint job is only as good as your prep.
|
|
ptree
- Thursday, 10/21/10 18:47:17 EDT
|
Education: Don't forget basic construction and woodworking as generally the person buying high end metalwork will expect you to install it too!
And finally what I suggest any artisan wanting to go Independent studies: Small Business courses! Until you know how to make a business plan, depreciate your assets, know what your shop rate *has* to be; you are not a business but only a failure waiting to occur!
Thomas
|
|
Thomas P
- Thursday, 10/21/10 18:52:54 EDT
|
Chad,
I understand your dilemma, but you can't really just dip or wipe a coating on steel and hope it will prevent rust while being invisible – there’s no such magic coating. There are a bunch of blacksmiths who use a mixture of turpentine, beeswax, linseed oil and Japan drier to make a "blacksmith's finish" and hope it will hold up. Even in interior use it will, in time, still allow the steel to rust. Then there are the guys who heat a piece up and quench it in used motor oil to burn the oil on for a finish - that rusts too, and the fumes from burning used motor oil can be toxic and carcinogenic, both. Another non-starter as far as protection goes.
Lastly, there are the guys like me (and a number of others) who paint their work - paint it so it looks like it wasn't ever painted at all but is completely rustproof. To do this takes both skill and art. The basic process is as follows:
Forge the piece and then clean it to bare metal by sand or grit blasting, tumbling, vibratory finishing, wire wheeling or pickling. I generally pickle mine in a dilute solution (~6-10%) of hydrochloric acid in water until all scale is removed. Following that the piece is rinsed, neutralized with a bicarbonate of soda solution and then rinsed again and dried immediately. The next step is a second pickling in a dilute phosphoric acid solution to do a partial conversion of the surface to iron phosphate, a form of iron that is less prone to rust than raw iron. That is followed by rinsing, drying and then painting it with a 95% zinc primer followed by a coat of red oxide primer. Then it gets painted a light gray color that is the same as bare steel. After that coat has thoroughly dried I apply two coats of clear. When the clear is dry I paint it a deep charcoal gray that matches the color of firescale - almost, but not quite, black. That paint has a retarder added so it dries more slowly than normal to give me time to burnish it back off the highlights to let the lighter gray show through. The piece now looks like freshly-forged work that has been given a gloss finish, so I then give it one or two coats of a semi-matte clear - more matte than satin but not full matte. I have to make this myself from a mixture of satin with flatting agent added. If the work is for an outdoor location I use automotive acrylic enamel with a urethane hardener additive and apply three coats.
That's the basics. I generally add subtle tints or hand-applied highlights and detail work to make the piece "pop" a bit or subtly match the color scheme in the immediate area. As I said at the beginning, this is art - part of being an Artist/Blacksmith and not just "a guy who makes metal stuff." I should note here that art pays better than craft, too. Yes, it is perceived value as much as actual value to some degree but I'm happy to cash the checks. :-)
Sounds like a lot of work, right? It is. Generally, just about as much work as the actual forging but I charge plenty for my work and I have high-end clients that will not settle for junk that is unfinished or semi-finished so it later rusts or requires touch-up. My finishes are one reason that I get the high-end clients. In the case of large projects for outdoor exposure (I’m in a marine environment) I generally sell them a yearly maintenance contract to guarantee that they don’t have to even think about maintaining the piece. Well-to-do people happily pay for that privilege.
Only YOU can decide if you want to settle for doing only half a job or if you are willing to learn all that is needed to do the whole job and reach out for the high-end work.
Rich
|
|
- Rich
- Thursday, 10/21/10 20:10:31 EDT
|
Wow... nice trick to getting that permanent (well, not exactly, i'd say more like almost :) ) 'black wrought iron' look by painting. I should put that in my 'new edge of the anvil' book notes section.
Then I could practice this on my forging whatevers that do not make it to clientele, only for practice, to master the basics.
PondRacer
|
|
PondRacer
- Thursday, 10/21/10 21:41:58 EDT
|
The art of Painting: I like using metallic lacquers for this kind of effect. A light metallic blue or blue-gray, over spray with clear tinted with a little black for shading effects, then a charcoal gray or black with some metallic added as a hand rubbed top finish. One of the automakers had a beautiful "gun metal" blue gray back in the 80's that would be perfect for the base coat of a "natural" forged iron look.
If you use lacquers for your base coats they are not effected by the hand rubbed coats of varnish or enamel (oil) based finishes or glazes like Guilders Paste.
I have not used Guilders Paste but I have seen it demonstrated and it is very easy and forgiving. We used to make our own hand rubbing finishes using varnish and artists oil colors for tint.
For spraying I used to have all kinds of odds and ends of automotive lacquer. We did a motorcycle with a metallic sky blue fading to silver on the bottom (sort of like a fish). The silver was from a Corvette we had painted and the blue from my old Pontiac Tempest. The bike owner provided some clear. We started with a fine sanding primer well finished, then the silver. After the silver the blue was applied with the fade. Then enough clear (several coats) was applied to be able to do all the rubbing and polishing in the clear and not effect the colors below. A beautiful paint job that lasted over a decade and survived several spills.
The BIG problem is that many smiths don't even think about the finishing process or include it in their prices. As noted above the finishing can equal the rest of the job in time and good paint is NOT cheap. Stainless starts looking a lot more attractive when you consider a good properly applied paint job. Hot forged stainless looks just like forged steel as well.
|
|
- guru
- Friday, 10/22/10 11:59:54 EDT
|
You don't see the old wrought iron fences and gates like you used to, or at least thats what we called them. They were weathered, but were around for years. Used to see them around old cemetaries and maybe around some old homes.
|
|
Mike T.
- Friday, 10/22/10 14:08:44 EDT
|
Mike, The problem with the old commercial fencing used at many small cemeteries is that they contained cast iron components which would break and lead castings which accelerated corrosion if not kept well maintained. There is also high demand for the old stuff which is removed from where it was and used in someone's backyard in upper class suburbia.
There are still tens of thousands of these as well as some used to fence in city lots. But they are going fast. And the modern replacement, is the ubiquitous ugly chain link fence. Makes you wonder what will replace that and create nostalgia for the good old chain link fence days. .
|
|
- guru
- Friday, 10/22/10 15:00:36 EDT
|
Wrought iron fences- In a town in Bulgaria there is a steel fence around a park. It is made from decommissioned military weapons. The posts are gun barrels. The pickets between these are rifles with bayonets welded in place. Very interesting.
Gilders paste- I actually sent to USA (Blacksmiths Depot) to get every colour they do. I have never regretted doing that. For a really unusual effect try tempering to get a dark blue then add highlights and cover it all with a lacquer to stop the blue from rusting. I love that blue from about 250 celcius.
|
|
philip in china
- Friday, 10/22/10 21:07:21 EDT
|
The Long Long Long Power hammer project . . .
Finally! After many false starts and rework we RAN the anvilfire X1 hammer today. Its not quite finished and some things were jury rigged but it ran slick. Smooth, hard hitting. . We have a couple more weekends of work to do on it and we will be forging hot iron. Will have video then.
For those of you that know anything about it this was the hammer that we were supposed to debut' 2-1/2 years ago at the last CSI hammer-in. We had worked a week of all day and late nights trying to get all the parts made and just could not do it. . I really screwed up socially at the hammer-in due to being much too tired and focusing on the hammer until much to late. Since then we have only been able to work on it an average of one day a month (and many of them short days) due to various scheduling conflicts, money issues and so on.
When all is done and well tested we will offer plans. Will report on progress as it happens.
|
|
- guru
- Saturday, 10/23/10 20:45:06 EDT
|
If I recall correctly, a long fence around Grant's Farm in St Louis County, MO (home of the Budwieser Clydesdales) has pickets of gun barrels also (Civil War, I think).
|
|
- Dave Hammer
- Saturday, 10/23/10 22:28:18 EDT
|
Anybody have any experience rebuilding a 1,000+ pound Niles-Bement-Pond steam hammer? Can these run off just compressed air? Value? Assuming it needs a lot of work but the bones look good? Thanks
|
|
dief
- Sunday, 10/24/10 00:21:05 EDT
|
Guru, Is it possible to download your eBooks to my eBook reader?
|
|
Carver Jake
- Sunday, 10/24/10 00:49:17 EDT
|
dief,
I love steam contraptions. I was born just before they started scrapping the old steam locomotives. A few years later my dad took me and my sister on a ride on an old steam engine waiting to go to the scrap yard. I bet there are steam engine enthusiasts who can advise you on rebuilding the steam power of the hammer. I saw a show where Jay Leno has huge buildings filled with old industrial steam powered machines that have been restored. He also has many of the early steam cars. He has studied all of the working parts and is,it seems,an expert on these old steam engines.....Come to think of it, if you rebuild this steam hammer, I bet it would be worth plenty.
|
|
Mike T.
- Sunday, 10/24/10 05:34:32 EDT
|
I was watching How It's Made on TV and they were showing how reproductions of antique swords are made. I watched it carefully and when they quenched the sword, they quenches it tip first, slowly, in a boiling salt bath, then they quenched it in plain water. After sharpening it on a belt grinder, it was tested on a sheet of paper. The guy held a sheet of paper in his hand and would shear off piece after piece of paper. It looked to be as sharp as a razor.
|
|
Mike T.
- Sunday, 10/24/10 05:40:17 EDT
|
eBooks: Jake I know nothing about what technology your eBook reader uses so I doubt it. A quick google shows there are numerous different formats. Our system is a proprietary one that I created that was designed to work from our server and will not work on a local PC.
|
|
- guru
- Sunday, 10/24/10 09:46:38 EDT
|
Big Hammers: Dief, Yes, they will run off compressed air with the proper lubrication system. But what do you mean by "rebuild"? Restore a worn out machine to perfect condition? Or get an old machine to to working condition? Restoration may require machining with equipment similar to what was used to make them in the first place. There are enough of these old machines in working condition or only recently taken out of service that one should carefully select candidates for setup.
These old hammers are pretty simple devices (I have one - a 350). The major problem is rust and the degree of rust. In many cases the hammer just needs to be disassembled, cleaned and reassembled.
While these are a simple devices there is always an "I gotcha". To disassemble the hammer the ram must be disconnected from the drive rod. These are held together by a tapered fit and a locking wedge or pin. To undo the tapered fit the die is removed. The die locking wedge is often torched off flush for safety. Once the die is removed (have fun) the ram needs to be kept blocked up so it doesn't over travel. There is a hole in the ram where a heavy rod is used to push the ram off the taper. NORMALLY, this is done using the hammer itself to raise the ram slightly and drop it on the rod popping loose the taper. Once disconnected the piston and drive rod can be removed.
Prior to this point there are other things that may need to be cleaned/repaired such as the control valves and linkage. If all this is free and working and the cylinder is not locked up with rust the hammer will run. I MAY NOT run efficiently, but it will run.
The big problem with working on such machinery is the need of a facility with a sufficient crane and work space. While such things can be moved with heavy duty fork lift equipment it is not safe to try to do work with such equipment. A couple 10 ton hoists with 20 foot or more overhead lift should do it. . Then you need a crew that know how to do the rigging and safely manipulate such heavy parts. I can hook you up with such a crane. . .
Placing and setting up the hammer is a different thing. THEN there is the issue of power to run it. A thousand pound hammer will need about a 100 HP compressor.. . You can make it move with less but to do more than just raise and lower the ram a few times you need significant HP.
|
|
- guru
- Sunday, 10/24/10 10:40:36 EDT
|
To convert a steam hammer to air, and have any hope of usefull efficiency, the valving will need to be modified, as steam valves are made with little to no sealing internally and will howl your very expensive air right through the valve.
Steam hammers are usually set up to tup, that is reciprocate all the time in use. This keeps the steam lines valves and so forth hot. hot steam in cold lines is a recipe for diaster. Compressed air however needs to not tup, as it is a waste of air, so the tupping arangement on the valve linkage will be superflous and may be removed. Depending on the piston seals you may have to modify for elastomeric seals similar to those on a pnuematic cylinder.
Grant Sarver has madified a number of steam hammer to run on air.
|
|
ptree
- Sunday, 10/24/10 10:54:35 EDT
|
Congratulations on the hammer Jock- What are you going to call it-"tire hammer" name has been taken. When can we come up to watch it run?
|
|
- Ray Clontz
- Sunday, 10/24/10 16:22:08 EDT
|
Ray, It has become the "X1" (EX ONE, for experimental #1 like the rocket planes). It will be at least Thanksgiving before it is really finished and painted, another month before X1.b is assembled. The available time to work in the shop has made it excruciatingly slow going.
The things left to do are, thread the treadle link, complete the treadle and treadle guard (bend the tubing, fit it up, weld it), drill and tap the anvil and sow block, shorten the frame on X1.a then paint.
Originally I was going to weld on the "sow block" but we have some ideas we want to try so its going to be bolted on with a couple 3/4-10's. The frame height issue was the result of being in too big a hurry and not having even semi finished drawings two years ago. . . The hammer works as-is but it can't be adjusted for running at short stroke. Well. . . its only steel. Cut out the welds, clean up with the grinder and put it back together again. . . So today I am ordering some grinding disks for the big grinder. . . And I hope there is enough gas left to do the cutting.
|
|
- guru
- Sunday, 10/24/10 17:44:43 EDT
|
Bonjour, the plant I work at has a small welding shop for maintenance purposes. Sixteen months ago I spotted an anvil under a welding bench. A brand new anvil! It had a nice ring and a good bounce. I turned it upside down and drilled a shallow hole under the base with a 1/8 drill bit. The chips are steel chips. A good anvil I tought.The anvil stayed there for months, so I asked my boss if I could buy it.Still waiting an answer. But last night, navigating Anvilfire, I saw in News, vol.30, page 8, an anvil shoot.The anvils used were the same I spotted. It is written "These anvils were purchased new for the specific purpose of being shot". If a blacksmith association buys a new anvil to be used as a projectile,I suppose it is a cheap object. Why not an ASO? What should I think about that anvil simply marked 45kgs England ? Anyone ever used one? I offerded $100 for it. I already bought a 50 pounds nice looking ASO before I found Anvilfire, and I don't need another one!!
Thank you Donald
|
|
donald
- Sunday, 10/24/10 17:52:18 EDT
|
I have a need to apply a 'firescale', or more precisely, a fire pitted surface on a number of completed pieces of door hardware made for low carbon steel. Like many, I have seen pieces finished this way, but not observed the process. Can someone with experience advise me? Thanks
|
|
walt myers
- Sunday, 10/24/10 18:39:05 EDT
|
Holy crap, I had to see a video of what donald is talking about:
http://www.youtube.com/watch?v=IhQ4dE_RGnQ
It sounds like a small howitzer going off.
And then I saw what is bound to happen with an activity like this:
http://www.youtube.com/watch?v=q9isw0fKXAE&feature=related
|
|
Nabiul Haque
- Sunday, 10/24/10 20:06:19 EDT
|
BGoP Anvil Shoot
The folks I know that state "Anvils specifically purchased for anvil shooting" bought good steel anvils and had them X-rayed for cracks and defects. The anvils in use in the above video are old English wrought iron anvils.
ASO's are commonly cast iron and often very poor iron at that with significant inclusions (fist size lumps of sand). Many of the newer ones have diagonal hardy holes, a stupid practice.
Note that there is a big difference in anvil shoots. Most of the folks I know in the blacksmithing community are happy when the anvil travels 5 to 20 feet in the air. Makes plenty of noise and smoke. The majority of practitioners are competitive shooters. They launch anvils well over 100 feet in the air. I don't want to be within a mile of one of these shoots.
The anvil you've seen marked "45Kgs England" is probably a Brooks or Vaughan Brooks. As anvils go they are pretty ugly with a heel so thick that would hold up if cast iron. But they are good steel.
|
|
- guru
- Sunday, 10/24/10 20:58:14 EDT
|
Walt,
This is just an idea I came up with for a fire pitted surface. Get some water fowl steel shot maybe no. 6 size or no. 9 if a smaller pit is desired and shoot the door hardware. I know this procedure is done on furniture in order to give it that antique worm hole look.
|
|
Mike T.
- Sunday, 10/24/10 21:17:20 EDT
|
Fire Scale Finish" Walt, Forged pieces naturally have a scale finish. Much stamped commercial hardware has the texture rolled or pressed into the surface. To any smith this looks totally fake.
To produce a forced scale finish requires heating the steel until it scales (nearly forging temperature) then hammering to break up the scale then reheating to produce more scale then hammering OR pressing that scale into the surface. This is done by hand or with flat dies on a power hammer, a fly press, or hydraulic press.
Reheating the work several times with broken scale causes variations in the scaling. Pressing the rough scale into the surface permanently deforms the surface so that even with the scale removed the texture remains. So the texture remains if descaled using chemicals or abrasive methods. This produces a somewhat aged looking surface like rusting.
If you are just looking for a textured surface you can use a strong acid or alkali (such as bleach) and let the parts etch for a day or so.
Note that we never recommend a scale finish as a final finish. Texture yes, finish no. Clean the textured steel and paint appropriately. We had a long discussion on the subject of paint and looking natural just a few days ago (look UP).
|
|
- guru
- Sunday, 10/24/10 21:27:58 EDT
|
I would never ever reccomend shooting steel hardware with steel shot. The rebound will fierce, and will be very dangerous.
|
|
ptree
- Monday, 10/25/10 07:18:51 EDT
|
Ever heard someone using a needle scaler on a metal container? It's like a bad trip, you just can't wait for it to be over.
|
|
- Nippulini
- Monday, 10/25/10 08:40:52 EDT
|
Textured Finishes: I've know a number of smiths that purchased power hammers for nothing more than texturing. . . Much texturing is done under power hammers with special dies. Big BLU sells several special dies for texturing but does most with a narrow fullering die. This produces a wavy hammered surface. Check their dies page. BlacksmithsDepot sells a number of hand held or hammer mountable texturing tools.
For a rough pebbly imprint a die has spots of arc weld put randomly on the surface. Some folks do the same with a hand hammer. Oddly, the work of smiths many people want to emulate was made with the goal of NOT showing any hammer marks or unnecessary texture.
On the other hand, I've produced work with a ball peen texture by hand that took a LOT of work. Doing this right requires 100% overlapping coverage of the surface as well as just the right amount of randomness. Remember the campy ironwork from the 1950's with one or two ball peen hammer marks on each piece. . . we have come a LONG way from that.
A needle scaler WOULD create some texture on otherwise smooth metal.
|
|
- guru
- Monday, 10/25/10 10:08:38 EDT
|
I was wondering, is the reason most smithys are a little on the dark side just because it makes it easier to judge heat colors?
PondRacer
|
|
Pondracer
- Monday, 10/25/10 11:36:31 EDT
|
I've got a small sledge hammer just for texturing, it works even on cold metal. One side I welded a bunch of uneven globs, other side I cut shallow random lines with a abrasive cutoff tool. Works good and it's fast.
I hate a factory finish on parts of forged work.
|
|
Carver Jake
- Monday, 10/25/10 12:07:15 EDT
|
Dark Shops:
Too cheap to put in good lighting. .
Too cheap to paint the walls once they get soot covered. .
Lots of smiths that work tool steel like a low lit shop to judge heat colors. I read about a magnet making shop that did heat treating in the dark. Workers would have to accumulate their eyes to the dark before starting. . .
But I prefer a well lit shop with light walls so you can SEE! If you can't see it, its hard to make it. Smiths that work outdoors in bright light will hold a piece under the forge hood or in a shaded bix to determine heat by eye.
To me lighting is as important as ventilation. I used to insist on good lighting and now that my eyesight is failing it is an absolute necessity.
Many of us don't do just forge work in the shop. We also saw and drill stock to scribed lines. Measuring, laying out and marking (punching) accurately requires good clear layout and visibility. It is also easier to do arc welding in a well lit shop. With near daylight lighting a standard arc welding shade can be seen through.
|
|
- guru
- Monday, 10/25/10 13:52:59 EDT
|
Im sort of new to all of this but does anyone here know what the best way to build an extra small forge that can fit in a surprisingly small backyard?
|
|
grant B
- Monday, 10/25/10 17:08:47 EDT
|
I have to take exception to the "caveman MIG welder" comment Nip.
I was a production welder for a year as part of my training at a large precision roll building shop.
While the rollers we made were not considered to be actual pressure vessels they were welded to pressure vessel standards.
The list of weld prep standards went on for three pages and the engineering and execution of the components left nothing to chance.
After everything was shrunk together and preheated the welding began. At the turn table I put journals and headers together that were later shrunk into the roll bodies and welded.
I never welded more then 15 degrees out of position. Root passes were laid down then ground out and laid down again with the prescribed number of filler and cover passes after that. Absolutely ANY chance of porosity was ground out and re-filled, the most common cause was from a fly or bee that was attracted to the ultraviolet arc light and would then fall into the weld.
I rarely had less than 500 amps dialed on and often ran at 800 amps at a 100% duty cycle ( yes, it was a really big power supply)
Water cooled gun with two radiators on it and 7/64 flux core wire.
I wore three layers of aluminized heat protection (the outer layer was replaced every shift)and I stood behind a 1/4" steel plate to protect any desire I might have for future procreational activities.
The 13 shade glass in my helmet and 2 shade safety glasses did not do enough to protect my eyes however so I'm glad I didn't have to do that for more than a year.
Ohh yes, hearing protection. Even my pair of military ear plugs probably were not enough, I should have tried to find some headphones that fit under my hood as well. Trying to hang on to a MIG gun feeding 7/64 flux core for ten hours a day was about all I could do.
I don't know how people can do that for a life time and have any thing left to retire with...
The only "caveman welders" I know of buy their welding supplies at home depot and don't need much to cover up from the 85amp max out put of their "welder".
|
|
- merl
- Monday, 10/25/10 17:36:09 EDT
|
GrantB---an extra small forge can be made from one soft firebrick and a standard propane torch---they kind a homeowner might use to solder a pipe with.
Not knowing WHAT you want to forge makes it hard to know if you want directions for a one firebrick forge, a bean can forge, a propane tank forge, (all propane, my propane forge sits on a gas grill cart where I removed the grill and bolted a steel plate where it had been so I can wheel it around to where I want ti---holds a propane tank too!
For coal forges the smallest I've seen working was made from a cast iron frying pan. For charcoal forges the smallest I've seen was about a quart of space.
For backyard use a quiet anvil and a non-coal smoke forge is generally suggested.
Cany you share with us more details of what you want to do?
Thomas
|
|
Thomas P
- Monday, 10/25/10 18:26:04 EDT
|
Grant B - heres a link to a coffee can forge - pretty small
http://zoellerforge.com/coffee.html
hth
dbk
|
|
David Knapp
- Monday, 10/25/10 18:29:18 EDT
|
Micro Forges: If you want a small GAS forge look here.
If you want a small DIY coal or charcoal forge see our Brake Drum Forge Article
As Thomas points out, there is small, then there is super small. A jeweler's blowpipe is a type of forge (blown air + fuel). And long ago jewelers and other crafts folk used Hibachi size forges.
|
|
- guru
- Monday, 10/25/10 20:41:21 EDT
|
I am still using my little portable forge- pending making a new, big fixed one. If I want to see what colour steel is I just put it under the forge pan where it is in shade. That helps a lot. Otherwise my shop is very well lit. Of course I am not paying the power bill but even if I were I would still go for good levels of lighting.
|
|
philip in china
- Monday, 10/25/10 21:08:25 EDT
|
A few years ago, an Omani locksmith at the Smithsonian Folklife Festival used a charcoal forge built in a 7.62 (I think) ammo box. The box was largely filled with clay.
|
|
Mike BR
- Monday, 10/25/10 21:11:10 EDT
|
Second try at the knife I cracked back on 10/16....
Same 1" dia mystery coil spring off a train, but worked at a consistent bright orange this time, approximately 2000F from various online color charts. I moved the forge a bit closer to the anvil and was able to pull the steel out, hammer for a minute, then put it back before losing too much heat. Mind you, its a bit easier to move 1" dia spring steel by hand when its HOT than when a bit cooler.
Broke my favorite hammer's handle right as the propane bottle went dry... and that was enough forging. I did some preliminary grinding to remove scale and get it slightly more in shape, then switched bottles and heated to non-magnetic.
At this point, I learned that those little neodywhateverium magnets don't actually survive being touched to red steel.
Held it at that temp for a min to soak through [still a thick piece] and quenched in oil this time. No terrible cracking noises, thank God. While waiting for it to fully cool, I had an odd thought:
Has anyone tried [or already knows a reason why not to try] quenching oil steels in radiator coolant?
Ground the knife down into better shape, polished, and can't see cracks. Whew!
Its still ugly, being only my second knife attempt, and may never see the light of day after Friday when I butcher a lamb with it, but it WORKED!!!!!
Now sharpening and slicing paper... it gets a good edge, but remains to be seen how long it will hold one.
|
|
MikeM-OH
- Monday, 10/25/10 22:25:10 EDT
|
yes Nip,for sheer noise intensity trying to veeing out fatigue cracks with an air chisel inside Artic fuel tankers. The entire village can't wait for those jobs to be over!add to that high temperatures and smoke. One hot July eight hours the first day and seven hours the second day with internal temperatures ranging from 95°F to 140°F even with forced ventilation. Heating 4x2 channel redhot with big gas torches and forming it to the internal curvature of the tank bulkheads with a 14lb sledgehammerwhilst inside the tank. The only access being the 16 inch diameter man hatch in the top. Fun jobs!! I don't think. The only advantage is that it conditions the neighbours to think that anvil work is quite tuneful and harmonious.
Noise did you say? Can you type that again but a bit louder
|
|
- Chris E
- Tuesday, 10/26/10 07:27:32 EDT
|
MikeM---yes but why would you want to? Just a liking for toxic steam as you quench?
Thomas
|
|
Thomas P
- Tuesday, 10/26/10 12:02:14 EDT
|
MikeM,
If you quench an oil-hardening steel in radiator coolant you're almost certain to crack it. Radiator coolant is, generally speaking, a mixture of water and either ethylene glycol or propylene glycol plus some other wetting agents and anti-foaming agents. In other words, radiator coolant is made to transfer heat as quick as, or even quicker than, water but not freeze or boil a too low a temperature. Think about it - you've just described a quenchant faster than plain water, right?
|
|
- Rich
- Tuesday, 10/26/10 12:59:48 EDT
|
Quenchants.
I would not reccomend antifreeze as a quench. In a dilute solution, beside making vapors that you don'y want to breathe, there are the problems noted by Rich.
Use straight up, ethylene Glycol is flammable.
For steels sensitive to quench cracking sometimes a polymer additive is used to "slow" down water. But this is an engineered polymer that retards the quenching action by design. They are a sticky gooey, pain in the rear, and very expensive. And if the dilution rate gets out of line, so does the quench rate, yeilding either quench cracks or softer than desired parts.
|
|
ptree
- Tuesday, 10/26/10 13:57:55 EDT
|
If you want a slow quench that isn't flammable, just try air. Moving air, like from a blow gun, will quench things almost as fast as oil in some cases.
|
|
- Rich
- Tuesday, 10/26/10 18:58:23 EDT
|
I just picked up a Peter Wright anvil. The side looks like it says Patent SOLID ROUGH 1 0 15 Is this a USA made? It has a good ring so I thought it mite be a good one??
|
|
- Harold G
- Tuesday, 10/26/10 20:33:22 EDT
|
I just picked up a Peter Wright anvil. The side looks like it says Patent SOLID ROUGH 1 0 15 Is this a USA made? It has a good ring so I thought it mite be a good one??
|
|
- Harold G
- Tuesday, 10/26/10 20:34:02 EDT
|
I have a question, I got a Peter Wright anvil today. It looks like it says SOLID ROUGH in a circle. Is this a good one and is a USA anvil? It has a good ring, the sides are wore some. It has a 15/16 hardi hole wt. is 1 0 15
Thanks
Harold
|
|
Harold
- Tuesday, 10/26/10 20:40:05 EDT
|
Harold this is not a chat room. Post and have a little patience and someone will answer when they see it.
The side probably reads "Solid Wrought" It should be a well made English anvil
|
|
ptree
- Tuesday, 10/26/10 20:48:37 EDT
|
Thanks, sorry about the extara post my computer said it didn't go through
|
|
Harold
- Tuesday, 10/26/10 21:09:19 EDT
|
Harold, it sounds like you have a 127 lb. English made anvil. A little bigger than the one I have. It should be a very good working tool for you. PW's are one of the best.
The Guru might like to have a picture of it for his collection.
If you can give the serial number someone here can probably figure out the date of manufacture for you.
Use it in good health and happiness.
|
|
- merl
- Tuesday, 10/26/10 21:23:03 EDT
|
I'm not aware of Peter Wright anvils having serial numbers.
|
|
- Rich
- Tuesday, 10/26/10 21:38:42 EDT
|
Hi,
I have a Hay-Budden Farrier's Swelled Clip-Horn anvil serial number 186978.
It is is good condition. Can you tell me what it is worth?
Dave 949 497 1158
|
|
Dave Russell
- Tuesday, 10/26/10 22:46:58 EDT
|
Hi again,
My Hay-Budden weighs 138 pounds.
Dave
|
|
Dave Russell
- Tuesday, 10/26/10 22:48:48 EDT
|
The text is "Solid Wrought" The numbers are the weight in English hundred weight (112 + 0 + 12)
|
|
- guru
- Tuesday, 10/26/10 22:49:10 EDT
|
Dave, It depends on where you are, who's buying and how long you are willing to wait to get your price. In the Ohio Rust Belt it would sell from $100 to $300. In California where there is a high population and few anvils double or triple that price. But if you are in a hurry you might only get $50 for it. . .
Note that old farrier anvils tend to sell for less than average.
|
|
- guru
- Wednesday, 10/27/10 01:20:54 EDT
|
A few posts back there was some conversation on how to make iron look old. I have a friend, a fine blacksmith/sculpter that would make antique door latches and hinges on request. He would bury then in a pile of chicken crap and in no time they would look a couple of hundred years old.
|
|
S K Smith
- Wednesday, 10/27/10 07:50:27 EDT
|
I was very pleased on Monday. I have made a shear. It is mounted on one of my avils. I had been using it on 10mm rods which it cuts through like lightning. I had some hot 12mm x 15 mm spring steel. It went through that just as easily. I doubt if it would have done so cold though!
|
|
philip in china
- Wednesday, 10/27/10 08:59:22 EDT
|
Heh, chicken crap... that stuff is pretty corrosive, so hopefully it gets cleaned off real good then finished to stop any further (ie, unwanted) corrosion from happening :)
PondRacer
|
|
PondRacer
- Wednesday, 10/27/10 09:32:26 EDT
|
Small Shears I made a little shear years ago to cut 1/4" (~6mm) rod for making basket twist handles. At the time I was cutting hundreds of these 6" long pieces. The blades were two pieces of 1/4" x 2" leaf spring split to 1", with two holes drilled near each other, one for a 5/16" Grade 5 bolt and one to shear the bar. One was welded to a piece of angle iron to clamp in the vise and the other had a piece of EMT about a foot and a half long brazed to it for a handle. To support and guide long rods I added a bracket with a piece of pipe for the rod to pass through. The spring steel blades were used normalized (air cooled). A pretty ugly tool, but it worked.
As light as this little tool is, it put a surprising load on the vise it was clamped in, springing the vise and making a good "pop" when it cut. I probably cut a thousand pieces with this primitive little tool.
The trick to making one of these is to put the shearing hole(s) as close to the pivot as possible (clearing the bolt head) and for the pivot bolt to be larger then the largest shear hole AND to use a high strength pin (grade 5, 8, 9 or any hardened). The ideal off the shelf pin is a socket head shoulder bolt. These are hard, smooth and very strong.
Drilling holes in tempered spring steel MUST be done a slow speed. Electric hand drills and most small drill presses turn too fast. I used a old hand crank drill press. Lost of pressure and very low speed. They may be antiques but I find a lot of uses for them even when I have all kinds of other drilling machines in the shop.
Somewhere I picked up a nice little Diacro rod parter. It has compound leverage and holes to fit round rods from 1/8" to 1/2". Cutting 1/2" is a bit of a stretch but it pops everything else quite easily. The problem with tools like these is they need a good heavy bench to anchor them on and space to feed bar stock and space for cut pieces (at least 1.5 times the length of the bars to be cut - 10 to 20 feet).
AND while these tools are very productive you can't beat an iron worker for shearing small bar, flats and angle.
|
|
- guru
- Wednesday, 10/27/10 10:37:11 EDT
|
I just found out that a Blacksmith can actually "ring the vesper chime" (1700s poem- The Anvil) I heard a small sample this last weekend. Where can I find Y-tube or other examples of 'playing the anvil'?
|
|
Debby
- Wednesday, 10/27/10 11:40:38 EDT
|
Don't know if it was ever recorded but Emmert Studebaker used to play the anvil with a light ballpein.
Thomas
|
|
Thomas P
- Wednesday, 10/27/10 12:27:26 EDT
|
I have LOTS of 1/4" rod from election signs (the ONLY thing I like about the season, damn the ads). I use a cold cut hardy and a 3 pound hammer. One nice whack and bend cold to break. Works pretty well for small quantities, but I'd sure like to try out a shear.
|
|
- Nippulini
- Wednesday, 10/27/10 12:34:10 EDT
|
I saw the information on the rolling mill. I can't find it to order plans. Is there more information about what all it does?
|
|
Garry
- Wednesday, 10/27/10 13:44:50 EDT
|
Garry, We are selling the plans but I need to get the CD's reproduced. You may contact me about an electronic download of the new production which includes the video, the reviews, the plans, images and a browser index.
The video and the reviews we have on line are about all you will find. It rolls short pieces of steel reducing them in thickness about 3/16" per pass. Hugh shows it welding Damascus (laminated steel) billets and flattening round into flat. Hugh also uses it to produce his animal head letter openers. When done forging the head he turns it around and rolls the blade in one pass.
The great advantage of these machines is they make no noise and are low horsepower for what they do.
See our AnvilCAM Rolling Mill Video
|
|
- guru
- Wednesday, 10/27/10 16:21:31 EDT
|
I am having a hard time getting my knives razor sharp. I am not sure if it is the bevel angle or the way I am doing it. I have a 2x72 grizzly knife belt sander. I have belts in grits of 32,60,100,120,220,30micron(400),15microns(600).
Thanks!
|
|
Mike
- Wednesday, 10/27/10 18:22:02 EDT
|
So Mike; what are you doing once you take the blades off the belt grinder?
Thomas
|
|
Thomas P
- Wednesday, 10/27/10 20:20:42 EDT
|
Shearing small bars in an Ironworker:
A friend of Mine was going to make a stainless grate for His gas grill. We had to shear qiite a few rods, they were about 5/32 or 3/16 diameter. I set the length stop on the ironworker, and We worked together. He held the rods 3 at a time against the stop and stacked the cut parts, and I feed the stock and operated the machine. We had them all cut in a few minutes.
He ended up scrapping the grill before He got around to making the new grate anyway.
|
|
- Dave Boyer
- Wednesday, 10/27/10 20:42:12 EDT
|
Mike, that machine has a buffing wheel on the other end, doesn't it? Try buffing "off the edge", being really carefull when You get to the point, rotating the knife to keep the wheel passing off the edge [At the verry point, the knife will be pointing at an angle towards the floor]. I prefer a spiral sewn muslin wheel and white "stainless" compound.
You could do as well with hand stones and a leather razor strop.
You need a small included angle for a really sharp edge, either method I mentioned will give an edge that shaves.
I have heard of using a worn out 600 grit belt charged with buffing compound followed by a razor strop, but I have not tried this Myself.
I
|
|
- Dave Boyer
- Wednesday, 10/27/10 21:03:26 EDT
|
I have an old cold steel tanto from 1989. I sharpened it with the belts down to 15microns. It cut paper ok, it did not really shave hair. The other knives are ones I made. They dont cut paper as well as the tanto so my angle may not be good. I have not buffed any knives yet although I have muslin and compounds. So how do I get the right angle?
|
|
Mike
- Thursday, 10/28/10 01:12:45 EDT
|
Mike, many bladesmiths simply judge the angle by eye and have done so for centuries. Others use an angle rest on their grinder table. Most of these are shop made affairs. Some are fixed angle and others adjustable. Many tool suppliers also sell fixtures to use with sharpening stones.
|
|
- guru
- Thursday, 10/28/10 01:21:32 EDT
|
I am judging by eye, if anyone has any technique tips I would be grateful to hear them.
|
|
Mike
- Thursday, 10/28/10 01:59:56 EDT
|
I guess everyone has their own method for sharpening a blade. I lay the knife flat on the stone. There will be a gap between the blade and the stone. Then I rotate the blade up and stop when the gap is closed. Then I sharpen the edge at the same angle on both sides. Use a coarse stone and then use a fine stone. I then get an old leather boot and strop it until it will shave.
|
|
Mike T.
- Thursday, 10/28/10 02:48:39 EDT
|
Guru, Thanks for the information. I live in Laguna Beach, California, am not in any hurry to sell.
|
|
Dave Russell
- Thursday, 10/28/10 12:02:40 EDT
|
why is the process of case hardening not used by knifemakers
|
|
- gerhardt
- Thursday, 10/28/10 14:21:51 EDT
|
induction furnaces how do they work and are thjey being used by Smiths for forging
|
|
gerhardt
- Thursday, 10/28/10 14:34:45 EDT
|
I don't remember how deep the maximum diffusion of carbon is when doing case hardening, but I'd imagine that the hard layer would be worn off after multiple sharpenings.
Also in todays world of machinery punching out knife blanks from sheets of metal, it is probably cheaper and faster to use steels that are hardenable from the beginning.
Induction furnaces heat up metal by inducing an alternating magnetic field in them, which produces electric fields in the material and causes charge carriers to flow. I think then it just heats up from resistance losses (electrons smashing into atoms as they try to move).
You can find information on them from google or wikipedia (not an academic source of anything, but it is great for curious people).
|
|
Nabiul Haque
- Thursday, 10/28/10 15:26:02 EDT
|
gerhardt, those questions sound like homework questions, which we do not answer. If not home work, let us know and we can help.
For the case hardening, think about the result of the case hardening, and think about the intended use and matenance of a knife.
|
|
ptree
- Thursday, 10/28/10 15:26:21 EDT
|
gerhardt, Case hardening only puts a very thin hard coating on steel. Maximum case depth before grinding of sharpening is usually .032" (0.8 mm). Thin blade edges also need to be strong and the added surface hardness does not help this to a great degree. It is said that during the 18th and 19th century trade with the native Indians in North America that cheap case hardened trade knives were manufactured for the trade. From this the the Indians learned to sharpen blades from one side only.
Induction heating is used throughout the blacksmithing industry from small shops to large commercial plants. It is a very useful tool but the entry point for small imported units is about $4,000 to $5,000 US. Larger Domestic units start at $10,000 for the smallest units. That is 10 to 1 compared to $500 to $1000 for a very nice commercial gas forge.
The advantages of the induction forge is fast heating, spot or zone heating, quiet operation, low waste heat. The disadvantage is high initial cost, high repair costs, limited capacity, tooling (making coils for specific jobs), and the learning curve.
They are a great tool in a production shop OR where open flame and exhaust is an issue. They have limited use in decorative work due to lack of flexibility. Many smiths still use coal forges because even gas forges limit the shapes of parts than can be heated.
|
|
- guru
- Thursday, 10/28/10 15:38:23 EDT
|
Painting galvanized sheet metal. I need to paint some galvanized sheet metal that I will use for a table shelf. I will clean it, primer it, paint it, and clear coat it. Do I need to do anything to the galvanized sheet metal prior to applying the primer?
|
|
David
- Thursday, 10/28/10 20:34:18 EDT
|
David,
That depends on what type of galvanizing it has. If it is a product known as Galvanneal or Paint-Lok, then you don't need to do anything other than prime and paint. If, however, it is hot-dipped galvanized you will need to etch it first to make it ready to receive paint.
First wash it thoroughly with a mixture of trisodiumphosphate (TSP) in water until the water sheets off instead of beading up all over it. Then dry it and wet it with an acid solution to etch the zinc. Automotive paint stores sell various solutions ready-made for the task, under such names as MetalPrep, ZincPrep, etc. Or you can use straight white vinegar. Let it sit on the metal for an hour or so, until all the "shiny" appearance is gone and the surface looks dull. Then rinse well, dry and paint with a primer designed for galvanized steel. Let the primer dry thoroughly and apply two or more top coats of your favorite paint. There is no point to the clear coat if you use a high quality paint - pigmented paints are far more durable than any clear coat.
|
|
- Rich
- Thursday, 10/28/10 21:08:06 EDT
|
David, We used an acid etch caled "Galva Prep" it came from an auto body supply shop, but that was 30 years ago, and I believe the auto industry uses aluminised steel now.
Y ou should still be able to get a similar product, but I am not sure who from.
|
|
- Dave Boyer
- Thursday, 10/28/10 21:08:49 EDT
|
Galvanized sheet metal also often has oil on it. This is more true of corogated or ribbed building material than flat but both are often oiled in the process of rolling after galvanizing. So degreasing may be step one. Acid prepaint preparations such as Ospho will etch galvanized prior to painting. There are also special self etching primers made specificaly for painting zinc.
|
|
- guru
- Thursday, 10/28/10 21:27:21 EDT
|
The wash with the TSP solution effectively handles de-greasing - there is very little out there that is more effective than TSP. Hence the recommendation.
Ospho is a phosphoric acid concoction that will etch the galvanizing. It also contains glycol esters that supposedly act as a sealant/prep coat for paint. The problem with glycol esters is that they are hygroscopic and will hold atmospheric moisture. If you're in a humid climate I recommend you use phosphoric without the glycol esters - GalvaPrep, MetalPrep, ZincEtch are all compounds that don't contain the glycol esters.
Self-etching primers were developed for industry to avoid one surface preparation step. They typically contain a dilute acid that *supposedly* etches the surface and then self-neutralizes. I prefer not to trust them and simply etch the metal myself, neutralize, rinse and prime. That way I *know* there isn't any active chemical left under my expensive paint job.
|
|
- Rich
- Friday, 10/29/10 08:54:44 EDT
|
We used self etching primer on zinc parts, not galvanized steel, and this may make a difference. The parts were small castings with machining operations so they had to be degreased. We had good results but they WERE solid zinc alloy parts. The same paint was recommended for aluminum as well as zinc.
I agree that doing the individual steps is probably best in a small shop situation. Some of the best (i.e. durable) paint jobs I've done were washed with lots of soap and water. . Often started with manually scraping off grease, using kerosene and or gunk engine cleaner followed by car wash or laundry detergent and water, followed by more water. These were jobs with no etching required.
For applying ITC products to steel they do not recommend degreasing with solvents as they just thin the oil and grease, removing some but not all. Their recommendation is to clean with a dilute solution of Clorox bleach. This both cleans and does a very light etch in the short time it is on the steel. I am not sure how it would do on zinc. Probably not a good idea.
|
|
- guru
- Friday, 10/29/10 12:07:06 EDT
|
Case hardening - how deep do you want it to go, what level of carbon do you want, what temperature are you willing to carburize at, and how long do you want the process to take?
Don't forget that blister steel had significant levels of carbon in the center of the carburized bars. Also, don't forget that it was a high temperature process taking days.
|
|
- Gavainh
- Friday, 10/29/10 13:23:17 EDT
|
Removing grease and oil from metal. Having a few years of industrial experience in removing oils and grease from metal, including cleaning piping and valves for oxygen service, I can offer the following:
The ultimate oil remover is Vapor degreasing. A solvent is evaporated with heat, and the cool part is suspended in the vapor cloud. The vapor condenses on the part and rinses off the part, with continously distilled vapor to condense on the part. Takes a very expensive machine that uses refrigeration to contain the cloud and aid the condensing part. Also usually uses very non friendly and very expensive solvents. This is a poor way to remove dirt however.
Simple solvent dip with filtered solvent. There are machines on the market that use continous filtration of the solvent to remove the oils and greases. These actually work well to wash off dirt, grease and heavy oil. Not a paint quality prep, but great for machine parts during repairs.
Hot Caustic cleaning. This is the cats meow if you have heavy dirt, oil and grease. At about 186F, a Ph of say 13.8 and good circulation a really grimey steel part will come out spotless and completey free of oil, and if rinsed and put into a phosphate conversion coating while still hot no rust. Just clean and rinse, and you can watch it flash rust before your eyes as it cools.
We ran about 6 million pounds of grimey, oily scaley forged steel parts and assemblies a month thru a "Parkerize " line. Caustic at 186F-rinse-phosphate at 186F to pickle-rinse-phoshate bath-rinse-oil dip. Leave out the oil dip and you had a great primer.
The caustic will work at room temp, just slower.
There are 3 ways to remove oil. Solvent, Caustic, or expensive ionic cleaners.
The solvents are usually flammable, and not friendly. The caustics are cheap, but hard on the users, and the ionic cleaners are the most friendly to the environment and operators but the most expensive.
Flammable solvents and caustics are Haz-waste by characteristic, and the waste streams from all are expensive to deal with.
|
|
ptree
- Friday, 10/29/10 14:17:02 EDT
|
Can you let me know the best way to sell two storage sheds full of blacksmith tools that a bank has repossesed? I would appreaciate it.
|
|
Richard Burns
- Friday, 10/29/10 15:23:20 EDT
|
Hello all,
I�m up here in Canada and have been interested in blacksmithing as a hobby for some time and am just starting to build my first forge. I have gone through the Iforge demos in their entirety and have found them to very inteteresting. With all of that said, as I have no experiance in this craft I am trying to find some sort of association or group that may offer workshops or classes for the beginner. If anyone has any ideas or able to point me in the right direction it would be appreciated.
|
|
Matt
- Friday, 10/29/10 15:37:06 EDT
|
Selling Blacksmith Tools: Richard, It depends on what the goal is and how much time you are willing to put into it and how much is owed. Some things to know.
1) New blacksmith tools are still made.
2) Old blacksmith tools, while rusty and dirty are still worth as much or more than NEW tools. Some were better made, some are collectors items. Everyone hope to buyt things at 10% of their value but that is no longer the reality unless you are a "finder".
3) Selling as a lot will get you about 1/4 of less of their current market value.
4) To get the highest prices each item should be cleaned, photographed, identified for the ad and listed on ebay. Expect to need to relist every item at least once. This also means shipping many individual heavy items all over the world.
Advertising in the local paper will often get a lot of response.
Blacksmithing tool prices depend a lot on the region they are being sold in. In Ohio prices are low due to be the heart of the old rust belt. In California where there was not a loe of early industry and there is now a high population prices are high. In your area, Kansas, the rural open spaces make it a place that prices are high due to rarity (good for you).
Normally I would send you to your local Blacksmithing Organization but I think Kansas is one of the few places that do not have one.
If you have an inventory of what you have I can help appraise it.
|
|
- guru
- Friday, 10/29/10 16:30:49 EDT
|
SMithing in the Great White North: Matt, There are quite a few Canadian smiths and there are Canadian blacksmith organizations. But Canada is a big country. They may be close OR quite far. Try our ABANA-Chapter.com page for Canadian group listings. Try the CanIron site as well. A new one should be coming up next summer.
|
|
- guru
- Friday, 10/29/10 17:06:50 EDT
|
Matt, the WDM in Saskatoon offers one of the best beginning blacksmith courses in the country.
|
|
JimG
- Friday, 10/29/10 19:38:32 EDT
|
Has anyone ever bought a new Swedish Kohlswa anvil? If so, where did you get it? I have contacted Kohlswa thru email, but I have not gotten a response.
|
|
Jon
- Friday, 10/29/10 20:43:38 EDT
|
Jon, There is one distributor of Kohlswa anvils in the U.S., Kentucky Farrier Supply. But they are hard to contact, their web listings are for old non-existent URL's. . .
I've had two Kohlswa anvils. My first anvil was a little Kohlswa I bought at auction in a little country blacksmith shop. It apparently was a replacement as the stump was for a larger anvil and the relatively new anvil was significantly chipped on the far side (probably from strikers). I used it for several years then sold it during a weak moment. My second Kohlswa was purchased at another auction. It is a 300 pound American pattern I found in the welding shop of a small foundry and ironworks. It too has slightly chipped edges.
My old Kohlswas are a bit too hard and ring very loud. They were made prior to Kohlswa becoming an employee owned company. Centaur Forge anvils were made by Kohlswa up until shortly after the reorganization. Bill Pieh of Centaur was not happy with their service and stopped having them made.
They are a lot of trouble to find and purchase at this point and there are many other suppliers with just as good of better anvils ready to ship today. So why worry with the hassle? Blacksmith Depot and Centaur Forge will load you up with as many anvils as you can truck away. . .
|
|
- guru
- Friday, 10/29/10 23:09:11 EDT
|
Thanks guru. I'm located in Arnprior, Ontario just outside of Ottawa (nations capital) so saskatoon may be a little far!! I will take a look at the ABANA site and CanIron. I am only about 2-3 hours from Syracuse NY so that may be antoher option.
|
|
Matt
- Saturday, 10/30/10 13:31:49 EDT
|
The next Caniron will be held in Fergus Ontario this summer coming up. The site has onsite camping and there is lots of other accommodation in the area. You should do your best to make it to this as it will be another 8-12 years before it's in Ontario again. That being said I have enjoyed going to them in Saskatchewan, Nova Scotia, and Vancouver Island.
Matt you should join The Ontario Artist Blacksmith Association. We have several members in the Ottawa area. About 80% of the members are on the west side of Toronto or near Toronto so that is where most of the meetings are however we do have meetings up your way. There are some members who do have some regular smaller gettogethers just east of the Peterborough area, which while not close is not that far either.
|
|
- JNewman
- Saturday, 10/30/10 15:07:32 EDT
|
Close and Far. Just a few decades ago many of us would travel 100 miles or more to visit with another blacksmith. Today there are enough smiths and enough organizations that in some areas you could go to meetings every weekend of the month in that radius. There is also a glut of blacksmithing schools. Enough that many cannot fill all their classes. Others are banking on local trade but that is a limited student population.
|
|
- guru
- Saturday, 10/30/10 15:38:33 EDT
|
I have to laugh when I see people complaining that it is a two hour drive to get to a meeting. Takes me two hours just to get through the airport so I can then sit through anywhere from six to twelve hours of flight time to get to a meet or conference.
If you really want to pursue this art/craft/profession you have to be willing to do what it takes. Go to meetings and conferences, get the proper equipment, spend the many hours necessary to perfect techniques, etc. Like anything else in life, if it was easy everyone would do it. Blacksmithing is NOT a pursuit for the lazy.
|
|
- Rich
- Saturday, 10/30/10 16:46:25 EDT
|
I was able to build my first propane forge thanks to this site's excellent info and advise from the community. I recently got a new 0-60 psi propane regulator with gauge and now I'm having trouble finding just the right setting to get the most heat. I have a venturi style burner and i am aware that cranking the pressure all the way up would be dumb. It seems hottest between 15 and 25 psi but I'm having trouble narrowing that margin. Are there ways other than just color or buying a $500+ instrument? If any one has ideas they would be greatly appreciated.
|
|
Sean
- Saturday, 10/30/10 22:22:47 EDT
|
Rich,
There is no blacksmith group in the virgin islands??
|
|
- Barney
- Sunday, 10/31/10 00:49:35 EDT
|
Sean, Economy says use as little gas as possible. You generally want a good forging heat but not a welding heat most of the time. If you are forging relatively heavy pieces with quick turn around such as with a power hammer then you want to run hotter.
The trouble with home built forges is they ALL have different characteristics. An obstruction or small orifice may mean that you need to run 30 PSI to get enough gas in the burner. Optimally built burners may run on 4 to 7 PSI. But at those pressures your gauge may be off by half unless it is a 25 PSI max unit.
So all you can do is tweek and pay attention. IF heats are taking too long or are not hot enough then boost the pressure. If you get a near welding heat all the time then back off unless you need to weld.. .
|
|
- guru
- Sunday, 10/31/10 04:55:41 EDT
|
Sean.... I suggest that you try managing your propane by volume, rather than just pressure. Put a good needle valve (like Alcon) on the top of your burner and crank your regulator all the way up. Tweak the flame by adjusting the needle valve.
|
|
- Dave Hammer
- Sunday, 10/31/10 07:10:06 EDT
|
Sean,
If you really want to get picky about your forge's performance, check out the book "Digital Temperature Control for Gas Forges" by Whitney Potter. Available at Artisan Ideas:
http://www.artisanideas.com/product.jhtm?id=1310&cid=
|
|
- Rich
- Sunday, 10/31/10 07:36:02 EDT
|
Sean,
You haven't mentioned this, but the hardest (and most critical) part of tuning a venturi-based gas forge is getting the mixture right. Once you do that -- it could require adding or adjusting a choke or changing the orifice size -- the rest is pretty easy.
Assuming the mixture's right, you just need to remember that propane that burns outside the forge is wasted. So if you get a significant amount of flame coming out the door, you've probably got the pressure up too high. Outside of that, just use enough pressure to get your work as hot as you want it as fast as you want it, and no more. Of course, reasonable expectations help. . .
|
|
Mike BR
- Sunday, 10/31/10 09:09:36 EDT
|
As one always benefits from trying to create every oppertunity to pursue a passion, we must not judge them. For example: a young person may not have transportation to go many hours or continents away to meet with blacksmithing groups. Not everyone has the same financial means, enviornment or free time as someone in another circumstance. Though, the above post makes a good point to perservere for the desires of ones heart we need to be mindful and not to be harsh in judgements of others.
|
|
- pacopperlock
- Sunday, 10/31/10 23:02:37 EDT
|
Ribbon Burners: I've seen a pine ridge ribbon burner and visited the website. One of the benefits is a more even heat and quick heat start up. But, they must be matched with the proper sized forge and most are use with large furnaces. Any opinions on using the ribbon burners in a blacksmith forge?
|
|
David
- Monday, 11/01/10 01:04:08 EDT
|
I've been throwing the idea around in my head to utilize my NG line in my house to run a forge on. How difficult/dangerous is this? It would save me a LOT of money, my gas bill is about $30 per month on average (that includes winter months). I already have NG plumbing in my workshop, just need to know the best way to not conflagerate my house.
|
|
- Nippulini
- Monday, 11/01/10 08:42:54 EDT
|
Natural Gas: Nip, Natural gas is safer than propane because it is lighter and dissipates. Propane is heavy and pools, doesn't dissipate as well. It can be used in orifice style burners but the very low pressure requires a larger orifice. Its easier to build a blower type burner and forget the orifice sizing. . .
For practical safety you just need to be sure there are no leaks, you turn off the gas, and do not leave the forge unattended. However, all commercial gas appliances have an automatic shut off that trips when the pilot and/or the flame goes out. This is one of the important UL requirements.
There are legal and insurance issues. You building code (and the gas company) will require that ANY device connected to the gas line have a UL approval and possibly others. IF a fire occurs and starts anywhere near your forge the insurance company COULD refuse to pay because you had a non-UL appliance connected to the gas lines. . . They can also cancel your insurance if they find out you have such a device connected to your gas lines. Gee. . . did you ask that question in a public forum?
SO, while NG is safer than propane, it may not be safer for your financial future.
|
|
- guru
- Monday, 11/01/10 10:03:46 EDT
|
Trying to ascertain the purpose of the 'breast' on an anvil.My guesses so far are:(1)it's either for preliminary forging for a right angle forged corner or (2)fork tine drawing out.Of course I am wrong but do you know?Thanks=G
|
|
Generik
- Monday, 11/01/10 10:09:40 EDT
|
Generik,
None of the anvil nomenclature I am familiar with includes the term "breast." Horn, heel, face, table, waist, feet, clip horn, side shelf, upsetting block, even "church windows", but no breast. Can you better describe what you are calling a breast?
|
|
- Rich
- Monday, 11/01/10 11:20:16 EDT
|
Generik, I've never heard of a part of the anvil described as "breast". Generally the conical part is called the "horn" (like a rhinoceroses horn)in English.

Above are the general parts of a Western anvil in English. In other languages the names vary. Commonly what we call the "face" is called "table" as translated in many languages.
Many anvils have slightly different parts. Most European anvils are "double horned" with one round (conical) and one square (pyramidal) horn. Some have a small side shelf or "clip" and other have a large block between the feet for upsetting. English anvils have names for the holes but in other languages they are simply the square and round holes. Traditional Chinese anvils look nothing like Western anvils and who knows what they call the parts. . .
Farrier's (horse shoer's) anvils often have many specialty features such as half round "clips" protruding from the horn and "turning cams" on the side or as part of the heel. Many had two pritchel holes and some have large round (not square) hardy holes.
USES:
Almost every surface, feature and transition between features are used by smiths in forging. The hardened steel face sees the most use for forging. The edges of the face (corners) are used for forming corners, steps and for fullering (making indentations). The horn is used for making smooth curves, bends and truing rings. It is also used for drawing (making thinner).
The "cutting table" is a feature that developed on English anvils where the hard steel face stopped and a soft wrought iron flat extened onto the horn. In modern steel anvils this area is not soft enough for cutting and should not be used for a cutting table. Soft steel or aluminium blocks are used instead.
The step at the cutting table is very handy for supporting work with a corner and offering an open space for making bends from the inside. The little transition between the table and the horn is useful for working inside reverse curves such as on a leaf that curls up on on one axis and down on the other.
Many old European anvils were designed to be set on their "back" which was flat and did not have feet protruding. Thus the features on the side of the anvil came into use. Some of these anvils also had horns and heels the same length as the feet so they could be turned on edge and the "waist" used to form large curves. There are wear indications on one of the anvils in the Greenwood Collection that it was used upside down quite a bit.
Every part of the anvil is used for many things according to the ingenuity and needs of the smith.
|
|
- guru
- Monday, 11/01/10 11:43:57 EDT
|
Nip, NG will need a different orifice size compared to propane. Also, your house line runs at a very low pressure, about 2-3 psi so there is not much there to control with unless you are feeding a blown forge.
|
|
quenchcrack
- Monday, 11/01/10 14:06:51 EDT
|
Not having transportation, etc.
That is when you carpool! We used to dump a load of folk interested in smithing into a van and take off for the 2 hour drive to SOFA meetings. Cuts down on cost and makes it a lot more fun too---we'd stop at a fleamarket on the way.
If you are interested enough you can find a way! Of course being 2 hours away from the closet meeting was why we founded a smithing group locally too.
Thomas
|
|
Thomas P
- Monday, 11/01/10 14:07:10 EDT
|
Yep, When there is a will, there is a way. If its important to you then there are no obstacles, just problems to solve. That said, the last few years of my life it seems I am thwarted at every turn. . .
In my youth I would walk ten or fifteen miles to visit a girl. . . I was good at looking at a map, determining the mileage and figuring my travel time at 4MPH. We had local bus service but the routes were so convoluted from where we lived that a 4 hour walk across town was faster than taking the bus and a LOT more interesting.
My first cars were REAL clunkers. $50 and you could watch the road pass below your feet. Had to study manuals and become a competent mechanic to have cheap transportation. I was never ONCE broken down on the road even though we commonly drove half way across the country.
The only other smith I knew for many years was a 125 mile trip. I traveled it many times in an old 1950 Chevy tuck and a 1960 Nash Metropolitian. I spent many overnights sleeping in the very small car. . . The only reason for this was the friend did not even have a couch to crash on and had a live in girlfriend in his one room apartment. . Most smiths will invite complete strangers to stay even if its on the couch for a chance meeting.
My transportation has improved a lot and I often invite others to travel with me. In my "old age" I cannot put in but so many hours driving. Its worth a lot of extra expense to have someone help with the driving. Those that cannot drive need to be good conversationalists.
On the other hand, there are a LOT of smiths out there today. So many that there is a good chance that there is ne within a mile or so. You just have to look. Start with the yellow pages under every kind of metal work. Then try our local blacksmithing organizations. Ask those who work in welding supply shops and steel warehouses.
AND as Thomas noted, if its too far, form a local group. I tell this a lot to folks in our area who did not want to travel all the way across the state. Finally someone took me up on the challenge (I would provide the web site if they formed the group). There ended up being a surprising number of local folks interested and there is a very active group now.
|
|
- guru
- Monday, 11/01/10 15:37:28 EDT
|
Guru, all sounds good, but I would rather pet my dog than walk fifteen miles to see a girl...grin
|
|
- pacopperlock
- Monday, 11/01/10 16:55:54 EDT
|
What teenagers will do for love. . .
|
|
- guru
- Monday, 11/01/10 18:12:26 EDT
|
Long Drives...I've found the driving time just disappears if I'm listening to a book on a story tape or CD.
|
|
Carver Jake
- Monday, 11/01/10 19:31:09 EDT
|
Thanks for answering.The part I am referring to is found on old style European anvils(also on the little brass commemorative ABANA meet ASO's)It is on the side of the main body,an inclined plane that meets the working face at thirty degrees or so.Josh Greenwood's collection has a bunch of armorer Anvils showing this feature,above the 'windows'.I could draw much more easily than describe,eh?Seems to have been useful as they always show hammer marks.My query also has the component of these type Anvils seem to be designed to be used alternately on their side.I bought a one of Josh's and you can be sure I will try various things and report back.=G
|
|
Generik
- Monday, 11/01/10 22:13:42 EDT
|
The sloping side does several things.
1) It reduces the the angle of the corner so that it is less likely to be damaged by a striker using a sledge hammer.
2) It puts that heavily worked edge nearer the center of the supporting feet (thus more sturdy under the hammer).
3) An the anvils with the center supporting column of the "church windows" it creates a buttress back to the working corner.
In some later German anvils they had a 90 degree corner along the heel up to the well supported part of the body, then the 110 degree across most of the body, then a side shelf with a 45 to 60 degree corner then the tapering horn. The widest usable variety of of edge angles and shapes.
|
|
- guru
- Monday, 11/01/10 23:18:51 EDT
|
"Ribbon" Burners: I looked into these and they appear to be a nice burner. The price is not bad until you start looking into the mixer (not part of the "burner"), fan and plumbing, much less controls. You could easily spend $500 without safety controls.
As to "careful sizing" that is true of ALL forge burners. While every burner has a range it is limited. Consider the NC-Tool approach of modular burners. They are all alike. They put 1 into a "baby" forge, 2 into a "moma", 3 into a large "moma", 4 into a "papa", up to a 12 burner forge which they only make on special order these days. Otherwise to cover that range they would need 6 or twelve specially designed burners. It was a pretty smart approach as it cuts way down on manufacturing costs.
How well the Ribbon burners will work in a forge I do not know.
|
|
- guru
- Tuesday, 11/02/10 09:35:48 EDT
|
|
|
[
CSI - anvilfire MEMBERS Group |
Getting Started in Blacksmithing ]
|