Learning to Draw
By Jock Dempsey
Many folks get into crafts such as blacksmithing without thinking about them being artistic endevours and needing to be able to draw.
When confronted with the fact that they need to learn to draw they often say they can't.
This is usually from adults who have not drawn for most of their life.
Virtually all humans draw when they are children.
Then over time they drift away from it unless encouraged by their parents or have a persistent interest.

Drawing is only one part of visual communications.
The ability to read, understand signs and symbols are all part of visual communications.
Even if you don't read the languages with the signs above you probably understand the message.
The combined symbol with words tells the story.
No Furmar is No Smoking and Peligro means Danger in Spanish ( Español ).
The Stop and Yield signs may use different words in other places but their shape and general coloring are used worldwide.
The scull and crossbones as a poison warning (or possible death such as from a mine field) is often understood by small children and used universally worldwide.
Other symbols are not so universal but that is another story. . .

Other visual cues are smiling, winking, waving goodbye and other hand or facial gestures.
Some are universal, some are not, varying with the culture.
IF you are reading this page you are already experienced in visual communications.
So you are half way there. . .
Writing and drawing are the reverse half.
If you can write then you know more than half of visual communication.
If you learned to write you can learn to draw.
So-called "natural" artists are people that have practiced since they were very young.
While they were not born that way humans have been artists since earliest times.
Mechanical drawing or "drafting" is taught logically one step at a time.
For many non-artists it is the place to start so that they understand views and how they are put together to make an isometric (3D) views.
From there it is easy to apply perspective (a natural view) to the same drawing.
To quote Jon Gnagy, America's original TV art instructor and inventor of the info-mertial,
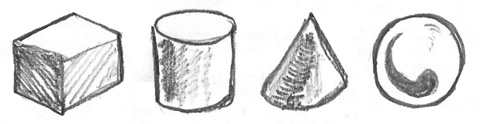
"If you can draw these 4 shapes you can draw anything".
 Free hand drawing is learned like writing and drafting, a step at a time.
The more practice the better.
There are many programmed learning systems for basic drawing going back to
Jon Gnagy Learn to Draw in the 1950's.
There are also public and private school art and drafting classes.
You can learn on your own or take classes.
Anyone can do it if they want to and try to learn.
You don't need to be a great artist but you need basic skills to design and sell your work.
Free hand drawing is learned like writing and drafting, a step at a time.
The more practice the better.
There are many programmed learning systems for basic drawing going back to
Jon Gnagy Learn to Draw in the 1950's.
There are also public and private school art and drafting classes.
You can learn on your own or take classes.
Anyone can do it if they want to and try to learn.
You don't need to be a great artist but you need basic skills to design and sell your work.
CAD, Computer Aided Drafting is NOT a substitute for being able to draw.
If you can't make a sketch by hand you will not be able to make a useful CAD drawing.
While CAD is a requirement in many modern shops, especially fabricator and steel erection shops, it should be learned after free hand drawing.
Teaching Yourself to Draw
Practice, practice, practice.
Get a bound blank book (artists sketch book or journal) and draw something in it EVERY DAY.
Draw anything and everything.
Draw what you like or are interested in at the time.
Draw from life (things you see) OR from your imagination.
Whatever you do, draw EVERY DAY.
DO NOT always draw using a writing grip on your drawing instrument.
Practice loosening up and drawing with your instrument, charcoal or chalk held between thumb and fingers.
Draw BIG. Fill the page. Draw on large format paper when you have the chance.
Draw the geometric shapes above. Change their proportions, connect them, build things from them.
Draw circles and circles in circles large and small. Concentric and eccentric.
Draw scrolls and geometric patterns.
Make fancy page borders and write your thoughts.
Practice your printing for engineering drawings.
Fill pages with scroll patterns with splits and double ends.
Add decorative elements (bean ends, leaves, flowers, faces, dragon heads. . .).
LOOK at something and draw it. Look at anything on your desk or table.
Look at your pet.
Look at the angle of the object, the shading and shadows.
Practice LOOKING at things.
The biggest mistake people taking photographs do is NOT looking with a critical eye at what is in the view finder.
They cut off people's heads or the corners of objects because they do not think about what they are looking at.
Practice making a composition that includes the whole subject.
If you draw of photograph an object you want the entire object. Not 90% or even 95%. You want 100%!
Train yourself to SEE what you are looking at. Most people do not. Artists DO.
Do this every day for a year and your drawing will be much more confident, your linework cleaner, your vision more accurate.
Then don't stop. True artists draw their entire lifetime and rarel miss a day without drawing, painting or sculpting.
DO NOT DRAW FROM PHOTOGRAPHS!
Cameras produce photographs with a single point of view (from the lens) while we have TWO eyes.
It makes a difference. The perspective is mechanical, angles are distorted and focus is fixed, not dynamic.
True artists can see the subtle difference at a glance.
Simply looking at a photograph while you work will result in this mechanical camera's lens view.
If you must use a photograph for reference do as much of your drawing without looking directly at the photo.
Reserve the photo for fine details or color.
 MECHANICAL DRAWING or Drafting starts with learning to draw simple three view drawings then more complex ones.
Typical problems include finding and drawing the missing view, creating a three view drawings from a model or 3D image and the reverse, creating an isometric from a three view drawing.
MECHANICAL DRAWING or Drafting starts with learning to draw simple three view drawings then more complex ones.
Typical problems include finding and drawing the missing view, creating a three view drawings from a model or 3D image and the reverse, creating an isometric from a three view drawing.
The detail part drawing to the left is an "in-house" drawing for a one-off project.
It is missing center marks and a cross section axis line. The view locations are also not standard.
However, it has all the basics, border, title block, notes, dimensions with tolerances.
Click image for an enlarged detail.
Beginning three view drawings are not this involved.
They are generally simple shapes and overall dimensions only (to practice drawing arrow heads).
Detailing, dimensioning for manufacturing with tolerances, radii, chamfers, specifying finishes, materials and heat treatment is advanced engineering drawing often left to specialists called "detailers".
Hand Drawn engineering drawings can be done on grid paper to help with squareness and lines for lettering.
The hand drawn assembly drawing above is an example of an engineering drawing on mylar grid vellum.
The drawing includes views, cross sections, isometric detail, hand lettering, titles and shading.
Click image for a more complete view.
This drawing was produced using wax pencils, simple drawing tools, straight edge, ellipse and circle templates and a standard parallel arm drafting machine (A T-square could have been used.)
It is not made to any published drawing standard.
It was made to our company standard which included old drafting styles and the freedom to use whatever notes and views communicated the designers intentions the best.
Our sub-contractors greatly appreciated the clarity of our drawings.
Most of their questions were regarding dimensional mistakes (it happens).
The most difficult part, the hand lettering.
While the above is an engineering drawing now universally produced using CAD, many top architectural firms prefer hand drawn illustrations for certain classes of work.
If you are selling to them they may appreciate the same from you.
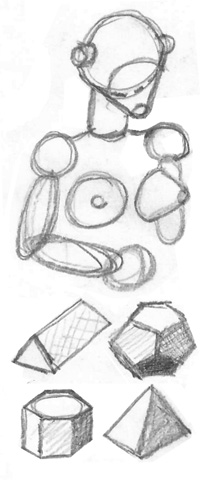
 ISOMETRIC DRAWING: This is the final step of learning mechanical drawing and can help in learning to draw Jon Gnagy's four geometric shapes.
Three views are combined to create a 3D image on 30, 60 and 90 degree axiis without perspective.
OR an isometric sketch is used to create a multi-view drawing.
In some cases the isometric "solution" is included on a 3 view drawing to clarify the part.
Isometric grid paper and 30/60 triangles make it easier to make sketches and drawings.
The isometric drawing (above left) was made using CAD and a 30-60 construction layout.
It is easier to draw isometrics manually than in 2D CAD.
Isometrics are one step from perspective drawings and when hand drawn often result in perspective drawings.
Mixed Methods:
The image above started as a simple sketch of two pickets with top and bottom rails.
The sketch was scanned and then copied numerous times to make a long section of rail.
This long section was then distorted to give it perspective and those parts copied and flipped to produce the final image.
This is a case where a small simple drawing was made into a larger illustration using cut and paste very quickly.
This is a great way to produce preliminary proposal drawings.
Links:


Learning to Draw
By Jock Dempsey
Many folks get into crafts such as blacksmithing without thinking about them being artistic endevours and needing to be able to draw. When confronted with the fact that they need to learn to draw they often say they can't. This is usually from adults who have not drawn for most of their life. Virtually all humans draw when they are children. Then over time they drift away from it unless encouraged by their parents or have a persistent interest.
Drawing is only one part of visual communications. The ability to read, understand signs and symbols are all part of visual communications. Even if you don't read the languages with the signs above you probably understand the message. The combined symbol with words tells the story. No Furmar is No Smoking and Peligro means Danger in Spanish ( Español ). The Stop and Yield signs may use different words in other places but their shape and general coloring are used worldwide. The scull and crossbones as a poison warning (or possible death such as from a mine field) is often understood by small children and used universally worldwide. Other symbols are not so universal but that is another story. . .
So-called "natural" artists are people that have practiced since they were very young. While they were not born that way humans have been artists since earliest times. Mechanical drawing or "drafting" is taught logically one step at a time. For many non-artists it is the place to start so that they understand views and how they are put together to make an isometric (3D) views. From there it is easy to apply perspective (a natural view) to the same drawing.
To quote Jon Gnagy, America's original TV art instructor and inventor of the info-mertial,
"If you can draw these 4 shapes you can draw anything".
CAD, Computer Aided Drafting is NOT a substitute for being able to draw. If you can't make a sketch by hand you will not be able to make a useful CAD drawing. While CAD is a requirement in many modern shops, especially fabricator and steel erection shops, it should be learned after free hand drawing.
Teaching Yourself to Draw
Practice, practice, practice. Get a bound blank book (artists sketch book or journal) and draw something in it EVERY DAY. Draw anything and everything. Draw what you like or are interested in at the time. Draw from life (things you see) OR from your imagination. Whatever you do, draw EVERY DAY.DO NOT always draw using a writing grip on your drawing instrument. Practice loosening up and drawing with your instrument, charcoal or chalk held between thumb and fingers. Draw BIG. Fill the page. Draw on large format paper when you have the chance.
Draw the geometric shapes above. Change their proportions, connect them, build things from them. Draw circles and circles in circles large and small. Concentric and eccentric.
Draw scrolls and geometric patterns. Make fancy page borders and write your thoughts. Practice your printing for engineering drawings. Fill pages with scroll patterns with splits and double ends. Add decorative elements (bean ends, leaves, flowers, faces, dragon heads. . .).
LOOK at something and draw it. Look at anything on your desk or table. Look at your pet. Look at the angle of the object, the shading and shadows. Practice LOOKING at things. The biggest mistake people taking photographs do is NOT looking with a critical eye at what is in the view finder. They cut off people's heads or the corners of objects because they do not think about what they are looking at. Practice making a composition that includes the whole subject. If you draw of photograph an object you want the entire object. Not 90% or even 95%. You want 100%! Train yourself to SEE what you are looking at. Most people do not. Artists DO.
Do this every day for a year and your drawing will be much more confident, your linework cleaner, your vision more accurate. Then don't stop. True artists draw their entire lifetime and rarel miss a day without drawing, painting or sculpting.
DO NOT DRAW FROM PHOTOGRAPHS!
Cameras produce photographs with a single point of view (from the lens) while we have TWO eyes. It makes a difference. The perspective is mechanical, angles are distorted and focus is fixed, not dynamic. True artists can see the subtle difference at a glance. Simply looking at a photograph while you work will result in this mechanical camera's lens view. If you must use a photograph for reference do as much of your drawing without looking directly at the photo. Reserve the photo for fine details or color.
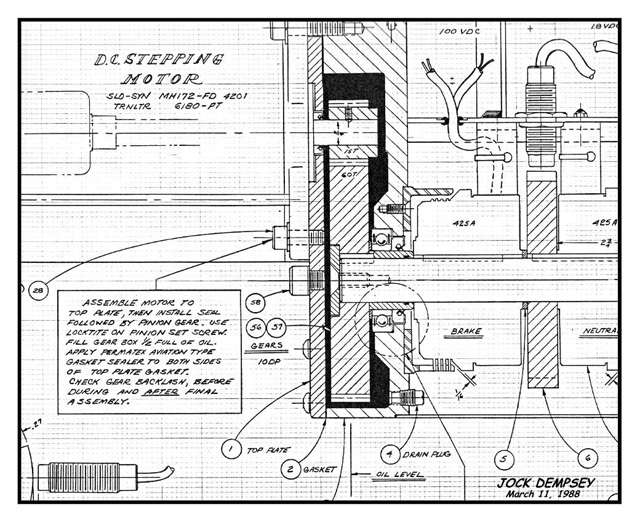
The detail part drawing to the left is an "in-house" drawing for a one-off project. It is missing center marks and a cross section axis line. The view locations are also not standard. However, it has all the basics, border, title block, notes, dimensions with tolerances. Click image for an enlarged detail.
Beginning three view drawings are not this involved. They are generally simple shapes and overall dimensions only (to practice drawing arrow heads).
Detailing, dimensioning for manufacturing with tolerances, radii, chamfers, specifying finishes, materials and heat treatment is advanced engineering drawing often left to specialists called "detailers".
Hand Drawn engineering drawings can be done on grid paper to help with squareness and lines for lettering.
The hand drawn assembly drawing above is an example of an engineering drawing on mylar grid vellum. The drawing includes views, cross sections, isometric detail, hand lettering, titles and shading. Click image for a more complete view.
This drawing was produced using wax pencils, simple drawing tools, straight edge, ellipse and circle templates and a standard parallel arm drafting machine (A T-square could have been used.) It is not made to any published drawing standard. It was made to our company standard which included old drafting styles and the freedom to use whatever notes and views communicated the designers intentions the best. Our sub-contractors greatly appreciated the clarity of our drawings. Most of their questions were regarding dimensional mistakes (it happens). The most difficult part, the hand lettering.
While the above is an engineering drawing now universally produced using CAD, many top architectural firms prefer hand drawn illustrations for certain classes of work. If you are selling to them they may appreciate the same from you.
Three views are combined to create a 3D image on 30, 60 and 90 degree axiis without perspective. OR an isometric sketch is used to create a multi-view drawing. In some cases the isometric "solution" is included on a 3 view drawing to clarify the part.
Isometric grid paper and 30/60 triangles make it easier to make sketches and drawings.
The isometric drawing (above left) was made using CAD and a 30-60 construction layout. It is easier to draw isometrics manually than in 2D CAD.
Isometrics are one step from perspective drawings and when hand drawn often result in perspective drawings.
Mixed Methods:
The image above started as a simple sketch of two pickets with top and bottom rails. The sketch was scanned and then copied numerous times to make a long section of rail. This long section was then distorted to give it perspective and those parts copied and flipped to produce the final image. This is a case where a small simple drawing was made into a larger illustration using cut and paste very quickly. This is a great way to produce preliminary proposal drawings.
Links: