Dragon-Head Striker
Demonstration by Robert Hogg
www.scoutskills.com
May 10, 2000 - June 16, 2000 Addendum
Dragon-Head Striker
Demonstration by Robert Hogg
www.scoutskills.com
May 10, 2000 - June 16, 2000 Addendum
Jock-D : |
Tonights demonstrator is Robert Hogg AKA SmithinScout.
Robert is a NEW High School graduate and Eagle scout. He makes strikers for fire kits as a business. Probably makes more forging than the rest of us. ;) |
SmithinScout : |
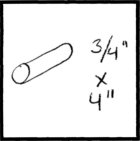
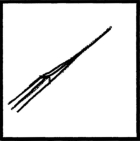
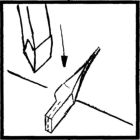
we are making a dragon-headed striker for flint and steel tonight, my personal design, we begin with a piece cut off of a 3/4" dia file that is 4"long |
SmithinScout : |
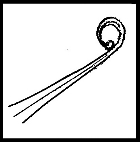
ok i dont have a pic of the finished thing, here is the basic shape and the blob is the head the loop is the tail, it will all make sense as we move on :) |
SmithinScout : |
|
SmithinScout : |
begining with a piece of a large rasp or file 3/4" dia by 4" long |
SmithinScout : |
|
SmithinScout : |
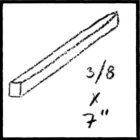
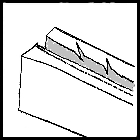
thanks for the intro jock :), here is the drawn out step 2, 3/8" square and 7" long, if it is longer you can always remove material |
SmithinScout : |
make sure to ignore the file teeth, they will make a nice scale like look for the dragon |
SmithinScout : |
|
SmithinScout : |
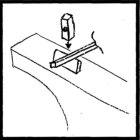
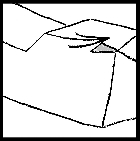
here we begin the head at the neck, about 1" in we use a fuller to make a groove, make a nice groove all the way around the square till it is about 3/16 square, then taper the metal behind the head, so the neck is nice and smooth tapering |
SmithinScout : |
|
SmithinScout : |
i taper to the middle of the piece, this makes it more graceful |
SmithinScout : |
it is a double taper, this is his neck, after it is drawn out make it round by hammering it into an octagon and then take out the peeks of the octagon, good practice :) |
SmithinScout : |
|
SmithinScout : |
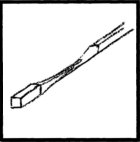
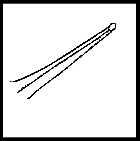
now draw out the other end to a point about 1/8 square |
SmithinScout : |
again draw fron the middle out leaving the center thick and a nice graceful taper, the tail should be 3/4"longer than the head end of the piece |
SmithinScout : |
do the same rounding process, drawing and octagon and then removing the peaks |
SmithinScout : |
I must take a moment to say hi to my girlfirend kristen and my best friend kris :) |
SmithinScout : |
|
SmithinScout : |
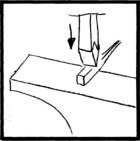
now we begin the detail of the head, use a cold chisel and cut a 1/8" slit 3/4 of the head length from the end on one side only, this is the start of his forehead |
SmithinScout : |
|
SmithinScout : |
hammer out the shelf like the picture shows, take care to rotate the head 90 degrees to maintain the width of the head, this elongates his snout and makes his forehead |
SmithinScout : |
|
SmithinScout : |
now heat the head to a bright yellow and take it to the vise, use a center punch to meke the eyes in the corner of the forehead and on the tip of his snout |
SmithinScout : |
this usually takes several heats because of the small size of the head and the cold vise |
SmithinScout : |
|
SmithinScout : |
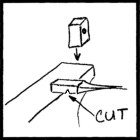
now we cut his mouth, it is not a cut all the way through, just a 1/16" in with the chisel all the way around his snout like the dotted line shows |
SmithinScout : |
again this takes a few heats |
SmithinScout : |
|
SmithinScout : |
now take the head, with a yellow heat, and clamp it good in the vise, use the chisel to cut the teeth along the groove of the mouth, cut like you are useing a wood cisel to remove the corner of something, but dont remove the chip, leave it to look like a tooth |
SmithinScout : |
do these allong the top and bottom of the sides, i dont put any on the front |
SmithinScout : |
|
SmithinScout : |
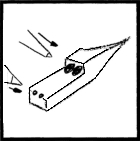
now we make his ears, this picture is the back of his head, use the chisel again and meke a nice big flake, you can use a file to round the ears, they tend to be sharp, i give them a hit right on the end, they look like a rippled old dragon ear that way |
SmithinScout : |
|
SmithinScout : |
this is the tail section, i drew it square to show the taper, you would have rounded it as i said before |
SmithinScout : |
|
SmithinScout : |
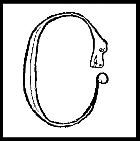
curl it around to about 3/8" in dia, or whatever suits you, i tend to do something different with the tail each time i make one, sme it wraps around there neck, some the tail is acting as a mussle like one for dogs, be creative |
SmithinScout : |
|
SmithinScout : |
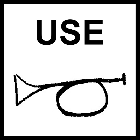
use the horn hehe get it :) |
SmithinScout : |
|
SmithinScout : |
this is a bit out of oval shape, a little to round, but this is a personal project make it to suit your hand, just dont test it while it is glowing red, that hurts and it leaves a mark :) |
SmithinScout : |
|
SmithinScout : |
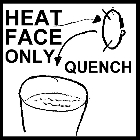
heat the area between the hatch marks for hardening, use a dull cherry red heat, the purpose of only heating the face is to leave the rest a bit less brittle |
SmithinScout : |
|
SmithinScout : |
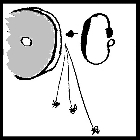
once cool, take it to the grinder and grind the striking face clean, that seems to work the best with a sharp piece of flint |
SmithinScout : |
Any Questions? |
Leah : |
Cool demo, SS. What else goes into the kit? Hubby might like one for his hunting bag. Where can you buy flint? |
David-Roeder : |
SmithinScout: Thanks for the demo,, I make a key ring useing the serpant's head,then the tail wraps around the neck to make the ring... |
Ntech : |
Great project SmithinScout. How long does it take you to make one and what do you charge for them ? |
Jock-D : |
Do you bend on the diagonal so the edge of the square is out? |
SmithinScout : |
leah, the kit gets some flax-tow for tinder, charred cloth and flint, go to www.scoutskills.com and then to skills it tells you how to make charred cloth |
SmithinScout : |
it takes about half an hour if all is well, and i dont really sell them, i make them for my friends and relatives, kind of a Rob Hogg one of a kind |
SmithinScout : |
no jock i like a face out to allow max striking area |
Pix : |
Scout,I came in late...log refreshed and didn't say what you were making...great suprise ending! Thanks!! |
David-Roeder : |
So the face strikes the flint ? |
Tapley : |
Good job Smithin'S. Anticipating that I might get one made - what do you recommend for tinder? |
SmithinScout : |
you hold it and strike the face with the flint, useing the flint as a knife to cut off little bits of steel that ignite and make sparks |
Tedd-Harris : |
Good work! Could wire brush to get rid of the scale. :) |
Ralph : |
Tapley old dry hemp rope works well. Especially if you can get some that was used a chinking |
SmithinScout : |
Tapley, go to www.scoutskills.com and look under skills i have a large writeup on the process there i recomend okum or jute fibre |
Tedd-Harris : |
Do you have a source for 3/4" files? I haven't seen many that big. |
SmithinScout : |
i got a buch of file from a second-hand shop |
Tedd-Harris : |
SS, Do you get better results quenching in oil or water? |
David-Roeder : |
Also you could use a 3/" coilspring right? |
SmithinScout : |
never tried oil, water always has worked |
Tedd-Harris : |
Who uses such big files? All I use are flat ones. |
Ralph : |
If files are hard to find, garage door springs work well, and if you find out where the repair folks get thier springs from you can go to the source for cutoffs.... |
SmithinScout : |
everyone, MARSBOYKRIS is my business partner, and my best friend, he and i own Sparks Fly Striker Co. |
Ralph : |
Tedd, strikers should be VERY hard |
Ralph : |
SS have you tried to make them from springs? |
SmithinScout : |
not yet i just got a spring to try it on |
SmithinScout : |
the strikers in the kits are simple and bent on a jig, these are my signiture piece |
Paw-Paw: |
 This is a picture of a flint striker, the way I make them.
I use pieces of broken garage door opener spring for material.
This is a picture of a flint striker, the way I make them.
I use pieces of broken garage door opener spring for material.
|
Paw-Paw: |
After the striker is completed, I heat the entire piece to non-magnetic. Then I quench JUST the striking surface to black. Allow the heat from the ends to flow back to the striking surface while I sing Twinkle Twinkle Little Star to myself, then quench the entire striker to cold. Singing the little song is just about the right amount of time. You could probably find a more scientific method to do it, but why? |
iForge
is an Andrew Hooper Production
Copyright © 2000 Robert Hogg.
HTML Copyright ©
2000 Jock Dempsey, www.anvilfire.com
Webmaster email: webmaster
![]()