Horse Shoe Demonstration by Rich Hale.
June 30, 1999
Horse Shoe Demonstration by Rich Hale.
June 30, 1999
Rich-Hale : |
Tonight we will show one of the many ways to turn out a finished handmade horseshoe | |
Rich-Hale : |
I am going to keep this real basic and explain a lot of things that may be routine for those that already have done some of these. | |
Rich-Hale : |
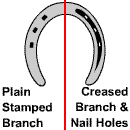
Left side of this drawing is plain stamped shoe...Right side is creased and punched. We will do the left side type of shoe first. |
|
Rich-Hale : |
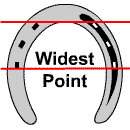
Note where the holes line up in the shoe...just behind the inside web for the front holes...at the widest point of the shoe for the last holes. Remember that. |
|
Rich-Hale : |
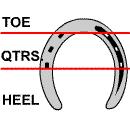
Parts of the shoe |
|
Rich-Hale : |
For this shoe we will use 5/16" X3/4" X 11" of mild steel. The use of the horse, size and surroundings help make a decision on stock size. | |
Rich-Hale : |
Lets build this shoe. | |
Rich-Hale : |
Layout your stock with a center punch. The very center , mark on the edge so you raise a little bubble on the outside..... |
|
Rich-Hale : |
The other two marks are in center of stock width, 1 and 3/8" from center | |
Rich-Hale : |
When the stock is hot, you can find that bubble and locate center easier than if it was in middle of stock. | |
Rich-Hale : |
Now heat it up...it is almost as easy to build two as it is one...one can be in the fire while you are working on other.... | |
Rich-Hale : |
I leave one end stick out a little and heat about 3/4 of the stock lengthwise. | |
Rich-Hale : |
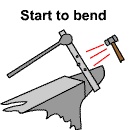
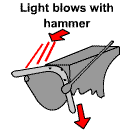
Get a good red heat and remove it, find the center and hold it like this |
|
Rich-Hale : |
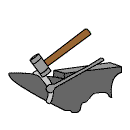
use the round face of your hammer, I use a 1 and 3/4 pound hammer for this. Start your bend with a series of hits, like in the picture | |
Rich-Hale : |
Keep an eye on your center mark......work from a bit on each side of nail hole punch marks.... | |
Rich-Hale : |
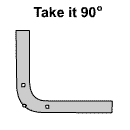
Take a 90 degree or so and start on a heel |
|
Rich-Hale : |
||
Rich-Hale : |
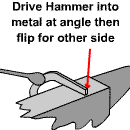
Turn other branch down and get behind tongs for support. drive hammer into heel |
|
Rich-Hale : |
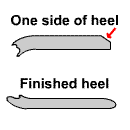
Flip stock and drive into other side. Then lay it flat and flatten the stock back to its original thickness |
|
Rich-Hale : |
Now lets bend the branch. If you need more heat,,get it now.... | |
Rich-Hale : |
As you hit the off side of the stock over the horn, it will bend, as it does, push your tongs down and keep your working spot on top.... |
|
Rich-Hale : |
TIP: Keep your tong hand above hot stock. You will likely not smell the scale on flesh if you you | |
Rich-Hale : |
As you get towards the heel leave it a little straighter..... |
|
Rich-Hale : |
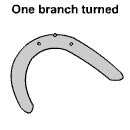
So, we have a turned branch, If you have an old or new front shoe for a pattern when you start you will be better off at this point. | |
Rich-Hale : |
If you still have some dark red heat lets do nail holes. | |
Rich-Hale : |
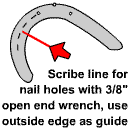
Use either your blacksmiths eyeball, calipers, crescent wrench, or like I do, a 3/8" open end wrench to mark a line for your holes. |
|
Rich-Hale : |
Run one edge down outside of stock, let other edge mark your steel. | |
Rich-Hale : |
Mark your holes with a forepunch...More about that later. |
|
Rich-Hale : |
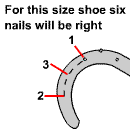
Mark the first at your punch mark, second at widest, third in between. | |
Rich-Hale : |
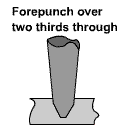
Now at a dark red heat, drive forepunch into marks, about 1/3 way through |
|
Rich-Hale : |
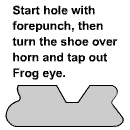
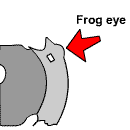
When you do this do all three holes, You will push the outside of your stock out and it will bulge,,Frog eyes. |
|
Rich-Hale : |
Tap those back in,,,move shoe around horn and get them close... | |
Rich-Hale : |
Now set in your forepunch. Note the shape of the punch, It will exactly match the head of the nail. For this shoe I punch for #5 city head or slim blade nails. |
|
Rich-Hale : |
Tip: Do not overheat your tools, I keep a tub of forschners hoof packing and dip them between each hole | |
Rich-Hale : |
Use either a handled set of punches,,or long ones,,,over a foot long will get your hands away from hot stock. | |
Rich-Hale : |
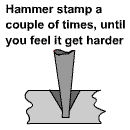
Follow the forepunch with a stamp,,start the area for the nail shank with this tool. |
|
Rich-Hale : |
It has sides smaller than forepunch and will not change hole size where nail head goes. | |
Rich-Hale : |
A couple of hits and you will feel it bottom over anvil face. Go to next hole after cooling. | |
Rich-Hale : |
Then the pritchel |
|
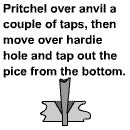
Rich-Hale : |
Stock should be at a black heat for this,, hotter will leave allot of distortion on the other side of your hole. | |
Rich-Hale : |
A little piece will fall from the hole if everything is right. Pritchel will protrude as you punch it in over the anvil hole, I use the hardy hole. | |
Rich-Hale : |
Cool pritchel between holes, I fuss about that allot. It takes me a while to get my tools forged and ground to make a perfect nail hole, overheat them and you start over... | |
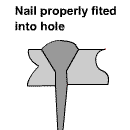
Rich-Hale : |
A bit of the nail head stays out of shoe. The nails have a little line that is about right. |
|
Rich-Hale : |
Cast or lost shoes cost a shoer money, Has to go back out and put them or new one on. Improper nail fit is a big reason for lost shoes. | |
Rich-Hale : |
Tip: Take a good length of stock and heat an end. Hammer the end like a heel,, punch stamp and pritchel a couple of holes, Cut it off and do it over. A few times and you can get the hang of it and tune up your tools. | |
Rich-Hale : |
Now we have one branch and the toe turned, do the other branch the same...try for a mirror image and symmetry in the shoe. | |
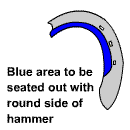
Rich-Hale : |
Work blue area with round face of your hammer, |
|
Rich-Hale : |
Overlap your hits so you leave space between shoe and foot in this area | |
Rich-Hale : |
Clean out any holes that need it from this side with pritchel | |
Rich-Hale : |
Your last run through holes with pritchel should angle holes so they follow angle of the hoof wall |
|
Rich-Hale : |
Now take it in tongs and like you did when you did the frog eyes,,,run around the outside edges with light hammer blows to bevel the edges...... | |
Rich-Hale : |
Lay it on the anvil face with foot side up and go from heel to heel with flat face of hammer,,,overlap blows, this will do most of the leveling and you can eye the rest..... | |
Rich-Hale : |
This may seem difficult if you have not done one,,,If I can do it anyone that can move hot metal can. | |
Rich-Hale : |
Don't worry about how many heats you take,,,You will lose some of them with practice. This can be made by a good hand in two,,,an exceptional hand in one, I have not seen that done. | |
Rich-Hale : |
Before we add a creased shoe to this does anyone have questions?. | |
Paw-Paw : |
Rich, Why would you use a plain shoe or a creased shoe? | |
Rich-Hale : |
Plain is enough for most horses,, esthetically owners sometime prefer creased,,,that is what they always have seen,,they say that a creased shoe adds traction,,,It may do that depending on ground or surface conditions....... | |
Rich-Hale : |
It is easier to pull out a nail from a crease,,,plain you have to loosen shoe.... | |
BILL-EPPS : |
creased shoe allows the nails to be pulled one at a time | |
Rich-Hale : |
Bill makes a point With a crease, you can remove just one nail if needed......tool is a crease nail puller:) | |
Rich-Hale : |
Now for a crease....Same as turning a plain shoe but I center punch at center and 1 1/8" from center for this shoe...again with center on edge of stock...... | |
Rich-Hale : |
Different punch marks lets crease go farther towards center and leaves nail hole about the same.... | |
Rich-Hale : |
After Turning toe, shaping heel, and turning branch. | |
Rich-Hale : |
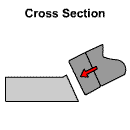
Turn the shoe around horn and run the edge down with flat face,,,You want a bevel |
|
Rich-Hale : |
||
Rich-Hale : |
Crease will move stock outward and if you do this first you will not drive crease closed when you work outside edge back later. |
|
Rich-Hale : |
|
|
Rich-Hale : |
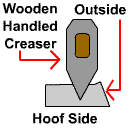
Scribe your line for this crease like we did for nail holes earlier,,,,only mark from the inside of the shoe as we have moved the outside when we beveled it. | |
Rich-Hale : |
Run the creaser with little taps as you follow the line from front punch mark to just behind heel nail area,,,just past widest part of shoe. | |
Rich-Hale : |
We want a red heat for this,,,not too hot or it will distort a lot,,,but not down to a black heat... | |
Rich-Hale : |
Mark that first line carefully, when you get off line it is hard to get back | |
Rich-Hale : |
From the first nail hole to the last you want a constant depth, the same as with the forepunch earlier,,,It must fit the nail head. | |
Rich-Hale : |
From the last nail hoe let up on force of your hammer, let it taper up to a nice looking crease towards heel | |
Rich-Hale : |
Now stamp and pritchel like we did on other shoe....Turn other branch......... | |
Rich-Hale : |
Get the shape you want and seat out the inside edge, run down the outside edges,,,no sharp edges if you are going to nail this on. | |
Rich-Hale : |
Level it up and........... |  |
Rich-Hale : |
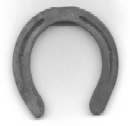
Should have a shoe!!!. | |
Rich-Hale : |
I keep a wire brush handy and use it when I remove steel from forge. If you leave scale on and hit it, it tends to either fly somewhere important or imbed into the stock........ | |
Rich-Hale : |
For a better looking heel you can hot rasp with an old shoeing file and clean them up real nice.... | |
Rich-Hale : |
Stick the shoe into a vise while it is hot and work all the rough spots out | |
Rich-Hale : |
Shoe in the last pic is all hammer worked,,,,,,, | |
Rich-Hale : |
That is how I make shoes......... | |
Rich-Hale : |
Questions or comments? |
|
joel : |
does a shoe have a lug at the heal? if so, haw do you get the lug? | |
Rich-Hale : |
Joel asked a bout the lug at the heel of some shoes,,,Joel that is a heel caulk, they sometimes are added to either raise the heels or increase traction for some horses,,,,They are usually forged into the shoe...Bills demo on the swan shoes how to do that,,,only he made a swan head instead,,,Look it up, Just the same..... | |