| |
 |
|
|
|
BRYAN
BLACK
|
|
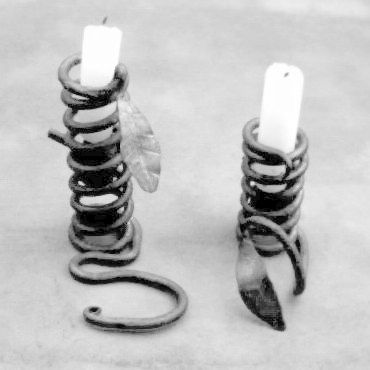
Tonight's demo is a courting candle. I first saw one of these at a buckskinner's Pre-1840 rendezvous. A blacksmith wearing not much more than a breechclout had made it. I didn't get his name. The Courting candle gets its name from its primary use as a timer... when the candle burns to the top of the holder, it meant it was time for the suitor to leave. Depending on which story you hear, either the girl or her father would set the candle high or low, depending on how well the boy was liked.
|
|
BRYAN
BLACK
|
|
The courting candle that I saw then was just a plain spiral with a traveler. After seeing a lot of Bill Epps' work where he makes things with a vine texture, I thought this would be a good way to go.
|
|
|
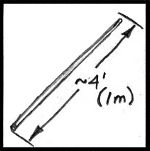
Figure 2 |
To start out, get a long piece of Ľ" rod, about 4 feet is a good start. The taller of the 2 candles at the top of the page is from a 4' piece, the shorter one was from a 3' piece.
|
|
|

Figure 3 |
First thing that I do is point the ends. I point both ends.
|
|
|
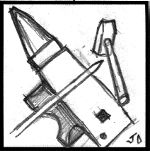
Figure 4 |

Figure 5 |
|
|
BRYAN
BLACK
|
|
Next we make a leaf with one of these points. there are already good leaf-making demos on I-Forge, and those have lots of good info, but for the sake of completeness, I'll describe how I do it. Leave about an inch off the side of the anvil and hammer it down on 2 sides to start to define the leaf. Then thin the stem just a little to give the leaf a bit more definition later.
|
|
|
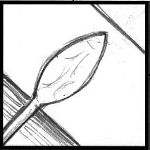
Figure 6 |
Flatten out the leaf. A farrier's rounding hammer is a good tool here if you have one... I don't so I use the cross pein to make the leaf wider. Then I use the face of the hammer to take out my pein marks.
|
|
|
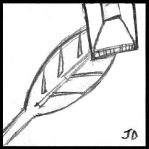
Figure 7 |
Use your favorite method of putting in the veins... A chisel is the po-boy method and it works... but if you have dies for that, more power to you! :) After putting in the veins, set the leaf on a chunk of wood and beat it up a little with a ball pein to give it a more natural appearance.
|
|
|
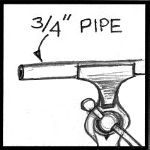
Figure 8 |
There are alternate ways of doing this, but this is what worked for me... I stuck a piece of pipe in the vise and used it as a form. this could be fashioned as a hardy tool, but sometimes you have to use what you have available. I used 3/4" black pipe. That has an outer diameter of about an inch.
|
|
|
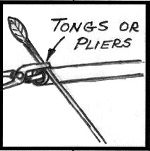
Figure 9 |
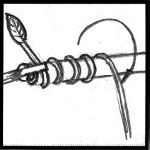
Figure 10 |
|
|
BRYAN
BLACK
|
|
start about 8 or 10 inches away from your leaf. This gives enough metal to form your base later. Get this area hot and take it to your pipe in the vise. Hold the area about 8-10" from the leaf onto the pipe and start bending the long piece of rod around the pipe.
When it gets too cold to bend any more, put it back in the fire and heat the next section.
|
|
|
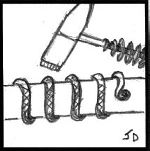
Figure 12 |
Another thing I do since this is supposed to be a vine... I use a welder's chipping hammer to give the vine some texture. Just beat up any metal that doesn't look like a vine until it submits! ;) Bill's texturing dies do a better job, but I don't have that kind of tooling. If you use dies for your vine texture, you would obviously do this while the rod is a lot straighter!!! I do the texturing at this point so that if I miss the particular spot I was aiming for, I still usually hit a spot that needs texture, instead of an anvil!
|
|
|
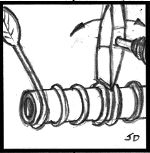
Figure 11 |
Next you get as much of the coil hot as you can so that you can make the spiral somewhat uniform. I used my chipping hammer to spread the coils apart. You need to make sure that the space is large enough for the stick in the side of the traveler can stick through without binding. I usually close up the very top and the very bottom so the traveler won't accidentally come out. Oh yes, at the top of the candle (on the other point on the end of the rod) I make a little curl to make it more vine-like.
|
|
|
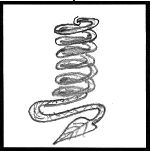
Figure 13 |
Next you make the base. Kinda curl it around until it looks kinda viney, but make sure that you have a wide enough base that the candle can stand on its own. Getting it flat is the main thing. If you have to unwind some of your spiral, do it, but try to make it stand flat and stable. Your leaf can become part of a handle for easier handling. I make these all just a bit different. On one of the candles shown, I put the leaf at the top. That is OK, but it can interfere with the traveler if you aren't careful.
|
|
|
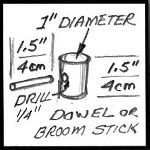
Figure 14 |
The last bit is to make the traveler. I used dowel rod (1" and Ľ") but you can certainly whittle your own out of a piece of tree if you are so inclined. The traveler needs to be long enough to not flop over and bind between the coils. 1˝" should be about right. Drill a hole in the side just large enough for your small dowel. Paint both pieces black. Put the large dowel in the candlestick and plug the small dowel in the side of the big one. Get a (preferably beeswax) candle, put it in the top, adjust for your daughter's suitors and shoo him away when the candle burns to the top of the iron! :)
Any Questions???
|
|
|
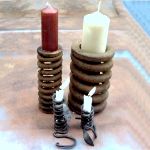
Figure 15 |
By the way... you can have fun with this idea if you want... without a lot of forging!!! :)
|
|
Sharon Epps
|
|
Bryan, you are a pretty good drawer. Or did you have help? Nicely outlined and explained your subject matter well:)
|
|
Sleepingbear
|
|
Good Demo
|
|
Bill
|
|
nice demo Bryan
|
|
Bill
|
|
nice demo Bryan
|
|
Leah
|
|
Have you ever tried to bend them cold or to use a torch for local heat?
|
|
axa
|
|
good demo
|
|
|
|
Bryan, How do you get the coil to come off and on the mandrel smoothly for successive heats. I thought a taper might work but haven't tried it yet.
|
|
JOCK D
|
|
Nice demo Ryan.
I wanted to point out that some folks cut a notch in the end of their pipe to catch the end of the bar in.
|
|
Milt
|
|
Thanks for the demo. Will the wooden dowel burn, or could it be capped someway to prevent that?
|
|
P-F
|
|
thanks Bryan...that is a nice bit of work and a clear explanation.
|
|
chopper
|
|
nice Bryan ,, gonna try 1 of these myself :)
|
|
Milt
|
|
Thanks for the demo. Would a cap of some type keep wooden dowel from burtning?
|
|
BRYAN
BLACK
|
|
I didn't have any trouble with successive heats. My coil was loose enough that it didn't bind on the pipe very much at all... a bit of persuasion with the hammer knocked it on and off quite well.
|
|
Ntech
|
|
Nice demo Bryan. Thanks for the idea.
|
|
BRYAN
BLACK
|
|
a pipe cap could certainly work, but unless you let the candle burn all the way down, is not usually necessary.
|
|
BRYAN
BLACK
|
|
Another thought I had on the spacing of the spiral... you could drill a hole in the pipe and put in a Ľ" rod and use that to keep your coil spacing uniform.
|
|
Jim C.
|
|
Bryan: good demo; thanks.
|
|
chopper
|
|
Bryan ,, what do u sell these for State side ?
|
|
BRYAN
BLACK
|
|
Leah, you could use a torch for local heat, but the more rod you can twist at one time, the quicker it goes. I would prefer a big hot area to get it done quicker.
|
|
McHal
|
|
Thanks Bryan, Do you go to hawkwood?
|
|
BRYAN
BLACK
|
|
I knew someone was going to ask that... I haven't sold any... but I did give one away at a Christmas party and it was well received!
|
|
BRYAN
BLACK
|
|
Sharon, I must confess... the drawings are Guru's... Figure 13 looks like it might have been mine, but I'm not sure. Thanks Guru for the help and for this wonderful site! :)
|
|
JOCK D
|
|
Figure 13 is Bryan's. The rest I took from his sketches. I didn't have to do a lot but they needed to be a bit bolder.
|
|
BRYAN
BLACK
|
|
If that's all the questions, I'm gonna head back to the pub! :)
|
|