| |
 |
|
|
|
-GURU
|
|
Tonight's demo is another on basics. In the past few weeks we have had a number of questions about riveting.
As simple as this is to most of us it can be a mystery to those that have never done it.
If you are doing a job that requires a lot of rivets you should buy them.
However, most blacksmithing uses require different diameters and length rivets for every job and you could never stock enough.
In any case, buy any that you see that you use a lot of or can afford.
|
|
|
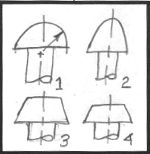
Figure 01 |
Types of Rivets:
1. Button Head or plain round head
2. High Button, I've never seen these
3. Cone Head
4. Pan Head
|
|
|
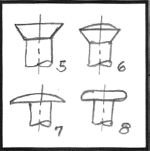
Figure 02 |
5. Flat Top Countersunk Head Rivet
6. Round Top Countersunk Head
7. Truss or Wagon Box Head
8. Tinners Rivet
|
|
-GURU
|
|
MACHINERY'S HANDBOOK has specs on all these rivets plus some. Dimensions, number per pound, rivet set dimensions.
There are hundreds of types of rivets and they come in every imaginable material.
We are using plain steel round head rivets for most blacksmithing.
Jay-Cee sales is one of the best sources
|
|
|
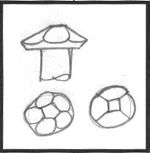
Figure 03 |
In most decorative work we create our own rivets or rehead round head rivets to make a "rose head".
|
|
|
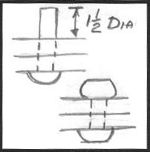
Figure 04 |
When riveting the round head requires 1 to 1-1/2 diameters of stock to form the head (depending on hole clearance).
It also works with the rose head as follows.
The first step is to heat the rivet in the forge or with a torch.
Most of us heat the shank of the rivet with a torch.
Then upset the rivet with one hard sharp blow.
Small rivets can be set cold. I commonly head 3/16" rivets cold but this needs to be done on the anvil where there is plenty of support.
|
|
|

Figure 05 |
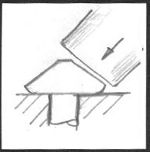
Figure 06 |
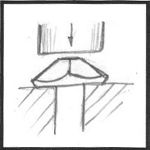
Figure 07 |
|
-GURU
|
|
Then five or six blows creates the head.
I use the flat end of a relatively small to medium ball pein hammer but rivet size determines hammer size.
|
|
|
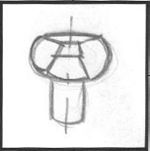
Figure 08 |
The finished head looks something like this. In fancy work the head is often decorated with punch or chisel marks.
|
|
|
Figure 09 |
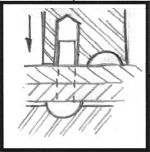
Figure 10 |
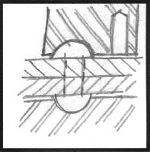
Figure 11 |
|
-GURU
|
|
For making any of the standard heads described at the top there are tools called a "Rivet Set".
A "set" is used to tighten the joint and then to form the head.
If you don't want the preformed head of the rivet to have a flat then you need to support it in a swage, dap, or another rivet set as shown.
|
|
|
Figure 12 |
In most blacksmithing we deal with long non standard rivets and stacked joints.
In this case we use a plain mild steel pin with extra material for both heads.
|
|
|
Figure 13 |
One side of the pin is supported by a "buck", a big hammer or a sledge while the other end is upset.
Often after forming one end a tube or tool like a set is used to tighten the joint before upsetting the other end.
Sometimes in cramped or tight locations flat ended punches are used to form the head.
|
|
|
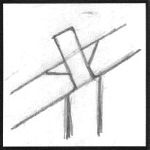
Figure 14 |
Another common riveted joint in decorative work is an upset tenon in a plain (solid) top rail.
Although common it is only found in the best of work.
The tenon is formed at an angle.
Often the shoulder is filed to fit.
The rail has a heavy countersunk hole drilled to match.
|
|
|
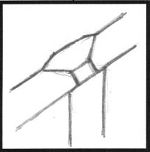
Figure 15 |
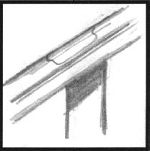
Figure 16 |
|
|
-GURU
|
|
The end of the tenon is heated, upset and hammered tight to fill the countersink.
In most cases you want extra material so ther is no lack of fill.
After riveting, the head is ground flush, any lines or texture filed to match and the head heated to create the same finish as the rest of the top rail.
When done it should be invisible.
|
|
-GURU
|
|
Questions, Suggestions?
|
|
AdamSmith
|
|
Bravo Guru, Would my local hardware store be likely to carry rivets?
|
|
Steve C
|
|
Jock, do you cool the head that is formed first or do you just use a rivet header to keep the head from being flattened?
|
|
Jim C.
|
|
Rivet set? Won't forming the head tighten up the joint?
|
|
gypsy
|
|
good demo thanks guru!!!
|
|
PF
|
|
guru..how do you do the angled tenon?
|
|
-GURU
|
|
PURCHASING: Years ago gneral hardware stores carried a few rivets and all industrial suppliers as well - no more.
You will need to order rivets from some place like Jay-Cee Sales. Note that minimumns apply (1,000 ea. for small sizes).
TIGHTENING: In some cases the shank of the rivet will expand and prevent the joint from tightening properly.
Using a set to tighten the joint is more critical in blind work such as on sheet metal.
ANGLED TENNONS:
We often machine the angled tenons.
The picket is bent,
then the tenon formed in a lathe using a tool that looks a lot like a woodworking tenoner.
This is also known as a box tool. A hollow milling cutter will also work.
The tool is on the lathe spindle, the picket on the carriage.
Angled tennons can also be forged.
They are forged straight a slight upset created at the shoulder of the tennon.
The tennon is then bent at the shoulder and dressed in a monkey tool (tool with a hold to support the shoulder).
|
|
dunchadh
|
|
Is it feasible to weld a tenon joint if heated up enough
|
|
Gilly
|
|
I really like the idea of the "rose" head . . . Rod uses a lot of riveting in his saddle making so that would fancy it up a bit. Thanks
|
|
AdamSmith
|
|
Especially informative to me were frames 14 through 16.
|
|
PF
|
|
Another good demo Jock, thanks
|
|
-GURU
|
|
Jim it depends on the type of rivet.
When doing rose head rivets in decorative work there is a flat (normally).
The opposite head cools rapidly. These are usually heated with a torch.
|
|
Gary
|
|
Thanks, I"ll be back for more.
|
|
-GURU
|
|
Dunchadh, These are sometimes welded but usually not (unless there is not enough material to fill the countersink).
|
|
dimag
|
|
Jock I've been using store bought rivets and been tightening them cold.
If I annealed my hot roll could I do the same or are those store boughts an alloy?
|
|
pigsmith
|
|
Great demo, guru, thanks. You mentioned Jay Cee sales- do they have a web site?
|
|
-GURU
|
|
Diamag, Common rivets are mild steel or low carbon steel. However, you can purchase high strength rivets.
Rivets made from common HR bar need to have the cut ends dressed smooth to prevent cracking if cold headed.
|
|
mike-hr
|
|
Would Centaur have the swage tool to create the first head?
|
|
-GURU
|
|
A rivet set USED to be a common tool. Blacksmith tool suppliers carry them and bottom swages off and on.
I suspect it helps tighten joints in sheet metal more than heavier work.
|
|
Nan
|
|
Thanks for the demo :)
|
|
-GURU
|
|
Mike I'm not sure. If you want to make your own round head rivets then you need a clamping or gripping "header" to hold the work for upsetting.
|
|
dunchadh
|
|
very informative thank you guru
|
|
|
|
Links:
|
|
|
|
|

|


Demonstration by Jock Dempsey
January 18, 2001 (Edited May 2011, June 2020)
If you are doing a job that requires a lot of rivets you should buy them. However, most blacksmithing uses require different diameters and length rivets for every job and you could never stock enough. In any case, buy any that you see that you use a lot of or can afford.
Figure 01
1. Button Head or plain round head
2. High Button, I've never seen these
3. Cone Head
4. Pan Head
Figure 02
6. Round Top Countersunk Head
7. Truss or Wagon Box Head
8. Tinners Rivet
There are hundreds of types of rivets and they come in every imaginable material. We are using plain steel round head rivets for most blacksmithing. Jay-Cee sales is one of the best sources
Figure 03
Figure 04
The first step is to heat the rivet in the forge or with a torch. Most of us heat the shank of the rivet with a torch. Then upset the rivet with one hard sharp blow.
Small rivets can be set cold. I commonly head 3/16" rivets cold but this needs to be done on the anvil where there is plenty of support.
Figure 05
Figure 06
Figure 07
Figure 08
Figure 09
Figure 10
Figure 11
A "set" is used to tighten the joint and then to form the head. If you don't want the preformed head of the rivet to have a flat then you need to support it in a swage, dap, or another rivet set as shown.
Figure 12
Figure 13
Sometimes in cramped or tight locations flat ended punches are used to form the head.
Figure 14
The tenon is formed at an angle. Often the shoulder is filed to fit. The rail has a heavy countersunk hole drilled to match.
Figure 15
Figure 16
After riveting, the head is ground flush, any lines or texture filed to match and the head heated to create the same finish as the rest of the top rail. When done it should be invisible.
TIGHTENING: In some cases the shank of the rivet will expand and prevent the joint from tightening properly. Using a set to tighten the joint is more critical in blind work such as on sheet metal.
ANGLED TENNONS:
We often machine the angled tenons. The picket is bent, then the tenon formed in a lathe using a tool that looks a lot like a woodworking tenoner. This is also known as a box tool. A hollow milling cutter will also work. The tool is on the lathe spindle, the picket on the carriage.
Angled tennons can also be forged. They are forged straight a slight upset created at the shoulder of the tennon. The tennon is then bent at the shoulder and dressed in a monkey tool (tool with a hold to support the shoulder).
Rivets made from common HR bar need to have the cut ends dressed smooth to prevent cracking if cold headed.
iForge is an Andrew Hooper Production
HTML Copyright © 2001-2011 Jock Dempsey, www.anvilfire.com
Webmaster email: webmaster at anvilfire.com