| WELCOME to the anvilfire Guru's Den - V. 3.0 |
|
THIS is a forum for questions and answers about blacksmithing and general metalworking. Ask the Guru any reasonable question and he or one of his helpers will answer your question, find someone that can, OR research the question for you. This is an archive of posts from November 1 - 8, 2001 on the Guru's Den |
|
|
|
Ever heard of "Jet" cast 'alloy' anvils? I've been trying to find out what the alloy is, but get no response from a caaaaaatalog listed e-mail address. Don't want another cast iron anvil. Already have one too many. "D" |
| Dan Flemmer - Thursday, 11/01/01 02:19:59 GMT |
|
Inquiring, Why Mexico? We probably need more info on your needs and wants. Sayula, Jalisco, has at least a half dozen smiths. Amozoc, Mexico, is the center of bit and spur making. Both are waaay below the border. Juarez, Chihuahua, has many ornamental iron shops, but most of them are fabricating shops. Some of the scrolls may be done hot, but the ironwork is most often arc welded together. They measure in metric. One time, I had to chop and remake a bunch of Juarez window grilles that did not fit my good doctor's house. I charged him U.S. bucks. |
| Frank Turley - Thursday, 11/01/01 03:36:03 GMT |
|
Catalog Anvils Dan, if they don't mention hardness or heat treating and "for professional use", it is probably a cast iron anvil. There are many "alloys" of cast iron generaly described as a grade in American usage. It can also be ductile iron or a ductile iron alloy. And "steel" can be low carbon. None are suitable for a real blacksmiths anvil. If you want a soft steel anvil you can do much better just buying a large flame cut slab of A-36. However, a few makers have made anvils of hardened ductile iron that are servicable. But the hardening is not a common treatment for ductile iron. Many makers consider the specific alloy they use as proprietary information. However good anvils are made of TOOL STEEL and hardened quite hard. They can be plain carbon OR alloy tool steel. If you can't afford a new, quality, anvil, a old beat to peices OLD anvil is better than cast iron or a cheap soft steel anvil. Old anvils in good condition are just as good or often better than many new anvils. |
| - guru - Thursday, 11/01/01 04:05:35 GMT |
|
Olle and others. I appologize for leaving out European smiths. Many of you folks are in the same position industrialy as we are and have a less interupted history of smithing and training smiths. At one time French blacksmiths were considered the best decorative smiths in world. Currently Germany manufactures more specialized smithing machinery than any other country in the world. And if you believe Indital's literature Italy exports more architectural iron than any country in the world. For a century or so "Swedish Iron" was world famous and more specified than any other. Sweden still manufactures a significant number of high quality anvils that are shipped globaly. |
| - guru - Thursday, 11/01/01 04:25:08 GMT |
|
More on Wrought Iron: A couple of Spring Flings ago I asked Peter Ross, head blacksmith for Williamsburg, about this same problem. He demonstrated that at least part of the problem is that we've been spoiled by the more uniform consistency of mild steel. When drawing out, if you don't keep your sides perfectly square, and they slip into a parallelogram, the fibers will slide past each other (picture a bundle of rods) and the end will fray. He then re-worked the end into round, and then squared and reforged it without fraying. He said that he could usually do any rusty old piece of wrought iron, if he took special care. Then again, he's Peter Ross. My own experience with salvaged WI ship spikes has been less than satisfactory. Some of these were to the point where it was more resmelting than reforging, which is definitely within the area of diminishing returns. Salvage and experimentation are fun, but they don't always pay off the electric meter. Visit your National Park: www.nps.gov Go viking: www.wam.umd.edu/~eowyn/Longship/ (cASE sENSITIVE) |
| Bruce Blackistone - Thursday, 11/01/01 13:44:44 GMT |
|
I have a few question about anvils. I have been ignorant about the quality of anvils until I found your website. For the past 6 years I have been working off a 150 lb. vulcan anvil. After going through your website I have determined that it is probably cast. I tested the anvil with a 5/8 inch ball bearing and it bounced about 65%. Now here is my question, am I mistaken about it being cast, or could it be that it is a higher quality cast anvil? Could it be that I should be using a larger ball? Is it possible that over the years I have work hardened the face of the anvil? I am asking because I am selling it on ebay so I can buy a better anvil. I'm starting to think that may have been a mistake. |
| Chris Vidito - Thursday, 11/01/01 14:42:56 GMT |
|
What is the best way to temper a carving tool made from an old file? The file was heated to a dull red and left to cool slowly before the shape was ground. It has been sharpened with a diamond stone, and now is ready for tempering I believe. Thank You, Brent. |
| brent birney - Thursday, 11/01/01 16:16:47 GMT |
|
Cast Anvils Chris, There is a big difference between cast iron and "cast" anvils. The vast majority of modern anvils are cast steel. Cast steel is very similar to forged steel depending on its quality and how it is heat treated. Early forged anvils were wrought iron with a tool steel face forge welded on. Later forged anvils had tool steel upper bodies and mild steel bases welded at the waist. Then there are the hybrid cast iron and steel anvils. These were invented in 1843 and manufactured by Fisher-Norris (Eagle Anvils). These anvils have a tool steel face welded to the cast iron body during the casting process (in the mold) and were the first American made anvils produced in quantity. Cast iron is very rigid. It breaks rather than bending. Its strength is 1/5 to 1/3 of high carbon steel. Although it will bend a little it is generaly considered to be inflexible. Cast iron also has porosity filled with excess carbon often in the form of graphite. The combination of porosity and inflexibility makes cast iron a "dead" material. It dampens vibration and does not ring. The vibration dampening is why it is so good for machinery bases. Its stiffness makes it a good support for the tool steel face of an anvil. The Vulcan (with arm and hammer logo) anvils were of this hybrid type. Many people like these anvils because they do not ring like wrought anvils and are much quieter to use. People either love or hate the Fisher/Eagle and Vulcan anvils. They are good anvils when in good condition but if the face/body weld seperates they cannot be repaired. They were always cheaper than solid wrought or steel anvils. The ball bearing test works pretty much with any size hard steel ball. However, the results vary a little depending on the relative mass of the ball and the anvil. However it is not much. |
| - guru - Thursday, 11/01/01 16:36:12 GMT |
|
File Steel Brent, depending on how slow the file was cooled and the type of steel it MAY be annealed (soft). While the cooling may not have been slow enough to anneal, also may not have been fast enough to fully harden. Tempering is the reduction of hardness to reduce brittleness AFTER hardening. Order of processes: 1) Forge or shape tool.Step 2 would be "annealing" if the tool is to be machined or worked with hand tools (files, chisles). Annealing requires a very slow cooling from the transformation point. For very high carbon steels this requires furnace cooling at a rate of no more than 20°F/hour. Medium carbon steels can be annealed by heating and then cooling slowly by burying in ashes, lime or vermiculite (the annealing substance du'jour). See our Heat Treating FAQ for more details. |
| - guru - Thursday, 11/01/01 17:20:34 GMT |
|
More Wrought Iron. Years back, I had a student who had served not quite one year of an apprenticeship in Denmark. His apprenticeship was interrupted when the Nazis took over Denmark during WW II. In the smithy, he said that if he did something right, nothing was said. If he did something wrong, he got treated pretty rough by the journeymen. One time, he got kicked in the butt, literally, by a journeyman. Harry, my student, asked what he had done wrong. Replied his "mentor", "You never draw wrought iron by starting back from the end and working toward the end. It causes splitting". He explained that you should hammer with the middle of the hammer face hitting the end of the bar and work back toward yourself. And by so doing, you are also in control of the length of the taper or the reduction. |
| Frank Turley - Thursday, 11/01/01 19:59:23 GMT |
|
Follow-up to my question about regulator for a crucible furnace. After talking with the local propane dealer, I tried his suggestion -- a barbque grill regulator, hooked up with some funky adaptors from the local home depot. Worked fine. Looks like I'll be doing some casting again this weekend! |
| Doug Ayen - Thursday, 11/01/01 21:32:00 GMT |
|
Hey Guru... I'm a 22 year old artist living in Arizona. I have some blacksmithing experience, a full semsesters blacksmithing course, and more recently 2 weeks of workshops at the John C. Campbell folk school in North Carolina. I was wondering if you could give some information or advice on how to best go about getting an apprenticeship. I am determined to become a black/metalsmith but am having a hard time making the next step towards making it happen. Any info is appreciated. Sincerely Ted Lott cosmicjesus at yahoo.com |
| Ted Lott - Friday, 11/02/01 01:27:33 GMT |
|
Thanks for the info. "D" |
| Dan Flemmer - Friday, 11/02/01 01:29:30 GMT |
|
Apprentices Again: Ted, look UP several days posts to my comments on apprenticeships. (Paid Apprenticeship, 10/28/01) The fact is that the majority of North American smiths are self employed entrepreneurs. Most are underpaid and do what they do for the love of the craft. Most cannot afford to pay help. Those that can afford help need dependable laborers that don't dream of being artists or doing the "interesting" work. They need deburrers, painters, cleaners. . . The problem is that there is no apprentice system any longer. Blacksmithing is no longer a "normal" occupation. Nor is there a full degree program in blacksmithing coupled with business administration, the two part of being a self employed smith. Blacksmithing as an occupation in North America is a do-it-yourself project requiring much self education and self training. Besides the above referenced post see our "Getting Started" Article for other ideas on the subject. |
| - guru - Friday, 11/02/01 05:03:13 GMT |
|
I have posted a new item on the auction page if anyone is interested. Some of the guru's work (rare valuable, hint hint). |
| - guru - Friday, 11/02/01 05:21:58 GMT |
|
a note on apprentices; If the smith does the job well, then by the time the apprentice can turn out work that the smith is willing to put his name on...the apprentice is ready to strike out on their own nowadays. This makes it a loosing proposition for the smith in economic terms. A bad attitude? Me? |
| - Pete F - Friday, 11/02/01 06:04:25 GMT |
|
Training Although it is NOT a general attitude in modern North American smithing (I don't know about other places), I know a few smiths that feel that way. Although they will share and do demonstrations they will not train helpers or "apprentices". They think they have secret methods that others do not know AND they do not want head to head competition. They see no good return on their investment. This is human nature. In the clasic apprenticeship the apprentice was a valuable assset long before the 7 years was up. Then the Journeyman system made sure that they would strike out and go somewhere else, not setting up as direct competition to the Master. This took into account human nature. Smiths that think they have secret techniques are wrong. Almost everything in smithing has been reinvented hundreds of times. Through anvilfire I have learned that techniques that I thought *I* invented were in use by others. The smiths I know that have "secret" methods are only fooling themselves because I have seen their methods in use by others. Not "reinventing the wheel" is what the openness of modern blacksmithing has been about. Recording and publicising methods to prevent their loss. Mankind should be the sum of all that followed. Loss of any knowledge is a loss to mankind. The goal of anvilfire is to share as much of this knowledge as possible. |
| - guru - Friday, 11/02/01 14:38:21 GMT |
|
There is no reason to even try to keep secrets, not even to avoid competition. The theory of traditional blacksmithing (before science got involved) can be written on a piece of standard writing-paper and you would still have space left for a grocery list. There�s no real secrets there. It�s doing it that�s hard, and anyone that is dedicated enough to really work at it will learn eventually. |
| Olle Andersson - Friday, 11/02/01 19:43:20 GMT |
|
One time I opened a fortune cookie, and there was this little slip of paper inside. It said, "Don't learn the tricks of the trade; learn the trade!" |
| Frank Turley - Friday, 11/02/01 19:55:14 GMT |
|
More Viruses I've been getting odd mail from a number of folks in our community that have attachments with PE_MAGISTR.B, a very nasty virus. All the senders claim THEY do not have it. Could be a tricky one using address book addresses for out going mail but that is very tricky indeed. Especialy since the header details agree. So far the attachments have been labled as EXE's. Something you should NEVER run. Suspicious e-mail is more problematic than anthrax and can be as deadly to your computer. Info here: Trend Micro - PE_MAGISTR info Remember, OLD anti-virus software cannot detect NEW viruses. |
| - guru - Friday, 11/02/01 20:04:11 GMT |
|
Olle; I'll be a gadfly and say that before science took a hand in it the "theory" of smithing took up much more space than it did *after* science started rationalizing it! Unfortunately it was almost completely *wrong*. I had never realized that the theory of platonic ideals was still a major force in steelmaking until the last gasp of the 18th! century when folks finally did the science and figured out that it was *carbon* that made iron into steel and not steel being a more perfect version of iron and you "refined" iron into steel...("Sources for the history of the science of steel" C.S.Smith is a must read in this area). It's amazing how much stuff gets "re-discovered" all the time. I remember talking to a blade maker back in the early '80's who was going to make a blade with a gun barrel in the center spine---"just like the one done in renaissance italy shown in the "Arms and Armour Annual"" I asked? He thought he was going to be the *first*. I tell folks don't worry about being first worry about being *best* Thomas |
| Thomas Powers - Friday, 11/02/01 22:16:37 GMT |
|
Its fun to read about you guys ramble on about the stuff that I ramble on about too... |
| Rodriguez - Friday, 11/02/01 23:54:10 GMT |
|
I got the MAGISTR virus a few days ago too! McAffee didn't stop it from bombing eudora, my mail program. I download the update patches at least every two weeks~ looks like I'm gonna have to do it every other day :( terrorists are having a ball making our wonderful American every day life miserable!! |
| Jerry - Saturday, 11/03/01 04:29:01 GMT |
|
MAGISTR - Jerry, then either something is wrong with your installation of McAffee or they don't keep up. MAGISTR is a fairly old virus. However it is self modifying. But good anti-virus software should have a signiture file that detects it regardless. Remember, YOU are your best first line of defense against computer viruses. Be sure all your email software does not auto-execute e-mail attachments. Auto-execute is the default for Microsoft products and it seems that others are following their lead (sheep over a cliff). Turn off the execution word macros. A macro virus is simply a letter written in MS-Word with an embedded macro. Macros in Word can run other MS software including Windows services like sendmail and delete file. . Do not trust odd mail or unexpected attachments even if they are from friends or acquaintances. TROJAN_SIRCAM asks you for your opinion of the attached file. Millions of people have fallen for it (including me). Watch attachments download. My Eudora-Lite shows the double file extensions where stollen files are made executable by the addition of a second file extension. Such as ".doc.pif" or ".dat.exe.". These are almost always virus files. But for some reason Windows98 does not show the second extension indicating the file is executable. . . Even though I have it set to display full file names with extensions. Do not use e-mail client address books. If you get a virus then everyone in your address book(s) will be sent the virus. MS-Outlook and IE are the most susptable but virus authors are now targeting Netscape and Eudora. Keep a text list of addresses outside of your mail programs. The spread of e-mail viruses can be stopped. However Microsoft (Bill Gates personaly) and the other companies following his lead continue to insist that THEY are not the problem. Maybe they have large investments in the anti-virus companies. . . |
| - guru - Saturday, 11/03/01 15:47:17 GMT |
|
guru, long time no talk I hope this finds you well. I am thinking about building a gas forge (something along the lines of a forgemaster (blacksmith model)) only larger, and i am curious about possible fuels, obviousley there is propane, natural gas , coal (i would like to stay away from coal) and i am wondering about home heating oil?? any advice would be greatly appreciated. thank you |
| jeff moore - Saturday, 11/03/01 18:56:51 GMT |
|
Forges Jeff, There are lots of pros and cons here. Most folks use propane because it is more available than natural gas. It is also portable. Natural gas is normaly a little cheaper than propane. NG is distributed under low pressure and sometimes doesn't work with venturi type forges. Industrial folks often have high(er) pressure supplys of NG. On small forges it works fine if they have large enough orifices and you plumb them up with big pipe. Liquid propane (LP, sometimes Butane) is limited by the size of tank. As it evaporates it cools the tank and contents to sub-zero temperatures. The lower the temperature the slower the gas flows. If you don't have a big enough tank (heat sink) you can quickly run out of gas even though the tank is half full. . . One and two burner forges work well on small portable tanks, bigger forges generaly need bigger tanks. As long as you can afford the initial fill up it is not a problem and the gas/oil company will deliver. Fuel oil or deseil forges work well and are easier to forge weld with than gas due to the richer atmosphere. However, this also means they need to be vented better than gas forges. You need a good chimney with both the forge vent and hood. Oil forges can be primitive. Oil dripping into forge with a blower providing air. Or sophisticated, using a small domestic oil furnaces burner (pump, blower, ignitor). |
| - guru - Saturday, 11/03/01 20:39:24 GMT |
|
Guru.. I have just bought a Small Peter Wright at auction ($150 can or $96 US) 0/3/10 for 96lbs I think .... the serial # is 6578 do you have any idea of the age? I've ordered the postman book but it hasn't come yet. |
| Mark Parkinson - Saturday, 11/03/01 22:45:11 GMT |
|
Peter Wright: Postman states that he has recorded all types of numbers and marks on Peter Wrights and believes they may be inspectors marks. No series of serial numbers is give. If under the word "Patent" it is marked "England" then it was made after 1910. In that year a law was passed that all English exports should be marked as such. Earlier PW anvils are dated by style. Good price on the anvil. |
| - guru - Saturday, 11/03/01 23:19:20 GMT |
|
I'm going to make some punches out of 5/8 dia. S 7. What is the forging temperature?How do you harden & temper?I was told to temper in oil & it's tricky to get the best hardness. This is my first time working this material.(Thanks) |
| Dave W. - Sunday, 11/04/01 01:33:45 GMT |
|
Dave W., S7 is either a cold or hot work steel depending on how it is tempered. Forge, start at 1950F-2050F, not below 1700F. Anneal, 1500F-1550F, 25F/hour down to 1000F; then air cool to ambient temperature. Harden, 1700F-1750F up to 2 1/2", air cool. Over 2 1/2", quench in oil till black. For cold work, temper at 400F minimum. For hot work, temper at 900F-1150F. Take slow-rising heats. Forget the heat rainbow spectrum for tempering; you're way above it. S7 is a chrome-moly steel. |
| Frank Turley - Sunday, 11/04/01 03:32:09 GMT |
|
Since I don't have a email for Mr. Postman maybe you can help with this!! Last weeek I purchased the "Anvils in America" book. I read and scanned the book. This weekend I went to a flea market and found a Hay-Budden 128lb anvil (made about 1921). for $125. According to the book this anvil is tool steel from the waist up. The face on this anvil is somewhat pitted. MY QUESTION is : Can the anvil be surface ground, about 1/8 inch, and still have the proper hardness to be used? Most of the edges are gone futher down than 1/8" , But I think I can work around that problem. Thanks!! |
| Benjamin Piccola - Sunday, 11/04/01 03:33:06 GMT |
|
S7. I meant the heat rainbow won't work on the hot work tempering temperatures. It is not recommended on alloy steels in the 400F-500F range, but I have used it with some success. I have taken some cold work tools to a dark straw color, about 465F. |
| Frank Turley - Sunday, 11/04/01 03:37:47 GMT |
|
Help! I've been invited to help demo at a california art + craft fair.. Dave, my mentor, said we gotta dress up 1890 style to make a good show for these fine folks with fat wallets. when i look in my closet, all i can find are denim carrhart pants and five brother welding shirts. is there anything for sale today that compares to this period? thanks, mike |
| mike-hr - Sunday, 11/04/01 04:39:16 GMT |
|
Anvil Surface and Edges: Benjamin, *IF* you can find a surface grinder heavy enough that can be done. I suspect that you will find that pits that LOOK 1/8" deep are more likely half that. I wouldn't try to clean it up 100%. You would be surprised how much you can improve an old anvil using a rotary or belt sander. You can also use an angle grinder but if you are not skilled at making flat smooth surfaces with one it is easy to do more harm than good. Abrasives last much longer when used wet. Test the hardness under the horn and heal first. But there should be plenty of hard material to grind on this anvil. The smaller anvils such as this one hardened much deeper than the larger anvils. Corners need to be rounded. Forgings should not have sharp inside corners. Smooth radi on the anvil help prevent the edges from chipping and make it easier to forge proper corners. If you need sharp inside corners you can leave a short section unradiused but it is better to have an anvil tool to drop in the hardy hole with crisp edges. To prevent chipping and the resulting rough edges it used to be recommended to heavily chamfer the edges of the anvil from about the hardy hole forward to the step. The rest of the edges were rounded. However, since finding used anvils in good condition has become difficult sharp edges have become desirable as a sign of good condition. Some smiths prefer sharp corners. That is their perogative. But the chances of the edges becoming chipped are much greater. On flat industrial hammer dies radii are very specific and are actually elliptical. The larger the hammer and dies, the larger the radius. The gentle part of the ellipse forming a drop off and the tighter part the edge. This allows smooth tapers to be forged on flat dies. I spent a week last month forging with an old anvil that has set outside for 20 years or so (and continues to do so). The general rust pitting did not show in the work. The only trouble I had was one hole in the sweet spot that might have been a torch mark. |
| - guru - Sunday, 11/04/01 05:05:59 GMT |
|
mike do a surch for reanactors (or liveing history) around the time you need most groops have a least one seamstress/tailor that should be able to help you out I know there are quite a few for renn/medivel large groops that work full time at it) hope that helps MP |
| MP - Sunday, 11/04/01 05:12:47 GMT |
|
1890's Dress Levi Strauss invented blue jeans in 1873. www.levistrauss.com Carhart has been in business only since 1960 but bib overals go back at LEAST to 1900 (probably earlier). Shawnee brand has been made since 1903. The Library of Congress has a lot of period photos. So do the Gill Farenwald calanders (same source). Men generaly wore their pants looser than today and most often with suspenders. Blacksmith's leather aprons did not cover the chest but were worn from the waist down. Shirts looked like common work shirts. Occasionaly vests were worn. Hats or caps were almost universal. |
| - guru - Sunday, 11/04/01 06:13:25 GMT |
|
For period type clothing you can look here http://www.wwmerc.com/default.htm or http://www.jastown.com/newhome.htm not as cheap as make do, but..... at least it is fun to look..... |
| Ralph - Sunday, 11/04/01 06:20:44 GMT |
|
mike-hr, what are Five Brother Welding Shirts, are they pull over or button up. Try jastown at jastown.com, they may not be modern enough for you but its a nice resource. larry |
| - lsundstrom - Sunday, 11/04/01 14:47:44 GMT |
|
Hi, my name is Darren, I'm an internal sales rep. for a company called Austral Wright Metals in Adelaide, Australia. We are one of this countries leading non ferrous metal suppliers and as such we get some pretty odd requests. This one has us beat. I need to quote on supply of 3000kg of 0.8mm Diam "TOBIN BRONZE" MIG wire. (Also called RCuZn-C) This is for an export order to the USA, so we would prefer not to purchase it from a company in the US. Can you tell me where I might find this material? If you only know of US companies that can supply it, we will consider them. I hope this is within the scope of your forum, and your response either way would be much appreciated. Kind regards, Darren Reid |
| Darren Reid - Monday, 11/05/01 02:37:33 GMT |
|
I am new to blacksmithing, as a hobby, and still very green. I have not obtained a forge yet. Is there anywhere to get info on the pro and cons of a gas fired verses a oil fired forge? AND are there any plans available for building your own forge?? |
| Benjamin Piccola - Monday, 11/05/01 12:40:54 GMT |
|
can u or or anyone else tell me some facts about "vulcan" anvils?? ie. construction methods, etc. |
| jon mire - Monday, 11/05/01 13:52:35 GMT |
|
My dumb question of the week. I am playing with the microforge concept, but have destroyed a few firebricks attempting to hollow them out. Any thoughts on how to not snap them in half? My limitation is a crappy drill that can only handle a 1/4" masonry bit. thanx! |
| Escher - Monday, 11/05/01 15:27:18 GMT |
|
Firebricks: Just a guess, but I would be a quarter you are using the wrong kind of brick. You should be using the fancy lightweight kind available from ceramic supply places (among others). This kind of brick is very soft and can be cut with a table knife (not the best tool for the job - just making a point). It's also more expensive - about $5 a piece. The hard yellow firebrick that you get in building supply stores will be very tough to hollow out. |
| adam - Monday, 11/05/01 15:56:52 GMT |
|
Somewhere along the line I came across three 18 inch blades to a wood planer for a buck. Thought they'd be decent high carbon steel. I tried the normal methods for annealing (heat to non-magnetic, let cool in bucket of ash, or let it cool in the forge), but this stuff will not get soft. The file skids right off. Any idea what this mystery metal is, and how to work it? |
| Gary - Monday, 11/05/01 16:14:15 GMT |
|
Microforge: Adam is right. If you need a masonry bit then you have the wrong material. |
| - guru - Monday, 11/05/01 16:14:57 GMT |
|
Types of Forges Ben, Just look UP a dozen posts or so for my most recent comparison. The archives are full of them. See our plans page for forges and links to other plans. See blacksmith.forge.cc for modern forge photos. |
| - guru - Monday, 11/05/01 16:23:10 GMT |
|
microforge: Wrong kind of Brick And yes, it is very tough to hollow out. That would explain it, thanx! |
| Escher - Monday, 11/05/01 16:29:12 GMT |
|
Annealing: Those planner blades are either HSS or high carbon steel. If they are HSS then forget annealing them, it takes VERY careful control of process, time, temperature and atmosphere. The high carbon is still difficult but CAN be done. However it requires a maximum cooling rate from the annealing temperature of 20-25°F per hour. Normaly this requires a temperature controlled heat treating furnace but CAN be done using a dry annealing medium of ashes or quick lime if you move very fast. After the first four or five hours the temperature should be below the transformation range and normal cooling permited. However, IF your cooling is slow enough you must know the exact temperature you started at and the rate of cooling to know exactly when more rapid cooling is OK. So just plan on waiting overnight. If the cooling rate is slow enough then the work should still be at a black heat the next day. |
| - guru - Monday, 11/05/01 16:34:42 GMT |
|
Working TOOL Steels in the Shop Normally if you need fully annealed tool steel to drill, tap, saw, machine or file, it is best to purchase NEW annealed material. Almost all finished tool steel is sold in the annealed condition specificaly for these purposes. That is one reason it is so expensive. W1, O1 and A2 are the most commonly available for this purpose. A2 is the most expensive but takes the least heat treating skill. O (oil quench) series grows in size less than the W (water quench) steels thus is better for parts finished to size. A2 is also good for this. When using the W series steels for precision parts you should plan on grinding to the finished size after hardening. Even samll parts of less than an inch will grow a thousandth or more on hardening. In the blacksmith shop you have the option of forging to shape then finishing by grinding. The grinding can be by hand or machine. Some tool steels can be annealed as above but many are air hardening (even those called oil hardening). Full annealing of these steels is tricky and time consuming. It is best to plan around annealing these steels if possible OR start with new material. All tool steels need to be handled carefully. They should be warmed gently before putting in the forge. Thrusting a piece of cold tool steel into a hot forge fire it almost garanteed to produce cracks that may not show up until the part is finished. The rule of thumb is to heat the steel until it is uncomfortable to pick up or hotter before putting it in the forge. This can be done on top of a coal fire but not in the direct flames or on the top or hearth of a gas forge. |
| - guru - Monday, 11/05/01 16:55:52 GMT |
|
Is it possible to replace the babbit shaft bearings used on LG power hammers with bronze bearings, like those that are pressed into bored holes? Patrick |
| patrick - Monday, 11/05/01 16:57:00 GMT |
|
Vulcan Anvil: Jon, The Vulcan anvil with arm and hammer logo are a cast iron anvil with a steel face. See my post above on 11/1 titled "cast anvils". |
| - guru - Monday, 11/05/01 17:12:25 GMT |
|
Replacement Bearings: Patrick, For practical reasons, NO. Machines designed for pressed in bearings have precision bores for the bearings and precision shafts. In large bearings they are usually pressed in and then reamed to size in place. On large items this requires in-line reaming so both bearings are on the same axis. Babbit bearings are poured into rough unmachined (as cast) journals. It is relatively quick and easy to do and is cheaper than precision machined parts. So what is wrong with babbit bearings? Your automobile engine uses babbit coated copper bearing liners on the crank shaft, cam shaft and auxiliary shafts. As long as they are properly lubricated they have a very long life and do not damage the shaft. It is best not to re-engineer machinery unless you are a mechanical engineer with machine design experiance. And don't judge machinery based on hundred year old examples that have been mistreated their entire life. OIL those machines! |
| - guru - Monday, 11/05/01 17:36:24 GMT |
|
Guru, Some specs please on H-13 steel. I was given a couple of pieces the other day, and can't find them listed in either of my Machinery's. |
| Paw Paw Wilson - Monday, 11/05/01 20:05:14 GMT |
|
Escher: I use a mild steel spade-bit. it was enough to make 5(this far) forges in soft insulating firebrick without too much wear. ok just to be a pain here is how i made it in the simplest way I could think of (was intended to be used once or twice max) to make it I simply soldered a 1/16" (1.6mm) sheet rectangle with desired size to a ~1/4" (6mm) round split down the middle with a hacksaw, the lenghth was about 3" (75mm)longer than desired cavity depth, the split should be about 1/2" (12mm) deeper than the "height" of the the blade to leave a pilot tap (to guide the drill some), the tap is then given a square taper, why square? simply because I found that the corners "cut" somewhat and made the bit less likely to wander. hope To help |
| OErjan - Monday, 11/05/01 20:11:16 GMT |
|
H 13, a chrome-moly high vanadium steel. Hot Work. All specs in Fahrenheit. Forge 1950-2100, not below 1650. Anneal 1550-1650, cool per hour 40F max. Harden with a slow rising heat to 1825-1900; quench in air. Temper 1000-1200. |
| Frank Turley - Monday, 11/05/01 20:47:22 GMT |
|
Paw-Paw, I just added an H-13 entry to the heat treating FAQ including Frank's post above. Second page listed under a search of the archives had the bulk of it. . . :o) |
| - guru - Monday, 11/05/01 21:23:24 GMT |
|
Thanks guys. I should have thought to check the archives. |
| Paw Paw Wilson - Monday, 11/05/01 23:06:03 GMT |
|
I have enjoyed the i-forge demos and have been able to replicate many of the projects. Thanks. I am wondering if you could explain in more detail the carving block that Bill Epps refers to so frequently as he makes his animal heads. Thanks in advance, stan |
| Stan Gryde - Tuesday, 11/06/01 01:07:08 GMT |
|
Carving Block: Stan, this is a tool that clamps in your vise. Most have a tringular block that fits across the vise jaws with a bar or angle iron welded to it that fits against the back jaw (normaly). When work is clamped in the vise the bar is clamped with the work holding the block securely with the work. When the work is chiseled or punched the block supports it and prevents it from rotating in the vise. The drawings of Bill's carving block (see horse head demo) shows a heavy piece of square stock with one end cut at 45° rather than a triangular block but the resulting work surface is the same. The first time I saw one of these was at Daniel Boone's (see NEWS). He was demonstrating making on of his famous dragons. The carving block was used for almost all the vise work. Its one of those tools that the first time you see one you say, "Why didn't *I* think of that!" |
| - guru - Tuesday, 11/06/01 02:42:09 GMT |
|
Goal, dinner bell in the shape of a donkey or burro, it could be just the head. any thoughts? Thnx |
| George - Tuesday, 11/06/01 03:51:04 GMT |
|
The first carving block I saw was used by Tom Bredlow in the early 1970s. He was using a healthy round bar as a backup, so the animal head leaned against the radius of the round. The smaller bar to be clamped was arc welded on, kind of a Tee shape, overall. |
| Frank Turley - Tuesday, 11/06/01 04:24:22 GMT |
|
Odd Bell: George, I've made numerous shapes. Hearts, stars and such besides triangles. Symetrical rings better but they all ring. Layout your shape on a table or board and make the bends heating with a torch. I always used a cutting torch as a small heating torch because a rose bud was too big. On an odd shape you might want to estimate the overall length and then start with longer just to be sure. Use 1/2" (13mm) or 5/8" (16mm) bar. I prefered round. Triangle style bells need to have some hardness to ring well. Mild steel works fine but wrought iron does not. When making triangles I worked fast enough to quench them after making the 3 bends in the style I made. In odd ones you may need to reheat the bends and quench after it is finished. Don't overheat to quench. Even mild steel will break if over hardened. It may not be THAT hard but it WILL be brittle. Always hang the bell using something resiliant. String, rope or leather. I always used oiled leather boot laces. |
| - guru - Tuesday, 11/06/01 05:16:08 GMT |
|
George; A more ambitious approach might be to forge up a hollow head out of 2 raised sides which would be welded together. I'd be inclined to use fairly heavy material if you were going to be doing mostly stretching. If you do it in steel, it will be pretty stiff when it gets to shape, despite annealings along the way. Avoid laps and cold shuts...and of course, tune the ears to the resonant frequency of the bell. If you forge it from bronze, it should be at least 10 or 12 ga. It will have a better chance of ringing if you cut him off at the neck. Ding-hee dong-haw eh? |
| Pete F - Tuesday, 11/06/01 08:01:36 GMT |
|
Does anyone know how to make the floral element that looks like a series of balls of decreasing diameter stacked on top of each other? I know you could just weld it up from balls, but it is sometimes seen in old work and I was wondering how this piece was made before the use of electric welders. Thanks Patrick |
| patrick - Tuesday, 11/06/01 14:57:23 GMT |
|
Beaded Element: Patrick, These are used as stamen in flower and leaf motifs. I have seen very old spring dies (esentialy closed dies) to make this element on BIG power hammers. The bar would have a gentle taper forged on it before putting in the die. One heat and about 4 blows the part is done. On this shape it would be best to have two impressions and three steps, taper, block depressions in one axis, then the final shape where the work would be rotated several times to make a smooth shape. That is the industrial production method. Using simplier methods, either hand or power, a mid-ball spring die could be used (see Kayne and Son on-line catalog under swages). Two sizes would probably be enough, three would be very graceful. These elements didn't taper very much. But the number of individual die sizes is up to you. Simplest - Forge a round taper, then - using a lever swage or spring swage with reletively narrow edge and a "hollow grind" isolate the balls. The die to do this does not need to be "a fit" or rounded. Two straight chisel edges (with a hollow grind and rounded edge) will do the job. This technique has the advantage of being flexible. It will work with different diameters and various number of balls. Note that in all cases the diameter connecting the balls should not be too small. The die should be made so that it cannot reduce the connection below a certain size (say 1/4" on 1/2" bar). If I had a lever swage I'd grind a new pair of edges in it. Starting from scratch I'd use round or square bar (spring steel would be good) and make a spring swage with the edges made into the end of the bar. This tool could be used hand held or anchored, hand or machine forging. Welding up a series of balls would be a mess. . . |
| - guru - Tuesday, 11/06/01 16:02:41 GMT |
|
I have been smithing for approx. 10 years as a hobby. I have done quite a few commissions for indoor work and usually [to keep the natural finish of the steel] I WD40 my work then seal w/ clear Behlens spray laquer. Recently I have built a gate for the front of a building here in NYC. I work at a museum exhibit design firm as a day job w/ many designers and architects, but no one seems able to answer this..... .. if we want to keep the original or natural steel 'color' on a piece that is to be outside , what are our options. Is there something clear we can use? One person says that when it comes to steel outside, there is no winning......! We want to avoid painting the piece black. Thanks so much... Michael |
| Michael Sedlacek - Tuesday, 11/06/01 18:35:08 GMT |
|
Michael, Sandblast and powder coat would be the best option, IMO. |
| Paw Paw Wilson - Tuesday, 11/06/01 19:08:10 GMT |
|
Michael, Well, you could wax it every day . . . ;-)} |
| Escher - Tuesday, 11/06/01 20:12:48 GMT |
|
Iron + Nature = Rust This is an absolute. I don't agree with powder coat either. It is an excelent finish BUT it does nothing to protect the steel if the finish is scratched or broken. The only thing that protects is galvanizing or zinc powder paint under the top coats as part of a 4 step process. See my articles on corosion and paint on our 21st Century page. Black paint is YOUR choice. Every color under the sun is available including wonderful automotive metalic lacquers that can be air brushed or overglazed. Finishes can be hand rubbed, brushed, sprayed or any combination of methods. Doing a work of art in steel then quiting when it comes time to finish it is lazy and unimaginative. Hollywood makes paint and plaster look like metal, brick, stone, wood. . . Why cannot blacksmiths make IRON look like IRON? THE BEST OPTION is stainless steel. Fresh forged stainless steel looks just like mild steel. It has the same blue grey oxide coating. When oiled or waxed it blackens the same as steel scale. The only places that will look different are corners or highlights that are polished. These will be whiter than steel which tends to be blue white. Stainless comes in most of the common hot rolled sizes and shapes. It is more expensive than steel and is tougher to work, but then you are avoiding finishing or even thinking about finishing. 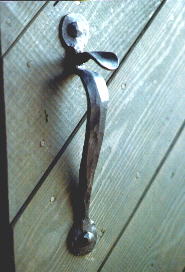
I forged this latch from 304 SS some 23 years ago. It is on the front door of my home, an old grist mill. It is exposed to the elements and the high humidity of being near a stream and mill dam (with falls and mist) in the South where the humidity is already higher than average. |
| - guru - Tuesday, 11/06/01 20:14:14 GMT |
|
Outside Finish: has anyone tried to get automotive colors that match the light and shadow of an as forged and brushed piece? If that's possible, it might work well. Air brushing the darker areas to blend? |
| Tony - Tuesday, 11/06/01 20:14:59 GMT |
|
Michael: Sandblast and powder coat with CLEAR powder coat. The sandblasted blasted steel will show, but will be protected. |
| - Conner - Tuesday, 11/06/01 20:22:49 GMT |
|
Tony, I have not. But I've painted ceramics to look like bronze, styrofoam to look like rock and motorcycle parts to look like a fish (metalic blue fading to silver). For a wrought iron look I would start with one of those dark silver gunmetal automotive metalic finishes. Then I would use a dark grey overglaze in a clear base to tone it down. For contrast a little black (also in clear). Although it makes a hodge-podge finish, varnish or rubbing oil with paint or dyes can be used over the lacquer on places like the top rail and where there is heavy texture. This will fill the creases and holes that are naturaly black and leave the top surfaces as finished by the lacquer. For authenticity some red-oxide should be speckled around. . . All this would be over top of a sandblasted surface with zinc paint and neutral primer. Although expensive air-brushes are popular for this work I always used a standard siphon spray gun for custom work. Spare cans help a lot. Most artists that consider themselves "sculptors" instead of blacksmiths do beautiful jobs finishing their work. They have no preconceptions that "black" is the only color or that the customer should finish the work. . . The materials mentioned above are not cheap. Probably $300 to $500. But it is the right way to do the job. Not in the budget? It should be unless you quoted to do half a job. Explain the finish in your bid. |
| - guru - Tuesday, 11/06/01 20:49:05 GMT |
|
Just got a card from ABANA. I will not renew. I feel that I got very little for my membership fee and I found their heavy handed way of dealing with the anvil shoot business thoroughly distateful. I do enjoy reading the two magazines they send me, but their quality is second rate and I would much prefer to spend my money on Jerry Hoffman's excellent publication. Their website has only a little content and this has hardly changed over the last year. If I do decide to attend one of their conferences, I will buy a membership just for that purpose. Otherwise, as a hobby blacksmith, I feel ABANA does little for me and my "patriotic" sentiments have been soured by the anvil shoot dispute. |
| adam - Tuesday, 11/06/01 21:09:17 GMT |
|
My membership was due for re-newal in September. I didn't re-new. Also sent a letter addressed to the board explaining exactly WHY I was not re-newing. Have not had any response, and don't expect any. |
| Paw Paw Wilson - Tuesday, 11/06/01 21:28:40 GMT |
|
Zinc Outside: Just a note. Product Finishing magazine has an excellent Q&A section. Last month someone asked about the differences between Hot Dipped Galvanizing and sprayed or brushed paint cold galvanizing. The answerer gave a description almost identical to what the guru has in the corrosion piece. Including the need for a topcoat. But further explains that the quality of the epoxy (hopefully) in the cold galvanizing and the zinc powder or flake content is all important. My experience with powder coat is that it is good, but the coating must be PERFECT if it's expected to last more than a year or two in a road salt environment. And go for the more flexible variety. The hard brittle coatings fracture if the base metal flexes or if there is significant thermal expansion. Personally, I don't think you've really lived until you do gold gilding. What a PAIN! And not durable in most applications to boot. |
| Tony - Tuesday, 11/06/01 22:08:34 GMT |
|
Hi ,I am using a small kiln to normalise my hand forged blades.When I take them out they are covered with black silver scale and underneath a fine layer of red rust. Is there anything to coat them with to prevent this.The layer of rust was really surprising.Thanks,Chris |
| chris makin - Tuesday, 11/06/01 23:50:39 GMT |
|
can you advise me as to antiqueing copper or direct me to a source or book? |
| don harnish - Wednesday, 11/07/01 02:53:31 GMT |
|
In THE AMERICAN BLACKSMITH,Volume 11 Number 12 ,Sept. 1912 there is a add for Peter Wright anvils. A picture of a blacksmith standing holding a bowl with one hand and the other hand dipping water out on to the anvil face with a quote ( Preserve Your Temper By Keeping Anvil Face Cool )Was this a sales pitch or was they worried about loosing the temper of the anvil? Being back then smiths worked metal for 10 or more hours a day? |
| Dave Wells - Wednesday, 11/07/01 04:56:09 GMT |
|
One of my clients does phosphatizing and powder coating for the telephone boxes that sit outside year after year as well as other applications. They have to stand up to a 'ding' test as part of the QA/QC. This seems to me to be a very rugged finish that would rank up there with the galvanizing/paint process. It is the type of finish that would need to be farmed out or set up your own plating shop. What is your opinion, guru? |
| Mills - Wednesday, 11/07/01 04:59:33 GMT |
|
This isn't really to ask any advice, though I'm sure I might need some later on down the line. I'm really just wanting to know if theres any bladesmiths out there with a battle-ready katana made in the ways of the old Japanese people. If so, I'd like to know if they'd like to sell the blade, and for how much. I'm fairly confident you might not answer this, as it isn't for advice, but if you do, thanks for your time, it's greatly appreciated. And I know my spelling stinks |
| Timothy - Wednesday, 11/07/01 05:13:57 GMT |
|
Protecting Steel During Heat Treatment Chris, on small scale setups stainless foil is the best solution. After that an inert gas atmosphere is the most common system used. Reheating oxides under certain conditions changes the type and color. Iron dust from forging that is embeded in the surface scale often turns red. |
| - guru - Wednesday, 11/07/01 06:12:34 GMT |
|
Antiquing Copper: Don, I'm told a paste made of water and "miracle grow" fertilizer does a good job making a blue green oxide. Dark brown can be made easily by cleaning and heating. MACHINERY'S HANDBOOK has numerous methods of coloring copper but most of the chemicals are pretty nasty. |
| - guru - Wednesday, 11/07/01 06:17:20 GMT |
|
Overheated Anvils: Dave, after working several hours on smallish work (fireplace tools), I've had anvils that were uncomfortable to touch. Working heavy stock it is easy to heat the anvil to temperatures well into the tempering range (over 350°F) and possibly soften the anvil. This is one reason heavy work needs to be done on heavy anvils. I've also had hammers much to hot to touch. . . This problem also occurs in power hammer dies. In fact the heat conducts up the ram and cause a tight fitting ram to lock up. On self contained hammers the extra heat can lead to diesling. . NOT a thing you want to be around. Yep, you need to keep those anvils cooled but not cold. |
| - guru - Wednesday, 11/07/01 06:27:55 GMT |
|
Folding brass rule, Do you have a source for blacksmiths' folding brass rules. My blacksmith class wishes to buy one for each student. It would be better for us to find the manufacturer rather than a supplier. The US or Britain would be Ok as we are in Australia. |
| Garry - Wednesday, 11/07/01 06:27:58 GMT |
|
Hot Anvils. "If your anvil ain't too hot to sit on by lunch time, you haven't been workin'". This expression was supposed to have originated with an old Nebraska smith. I don't know why, but forge visitors often lolligag in the area of the anvil [while I'm working]! I love it when they lean on the anvil, when the anvil is too hot to touch. |
| Frank Turley - Wednesday, 11/07/01 12:56:01 GMT |
|
Paint finishes, Lately I've been using high temp black as a base and then using a dry brush technique to impart a brushed finished to painted work. At one of the paint stores in my area they sell little jars of oil based silver, antiqued pewter, etc. Buy a stenceling brush, round, short bristles, buy as many different silvers as you can, plus some black of the same brand paint. BTW,when you re going to paint a piece, up the texture level. You need those ridges for the highlights. Now the DRY brush part. Get some paint from the cap of one of the silvers you bought. Better yet mix yourself alittle black or use the pewter or antiqued silver. Now scrape all the paint off on a dry brick. Rub the brush on your hand. When almost no color comes off then brush your black piece, working the high spots. A little silver paint goes a long way. Then finish up using the brightest silver you have on the highest of the high spots. This part goes very quick. You will be surprised what you can do with paint. But its also alot of labor. One more thing, a fella in CA told me yesteday that he rolls his SS in coal dust before forging to give it color. How about that. |
| Pete-Raven - Wednesday, 11/07/01 13:10:04 GMT |
|
Hi, I'm not sure if you can help me, but I am a fashion design student and I wanted to create a collection using handcrafted sterling belt buckles. I have no experience with jewelry making and don't know where to begin. If you have such knowledge can you please start me off with the tools and type of supplies I will need. Thanks for your help! |
| Melissa - Wednesday, 11/07/01 13:26:11 GMT |
|
water on the anvil I seldom work so big and hard that my 200 kg anvil gets to warm, sometimes i still put water on the anwil and the hammer, not to cool it but to get a better surface on my object, the oxides explode off, a few hits with the hammer and the surface is smooth, no little holes, no rough surface, saves a lot of finishing time, especially on knives, I have to cool my hammerbits on the powerhammer |
| Stefan - Wednesday, 11/07/01 14:07:06 GMT |
|
Jewelry: Melissa, Design of metalwork is like the design of anything. First you have to know what can and cannot be done with the material, what processes are in your scope and what has been done before. In other words, you need to study the art. OR go the experts. Over the years I have made patterns for my own cloths. Custom vests mostly (simple). And I can sew by hand or machine including using most of the attachments. I know about seam allowances and darts, selvedge edges and diagonal stretch. But does that make me a fashion designer? No. I don't know the difference between taffeta and organza much less one type collar from another. Metal work is the same. Not only are there many processes to learn you have to know how to apply them. There are also specialties within metalwork. Making Jewlery is one. And like anything worth while it takes a great deal of study of both the processes AND design. Jewlers, like most metalworkers use almost every process they can apply. Forging, casting, piercing, raising, turning, soldering and welding. All these processes can be applied to silver and are often applied in combination. The simplest jewelry work is done by piercing. Sheet stock is drilled and sawed. The brilliance of silver with pierced patterns against a dark background is often used. See our iForge demo #87 on the Heart Spatula, figures 12 through 15. A Jewlers saw and piercing is shown. This technique is most often applied to thin material between 1/32" and 1/16". The metal is often textured (after peircing). A hammered texture with all its facets creates "glitter" and gives the metal "body". A small anvil or a series of special anvil shapes is used in silver work. Hammers of various sizes and shapes are used but a ball pien is most common. After sawing and or hammering the metal will need to be polished. This can be done by hand with abrasive compounds on rags after using fine sandpaper. However, it is most common to use a motorized buffing setup with sewn cotton wheels. These come in hard and soft. The buffing compounds most commonly used are Trippoli and rouge. The rouge is very fine and is only used for improving the final "color" of the finish. Most of the work is done with the Trippoli. However, for deburring and cleaning up castings a resinoid or rubber wheel impregnated with abbasive is also used. Most Jewlers have several motor buffers with two wheels of different kinds on each. Polishing is an art in itself. See my comments on the subject on our 21st century page under "Polishing X". To make a belt buckle by the piercing technique you will probably need to solder or weld the pin and loop to the back. To learn these techniques you NEED to take a class. It will cover techniques, tools and safety. A VERY common method of producing silver jewelery, especialy buttons and buckles, that has been in use thousands of years is lost wax casting. In this method the entire object OR parts of the object are modeled in wax. This is often beeswax but today there are blends that are hard and soft depending on the application. Beeswax is modled by hand but there are also waxes designed to be machined and carved with sharp tools. Once the was original pattern is made then sprues, gates and vents are added. These are places for metal to be poured in through, to feed shrinkage and to vent gases. The pattern is then supported in a mold box and plaster of paris poured around it. After the plaster is throughly dry the plaster mold is heated to melt or burn out the wax. YES, your original is lost. That is why it is called "lost wax". The mold is then heated to over 1,000°F to cook out all the water including some that has chemicaly combined with the plaster. This is called calcining. While the mold is still hot from calcining the metled silver is poured into it. After the metal cools the mold is broken open. Now the hard work starts. Castings look like dung. The gates and sprues must be cut off with a saw or grinder. Then the surfaces filed, sanded and polished. Designing the gates and sprues is an art in itself. Done improperly the casting will fail. In the case of lost wax this is a disaster because the original is lost. If more than one of an iten is to be made permanent patterns are made and molds made from the patterns. The difference hear is that the pattern must be able to be extracted from the mold with damaging the mold. Patterns require "daft" the taper that lets them be extracted and a "parting" where the mold will be split. Pattern making, molding and casting are all seperate arts that most jewelers learn and use. These also require considerable investment in equipment. I could go on for several pages and not get into specific details. Get the point? |
| - guru - Wednesday, 11/07/01 16:28:00 GMT |
|
Melissa; a great place to *start* is to take a beginning jewelry course at a local college or community college. These are often offered as no credit "out of hours" classes that don't hog a lot of time or money but get you into thye shop with trained people *making* stuff. Locally they usually start with a fab class and the intermediate class is casting. If you just want to farm out the work a college student in the art dept is generally *MUCH* cheaper than someone trying to support their family silversmithing... Thomas (note that sand casting is an easy and fast way to go for items that meet it's criteria!) |
| Thomas Powers - Wednesday, 11/07/01 16:48:15 GMT |
|
Once again I find myself needing to reline my furnace; can anyone direct me to a source of kaowool or inswool that will sell me a 3' x 4' piece? I really don't want to buy an entire 1000' bundle. Thanks, Dan |
| Dan Davis - Thursday, 11/08/01 01:40:42 GMT |
|
I am looking for the website of Bill Epps of Texas, can't seem to locate it. my brother is the beging blacksmither, reads off an add. out of a book and it dos'nt work. app. any help sin. dale |
| dale - Thursday, 11/08/01 02:21:37 GMT |
|
Kaowool: Dan, I bought a bundle of 2" x 24" back in the spring with the intention of breaking it up into kits for making freon tank forges. Write me with the exact amount you need and I'll check the price tommarow and give you a quote. |
| - guru - Thursday, 11/08/01 02:28:24 GMT |
|
Dale, click on "The Gurus" on the top of this log, his web address and email are listed. His e-mail is also listed on all of his iForge demos. His web address is: www.besmithy.com |
| - guru - Thursday, 11/08/01 02:32:35 GMT |
|
Sandcasting: Last June at Camp Fenby a jeweler was demonstrating brass and pewter casting (silver would be the same). He used small cast iron flasks which is not unusual but was very convienient. What WAS unusual is that instead of water bound greensand he used gliserine to wet the sand. The gliserine does not evaporate like water (it does but VERY slowly) so once the sand is properly tempered (wetted to the right consistancy) it can be used and reused over and over without re-tempering. If kept in a sealed container it has a very long life. The gliserine also adds a little stickyness to the sand so that less is needed compared to water. Even an ancient technology like hand molded sandcasting still sees occasional improvements. |
| - guru - Thursday, 11/08/01 03:05:21 GMT |
|
re Painted Finishes: I've read the guru's repeated comments about coating work for outside, and really taken it to heart - I have a rusting 6 month old piece that I originally coated with so-called "kill rust" enamel. Does anybody have any other ideas for decorative finishes for indoor work? I've seen all sorts of interesting oxide finishes - red, blue, etc. But how do you do it? Are there any good reference on this? |
| richard - Thursday, 11/08/01 03:32:30 GMT |
|
Jewelry: Melissa, Sorry about the long round about tirade above. Thomas's response was much more concise. As a designer you should concentrate on design and let others worry about executing the designs. It is best if you understand the techniques used but you don't need to do it yourself. There are three options to silver. Pewter (mentioned above) is mostly tin. It has a lower melting temperature and is a little softer. But it is nearly as bright as silver and much cheaper, "costume" silver. The lower melting temperature makes it easier to melt and cast. The softness makes it easier to work. Another option is stainless steel. It is more commonly available than pewter or silver and is often used to replace silver jeweley just as it has tableware. However, do to the difficulty of working it, stainless jewelery is often more expensive than silver. For people that have metal alergies this is one of their few options. Stainless has too high a melting temperature to cast in small operations and it is more dificult to weld than the nobel metals. However, it is workable with common blacksmith's tools and techniques. Its more difficult to polish than the softer metals but it doesn't tarnish and is harder than silver. One useful feature is that forged stainless is black. Textured surfaces can have the highlights polished leaving the lower areas black. Great contrast. Then there is aluminium. Most of what I said about stainless applies except it is softer and much easier to polish. It is great to carve, sawing, chisling and filing easily. It can be forged cold if annealed. The most difficult thing to do with aluminium is weld it. |
| - guru - Thursday, 11/08/01 03:36:53 GMT |
|
Oxide Finishes: Richard, MACHINERY'S HANDBOOK has numerous chemical oxide finishes, then there are the gunsmiths references on "Blueing and Browning". Other than "niter blue" (gun bluing using nitric acid + ) color oxide finishes are "temper" colors, the color oxides that form on steel at modest heats. All color oxide finishes require absolute clean polished steel. Using careful temperature control brilliant temper colors can be applied to parts. These can be evenly colored (even temperatures) or varigated. The cleanliness and careful heating dictate that pieces to be temper colored be relatively small (unless you have a large buget). All oxide finishes on steel are mearly carriers for oil or wax that must be reapplied on a regular basis. The temper colors are very thin (just the surface molecules) and should be protected with clear lacquer. Since temper colors need absolute cleanliness to be applied, the part is ready to lacquered as soon as it is cool enough. |
| - guru - Thursday, 11/08/01 03:58:36 GMT |
|
I plan to smith through the winter. My forge is in an unheated shed so I'll have to dress warmly. Most ski jackets and parkas are made of synthetic fabric. Most of these fabrics are highly flammable (except kevlar and nomex, as far as I know). But I have never seen a warm kevlar jacket. Are there any other coat materials that are not flammable? I suspect that wool will work, and a leather apron covering is a good idea. But the latter will not cover sleeves. Montreal weather is much like that of minneapolis-St. Paul. (read COLD). Any ideas and suggestions would be gratefully appreciated. Regards, Slag. |
| slag - Thursday, 11/08/01 05:45:12 GMT |
|
I wear an old bike jacket the thick leather keeps the burns away and it is line with flanel so it is warn (though it isn't nearly so cold here in CT) might want to insalat the shed my old shop was in a uhheated garage that was insalated (I am now out doors) and the heat from the forge along with my body heat warmed the shop up to the point I could work more or less comfortablely in a flanel shirt hope this helps MP |
| MP - Thursday, 11/08/01 06:38:11 GMT |
|
Slag, Before I built my smithy i also worked outside. I live in Massachusetts, gets cold here in winter too. I wore a thermal shirt , then a cotton t-shirt, then multiple layers of wool. That kept the core body temp warm. The most important thing I feel was to keep my feet warm. I wore a good pair of LaCrosse boots with heavy felt liners, the ones I used to go deer hunting with. Feet warm , body warm , hands....no problem forge warmed them . hope this helps. Mark |
| Mark - Thursday, 11/08/01 09:00:45 GMT |
|
Slag, Quilted Carhart Bibs. There's no reason not to wear a leather apron winter, summer, spring or fall. Leather jackets aren't to warm but would protect a down filled vest. what about hands? Larry |
| - lsundstrom - Thursday, 11/08/01 13:00:06 GMT |
|
Just a personal note. Any straps going over my shoulders or around the neck cause me to go ape, especially while working during the hot, sultry, summer days...and that includes, bibs, leather aprons, and galluses. You can wear'em if you wanta'. |
| Frank Turley - Thursday, 11/08/01 13:34:19 GMT |
|
Winter smithing: Slag, I'm in WI. And my lean to smithy is unfortunately on the North side of the garage and open to NW winds. I go through work clothes like candy. So I recycle. Lately, I've been using surplus NATO miltiary coats. Button in liner, hood, big slash pockets. Olive drab non plastic fabric shell. $15 from some of the surplus places. Buy next size up from normal. To protect from burns and add another layer, I use the green treated cotton welders jackets. Last batch I bought were $15 also, from weldersmart.com I think. Carhart is great stuff, but pricey and I go through them fast too. I do use their double front jeans. Tough as iron and two layers before they are junk. I'll wear just about anything but pink and purple. A fashion statement I am not. Bigger problem is getting and keeping the anvil warm. Two clothes irons from the thrift store and a bungee strap and a blanket. I wish I could remember who gave me that tip. It was a good one. |
| Tony - Thursday, 11/08/01 13:36:43 GMT |
|
Sandcasting: I use petrobond oil sand---its very fine---we've accidently transfered fingerprints off a positive before! It seems to last quite a while. I'm still using a container I bought 10 years ago at a school auction and have not added any more oil/catalyst to it. I'm carefull to remove the burnt stuff and save it for backing material. Wool is *good* wool mixed with nylon or other synthetic fiber can be bad news. They use 100% wool blankets for beating out brush fires; before kevlar it was used for fire suits. When in historical clothing I use linen next to the skin and then layer the wool tunics on as I warm up I can shed layers. Note building a platform to stand on say 3/4" plywood with 1" foam insulation underneath it can make your feet a *LOT* happier. Thomas trucking the forge to an SCA event Saturday |
| Thomas Powers - Thursday, 11/08/01 14:46:15 GMT |
|
Hey Tony, A leather apron will double the life of your work clothes, and knock 50% off you clothing bill. Besides, it increases safty and reduces the number of wire brush ends in the belly. larry |
| - lsundstrom - Thursday, 11/08/01 15:38:03 GMT |
|
slag - I am in the same boat, in St. Paul. Everything mentioned so far works great. Buy the best insulated boots you can and layer everything else. Always make sure the outside layer is thick organic (cotton, wool, etc). Presuming that you have as much wind as we do, erect a simple windbreak, this will add many relative degrees to how you feel. And electric socks, definitely good for the long stays outdoors. I use charcoal which tends to give off more sparks then mineral, but then again, I don't break the chunks down enought either ;-). stay warm . . . |
| Escher - Thursday, 11/08/01 15:40:34 GMT |
|
Apron: Yeah, but Larry, I can't run fast enough in an apron. |
| Tony - Thursday, 11/08/01 16:32:35 GMT |
|
I recently tried my hand at forging some 304 stainless. All went well except I ended up with some thin flaking of the metal on the finished forging. I thought it was scale, but it is actually a thin layer of metal that has to be filed off as it is sharp and unsightly. I don't believe it was a case of cold shuts as I am careful to avoid that. I was forging at a bright red to orange heat. Was that too hot and causing some separation of the alloy? Thanks for your help. |
| Dave C - Thursday, 11/08/01 16:34:10 GMT |
|
Apron: Tony, that is one reason why farrier's aprons are split! I cut the bottom 8 to 12" off the bottom of a standard welding apron because I can't stand it being on or below my knees. Leather Sleaves: Ask your welding supplier. These are a common addition to aprons and gloves. Bibs. . I never wore suspenders OR bibs until a few years ago when I gained too much weight from sitting at the desk and PC drinking way too many soft drinks (I have cut out the soft drinks, H2O only). Now I can't do without either (bibs or suspenders). Bibs are about the only thing I have to wear these days but I would love to be able to go back to jeans. You get used to what you must. . . . |
| - guru - Thursday, 11/08/01 16:37:26 GMT |
|
Wish all I had to deal with was cold weather.. Yes my 'shop is outdoors', But here in the PNW I get to deal with rain more than cold in the winter....... |
| Ralph - Thursday, 11/08/01 17:06:37 GMT |
|
SS Problems Dave, I have found that in general SS has more problems with cold shuts AS delivered, especialy in hot roll bar. It also sounds like you may have been working too cold rather than too hot. What was the source of your SS? It is common in the nuclear industry to chrome plate SS to provide a hard surface and to prevent galling. This is especialy true of fasteners. Plating would cause what you describe but is speculation. |
| - guru - Thursday, 11/08/01 18:03:55 GMT |
|
Dave C: 304SS at a bright red? You're a better man than I! I have to get it to at least a full yellow before it moves. I've had that "sharp scale" phenomenon too, though, and I know my SS wasn't plated. |
| Alan-L - Thursday, 11/08/01 18:29:54 GMT |
|
Guru, I dont have any experence working with a forge. I weld and fabricate but I,m really interested in the blacksmith trade. Could you advise me on some books to get started,and where I might buy a forge and the proper equipment. Thank you, trkbyer |
| trkbyerjr - Thursday, 11/08/01 19:00:55 GMT |
|
trkbyerjr, Click on the "Getting Started in Blacksmithing" link on the bottom of this page, it'll tell you everything you need to know! |
| Mike Roth - Thursday, 11/08/01 19:25:43 GMT |
|
Jock, what's the best way to do curves on a metal lathe? larry |
| - lsundstrom - Thursday, 11/08/01 20:56:18 GMT |
|
Curves on Lathe: Larry, Freehand unless you have a CNC machine. If you need spherical surfaces there is an outfit that makes a "ball" curve turning attachment. If you need repeat parts then you have to do a little rigging. Off the front of the tailsock you hang a metal template cut from 10ga (3/16") plate or heavier. On the cross slide you attach a bracket for cam roller (1/2" to 3/4"). This lets you change depth of feed using the compound rest without changing the position of the template. Generaly this means drilling and traping a couple holes in the crossslide. Then, with the cam roller set at the point were you will be taking off the most material set your tool against the work ("take a touch"). The back up along the template and reset the depth of cut using the compound rest. Use both feeds to keep a light pressure against the template while you feed the carriage manualy. It is best if the template is seup so that YOU have to feed toward it rather than the teplate trying to push the crossslide back - it can't. If your lathe has a taper attachment then its possible to jury rig a similar setup using a bent bar and two cam rollers so that the template (the bent bar) both pushes and pulls the cross slide in and out. To machine dish or cup shapes where the carriage must follow the template then the cam roller is attached to the carriage via one of the boring table anchor holes (if your lathe has them). |
| - guru - Thursday, 11/08/01 21:24:59 GMT |
|
tailsock = tailstock. . . . I use an old tapered drill arbor with a flat machined horizontaly and a drilled and tapped hole. Then you bolt the template to the special taper adaptor. Don't forget to lock down the tailstock and feed screw. |
| - guru - Thursday, 11/08/01 21:28:42 GMT |
|
Hello Jock, Are you familiar with anvils from Old World Anvils? I'm having a heck of a time finding a used anvil in my area that doesn't look like it has been used for mortar practice here in Illinois. They offer "solid, high carbon steel" anvils. Any Thoughts? Thanks...Dave |
| Gator - Thursday, 11/08/01 21:41:59 GMT |
|
took an old wood splitting wedge hammered out a hardie shaft widened the blade then folded it over on itself a couple of times hammered to 3\8" and ground smooth. in your opinion, will this harden and temper in to an effective bottom fuller? |
| - jarhead - Thursday, 11/08/01 22:06:34 GMT |
|
Jarhead. Yes, unless it unrolls in use. Even a 3/8" mild steel rod, un-heat treated, will last quite a while as a bottom fuller. Put a bend in it, so it doesn't roll off the anvil, and go to work. It's what we called in the army, a "field expedient". |
| Frank Turley - Thursday, 11/08/01 22:47:34 GMT |
|
Jarhead, I've done the same except no folding and it hardened to file skating hardness in cooking oil, tempered to straw on the working edge. It takes a beating. I made a straight peen hammer from one too. Mine were old collins brand. Don't know if all brands are the same steel. I said weldersmart.com in post above. It's actually weldingmart.com The green fireproof cotton welders jackets are $13 and full leather welders jackets are $43. They have good cobalt drill bits too. And they have sleeves separate. I know what you mean about straps in warm weather Frank. I only wear bibs in cooler weather. That way I can tuck in the thick tails of the quilted shirts I wear. Split apron... maybe I'll try one. But if it slows me down enough that I get caught, I know who to blame. |
| Tony - Thursday, 11/08/01 22:55:59 GMT |
|
Jock, I have the kind of tool holder that will hold four tools. It pivots on the tool post. What would happen if I 1. mount tool on left side of block pointing towards work. 2. mount a long bar on the other side of the tool block for a handle. 3. snug down the swivel screw but not tight. 4. engage the power feed carriage very slow. 5. as the carriage moves across the work, vary the depth of the cut with the handle on the tool block. I know this would be free hand and not a good way to make repeat parts but would it work for one of the kinds or be unsafe. I have already made a ball in the middle of a piece of 1/2" square stock. It takes a while, reminds me of 'etch a sketch' because you have to turn the apron handwheel and the cross feed knob at the same time. I would like to make slightly more complex (and have) curves and then use the as the masters for dies. What is a cam roller? I wish there was a easy way for you to sketch on this page cause this head full of mush has trouble changing words to pictures in my mind. Thanks for your time. larry |
| - lsundstrom - Thursday, 11/08/01 23:48:57 GMT |
|
|
|
|