I have a Peter Wright that appears to have been painted Black during its life. Would it be better to remove old paint or leave it painted? (Collector/resale wise) Was painting of anvils common? I can only assume it was to inhibit rust.
|
|
mike
- Wednesday, 09/16/09 05:21:00 EDT
|
Hello from Georgia,
I just obtained an anvil with hay-budden manufacturing co and it looks to be brooklyn ny with 9-5 under that.
It also has 77 stamped on the reverse side ann 180147 on the base. do you know if this is a worthwhile anvil to be using for a beginner? Thank you, Perry
|
|
Perry Bourlet
- Wednesday, 09/16/09 07:08:47 EDT
|
Dave, Instead of bolts through try a couple clamps around. Like hose or muffler clamps.
|
|
JimG
- Wednesday, 09/16/09 09:43:21 EDT
|
Guru, grant, JimG, thanks for the suggestions. I will try them out. I may also try welding a short pipe on as a socket to slip the handle into. Thanks again!
|
|
Dave F
- Wednesday, 09/16/09 10:06:28 EDT
|
Anvil Paint: I've seen them every color from pink to sea-foam green. This is due to industrial painters that are told to paint anything that rusts. . .
But from the factory they were probably painted black to reduce reduce rusting in shipment. I know at least one brand that their ads specifically stated a black "tar oil" coating. Modern makers paint anvils black OR lacquer the machined face with clear and paint the body black.
Aside from sloppy industrial painters most anvils lived their life with a coating of rust that was occasionally oiled. Paint does not last long on an anvil that is in use. Heat, scale, rubbing and normal use tend to remove much of the paint. In the past I've painted both of my main anvils to photograph them. I only paint the others when damp and rust is a problem.
As for resale that is a difficult question. The dealers that are getting the top dollars are wire brushing off all the paint, rust and original scale then waxing them. Anyone in the antique establishment would say you have ruined the value of the item by stripping and refinishing it.
The problem with anvils is that what many people consider collectible antiques are just old classic usable tools by others. It is not unusual to see 180 year old (sometimes older) anvils in daily use in busy blacksmith shops.
|
|
- guru
- Wednesday, 09/16/09 10:09:10 EDT
|
Perry, That is a great old anvil. Hay-Budden is considered one of the best of the American makers. I suspect the weight is 95 pounds which makes it a good weight for everything except heavy work. A perfect starter anvil and a good long term portable anvil.
|
|
- guru
- Wednesday, 09/16/09 10:12:25 EDT
|
Does anyone know how to clean up a flame cut with out a grinder? i think i will have to hot-rasp the cuts smooth, as i have no other option to clean it up.
|
|
bigfoot
- Wednesday, 09/16/09 13:21:55 EDT
|
Bigfoot, The HAZ of flame cuts can be very hard and will often wreck cutting tools of all sorts. This leaves grinding as the best option. Second to this I've found a cold chisel to be better than a file. You can easily resharpen a chisel but broken file teeth are forever.
|
|
- guru
- Wednesday, 09/16/09 14:05:44 EDT
|
I think Guru missed that you said "HOT rasp". If that's your only option, it should work fine, the edge will no longer be hard once heated. The reason it's hard is that it cools so fast from the flame cutting. Once heated in a forge, you could cold file it after cool down.
|
|
- grant
- Wednesday, 09/16/09 14:43:11 EDT
|
I sort of overlooked that. . . I've seen a lot of poorly cut steel that appeared to have absorbed carbon from the flame resulting in very very hard spots in the cut. Working those at a red heat MIGHT help.
Even with a grinder at hand I start the clean up of rough torched work with a chisel to remove those hard droplets and slag that accumulates at the edges. But how you approach these things depends on the cut. Flame cutting can vary from as smooth as machined to a jagged burnt saw edge.
I cannot imagine cleaning up bad flame cutting without a grinder.
|
|
- guru
- Wednesday, 09/16/09 17:08:37 EDT
|
Guru and I are looking at two different aspects. Are you talking about removing the slag or smoothing the edge?
|
|
- grant
- Wednesday, 09/16/09 18:14:11 EDT
|
I find that knocking the droplets etc off a burnt edge greatly speeds grinding and saves abrasives.
At the boiler shop the standard routine was to use a 2# ball peen and hammer the burnt edge at a 45 along both corners of cut. This knocks off maybe 60% of the crud. Then a nice long chisel and perhaps a 4# hammer more tapping than swinging will give a fair edge.
If a nice edge was needed for a machined surface, they stopped at this point, no grinding as they left machine allowance on and ran a roughing carbide in under the burnt crub both cleaning up the edge and popping off the Haz.
I like to do the hammer then chisel then a hard wheel in a 4.5" grinder, and then a quick blend with a flap wheel.
|
|
ptree
- Wednesday, 09/16/09 18:47:02 EDT
|
i am referring to both. i am going to do this HOT ie. like orange/yellow i have a couple of bastard files that i need to smooth the face, and weld droplets. it was cut with oxy/ acetylene. am thinking to save time to use a felling axe (beat up and crappy anyway) to cut the end off and clean that up. my angle grinder was stolen so that made this a challenge. the cut is pretty good actually, and i do not think that with a grinder it would take more than 20 minutes. thanks for the help and i have a buddy who wants a knife who may help (i am a newbie smith but i think that i am ok to make knives as the one i made for me has held up to use by a 12 year old). this will probably get done pretty soon, thanks again.
|
|
bigfoot
- Wednesday, 09/16/09 20:21:09 EDT
|
By the way, when i use the felling axe, i will use it like a hot cutter, no to actually cut it like i would a tree.
|
|
bigfoot
- Thursday, 09/17/09 07:00:09 EDT
|
Bigfoot, Note that the eye on an axe will not withstand a lot of pounding. The flat poll is for taping in wedges and other such light work. Those that use them with a sledge for splitting wood wreck them.
|
|
- guru
- Thursday, 09/17/09 08:45:38 EDT
|
i knew that, but the axe is bad anyway. i think that i may just flatten and sharpen a long section of leaf spring, and use that as a cutter. i have another day to figure this out so i will probably over think this.
|
|
bigfoot
- Thursday, 09/17/09 09:05:14 EDT
|
The other day I had to make a repair on a shoe buckle at work. I used a hatchets flat side as an anvil and a carpenters hammer to forge a nail into a flat buckle pin. An excersize in futility, but I got it working. You'd be surprised how much you can do with so little.
|
|
- Nippulini
- Thursday, 09/17/09 09:13:21 EDT
|
I've taken to keeping some tools at work besides the ones in the truck. It's amazing how many piddling little jobs appear that the PhDs in astrophysics can't figure out how to do...
Thomas
|
|
Thomas P
- Thursday, 09/17/09 10:07:15 EDT
|
Nip, the other day at work I had to make some "adjustments" to a piece of 1/2" steel rod that was beeing used as a spindle stop on a lathe.
The operator had somehow turned the last 6 inches or so into roughly the shape of an "S".
Without even thinking about it I grabbed a 4# cross pien from my tool box and took the stock over one of the 8" diameter by 8" long pieces of stock I was working on my machine and, had the rod straightend out and on the bench befor he got back from the stock rack with a new piece.
He came back and looked at the piece of rod I had fixed for him and said "Where did you have that piece hideing?"
I pointed to my hammer and he says" Oh, yeah I should have known..."
|
|
- merl
- Thursday, 09/17/09 10:16:08 EDT
|
Old wood splitting mauls are closer in shape to a blacksmiths tool having a heavy body and small eye. The difference is going to be the steel is probably lower carbon in the wood splitting tool. But you never know.
|
|
- guru
- Thursday, 09/17/09 10:23:15 EDT
|
thanks for the idea guru. i think i may use that as a cutter.
|
|
bigfoot
- Thursday, 09/17/09 10:49:18 EDT
|
Places for anvils: After having been in smithing a while it is difficult to work in any kind of metal working situation without an anvil and a heavy hammer. The simplest straightening tasks are sometimes almost overwhelming without a good heavy flat surface to work on (other than machine beds!!!). Often it is not even a metal working situation but any kind of shop or studio.
I've had use for smiths tools in auto garages, machine shops, artists studios and potteries. While a complete set of tools is not needed the basics sure are helpful.
|
|
- guru
- Thursday, 09/17/09 11:02:14 EDT
|
PLACES FOR ANVILS: i think that all a person really needs is a heavy steel block, a hammer and tongs. which, is what i have. the rest of my tools i make and improvise. and anyway, it is good practice.
|
|
bigfoot
- Thursday, 09/17/09 11:22:53 EDT
|
Tools at Work:
Yep; I'm the one that fixes sandals, repairs jewelry, unscrews machinery; etc. Steel block anvil and riveting hammer under the desk, and a govt. tool kit locked in the drawer.
Now, out in the field, our folks have constructed entire office suites in warehouses (without anybody's permission or proper paperwork... [insert proper bureaucratic eye roll] ).
|
|
Bruce Blackistone (Atli)
- Thursday, 09/17/09 11:46:21 EDT
|
A friend of mine from HABA who is also an engineer keeps a 200# anvil in his office....right next to the suit of armor and under the broad sword. Hey, you never know.... First time I went into his office I thought it was the gift shop......
|
|
quenchcrack
- Thursday, 09/17/09 12:06:07 EDT
|
Before all the "high security" at airports I used to carry a collection of small tools in my briefcase and later in my computer bag as well as my pocket knife. Now I have a zip-lock bag to put in my checked luggage (including my pocket knife). Two small screw drivers, two small pliers, a 4" Crescent Wrench, a 4" warding file, and a basic 5 piece key pick set. More recently since we have been traveling for different purposes I have added a 16' Tape measure and a combination can-opener and cork screw.
While these are not blacksmithing tools they ARE tools. It is amazing how often all these came in handy. I do not think I've traveled once when I did not need one or more of these. Being without a can-opener can be very disappointing when all you have is canned food. . .
Sadly, what makes us different from the "lower species" is the use and manufacture of tools and today's paranoia and false security measures has reduced us to being toolless cattle when we travel.
|
|
- guru
- Thursday, 09/17/09 16:19:55 EDT
|
I'm building a small triphammer for texturing 16 gauge mild steel. My design works very well but the hammer strike is too fast. I've changed out pulleys on the motor and the drive shaft already and that helped. I was wondering if you could tell me where I could get information about slowing down the motor. I'm not certain that this motor can be made to run at a lower speed without harming it. My thought is to connect a sewing machine foot peddle to it so that I can vary the motor speed as I need to. If that's possible then the tool is done and I can get on with more urgent projects. Thanks in advance for any help.
Bill
|
|
Bill
- Thursday, 09/17/09 16:39:28 EDT
|
Tools - Bad habits from being a regional engineer for Airco still haunt me - I travel with a full blown tool kit 95% or more of the time. The only time I don't any more is when flying because it's usually for pleasure any more. Still carry a knife and a few necessities in checked luggage.
Axes for hot cuts, I know it's not recommended but that what they used at Quad State last year to cut apart the 1 bloom they produced.
|
|
- Gavainh
- Thursday, 09/17/09 18:20:03 EDT
|
Bill,
If the motor has brushes, you can probably slow it down with something like a dimmer switch. But a motor big enough for a trip hammer is probably an induction type (no brushes). You'd a variable frequency drive to slow one of those. They've come down a lot in price, but you'd still be looking at a couple hundred dollars or so. A lower RPM motor or a jack shaft might make more sense.
|
|
Mike BR
- Thursday, 09/17/09 18:43:44 EDT
|
Mike BR,
What is a jack shaft?
Bill
|
|
Bill
- Thursday, 09/17/09 19:32:14 EDT
|
Bill
It's a jackshaft typed by an ignoramus(grin).
Assuming you weren't just thown off by my poor spelling, it's a shaft with a big pulley at one end and a small one at the other. One belt goes from a small pulley on the motor to the big pulley on the jackshaft, then another goes from the small pulley on the jackshaft to a big one on the hammer. In other words, a device that allows you to get more speed reduction than you can with a single set of pulleys.
|
|
Mike BR
- Thursday, 09/17/09 20:08:21 EDT
|
A 1 HP VFD from Automation Direct is $128.00. Seen hammers run with this and a variable foot pedal. I was surprised that it could accelerate fast enough to give a decent single blow. Always thought you needed a flywheel do do that. Looks like a practical way to run a hammer nowadays. Gives variable speed and acts in place of a clutch.
|
|
- grant
- Thursday, 09/17/09 20:23:16 EDT
|
Mike BR,
Thanks much! I was just thinking about that and almost asked but then I read your post. I'm an artist you see. Not a mechanic. So some of these simple things are outside of my experience. I'll have to make another set of pulleys and get some more bushings but I have enough room in the design for another shaft. This helps with another machine I have in mind also. Thanks very much. You just made my weekend!
Bill
|
|
Bill
- Thursday, 09/17/09 20:48:29 EDT
|
Bill, Jack shafts are easiest to make using ball bearing "pillow blocks".
Purchase them to fit a standard size shaft that common pulleys fit such as 1/2", 5/8" or 7/8"
When a jack shaft is used you get double reduction.
The math is simple.
Diameter of Pulley A divided by Diameter of Pulley B.
When you have double reduction the effect multiplies.
If you have 3:1 and 2:1 the final ratio is 6:1.
Most common practical ratios with belting are close to 3:1.
Do this twice and you have 9:1. With double reduction it is easy to get anywhere from 5:1 to 16:1.
|
|
- guru
- Thursday, 09/17/09 21:17:41 EDT
|
Anvil in the office: QC, I'm just wondering how the airco handles it when he fires up the forge...? (incert dumb grinning smilley face here) Does he get alot of complaints from the office below him when he's at the anvil? What are his procedures if he should spring a leak in the slack tub...? (same incert as above)
The visual on your friends office would make a great add campaign for a white coller occupational re-training program. Can you just see the guy with his tie flung over his shoulder, shirt sleaves rolled up and, the sweat pouring off him while he's got a copy of "101 Blacksmithing Projects for the Beginer" on the desk and a piece of steal sparkeling in the fire?! A couple of his co-workers peaking around the door with wide bulging eyes completes the scene for me and I'm rolling on the floor!
Thanks QC, that will get me through the work weekend...
|
|
- merl
- Thursday, 09/17/09 21:26:03 EDT
|
Seat of the Pants shaft rules.
If your motor has a given shaft size the jack shaft should be the same size unless:
There is a LOT of reduction, IE the output is very slow. In that case the shaft should be a size larger.
IF there is a LOT of step up, IE the output is running very fast. In this case the shaft can be one step smaller.
Standard CF bar in SAE 1018-20 is sufficient for line shafting, jack shafts and most common machine shafting. Normally Cold Drawn bar is tight enough tolerance to fit bearings and pulleys. Centerless ground is often diametrically accurate enough but not straight enough.
|
|
- guru
- Thursday, 09/17/09 21:30:18 EDT
|
Travel Tools: In my car I carry a few more tools than in the luggage. However, tools are like the #3 theft item in cars (after money/purses and stereo/electronic equipment) so I no longer carry enough that the box is obvious. I now carry an old ammo box with sockets, basic wrenches, screw drivers and pliers. I SHOULD be able to replace a belt, hose or other minor repair. Since I am no longer a professional mechanic I am way TOO far out of the loop on late model systems and avoid anything other than the simplest emergency repairs. The box hides under the seat and is normally never visible.
While I DO lock my car on some occasions I dislike doing so because almost any thief willing to take anything of significance from your car will break a window do so in an instant. SO, I try to never leave anything tempting anywhere visible in the car. Traveling is different but we try not to leave anything of importance in the car. Cameras and computers are big time targets. . .
In my mechanic days I had a small tool chest with enough tools that I could completely dismantle my car on the side of the road if need be. This actually takes less tools than it sounds like. Back in the 1970's this was $200-$300 worth of tools. Today, probably triple that. Twice my Dad had several thousand dollars worth of tools stolen from his Chevy Suburban (yeah, big glassed in box that screams "break and steal").
My travel quandary now is the big truck (F600 flatbed). It has no room in the cab for anything extra. You might squeeze in a lunch box when you have a passenger but that is it. If I carry tools on the bed that means securing them at night or even when you stop for a meal. SO, a big expensive under body storage chest is in order. . . The key word here is expensive.
Such is life. Never enough money no matter how much you have.
|
|
- guru
- Thursday, 09/17/09 21:59:07 EDT
|
Well, Guru, it is not often that a beginner like me can correct you on a question of tools but that is what I am about to do. Contrary to what you say above a corkscrew IS a blacksmiths tool.
|
|
philip in china
- Thursday, 09/17/09 22:07:55 EDT
|
Underbed tool box.
Jock, think outside the box:) I have always wanted to tell you that:) Instead of the very expensive store bought underbed box, consider a reworked electrical enclosure box. You might have to weld up a few conduit entry holes, but you get a stout box with a gasketed lid. Add a locking device and bingo. I have a large control enclosure on my demo trailer converted to a tool bax and it works fine.
Coming to Quad State? I have a number of available control boxes in various sizes, e-mail me for what id available and I am sure we can work an easy deal.
|
|
ptree
- Friday, 09/18/09 06:16:18 EDT
|
Merl, ya know, I didn't see a forge...maybe he does everything cold.....fortunately, he is on the ground floor so the anvil is fairly safe.
|
|
quenchcrack
- Friday, 09/18/09 07:41:32 EDT
|
Hmm, ammo box mounted behind the frame members so invisible unless you know to look? Perhaps a couple for different items? They seal a lot better than most electrical boxes I have seen.
Fixing things at work: Sometimes the most important tools are in your head! We had a computer case that was badly dented in a lab move, $30K to replace and quite a long time to process an order and get a replacement. Finally someone said "Thomas works with metal..." and they came and asked if it could *hammer* it back to shape so the cards would fit... (NOT SUGGESTED FOR COMPUTER EQUIPMENT!)
So I looked around and found some scrap wood that would bridge the dented area and took a C clamp and quietly and gently pulled the case back into shape without jarring all the chips and connections that already had suffered too much impact as it was.
We were able to re-seat the cards and the system booted up and was still in use when I left the company several years later...(strong possibility I missed a couple of lay-offs due to being "multi-talented" and not adverse to doing stuff outside my "white collar" job designation.)
Thomas
|
|
Thomas P
- Friday, 09/18/09 12:48:11 EDT
|
Thomas, I will have to try the c-clamp approach to computer repair. I know my "impact adjustment" using a 4# cross peen has had mixed results as far as functionality goes. Very satisfying, however.
|
|
quenchcrack
- Friday, 09/18/09 12:59:19 EDT
|
Quenchcrack, never call it a cross peen or hammer. It is a 4# micro adjuster tool!
My Dad's favorite motto, "Son,Don't forget the first rule of mechaniking, don't never force it, get a bigger hammer!"
|
|
ptree
- Friday, 09/18/09 13:22:29 EDT
|
Underbed Storage: I've used a lot of electrical enclosures from shoebox size to walk-ins for control panels . I've never seen one with the proportions I need to get the best use of the space available. Depth is the usual problem. I need a box that will comfortably accept tools, rigging and luggage. It needs to fit the space. . .
On a friend's recent trip to Costa Rica by flat bed truck he carried a large walk-in enclosure for locking up tools. Almost anything loose on the truck, chains, buckets were stolen in Mexico. But the stuff locked in the box made it safely.
|
|
- guru
- Friday, 09/18/09 14:56:11 EDT
|
A friend of mine never locked his convertable because he didn't want a thief to slice the roof. I guess you could say it worked -- they broke a window instead (didn't pause long enough to check whether the doors were locked).
|
|
Mike BR
- Friday, 09/18/09 17:29:17 EDT
|
Mike BR, My little sister had a Triumph Spitfire convertable in the early 80's and she also did not lock to stop the razoring of the top. She even placed a sign on the window and the #&^%$* still cut the roof. He would then yank out the radio by reaching up under the dash and pulling, splintering that nice wood dash.
Someone repaired the dash after several thefts, and placed a single dge razor blade on the top rear of the radio. The dash only had to be repaired once more after that. The carpet needed cleaning though.
|
|
ptree
- Friday, 09/18/09 17:47:49 EDT
|
Leave any finger prints so to speak...?
Thomas
|
|
Thomas P
- Friday, 09/18/09 18:15:39 EDT
|
Yes ThomasP, lovely red ones:)
|
|
ptree
- Friday, 09/18/09 18:43:39 EDT
|
I not only leave my Pinto's doors unlocked, I leave the key in the ignition. Now the 8 track tape case gets locked up on the passenger seat.
|
|
- Nippulini
- Friday, 09/18/09 19:11:41 EDT
|
Just Checking in, I haven't been around here in a while, and wanted to see if I can still post.
|
|
- John Odom
- Friday, 09/18/09 19:30:43 EDT
|
Just Checking in. I haven't posted here in a couple of years.
|
|
- John Odom
- Friday, 09/18/09 19:32:07 EDT
|
John, we are still here, answering questions and solving all the world's problems. . .
|
|
- guru
- Saturday, 09/19/09 02:54:57 EDT
|
Back for more advice. I was able locate bearings for my jackshaft. I have the pulleys worked out. What I ran into though was a complete lack of pillow blocks to mount the bearings. I know I can make them but I would like some reccomendations on how to make them. What is the simlest and least time consuming way to do it? I really don't want this project to drag out any more than it already has.
Thanks again,
Bill
|
|
Bill
- Saturday, 09/19/09 14:58:46 EDT
|
McMaster-Carr, Pillow Blocks Select, General Purpose, Solid, Ball, 501 - 1500 lbs.,
You can mount a jack shaft with set collars in two pieces of oiled hardwood, or spend a week machining bearing blocks and fitting bushings OR for $11 each you can get two industrial duty ball bearings in self aligning bases.
The hardwood route works but has limited duty until something overheats. Nothing exotic is needed, maple or walnut will work fine and absorb oil well.
Purchased oilite bronze bearings are cheap and easy to mount IF you have a lathe to bore precision holes or purchase reamers to do the job on a drill press.
You can mount shielded ball bearings in metal blocks but will need a lathe, precision measuring tools and skills to make the blocks. It could be done on almost any small lathe from 6" up including squaring the blocks.
Spend the $25.
|
|
- guru
- Saturday, 09/19/09 17:34:53 EDT
|
Welcome back, John Odom. Haven't heard from you since Keenjunk folded.
|
|
quenchcrack
- Saturday, 09/19/09 18:13:01 EDT
|

The end of the connecting link above was blocked and bored for a press fit of the bronze bushings next to it on a old 1950's 6" Craftsman lathe. The screw is stock but was center drilled, faced, chamfered and one end turned down to fit tightly in a hole in the end part prior to being welded on using the same lathe.
The aluminum toggle block was machined all over and bored for the 1-1/8" screw and the nuts faced and chamfered also on the same small lathe.
This is an entirely undersized machine for many of these jobs but it has worked. When we are finished with the current project it will be used to make a new tail-stock spindle and tool post for an old 1900 14" Porter lathe. that in turn will be used for bigger and better projects.
If you are building machinery in a small shop a lathe is an indispensable machine. With the exception of a few jobs that need a shaper of mill such as cutting keyways you can do 90% of most jobs with a common engine lathe. It doesn't need to be new, or pretty, or very large. But there is good reason it is called the King of Machine Tools.
|
|
- guru
- Saturday, 09/19/09 18:13:18 EDT
|
Howdy,
I have a 292# anvil that I bought a couple of weeks ago. It was covered in green paint and I could see no markings. To top it off, the base bottom is flat, so no markings. I took all of the paint off and still no markings. Some of the guys on other websites tell me that it appears to be a Mexican cast anvil that is a copycat throw-off of another anvil. It may or may not be worth a hoot. I haven't figured out how to post pics here so if you would like to take a look at it, email me and let me know how I can upload some pics to you. I would value your opinion, and I realize there is no way to be absolutely sure about the origin of this anvil.
Thanks,
Bill
|
|
Bill Sikes
- Saturday, 09/19/09 18:29:56 EDT
|
Quenchcrack, I've been on forgemagic.com a little bit, but mostly too busy with work to spend much time on the net!
|
|
- John Odom
- Saturday, 09/19/09 19:28:34 EDT
|
Oops... I forgot to tell you that I am a 60 year old retired truck driver and I live in West Virginia. I am not a blacksmith, although I know several and they are trying to talk me into learning the basics. I weld a little and do other handyman projects.
Thanks...
Bill
|
|
Bill Sikes
- Saturday, 09/19/09 19:37:49 EDT
|
Guru, I saw the section you have on spring hammers with arched leaf springs. These are ubiquitus in Japan. I have a photo I took of one in a Japanese smithy. Give me an address and I will send it to you.
|
|
John Odom
- Saturday, 09/19/09 19:48:47 EDT
|
Bill Sikes, while it is not foolproof, try tapping the face with a hammer. A high pitch ring would indicate cast steel or ductile iron, both of which will do you fine. If it goes thud, you may have cast iron which is not usually a good anvil. However, there are some cast iron anvils that have hardened steel face block that are very functional. If you have a steel ball bearing, try dropping it on the face from a height of 10" and try to see how high it bounces back up. Anything over about 7" should indicate a hard face. If you lightly tap on the face and it goes thud and the hammer leaves marks on the face, you have a boat anchor.
|
|
quenchcrack
- Saturday, 09/19/09 20:24:58 EDT
|
ptree, the former electrical box turned into a storage box is a great idea!
I have a large electrical box I salvaged from an old three phase motor that I have mounted to the head plate of my flat bed truck. I keep all my ratchet straps, chain binders and bungee cords neatly stoed and dry but, easily got at when needed. I think most boxes intended for all wheather service usualy have some kind of locking hasp but, they are not always very sturdy. A few hundred dollers worth of tie-down gear requiers good locking hardware as you say.
BTW QC, my favorite wrenchin' motto is "Tight is tight but, too tight is broke!"
|
|
- merl
- Saturday, 09/19/09 21:43:51 EDT
|
Can I harden a old railroad spike by getting red hot and then cooling rapidly? I'd lilke to use it as an axle.
|
|
Rory James
- Saturday, 09/19/09 23:09:44 EDT
|
Bill's Anvil: Bill, There are a lot of good old anvils around that have no markings. AND there is also a lot of junk out there including cheap cast iron copies. Most of the good old ones will have significant dirt and rust and if painted the dirt is usually under the paint. Some cast anvils will ring due to shape, but not hardness.
Good anvils are hardened steel and can take a lot of abuse without marking the face. That includes significant blows with the face of a hammer with a good crown but NOT corners or edges of hardened tools. These WILL mark an anvil.
A good bouncing rap with a hammer will tell you a LOT. if the crowned face of the hammer puts a significant dent in the face then its junk. If it marks it slightly then its a cheap unhardened or ductile iron anvil.
When you give the anvil that sharp rap the hammer should fly back toward you (bounce) nearly as fast as you struck it. Hard steel bounces off hard steel like billiard ball off billiard ball. If there is no bounce, and a dull thud then its probably a junk anvil.
Normally you don't go around destructive testing anvils but if its yours and you have serious questions then the hammer test will answer a lot of questions.
IF the anvil has parting lines (raised mold lines) on the face, horn or heel, or parting lines that have been roughly ground off in these areas and there is rough cast surfaces around the ground of lines. . . Its cast iron junk. All the good old anvils were forged and dressed by grinding or machining all the working surfaces. Even when aged, rusted and abused there will be nothing that looks like cast surfaces in these areas.
|
|
- guru
- Saturday, 09/19/09 23:53:45 EDT
|
Hardening RR-Spikes: Rory, All steel including "mild" steel will harden if heated properly and quenched. The hardness varies according to carbon content. Generally the more carbon the harder the steel. Other alloying elements such as manganese come into play as well.
RR-spikes are made from low carbon and "high" carbon steel. In the this case "high" is actually a medium carbon steel.
SOME, not all spikes are marked "HC" for high carbon. Many others are just marked with a manufacturers mark or code.
So, yes its hardenable, how hardenable and the resulting strength is a good question.
All Junk Yard Steel Rules apply. If you want specific results for a critical application you should obtain steel of a known composition.
|
|
- guru
- Sunday, 09/20/09 00:18:49 EDT
|
Thanks guys... it is probably junk. I will hit it harder with a hammer tomorrow. I have noticed a sweet spot where someone has done some work and there is some wear and tear, but closer to the horn there is a spot that seems to be a dead spot. I'll have to look around this site more closely and figure how to upload pics from my computer. Some folks might want to see an anvil-shaped boat anchor.
Bill Sikes
|
|
Bill Sikes
- Sunday, 09/20/09 21:10:20 EDT
|
Hi Bill, I'll say the same thing here too! (Before anyone wastes more time posting about it sight unseen)
Bill's anvil looks like a traditionaly made london pattern anvil---except that it's cast with the parting line down the center of the face. It doesn't have a pritchel hole and its spot on for one of the mexican cast anvils that are fairly common around these parts and working their way north---I'd bet that they will be several at Quad-State!
They "look" like a good old anvil from a distance (must use a "real one" to make the mold from) and they seem to be made from a number of different alloys---I figure that they get poured at the end of the day with whatever is left in the ladle. Generally minimal clean up of the casting.
I figure some bright lad will start spending way too much time gussying them up and fake stamping them and try to get antique prices for them. (*not* Bill, he's on the up and up!)
Thomas
|
|
ThomasP
- Sunday, 09/20/09 21:53:16 EDT
|
Saw two "anvils" at the flea mkt yesterday. One was a crappily cut rr track anvil, the other a 25 pound unmarked cast anvil. Surprisingly the rr track anvil had a really nice ring to it.
|
|
- Nippulini
- Monday, 09/21/09 09:58:52 EDT
|
Nip, A RR-rail anvil is all steel, higher carbon than the best anvils but not as hard. They should ring quite well. But that doesn't make them a good anvil, just good steel.
|
|
- guru
- Monday, 09/21/09 10:14:48 EDT
|
Bill, we currently do not have a way for users to upload images to anvilfire. However, Thomas has seen the anvil and is quite expert in these matters.
I described in detail the parting line business. There is no chance that is a "real" anvil. You did not mention lack of a hardy hole. I've NEVER seen such a thing in late pattern anvils that you would recognize as an anvil. This is a non-professional pattern and non-anvil foundry methods. It is someones back door operation.
There is NO chance it is anything other than junk. It is an ASO (Anvil Shaped Object), AKA door stop or could call it a boat anchor except its not even good for that. They make GOOD lawn ornaments.
The SAD part of this is that even "cheap" cast iron costs $1 or more per pound to have cast. So a 300 pound cast iron anvil is an expensive lawn ornament.
|
|
- guru
- Monday, 09/21/09 10:51:28 EDT
|
Guru; Bill's anvil has the hardy hole just no pritchel.
I've seen a cleaned up one with the pritchel hole drilled at an auction here in NM---but they forgot to deal with the parting line on the underside of the horn...The auctioneer was of course calling it an antique...probably less than 2 years old...
They are better than the HF anvils as the shape is at least usable.
Thomas
|
|
Thomas P
- Monday, 09/21/09 12:38:11 EDT
|
Re: your comments on lathes. Just to add, I've owned a couple of milling attachments for small lathes. They're just a vise with a vertical screw/slide and make it possible to do things like keyways etc. Knew an old machinist who cut internal keyways by holding a slotting tool in the headstock and running the carrige back and forth with the part clamped in a milling attachment.
|
|
- grant
- Monday, 09/21/09 14:22:42 EDT
|
Engineering questions:
Can someone give me a reasonable estimate of the weight per foot of a piece of I-beam 5/8" thick with an 8"-10" wide web? I know that's not all of the dimensions needed, but a reasonable guesstimate.
This is going to be the frame for my hydraulic press.
And while I'm at it, anyone know the formula to figure the force needed to shear a piece of 2" round steel bar?
Thanks.
|
|
- Stormcrow
- Monday, 09/21/09 15:14:02 EDT
|
Thomas, thanks for jumping in and helping explain the anvil. If you know anyone who is going to Quad-State that is coming through WV and will be using Rt. 35, let them know they are more than welcome to drop by Leon, WV and take it to the meet. I am not trying to sell it, but it should make quite a conversation piece. Anyone who is to pick it up (and bring it back, of course) needs your approval, or guru's approval. I'm sure that will not be a problem, for I can't imagine a dishonest blacksmith. Just email me at:
wsikes@earth1.net
Bill Sikes
Leon, WV
304-458-2024
|
|
Bill Sikes
- Monday, 09/21/09 15:22:26 EDT
|
Calling all 'anvilheads'........ :)
Can anyone shed any light on the anvil in this thread on 'britishblades' forum?
Im 99% its a P.W, but its marked up in KGS, without the PW solid wrought logo.
The guy that has bought it is in sweeden if this throws up any possibilities?
http://www.britishblades.com/forums/showthread.php?t=88687
thanks,.
|
|
- John N
- Monday, 09/21/09 15:27:25 EDT
|
Hello Gents- I have come into an opportunity to get ahold of 12 or so spent Nitrogen and Carbon Dioxide cylinders; however, I have a two part question concerning what exactly I'm going to do with said cylinders. I know that the bottoms can be used as dishing forms, and I've heard a few folks make bells out of some sections; can the top be used for anything in particular? I was thinking perhaps the firepot for a solid fuel forge... Which leads me to my second question- after I've cut the bottoms and tops off, does anyone have any good uses for that rather large (and heavy!) section that's left? I'm a little short on space as it were, but it seems a shame to just toss it all...
|
|
MacFly
- Monday, 09/21/09 15:58:45 EDT
|
John, While it LOOKS sort of like a PW the base shows casting draft on the feet. I'd say its a cast steel anvil using a PW as pattern.
Note that such copies do NOT have to be junkers such as the Mexican anvil discussed above. Occasionally these are cast in steel, properly dressed and heat treated. Prior to about 1960 when EVERY industry had a captive foundry many industries made as many tools as possible. Using others tools as patterns was common. Since the majority of these were not for resale, design and patent issues were moot.
|
|
- guru
- Monday, 09/21/09 16:11:12 EDT
|
Cylinder Gongs: MacFly, They work very well with the TOP left on. One maker sticks a commercial lifting eye in the hole and arc welds it to the heck. Makes a HECK of a gong.
There is not an inch of material in one of these that is not useful. .
|
|
- guru
- Monday, 09/21/09 16:13:57 EDT
|
Beam Weight, Section: Stormcrow, There are W, M, S and HP beams. All with different proportions.
A 10 x 60 pound W (Wide Flange) Beam has a FLANGE width of 10.065, flange THICKNESS of .683" and WEB thickness of .415. It is 10.25" tall.
The 10" series W beams come in 112 to 11.5 pound per foot sections.
A w8x48 has a flange thickness of .683" and web thickness of .405". It is 8.5" tall and 8.117 wide.
The 8" series (there is no 9") ranges from 67 to 10 pounds per foot.
SO, if your micrometer eyeball is correct then it is between a 66 to 40 pound beam (quite a difference) That is as close an estimate your are going to get.
The W (Wide Flange) beams are the most common type used today. Wide flange beams have no slope to the flanges like the old standard S-sections commonly called I-beams. These have about a 10 degree slop to the flanges and require special wedge shaped washers for bolting. In general they are much taller than wide. Wide flange beams are much easier to build with.
When measuring do so accurately. Most of the dimensions are the result of calculations giving the most strength per amount of mass. W beams are all based on centroid dimensions and nothing is even. M beams are even heights with resultant widths. Measure the width and height to the nearest 1/64" and the flange thicknesses the same or better.
OR if you have the weight and exact length plus any two of the above dimensions that should define it.
With those dimensions, assuming some in error, some not, I should be able to tell you exactly what beam you have and the section modulus and other engineering bits needed to do stress calculations.
|
|
- guru
- Monday, 09/21/09 16:47:57 EDT
|
Interesting thoughts on the ?PW? anvil, Ill have to take some detailed photos of mine (within a couple of lbs of the same weight as this one, and definatly a PW) for a compare and contrast! If you dont mind Ill point you back to the thread when ive got good pics of my one posted there for an opinion?
|
|
- John N
- Monday, 09/21/09 17:47:41 EDT
|
John N, did you hear about the last time someone called us a bunch of "Anvilheads"? :) Someone showed up at Quad State with an anvil mounted to a hat!
Same fellow may have a new style low profile, use the blacksmith as the base design to reveal this year:)
|
|
ptree
- Monday, 09/21/09 18:24:37 EDT
|
John N have a look at the Anvilfire news, SOFA2005 anvil and odd hats.:)
|
|
ptree
- Monday, 09/21/09 18:27:09 EDT
|
g'day. i'm making a pigging knife for a friend, and i want to make it out of a file. (it's sole use is for stabbing pigs). i need to know how to go about tempering the centre of the blade and then rehardening the edge. also, it's to be fitted to a tube steel handle as a survival knife. can it be welded to softer steel pipe? hope you can help. thanks. dan.
|
|
Dan Bristow
- Monday, 09/21/09 18:51:08 EDT
|
Anvil ID: The problem with many of these cast anvils is that they are like the beautiful Hungarian Cast Steel anvil in our anvil gallery. Anvils have been made EVERYWHERE and in Europe the number of makers is probably in the thousands. In England alone there was over 200 or 250. Steel foundries making anvils as a side line could add to those recognized makers.
|
|
- guru
- Monday, 09/21/09 19:10:30 EDT
|
Guru, the beam is per the recommendation of my second cousin (the one who has built a number of hydraulic presses before) and actually somewhat larger. I was trying to figure what to estimate to pay based on a per pound system. I'll go with the highest number you listed for my calculations.
How about the shear modulus (I think is the correct term) of 2" round steel bar?
|
|
- Stormcrow
- Monday, 09/21/09 19:12:13 EDT
|
Dan, I think you're maybe working at cross-purposes. If you're killing wild feral hogs with a knife, you do *not* want to skimp on the tang. If it snaps off, you're in trouble. "Survival knives" with hollow handles can be done, but usually they have a very weak, stubby tang.
I'd say you'd be better off building a knife with a strong tang and a sheath that carries a pouch on the side. Anything you would put in the handle goes in the pouch. It would probably give you more room, even.
If you do want to make a hollow handled knife still, I'd recommend an integral socket handle like the Cold Steel Bushman or Tai Goo's bush knife series. They are very strong. You would need to close off the opening at the front and the seam if you want a weather-proof container. Welding on high-carbon steel can be problematic, and I'll leave that discussion to the welding experts.
As for the heat treatment, are you asking about a single or double edged design?
|
|
- Stormcrow
- Monday, 09/21/09 19:20:34 EDT
|
Guru, hope that didn't come across as snotty. I'm just meaning that according to my cousin it should be plenty stout and I'm just trying to figure how much money to throw at materials.
|
|
- Stormcrow
- Monday, 09/21/09 19:21:58 EDT
|
Stormcrow: We figured shear strength was 75% of tensile strength. So if You have 70 Ksi material, You will need about 83 tons to shear it.
|
|
- Dave Boyer
- Monday, 09/21/09 20:11:39 EDT
|
On machinery frames the limitation is never the ultimate failure point but the stiffness needed to resist deflection. The only parts that you use shear strength on are pins and bolts or other parts such as flange welds that are in shear. The frame itself will be many times stronger.
The difference in the beam weights is an estimate and could add up to a big difference in cost and strength.
Since MOST structurals all cost the same per pound what you want is the most bang for the buck. When looking for frame stiffness this means a taller beam with the same weight. Then you back up and look at the maximum stress.
|
|
- guru
- Monday, 09/21/09 20:50:05 EDT
|
What I was looking at was a fairly wide webbed beam.
There were a tremendous number of 2" round cutoffs that I'm thinking about using for pins to support the bottom die holding crossmember thingy. A couple of those per side should be stout enough for a press up to around 80 tons, right?
|
|
- Stormcrow
- Monday, 09/21/09 21:22:38 EDT
|
It seems like I read something about sprinkling carbon, graphite ? and hammering it into hot steel to increase carbon content. Maybe case hardening. Is this right ?
|
|
Mike T.
- Monday, 09/21/09 22:53:56 EDT
|
Mike T. Absolutely NOT. Maybe in someones work of fiction. Case hardening requires controlled conditions. See our Heat Treating FAQ.
|
|
- guru
- Monday, 09/21/09 23:02:22 EDT
|
Stormcrow, Pins in shear are one thing but if they bridge a span its another. Then deflection comes into play.
If the pins are in shear, that is in fitted holes supporting a more rigid part then you use the area of the pin times the design shear strength of the part. THIS is a lot lower than the maximum safe load. For common mild steel you can use 10,000 PSI which gives you about a 4-1 safety factor. Using tempered high strength material you can go to about 30-40,000 PSI with the same safety factor. 2" pins have an area of PI so the safe design load for unknown steel is 31,416 pounds per shear joint.
The 10KSI limit also prevents indentation and load wear on parts. If you rate parts too close to the shear strength then you will find them distorted after use. ALSO, under too high a load the deflection in the joint will allow spreading and bending. Then you no longer have a shear condition. So, highly loaded joints need to be well designed. If you look at pins in roller chains the pins are in multiple shear. You can double, triple, quadruple. . . the total allowable load by increasing the number of shear points. That is what multi-row chain is about. Double the shear joints in that mystery steel 2" pin and its good for 62,800 pounds.
80T = 160,000 pounds / PI = 50,929 PSI. That is 25 tons. You can PLAN on steel shearing at 30 tons for punch press purposes. The actual shear is less. . . SO, your press could probably shear a 2" dia. mild steel bar.
Also at 10,000 PSI you will see most beams deflect to their reasonable design allowance of 1/4". However, This can be way too much in a machine frame. But I THINK, the frame you were planning is an H frame with C loading on one side. Each case must be looked at one individually. Joint design also comes into play. You rapidly find out why truss bridges were built with pin joints when you start analyzing bolted joints. . All the parts are easily defined as being in tension, compression or shear and how much.
As an H-frame your frame will act like any other H-frame fairly equally dividing the load. However, an engineer looking at the safety aspects would put at LEAST 2/3 or 3/4 of the total load on one side (for misalignment and off center work). Possibly 100% due to overloads under a bad situation. On multi-point lifting eyes we always assumed the worse case, that ONE point had to take the entire load under a shock condition.
IF we take your 2" pin and assume a shifting load puts all the load on ONE of two pins then the load will be enough to shear the pin. IF you have the pin in double shear then you are at 50% of shear. While this will not fail it may have some serious dents in the bar and be hard to take in and out. . .
As a C-Frame the design is very different than most. The near member is almost in 100% tension and the far member in 100% compression. IF the cross beam joints are pin joints this is true. However, with bolted joints the bending moment in the cross beams (top and bottom) is translated into uneven loading of the vertical members. This will cause the C-side to deflect toward the load as the cross beam deflects UP. The bolts at the outer part of the joints MAY have significantly more load on them then the others.
Unless you have defined cases and do the deflection calcs you will not know if you are in the right range or not. That is also why designers use very conservative numbers. Its a lot easier to be conservative than to optimize based on unknowns. Just pretend the whole thing is made of rubber and think about how it will move under load.
A W10x45 beam spanning 12" will deflect only .0005" at 50T
At 100T it will deflect .001" But, at 16" and 50T it will deflect .0012. That is not much but the increase in the span makes a big difference. It does not take much deflection in a C-frame for the work to want to push out of the frame and cause damage or a dangerous situation.
If you design your frame right it will be no problem. But sometimes parts that you THINK are overkill can be weaker than you think. So study it, look at the forces and the results. It is not hard to make a simple drawing, put some arrows on it for the expected loads and then look at each part under load one at a time. It really IS important to do under these loads.
|
|
- guru
- Monday, 09/21/09 23:13:36 EDT
|
thanks for your prompt reply guru. the design was a request of my pig hunting friend. i plan to take the centre out of the tang leaving two arms that will fit into slots cut up the sides of the tube handle to allow more welding area. the arms will be about 40 to 50 mm long, and the weld will run down the arms and around the blade end of the handle. as concerns the blade itsself, it will be 200mm long and 25ish mm wide, in a stiletto style double-edged setup. again, my friends request. i personally would prefer to do a full tang, but he was quite specific in his request. hope you can help. thanks. dan.
|
|
Dan Bristow
- Tuesday, 09/22/09 03:33:16 EDT
|
i am looking to begin the trade of the swordsmith but first i am going to make my tools.
so that being said what would you suggest a person build their first forge out of and any design ideas fo
|
|
nightwolf
- Tuesday, 09/22/09 07:36:52 EDT
|
Nightwolf, we suggest you scan the section called "getting started in Blacksmithing", the link to which is located at the top of this page. Use the scroll bar at the right to go up to the top. Learn all that material and you will be ready to forge a sword.
|
|
quenchcrack
- Tuesday, 09/22/09 07:49:11 EDT
|
SWORDS: not to be mean but why do you need a sword? i know for a fact that they are illegal to own if sharpened in the state of ct. if they are so if-y to own and are dangerous, why would you want one? plus they are hard to make and a pain to get the handle pommel whatever it is called right. why not make a tomahawk or some medival style armor? just as cool (at least to me) and less dangerous. well at least the armor. :D
|
|
bigfoot
- Tuesday, 09/22/09 08:13:40 EDT
|
We play wth fire, glowing steel, heavy hammers, and talk casually about harnessing power equivalent to 160,000 pounds and you think swords are dangerous?
I don't base what I want to make around what Connecticut is afraid of. I make large blades because they are useful and because I have customers who want to pay me to make them.
Seriously, why is a tomahawk ok but a sword is iffy? If you're going to make a weapon, do so with seriousness and an understanding of just what it is you're making and then do it well.
|
|
- Stormcrow
- Tuesday, 09/22/09 09:13:59 EDT
|
Swordsmith. . . Like the Jedi knight you must study the art until you can build your own light sabre (forge). Until you know which is best and how to build one you are a long way from making blades.
The "best" forge depends on your location and available fuel. Top grade coal (if available/affordable) is the "best" smithing fuel but it is smokey and can raise the ire of your neighbors and have them calling the local authorities about the stink you are making.
Diesel forges follow coal but are not as easy to build and operate. They can also be smelly but in an urban environment diesel smoke stink may be overlooked as normal.
Charcoal forges come next and if the fuel is readily available would be number one in many cases. See our FAQ on Coal and Charocal. Charcoal burns clean enough that it does not need the kind of ventilation that other fuels require.
Due to its availability propane gas forges are becoming very common. They are clean and easy to use. However, they can be difficult to weld with. While you can build your own (as many do) it is not a project for everyone. There are many commercial models available.
Last, The "green" forge of the future is here now. They are electric induction forges. Hold your work in the coil and count to 3 and you have a heat. . VERY neat. Quite expensive and the only forge that will probably never be a DIY project.
Forges vary from pits in the ground lined with cow dung to fully automatic temperature controlled furnaces with electronic controls. The "best" may be the one you can afford.
Check our book review page. The Craft of the Japanese Sword has details of box bellows and a trough forge. These are very good for charcoal. The box bellows does not require a full ox hide to cover and the wood working skills are basic (DO NOT use plywood in its construction). The forge can be built on the ground or raised on a table Western style.
See our Sword Making Resources for reading material. All the research has been done for you.
|
|
- guru
- Tuesday, 09/22/09 09:17:40 EDT
|
Pig Sticker: Blade assemblies of this type are best silver soldered with a copper/silver alloy.
All the heat treating and finishing is done first. Then the parts carefully assembled. Using a small torch and a good heat sink silver soldering of guards without damaging the blade hardness is common.
For the type of thing you are making edge quenching may be the best way to go. Briefly, the part is heated to the non-magnetic point or higher and then slowly cooled in wood ash, lime or vermiculite to anneal. This is usually done before the other shaping and work. To harden, heat to the non-magnetic point then edge quench in oil. This technique is covered very well in Wayne Goddard's The Wire Damascus Hunting Knife. He uses a mixture of oil, grease and paraffin in a shallow pan for edge quenching. I believe he also covers the silver soldering process described above.
For a silver soldering job this complex I would make at least one practice piece. The heat treating also needs to be experimented with as files are scrap steel of unknown type. All Junk Yard Steel rules apply.
|
|
- guru
- Tuesday, 09/22/09 10:30:45 EDT
|
i think swords are dangerous beacause they are according to my state law ;) and tomahawks have a practical purpose (cutting wood and camp chores), and therefore are not an iffy thing for me to own or make. i have been talked to a few time by the local cops for having a forge and they already know me by name. i do not think the swords or tomahawks are dangerous to the makers, but to those who use them im properley. I don't play tools. i use dangerous tools and enjoy it. i avoid playing with dangerous things as they have a tendancy to peel parts of me off. i have a problem with swords as they are weapons and nothing else. it is just my opioion, plus i am tired of people asking me to make them swords, plus the only sharp thing over 4 inches in lenght i have ever wanted is a parang, which is useful as a large camp knife. plus i try to avoid breaking state law, but not all states haave the same laws.
|
|
bigfoot
- Tuesday, 09/22/09 10:56:03 EDT
|
I make specialty swords for sword swallowers. Ever since I started smithing I too have been pestered to make swords. But my swords could hardly be considered weapons. Now my forged knives I've made are EXTREMELY hard and sharp and are made for fun and for friends and relatives as gifts and tools. Are they dangerous weapons? They could be, but a can of spray paint could easily be a tool for grafitti artists as much as it is used in my home for painting my work. How would YOU look at it?
Cap & Ball rifles are weapons too (and equally as dangerous, even more so), but chances are you'll see them as decoration or as an antiques investment. Same thing with swords. Last I checked, native Americans have utilized tomahawks as weapons for a LOOOONG time. The reason I am bringing all this up is that you are choosing what to villify for your own reasons. It's not logical. Not trying to start a war here, just trying to use my brain as a tool too.
|
|
- Nippulini
- Tuesday, 09/22/09 13:06:49 EDT
|
true, and i love throwing hawks, but they are practical tools that i use alot, and are better (in my opionon) than hatchets. plus they are less ilegal in CT (where i live) then sharpened swords. now a francisca i would not make as i have never been able to chop wood with them and they do not feel right for anything but throwing.
|
|
bigfoot
- Tuesday, 09/22/09 13:34:32 EDT
|
oh and Nippulini don't worry about me getting annoyed, as if i didn't agree with every body i would not learn much about anything (at least except for math).
|
|
bigfoot
- Tuesday, 09/22/09 13:35:28 EDT
|
No prob. CT has somw odd laws.. I live in PA where you can't buy beer and wine in the same store. Liquor stores are run by the state, it's weird.
|
|
- Nippulini
- Tuesday, 09/22/09 13:42:23 EDT
|
Since swords were specifically mentioned in the writings leading up to the creation of the Second Amendment CT may be in trouble constitutionally!
Pig Stickers---usually double edged. Welding on high carbon steel can be done but you must deal with proper pre and post heat treatment.
As files are already *hard* you can generally back them down a bit in a regular oven and then taking care to grind them cool-ly not need to re-heat treat.
However it's often easier to anneal them, work them and then re-heat treat them (normalize x 2, heat till above non-magnetic and quench in warm oil, temper x 3)
Do NOT suggest using your first knife where someone's survival is at stake---too many chances you might have made a goof!
Sword making: Start with knives, a lot faster learning curve when turn around on a mistake is one day and not 2 months!
Thomas
|
|
Thomas P
- Tuesday, 09/22/09 16:15:36 EDT
|
heat treat oil: well yesterday i ordered some heat treat oil from mcmaster carr, the guy i oredered it from said the 28 second quench was plenty fast for 5160 or 4140. i am inclined to aggree, but is this true? and what should i draw the temper back to on a hammer? the axle i will use is something that hardens to the point where a file will bareley cut, maybe 4150 or something. i think blue. i have use this axle for a jewlers anvil and left it with a 300 deggre farenheit temper, which made hard enough for an anvil and still tough enough for me to use.
|
|
bigfoot
- Wednesday, 09/23/09 07:03:50 EDT
|
note: this will be my second hammer i participated in. the first was made of known 4140 and i was a helper, so i just watched and grabbed stuff. the temper was drawn to brown on this but i think it may be a little hard for modern anvils. he used a rosebud to heat the center so the heat would travel to the pein and face. i think the pein was a peacock blue.
|
|
bigfoot
- Wednesday, 09/23/09 07:06:25 EDT
|
Guru,
What style of slide are you planning to use for your power hammer's ram? Will it be similar to the old Little Giant, new Little Giant or something totally different? Thanks
|
|
Larry
- Wednesday, 09/23/09 07:48:42 EDT
|
I just bought a peter wright anvil and i have figured all the markings out but one. there are 2 triangles on the bottom front of the base. one with 3 lines marked in it. i was trying to figure out what they ment.
|
|
zach
- Wednesday, 09/23/09 09:40:51 EDT
|
bigfoot,
Junkyard rules apply. When you say, "...maybe 4150 or something," it means you're guessing at tomcats. Ptree knows axles, but I wonder if they were really made of 4150 which contains carbon, manganese, silicon, chromium, and molybdenum, and gets hardened in oil @ 1500-1550ºF. More likely, if the axle is 20 years old or so, it may be 1050. Now I'M guessing! I've treated my axle-made hammers by quenching in water 1475-1525ºF, which is a 1050 suggestion by the metallurgists. I temper the head to dark straw by dropping a welding-heat turned eye around it (7/8" square stock) while the scale-free head is above the vise jaws. I temper the peen to a purple with the torch while a wet rag remains around the tempered head to protect its temper. The head and peen are quenched separately, the main reason being if you quench the entire head, the thin cheek of the eye may crack. If it does crack, sob, sob, snuffle.
|
|
Frank Turley
- Wednesday, 09/23/09 10:18:21 EDT
|
this actually is not a junk yard axle, it was a *new*(ish) axle off a big mac truck (i think) so it was maybe 4 years old tops. i clean up a truck shop on occasion for steel and such, and this sweetened the deal. i know it hardens in oil (i tested based on the junk yard rules), so i doubt it is in the 10 series. and i am guessing at tom cats. another part of the axle is now a jewlers anvil and ring mandrel, both of which hardened in oil. so dark straw face and purple pein? that i will do, but my hammer will definatley have scale on it, but the face/ pein will be clean.
|
|
bigfoot
- Wednesday, 09/23/09 10:31:01 EDT
|
Hammer Hardness My favorite old hammer was found buried in leaf mold next to an old carriage house. It was a standard 2.5 pound American pattern cross peen that was obviously drop forged from the die lines. I used it until the face started to mushroom to one side. I still use it a little when I need a light hammer AND to show people that hammers can be worn out.
My point is that it was a little soft. In the case of a striking tool this is probably preferred than too hard. I would much rather have it mushroom than have pieces flying off. My favorite heavy ball peen has a crack near the face and has been retired for safety. . . (by removing the handle). I may cut the crack out but this is going to reduce the flat face 1/4" at least.
As Frank and others have noted on numerous occasions a blacksmith heat treat with either selective hardening and tempering is generally different than most industrial heat treating where the whole part is dumped in the quench and then the whole part tempered the same. However, there are a lot of exceptions in industry where parts are locally flame hardened such as gear teeth or locally tempered to dead soft like file tangs.
|
|
- guru
- Wednesday, 09/23/09 11:32:25 EDT
|
Junkyard Steel A part is STILL junkyard steel when you buy a BRAND NEW part off the shelf. If you do not have the manufacturers specs (not advertising literature) it is still unknown steel.
|
|
- guru
- Wednesday, 09/23/09 11:39:09 EDT
|
Peter Wright Symbols: Zach, These old hand made anvils were made by skilled teams of forgers and they had a mark to identify them. This was strictly for the factory to know who made which anvils. Multiple marks may be from the grinder and heat treater.
|
|
- guru
- Wednesday, 09/23/09 11:42:33 EDT
|
HAMMER HARDNESS: well i think for my fisher i can use it at a dark straw face and a purple pein. thanks for the help.
|
|
bigfoot
- Wednesday, 09/23/09 13:06:30 EDT
|
Truck axles, as of 2005 when I left that trade were as follows;
If the unforged portion of the axle is 1 3/8" diameter or less in diameter, the material is 1050H
If the unforged portion is larger than 1 3/8" diameter, the material is 1541H
These are the industry standards and applied to Dana, Mack Axle alliance and every other big maker. In big off road axles of say 3" diameter and up, at least for Deere, 4140 in an aerospace forge grade was specified. Same for Case skid steers.
The 4140 was used for axles that were heat treated in furnace type operations and the truck axles went thru the forge shop's scanning induction heat treaters.
I worked in a company that owned and operated about 50-70% of the axle forge biz in the US.
Since 2005, the spec's may have changed, but I doubt it. These have been the spec'ed steels for at least 20 years, and the steels are chosen more I think for the heat treatment method to be used rather than any other reason. Scanning inducton heat treat is a very demanding process, and quench cracking is an industry problem.
The metalurigist that I worked with there suggested that I quench in oil only, and draw at 350F minimum for hammers. He also noted that we tempered within a 1 hour window.
|
|
ptree
- Wednesday, 09/23/09 13:28:02 EDT
|
Ptree, I had most of your comments in the Junk Yard Steel FAQ. However, they are not all in one spot. I will re-edit and highlight. Thanks again.
|
|
- guru
- Wednesday, 09/23/09 14:17:55 EDT
|
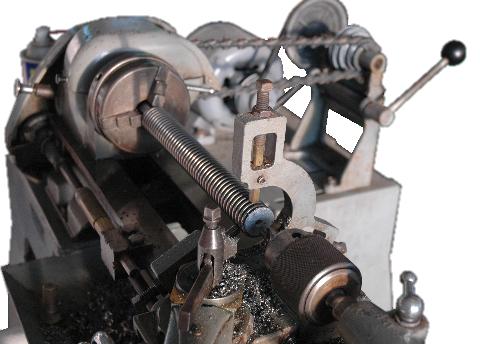
Power Hammer Ram, Guides:
We are using a pretty simple ram. Just a big piece of 3.5 x 5" CF steel about 18" long. However, what used to be commonly available cold drawn steel is getting more and more difficult to find in this country due to declining industry. Big BLU dies and die holders will be used.
The guides have dropped sides like many power hammers in order for the toggle, or in this case the spring attachments to clear.
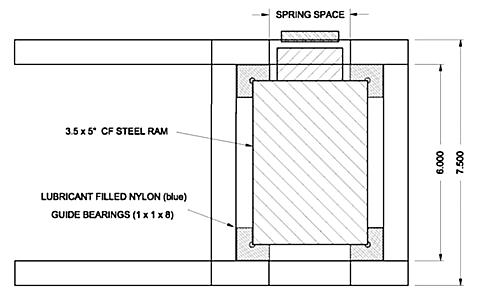
The ram runs in a heavy ram guide made of 3/4" CF plate bolted together. In each corner there is a machined nylon guide bar. These are adjusted with multiple set screws.
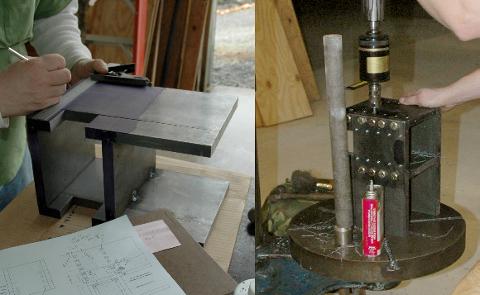
The guide assembly had a LOT of drilled and taped holes requiring careful layout. (20) 1/2-20's drilled taped and counterbored, (32) 3/8-24 tapped, (10) 5/8-11 drill and taped. Making two of these at a time made the processes a little more efficient. The problem I had was that a couple of my holes inadvertently intersected. . . resulting in a broken drill deep in one part. Being one of many we just have to live with it. However, before releasing drawings the problem must be corrected.
Our hammer has a LOT of drilled and taped holes as well as quite a few machined parts. It is not a cheap Junk Yard Hammer. At this point I wish I had not used the spare tire clutch design simply because it will LOOK like a tire hammer. . It is not.
Some of the drilling and machining went quite quickly and efficiently. My 25" Champion drill is a chip making horse of a machine. We have made a bunch of 1.5" holes with it on this project and the guide assembly drilling and taping was as fast as could have been done on any newer machine.
However, so far the turning has all been done on my little 6" craftsman lathe. It is about one size too small for most of the parts we have made. I have larger lathes but they are not fully functional at this time. SO, we limp along with the little machine.
At the start of the project we used the mill in my Dad's shop and had much of the heavy steel cut by suppliers. We also had helpers and I spent a ton of money. But we could not make the 2008 anvilfire hammer-in deadline and I ran out of time and money. . . It was an impossible deadline to meet and at the time but I could not see it due to being too burned out. So here we are 20 months later still making chips a few hours each weekend. We probably could have finished after a couple solid weeks. But we are getting close. . .
|
|
- guru
- Wednesday, 09/23/09 14:20:34 EDT
|
Thanks for the generous details Guru. When you say it will look like a tirehammer, do you plan to have the linkage attached to the wheel like a tirehammer or will the tire clutch drive a shaft connected to the cam and linkage?
|
|
Larry
- Wednesday, 09/23/09 16:19:22 EDT
|
I have long wanted a sickle-sword and bought a one-handed replica. It lacked the balance i was looking for. So i decided to make my own. (I admit i used plate steel and a plasma cutter due to the fact that i have few forging skills) and made a version with a 15 inch blade with a long samurai-type handle. It is to me very balanced and a really aggressive looking weapon but it is crude. All of my fellow knife enthusiastas buddies are really in awe of the drop blade design. My question is how did the egyptians make the drop in the blade? And how can i reproduce it with the long handle and the drop blade design without using the hillbilly plasma cutter method? Or can i send a photo or sketch to one of you guys and pay to have it done by someone that knows what they are doing.
|
|
daniel green
- Wednesday, 09/23/09 17:05:04 EDT
|
This might sound like crazy talk to some knifemakers, but I have always acheived the drop point tip of my knives like this: I forge one side of the metal to a blade sharp edge. This causes a banana-effect, curling the steel. I draw a straight line across the top of the banana, cut along the line so the tip is pointy. When done properly, the effect is quite similar. Forging this way seriously saves a lot of time with stock removal. Never pay anyone for something you can do yourself.
|
|
- Nippulini
- Wednesday, 09/23/09 17:11:35 EDT
|
I see what you are saying. The blade width is 3 inches from top to bottom. Would that have the desired effect? I am new to this and only have access to plate steel and leaf springs of which i have made several knives out of that really hold an edge (once you figure out how to temper it.) I admit i do not have the skills yet to make my own billets nor alot of the equipment just yet to pull that off. but is there a way to order 1095 carbon or another high grade in plate form so i can use the not-so-craftsman-like method to make another one? This one is mainly a weird looking machete and would like to make something with real quality steel and looks.
|
|
daniel green
- Wednesday, 09/23/09 17:22:55 EDT
|
p.s. hand filing an edge really takes a whole new meaning on this one. I want the blade to be a tough 1\4 inch thick
|
|
daniel green
- Wednesday, 09/23/09 17:25:37 EDT
|
Blade Shapes Daniel, A smith forging hot steel can make a blade any shape he wants including curves and tapers. The last blade I forged was a 7 curve Kris (a snake shape) blade with a diamond cross section. It took about 5 minutes using hand and power hammer to forge it out of round bar.
A curve in a blade is the natural result of forging one edge. As the steel is thinned it also gets wider thus one side is longer than the other and it must curve. As steel is tapered in a heavy blade the thin edge pushes out so far that it naturally forms the famous "clip point" of a Bowie knife. Making a straight blade is harder than making curved. . .
Many bladesmiths use the "stock removal" method. This sawing, grinding, filing. Long curved blades would be most efficiently made from straight stock that is bent into the curve then the tapers ground.
The big advantage to forging is that features like distal tapers (tapering along the length) is much easier and does not waste so much material.
The advantage to stock removal is that there is less possibility of damaging the metal by overheating. The equipment needed, the belt grinders and polishing equipment is ALSO needed by the smith that forges a blade. So the stock removal method takes less equipment.
While belt grinders are the best machine for shaping blades or finishing forged blades a hand held "angle" grinder can also be used.
Almost any book on bladesmithing of knifemaking covers the variety of processes in detail. See our book review page for a number of examples.
|
|
- guru
- Wednesday, 09/23/09 18:02:43 EDT
|
PH Shafts and Wheels: We have a heavy 1" thick flange on a 1.5" shaft running in pillow blocks. The crank pin attaches to it in one of 4 holes to give the hammer an adjustable stroke. The wheel bolts to the back of the flange. It could easily be replaced with a slack belt clutch pulley or have been made with a clutch on the back of the machine.
The original goal was to simply bolt the wheel to the back of the flange and have no welding or modification of the wheel.
When we started the design process I had seen some wheels offsets and fairly flat faces. I measured on for the design. But when it came time to build the hammer all we could find were wheels with the flange offset back in as far as it was offset out. It was also very difficult to find two wheels alike much less a specific design.
I had also considered this a production project and in the worse case have to buy new. . . The first thing I found is that virtually ALL pressed steel wheels are made in China. If you want to buy from the manufacturer that is where you have to go. THEN there is the matter of the little doughnut high pressure tires. . . New they cost about triple that of a good radial tire. In the end it is just as cheap to manufacture slack belt pulleys to your own specs.
|
|
- guru
- Wednesday, 09/23/09 18:05:59 EDT
|
Does any one know where one might be able to get a hold of a large number of ceramic balls about the size of bb's?
|
|
Nabiul Haque
- Wednesday, 09/23/09 18:54:52 EDT
|
Nabiul Haque, check out "Small Parts" on the web, also search for abrasive finishing media. Last but not least search for ceramic balls. I know they are made as we tried them in ball check valves. Depending on the spherical accuracy needed the price goes up.
|
|
ptree
- Wednesday, 09/23/09 19:41:58 EDT
|
Guru, I think you did well to choose the tire clutch. I love mine, and find it very nicely controlable.
I know I saw a pile of several hundred new looking compact spares at the local auto junk yard I frequent, and was told take all you want, $5.00 each in 2002 when i built mine. Want I should check for you?
|
|
ptree
- Wednesday, 09/23/09 19:43:44 EDT
|
I googled "ceramic balls" and found lots of suppliers.
|
|
- grant
- Wednesday, 09/23/09 20:11:50 EDT
|
Yes plenty of suppliers... on the industrial scale. I need them for some experimenting, tolerance isn't of importance as long as they are balls and they are very very hard.
Thanks ptree, I'll check it out.
|
|
Nabiul Haque
- Wednesday, 09/23/09 20:36:22 EDT
|
Naibul,
Ceramic balls are sold as pie weights, so you could try a cooking store. Not sure if they come as small as you want, though.
I was also able to find "loose ceramic balls" (ball bearings) for sale in small quantities pretty easily. Unfortunately, "small quantity" didn't seem to be the same as "small price."
|
|
Mike BR
- Wednesday, 09/23/09 20:55:41 EDT
|
Sorry for the misspelling. . .
|
|
Mike BR
- Wednesday, 09/23/09 20:56:25 EDT
|
I was recommending your Spare Tire Hammer site to a friend and he told me to take a peek after viewing it. Seem's I got an honorable mention for making the thing using O/A instead of electric welding?! Is there such a difference in strength between the two methods, or is it merely heat and speed that makes electric preferable? Still don't own an electric welder....."If you can't take the heat, stay out of the shop" LOL!
|
|
Thumper
- Wednesday, 09/23/09 21:05:40 EDT
|
Thumper, I'm not sure what "site" you are speaking of. . .
Arc welding rods come in various strengths and can be used on steel that is stronger than mild steel and keep the joint strength equal to the base metal.
The down side of gas welding is the large HAZ. While it works you put a LOT of heat into the parts due to the time it takes to make the weld. There is also a tendency to get a lot of scale on heavy work in the HAZ which is completely avoided in arc welding.
|
|
- guru
- Wednesday, 09/23/09 21:22:04 EDT
|
Ah, and I forgot to mention, arc is MUCH MUCH cheaper. I do not know the numbers but I would bet 10:1 or more.
|
|
- guru
- Wednesday, 09/23/09 21:23:09 EDT
|
Thanks for the info. I am purchasing one of your books this weekend. I appreciate all the feedback. I will post a pic of the finished product upon completion. Thanks again for your insight
|
|
daniel green
- Wednesday, 09/23/09 21:44:34 EDT
|
I think I have learned steel and carbon content to a small degree. Wrought iron is on the far left of the spectrum, little carbon and maleable. When wrought iron is heated to say 1500 degrees, the oxygen atoms in the iron and carbon
atoms in the fuel are attracted to each other. As the carbon builds up in the iron, it begins to melt and the absorption of carbon rapidly increases to about 3%. At this stage the wrought iron has been converted to cast iron ( on the far right of the spectrum ), which is now strong but brittle. In olden times, I believe, there were two different ways to make steel, 1. increase the carbon in wrought iron and 2. decrease the carbon content in cast iron....wrought iron could be packed with pure hardwood charcoal, sealed off and heated for a long period of time.
When unpacked, the iron would have blister steel fused to it. The blister steel could be seperated from the iron and placed in a crucible, melting it to a purer steel. I watched Paul Champaign melt magnatite in a bed of charcoal, forming a blume. He then broke it into pieces, heating and hammering each piece to get the impurities out,
then all the pieces were forged together into a bar, I watched him draw it out, folding and welding several times. I watched carefully to see how carbon absorbtion was controlled, but didn't see anything or didn't recognize it. He made beautiful swords.
|
|
Mike T.
- Wednesday, 09/23/09 22:14:58 EDT
|
Pie Weights: Oh thats interesting. They might be close enough to the right size, but I wonder if they are hard enough.
|
|
Nabiul Haque
- Wednesday, 09/23/09 22:36:35 EDT
|
Mike, What is being found out by a lot of research is that there was a more common middle ground where the fire is controlled to produce a high carbon steel bloom without melting the iron and getting cast iron. When this high carbon bloom is worked the carbon drops due to decarburization with each heat. Occasionally these blooms have bits of CI in them but through reworking and carbon migration it reduces to steel. This is the Japanese method and they now believe it was practiced all over the world in small furnaces.
In the blister steel process the entire wrought billet is converted to steel with a great variation of carbon content from the surface to nearly nothing in the middle. Again, working by layering and forging along with carbon migration (from high to low) equalizes the carbon content and makes the product more homogeneous. The same could be done without blistering the iron by starting with very thin sheet (1/16" or less) and case hardening it. A pile of these could then be laminated and worked just a couple times to produce a very fine steel with less work. The trick is to start with good clean thin plate. Since this is expensive and requires better control than the blister process I do not believe it was used historically. But it would work.
Another method I have seen demonstrated is to make a low carbon billet with spaces and heat with cast iron powder on the top of the billet with the edges up. When the CI becomes liquid (it melts at a lower temp than the lower carbon iron/steel) it is pulled between the layers of the billet by capillary action. The result is a CI/Iron billet where the CI is reduced to high carbon steel due to carbon migration. Carefully heated and worked it becomes steel. . .
Decarburizing CI is an industrial process called puddling. Through it the blast furnace converter was discovered.
|
|
- guru
- Wednesday, 09/23/09 23:01:17 EDT
|
|
|
[
CSI - anvilfire MEMBERS Group |
Getting Started in Blacksmithing ]
|