Lathe Drive FAQ
I've compiled the Lathe Drive information into a FAQ, added some information and will update it over time. It could stand some math and diagrams.
|
|
- guru
- Sunday, 08/23/09 08:57:52 EDT
|
My Delta drill press has a jackshaft the floats on a pivot the way Dave describes (I've also used a double-ended motor as a jackshaft, but Delta didn't).
My drill press (a Home Depot special) came with short-lived belts marked A25. I bought a pair of new A25s, which were too long to use. This seemed so odd that I came up with a hare brained theory about Delta's supplier marking 4L250 belts as A25, without realizing that lettered belts are sold by the inside diameter and numbered ones by the outside diameter. Predictably, I guess, the 4L250 belts I bought were too short.
I was pretty bummed about buying four belts the wrong length. Then I realized that they were the right length *on average*, and there was enough play in the jackshaft to use one of each. That was around 10 years ago; I just put the spare (mismatched) pair on the machine this spring.
|
|
Mike BR
- Sunday, 08/23/09 10:43:42 EDT
|
HABA had an unusual meeting this month; it was inside an air conditioned meeting room. Three of us presented information about smithing. I created one on heat treating and one on Wootz metal. They are available for free download on the HABA site: www.habiron.org. and go to Blacksmith discussions or go to http://habairon.org/Aug09/.
|
|
quenchcrack
- Sunday, 08/23/09 17:29:09 EDT
|
AC Meetings. . . no fair!
|
|
- guru
- Sunday, 08/23/09 17:52:25 EDT
|
Guru, no forges, just talking. Come to one of our regular meetings with a dozen forges, 115F heat index and 90% humidity.
|
|
quenchcrack
- Sunday, 08/23/09 21:03:59 EDT
|
I have had both of my older children in the shop doing age appropriate hot work with my. My son is two, my daughter is seven. I hold the steel and let them hit. At this stage, the biggest challenge is hammer control and strength of blows. We do simple, small work that they can complete fairly quickly and easily. Just this weekend, my son was practicing pounding nails in a board. He got to the point where he did something like 8 nails, most of them completely by himself, including getting them started. I just held the board.
Patrick
|
|
Patrick Nowak
- Monday, 08/24/09 08:05:25 EDT
|
I am going to be doing some repair work and reinforcing on an avil clamshell bucket used for heavy slatwater dredging, what type of steel do you recommend?
|
|
Dan
- Monday, 08/24/09 08:13:58 EDT
|
Bucket Repair: Dan, This is out of my area but I do know that many of these devices are made from what is known as "AR plate" for Abrasion Resistant. This is fairly hard and difficult to work material by chip making processes but works well by welding methods.
|
|
- guru
- Monday, 08/24/09 11:16:42 EDT
|
I was fortunate enough to find a 105 lb post vise for a very good price and am getting ready to mount it. I beleive I want to mount it belt buckle high on a bench I will be securing to the wall. What material would be best to place between the end of the post and the cement floor in my garage? I was thinking of using a stump. Any other insight would be appreciated.
|
|
MD
- Monday, 08/24/09 12:57:51 EDT
|
Vise support: MD, Most folks just make a large support plate or washer that fits the end of the leg and spreads the load so as to not damage the concrete or the foot of the vise. If you need to raise the foot then a large block of wood plus the washer. However, most leg vises are about 39" high and need little extra unless you are very tall.
The important thing is to have good anchorage such as the bench being bolted to the wall and be fairly convenient to the forge. Smiths often do as much work at the vise as at the anvil. You may also want to look at the vise accessories page at Blacksmiths Depot. There are a bunch of tools that increase productivity at the vise.
|
|
- guru
- Monday, 08/24/09 13:11:41 EDT
|
Thanks for the information. I am very tall, so I am planning on raising the vise higher than the original leg. Any ideas on the washer size or type that the block of wood should sit on?
I plan to mount the vise such that there is a triangle of sorts made up of the forge, anvil and vise. I appreciate the information about accessories. I looked and can see some handy tools there.
|
|
MD
- Monday, 08/24/09 13:24:11 EDT
|
Vise Height: If you're planning to do a lot of filing and fine work, you may want to mount the vise high; but if you're planning a lot of pounding, you might want to keep it low (although higher than your anvil face).
For the light leg vise I have mounted over pavers I just used a block of oak, mounted with the grain horizontally and attached to the workbench leg.
For my 100# vise I have it mounted on a pair of 4 X 4s pinned together for the main mounting, and the foot set in a lage metal washer atop a locust log, also pinned to the 4 X 4s and the whole sunk into the gravel floor with 60# of Sackrete.
For a paved floor, I would go cross-grained locust or find a good piece of elm, which is resistant to splitting. You could always band the wood should you use end grain on a short stump.
Hope this helps.
Sunny and warm on the banks of the Potomac.
Visit your National Parks: www.nps.gov
Go viking: www.longshipco.org
|
|
Bruce Blackistone (Atli)
- Monday, 08/24/09 15:15:32 EDT
|
A Bruce notes you can do without the steel washer. But that is what is needed for the minimum height change on a hard floor. The thickness needs to be about 1/2" (13mm) or more depending on what you have. Where the hole is needs to be as thick as the point to shoulder distance on the vice leg (if the shoulder is still there and you need a hole). To prevent damaging the concrete anywhere from 4" (round or square) up would do.
|
|
- guru
- Monday, 08/24/09 15:53:41 EDT
|
I just re-mounted my big 7" vise this weekend. The previous mount had the bolt plate on the bench. That put the jaws at or just above my belly button. To accoplish that I had a 3" diameter steel post counterbored under the vise foot. The new mount has the vist foot about 3" below the floor. I built a steel stand, then welded the counterbored post with a spacer to the bottom of the stand base plate. I cut a hole in the floor and dropped the post in. The stand itself is anchored with four 3/4" wedge anchors and is welded to the bench. It is now at a much more convienient height and is about 5 feet further from the forge than it was so it doesn't heat up like it used to. It also sits out from the bench about 13 inches further than it used to which lets me get almost all the way around it. Previously I could only get at it in an arc of 180 degrees. One thing I noticed when doing this project was that I could have set the vise even lower as the jaws are still a few inches above the bench top, but then the screw box would be so low that it would be akward to open and close the vise. I should have wieghed the vise when it was dismounted. my guess is that it comes in around 200 lbs. I can move it by myself, but picking it up straigt is a struggle.
Patrick
|
|
Patrick Nowak
- Monday, 08/24/09 15:55:05 EDT
|
The most convieniently mounted blacksmiths vise I ever had was on my portable forge trailer. It was on a hinged triangular "bench" lower than the rest of the bench top that let me have about 240 degree access. I like having a "bench top" support for holding tools as one works. Many smiths mount their vises on a heavy post (wood or steel) but this does not leave a place for the hammer and chisel, tongs, files, grinder, welding leads or whatever set of tools is in use. So the triangular benchtop was very handy.
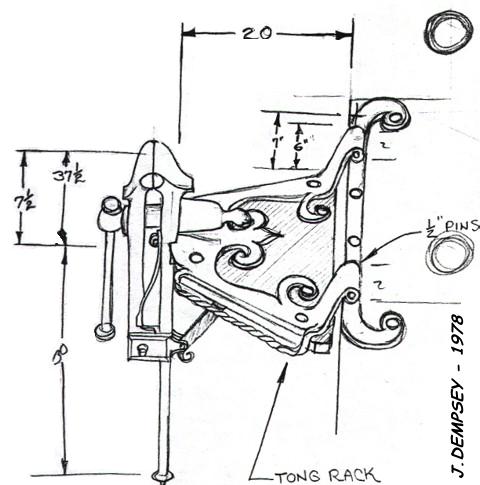
Blacksmith Leg Vise Mounting by Jock Dempsey
The leg would tend to dig into the dirt and lower the vise over time. I think the lower height like Patrick's setup may have had some advantages.
|
|
- guru
- Monday, 08/24/09 16:32:41 EDT
|
I really appreciate all of the information that has been provided and I think I understand the benefits of having the vise mounted lower. I am 6'7" and want to have it at a comfortable height. So for most of the work that the folks here use thier vises for, anatomically where is the vise located? (Knuckles, belt buckle, belly button, etc...)
I like my anvil at knuckle height, on me, and that is about 6 or more inches to high for most people I talk/work with.
|
|
MD
- Monday, 08/24/09 17:08:19 EDT
|
Vise Height: The standard leg vice is about 37" to 39" (940 to 990 mm) from leg tip to jaws. On most people this puts the screw at a convenient height and the jaws at about waist or belly button height.
But work height needs vary. I have a heavy bench vice mounted on a 36" (914mm) bench. This puts the jaws at 46" (1170mm - chest height). It is very handy for filing, sawing, chiseling and other bench work. Oddly it worked well for holding benders as they were just below shoulder height where it is good to push with your arms. While the screw is a little high the jaws put work in the close vision range.
As noted on my vise that sunk into the ground and Patrick lowering his a height of about 32-33" (810 to 850 mm) is good for average height folks doing heavy work. Patrick and I are about the sam height, I'm 5 foot 8" (17.3cm))
The ideal vise would adjust in height from 28 to 48".
I have an old 20" drill press that would be scrap except it has the base, 6" dia. column, table and raising mechanism. I'm going to saw off the top of the column and mount a heavy bench vise on the table. It will be a little springy but the adjustability of the swing arm, rotating table and the heght adjustment should balance that defect. If springiness is a problem I can always put a jack screw under the table.
|
|
- guru
- Monday, 08/24/09 17:46:02 EDT
|
MD: which one? I currently have 4 mounted in my work area and each one is at a different height. (and I have a machinist vise mounted on the table of my heavy duty drill press so I can crank it to the height I need for the task I am working on.)
Thomas
|
|
Thomas P
- Monday, 08/24/09 17:55:36 EDT
|
I'm about 5'8" and have a post vise mounted as low as I could get it without drilling the floor. If I have to do any heavy pounding in the vise, I stand on a milk crate!
|
|
Mike BR
- Monday, 08/24/09 19:19:02 EDT
|
anvil height: i use an anvil at second knuckle height when i stand a ground level, and for fine work i have a 2 in deep pit on the other side. it works for me, and maybe other people. too bad for me i do not have a vice :(. i have found a normalized spring steel bar is the best hold down for me. and that hot things don't go where your feet are! but as i am 6'2" and still growing (i'm 16) so digging a pit comes in handy!
|
|
bigfoot
- Monday, 08/24/09 19:43:11 EDT
|
Anvil Repair
I have a 180# Mousehole anvil with a crack in the heel. I assume this crack is due to seperation of the heal block from the main anvil body since the crack penetrates the entire thickness of the anvil and is located at the narrowest point of the waist. The crack runs from the waist up through the face. In the face, it is probably a bit over 1" long, but in at the waist in pentrates about half the width of of the anvil. My intention is to grind out the crack, or at least a most of it, then back fill with weld. During solidification of the weld, stress will be built up that will pull the side of the gouge towards one another, but that will result in a tensile stress on what is currently the sound part of the forge weld. I am concerned that these stresses will cause the as yet un-cracked forge weld to crack. Does anyone have any experience with this type of repair and do you have any recommendations? Thanks.
Patrick
|
|
Patrick Nowak
- Monday, 08/24/09 21:51:24 EDT
|
Patrick, These failures are usually at weld interfaces where the scrap used to make the anvil was not sufficiently clean or descaled or too rough when welded. This often results in the horn or heal breaking off. The heal is less likely to break due to the reinforcing steel plate covering the joint.
Stress from the weld repair is likely to finish the job on the other side and possibly crack the face as well.
Short of replacing the entire heel with a replacement steel part I think all you can do is try the repair, peen it, stress it and if it cracks somewhere else repair that.
|
|
- guru
- Monday, 08/24/09 23:30:19 EDT
|
Patrick
I picked up an anvil this summer that is cracked through the waist to the face about an 1 1/2 inches off of the heel.This is quite a severe fracture but I figure when there is some quiet time this winter I will gouge out the fracture and weld it back up.I have done quite a bit of repair welding on steels this thick over the last 30 years and the best advice I can give you is PREHEAT-POSTHEAT and slow cooling ie; when you are done postheating wrap the whole anvil in insulation and leave it to slow cool overnight. If you can bury the anvil in Zonolite that is even better.As Guru stated peening is a must after each pass and maintaining a temperature of 300-400 degrees through out the welding procedure will significantly cut down on the stress build up and the pulling.Good luck
|
|
Amos
- Tuesday, 08/25/09 01:01:55 EDT
|
I have a weird question that you may help on. My brother is a U.S Marine and i want to get him some superior armor for him not the Kevlar vests they get issued , I'm talking about a full titanium set from head to toe. now would a blacksmith be able to create that for me or some one else and do you think titanium is a good metal for bullet proofing, and do you think its particle for a blacksmith to make
|
|
Jon Evans
- Tuesday, 08/25/09 02:44:04 EDT
|
Jon:
I can see where you would want your brother rigged-out in the best gear. Based on my brief time in the Marine Corp (late '60s, early '70s) I noted that where you may pack some personal weaponry, such as knives, machetes and tomahawks, when it comes to primary weapons and protective gear; you use what the USMC gives you; and his platoon commander is not going to let him wander about in a full suit of titanium armor while the rest of the platoon has standard issue protective gear. The “uniform services" are uniformed for a reason; the USMC wants to know that everybody has the right equipment for the mission, and that they are in the right place at the right time. This brings us to the second problem with armor: weight.
A lot of people have spent a lot of time over many centuries reinventing the wheel when it comes to body protection. The great dichotomy is that you usually sacrifice mobility for protection. Even light infantry, like the Marines, carry a huge load in arms, ammo, water, rations, med kits, shelter, and the support equipment of the platoon. Every ounce is another burden. Non-standard armor tends to just add to the burden. The slower you are, the more you are exposed to hostile fire in an ambush and the slower you are to take cover. Looking for improved armor, folks have spent a lot of time experimenting with metal, ceramic, plastic, fiber and every combination and variation thereof. Nothing is perfect, everything is a compromise. It's one thing to create and test armor under controlled conditions, it's another to try the armor in varying conditions out in the field where people are trying to do you bodily harm.
Lastly, you would have to decide what needs protecting. To quote Frederick the Great "He who defends everything defends nothing." Throughout the gunpowder era armor was reduced on the limbs to enable heavier armor to be used on the more vital head and torso; which is pretty much where the modern body armor is concentrated.
I admire your devotion to you brother, but even if you found a smith, or, more realistically, an armourer who could create a suit, I do not think the Marines would allow it to be used by your brother under field conditions. Auxiliary equipment such as smaller weapons and tools, and spot armor (I had a friend who worked for an NGO in Afghanistan during the Soviet occupation who wore a discrete chest plate under his clothes when he was in certain "unpleasant" areas) are within the capabilities of most smiths, and you may want to redirect your attentions there.
For more general information and advice on body armor (or references thereto) you may want to check out www.armourarchive.org . (They are having server problems, of late, but they should have things squared away in the next few days.)
Good luck and good hunting to your brother, we appreciate his service on our behalf, as we appreciate your concern for him.
|
|
Bruce Blackistone (Atli)
- Tuesday, 08/25/09 07:58:55 EDT
|
Every year at the last Saturday of September my hometown of Hulmeville has "Hulmeville Day", where EVERYONE in town (mostly on Main Street) has a yard sale. IT's a small town (900 pop) but everyone gets involved. Last year I wanted to do a demo, but the fractured pelvis thing kind of got in the way. This year I plan on bringing up my newest anvil (the "American Wrought") it's got a ring like you wouldn't believe. I already have the anvil, mount and hammer setup in my mind, but what would be the easiest way to temporarily mount the post vise? I was planning on setting up in my driveway (its in the shade) with my dual Mapp fired micro forge, the first half of the driveway is paved, the back half is medium sized gravel. I also plan on having a few fire extinguishers around just in case the police and/or fire dept may have a problem. Every year I put out some small work for sale (hooks, nails, etc.) and maybe one or two pieces get sold. I figure the demo-ing will draw a nice crowd (we should sell out of all our crap we've been collecting all year) and possibly earn more sales of my forgings. Any tips? Suggestions? If this gets in the papers (which I have a strong chance of getting) I'll post a link.
|
|
- Nippulini
- Tuesday, 08/25/09 10:06:42 EDT
|
Portable Vise Stands: Nip, IF you have access to an oil drum or old water tank about the same size then you can make a combination quench tub and vise stand. The 500 pounds or so of water makes a decent vise anchor.
To attach the vise cut a thick piece of wood (2 x 8, 2 x 10) to match the curve of the cylinder. Bolt the two pieces inside and out flush to the top of the cylinder. Then the vise to this. The height will probably not match the vise and you will need a foot. Standard drums are about 33" and the vise probably wants 30". If you use a hot water tank you can cut it to the proper height as well as weld brackets to it.
At the back of the top boards nail on a guard to keep tools from falling into the tank. A screen of some sort to prevent stuff from going to the bottom is also helpful since it is a LONG reach.
Filled with water, this is a heavy stand. Empty it can be rolled or man-handled out of the way.
Bolting the boards on inside and out over as wide a section as you can fit stiffens the drum wall. This is needed otherwise when you work with the vise water will splash out.
Having all that water is handy when working outdoors near grass and other combustibles. The last one of these I helped make we put a hose bib on the side of the drum near the bottom. This helps draining and you can connect a hose so that you don't drain the water where you stand.
-----------------------------------------------
Depending on the vise and the truck a hitch receiver mount can be a good temporary vise holder. Cars not so good. Heavy trucks with high bumpers better.
---------------------------------------------
Atli has a "field expedient" tripod type affair to support a leg vise at an angle. I found it too difficult to use but it works in a pinch.
-------------------------------------------------
I have found things like weighed truck brake drums and wheels to be fairly useless as vise stands. While they can be quite heavy the leverage of the leg or support for standing work is too much and easily overcomes the weighted bottom. Even tightening the vise becomes difficult. The exception is a stand with a plate that you stand on.
|
|
- guru
- Tuesday, 08/25/09 11:02:05 EDT
|
Artist's dreams. . . . My current plan for a vise stand for my large vice is a sculptural work of art as much as functional stand. It will be similar to my free standing stand that has a plate to stand on shown on our leg vise article but larger. When standing on the plate the vise is immovable by the user and does not need to be bolted down.
Where the normal post goes I want to build a large diameter steel tree stump with branching roots and branching limbs that brace the "column" on the plate and spread out under the benchtop. It would start with an 8 to 10" diameter tube and then pieces of smaller pipe or tube fitted to it as major branches and the smaller pieces such as 3/4", 1/2" and 3/8" pipe user to form a bark like effect that extends into roots.
The small bench top would be a free form type of shape extending the top of the "stump" made from some 1.5" thick mahogany I've got.
The whole would be made to be tree like but also very functional. The "roots" creeping around the edges of the floor plate would stiffen it and prevent bounciness. While large and relatively heavy it would still be portable as it would not need to be bolted down. The weight would be reduced somewhat by use of hollow sections as much as possible. But it would all add up and be quite heavy . . movable by a couple men, hoist or fork lift.
|
|
- guru
- Tuesday, 08/25/09 11:08:52 EDT
|
How about a bucket filled with concrete and a 6x6 stuck in it? Or is this more like the weighted brake drum idea? I could theoretically dig a hole in the gravelly portion of the driveway, sink a 6x6 in it and back fill with gravel. Also not looking to put TOO much into this as after 4 or 5 hours the whole event is over and I'll probably never use it again until next year.
|
|
- Nippulini
- Tuesday, 08/25/09 12:10:34 EDT
|
The big vise I mentioned earlier is about 44" inches tip to tip. My original mounting configuration put the jaws about 50" off the floor. The new mounting set up has them 41" off the floor. My anvil is 32-33" off the floor. I am just 6 feet tall, so I think this set up will work well. I hot bent some 1x1.5" stock on Sunday around a form held in the vise and I was able to get plenty of leverage.
Patrick
|
|
Patrick Nowak
- Tuesday, 08/25/09 12:35:05 EDT
|
Jon; forging Ti tends to make it brittle due to absorption of gasses. Ti isn't a real good metal for armour in my opinion; of course I had a friend punch out several hundred holes in Ti sheet with my sheet metal punch so that colours my opinion some...
You might be able to find a commercial armour plate that is "too expensive" for the service to use that might be addable to what they already have. Note that increasing armour generally works counter to what you want as it gets "forgotten or left off" more. There are also social aspects---did you know that body armour that was really quite effective was around during the American Civil War? Folks who had it were ridiculed a *lot* and it fell out of favour... (Arms and Armor Annual Vol 1)
Thomas
|
|
Thomas P
- Tuesday, 08/25/09 12:35:46 EDT
|
TGN I made a couple of legs out of 1/2" sq stock that mount to my postvise's mounting bracket and angle down and out with a foot bent out and then a spike bent down.
It works OK for light duty and quite well if you get people to stand on the feet.
Under the leg I have a small tamper---flat plate with a piece of pipe in the middle that keeps the leg from being driven in the ground. A couple of tent stakes to keep the plate from moving sideways helps too.
The 55 gal drum with water works better; but harder to use in a medievaloid setting...
Thomas
|
|
Thomas P
- Tuesday, 08/25/09 12:39:08 EDT
|
TGN
I was going to say:
Is there a light pole or parking meter nearby? Maybe you can make a clamp and use something that's already there.
You have probably already considered this though - sorry.
|
|
Dave Leppo
- Tuesday, 08/25/09 14:34:20 EDT
|
A temporary use post set permanently deep in the ground would work if you need it from year to year. Sign Post in between?
|
|
- guru
- Tuesday, 08/25/09 15:08:15 EDT
|
Wish I had a photo to show you guys the driveway, no parking meters or poles nearby. Besides, even if there were a parking meter I'm sure the local governement wouldn't be too happy with me converting it into a post vise mount. :) Anyway, I'll try to figure something out, maybe set a post as guru just said... I'm sure I could find uses for it during the 364 other days.
|
|
- Nippulini
- Tuesday, 08/25/09 15:36:43 EDT
|
OTOH solid posts near driveways tend to be expensive in bodywork. Of course I had kids learning to drive...
Hmm set a piece of good sized square tubing in concrete in a post hole *below* lawnmower danger and make up a post vise system you could drop in or remove as needed...
Thomas
|
|
Thomas P
- Tuesday, 08/25/09 16:03:08 EDT
|
Maybe you could mount the vise on a fair-sized (say 2' diameter) wood or steel base, and fix that to the driveway with those auger-type tie downs. Of course, that only works if the gravel is loose enough to get the augers through it.
|
|
Mike BR
- Tuesday, 08/25/09 16:50:55 EDT
|
I got it! Portions of the gravel driveway have wood ties making a framework to the retaining wall behind it. I could easily secure brackets into the wood to attach the 6x6 or whatever upright for mounting. After the show, removal just means unscrewing the brackets from the base. Still accepting good ideas in the meantime.
|
|
- Nippulini
- Tuesday, 08/25/09 17:40:47 EDT
|
We've worked ourselves back around to gozintas! I'd sink a tube with a flange around the top and some welded on rebar for anchoring into either a new slab on the edge of the driveway, a hole cut in existing drive and refilled with concrete or hydraulic cement, or if the tube is long enough just dig down into the dirt. Make a vice mount that slips into the tube, wedge if needed. Make a cap while you have the welder out.
|
|
Judson Yaggy
- Tuesday, 08/25/09 18:32:45 EDT
|
Nip, The steel for a good "gozinta" is difficult and expensive to buy EXCEPT at trailer and motor home suppliers. The price per pound is higher but you can purchase the hitch receivers and tubing to fit them without buying 10 to 20 foot lengths of different sizes. They also have decorative filler caps. . .
|
|
- guru
- Tuesday, 08/25/09 19:24:02 EDT
|
Tripod Field-Expedient Vise Mount:
As the Guru mentioned, it takes some getting used to; good for light work at demonstrations, though.
http://www.anvilfire.com/21centbs/armor/atli/helm99/ahelmDb.jpg
http://www.anvilfire.com/21centbs/armor/atli/helm99/ahelmEb.jpg
The secret is the massive 1 ½” rebar legs, hammered to half-thickness and drilled for two bolt holes in each. That way you can remove a bolt, loosen the other and fold one leg against the other so that the unit lies flat in the truck bed; or unbolt both legs completely. The heavy legs provide both strength (Overdesign-R-Us) and stability. It is cheap, it is (relatively) easy to fabricate, it is transportable, It is stable (tripods are good for that) but it has its limitations, too.
|
|
Bruce Blackistone (Atli)
- Tuesday, 08/25/09 20:07:13 EDT
|
TSC farm stores have the receiver socket and tube to fit that Jock mentioned.
|
|
- Dave Boyer
- Tuesday, 08/25/09 20:17:46 EDT
|
Jon,
As someone who has spent close to three decades in law enforcement, wearing body armor on a pretty much daily basis, I can assure you that titanium armor would not be worn by anyone who really needed body armor. Kevlar body armor is one of a class of goods generally referred to as "flexible body armor", with the emphasis on flexible. Any armor that is not flexible is useless in today's combat situations. Even the ceramic plate armor is segmented so that it will allow movement, and it is only worn when circumstances require it and when the limitations it imposes on freedom of movement are acceptable.
In combat, you go with what gives you a *reasonable* chance of surviving encounters without unduly hampering your ability to move and respond to circumstances. Rigid body armor does not fit those parameters, I'm afraid.
|
|
vicopper
- Tuesday, 08/25/09 21:34:13 EDT
|
Jon,
One thing I should mention about supplemental hard plate additions to flexible body armor, i.e. trauma plates over the central chest, is that they must be properly configured so as not to deflect a projectile up under your chin or down into your groin. Sadly, that has happened with the earlier iterations of hard trauma plates - enough times that most people now opt for flexible trauma plates.
Part of body armor's ability to contain a projectile comes from the flexibility itself, allowing the material to envelop the projectile and thereby increase the impact area, reducing penetration. Think about standing next to a guy wearing all hard plate armor - your chances of being hit by a deflected round (ricochet) are pretty high.
|
|
vicopper
- Tuesday, 08/25/09 21:40:05 EDT
|
When Ralph Sproul poured the floor in his shop, he included several 6x6 square tube gazintas set flush (when capped) with the floor. Not only that, but they're all tied together electrically so he can have a ground connection for the welder anywhere he needs it without having leads running all over the floor. That, my friends, is smart planning ahead!
|
|
vicopper
- Tuesday, 08/25/09 21:48:36 EDT
|
can someone please e-mail me some plans for a coal forge im very new to this and am having trouble getting started any advice would be very welcome
|
|
jason
- Tuesday, 08/25/09 23:22:52 EDT
|
Jason, There are many types of solid fuel forges. You can spend anywhere from a few dollars (or none if you are a good scrounger) to thousands of dollars on a "simple" brick forge.
If you are having trouble getting started then you need to read our Getting Started article that is linked at the top of this forum, and on the top of almost every page on this site. Study it, follow the links. There are links to plans, books and articles.
A major part of blacksmithing is taking the initiative to find information and figure out how to do things on your own. Plans are here, it only takes two clicks to get to them. Book reviews with excerpts of plans are here and only takes three clicks to get there. But I recommend you get the books and study them. They are cheap education.
|
|
- guru
- Tuesday, 08/25/09 23:51:27 EDT
|
Planning Ahead: When pouring a shop floor there is a lot you can do as VIcopper noted.
When a friend of mine had to pour a new floor in building to house his machine shop he laid out where the machines were to go (rows of lathes and mills) he ran the power to the machines under the floor and up into pedestals next to them. Each had 3PH, 240VAC welding outlet, 120V receptacles for lights and accessories such as DRO's, AND air lines.
When I built my last shop I ran conduits under the floor to next to the power hammer foundations. The foundations had been dug and formed prior to pouring the floor. Much of the electric distribution was under the floor in conduits but not enough.
For moving machinery we have suggested numerous times for folks pouring floors to place heavy anchors with eye bolts in the the floor at the far side from the door for dragging things in or using as a dead man for a hoist. I suppose that they should also be placed near the door for dragging things out.
In numerous large shops they have paved the floors with weld platens (Acorn plates). This is for bending large beams and forcing structures into shape.
I've had folks recommend setting channels in the floor so that T-bolts could be used to bolt down machinery easily. But I think this plan has significant faults.
Twice in our shops we have had to put in pits in order to have enough overhead to build tall machines. One was 8 feet deep and we had heavy covers to close it when it was not needed. A heavy truck could drive across it. Sockets in the floor held removable railings. The second pit was only 4.5 feet deep and had a stairway at one side. It increased the height under a 24 foot tall hoist to 28.5 feet.
In wood working shops they recommend putting a power outlet in the middle of the floor for the table saw. But if a shop is to be dedicated to wood working an under floor exhaust system for saw dust and chips keeps the shop clean and does not break up the floor. Similar downdraft ventilation systems are useful in welding shops.
In Dean Curfman's shop where they build the Big BLU's all the temporary power cords and air lines are on retractable reels so that there are no cords on the floor to trip on. A number of the benches have outlets on the bench with power lines buried in the concrete floor. Welders are hung from jig cranes so the cables do not run across the floor. All this reduces the typical tangle of cords that represent serious trip hazards in shops.
When I plan a shop, lifting capability is important. A place to hang a hoist or a monorail for unloading, loading and moving heavy tools and machines. The option is a fork lift. These are expensive, require a lot of maintenance AND take a lot of room in the shop to use.
The big thing is planning and taking advantage of what you can. It is much easier to put things into concrete before it is poured than afterward. This requires planning and making the investment in steel, pipe, conduit and time. But it is all well worth while afterwords.
|
|
- guru
- Wednesday, 08/26/09 01:06:30 EDT
|
Re planning ahead... is there any other kind of planning?
|
|
philip in china
- Wednesday, 08/26/09 08:38:08 EDT
|
Planning afoot. . ;)
I find myself doing a lot of planning in the moment. Not ahead enough to think much about it. Lots of mistakes happen that way. . .
|
|
- guru
- Wednesday, 08/26/09 09:36:49 EDT
|
One thing I found invaluable in my shop is a Harbor Freight 2 ton foldable shop crane....with it I can move my trip hammer,press,surface grinder,etc by myself and when not in use folds up compactly...not bad for 200 bucks
|
|
- arthur
- Wednesday, 08/26/09 14:51:37 EDT
|
If you have no other lifting means these engine hoists will move some things but are difficult to maneuver and their height capacity is severely limited. I had one and sold it for half price to get it out of the shop.
Commercial pallet jacks are better built and generally as useful. However, you have to get loads on a pallet.
While a good monorail will not cover an entire shop they are a lot better than many other rigs. I cannot advise on the engineering but many are simply attached to the rafters of the building. Many shops get by with multiple monorails with short ones taking the load to the sides after transferring from a longer one down the center of a shop or from an isle where a fork lift or pallet jack can drop the load.
|
|
- guru
- Wednesday, 08/26/09 18:07:40 EDT
|
I have both a HF engine hoist/shop crane and a pallet jack, and I find that the crane gets ten times the use the pallet jack does.
While the crane is certainly a bit cumbersome, it does allow me to move my power hammer, fly press and stand, big anvils, etc single-handedly. I've also used it to hold heavy work for welding and forging, to pick up a 1000# heavy I-beam from the side of the road and load it into my truck for future use and to lift the front of my tractor so I could assemble the front end drive unit. As Arthur said, not bad for $200.
My pallet jack would get much more use if it was one of the narrow ones. As it is, it just doesn't fit enough places in the shop to be much use for moving things, so I lift them with the crane and move them with low dollies made for the purpose
I'm planning to build a couple of light duty jib cranes for the shop to handle most of the shifting of things and I'll probably mount the MIG unit on one of them.
|
|
vicopper
- Wednesday, 08/26/09 19:19:25 EDT
|
I recently aquired what i beleive is an oil drill rod from my cousing it is about 3.5 feet long and most of the length is about 1/2 inch thick ( round) then it gets bigger to about 1.5 inches and then has about a 1.25 thick square section then round threaded. So its .5 round for like 3 ft, then gets like 1.5 round for an inch, then a 1.25 inch square section for 3 in, then 1 in threads for 3 or 4 in. I was wondering what this may be made of and if its a water or oil quench? Its hard to put in words, its stright and if you dont understand i dont blame you i will try to get a picture. My dad called it a ________ bar.... think it started with an s.
|
|
- Jacob Lockhart
- Wednesday, 08/26/09 21:17:09 EDT
|
i have heard of drill rods made into gun barrels and chisels. but i do not know how and what heat treat it needs. i would go with air cool first, then oil, then water. if anything it might make good punches, or even something to fool around with for fun.
|
|
bigfoot
- Wednesday, 08/26/09 22:32:29 EDT
|
Jacob, Water well sucker rod? Maybe 1050 to 1055 steel, a guess. Water hardening unless it's a thin, flat section; then try oil. Like all junkyard steel, you're guessin' at tom cats. Can you spark test it? Test the unknown to a known.
|
|
Frank Turley
- Wednesday, 08/26/09 22:50:41 EDT
|
Welders and Jibs: I've seen a number of welders hung from jib cranes (device like a fireplace crane). Since most jibs do not do a 360 turn running the wire is not an issue. I've thought about hanging one of my buzz boxes this way.
The advantages to hanging the welder on a jib are numerous. Putting it overhead gets it out of the way by using shop space 3 dimensionally. Being up off the floor gets it out of the high dust zone keeping the works cleaner and increasing its life. Putting the cables overhead gets them off the floor reducing the trip hazard and reducing wear and tear on the cables. The usable range of the cables is increased by double the length of the jib. With copper becoming proportionally more and more expensive this is of some economic benefit which can be taken from the cost of the jib.
When the welder is a MIG unit the added range is significant improvement since MIG stingers are quite limited in length. A normal 6 foot lead can be extended to cover a 15 foot circle when on the end of a 6 foot job. This will often get the weld point to the middle of a large table where MIG may not normally reach. The cost of a heavy cart for a portable MIG can also be balanced against the cost of the jib.
The only down side is that the welder is not portable and must be used in a specific area. But this is usually the case since power outlets and cables are usually limited. Maintenance and adjustments may also need to be done from a ladder. But these are small trade offs for all the benefits.
|
|
- guru
- Thursday, 08/27/09 08:56:15 EDT
|
Does anybody have any information or experience with what diameter of flue pipe will draft and what won't? It'll be going straight up about 8 feet from the forge. I was originally planning to use 14" diameter, but there appear to be some technical issues with doing that in Canada, so I was wondering whether anybody knew whether I'd have any trouble with draft with a 10" diameter pipe.
|
|
David Brandow
- Thursday, 08/27/09 09:01:48 EDT
|
I was thinking about cutting a piece of railroad rail let's say an inch in width down through the ball of the rail until you get to the flat underside, make the flat underside the width you want, weld a handle to the upper ball portion making a flatterer. You could make flatterers narrow or wide for each particular use. Just a thought.
|
|
Mike T.
- Thursday, 08/27/09 10:57:41 EDT
|
Stacks: David, For most coal forges 12" diameter is needed. You can "get away with" 10" in some cases but it results in a smokey shop. The pipe diameter is also only part of the story. If you use an overhead hood the 14" might be too small. The 12" is based on using a side draft "hood" that is very efficient due to being close to the fire and sucking up mostly hot gases. Overhead hoods have to move all the cold air at their opening as well as the hot. This cools the gases, the flow is less while the volume is higher. . . See our plans page for the "Super Sucker" forge hood.
|
|
- guru
- Thursday, 08/27/09 11:18:39 EDT
|
Mike, Even small flatters require sledge hammer force to work. To transfer that force requires a thick pyramidal body. The narrow web of the railroad rail is too flexible in this application.
|
|
- guru
- Thursday, 08/27/09 11:21:23 EDT
|
Sucker Rod can be anything from 1030 to 4140, depending on how deep the well it was used on is. The deeper the well, the longer the sucker rod string and the stronger the top sections have to be.
|
|
quenchcrack
- Thursday, 08/27/09 12:35:53 EDT
|
I have a swiss made anvil and cant seem to find any other example of it Does anyone know anything about them ?
|
|
- Rick Boone
- Thursday, 08/27/09 14:24:12 EDT
|
I have a Swiss=made anvil and cant seem to find any info or history of it. Anyone know anything about these ?
|
|
- Rick Boone
- Thursday, 08/27/09 14:26:29 EDT
|
I have a Swiss=made anvil and cant seem to find any info or history of it. Anyone know anything about these ?
|
|
- Rick Boone
- Thursday, 08/27/09 14:29:17 EDT
|
Rick, We are building a Gallery of anvils (see home page) with a great number from Europe. While we have many photos the origin of many of the anvils is yet to be determined. If you can send me a photo or two I might be able to tell you more.
|
|
- guru
- Thursday, 08/27/09 15:09:05 EDT
|
MIG Jib Boom:
All the points you make are right on the money, Jock. I've given the project a considerable amount of thought and a bit of actual design time, and I think I've come up with a design that will answer almost all the possible downside issues of having the MIG unit up on a jib boom.
My plan involves making a support column of 2-1/2" or 3" Sch 40 pipe with a floor plate and the top anchored to the rafters. It will sit at the corner of a support column in the shop, since I can't remove the column. I'll only get 270 degrees of swing, but that will cover all the area where I really need the MIG handy. Normally, I'd weld the jib boom to the support pipe and have the pipe pivot, but in this case the pipe will be fixed and jib will rotate around it.
With the jib welded to a collar that rotates around the support pipe, I can affix a small hand winch to the base of the pipe to run the jib boom up and down for changing spools, cleaning and shifting the MIG to a rolling cart for outside jobs. A simple "dead man" pin through the support pipe beneath the collar will ensure that it doesn't fall if the winch has a failure. I'll run a longer piece of tubing for the shield gas which will remain on the floor, on the "dead" side of the support column.
All in all, it's not a very complex arrangement, but it allows the flexibility I want and really extends the useful range of the MIG stinger for most jobs. I don't really gain any floor space, since I'll still have the MIG cart sitting around, but it can sit out of the way when not being used - like outdoors.
|
|
vicopper
- Thursday, 08/27/09 15:54:33 EDT
|
I have my mig on a jib, and have since 2000. Mine is the little Lincohn Weldpac 100, and since it weighs only about 40#, I just lift it in and out if I need it elsewhere. Mine is at a level that allows access to put in the wire and so forth. Mine is on a column like Rich describes, in the middle of my shop. I just swing mine back out of the way when not in use. I have a little CO2 bottle, soda size, and it hangs on the pole, with a hose that allows the jib to swing. Mine hangs on gate pintles, and I have placed more pintles in several areas of my parking lean to for working on other jobs. I take the welder out and move it, and then move the jib. The jib only weighs about 20#, and also has hangers for my grinders and so forth.
I would never consider a different set up, at least in my existing shop.
We had several hundred of these jib in the boiler shops, with the power supply on the floor at the column, and the feeder at the end of the jib. Some had setup to slide the feeder back and forth along the jib as well. When you are pushing BIG wire and high amps, the supply is heavy, and you want the tourch stinger short. Makes the water coolers for the tourch not work as hard:)
|
|
ptree
- Thursday, 08/27/09 18:15:03 EDT
|
I spent a small fortune on the HD double cylinder cart for my Airco DipStick MIG welder that was orphaned within a year of the purchase. . . The dual cylinders were for the add-on TIG unit I put on the welder. Big investment in a single portable package that that the core parts are cheap and no longer maintainable. . . I learned why the good stuff is modular (power supply seperate from the spool unit).
ANYWAY. . . While the unit was portable it was not that convenient and was still limited to where a cord would reach. Cords leading to and from. The unit being 30" x 48". . Takes a lot of floor space. And while it rolled our shop was on two levels with ramps in between. If you didn't handle the thing right it could flip over on the ramp. AND we had gantry crane track (2" angle V-up) to contend with. So except in emergencies it stayed in a small seperate welding shop.
If yours is modular you can put the power supply near the column and the spool out at the end of the jib. Ideally the stinger would reach the floor for low work. If it is not that long then something below bench height.
The most compact setups I've seen were with the MIG unit on a shelf above the work area, OR under the bench. This is very limiting but it is out of the way. . .
I'd love to have a cord reel on the buzz box if overhead but at $800. . . . An option for that is a fixed length drop on a small trolley connected to the welder with festooned cable. Then the leads cover most of the area under the jib without a lot of extra cable dangling down.
|
|
- guru
- Thursday, 08/27/09 18:40:56 EDT
|
For my 50lb'er Little Giant, I need to cut in the oil ways in the new babbet in the top journals. What should be the design of these oil ways please? I need the pattern as well as depth and width of please.
Thanks, Arlo
|
|
arlo
- Thursday, 08/27/09 22:18:19 EDT
|
Welder Booms: You can get a lot of coverage if the boom is hinged in the middle as well as at the mount.
The MIG I use all the time is an Airco Dip Pak 200 with (2) 125 CuFt cylinders on it. That and the 50' of spool gun lead and 15' push gun does make a lot to wheel around, but the spool gun has enough reach that I never had to move it to use that. The 15' MIG gun reaches all over a garage bay pretty well too, however the bay is presently full of other stuff, so I have been moving the machine slightly and welding outside.
I can't speak for Jock's Dip Stick 160, but My Dip Pak 200 & Dip Core 300 are quite well made & have the same feed mechanism as Airco's "Mighty" series of stand alone feeders. The gun consumables for the old style Airco guns are an issue, but even the later Linde style guns have been phased out, that is why they make gun adapters.
|
|
- Dave Boyer
- Thursday, 08/27/09 22:31:36 EDT
|
My AirCo unit was marketed for the small shop, body shops ect. and had AC/DC taps and the spool feeder built into the box. With the optional HD rack, extra regulator, and TIG unit I had $4,000 invested in it about 1986.
When it was almost new we had to replace the cable liner several times until we got one that worked. When it was about 6 months old the feed motor power diode failed. That was when I found it had been abandoned. My dealer said diodes were back ordered for months. . When I was checking on it I passed through the repair department and there was a dozen Dip-Stick 160's lined up in various states of dissasembly. . . So I went to Radio Shack and found a diode bridge close to the same rating (actually heavier) and fixed it with that. THEN another 6 months later the main power switch failed. . . That wasn't available either. So I found a close match in a Bryant at my electrical supplier. Same rating, same action, different pole connections.
The last part I tried to get was a replacement MIG copper tip. It was a bastard tip that nobody makes. . . I'll have to replace the entire MIG cable and gun unit. There is no standard replacement part so it will require cobbling and adapting. . .
|
|
- guru
- Thursday, 08/27/09 23:51:21 EDT
|
I have been talking to a client about a fabricated steel and stainless cable deck railing system. She returns again and again to the notion of an intentionally rusted finish. There will be lots of contact with this exterior railing
(450 lin.ft.of it) and it will be attached to an Ipe'
( exotic hardwood) deck surface, so it can't be dirty to the touch, or stain the decking. My primary question is does cor-10 steel come in small sections? Local steel yard says just plate, and large structural sections. Thanks much!
|
|
wadco
- Friday, 08/28/09 01:21:03 EDT
|
Wadco, Corten rusts and stains anything it is attached to. It just rusts less than common steel. While it sounds like great stuff it has limited uses. Structures made of it must be assembled with matching fasteners and any heating must be followed by a specific heat treatment to recreate the controlled rusting condition.
Many structures that were made of Corten at great expense have since been sand blasted and painted. A water trap such as between the wood deck and the Corten flanges attached to it is the kind of place that the Corten system fails. They will tell you so in their literature.
The problem with rust is once it starts it is hard to stop. When everything is perfect Corten is supposed to stop rusting. But many people have found this not to be the case. And then you have the water trap issue, then the non-Corten cable fasteners. . .
My recommendation for rust finishes is to paint it to look like rust. While a rust finish my be too uniform or not uniform enough you can make paint look any way you like. It can vary and have shadows, texture and the color you or your client really wants.
Paint to prevent rust and to protect your client's investment and your reputation is part of the job. Done properly it will look the way you made it 20 years from now. If the client changes their mind or sells, then it can be repainted by someone else.
|
|
- guru
- Friday, 08/28/09 03:44:01 EDT
|
Rust Finish; Plan B: Every morning the owner sends a servant out to carefully oil and wax the installation. ;-)
(Ah; the good-old-days of large, cheap, well mannered labor pools; when servants and butlers polished the silver so often that the engraving was slowly worn away!)
These days there are an amazing number of black powder firearms with barrels made of stainless steel so that we don't have to spend the time carefully cleaning and inspecting and lubricating the blued or brown ironwork; and some folks just swab them out quick and toss them in the back of the closet until next autumn; mostly with somewhat disappointing results. (Hint, lock parts may not all be stainless steel, especially springs.) With metal, maintenance is key.
"We are the infrastructure; all that other stuff is just entropy in action." (UAVTBoW)
|
|
Bruce Blackistone (Atli)
- Friday, 08/28/09 08:29:40 EDT
|
Oiling and Waxing: I had one correspondent that maintained a commercial building write that they had been religiously oiling their hand forged railing according to the instructions given by the smith. Apparently the smith had no clue that they would actually do it and that typical maintenance personell would do so for decades. The result was that in some places they had 1/8" build ups of the linseed oil and beeswax mixture. Now, the problem was cleaning off the pounds of goo. The rail was set into marble or polished stone stairs and made a turn around an indoor Coy pond.
They had tried solvents and it made too much of a mess. Lots of the goo was removed by hand scraping. The final solution was to hire a specialized crew to use dry ice grit blasting at great expense.
At least the iron HAD been protected but in the process the "fine hand rubbed" finish became worse than a heavy coat of paint aimlessly slopped on the work. The smith had taken the lazy low cost way out. In the end it cost the client who had taken his advice and it made the smiths work look terrible in the process.
In an application such as this paint will wear off a top rail. Thus most commercial rail products are aluminium, stainless, brass. . For a durable commercial building top rail stainless should be considered. The rest should be painted to the highest standards of paint application on metal. Final finishes can be hand applied to whatever effect the artist wants.
Finishing with paint is a large part of the job. Often it is as costly as producing the ironwork, even if it is all hand forged. Not cleaning and painting it properly is leaving the job half finished. Leaving the painting up to the client is shrugging off a critical part of the job.
If Hollywood can make paint and plaster look like anything from brick or rock to chrome plated metal then blacksmiths should be able to make their ironwork look like iron.
|
|
- guru
- Friday, 08/28/09 12:53:47 EDT
|
Gazintas and Vices: I have a very nice old wagon vice. Its one of the cache of unused WWI US Army vices that was distributed a few years ago. I had been trying to figure out how to best attach it to my welding bench. Putting it on a hitch receiver (very appropriate for a "wagon" vice) would let me use it with the jaws level to the bench top OR in a second receiver above the bench top.
Mounting flush level is for when work is being done on the bench and the vice is of secondary use and would be in the way if it was higher than the bench top. The higher position is for convenience of use when the vice is the primary tool in use on the bench. Being able to remove the vice and not have it sticking out in the way is also a convenience.
In the past I would not have thought much about the vice sticking out of one side of the bench. But now that I have a fork lift and the bench is often moved to where it is needed or entirely out of the shop when the indoor space is more important, the vice sticking out would be a hazard and possibly get damaged itself. So quick removal is the best way to go.
Making things movable by fork lift or pallet jack is also a consideration in shop planning. It is easy to make benches and stands that are difficult to move with these tools and no more difficult to make them easy to move.
|
|
- guru
- Friday, 08/28/09 14:03:32 EDT
|
Just as Ralph uses lots of Gazintas, I have always built my industrial machines with horizontal Gazintas for forklift forks to move the machine/bench etc. You can have a faily top heavy device but with a pair of Gazintas for forks either at top or bottom makes for a nice, safe steady move. These can be as simple as rectangle holes in the frame to rectangle tubes across a space frame.
|
|
ptree
- Friday, 08/28/09 14:57:01 EDT
|
Rick
Have heard swiss anvils are brittle and will not take the abuse of other European anvils. George
|
|
George
- Friday, 08/28/09 16:10:23 EDT
|
i think perhaps some people are confusing swiss with swedish ?
|
|
- tm
- Friday, 08/28/09 20:13:18 EDT
|
Airco Dip Stick 160: They were made by Mid States. I doubt Your supplier told You to go to them for the parts, but I am pretty sure the whole machine still available into the early '90s. You might be able to replace the small brass part the tip screws into with a Tweeco part and use commonly available tips, depending on what gun You have. Late machines have the Euro connector for the gun, older ones use the Airco fitting, which few if any offer anymore. It makes the most sense to convert to an available fitting, I will change the 300 to the Euro, it has an obsolete Airco gun & fitting. My 200 has the euro fitting, but has the more recently obsolete Linde gun. When used industrially, the whole MIG gun has finite life, and would have been replaced with something common before the parts suply ran out. This is what happens when companies get bought, sold & combined. I have scrounged parts to keep on hand, I expect to be able to keep Mine running a long time.
|
|
- Dave Boyer
- Friday, 08/28/09 20:57:24 EDT
|
I found a New York Times article from 1918 that says all of Switzerland had one small deposit of iron ore, one small blast furnace, and no coke: http://tinyurl.com/kk4tyy. I guess a Swiss anvil would be possible, but it doesn't seem very likley. Sad to say, I suspect tm may be right.
|
|
Mike BR
- Friday, 08/28/09 21:44:45 EDT
|
Mike - a lack of resources to produce iron doesn't necessarily imply iron work and forging was not done in that area in the 1800 & 1900's. The iron trade was international even in the 1700's - Great Britain was importing Swedish iron to make blister steel in the 1600's and the 1700's even though they had iron ore deposits, charcoal, coal, and limestone.
Also doesn't mean that there were Swiss anvils being made - more research would be required.
|
|
- Gavainh
- Friday, 08/28/09 22:32:44 EDT
|
Then there was the huge Swiss screw machine business that made all those precision machines for making small precision parts in great quantity including clock and watch parts. They were sold all over the world.
|
|
- guru
- Saturday, 08/29/09 01:11:51 EDT
|
So let me see if I'm understanding what a downdraft forge is: rather than blow air from the side or bottom through into the heart of the fire, it *sucks* the air through the fire down into the heart and then off down the pipes we see in the picture, carrying with it the smoke. Am I right? Same basic idea as a downdraft carburetor, right?
|
|
- Stormcrow
- Saturday, 08/29/09 09:58:22 EDT
|
Stormcrow,
I think you're making the same mistake I've made before (in a newsletter article, no less). "Blast" normally refers to the combustion air forced into the fire. So forges are generally (maybe always) bottom-blast or side-blast. "Draft" refers to exhaust. So a downdraft forge sucks the smoke back down into the table, rather than letting it rise into a hood or sucking it off sideways. A downdraft forge could be either bottom-blast or side-blast (but almost certainly not top-blast).
Gavainh,
I guess my thinking was that casting or forging an anvil probably doesn't add enough value to justify importing the iron or steel and then (presumably) reexporting the anvil. At least the places I can think of that are famous for anvils are also know for iron and/or steel production. But there could be (and probably are) exceptions.
I guess in today's world, Switzerland is just as likely a place to build a mini mill as anywhere else. If I wan't so lazy, I could probably find out if they had any.
|
|
Mike BR
- Saturday, 08/29/09 10:53:47 EDT
|
Simple question...it takes more heat to get low carbon steel up to welding point ? So if you are making a cable
( plough steel ) blade, tying the pieces of cable to the end of ie. 1018 rod would be the way to go ?
|
|
Mike T.
- Saturday, 08/29/09 11:34:30 EDT
|
In a pictoral demonstration by Jim Hrisoulas, he binds the metal pieces to be welded with 12 gage soft iron wire, so it looks like it takes more heat to melt iron than it does carbon steel ? As he welds the pieces, when he gets to the iron wire, he cuts it off.
|
|
Mike T.
- Saturday, 08/29/09 11:44:53 EDT
|
A simple question may have a complex answer.
With plain carbon steels, the lower the carbon, the higher the forging temperature, melting temperature, and heat treatment temperature. The converse is true.
"Cable" could mean a number of things. I've forge welded "wire rope" which is good for letter openers, etc., and will give a pattern when etched and completed. I torch-cut a handling length and hung on; it required no welded or wired packages.
"Plough steel" is another ball game.
|
|
Frank Turley
- Saturday, 08/29/09 13:12:44 EDT
|
There is no need to actually mine the ore, to have a manufacturing base.
Switzerland has a centuries old tradition of fine metalworking- and still, to this day, makes all kinds of things besides watches and pocket knives and chocolate.
As the Guru mentioned, "Swiss" has become a nickname for high quality multispindle and turret lathes, because the big Swiss companies make such great machines- and still do today.
Tornos, for example, is still a world leader in "Swiss" machines, still made in Switzerland. Charmilles is probably THE most respected name in EDM machines, still made in Switzerland. Mikron makes incredible CNC machine tools there. Schaublin still makes some of the very best manual lathes available anywhere in the world- in fact, they are so good, and so expensive, that most american companies cant afford em.
Fehlman, in Switzerland, builds a benchtop mill drill that is so incredible, it makes the chinese version look like a stone age tool- and it costs $65,000 or so.
Since the Swiss have such a huge jewelry and watchmaking trade, they make the finest machines for those businesses as well- incredible high quality lathes, mills, drills, small rolling mills for jewelry, and so on. No doubt, they have made anvils.
Probably, though, mostly were for Swiss, German, and Austrian customers, who are willing to pay for the very best.
|
|
- Ries
- Saturday, 08/29/09 15:14:29 EDT
|
The Hungarian anvil I mentioned in the Hammer-In that is in the Lyda-Ferdinand collection appears to be a VERY fine anvil. This is judged by the beautifully finished working surfaces that have that "look" of very hard steel. While looks can be deceiving good hard tools often have that look that most of us with experience with metals can recognize immediately. It is definitely a tool made for tool makers for other tool makers. If the Swiss made or make anvils, I suspect they would be like that.
So who ever heard of SAC Hungarian anvils? Very few, even in Europe I suspect. But of all the anvils in the Lyda-Ferdinand collection that is the ONE I would want (even if it IS left handed. . .).
|
|
- guru
- Saturday, 08/29/09 16:39:55 EDT
|
Mr. Turley,
Thank you. Appreciate your answer.
|
|
Mike T.
- Saturday, 08/29/09 22:08:24 EDT
|
Well, I guess I'm still not convinced. The Swiss obviously can make unsurpassed precision equipment, and sell it at prices that make raw material costs irrelevant. But "Swiss precision anvil" sounds like the punch line to a bad joke. Of course, I'm not saying there aren't any Swiss anvils, precision or otherwise; the Swiss certainly *could* have made them, and it would only take one to prove they exist.
I will say that, since none of the regulars here seems to have seen a Swiss anvil, it's unlikley they have a reputation for not holding up well (or any reputation at all).
|
|
Mike BR
- Sunday, 08/30/09 09:28:15 EDT
|
Well, it is logical to focus on your strengths. Switzerland also has a reputation for neutrality which also means that trade has been open and there may not have been a need to make everything.
|
|
- guru
- Sunday, 08/30/09 10:17:17 EDT
|
I don't think an American blacksmith could ever afford a Swiss Made Anvil. I own about 30 Swiss Made Carving tools that average about $25 each. You can buy an American carving tool for about half that. However, the Swiss Made tools are worth the money.
|
|
quenchcrack
- Sunday, 08/30/09 13:33:07 EDT
|
...not to mention Swiss files.
|
|
Frank Turley
- Sunday, 08/30/09 14:48:57 EDT
|
Small Oxygen Tank:
I obtained some small oxygen tanks from a nursing friend of mine, that she had finished bleeding for disposal. These are the small tanks (~18" X ~3") such as you might see toted about by a patient, and are meant to be disposable. The brass valve system in the neck has two holes for a special wrench with two pins. I tried to use various pins and wrenches, but couldn't get it to unscrew. Figuring that maybe it was a revers thread, I twisted both ways as I tried various configurations. I did not lubricate, since the interior would still be oxygen, even at sea level pressure. I'm always leery of pushing my luck with tankage (especially after some of the horror tales we've heard here) but I certainly don't want to cut or drill an enclosed tank, either. Short of shooting a round through it from a safe distance, anybody have any suggestions? I have a toy non-firing cannon in mind for some neighbor kids, and these tanks are just about the right size for their pirate fort.
Warm and humid on the banks of the lower Potomac. We might take our smaller Viking boat out next week to meet with the local chapter of "The Redneck Yacht Club."
|
|
Bruce Blackistone (Atli)
- Sunday, 08/30/09 17:26:56 EDT
|
Bruce, If they are empty (supposedly) and reasonably sure then I would put one in the saw and cut the end off while staying out of the line of gas flow in case there is some pressure. Start saw, jump back. . . That is probably the method the disposal place would use. All necessary protective gear worn as usual. . . ;)
|
|
- guru
- Sunday, 08/30/09 17:37:03 EDT
|
Bruce,
If you can find a fitting to connect to the valve on the tanks, you could fill with air and bleed off a couple of times. Say to 100 PSI, or whatever's convenient. Really even once would be enough to dilute any remaining oxygen as close to ambient levels as makes no difference.
|
|
Mike BR
- Sunday, 08/30/09 17:44:14 EDT
|
Come to think of it, I guess there's a remote chance that oil in the air could spontaneously combust in an oxygen atmosphere. I think it really *is* a remote chance -- the oxygen's at atmosphereic pressure (if the valve was stuck closed you wouldn't get air in anyway) and you'd be in the process of diluting it. But if you were worried, you could put the bottle at the end of a long air hose or use an oilless compressor.
|
|
Mike BR
- Sunday, 08/30/09 18:20:24 EDT
|
Bruce - I'd leave the vale open for awhile if it hasn't already been so - even with no flow conditions there will be a tendency for the contents to try to come to equilibrium with air. If you're very concerned, I'd purge either with air or with water and then cut. The rule of thumb we used when setting up heat treating furnaces to purge them of oxygen was that 6 volume changes in about 1 hour's time would reduce oxygen sufficiently to be able to commence adding hydrocarbons to generate either a carburizing or neutral hardening atmosphere. The opposite is true as well.
|
|
- Gavainh
- Monday, 08/31/09 00:25:57 EDT
|
hai....guru,i had these kind of wild imagination about powerfull armor.My question is , just say in the future later a sprayer machine spray's a hot liquid metal(nano sizes hole from the sprayer )to create nano thick layer of steel (A4 in sizes) ,layer by layer until the thichness of the steel is around 1 cm so that is approximately 1 billion layer of steel( samurai sword is around 3 million layer)...steel,ceramic ,glass,and other metal...sandwiched between layers . After finnish spraying the 2nd application is that we fold the metal by spinning it to create another layer(just like after when we wipe the spillage we squeeze the rag,one hand holding the tip of the rag and the other hand holding the other end of the rag so in the middle it create a shape look's like a drill).From 1 billion layer we spin 1 time it create 2 billion layer the third spin it create 4 billion layer and so on until 32 billion layer of ceramic steel...then when it still hot we use liquid metal application by spraying it with mixed mineral( it said that liquid metal spray can hardened the metal 3 fold.)after these application we cooled down to make crystallization....now my question is if the bullet proof glass has around 80.000 layer can withstand a small caliber can my armor work as well?, does the 32 billion layer make's my armor stronger then the conventional way?The streanght of 1cm alexander steel is equal with 10.666.667 of samurai combine together ( from 32 billion divided by 3 millon.)is that true? i will be appreciate very very much if you can answer my question that had been stuck in my had for over 4 years, thank's to make a very good site on the internet and i appologies if my engglish writing is is hard to understand.
|
|
alexander
- Monday, 08/31/09 03:05:39 EDT
|
Alexander:
Are you talking personal armor, or armor for vehicles or vessels or fortifications? A little unclear, but critical.
I'll leave the metal work to the Great Guru and others here, but I have had some experience with bulletproof (and "bomb proof" and shatter resistant...) glass. The three constants that I see are that the glass is heavy, it's thick, and the effort is applied to not only resisting projectiles and overpressure, but to to keep the glass itself from becoming a danger from the energy that impacts it. Sharing your time and space with many shards of sharp, broken glass is not condusive to survival. Also, if the glass remains semi-intact, but the framing system gives way, it becomes a large fly swatter, and you're the fly.
Now, to return to the armor question; just keep in mind the first two features... heavy and thick. No matter how many layers, and no matter what they consist of, heavy and thick requires a lot of energy to move it around.
|
|
Bruce Blackistone (Atli)
- Monday, 08/31/09 07:43:07 EDT
|
Future Metal - High Tech UnObtanium
We have a long ways to go in materials technology and the future is wide open. In the past couple decades previously undreamed of materials have been created.
However, your examples and comparisons are flawed. The layering in Japanese sword steel is a method used to attempt to make a homogeneous steel. While it is a fine steel and its fine layers appears to give it superior cutting abilities the actual hardness and strength is no better than a modern crucible steel. In fact their are many superior steels. You are comparing myth and legend with science and fact.
Hardness does not equal Strength. As metals become harder they become more brittle. When stopping a projectile a hard brittle substance ultimately spends its strength in the failure mode by cracking or shattering. If the projectile is stopped its transferred energy is now in the flying shards. A relatively soft gummy material does so by deforming thus adsorbing the energy over time and distance and holding on to the projectile.
Current armour works a couple different ways. Bullet proof "glass" is actually a thick Lexan plate. Lexan has the unusual characteristic of translating perpendicular force into parallel force thus absorbing a projectile's energy over a large area. It is also a soft gummy material that holds the projectile. The result of this is a large circular white spot that ruins the transparency but not your day.
Kevlar and composite plates use mats or woven fibers in flat layers to spread a projectiles energy over a large area. While many of these fibres would be classified as brittle in large sections they are flexible due to their small diameter and proportionally long length. The advantage of these materials over steel is that they are very strong for their weight. Using multiple layers of the fibres running in different directions spreads force in different directions and creates a trap to hold the projectile if it penetrates. The down side of these products is that every time they do their job many of the fibres are broken and eventually they lose their shape that makes them resistant to force.
The ultimate armour material would be one like Lexan which worked without the material being damaged. When a projectile hits it the energy is instantly translated into and absorbed by all the material not just a small area. Perhaps the energy is converted directly to heat or electricity and used to charge a battery to dissipate it. This might be some type of superconductor that generates electricity when mechanical force is applied. Dissipate the electricity and you nearly have a "force field" barrier.
The current state of most materials research is trial and error. A material (metal, plastic, ceramic or composite) is made then tested for all manner of attributes. Often a material with unexpected properties is created accidentally. Often the making of the materials requires developing new methods of manufacture. Then that new method is applied in unusual ways.
Example: A common inkjet printer mechanism is converted to making synthetic skin. The ink is replaced with different organic materials which are sprayed onto a disposable substrate OR a special roller platen that the resulting material can be scraped off in sheets. The printer is used with a cellular "graphic" that creates cell walls, fills the cells with jelled fluid, makes microscopic arteries and more all from organic "inks". Multiple layers result in a three dimensional structure.
Remember the scene in "The Fifth Element" where Lilu is recreated from a sample of DNA? Sort of like that. Except that this is REAL research going on today. The current goal of the research is to produce synthetic DNA neutral skin or temporary skin matrix for use with burn victims.
The same printer scanning technology is currently used to create laser prototyping machines where the heat of the scanning laser cures plastic a layer at a time until a full three dimensional object is formed. This has been so successful that limited production runs of new products have been made for testing. The advantage is a simple change can be made to a 3D CAD drawing and a new part can be generated without changing very expensive high production metal dies.
Who would believe that printing, a two dimensional process used to spread the written word would be used to make solid objects appear from clear liquid or make synthetic skin or organs? This is the world of materials research, science, imagination, trial and error with LUCK.
|
|
- guru
- Monday, 08/31/09 09:10:30 EDT
|
Given the race between people who develop armor and the people who develop bullets, I'm betting on the bullet guys.
|
|
quenchcrack
- Monday, 08/31/09 13:24:21 EDT
|
Bruce, I'm heavy and thick....are you saying I'm bullet proof? Woo Hoo...........
|
|
quenchcrack
- Monday, 08/31/09 13:25:57 EDT
|
When flexible body armor is impacted by a projectile(s), it is promptly decommissioned, since the impact locus is now compromised. Likewise for "bulletproof" glass. Ditto for crumple zones in car bodies. You just don't get to go to the well twice, in other words.
There is one thing that will absorb the energy of any projectile developed so far, without itself being damaged. Distance. If you're far enough away from the shooter, gravity and inertia will overcome the projectile's momentum before it reaches you. To put it succinctly, avoiding the projectile is better than any armor ever devised.
I spent thousands and thousands of hours wearing flexible body armor, form the earliest ballistic nylon stuff to the later aramid fibers and other exotics, including ceramics and steel, and none of it is fun to wear. When they finally come up with a force field for personal protection, it will probably turn out to make you sweat like a pig, too. (grin)
|
|
vicopper
- Monday, 08/31/09 15:51:47 EDT
|
Serrated hot cutter
Hi, I just found a confusing tool on ebay and I wonder if any of you know what it would be most useful for. Most of all, I want to know if the serrations in the cutting blades would work on a smaller hot chisel to help keep it in the same spot on the work (mine tends to shift out of place and jump). Here is the link http://cgi.ebay.com/MASSIVE-6-7LB-BLACKSMITHS-STIS-HAMMER-HEAD-SEE-OTHERS_W0QQitemZ310165209193QQcmdZViewItemQQptZLH_DefaultDomain_0?hash=item4837498069&_trksid=p3286.c0.m14
I hope all of you enjoy wondering about it as much as I do. I strongly suspect that the designer had breaking down flat bar stock in mind and apparently wanted to do it in one swing, but that is as much of a guess as I will venture.
|
|
Matthew Marting
- Monday, 08/31/09 17:36:46 EDT
|
Correction - could it possibly be a one handed wood splidding double bladed maul?
|
|
Matthew Marting
- Monday, 08/31/09 17:46:57 EDT
|
Mathew, Its a stone cutters hammer. Used for dressing stone.
"Blacksmith" is the most abused keyword on ebay and many other places. If its iron and rusty it MUST be a blacksmiths tool. . . The world is full of . . .
|
|
- guru
- Monday, 08/31/09 18:57:38 EDT
|
Armour and unobtainium
We used to use an armour plate caled B555. That was actually the hardness of the stuff when it was impacted although until impacted and thereby work hardened it was quite workable. For some applications that was just too hard. The main one was blast armour which has to have different qualities from anti projectile armour. So for that we used B300 which actually was resoftened B555. Don't ask how as I don't know but it did work. We also used some stuff called IT100 which, from memory, was made by Kaiser Ulmann in Sheffield. Thst was different again. It seemed to be hard all the time and was used for a different application. The point is that there is no such thing as "armour plate" as a generic term. Tell me what you are likely to be hit by and I will tell you what to use. The trouble is the bad guy has an annoying habit of using a whole cocktail of projectiles even inside one magazinewhich makes armour an even trickier sublect. Add to all this the problem of weight and cracking due to the vinbration within a vehicle and you have a problem to which any solution is a compromise.
I have tried nonexistium. This is made by heating unobtainium to a green heat in an oxygen rich reducing atmosphere for a fixed period. It is the best all round defence possible.
|
|
philip in china
- Monday, 08/31/09 19:49:47 EDT
|
Philip makes a good point about armor - some is designed to absorb impacts, some to deflect impacts, and some to do both. For deflection, hard is good. For absorption it isn't do desirable at all. Sometimes you need both, and so composite materials are used. The design is driven by the anticipated projectile and extant circumstances, there is no one-size-fits-all-needs armor.
|
|
vicopper
- Monday, 08/31/09 19:58:12 EDT
|
now this is funny stuff:
from the guru sorry to laugh at this but i got the image of someone rambling of idiots after reading this:Blacksmith" is the most abused keyword on ebay and many other places. If its iron and rusty it MUST be a blacksmiths tool. . . The world is full of . . .
and thanks phillip: I have tried nonexistium. This is made by heating unobtainium to a green heat in an oxygen rich reducing atmosphere for a fixed period. It is the best all round defence possible.
rotfl
|
|
bigfoot
- Monday, 08/31/09 19:59:06 EDT
|
Many thanks. That makes quite a bit of sense - I couldnt make heads or tails of it but never stopped to consider that the poster just may have been ignorant as to what it was, and failed to research what it may be instead of posting his (or her) best guess.
|
|
Matthew Marting
- Monday, 08/31/09 19:59:53 EDT
|
5th Element
One of the best! Hair like fire,eyes like the smoke off green coal,fists like hammers yet soft like steel fresh on the anvil. Good to watch everytime it comes on.
Picked up a new forge last week (well new to me)30by24 inch Buffalo pan,Champion blower and Canadian burner. Sure beats the heck out of my little Allidays and Onion,this thing gets one inch steel up to melting in no time at all!Mounted a set of wheels on for portability around the shop now I have to make a hood/cover for it cuz it will be outside when not in use.
|
|
Amos
- Monday, 08/31/09 23:34:35 EDT
|
On a related matter, I've been trying to test some things I've glued together this summer to see if they can stop bullets. Apparently the first result is that fiberglass layered with silicone doesn't do squat. I thought it might work because E-glass was near the tensile strength of some kind of kevlar from what I remember, but I guess it's no use since it can't stretch like kevlar.
I wish I could afford kevlar 49 or spectra even.
Next up is acrylic and lexan, saw an interesting video on youtube of a commercial product; one way bullet resistant glass. 3 Inches of acrylic and lexan laminated together stopped several 7.62x39 rounds from an AK47, their explanation was that the acrylic face hardens when hit and the lexan absorbs the energy instead of letting the acrylic shatter like it would normally do. On the reverse side of the glass however, bullets have no problem plowing through the soft lexan and shattering the acrylic, allowing the victim to shoot back.
|
|
Nabiul Haque
- Tuesday, 09/01/09 01:03:57 EDT
|
"Weel ladie, a piece of transparent aluminum would do the trick." Scott, Star Trek IV. The Voyage Home.
Is it possible? You never know. Materials science is still more alchemy than science. While finding new elements in outer space is science fiction (there are no holes in the periodic table) there ARE infinite alloys that have not yet been made or tested and high tech possibilities such as combining ceramics or fibers with metals as Alexander suggested.
But it is very slow work, like Edison looking for the right material for the light bulb element. In the process he found thousands of things that did not work. But he also discovered properties about many of the materials that did not do the job a hand. That is how materials research works. Often more unexpected things are found than the specific thing looked for. But failures are more common than either. This makes materials research very expensive. But the future of technology demands it.
|
|
- guru
- Tuesday, 09/01/09 09:15:49 EDT
|
|
|
[
CSI - anvilfire MEMBERS Group |
Getting Started in Blacksmithing ]
|