Bloom iron source: Why Bloom Iron? -- http://www.leesauder.com/maxpages/Why_You_Might_Want_Bloom_Iron
|
|
Ken Scharabok (Poor Boy)
- Saturday, 08/25/07 06:22:34 EDT
|
I neglected to mention, as it is somewhat of a cheat, one other way to do the vise handle. I've used it and it works just fine.
Forge and entire handle from stock of a size where you simply isolate the ends and draw out the middle shaft. After you get it all forged and swaged to nice and round, true it up in the lathe. When it's the way you want it, cut one end off so it has about 3/4" of shaft left, and chamfer the ends of the cut pieces. Slip it through the screw boss, then weld the thing back together and dress the weld.
If you cut the shaft close to one end, the weld will be supported by the screw boss when in use, minimizing the potential for problems.
Yeah, it's definitely a cheat in my opinion, but it allows you to do most of the work without having to deal with the screw dangling there. I've used it to enable me to get a handle with decorative turned ends, something that (for me) is too difficult to do in the lathe with the screw attached.
|
|
vicopper
- Saturday, 08/25/07 07:42:12 EDT
|
Actually an anvil that's magnetized might not be such a bad idea. Good to know when you've reached non-magnetic before a quench. And it's usually pretty hard to misplace your anvil as say, opposed to a speaker magnet on a wire which the kids might run off with. ;)
|
|
- J. Moran
- Saturday, 08/25/07 08:02:27 EDT
|
J.M., Its a tad heavy to reach into the forge with or to test at the hearth. . . :}
|
|
- guru
- Saturday, 08/25/07 08:14:59 EDT
|
Ken and others,
There is a small anvil on E-bay that is very unique it might be worth getting permission to capture the photos. ebay # 110162896745
I don't know if I have a lot of faith in the provenance of the piece but it is different.
|
|
Habu
- Saturday, 08/25/07 09:46:40 EDT
|
Habu, Now THAT is an unusual anvil/swage. Very unique design (makes me jealous). Shame it is a little cast iron thing.
|
|
- guru
- Saturday, 08/25/07 14:28:54 EDT
|
i finaly have my 25 pound powerhammer going what light wieght oil should i use for the ways and lube for the cluch any help would be good thanks
|
|
- jake
- Saturday, 08/25/07 15:33:15 EDT
|
I'm interested use of static electricity (sparks)in Bronze age Scotland. Could a bronze sword be charged with magnetism and influence a gold(inductor)wire to produce a spark.
|
|
dave
- Saturday, 08/25/07 16:47:32 EDT
|
Dave, NO. The reasons having to do with very basic physics. Try a physics book.
|
|
- guru
- Saturday, 08/25/07 17:02:13 EDT
|
Little Giant Lube: Jake, it depends on the condition of the hammer. In general the bearings, clutch surfaces and guides should be lubricated with SAE 20W20. The clutch bearing is greased either through a zirc fitting or a grease cup on the end of the shaft. YES you OIL the clutch lining of a Little Giant.
The crank bearing and link pins are all oiled (there are oil holes). Lubrication places vary with the age and models but the old rams with a wrap around guide had oil holes drilled in them to the toggle pockets. I have seen these filled with grease then painted over. Anything that turns or pivots (the treadle linkage) should be lubricated.
If the hammer is sloppy and worn I would use a heavier oil like SAE 30 or 40 (if you can get it) on everything except the clutch.
All the main lube points should be given attention with every use and more often (two or three times a shift) with heavy use. If a Little Giant is not sopping wet with oil it is underlubricated.
|
|
- guru
- Saturday, 08/25/07 17:13:06 EDT
|
Electrostatics (more): Dave, if what you are trying to do is legitimize magic then forget it. Magic is magic and can be anything the magician wants.
Electrostatic charges are created by light friction between dissimilar non-conductors or non-conductors mounted on conductors. Wool felt, amber, wax, hard rubber and plastics are the common non-conductors used. No magnetizism is involved.
Do a google search on "static electricity".
If you want a REALLY zippy charge you can use a Van de Graaff generator. I built one of these when I was in the 7th grade. Loads of fun making your hair stand on end and popcorn repeatedly attract and repell. .
Then there are Leyden jars. These can store a significant static charge and can be downright dangerous.
However, both these inventions and others involving static electricity came much later than the Bronze Age. The most man made static electricity at that time would have been created by a young lass combing her hair with an amber comb.
|
|
- guru
- Saturday, 08/25/07 17:40:55 EDT
|
Jock, I am pretty sure Johnny8Acres found that strange anvil on eBay in the garage of the house he just bought.
|
|
quenchcrack
- Saturday, 08/25/07 19:15:30 EDT
|
If that three-legged, three-faced anvil/swage block were given dimensions of about 3-1/2"x4"x13" for the three main masses and cast from 8640 or something similar, you'd have a pretty spiffy all-in-one tool for a hobby smith. Should weigh in at around 200#, still just managable for one person, but enough mass to sit still while you hit it.
I'd much rather have all the different functions as discrete tools, but if I had to work in half of a one-car garage, it would sure do the job. One of the conical horns should have a clip horn on it, so you can pull toe clips for your draft ponies. (grin)
That's about the only Leatherman-tool anvil I've ever seen that I thought had any real utility. I'd venture to say that one was designed by a working smith, not a Ron Popeil wannabe.
|
|
vicopper
- Saturday, 08/25/07 20:20:46 EDT
|
The design has possibilities for even more functions on a larger tool. One horn could be ovoid and there is room for more swage type functions without detracting from the overall simplicity. However, the pattern and mold making costs on this one are quite high. Almost no foundry would touch this one today as it requires at least mold 5 pieces. Even if you could find a hand molding foundry to handle it there would be a significant mold making surcharge over the normal price per pound.
The fact that it does not need a special stand to make use of the features is very slick and rolling it over would be easy compared to a swage block.
Draft ponies. . is that an oxymoron?
|
|
- guru
- Saturday, 08/25/07 23:29:58 EDT
|
It just doesn't look ACW to me though; since it's not in any book I wonder how he dated it?
Thomas
|
|
Thomas Powers
- Sunday, 08/26/07 00:33:38 EDT
|
As for doing the same today I would go with lost foam casting.
Thomas
|
|
Thomas Powers
- Sunday, 08/26/07 00:34:24 EDT
|
Questions about air quality...
I have been reading the postings about chlorine, flourine, carbon monoxide and sulfur particles with interest. My shop is 50'x60' with 12' eaves and an 8/12 pitch. Three large sliding doors and generally pretty drafty. I built a retractable top draft hood with a 12" square stack that works perfectly once the coal smoke ignites. There is also usually a propane forge running. In as much as my face is always sooty when I come in, my wife is anxious about my health. I know that this is not enough information for accurate analysis, but what is the consensus?
Also my retractable hood has a counterweight inside of it,and is fabbed out of 18 ga. mild steel. The entire assembly is pretty heavy. I see large flakes of rust falling out of it often and I am wondering how long that mild sheet metal will maintain structural integrity in this corrosive environment. Ideas?? Hipshots??? Thanks????
|
|
wadco
- Sunday, 08/26/07 01:31:09 EDT
|
Lost Foam: Thomas, It has its costs as well. Either dies to make the foam (mucho expensive) or hand carving each investment. . . In industry it costs about the same or maybe 80% of the pattern cost, EACH TIME. For a one off for yourself hand carved its affordable.
|
|
- guru
- Sunday, 08/26/07 06:59:07 EDT
|
Air Quality: Wadco, this is difficult. However, I see no ventilation fans in your list. Drafty may work when the wind blows but often it does not. The shop our departed friend Paw-Paw Wilson built is on a windy hill, had no back wall, an open truck door and three man entry doorways without doors. It is too windy to leave ANY paperwork lying around on most days and generally a pain to work in. However, the spring day he was burning zinc off pieces of pipe there was no breeze and the end result was his death. See our iForge page safety article III Metal Fume Fever. If there had been a breeze that day he would most likely still be with us.
As to your black bugger syndrome we have all had this from time to time and often daily. Some may be from coal smoke, some welding and some from grinding dust. Most people survive years of this but different people have different tolerances for this kind of thing. It is about like smoking cigarettes. If you also smoke then it is 4 times as likely that you will have a problem.
Arc welding is now known to have its own problems from manganese and spot ventilation is highly recommended.
Overhead forge hoods do not work as well as side draft. The retractability helps but they still leak smoke around the edges constantly. Old industrial shops that had overhead hoods often had them attached to exhaust fans.
Corrosion due to coal smoke varies depending on the sulfur content in the coal and the local humidity. Since you already have significant corrosion I would give your hood system 4 or 5 years before it turns to dust. It may need replacing sooner. Galvanizing helps a great deal and stainless is best.
|
|
- guru
- Sunday, 08/26/07 07:23:30 EDT
|
Wadco,
I work as an industrial safety guy. I also forge with a coal forge and propane, and weld etc in a much smaller shop than yours. I do not get a sooty face, except from brushing a dirty hand across my face.
I do have a side draft hood on the coal, with a drop down lip extension for when I am starting the fire, and I get almost no visible smoke in the shop. Directly over my propane forge I have a 24" turbine ventalator. In a 5 MPH breeze it is supposed to exhaust something like 3500 cubic feet a minute. With the gas forge running it spins like a helicopter blade, and really does exhaust. This turbine entry is perhaps 10' above the forge. My shop has a shed roof, and the turbine sits at the peak, so I also have normal convection to help remove smoke. I also have a 40" square exhaust louver with an assist fan, in the top of the high wall for weld smoke. And I wear a pancake style respirator when welding and wire wheel brushing.
I would in your case consider some powered exhaust fans. I would place them in the gable ends in the peak. I would also consider a side draft hood as well. If you have good respiratory health, and don't favor a beard, a respirator with pancake style "HEPA" style filters will help greatly when wire wheel and welding.
It is NEVER a good thing to inhale dust, smoke or fibers. Smoking increases the probability of damage by removing the bodies natural defenses to the small particles that do the damage. The current teaching in the asbestos trade is that smoking increases the probility of damage by over 500+ times. So while smokers need to be extra carefull, all should avoid breathing smoke, dust and fibers.
Good luck
|
|
ptree
- Sunday, 08/26/07 09:48:31 EDT
|
Ptree,
That, as with all your safety information, is well put and helpful. Thanks!
Have you considered putting together all the bits and pieces of blacksmithing safety information you have into one document that could be posted on the FAQ's page? These questions come up over and over, and it would be nice to have a well-written and accurate document to refer people to.
|
|
vicopper
- Sunday, 08/26/07 12:03:35 EDT
|
Vicopper, with my writing skills as they are, perhaps with an editor:)
On a somewhat similar note, today I did a somewhat scientific comparison of forge lubricants. After the controversy over salt I did some basic safety research as noted previously, and gave some thought on how to compare the relative merits of several lube's. What I really wanted to do was to use a slide hammer arrangement, so as to remove the variability of how hard the hammer blows would be. Not having a slide hammer big enough to do any real work, I settled for the following test set up;
One bar of 3/8" x 3/4" A-36. for punch testing. 1/8" handled punch, struck by a 2.5# hammer. Three blows, with lubricant after the first and second blow. Heated in a gas forge to ensure even heating. Brushed with a heavy brush to remove scale just before the punching. 125# Trenton, well mounted. All three blows from MY standard head high lift, but swung in a mostly gravity mode. (three blows to try to even out any variation if energy.
Results;
no lube, the punch stuck somewhat, and the depth was .120"
Beeswax, no sticking, depth .125"
Coaldust No sticking, depth .125"
Moly paste in oil, no sticking, .250"
table salt no sticking, .020"
Alkaline salt punch lube, no sticking depth .200"
notes, the bare punch stuck but did not mushroom, one tap of the hammer and the bar came off. With the exception of the alkaline salt punch lube, all the other lubes gave off flames, smoke or vapors. The salt gave off acrid vapors that instantly was noticable, even with heavy ventalation. The salt left on the bar gave off a heavy yellow/orange flare when inserted into the forge, causing my departure from the area.
I then tried a plain, moly paste and Seal release 920 on a touch mark. This touch mark is about 1/2" square, with the logo cut into the end of the mark. This requires both penetration and back extrusion of the steel to fill the impression. one blow, in a 1/4" thick bar, again heated in the gas forge. again a 2.5# hammer, one blow. I did not continue with the salt as the lubricity was simply not worth pursuing.
Results plain, penetration .030" good fill.
moly paste, .040 fair fill
Alkanine salt punch lube .030" best fill.
From the above, I can say that if punch sticking is the reason to lubricate, all of the lubes tested worked. If best penetration of the punch is desired, a modern lube with the alkaline salt or a moly disulfide paste would be indicated. A water based moly, that sticks to the tool would be better than the moly in oil that I tried but I did not have anything like that on hand.
If I had bothered to mix up the SealRelease 920 to exact specification, I may have had better penetration as well. The batch I used is the one I mixed several years ago,from a similar Henkel product. The SealRelease 920 is enhanced for the method we use as blacksmiths IE dipping instead of spraying, and has more solids and I have just added water from time to time.
From a safety standpoint, and a usefullness standpoint, I can not reccomend the salt.
|
|
ptree
- Sunday, 08/26/07 13:12:10 EDT
|
Hand made patterns: You may not have heard of rapid prototying machines. CNC/Laser controlled using a polymer liquid that solidifies under the laser. I single layer is made an the part is raised out of the solution and the next layer is "buarned". Single pieces can be made in hours and changed quickly. Chrysler and others use it to check the size and shape of parts for fit on new model cars. Could easily make one-off patterns. There are companies that do this work for anyone and the price is reasonable, especially if you have the part in CAD files.
|
|
quenchcrack
- Sunday, 08/26/07 13:58:16 EDT
|
i have a small question where could i find plans for a sandstone grinding wheel wooden stand
|
|
woody2
- Sunday, 08/26/07 15:28:27 EDT
|
I aquired a large anvil that I would like to know more about, it weighs about 500 lbs, has a 6 inch face, it is a wrought base with a steel plate, I thought it was a hay budden, but there are no stamping on the side, and it has no handling holes on it, but it has a serial number on the left front foot 158999, and on the left foot it has 396, the plate is about a half a inch thick, it is flat and has good bounce and a great horn, I read postmans anvil book and can't find any thing on it, maybe you can help me
|
|
martin
- Sunday, 08/26/07 16:57:09 EDT
|
Can you weigh it? What does the bottom look like? Feel under the heel - smooth or rough forged? Initial thoughts are either an Arm & Hammer or Trenton. For an A&H, serial number would be in the extremely high range - if one, perhaps one of the last they made.
|
|
Ken Scharabok (Poor Boy)
- Sunday, 08/26/07 18:30:57 EDT
|
Ptree,
Thanks for that report on your empirical testing of punch lubes. I found it quite interesting and helpful, and I'm sure others will as well.
The only question I have is the depth of impression you show for the NaCl lube. You show only .020" and I wondered if this was a typo. I would think it would be .200", as the unlubed punch did almost that. while I don't think that salt would be a great lube, I don't think it would actually hinder punching. Can you clarify this for us?
You did a great job of setting up as impartial and replicable a test as possible under the circumstances. Good work!
|
|
vicopper
- Sunday, 08/26/07 18:57:06 EDT
|
Martin,
That sounds like it is a nice anvil!
Are you sure the body of that anvil is wrought iron? I can't figure out how an anvil could be forged without handling holes; there's just no way to manipulate such a mass without using porter bars, that I can think of anyway.
|
|
vicopper
- Sunday, 08/26/07 18:59:57 EDT
|
Vicopper,
I too was puzzled at the .020" but it indeed was that shallow. My only thought was that the gas production repelled the punch, the sodium "glued" the punch to the hole sidewalls or possibly the acrid smoke caused me to pull the blows. It did not stick, but the impression was quite shallow.
As I posted across the street, I am thinking of a punch lube test at SOFA, if I can get a proper slide hammer made.
|
|
ptree
- Sunday, 08/26/07 20:29:19 EDT
|
Vicopper. The back of the heel seems smooth, there may be a weld around the waist, the serial numbers are punched in and it has a welded on steel face,
|
|
martin
- Sunday, 08/26/07 20:34:31 EDT
|
Hi Martin
Can you give us a link to a photo of your anvil? It may help.
|
|
- Burnt Forge
- Sunday, 08/26/07 21:01:49 EDT
|
Martin,
The possibility of a weld around the waist is enlightening. A couple of anvil manufacturers used a cast tool steel top half with a cast mild steel bottom half, welded at the waist. I believe Hay-Budden did this in later years, and at least one other. I'm not much of an anvil authority, though. Ken Scharabok and some of the others here are much more knowledgeable than I when it comes to anvils and their makers.
|
|
vicopper
- Sunday, 08/26/07 23:51:52 EDT
|
Re: Air Quality
Thanks for the information! All my life I have tended to err on the side of productivity at the expense of health and safety. As I approach the half-century mark I detect an increase in my survival instinct... Think I'll put in a couple of powered gable end vents.
|
|
wadco
- Sunday, 08/26/07 23:54:42 EDT
|
According to Richard Postman in AIA Hay-Budden went to a (I believe forged) tool steel anvil top half about 1908. If a H-B serial number would put it about 1907. Close. If a H-B of that period anvil bottom should have a concave area following the outer edges. However, looking from the front of the anvil H-B put their serial numbers on the left. Description, to me, implied it was on the right on this one. If an A&H or Trenton should (not not always) have a pill-shaped depression in bottom. If they had to forge a base in house likely the bottom would be flat.
All Swedish anvils, to my knowledge, were cast. None I know of had serial numbers.
Late production Peter Wrights had serial numbers, but I doubt they went anywhere near that high.
Dunn & Murcott apparently had a serial number, but of the ones recorded so far, do not exceed 400.
Yes, photo link(s) please if possible.
|
|
Ken Scharabok (Poor Boy)
- Monday, 08/27/07 08:20:41 EDT
|
Swedish anvil manufacturing goes back much earlier than the late cast anvils. We just do not see them here or have detailed information about them. They are like many of the small regional anvil manufacturers in Europe that had long histories but were not exported or heavily advertised.
I looked at the bottom of my 300 pound Kohlswa for the first time yesterday and it has a nice deep ovoid depression in the bottom. Kohlwsa made anvils nearly 500 pounds but I have yet to see one larger than my 300.
Most Hay-Budden's are easiest identified by the fact that the body between horn and waist is squarish where it blends into the waist and often has a flat or straight line underneath. The horn on some is quite ugly and distinctive but not all share this feature. The next thing is the depression under the base is rather irregular.
Hay-Budden commonly sold anvils for others (such as Sears) to privately brand. These companies were supposed to mark these anvils and usually did so with a paper label or thin decals that wore or rusted off. This leaves us with many unmarked anvils.
|
|
- guru
- Monday, 08/27/07 10:16:22 EDT
|
Foot Treadle Grinder: (click image for detail)
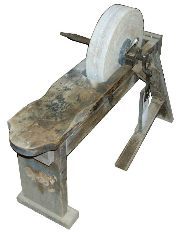
Woody, Step one is to find the sandstone grindstone, then design around it. The one in my photo above is one of the largest I have seen (other than in historical photos). It is about 23" diameter and 4" wide. Many are as big in diameter but narrower. Many are quite worn.
This stone had been used for a long time with a water filled trough and mounted crooked (about 10°) on the shaft. The result was that it was worn out of round AND crooked. Never leave these stones resting in water as it makes that side soft AND heavy resulting in excessive wear on that side.
The original mount was an affair that looked like a saw horse with box trough. The axle set in two grooves in the edge. It was old an rotted and I left it with the dealer I got the stone from.
I mounted the stone using nearly pure Portland cement. Normally these large stones were lightly wedged with wooden wedges onto the square shaft. Often there were flanges with screws in the four corners that protected the wedges and held everything snug.
This stand is made from scrap framing lumber I had on hand. The top and back leg are 2x10 (1.5 x 9.25") and the height comfortable to sit at. The shaft is the original and had a square tapered end for a hand crank. The bearings are oiled walnut. The primitive foot treadle crank parts are the first things I ever forged and are quite primitive as I had no anvil and few tools. Water was provided by a drip can.
I've spend many hours operating this grinder trying to true the stone. Its close enough to be usable but it is still a little like riding a horse.
Sadly I will have to abandon this grinder stand. It is invested with powder post beetles which are nearly impossible to get rid of. On the other hand I can make another in a couple hours. Using the photo I could even distress it to make it look old. . .
Commercial grinders were made with flimsy tubular frames and steel seats. Most had 18" diameter wheels about 2" thick.
So you need to start with the stone for sizing. Then how it mounts (round or square hole). Then the kind of materials you want to use. The rest is built to fit your body (seat height, width, distance to the treadle).
|
|
- guru
- Monday, 08/27/07 11:08:01 EDT
|
Patterns: if you have a cad file you could probably do a conversion and CNC mill the foam.
As for molds I expected it would be easiest to make 3 one per "anvil face" and then join them.
Now to convience a textbook writer that such an item should be a mandatory final project for a CNC class and wait for them to enter the fleamarket/garage sale "scrap" stream---I have seen many examples of "shop class projects" semi identical and usually location specific---with enough time I could probably track down the teacher that used them.
I will admit that I would not have been happy if I was given this to draft as an isometric back in my Jr high paper based drafting class...
Thomas
|
|
Thomas P
- Monday, 08/27/07 11:17:12 EDT
|
Speaking of old-fashioned grindstones, would it be feasible to make one from Portland cement and fine sand or a similar abrasive, cast into a round mold? I've only seen one real sandstone wheel for sale, in-person, and IIRC it wasn't cheap.
|
|
Matt B
- Monday, 08/27/07 11:27:38 EDT
|
Casting the Tri-Anivl: The expense of the pattern is dealing with the foundry. There are so few foundries today and virtually none do hand molding that determining what THEY WANT in a pattern is very difficult. In fact, they want to make the patterns for you at great cost to suit their methods and work flow which they will not explain to you assuming you are an ignorant fool. I've been working with molds and making patterns and molds longer than most of these folks have been alive (production ceramics at age 10, plastic casting complex shapes at age 15, machine tool and swage block patterns in the 1980's permanent zinc casting in the 1990's). . . .
So, making the 3D cad file is not just a matter of drawing the part. I can do an isometric of this one with my eyes closed. . . The problem is this shape requires molds to make the mold parts from (known as "loose pieces" in the foundry industry) and this one is ALL loose pieces, somewhat like a 5 or 6 piece ceramics mold. The molds are all much larger than the finished part (a lot like core boxes) and would suck up a LOT of material on a large rapid prototyper. I'd bet I can make wood molds faster and cheaper (but maybe not quite a perfectly accurate).
When these loose pieces are all assembled and HOW they assemble and what the final configuration is must be agreed to by the foundry and must include all the gates and risering (an art not a science). So it all goes back to the foundry again and we are thwarted. . . A word which is becoming the prime force in my life, everything "twarted" by something else. . .
SO we are back to fabrication and chip making as the most effective, affordable way to make and anvil. The used tools for this are already in the "scrap stream" no matter how big you need.
|
|
- guru
- Monday, 08/27/07 11:39:14 EDT
|
Grinding stone: Matt, most grinding wheels are molded man made stones using various abrasives and adhesive methods. Cement MIGHT work if it was lean enough. The trick to a good grinding wheels is the friability of the material. Old worn abrasive must wear off the surface as the stone is used otherwise it becomes dull and glazed.
Grinding wheels of all types are relatively expensive but you can often find large foundry type wheels at tool flea markets. I do not recommend that you operate these at full speed (there is a REASON they were discarded) but for hand or foot power they would work great.
|
|
- guru
- Monday, 08/27/07 11:46:20 EDT
|
I have a question relating to carbon content of steels. From what I have gathered from various sources, a higher carbon content will make a steel harder and more brittle after being heat treated, while before heat treat it would be tougher and harder to bend. So what I was wondering, is why is steel with say 90 points of carbon uses for knifes, hardened then tempered, when you could use something with say 120 points and just temper it more, resulting in a tougher, yet same hardness for the knife? I may be interpreting the meaning of being "tough" in a tool steel however, which may explain this. By the way, has anyone ever used Vasco Wear? I was reading about it in one of Jim Hrisoulas's books and was wondering how much harder it was to forge than other tool steels.
|
|
- Hollon
- Monday, 08/27/07 16:18:48 EDT
|
Greetings,
I'm looking into setting up my first forge. I am a novice, though years ago, i did attend the ABS Intro to Bladesmithing class (hoping bits and pieces of the knowledge acquired there will seep back to me). I would have liked to set up my forge sooner, but circumstances have dictated otherwise...
Anyhow, I'm currently looking into procuring a gas forge. The bits and pieces that I've read suggest that commercially available gas forges will *not* reach forge welding temperatures. Is this true in all cases? Does anyone have experience with the Whisper Daddy forges available from www.blacksmithsupply.com? Does anyone know of commercially available gas forges which are suitable for forge welding?
Thanks for you time,
Dustin
|
|
Dustin R.
- Monday, 08/27/07 16:24:06 EDT
|
I forge weld all the time in my Whisper Momma. Pressure at 8 to 10 lbs. The 1/2 inch welding brick, which is an extra, is a moust though.
I'm on here for a question though... Is there a system yet in the U.S.A. to actually qualify someone as a "master blacksmith"? If not, isn't it high time? What would it take to initiate such a program. Does ABANA have such a thing? I'm sick of going to demo's that advertise "master blacksmiths" only to find out that I have more skill, and I'm no master.
|
|
Rodriguez
- Monday, 08/27/07 18:28:44 EDT
|
Is quenching in new or used motor oil equivalent to case hardening? Is there any carbon absorbed by the steel?
What is the "bubbly" pattern on my steel knives after I have quenched them in motor oil?
|
|
Earl Aldrich
- Monday, 08/27/07 19:12:02 EDT
|
Do any of you gurus know anything about direct resistance heating? I figured I'd ask before I stick a blade between the electrode holder and work clamp of my welder and crank the amperage all the way up. ;)
Kidding! Only kidding! (Mostly.)
|
|
Matt B
- Monday, 08/27/07 20:05:03 EDT
|
Rodriguez,
There is, and has been for a number of years, a Master Bladesmith designation in the U.S. It is bestowed upon a journeyman bladesmith who successfully passes the examination/judging done by the American Bladesmith Society (ABS).
You can find out more about the ABS on their website, www.americanbladesmith.com. As experienced as you say you are, I'm surprised you've never heard of them. They've been around since about 1975 or so, and have run a bladesmithing college and been certifying journeymen and master bladesmiths for the past twenty or more years.
|
|
vicopper
- Monday, 08/27/07 20:26:52 EDT
|
Matt B, Resistance heating is just that. The heating is the conversion of electrical energy from the resistance to the flow of electrons. Since we can not create or destroy energy, only change its form, one sees heat in every process that involves energy. Energy always seek to go to a lower form, with heat being the lowest energy form. A drawback to resistance heating is that the heat is not uniform. The highest heating occurs where the resistance is the highest. So with a typical knife blade, the section varies from end to end. The heating would occur in the thinest section.
A related method of heating the blade would be induction, in that the applied current is to a coil that does not touch the article to be heated but induces a counter current in the article. Since the countercurrent can not flow anywhere, it becomes heat. Again in thin sections some care in coil design is needed especially when the section also changes. One way of bypassing the issue of too hot in some areas is to pulse the power on/off so that heat may conduct to even out.
Another advantage of induction is the ease of shallow heating for a case and core effect. That is to heat and quench only the surface and down maybe 0.060" and have a much tuffer core. Often used in cam and crankshaft bearing surfaces to give good wear and strenght. Many of the old surface hardeners used a fixed high frequency to limit the penetration of heating.
|
|
ptree
- Monday, 08/27/07 20:27:02 EDT
|
Resistance Heating: I've seen a film of resistance heating 3/4" x 2" bars in the restoration of the Statue of Liberty. Clamp on the electrodes press the pedal and in about 2 seconds you had a yellow heat in a 3 to 4 foot bar. Takes LOTS of KW. Its just like sticking an electrode but on a much bigger scale. You could flambes' your local neighborhood transformer with this kind of load AND the local utility will be out to ask what the heck you are doing.
|
|
- guru
- Monday, 08/27/07 20:35:00 EDT
|
Case Hardening: Earl, No, and No. Holes in the scale. See our Heat Treating FAQ.
|
|
- guru
- Monday, 08/27/07 20:37:07 EDT
|
VICopper,
I read Rodriguez's post the same way you did the first time, but he asked whether there was a system for qualifying as a master *black*smith. I guess we both saw what we expected to see -- a good clue that the answer to his question is "no."
|
|
Mike BR
- Monday, 08/27/07 20:51:39 EDT
|
Master Blacksmith: Rodriguez, As VIc noted the ABA has a Master Bladesmith program. However, like a lot of programs it is one that depends a lot on who you know.
There is no US Master Blacksmith program. There is or used to be a German Master program based on the apprentice, Journeyman, master system. Most other such programs broke down many years ago.
For any such program to have teeth you need the backing of a law that says that you cannot call yourself a Master unless you have met the requirements of a certifying organization. Then you need the organization (with operating funds) and the willingness for people to go through the process.
The big problem is defining what the requirements are to be. I have seen lists that required experience with tools that I dislike and would not have in my shop (chop saws) and overlook basic machinery like a drill press. Old systems required results more than how you got there and included things like locksmithing as well as tool making. Then do we modernize and include the knowledge of CAD for pattern cutting and the mathematics for estimating a job. An engineering school would. . . Or should we include we include some McIverisms such as building a gas forge with some pipe scrap, a plastic straw and a few bricks or tempering in auto exhaust?
|
|
- guru
- Monday, 08/27/07 21:02:48 EDT
|
Jock, I assume my breaker would trip before the transformer blew. I wouldn't need to heat anything that big, either, nor that hot, nor that fast. I'm still really intrigued by the idea. Not for forging -- just for heat treating.
Jeff, I'm familiar with induction. I was trying to figure out whether it'd be feasible to make an induction heater (answer: probably not, with my resources and skills) when I came across the direct resistance idea. Having seen a few electric stoves in my time -- and having stuck quite a few electrodes since I bought my welder -- it made instant sense. I'm just trying to figure out how to calculate how much power you'd need for a given application.
|
|
Matt B
- Monday, 08/27/07 21:03:10 EDT
|
Ebay Anvil
That ebay anvil could be cast with a follow board and 1 corebox, or set up in moulding boxes with an offset parting and the same corebox. Stand it up on the tails on top of the follow board and the core to create the swage block face. By the look of the picture the sides of the anvil faces is a machined face, the machining would cut off the draft. If you didn't want to machine the sides and the draft was unacceptable to you. Three cores could be made from one corebox and placed around the outside.
|
|
- JNewman
- Monday, 08/27/07 21:15:03 EDT
|
I recently found a water powered forge blower, "TILBURY IRON WORKS ONTARIO" the out let is approx 3", the water inlet is 1/4", the outlet 1/2". when running on city water pressure it will float a spray can lid approx 8-10". I play with antique hit miss engines. I'm looking for any info on this type of blower. thanks
|
|
frank
- Monday, 08/27/07 21:22:40 EDT
|
Matt, The problem is changes in cross section. On a plain bar it works, on a knife blade you would vaporize the tang and tip before heating the larger mid section.
Frank, Never heard of or saw one - but others may have. At one time many places had un-metered water and it was used in many wasteful and expensive ways. Some of the earliest air conditioning just used a LOT of city water and heat exchangers. This misuse of a flat rate (or often FREE) public resource resulted in metered water for everyone.
John, I was thinking much too parallel. You are right, it could be made in a two part mold except for the swage surfaces. It could also be pulled through a stripper board and lose all the lengthwise draft.
|
|
- guru
- Monday, 08/27/07 22:23:00 EDT
|
Hollon: Lets get the language resolved first. When dealing with tool steel except for machining considerations, the properties as recieved don't matter. The properties after heat treatment are the ones to concern Yourself with. Hardness is the ability to resist penetration of the point of the Rockwell tester. Toughness is the ability to resist chipping or breaking. Wear resistance is the ability to withstand abrasion. Wear resistance increases with hardness, but greater wear resistance than what You can get from carbon and hardness alone can be had by adding chrome or some other alloys. At right asrround 1% [100 points]carbon, plain carbon steel gets about as good as it will get from a standpoint of wear resistance at a useable compromise of hardness and toughness. A2 with its 5% chrome will have considerably greater wear resistance at roughly the same hardness & toughness as plain carbon tool steel, and the High Carbon/High Chrome steels such as D2 & D3 will have even greater wear resistance with 12% chrome and 1.5 and 2% carbon respectively. For better performance than W1 or 1095 gives alloy steels are the way to go. After You grind some properly heat treated D2 or D3 You might decide You don't need that much wear resistance.
|
|
- Dave Boyer
- Monday, 08/27/07 22:54:04 EDT
|
Some body told me that mild steel will weld at 2300 F and the propane forge he is selling will exeed that temp.
At other places I am told 2500 F is high carbon welding heat. If that was true mild steel would be somewhere above carbon steel. I have the feel that the somebody who says mild steel will weld at 2300 F is feeding me ****. At least not under normal conditions. Is this true?
|
|
troy
- Tuesday, 08/28/07 00:17:48 EDT
|
OK thanks Dave, I think I confused toughness and wear resistance.
|
|
- Hollon
- Tuesday, 08/28/07 06:58:29 EDT
|
Forge Welding in Gas Forges: Troy, the problem is that not all forges are equal. You can forge weld clean well fluxed billets in a gas forge because they are an EASY weld. Some difficult welds in mild steel and wrought iron require a more carburizing atmosphere and higher temperatures such as found in solid fuel forge fires.
If you desire to weld little pieces together then forget the gas forge. It CAN be done but its even more frustrating than in a coal forge. Plan to use coal, charcoal or other welding methods.
If you plan on doing lots of billet welding plan on any gas forge being a consumable. The flux is very hard on forge linings, ESPECIALLY the low density fiber and Kaowool types.
If you need a high production gas forge for welding you will want to build a blown forge.
|
|
- guru
- Tuesday, 08/28/07 08:38:24 EDT
|
MikeBR,
By Golly, you're absolutely right! I most certainly DID read it that way. Talk about self-fulfilling expectations. Thanks for setting me straight on that one, I appreciate it.
I think that there are a couple areas in the US where the unions still have apprentice/journeyman blacksmith classifications, at leastin an industrial setting. As far as I know, they don't have a Master Blacksmith category, but I could easily be mistaken on that. I'll ask a friend of mine who is a union blacksmith.
As Jock noted, many tradesmens' job-skill classifications went out the window with the death of the old Guild system. The few that are left are the result of licensing laws in various localities that support classifications like Master Plumber, Electrician, etc mostly for building code reasons, I think.
Down here in the middle of nowhere, I am a licensed Carpentry Contractor as well as a licensed blacksmith. Both licenses are merely a matter of paying the money and meeting the guidelines of the zoning and fire people, and have avbsolutely NOTHING to do with skill level in the trade itself. If I wanted to be a licensed plumber, on the other hand, I'd have to pass a written test and have X-number of years experience under a licensed Master Plumber. Fortunately, I don't want to be a licensed plumber. (grin)
Thanks again for catching that mis-reading of Rodriguez' post. I am chagrined, but I'll probably do it again, anyway.
|
|
vicopper
- Tuesday, 08/28/07 09:11:18 EDT
|
Master Blacksmith - I believe Williamsburg is still maintaining/has reintroduced the apprentice, journeyman, master status for the crafts people working for the foundation. I'm not aware of any other such situation in the US.
Dave - wear resistance - gets a little more complicated than you mentioned - at a first approximation you gave a good answer, but there are all sorts of oddball steels developed specifcally for wear - Hadfield's aka as 13% Manganese steel, comes to mind, usually used in the annealed condition as it is a work hardening steel. I've seen it used for jailbar, and also installed in earth moving equipment in abrasion areas.
Sorry, the metallurgist in me's coming out. :)
|
|
- Gavainh
- Tuesday, 08/28/07 12:23:10 EDT
|
Jail bar - I heard about that a long time ago. Something along the lines that when attempted to be cut with a hacksaw, the steel hardens (work hardens) making it almost impossible to cut. Where can I get some of this?
|
|
- Nippulini
- Tuesday, 08/28/07 13:41:27 EDT
|
Trying to find a blacksmith and or school in the Ventura County, or L.A. county of California. I 've done horseshoeing in the past and welding school in Simi Valley, Calif. Can' find anything close to me. Can you advise? I tried ABANA web site, with no help. I made a list of the books you suggested and will start with that, but I really like working with someone as I did with horseshoeing. Thanks in advance, David P.
|
|
- David P
- Tuesday, 08/28/07 16:53:18 EDT
|
Guru(s),
I'd like to verify something that I read in "The Blacksmith's Craft", by Charles McCraven. It says that you can make a hot cut cheaply and easily by forging it from an old hammer head and softening the striking face. Seems to me that I heard somewhere else that wouldn't work very well. I don't always believe everything I read, so I thought I'd ask you fellows.
|
|
Craig
- Tuesday, 08/28/07 16:56:22 EDT
|
Craig, a hot cut made from an old hammer head would make a servicable hot cut. The type of steel the hammer is made from is a factor in how well the hot cut would work. Listen to all advice, but don't take much of it.
|
|
Ty Murch
- Tuesday, 08/28/07 18:01:47 EDT
|
Craig, Generally hammers are 50 to 75 point carbon steels which make them suitable to convert to other tools. By tool steel standards these are low carbon levels. For really spiffy hot cut tools folks like to use H13 and S7. However, these are expensive modern tools steels and not absolutely necessary.
Recylcing old tools is one of your best sources for tool steel. However, Junk Yard Steel rules still apply.
|
|
- guru
- Tuesday, 08/28/07 18:12:25 EDT
|
Schools or Smiths in California: David, try the CBA (California Blacksmiths Association).
If you are using the Yellow Pages try under Ironworks or Fence and Railings.
|
|
- guru
- Tuesday, 08/28/07 18:15:33 EDT
|
I just purchased a large old fly press off ebay that is in mint condition except that it has no stop nut. It looks like an acme thread, 2 3/8" dia. 3 start, but since my thread guages don't go anywhere near that large I'm not sure I want my local machine shop to just make one and hope it fits. Any tips on how to make sure? It's a Perkins, made in Mass., USA in case anyone else out there has one and knows. These are REALLY cool tools for squishing hot steel- I wish I had bought one years ago. Thanks!
|
|
Jud Yaggy
- Tuesday, 08/28/07 18:40:58 EDT
|
Troy,
The other thing to remember if you're looking at gas forge temperatures is that heat transfer is proportional to temperature difference. I'm just making up numbers, but if you put a piece of steel in a 2500 degree forge, it might take one minute to reach 2300, another two minutes to reach 2450, and three more after that to get close to 2500. If you need 2300 degrees to weld mild steel (that does sound about right to me), a 2500 degree forge might be pretty good. In a 2300 degree forge, the piece might turn to scale before it got hot enough to weld. Like I said, these aren't exact numbers, but you do need a forge hotter than the temperature you want to work at.
|
|
Mike BR
- Tuesday, 08/28/07 19:05:09 EDT
|
dear brother sister smiths,
i am wanting to build a gas (propane) forge. i have been blacksmithing/ bladesmithing for almsot 30 years now. i don't know all the technical stuff but give me a forge an anvil and acouple hammers na tongs andi can turn out something nice. but on gas forges i have no idea where to start. i'm rad that you need something like one burner for every 350 cubic inches of forge volume after the lining is in. but i need a fairly large interior area (like a 10 inch diameter circle, about 18-20 inches long.) big enough to make my railings and gates in. BUT!!! i have to be able to forge weld in it. i know oyu're probabl thinknig that old fat. jsut use a solid fuel. and i'm gonig to say...i have been useing solid fuel my whole blacksmithing life (i'm 59 been forging since i was 32)
but i used to live in the country. now i moved into the city. and my deed restrictions won't let me fir eup my sold fuel forge. but i talked to the mayor and he said that a gas forge would be perfectly acceptable. now back to my original question. how would i go about building a reasonably priced gas forge big enough and hot enough for my purposes.
thank you
Son
|
|
- son
- Tuesday, 08/28/07 19:31:58 EDT
|
Big Odd Threads: Jud, Outside of the OEM shop these things are made by measuring, and trial and error fit. That means you take the thread to the shop that is making it. Generally these have a square thread or a modified acme, not a true acme. It takes some careful inspection. Most shops that do this kind of stuff use specialized tools, sulfur or plastic impressions and optical comparators to start. Then they chase the thread and test the fit over and over until it fits. This is the ART of being a true master machinist.
|
|
- guru
- Tuesday, 08/28/07 19:41:37 EDT
|
Gas Forge Welding: Son, see my posts above. For specifics on atmospheric forges you want the Ron Reil pages on the ABANA site. But for a roaring hot industrial duty forge you want to build a blower type, either gas or oil.
Blower forges are much more flexible, faster and hotter. They are easier to run on NG than atmospheric forges (thus cheaper to operate). They can often be reved up lining glazing temperatures which are nearly as hot as a solid fuel forge. They are also noisier and less fuel efficient (power costs money). But they are dead simple to build. See our plans page and my "stupid gas burner".
There are no orifices, no venturi tubes, just a T, air and gas. Adjust as needed.
Large and Small Gas Forges: If you are converting from solid fuel to gas then you need to know that gas forges are different in ways you have not thought of. A big gas forge uses LOTS of gas and you cannot efficiently turn it down. A small gas forge is efficient but you cannot put big work into it. So have any semblance of efficiency in a commercial shop you need at LEAST 3 different sizes of gas forge to replace a single coal forge. On the other hand, you can feed a power hammer with billets as fast as you can work with a gas forge.
Unless you are forging top rail or making sweeping bends in heavy stock you do not need a long forge. Smiths using gas find that they can forge many short billets into long pieces in a couple heats that would not have fit in a much larger forge before they started. The equipment changes your work methods and sometimes the design of what you build.
For long or odd work a C frame forge with a door that closes the C is very flexible and convenient. For long heats a series of modular forges works fine, and then you can break them down so that your shop is not filled by one long forge.
For short heats on long work a ring type forge such as Blacksmiths Journal sells is handy. These rings can also be stacked to make a long forge.
The slickest forges I have seen were tunnel type with a blown burner and air curtains in front of the openings to prevent the Dragon's breath from singing your eyebrows and beard.
For the ultimate convenience the Forges built by NC-Tool and others that have the push button pizieo electric ignitors can not be beat. These are cheap (compared to industrial forges) and considered consumables by bladesmiths. However, smiths that do not welding in them get 20 year lives from them in daily use.
Like everyone else I like to build my own but the commercial forges have lots of advantages. Since you are going to need several I suggest you buy one from one of our advertisers and then build the others you need after having some gas forge experience.
|
|
- guru
- Tuesday, 08/28/07 20:04:08 EDT
|
So... If I go ahead and make the recycled hammer head hot cut, is it more practical for the cutting edge to be parallel to the handle, or perpendicular? And if using a ball pein hammer for stock, which end should become the cutting edge? I know it sounds like a dumb question, but I'd feel more dumb if I actually made it the wrong way around without asking.
|
|
Craig
- Tuesday, 08/28/07 21:45:00 EDT
|
Jud:
Not real sure why you HAVE to have a stop nut. That being said, if I HAD to have one here's what I'd do: make a collar with your 2-3/8 dia. hole. drill and tap three holes radially equal distance thru the collar. grind the end of three high strength bolts to match the thread groove. thread them into the holes and use lock-nuts on the outside. 'Course you'll want a split collar with a clamp bolt.
|
|
- grant
- Tuesday, 08/28/07 22:16:39 EDT
|
Son-- I have been using an atmospheric (unblown) propane forge since 1991 at 7,000 feet above sea level, have done lots of forgings, made several gates and lots of railing in it. It is just a simple box made of stacked fire brick, open at both ends except for more stacked fire bricks, no attempt to maximize or conserve the heat. Two jets going into salvaged from scrap home furnace Venturis (avoid plumbing bell reducers!!) then into down pipes through top of the box. Works great. Forging heat in maybe 10 or 15 minutes from a cold start, but takes a while to get to maximum temp. No welding heat, but a friend with excat same forge at same altitude has achieved it, and I think more insulation would easily do it. Take a gander at the Robb Gunter "Sandia" forge, plans for which are available from ABANA. It is a roaring furnace of a recuparative atmospheric forge, works like a charm. Beware-- gassers put out a LOT of nasty fumes.
|
|
Miles Undercut
- Tuesday, 08/28/07 22:17:00 EDT
|
Jail Bars; TGN:
I don't know of any special work-hardening alloys, but for a while, at Oakley, we had a fellow renting across the street from us that specialized in fabrication for prisons and jails. His method was to use pipe with a free-spinning solid hardened rod in the center. Even if you sawed the entire perimeter the pipe the core just kept spinning around and would be impossible to get the teeth into.
On the other claw, cutting some scrap stainless steel alloys is like trying to saw well-chewed bubble gum; it just gets slower and "stickier" as I go along. Maybe some jail-bar steels are like that?
Finally moved 300 yards on the banks of the lower Potomac. Now, is there any money left to build the new forge? :-(
Visit your National Parks: www.nps.gov
Go viking: www.longshipco.org
|
|
Bruce Blackistone (Atli)
- Tuesday, 08/28/07 22:46:35 EDT
|
Graig, All the hot cuts I have seen were parallel to the handle axis. This is so you can easily rock them back and forth or incise on a slope. I would leave the large flat end flat.
|
|
- guru
- Tuesday, 08/28/07 22:58:43 EDT
|
I recently bought, refurbished and installed a Canedy Otto Western Royal Chief blower (mega air), I also re-worked the vent system to my electric blower (I use coke and need a constant air supply), I can now bring a 1.5" piece of square stock to lemon yellow in record time. My forge welding skills are poor at best, now that I have the necessary air to achieve welding temp can anyone give me insite on how to weld with coke consistantly without having to guess buy the amount of sparking the metal gives off? Or do I just have to learn my forge again?
|
|
Thumper
- Tuesday, 08/28/07 23:03:27 EDT
|
Hi, I've been gold and silver smithing for a few yers now. I never had to change a tank til recently, and sprayed
wd-40 on both the oxy and the propane tanks where they screw on to the regulators to loosen them. Unsrewed the regulators, got the tanks refilled, reattached them and lit the torch. Once. No problem. Since then I've discovered that I'm pretty lucky, and haven't lit the torch again. I've unscrewed the regulator from the oxygen tank. Can you recommend a way to clean up the wd-40 from the oxy tank regulator? I was told the propane tank was fine. I've also been told that if use a contact cleaner with no flash point the oxygen tank will be fine to use. I've also read something by one person who said they wouldn't touch a regulator sprayed w/ wd-40 ever again. What's your take if you don't mind? Any informed input would be appreciated.
Jay
|
|
Jay m
- Tuesday, 08/28/07 23:04:48 EDT
|
Send the old regulator to the shop for service, rent a new one till it returns and return the oxy tank also...be sure and tell them why it's being serviced/returned. Anything else (including aerosol degreaser's, alcohol, etc), would be pushing your luck unless you've got a method to give you proof positive all the oil is gone and personally I don't know of one!
|
|
Thumper
- Tuesday, 08/28/07 23:20:13 EDT
|
Gavinh: I tried to keep it simple and use examples that are suitable and pretty commonly used for knife making and easy to find. I didn't mention F2 for instance, because I have never even SEEN any of it, let alone used it. I know of work hardening steels, but don't know much about them, most of what I do know pretaines to overlay [hard surface weld] alloys.
|
|
- Dave Boyer
- Tuesday, 08/28/07 23:23:33 EDT
|
Sooooo...I have decided to keep the sorry old magnetized Gladiator right where it is!!! Heck...I might be able to fire my studio assistant if the anvil will hold stuff to itself!!!
Great ideas on the demagnetizing process though.
See you around.
Firedog & his Dancing Hammer
|
|
Jim A
- Tuesday, 08/28/07 23:45:25 EDT
|
may we send you some of the images of armors?
best of luck
FirDous
|
|
firdous
- Wednesday, 08/29/07 01:56:20 EDT
|
Jail bars.
Nippulini, I met the guy who filed the original patent on a system for jail (and any other window) bars in UK. It is similar to the system suggested running a bar inside a tube. He, however, got box section about 2" x 1" and drilled one side of it. The bar sits in there. The top tto retain the bracket is just the same but with the hole facing down (obviously). If the bars are long you just put another length of box in the middle. That piece is through drilled though. Use your favourite type of non removable masonry anchors and you are finished. One tip is to turn the bar ends to a point so that they spin more easily and obviously take all the advice already offered on this page. I know they used to use a Tungsten steel on the bars at our secure mental hospitals as the inmates there could be .... well I don't know the PC term for it. One huge advantage of all this is that it assembles on site so even bars for a huge window or several will just go in the back of a small truck. Unless you anchor by welding the nuts onto a rawlbolt you also don't need to weld a thing on site. To a man who can lift anvils with his Bristol Cities this would be a very simple job.
|
|
philip in china
- Wednesday, 08/29/07 06:16:40 EDT
|
Craig: The round end portion of a ballpein hammer can be reformed into several shapes, such as punches or small hot cuts. I've seen tomahawk blades made from the hammer head portion.
On jailhouse bars, I've heard stories of inmates cutting through them using flossing thread and scouring power. Likely wrought iron or mild steel bars though.
|
|
Ken Scharabok (Poor Boy)
- Wednesday, 08/29/07 07:00:45 EDT
|
Jay m: You are indeed lucky! I am a retired fire amd explosion investigator and have seen the remains of those who wern't.
Take the advice given above and return the tank, with an explanation and send the regulator to a good rebuild place with the same.
|
|
- John Odom
- Wednesday, 08/29/07 07:54:57 EDT
|
Craig,
Sometimes we make the hot cut blade at right angles to the handle for slit-drifting work, especially on large work where you want to get your holding hand away from the heat. On this type of hot cut, you can have a sharp cutting edge with radiused corners at the bottom. The two side edges are also sharp at the bottom, but as you go higher toward the eye, they receive a slight radius.
|
|
Frank Turley
- Wednesday, 08/29/07 08:33:16 EDT
|
Nipp - time period was 1978 +/- a couple years the grade is known is 13% Managanese steel, or also Hadfield's steel as it was originally developed in the UK. It's still in the grade books, so I assume it's being made - I'd try a specialty steel distributor - small quantities will cost. Like the 300 series stainlesses, it's austenitic at room temperature, so you soften it by quenching from an austenitic high temperature state - we used 1900F if memory serves. As you try to saw it, or otherwise work it it work hardens becoming more resistant to further cutting/abrasion. We definitely sold material in the 1" round range for final application as "jail-bar". I've no idea how it held up, but we never had a complaint regarding it - I know, as I got to investigate all the complaints for annealed and heat treated product. The company making it was Crucible steel, at their Midland, PA plant. Crucible no longer operates that plant, but is still a going concern so you might try their web pages or sales office to see if it's available.
|
|
- Gavainh
- Wednesday, 08/29/07 12:22:17 EDT
|
On the topic of the Jail bar couldn't you saw some of the pipe off and then break the hardened rod with some other instrument you have acquired with your hacksaw such as a hammer, or you foot? Perhaps it's not as hard as I'm thinking though.
|
|
- Hollon
- Wednesday, 08/29/07 12:42:38 EDT
|
Security Bars: There are numerous methods of doing this. Master Lock made padlocks with a hard cylindrical sleeve on nylon bushings (so it spun easier) covering the the tough mild steel locking bar. The idea was that you could not get enough pressure to saw the hardened steel sleeve. Jail bars with rotating pipe over another bar use a case hardened tube that is hard to saw or abrade.
On safes they make a "drill proof" armour plate from ceramic tungsten carbide chips and cast steel. A mess to try to dill through. The hard places cause the drill to wander into the soft and break if not just ruin the bit.
|
|
- guru
- Wednesday, 08/29/07 13:32:48 EDT
|
On hot-cuts and other tools from ball peins: Use the flat hammer face for the working tool, you have a LOT more material to play with. It's easy to flatten the ball end for use as a striking face, and the weight distribution makes it easier to hold the way you want it that way. I made a slitting chisel from a 12-oz. head in which the cutting part ended up 1" wide, 1/8" thick, and about four inches long. If I'd used the ball end, the final blade length would've only been about 1.5 to 2 inches, with a grossly overweight striking surface.
Stuff to think about.
Note: it does not hold up well to prolonged hot-cutting or slitting use. It's not a hot-work steel, after all. Keep that in mind and cool the thing off every few blows and it'll work fine.
Oh, and I made mine on a 45-degree angle to the handle so I wouldn't burn my knuckles but could still see what I was doing without looking like a whooping crane doing the mating dance with a treadle hammer. Appearances are important, you know!
|
|
Alan-L
- Wednesday, 08/29/07 14:35:07 EDT
|
I am in the process of developing a WEB page for blacksmithing. Your anvil and fire are quite outstanding on your pages. I would not want to take your image but I wonder if you would be willing to share who you hired to make that image. I am having a heck of a time trying to find someone who can do any kind of an animated image. I would appreciate any help at all that you might be willing to give me. Thanks a bunch.
ken
|
|
ken preiser
- Wednesday, 08/29/07 15:58:50 EDT
|
Images: Ken, I do almost all of the art and photography myself including many of the banners. Our logo was created by my son (a professional artist). You will find that images are one of the most difficult things to obtain in web development. Most animations are the result of special software and individual images (same as all animation). Many flame effects are canned packages but they usually are not free.
ALL images you find on the web are covered under copyright even if they do not say so on them OR on the page. "Borrowing" can find you in court over copyright infringement (something we take seriously).
I do graphics work for a variety of web sites as well as full development, but would not produce work for sites competing with anvilfire.
|
|
- guru
- Wednesday, 08/29/07 16:39:50 EDT
|
I made a hot cut on a 45 also, but I must have got the opposite 45 from Alan. Anyway, the hand holding it and my hammer hand always seem to want to be in the same place. If you go with a 45, think *carefully* first.
Actually, you probably want one angle when you're using the hot cut with a hand hammer (and holding it with your left hand) and the opposite when you're using a treadle hammer. And if you're left-handed, you want the opposite opposite (grin).
|
|
Mike BR
- Wednesday, 08/29/07 17:22:41 EDT
|
Is there much difference between W-1 and O-1 I have welded w-1 to wrought iron for edge tools and have had much sucess....now my w-1 stash is gone and its a little cheaper and easier to obtain 0-1 should i go for it? Is there somewhere that lists the differences between tool steels? thanks!
|
|
coolhand
- Wednesday, 08/29/07 18:34:11 EDT
|
i cant seem to forge weld in my forge it gets hot enuff i can melt a 1\2 inche rod in it. i was wondering if the depth of my forge has something to do with it
|
|
jake
- Wednesday, 08/29/07 20:04:48 EDT
|
What kind of steel are you trying to weld? What are you using for flux? Are you maintaining a reducing atmosphere? Inquiring minds want to know.
|
|
Matt B
- Wednesday, 08/29/07 20:14:26 EDT
|
cold rolled and i use 20 mule team borax
|
|
jake
- Wednesday, 08/29/07 21:13:18 EDT
|
I am plumbing my new shop. What psi of Propane should i put in? I have a McEnglvan and a Johnson blown forge.
|
|
- Ben
- Wednesday, 08/29/07 22:32:53 EDT
|
Maximizing "springiness" in high carbon steels
Most of my experience with high carbon steels is in making edge tools for woodworking, and I've been successful hardening and tempering O1 as required for different tools. Now I've been asked to make a log scribe (for log homebuilding), which like a schoolkid compass (for drawing circles) but on steroids. In the back of Ray Larsen's book on Toolmaking for Woodworkers, he shows a log scribe he says is made from high carbon, but he says nothing more about the process. In his design, there is a flat omega-shaped loop of steel (maybe 1/8" or less by 3/4") that serves as the pivot between the two legs of the compass. My presumption is that one would want this metal to be springy and able to withstand many bending cycles without deforming or fatiguing. None of the rest of the piece needs much in the way of special properties. So my question is, how should something like O1 be heat treated (if at all) for this app? What if I used some junkyard steel, like the tine off an old hay rake? Thanks much, Dave
|
|
Dave M
- Wednesday, 08/29/07 22:36:02 EDT
|
Dave M: for spring temper in O1 You would harden just like for the woodworking tools and temper much hotter, 750 F - 800 F. This is a little beyond blue.
|
|
- Dave Boyer
- Wednesday, 08/29/07 23:29:32 EDT
|
Hi, me and my friends were thinking about starting blacksmithing. I've read a lot of web pages dedicated to blacksmithing and have found plenty of info on blacksmithing (or at least I think I have) ,but I cant find any large selection of anvils (to buy) on any site I've visited. From what I've read here and elsewhere a 100lb-200lb anvils would be what i need ,right? Second we were planning on building a Brake Drum Forge and use that to build a more effective/permanent forge from designs and concepts I've found, is this a good idea? Third question is we were thinking of join ABANA or California Blacksmith Association we were wondering which we should join first? And by the way this site is a huge help when it comes to research.
|
|
- Demon
- Thursday, 08/30/07 01:17:10 EDT
|
Hot cuts:
I made a hot cut chisel with a short handle and use tongs with a rein clip to hold it. What's nice about that is I can set the angle to anything, even while in use. That comes in handy when cutting leaf veins and other texturing.
|
|
- Marc
- Thursday, 08/30/07 06:59:24 EDT
|
Demon, did you try Googling the word "anvils"?:
http://tinyurl.com/24re3s http://tinyurl.com/2cbejk http://tinyurl.com/ytlhfr http://tinyurl.com/2f3kjj
Yeah, they're expensive. If you're looking for used anvils, the Internet isn't a good place to do it. But there's lots of info here at Anvilfire on making anvils. (Try the Anvil Making FAQ.) That's a good way to get your feet wet in smithing. No point spending hundreds of dollars on an anvil if you only end up using it for a few weeks.
A brake drum forge would be a good place to start, for the same reasons.
Join whatever organization has a local chapter. The most important thing is to meet other smiths to learn from. They can probably also help you track down anvils and other tools in your area.
|
|
Matt B
- Thursday, 08/30/07 07:54:31 EDT
|
I heard soemwhere about a 1,400 pound Trenton. Was such an anvil ever made? If so what was it designed for?
|
|
philip in china
- Thursday, 08/30/07 09:42:44 EDT
|
Mike BR, yeah, I made mine so it must always be held in the left hand. I have a chisel-holder/universal handle thingy that's the way to go for absolute flexibility as well.
Coolhand, I think O-1 is a little bit tougher to weld, but not enough to worry about. Oh, and oil-quench is a must!
|
|
Alan-L
- Thursday, 08/30/07 10:30:58 EDT
|
Alan-L,
Could you email me a photo of your above mentioned universal handle thingy. At your leasure of course. :)
|
|
Brian C
- Thursday, 08/30/07 12:15:22 EDT
|
O1 vs. W1: The big difference is O1 is more stable when heat treating. It doesn't grow like W1 and warpage is less. SOme of this is due to the oil quench. O1 is more expensive for these reasons because it is better for making precision parts.
|
|
- guru
- Thursday, 08/30/07 12:46:26 EDT
|
1,400 lb Anvil: That was the big 1898 Industrial Exposition anvil made by Fisher of Trenton NJ, not Trenton Anvils.
|
|
- guru
- Thursday, 08/30/07 12:47:55 EDT
|
Demon, Join CBA first. You will learn a lot from there.
A brake drum forge is a good way to test local fuel before making a big commitment. Good coal is hard to get in California. I would try real wood charcoal instead.
|
|
- guru
- Thursday, 08/30/07 12:50:34 EDT
|
Fuel Pressure in Manifolds: Ben, this depends on the local building codes. If not then you want about 25 PSI in a 3/8" or 1/2" pipe. This will run industrial duty forges. However, some gas devices operate at ounce inches of pressure and use larger pipes. Check with your appliance manufacturer.
|
|
- guru
- Thursday, 08/30/07 12:53:47 EDT
|
Brian, will do at some point when I get home. A simple description is really all you need, though. Cut an 18" length of 1/2" or 3/4" square tube, then cut out two opposing sides for about an inch from one end so it's kind of like a fork. Fishmouth the long ends, a simple 1/2" deep V-notch will work. This will look like a long four-pointed square fork. Now, take a 1/2" long piece of the square tube and weld a 19" length of 3/8" allthread to one corner on the diamond. Run the allthread rod through your 18" tube so that the short square on the end is held in between the V-notched cheeks, then put a washer and a wingnut on the loose end of the allthread. That's it.
To use it, loosen the wingnut, drop a chisel or punch in the hole at the other end, and tighten the wingnut. The V-notches and the corner of the short square will clamp any shank that fits tightly. No reason you couldn't do it with round notches and round pipe also.
It's not my idea, I got it from a friend, Mark Callahan. Literally, he gave me one!
|
|
Alan-L
- Thursday, 08/30/07 12:57:00 EDT
|
Edit the above post to add that the short square tube on the allthread, if held up in one hand, makes a "hole on a stick" diamond-shaped lollipop-looking thing.
|
|
Alan-L
- Thursday, 08/30/07 13:00:34 EDT
|
I don't plan on forge welding any high alloy steels in the near future, but I'm curious: where do folks buy fluorspar for flux?
|
|
Matt B
- Thursday, 08/30/07 15:21:33 EDT
|
Matt - Try pottery supply places: It's used in glazes. The kind of pottery supply place that sells clay & glazes, not premolded stuff to paint. . .
|
|
John Lowther
- Thursday, 08/30/07 15:56:29 EDT
|
Thanks, John. I know just such a place.
|
|
Matt B
- Thursday, 08/30/07 16:17:49 EDT
|
Hello all,
I would like to know any options you guys can share with me about pyrometers or thermometers that can tell me what the temp of my gas forge and my pieces are, what do some of you use?
Thanks-
Kevin
|
|
Kevin
- Thursday, 08/30/07 17:55:46 EDT
|
Demon check out the "anvil story" link on the mkarmory.com website for an example of an anvil that was cheap and much better than a cast iron ASO.
Ken; how is your webpage going to be different than the slew of webpages already out there for blacksmithing? Personally I'm at my limit reading just a subset of the great pages aready out there and have to skip some very good ones I have been invited to participate on.
Thomas
|
|
Thomas P
- Thursday, 08/30/07 18:15:10 EDT
|
Damon,
Just because no else has said it, I'll point out that, although starting with a brake drum forge can be a good idea, the forge itself won't be much help in building a permanent one. If you have a welder, grinder, and O/A torch or plasma cutter, you can build a permanent forge. Or you can build a masonry forge around a purchased firepot.
If you already have a working forge, you'll probably find that some bits can be best made using it. But a forge isn't necessary to build another forge, and it won't replace fabrication tools.
On the other hand, experience with a brake drum forge can be a big help in figuring out what features and dimensions you want in a permanent one.
|
|
Mike BR
- Thursday, 08/30/07 18:20:26 EDT
|
Matt B, If by some chance you do use the flourspar as flux, be sure to have very good ventalation as the flourine that is evolved is as close to anti-matter as is known by mere humans.
|
|
ptree
- Thursday, 08/30/07 18:29:18 EDT
|
How Hot?: Kevin, We use the same method used in the Bronze Age. We heat it until it looks right and then work quickly. Most smiths, even in the 21st Century judge the temperature by eye. The actual color varies greatly with the ambient lighting. However, you can also feel the proper heat under the hammer. Too stiff and its time to stop and reheat. High carbon steels do not like to be over heated so you work in the red ranges not the yellow.
Bi-Metal pyrometers burn up at the higher forging temperatures so are only used in heat treating. Optical pyrometers are used when you MUST know. Generally a practiced smith is just as good.
|
|
- guru
- Thursday, 08/30/07 22:08:09 EDT
|
Jeff,
Will do. But is that really enough? Is even a respirator enough? I remember being thoroughly impressed with the sheer nastiness of fluorine back in high school chem, but I just refreshed my memory and it's worse than I remembered. To my understanding the stuff can penetrate skin and attack your bones, as well as causing really nasty burns that can't be seen or felt for hours. Blindness, kidney damage, "fluorine martyrs" . . . sheesh.
Alan L: I'd like to see a photo of your universal punch handle, if you don't mind. I didn't entirely follow your description. (I'm having trouble envisioning how the allthread doesn't get in the way of the punch fitting into the jaws.)
|
|
Matt B
- Friday, 08/31/07 01:52:17 EDT
|
I looked at mkarmory.com and the tinyurls. I was playing to use charcoal more than coal because its easier for me to acquire and probably cheaper too. I was going to use the Brake Drum Forge to Heat/Make rivets for some the forge parts that I found designs on. Does a Anvil have to be flat for practicing folding billets that will not be made into anything? I could probably find an anvil thats Bowed at an auction for cheap and that could get me started getting basic skills like heating and hammering, right? What are good dimensions for anvil face? I don't have a welder but some of the stuff i can weld at school. Same with torch and plasma cutter. My teacher has a forge thats about 3x2x3 feet but he says its has heating problems. He has 2 anvils but he had them past down from his Grandfather. Oh, by the way i may have forgot to say this but my grandfather used to be a blacksmith and made horse shoes but he sold his anvil a long time ago. What weight would count as "light" when talking about tongs? Would use Optical Pyrometers when melting Aluminum cans into Aluminum Ingots to avoid it burning though the melting pot (Steel)? (Something I found on a site) How high can Optical pyrometers register?
|
|
- Demon
- Friday, 08/31/07 01:54:26 EDT
|
Optical pyrometers: Much hotter than you'll even see, but they are not cheap. If you're wanting to write down the information you gather and make a book you might get your money back. Otherwise it's not worth the investment.
|
|
- J. Moran
- Friday, 08/31/07 06:25:30 EDT
|
Optical Pyrometers: I have one. It was very expensive it its day! It is a PYRO Instruments Unit. It is a lovely piece of engineering and craftsmanship. I needed it for a big project back in the 1970s. It uses batteries that are now obsolete, and unavailable. If I really needed to use it I would make a power pack to use a current available battery. Three AA cells, properly packaged to fit in the original battery space would do. I don't want to use an external power pack as that would require drilling the battery compartment cover and reduce the antique value.
|
|
- John Odom
- Friday, 08/31/07 07:25:10 EDT
|
I use a Type K thermocouple with digital read-out in my non-ferrous foundry. With properly chosen thermocoupled you can get close to 3000F, but they are extremely expensive and delicate and won't stand up to shop conditions. The K thermocouples are relatively cheap and rugged and are useable to 2000F. Not quite high enough for smithing, but ideal for the non-ferrous foundry. The problem of proper thermal contact between the work and the thermocouple is also a major problem, as is the time to get a stable reading.
For temperatures in the forging range, with practice, a good smith can bring a workpiece to within 20 degrees of the desired temperature, by matching the color to that which has been previously demonstrated and measured with the optical pyrometer, or to the interior of a furnace with a thermocouple.
In the lab, optical pyrometers are used to above 5000 degrees.
|
|
- John Odom
- Friday, 08/31/07 07:42:00 EDT
|
Demon, PLEASE See our articles on anvils on our FAQs page.
The problem with melting aluminium or zinc in a steel pot is not burning through, it is the melted metals dissolving the pot and leaking out the liquid metal. This happens in just a couple melts with a 1/4" (6mm) wall pipe crucible. Metal pots must be lined with a ceramic coating to prevent this problem.
Weight has nothing to do with "light and heavy tongs", it is how springy they are for a given size work. While this results in a difference in weight it is the size of the reins that makes the difference. For small work tongs with 1/4" to 5/16" reins (on average as the taper) are light. For medium work 3/8" to 7/16" is light and so on. Heavy tongs are difficult to spring in the hand and thus are difficult to use without retainers to hold them on the work. Many poorly made (farmer or student) tongs are too heavy to use all together.
|
|
- guru
- Friday, 08/31/07 07:59:36 EDT
|
ABOVE should say "steel pots" not "metal pots".
|
|
- guru
- Friday, 08/31/07 08:00:44 EDT
|
Matt, the allthread is not in the way of the punch, it is only there to pull the little short bit of tubing into the forked end of the long tubing. A picture is worth a whole lot of words in this case, and one of these days we'll have picture capability here. Until then you and Brian will have to wait until I take a few and email you. ;-) Or maybe I'll post it elsewhere and give the link.
|
|
Alan-L
- Friday, 08/31/07 09:19:53 EDT
|
Alan, is it sort of like this? http://tinyurl.com/388y8z Hasty drafting, so don't worry too much about the details. Is that the gist of it?
|
|
Matt B
- Friday, 08/31/07 10:46:23 EDT
|
Demon; I have welded up a billet on a chunk of RR-rail that was quite crowned. Yes with years of experience I could do it and do a good job of it; however a flat chunk of steel would have been better and I would not suggest a new forger try it that way.
Now why the heck are you worried about billets when you aren't even smithing yet? Sort of like saying you are wondering how you could practice Formula 1 racing when you don't even know how to drive yet!
Get good at smithing and then worry about billets; I've seen a fellow who couldn't use tongs or control his hammer squirt a billet into a slack tub once---came out in nice small pieces...
Nice long weekend coming up, break out the real chunk charcoal and a blowdryer and a hammer and a chunk of steel for an anvil and make a couple of pairs of tongs!
Thomas
|
|
Thomas P
- Friday, 08/31/07 11:21:28 EDT
|
Demon, please don't try casting -- even aluminum -- until you've learned a lot more about it, know all the dangers and have the appropriate safety equipment. Molten metal has absolutely no mercy. Someone put it very well to me once: "Hot steel can fall to the floor and burn you. Molten metal will chase you down the hall and burn everything."
Take that money you'd waste on an optical pyrometer and set it aside. Then do some serious reading. *Then* got get your money back out and buy some proper equipment, including safety gear.
|
|
Matt B
- Friday, 08/31/07 12:02:16 EDT
|
Matt, not really.
I posted a set of four pics of it over at
http://www.forgemagic.com/bsgallery/bsphoto2821.jpg
. You'll see that mine is made a little differently than I described, using round tubing with flat stock "ears" on the end instead of square tube all the way. I tried to make the description easier to understand.
|
|
Alan-L
- Friday, 08/31/07 12:22:24 EDT
|
Thanks, Alan. That clears it right up.
|
|
Matt B
- Friday, 08/31/07 12:56:09 EDT
|
I am wanting to build a simple solid fuel forge, probably square and not very large ( maybe 16" x 16" unless this would be too small), and have access to a welder, O/A torch, and some plate metal up to about 3/8" thick, and some angle iron (1/8", 1/4", and a little bit of 3/8"). I was thinking of basically building a square out of angle iron and a piece of plate, and cutting a hole for the tuyere and ash dump. My main question was would using the 3/8" plate be overkill, and possibly make the forge heat up slower?
|
|
- Hollon
- Friday, 08/31/07 15:54:24 EDT
|
Where in the world does a man sell the blades he makes? I donh't want to sell on ebay and I don't have the means to create a website for me personally. Is there a custom bladesmithing site out there some where that I could register as a seller and display my pieaces along with other sellers. The internet is the only was for me.
|
|
- David G.
- Friday, 08/31/07 15:58:10 EDT
|
David, here's one such forum: http://forums.dfoggknives.com/index.php?showforum=24
|
|
Matt B
- Friday, 08/31/07 16:05:25 EDT
|
FLOURSPAR.... I have been using some stuff for flux for awhile now that i bought off some guy and he said it was feldspar. I bet it is the same stuff. I had no idea it was dangerous....should i stop using it, cause i think it works great. or should i just hold my nose away when im sprinkling flux on hot metal?
|
|
coolhand
- Friday, 08/31/07 16:18:55 EDT
|
Coolhand, The actual flourine gas given off is very small. However, as noted, even with common salt you need good ventilation. You also get evaporated borax or boric acid when you use common fluxes. The flourspar is used in all stainless steel welding electrodes.
General and point ventilation is recommended when you heat anything to high temperatures. Hey, and even drinking too much water can kill you.
|
|
- guru
- Friday, 08/31/07 16:45:14 EDT
|
FORGE CONSTRUCTION: Hollon, while structurally 1/8 steel is plenty heavy corrosion is a big problem in solid fuel forges, especially if using coal. 3/8" (10mm) plate is not overkill if you are looking for durability.
To reduce damage from corrosion clean the forge regularly and repaint. I would use zinc rich paint for everywhere EXCEPT the fire port and then high temperature black everywhere else (over the zinc) and including the firepot.
Coal forges stored outdoors in humid conditions corrode at rates that could be measured by the month. The reason is sulfur and other corrosive compounds in the coal ash and smoke that mix with water and act as strong electrolytes. Even where there is not a lot of moisture many of these compounds have been made hydroscopic by the high heat and they attract water.
The plate thickness will not effect forge heat up. Most fire pots range from 5/8" to 3/4" thick cast iron or steel.
|
|
- guru
- Friday, 08/31/07 16:54:32 EDT
|
Pyrometers: these are not the be-all, end-all for temperature measurements. Expensive and subject to error in setting the emissivity, error due to radiant gasses, etc. Consider using a temperature crayon. You can get them at any welding supply store for about $7 per temperature. These are 1% instruments and I have used them to calibrate my pyrometers, which are usually 2-3% instruments. Just wipe a stripe onto the work, and when it melts, the piece is up to heat.
|
|
- quenchcrack
- Friday, 08/31/07 17:38:17 EDT
|
If you are an anvil collector, and who isn't on this site, there is a really cool Church Window Double Horn anvil on ebay. Same guy is selling a double screw vise. Take a look in the blacksmith section.
|
|
- Paul P
- Friday, 08/31/07 20:07:43 EDT
|
Re quenchcrack's comment about the crayons. The Tempil Company which makes them also prints the color chart, "Basic Guide to Ferrous Metallurgy". However, this past year, they reprinted the chart with a typo. In the red colored section, above a stylized cubic structure, the typo reads:
BELOW A1
STEEL IS NON-MAGNETIC
FERRITE (ALPHA IRON)
BODY CENTERED
CUBIC LATTICE
It should read:
ABOVE A3
STEEL IS NON-MAGNETIC
AUSTENITE (GAMMA IRON)
FACE CENTERED
CUBIC LATTICE
|
|
Frank Turley
- Friday, 08/31/07 20:28:13 EDT
|
Good Evening,
I have an old 75 lb anvil that was left outside for quite a while. The face is pitted quite a bit and the edges had been chipped, though the anvil is sound otherwise.
I need to get the face ground flat; I'm finally getting to a point where the "Character" the pits in the face give is not a benefiet. The problem is that none of the machine shops I've called are willing to do the work. I tend to call up shops and ask if they can grind down the face of the anvil; should I be asking for something else? Is there a specific type of shop I should be looking into?
Should I be worried about the face loosing its hardness? I figure 1/16 removed would bring it to a complete flat, and I might even be OK with 1/32. I can file the horn to smooth it out (though that took forever), but the face is too hard.
Many thanks!
|
|
- Gerdawr
- Friday, 08/31/07 21:51:37 EDT
|
Gerdawr, DO NOT take it out to be ground or machined. Machine shops will do this type work but ruin many anvils.
The surface needs to be relatively smooth but not all over. It does NOT need to be perfectly flat. AN anvil is a work surface for forging, NOT a reference flat. A little sway is good for straightening, you cannot straighten on a perfectly flat surface.
The corners probably need to be dressed and this will fix 90% of the chipping. Those that do not clean up can have the corners knocked off and you just work around them.
The hardness of an anvil face drops off rapidly and taking 1/16" off is taking a LOT off. See Grinding Anvil Radii:
Use a belt sander or small angle grinder with a soft flat wheel to dress your anvil. Do as little as possible.
|
|
- guru
- Friday, 08/31/07 22:12:31 EDT
|
|
|
[
CSI - anvilfire MEMBERS Group |
Getting Started in Blacksmithing ]
|