| WELCOME to the anvilfire Guru's Den - V. 3.0 |
|
THIS is a forum for questions and answers about blacksmithing and general metalworking. Ask the Guru any reasonable question and he or one of his helpers will answer your question, find someone that can, OR research the question for you. This is an archive of posts from June 1 - 7, 2006 on the Guru's Den |
|
|
|
Moving weight, Rollers, Fulcrums: How you move something, how you prepare and the methods depend on numerous factors. The hardest part of moving something heavy as Marc noted is getting it off the ground. The second is having a hard surface to move on. In the Forgotten Technologies video the methods are shown. And they also assume a good roadway or hard surface. Any distance on soft ground is a pain. Big moves where you knopw you have to prepare are easier than little moves where the cost of preparation is proportionaly significant. Wallington uses levers and counter weights on levers for much of what he does. Getting the counter weight on to the big slab was nothing compared to raising the big 10 ton slab three or four feet. He used the same method for both and did both alone. With a team that knew what they were doing helping him it would move very fast. AN important trick os patience and small moves. The stuff he moves is impressive. It is also all has a low center of gravity. Where things get tricky is when they are tall and have a tall center of gravity. I've moved a lot of little giants alone (from 50 to 250#). On the level they are not a problem but on inclines they are a little scarey. We have a ramp between two sections of our shop that is probably a 3:1 slope. An LG is very close to the tipping point at that angle. I moved both a 50 and a 100 down and back up that slope alone. . Carefully with a plan. |
| - guru - Wednesday, 05/31/06 23:41:48 EDT |
|
I used to install and service safes and vault doors, Rarely did I have to work alone, But the biggest critera for success is to have the tools then THINK the whole process through before moving anything. We had lots of 3/16" steel sheets to lay down over carpet or soft flooring and for the most part things would be rolled on 3/4-1" steel round bars. I can tell stories about standing up or laying down a high finished vault door or "reefer"(large safe, roughly the size as a refrigerator) |
| - Mike - Thursday, 06/01/06 12:24:32 EDT |
|
I seem to have gotten in the middle of "The Forgotten Technology" and have not found the starting thread. What is the website or place where the dvd and online video is at? It looks interesting. Thanks |
| david - Thursday, 06/01/06 15:12:04 EDT |
|
www.theforgottentechnology.com Its no hype. Very interesting. I question the fact that it may have been done exactly like this but it certainly is possible. One man moving and lifting 10 ton blocks alone quickly with simple tools. Image what a trained crew could do! |
| - guru - Thursday, 06/01/06 15:20:14 EDT |
|
Finishes on things to be hammered into the ground: This is where zinc galvanizing comes in. It MAY scratch but it does not come off and it self heals. Zinc powder paint over sand blasting is second best as the zinc embeds in the texture and not all abrades off. However, for this purpose it is a distant second. |
| - guru - Thursday, 06/01/06 15:23:07 EDT |
|
The interesting thing is that Wallington of theforgottentechnology.com does not use rollers. He uses balance points and walks the load. This requires a solid road bed but NOT one smooth enough for rollers. I use rollers a lot myself but they fail and lock up on dirty surfaces. A bit of gravel will stop a fairly large roller. I have also rolled vertical loads that were so heavy that even with a full complement of 3/4" schedule 80 rollers the pipe flatened and extruded. . . Made a mess of a over a dozen 36" pieces of pipe on a smooth concrete floor. Had to scrap about half. |
| - guru - Thursday, 06/01/06 15:30:51 EDT |
|
A note on this "livesteel" place; If you go to their home page, they have pictures of swords they have actually made with this cold straightening method. However, you'll notice that they only show pictures of swords without the bolt filling in the hole... I found this a little odd. |
| - Rob - Thursday, 06/01/06 16:05:54 EDT |
|
FORGOTTEN TECHNOLOGY Interesting site indicating how the blocks were lifted in ancient Egypt. wwwDOTwyattmuseumDOTcom/how-the-pyramids-were-built-02DOThtm The rest of the site is intriguing as well. |
| - Tom H - Thursday, 06/01/06 16:10:35 EDT |
|
Ok, I get it. You made yourself very clear. I have between zero and almost no experience with metalworking so I don't expect miracles. I own an anvil (about 100#) and various hammers. I want to know what kind of sheet metal would work and, more or less, how to fashion pieces for a suit of armor. I want to make one about 5.5 to 6 feet tall including helment with visor, breast and back plate, arm and leg covers, elbow and knee joints, gauntlets, and shoe covers. Now, is that too much to ask? At least I don't need to make a sword! For what it's worth, I am very experience in woodworking and carving, quite artistic, and a quick student in art related fields. I appreciate the help. |
| Scott - Thursday, 06/01/06 17:01:55 EDT |
|
The photo shown on that page has about a ton of lumber being used to raise a car that weighs less than a ton. . . Possible but way too complex for heavy loads. Wallington of theforgottentechnology.com uses a method that I have used before on smaller loads of just rocking a load back and forth adding spacers on each side of the pivot block as the load is raised. He has a set of wood guides to hold the riser blocks for saftey and the whole is a very small fraction of the load. And most importantly, it is VERY simple. No pivot pins, no levers in tension, no load distribution system, no metal parts. . Just parts and pieces that could be made by wood worker in a stone age culture and very efficiently by a bronze age wood worker. He also solves the problem of getting that first wedge or spacer under the load with simple leverage and counter weights. Wallington's premise is that simple but intelegent methods were used. Simple DUMB methods like strapping a thousand slaves to a block of stone make good movies and stories to scare children but are very inefficient. Using all those slaves was expensive. If you could use two or three men to move a stone a mile a day instead of thousands it would make a lot of sense. That lets you spend your budget on quarying, carving, fitting instead of just physical movement of the results. It also leaves time for people to raise food and other necessities. Wallington's ideas are also so stupidly simple that and illustration of it hides the fact that anything is happening. I suspect methods similar to his were used where they could and the thousand slaves harnessed up for the ocassional lack of planning OR grandstand show. What greater spectacle could you imagine for visiting dignitaries than to show them a thousand slave working on one task. . . Then when they leave you go back to using the smart methods. |
| - guru - Thursday, 06/01/06 17:02:21 EDT |
|
Scott, Click on the "NAVIGATE anvilfire" menu bar in the top right corner of this page and go to the armoury section. There are several articles there explaining how to make various types of armor and all of the tools and methods used. |
| Steven Galonska - Thursday, 06/01/06 18:28:15 EDT |
|
Guru, I by no means disagree with you, but I have read that one purpose of many large projects in the ancient world was to provide employment. Using 1000 people to move a stone *might* not be stupid if otherwise they would be starving or off starting a revolution. Assuming you an afford to feed/pay them, of course. On the other hand, it's possible that the archaologists' conclusions that the projects were intended to make work were based on incorrect assumptions about the amount of labor needed. |
| Mike B - Thursday, 06/01/06 18:35:01 EDT |
|
Scott, may I commend to your attention armourarchive.org as a website dedicated to armor making---note the use of the english spelling "armour" in the url. Basically most armour today is made from hot rolled or cold rolled mild steel with stainless and medium carbon steels following and a very few folk work in Ti. What guage you use depends on what you are going to use it for but I will say that thinner is not always easier to work---especially when dishing! Thomas |
| Thomas P - Thursday, 06/01/06 18:35:59 EDT |
|
I've always wondered why the blocks for the pyramid couldn't have been moved by oxen. The Egyptians were well aware of draft animal usage. Also keep in mind the very large blocks which were involved in pyramids and stone structures in Central and South America. |
| Ken Scharabok - Thursday, 06/01/06 19:15:16 EDT |
|
I normalized a tomahawk today and then found out that I needed to fix something near the eye. Can I heat it up again and drift the eye without having to normalize afterwards if I don't get the edge too hot. I've heard of this before. I just need to know what temperature not to exceed. Thanks |
| Tyler Murch - Thursday, 06/01/06 19:19:06 EDT |
|
Ken, The stone structures in Latin America were pre-Columbian. There were no oxen in the New World until the Europeans brought them over. Oxen are easy keepers, but they are slow. In terms of draft, it took 20 mules to haul a couple of borax wagons, and not to forget that wagons are wheeled vehicles. Admitted, the wagons were heavy, the rear wheels being about 8 feet tall, the iron tire 1" x 8", but without wheels, you'd need to somehow overcome the inertia of the big stones. |
| Frank Turley - Thursday, 06/01/06 20:31:30 EDT |
|
Re Normalizing: Tyler, Part of what normalizing does is help reduce stresses from partial heating, quenching by forging (between hammer and anvil) and other inequalities. It also helps reduce grain size as a result of over heating and soaking at forging temperature. This prepares the steel for the best possible heat treat. The point being to give it a uniform metalluricaly improved condition. How you handle it is up to you. Note also that certain high carbon steels are not recommended to be normalized. |
| - guru - Thursday, 06/01/06 21:27:24 EDT |
|
Google up this guy, Edward Leedskalnin He was doing this heavy moving magic many years ago. I gotta love these excentric things,,, |
| - Sven - Thursday, 06/01/06 23:04:39 EDT |
|
Frank Turley: Comment ran together but was intended as two parts. The Eqyptians would of had access to oxen in additional of manpower. The Inca and Aztec also moved very large stones (with precise fitting) in some manner. |
| Ken Scharabok - Friday, 06/02/06 06:22:52 EDT |
|
I have a fabrication question. I am making a gate which has a frame of 5 by 2 by 3/16 rectangular tubing. 2 is the depth. It is about 78 inches across and 72 inches high. Inside the frame is a grid of 3 by 1/8 bar stock which forms 64 empty spaces which get filled in with various geometric designs. This grid was formed by laying out seven straps of 3 by 1/8 and cutting pieces about 5 inches long to go between them to form the grid. Each empty window gets a little frame of 1/2 by 1/8 to provide a 1/2 deep frame arond the "window." These little frames are deliberatelyb ent slightly, say 1/8 to 1/4 inch of curve, so that the sides of each window are not too straight and alike. So some "swim" is desired at the level of the windows, but the overall frame is intended to be pretty straight, say within 1/2 inch tolerance or so. So my question is about assembly. Right now the interior grid is tacked together pretty flat and the little window frames are tacked within the windows and the designs are tacked in the windows. Now to weld everything up and keep it reasonably flat is the issue. It is on a flat steel table that it can be tacked and clamped to and welded a bit here and a bit there until one side is done, then turn over and weld the other side same way. Or, my helper, who has a sore back, wants to hang the whole thing on the wall so he can work standing up, and weld here and there on both sides alternately counting on having access to both sides to somehow balance warpage. Should we try his method? It sounds pretty risky. Next time I think I will plasma cut the window holes out of a sheet of 1/8, but that's another story. |
| brian kennedy - Friday, 06/02/06 09:03:27 EDT |
|
Brian, working from both sides WILL reduce warping and much gnashing of teeth later. To work flat you would have to weld as much as you dare, flip the work over and repeat, then do the same agin until finished. However, the grid design sounds like it will hold itself pretty flat if it is already welded. Working from the center out is also helpful. However, if the frame is already welded then working from the outside in may also work. The point in either case being to spread the weld shrinkage out evenly so that in the end the tension is distributed equaly. The only risk to standing the thing up is if it is strong enough now. It sounds like it is. I am not sure what you mean by "hang it from the wall". If you are talking about hanging it from the pintles then it should work if the frame is welded. This will also give you an idea about how much sag there is going to be. I would measure the sag then jack it up at least 50% past level before welding. The gate is still going to sag but filling the grid should make it somewhat more rigid. So I am guessing 50% correction. Sounds like a neat project. I don't think the welding is going to be as much trouble as you envision. But I would do it in the easiest working position. |
| - guru - Friday, 06/02/06 10:19:46 EDT |
|
Moving heavy stones. This guy has just expressed nicely the principles many of us have been using. In one sense stones are easier than machines because there are solid sides, particularly the bottom, allowing fulcrums and pivots to be placed where needed. They also are of relatively uniform density. With machines, this is not always the case. Machines can't be tumbled or rested on any but the bottom. |
| - John Odom - Friday, 06/02/06 10:36:09 EDT |
|
Thanks for the prompt helpand suggestions. Very reassuring. The frame is not welded together yet. I meant to just tie it on a horizontal beam to hang it, not by the Pintles.(Pintles are the pins that go into the receiver-barrel halves of a barrel-type hinge, I assume.)Sag will be interesting to work out, thanks for the hanging suggestion for measuring. There are actually two wings this size and it will go between two telephone pole posts, one of which moved when I kicked it so...adjustments will be in order I guess. |
| brian kennedy - Friday, 06/02/06 11:14:41 EDT |
|
Just got a note forwarded by Lydia from Science Daily on a new form of iron. http://www.sciencedaily.com/releases/2006/06/060601220415.htm The world is full of unexpected things! Hazy and humid on the banks of the Potomac. Visit your national Parks: www.nps.gov Go viking: www.longshipco.org |
| Bruce Blackistone (Atli) - Friday, 06/02/06 11:18:45 EDT |
|
Clamping it to the table while welding won't keep it from warping it will just do so *when* you take the clamps off. Moving stuff: I started using rollers to move heavy stuff when I was in grade school and have just moved on to bigger and heavier stuff over the years. Spinning something when the roller is at the balance point is an old trick. I have a bunch of pipe and solid I keep around for this use. Note that wooden rollers will "absorb" small crud in their path where metal will stop---unless it can crush it... The other thing that's handy to have is a bunch of wooden blocks for cribbing when you have to lift things up; sigh my 15 year collection was left when I moved. Thomas |
| Thomas P - Friday, 06/02/06 11:19:53 EDT |
|
Edward Leedskalnin is a totaly different sort. He claimed he knew the secrets of how the ancient Egyptians built the pyramids but always kept them secret to himself. He WAS known to use a truck from time to time and his working secretly at night may have had a dual purpose. He had worked in heavy moving industries (logging) and it is common for loggers to move their overloaded loaded (illegal) trucks at night when it is difficult to simply SEE they are overloaded. The DOT and State Police folks that weigh overloaded trucks with portable scales rarely work at night either. I'm not saying he did it all with a truck but working at night may have been hiding an unlicensed vehical or who knows what. . Maybe even a friend moonlighting (literaly) with a tow truck. He was also known to use a block and tackle. AND he was a sectretive sort that lived on pamplets he sold having to do with his philosophy and faux science. The air of mystery was needed to push this new age rubish. He may have made some wonderful re-discoveries but they, (unlike Wallace Wallington's) went to his grave along with the ancient Egyptians. One thing the public often forgets or fails to learn is that folks with claims of great breakthroughs or other things of importance that keep them secret are almost always hiding the truth. Leedskalnin may have some up with some ingenious methods but they may have included modern tools that the ancient Egyptians did not have and he could not explain away. He LIKED folks thinking he could levitate those heavy stones. . . As a result he has HUGE fame among the New Age Faux Science cult and thus has his place in history. Wallace Wallington of the Forgotten Technologies explains every detail and does the moving in front of a video camera. There is no magic, no levitation, no intersection of magnetic lines, no numerology, no New Age Faux Science. His plan is to build a replica (in mass and shape) of Stonehenge, working ALONE. Since he is financing it on his own (about $1500 worth of concrete and rebar at a time) it may take a while. He is also still developing safe methods for doing this alone. In the end he will have proved that it did not take a huge population to build such monuments. I think he has already proved his point but he knows that sometimes it takes a grand statement or monument to convince a doubting public. In fact, if using Wallington's methods to move the stones the quarying would be the biggest part of the job for the ancients. Wallington's work is research, proof of concept and educatiuon. Documenting and spreading the knowledge. I have been reading Cathedral, Forge and Waterwheel and the authors claim that the Egytians did not have the block and tackle, that it was developed in the Middle Ages. This has been a huge advantage to manual movement of things ever since. It is a light portable tool that lets one or more men easily move large weights provided there is an anchor point above (often a problem). But it also allows applying huge horizontal forces. As simple as it is, the ancients did not have it. Nor compound gearing or compound levers. Over the years many folks have come up with different possibilities for what the ancient Egyptians did but they are either to complicated OR use dumb brute force and high numbers of people. Wallington's methods are smart and efficient. They are also simple in needs, not using anything that the ancient Egytians did not have or understand. I suspect that the ancinet Egyptians needed their oxen in the fields to feed the multitudes that were cutting stone, moving sand, moving the stone. You have to remember that not only did it take a lot of manpower to quary and true the massive stones, that they were also moved long distances, then raised into place. If your supply chain is relatively continous then you still have a LOT of people working. They are just spread out over the entire supply chain. I cannot believe that the ancient Egytians had so many workers that they could waste them on dumb methods just to keep them busy. They were BUILDERS that wanted to see results in their lifetimes. When you have a large work force they require an even larger support structure providing food, shelter, childcare. . . (more workers have to come from SOMEWHERE). The guys moving the stones would need other folks making the wedges and wood levers which have a short life and the people cutting and hualing the lumber, folks delivering food on the road (besides raising and processing it). Even if the moving crew for each stone was small there would be many on the same supply chain and the entirety would need constant support. |
| - guru - Friday, 06/02/06 11:23:29 EDT |
|
Machines: John, you are exactly right. They are not only incapable of being rolled over (without wrecking them) but centers of gravity are often high on something with a small base (power hammers, drill presses, milling machines, punch presses). AND there is often a raised or hollow center that makes it a real pain to support. Some of my machines have nice wedge notches to help get them off the floor but then the notches trap rollers. . . a bigger problem than getting them of the floor to start. I almost always start by putting skids under the machine made of either timbers of angle iron. The Ancients were not dumb. They knew what tools they had available and designed accordingly. One of the most amazing tricks of modern technology is a crane that can raise itself. It is a combination of careful logic and technology to support it. It solves the problem that every workman with a block and tackle has had to face since the middle ages, a sky hook to hang it from. . . Only a couple generations ago the cranes used to build tall buildings were built from the top of the structure and moved up a level or two at a time. The system worked fine but required a lot of time and effort continously stopping and moving the crane. Today the cranes are seperate and are placed higher than the building they are going to build. It is more of a trick of logic than high technology. It is also much more efficient than raising the crane with the structure. |
| - guru - Friday, 06/02/06 11:25:40 EDT |
|
Cribbing: Thomas is dead on the target here. No matter what methods you use wood cribbing is a big part of your moving tool kit and often overlooked. It is used to support, make temporary platforms, level, act as road or skid. It is needed to support things off the floor to get rigging under it or to remove rigging. It does not just magicaly appear either, you have to plan for it and purchase or scrounge it up ahead of when you need it. I have used a lot of rough sawn pine but hardwood is best. Oak, hickory, ash and such. Pine is handy due to weight for stacking high supports but hardwood is best for skidding and especially for wedges. Pine is too soft and compresses when used as wedges under the edge of a machine or stacked high under a heavy load. It also can not be driven in as wedges. Any machinery I have in my shop that is not installed is left on rollers until I need them. Then wedges are used to retrieve the rollers and replace with wood skids or cribbing. This keeps the machine in a "ready to move" status. Stacked cribbing is often needed with that sky hook (hoist, chainfall, block and tackle, come-along). Usualy what happens is the lifting device does not have enough travel and you must support the load, re-rig and continue. Unless you have a very good hoist with enough chain or cable to reach the floor and perfect short rigging these situations come up fairly often. I've had to rig short on a tall truck then lower the load, support and re-rig in order to get to the floor a number of times. In our big shop a full pickup load of rough 2x4's and 6x6's (50x100mm and 150x150mm) lumber dissapeared into use in no time. It was only noticable between jobs when it had to be stacked and stored. But when working there never seemed to be enough. On various jobs cribbing often gets used on saw horses to make temporary work platforms or scafolding. Like scaffolding boards this lumber is a TOOL and should be regarded as such. However, like many pieces of material in the shop it invariably gets used for other purposes, crating or blocking, sawed short to fit some space. It also wears out and must be replaced. On multiple contractor jobs nobody want to be responsible for supplying the needed cribbing. It should be the general contractor's job. In your shop it is your job. A good kit to support your rollers and other moving equipment is a set of four thin low angle steel wedges about 1-1/2 to 2" wide 4" long and 1/2" thick, then at least four (or more) hardwood wedges about a foot long and 2" tall. Then some blunt wedges of the same angle but 4" tall to replace the first wedges. I make extras when making these things as they tend to dissapear. . . The handiest rollers I've used for general purpose were 3/4" pipe (1.040" dia) cut 36" long. Schedule 80 is better than the the common schedule 40 pipe. You can get 7 of these from a length of pipe. I chamfered all of ours in a lathe but you can do the same with an angle grinder. They will not stay painted in use so put a light coating of oil on them when in storage. Not everyone needs these tools but if you have the pace in your shop and you have heavy machinery you will eventually need them. On the other hand if you have no skill at moving heavy things then it may be best to let a rigger do it. They have the tools and know how. THEN there are those that can afford a fork lift. . . |
| - guru - Friday, 06/02/06 12:15:11 EDT |
|
Gate on Wood Poles: Ah. . . the sag will be huge and will continue over time. I would suggest some sort of supports outside the posts, guy wires, diagonals or some sort. . . |
| - guru - Friday, 06/02/06 12:30:40 EDT |
|
I feel the most important job of cribbing is saving your damn fool neck when something heavy you have been lifting suddenly decides it *hasn't" slipped the surley bonds of earth. If you have been cribbing as you go along it usually just settles on the stack and you can work on plan "B". I have had tree trunks split, the 1.5" dia digging bar turn out to be two pieces surface welded together in the middle and then ground down to hid the fact, the seals in a hydraulic jack blow, a screw jack kick over, etc and *never* had to even get a bandaid! Slow and safe is my motto when moving heavy stuff. Course now that I'm older riggers and friends with heavy duty 4WD forklifts are now playing a bigger part in my schemes. Thomas |
| Thomas P - Friday, 06/02/06 16:12:43 EDT |
|
Dear Guru(s), I am an archeologist working on a project at a mid 19th century federal armory. We are excavating the "Smith and Forging" shop. In about 1845-55 they replaced the traditional bellows with an underground system of pipes to supply air to the individual forges that apparantly existed in the forging shop. I would love to find out what the inside of a shop like this may look like. We are hoping to find clues of what me may encounter underground since all of the machinery (including the "portable forges") was robbed out by the Confederates in 1861. If anyone could point me in the direction of resources specifically for this topic I would be very grateful. An additional question is: We are finding large deposits of a hard white substance (it has the consistency of lime) with chunks of metal in it. Any ideas on what this might be? Thank you very much! Michelle |
| Michelle - Friday, 06/02/06 19:14:39 EDT |
|
Hard White Substance with the consistency of lime with chunks of metal in it? Hmmmmmm limestone is used to flux the iron ore in a simple smelting furnace. Could be the remains of the limestone slag used to reduce the iron ore in a smelter. Do a google on archeo-metallurgy and you can find some whitepapers on it. |
| quenchcrack - Friday, 06/02/06 20:19:04 EDT |
|
Thomas-- Then there was the time the borrowed comealong suddenly and dramatically-- zippppp!-- revealed itself to have some loose coils of wire rope on the drum and the crank on the humongous 200-plus-pound wall-mounted post drill just missed the friend working on unbolting something under it's right ear. |
| Miles Undercut - Friday, 06/02/06 23:42:23 EDT |
|
Hi everyone, I'm very new here and was wondering if anyone can tell me how they feel about Nimba Anvils and what your experiences have been with them and your thoughts. Your opinions will be appreciated |
| Joe - Saturday, 06/03/06 00:31:40 EDT |
|
Joe, For some folks they are odd shaped. However, this is a standard Italian pattern made for centuries. They are made from very god material, machined and hand dressed. The Made in USA and hand dressing is what you are paying for. There is none better. Some people prefer an anvil with a narrower face. That is the only complaint I have heard. |
| - guru - Saturday, 06/03/06 07:47:51 EDT |
|
hi, i was wondering if you could tell how much my old anvil is worth it wieghts about 80-120 pounds ,and has the 2 whole's in plus a square wedge like thing that is removable your help in this matter would be appreciated , |
| fred - Saturday, 06/03/06 12:20:31 EDT |
|
HI ALSO IF SOMEBODY CAN TELL ME THE VALUE OF IT ,IT WAS MY GRANDFATHER'S ON THE OLD FARM STEAD |
| fred - Saturday, 06/03/06 12:27:01 EDT |
|
HELLO GURUS' I AM LOOKING TO SEE IF YOU COULD TELL ME ANY INFORMATION ABOUT A TRIP HAMMER I HAVE AQUIRED FROM MY GRANDFATHER OLD FARM. THE INFO I HAVE OFF IT IS: A.B. JARDINE & CO. THE CANADIAN GIANT #25 IT WAS RAN OFF A TOP DRIVE BELT SYSTEM WHERE THERE WAS A POWER SHAFT THAT RAN OVER HEAD. I WAS HOPING SOMEONE MAY KNOW IF THERE IS STILL PARTS I COULD GET FOR THIS. I AM LOOKING TO DONATE THIS TO A LOCAL MUSEUM. ANY LITERATURE OR PHOTOS OF EXISTING WOULD BE APPRECIATED. THANK YOU |
| Richard - Saturday, 06/03/06 14:34:26 EDT |
|
Fred, the value of an old anvil is just like the value of an old car, model, mileage, condition. . . Anvils also sell generally by weight and there is a big differece between 80 and 120 pounds. Old anvils vary in price from $50 to $1500 or more depending on make and condition. If you clean off the sides of the anvil there should be some kind of markings. Often they are faint and you need to use a wire brush and then take a rubbing. Weight will be marked several ways. See our FAQ's page under Anvil Weight Markings |
| - guru - Saturday, 06/03/06 15:54:31 EDT |
|
Jardine Hammers: Richard, These are a copy of the American made Little Giant. Some parts MAY be interchangable but it is doubtful. See our Power Hammer Page, Little Giant Specifications and the manufacturers page. Sid Sudimeier is the Little Giant parts source. |
| - guru - Saturday, 06/03/06 15:57:40 EDT |
|
Michelle, if you can find the end of the pipe, that should be the forge, the anvil would have been with in a few feet of it, look for a lot of red, rusty deposits that will be scale from forging, most everything else would be arranged around that. |
| daveb - Saturday, 06/03/06 16:52:04 EDT |
|
I have just installed an NC forge in my truck. I have a standard 5 gall propane tank, into 12' ft of rubber hose, to a valve, a regulator and into the forge. when turned on, it maintains pressure fine for a few seconds then drops to 5 lbs... I removed the regulator, and the valve, same symptom. Any ideas? Thank You |
| jon Bryan - Saturday, 06/03/06 19:28:52 EDT |
|
Jon: some of the new 20 lb tanks have an excess flow valve that might be malfunctioning. Try it on a 100 lb tank or an OLD 20 lb tank. |
| - John Odom - Saturday, 06/03/06 19:50:09 EDT |
|
Excess Flow: In addition to what John said, wait several seconds after opening the tank valve, then try opening the valve to the forge slowly. And if there's (another) regulator at the tank, make sure that's come up to full pressure before you try to start the forge. On mine, the excess flow valve allows a low flow rate until the pressure equalizes on both sides of it. Try to start the forge before that happens, and it shuts down altogether. (I think the valve that's doing this on mine is in the acme-threaded nipple that connects to the tank rather than the tank itself). |
| Mike B - Saturday, 06/03/06 20:23:23 EDT |
|
One more thought: Having the regulator downstream of the shut-off valve will create a sudden flow surge as propane at full tank pressure flows through the open regulator and into the fuel manifold on the forge. This might be enough to trigger the excess flow valve. Moving the shut-off valve downstream of the regulator might solve the problem. |
| Mike B - Saturday, 06/03/06 20:47:46 EDT |
|
Which came first? The industrial production of round iron or the industrial production of square iron. I heard discusion on the subject while giving a demonstration today, they didn't ask me but it got me thinking. My guess would be square, I was looking in the archives for a while but did not come up with an answer yet. I thought I would give you guys shout. Thanks for your time. Bob |
| Bob Clark - Saturday, 06/03/06 23:03:37 EDT |
|
Bob, The first production bar making processes were using hammers with flat open dies and this results in rectangular bar. Later they rolled flat bar and then ran it through a slitting mill which was actually a rotary shear. Early shafts were square with round ends. This has numerous advantages. It the shaft is to be mounted on something the flat surfaces mate easier and do not rotate. Pulleys and gears did not need hard to make keyways (a modern invention) or precision fits. These parts had a large square hole and could be wedged into alignment at the flat surfaces. This was common mill wright practice until after the age of big steam driven machinery in the mid 1800's. Round wire was made by hand until the invention of the wire drawing plate around Y1K. By the 1300's there were factories producing brass wire in production. As wrought does not draw very well iron had to wait until the age of crucible steel before drawing it became common. However, some highly refined wrought (very nearly pure iron) was drawn in limited amounts. One of Francis Whitaker's best statements was that for a hand made look the smith should forge round from square and square from round. . . |
| - guru - Sunday, 06/04/06 07:48:51 EDT |
|
hi, the anvil weight is 120 pounds, its base is 9-1/2inches wide,length is 28 inches long ,the mass or front is 10 inches long and top flat is 3-1/2 inches wide ,sorry for and miss named pieces on the anvil not familiar with them ,,,also did what you said to do with steeel brush and found name on side it is stanped iin it name on it is "TRENT" THANK YOU |
| fred - Sunday, 06/04/06 08:43:27 EDT |
|
I am searching for contact information for Joel Sanderson. I sold him a 5' metal planer several years ago and was wondering how he was getting along with it. I grew up watching D. Miers demonstrating a the NMLRA range at Friendship IN. After 18 years of making sugical retractors which was largely cold forming various stainless steels I now have a well equipped Blacksmith shop of my own and do custom and commercial work. I love this site for the information it contains! Mike |
| Mike Yazel - Sunday, 06/04/06 09:14:03 EDT |
|
I built my first propane forge with air blower. I have tried to weld cable ( Damascus ), but it just won't make a weld. Borax is applied and allowed to melt. Should the cable be held in the forge until it sparks ? I am frustrated. Please help. |
| Mike Thompson - Sunday, 06/04/06 09:40:36 EDT |
|
Welding: Mike, Welding is either easy when everything is right or impossible if things are wrong. The things that go wrong: 1) Too much air in the forge (highly oxidizing fire). 2) Too little heat (bad forge design/adjustment) 3) Dirty metal. 3a) In cable this means no rust, no grease. 3b) Fluxing after burning - you need to flux early with cable and twist to tighten. Flux some more. In this case heavy fluxing is done over a pan where you dump flux over the hot steel. Once steel is burned you cannot repair it. 4) Too hot a forge (worse than too cool). When too hot the flux boils off, the metal burns. . . Sparking is usualy too hot for medium and high carbon steel. A sparking heat is only suitable for wrought and mild steel. In mild steel just a couple sparks are a warning that you are about to overheat and burn the steel. 5) Lack of patience - not letting the billet heat through. 6) Hitting too hard and blowing the weld out. How hard you hit is a matter of scale (size) but the initial blows should only push out the dross and increase the contact area the should be sticking without heavy blows. Once the joint is made you can forge as needed. With cable this takes care, rotation and is done a little at a time. As you can see, with a gas forge you need a balance. When you hit that balance you will get good welds. In fact multiple billets may stick to each other. The video by Wayne Goddard on the Cable Damascus knife is very good on this subject and I highly recommend it. |
| - guru - Sunday, 06/04/06 10:17:17 EDT |
|
Fred: Then you likely have a Trenton, from the Columbus Forge and Iron Company of Columbus, OH. Logo should have originally been in a flattened diamond with the letters size proportional within it. Trentons were among the best anvils made. Look on the front foot. You should see some numbers. On left (looking at horn) should be the weight when manufactured. On right a serial number which can be cross-referenced to year of manufacture. If in doubt, use your bathroom scale. Will be close enough. If no numbers there, may be a per-CF&I Trenton imported from Germany. On value, actually if it weighs 100 lbs or less it may be worth more, per pound, than if it is more than that. 100 lbs is a fairly nice weight for a portable demonstration or farrier anvils. On value, really depends on condition. If like new, perhaps $2-4 lb. If beat up, then way less than that. |
| Ken Scharabok - Sunday, 06/04/06 11:08:00 EDT |
|
Welding wire rope. The guru advised patience. You want a 'soaking' period to get a thorough heat. When you first hit the material, your hammer will tend to bounce away from the work. Use light and moderate blows. Repeat your heats until the metal feels solid. Then, you can lay the blows on harder. |
| Frank Turley - Sunday, 06/04/06 13:23:08 EDT |
|
hey gurus. i am moving my smithy indoors in to a newly built shop. i need to make a hood for my forge which is 30" square with a 12" square firepot. i burn soft coal and use a hand crank blower. i figure my "hood" should be about 24" round and suspended about 16-18 inches above the fire. my QUESTION is what size pipe should i reduce my hood down to? i am planning on using single wall stainless pipe. one blacksmith told me to use 10 or 12 inch pipe because you dont want to restrict any smoke... i was thinking that samller would be better like 6 or 8 inch cause it would stay warmer and draw better. (i am a hobyist and usually have small fires) thanks coolhandluke |
| coolhand - Sunday, 06/04/06 17:33:17 EDT |
|
Luke: Side draft forge ssmoke removers usually work better than "hoods." |
| - John Odom - Sunday, 06/04/06 18:00:56 EDT |
|
Coolhand: Consider a compromise. Can you find an old, large water well pressure tank. Cut out the bottom which arcs in, leaving the outside bottom reinforcement strip. Then cut out an opening to one side in an arc which will fit over your firepot. Make the top of it say about half way up the tank. On the top make a circle out of say 1/8" x 1" into which your stovepipe will sit. Once welded on to the top of the tank cut out the circle within it. |
| Ken Scharabok - Sunday, 06/04/06 18:54:33 EDT |
|
Oops, in the above, the stovepipe should sit outside the top ring. |
| Ken Scharabok - Sunday, 06/04/06 18:56:17 EDT |
|
I'm fairly new at blacksmithing and am making swords by hand out of rebar, I was just wondering if you could tell me how to make the metal sword quality. |
| Joseph - Sunday, 06/04/06 19:12:55 EDT |
|
To make rebar "sword quality" you need a wizard, or at minimum a voodoo queen, to sacrifice a chicken and spill some rum on the ground. Because magic is the only way you are going to change rebar, which is a low quality grab bag mix of scrap, into high quality carbon steel. Read the Swordmaking FAQ under "Armoury". |
| ries - Sunday, 06/04/06 19:38:44 EDT |
|
Hi, I have an old forge bellows that was passed down to me from my father who received it from some one in his family about 50 years ago. I have been packing this huge thing around for some time and was wondering if you would know if it has any value or even if there is any market for something like this. I don't know the age or make, I do know that it was used in Colo. some time ago. Any information on this would be great. |
| Mike - Sunday, 06/04/06 20:38:22 EDT |
|
Mike-- there is a huge market, nice bucks, for that old bellows among barbarian interior decorators who use them as restaurant decor or who dismember them and make coffee tables from the main components. Or, perhaps some savvy museum curator would like to give it the home it deserves. Get a receipt in high three figures (at least) for your taxes. |
| Miles Undercut - Sunday, 06/04/06 21:22:21 EDT |
|
jon Bryan...If you are using a barbaque tank ...use a connector that attaches to the internal threads on the tank,not the black plastic connector that handscrews onto the external threads.... |
| - arthur - Sunday, 06/04/06 22:25:43 EDT |
|
Stack Size: Coolhand, Overhead hoods need HUGE stacks and still smoke. If you smoke cigarettes don't worry about it, its just more smoke. . maybe the sulfur will help activate the niotine more. (My public service message for the day). See our plans page for side draft hoods and the super sucker hood. These are the most efficient because they are not trying to suck up all that cold air that regular hoods do. And that is the problem with hoods, the entire open area must move into the throat and UP. The smoke is diluted with the cold air an there is a further loss of efficiency. They only work to scavange up stray smoke if the stack is about 30% of the opening area. Side draft "hoods" are placed near the fire and have a small opening. The fire makes a sharp turn right into them. I recommend a 12" stack for forges but lots of folks get away with 10". I've used 8" and had smoke boiling out constantly. However, with a side draft hood and a SMALL fire 8" diameter will work. But you WILL set off smoke detectors. . . Check the plans page for the two links. You could build a side draft from a hot water tank. |
| - guru - Sunday, 06/04/06 22:32:04 EDT |
|
Magic Steel: Joseph, See Ries post above. Then, see our Re-bar FAQ, then see our Junk yard steel FAQ. Old re-bar used to be made of any kind of scrap and ranged from the lowest quality wrought, the cut off ends of steel ingots that had a shrink holes, to recycled RR-rail. Modern re-bar is better but only needs to meet minimum strength requirements. It CAN possibly be OK steel but then it can also be a chemistry that is nearly impossible to heat treat. Read the Junk Yard steel FAQ AGAIN. That said, you have a piece of Junk Yard Steel that is of unknown pedigree. It is probably better than what was available in the Middle Ages at worst. But this is not saying much. Working steel then was much more of an art than it is today and smiths spent a lifetime (or a long apprenticeship) learning the peculiarities of the available product which was different every time and could be wildly different from one end of the bar to another. . . You are much better off spending a few dollars on good steel of known peddigree OR at least scrounging something like a piece of spring steel that has a range of possibilities. It is still Junk Yard Steel but it was once GOOD steel. |
| - guru - Sunday, 06/04/06 22:45:03 EDT |
|
Side draft Hood: My mostly finished side draft hood [NOT PROVEN YET] is made from a section of a 30# propane tank, just the cilindrical part, no ends. I cut a 10"x10" round topped opening starting at the bottom. 12" stovepipe crimped end fits in the top of the cilinder. If I end up with a building surrounding this forge I plan to add a colar inside the cilinder that fits inside the stovepipe so I can use the stovepipe right side up. The opening is smaller area than the stovepipe, I think it will work. |
| Dave Boyer - Sunday, 06/04/06 23:45:37 EDT |
|
i guess this isnt really a technical question but i was hoping you may be able to help. as part of the course i am doing at hereford college i have been asked to collect information on metal finishes both internal and external and am yet to find a source of useful info on the subject. any ideas or personal knowledge would be greatly appreciated. thanks ben |
| ben h - Monday, 06/05/06 06:45:31 EDT |
|
Ben, There are many DIY (Do It Yourself) finishes that I do not recommend except for temporary use. These include: * Beeswax softened with turpentine rubed on * Beeswax softened with turpentine burned on * Beeswax and boiled linseed oil applied to hot iron * Beeswax and boiled linseed oil and Japan dryer * Graphite, beeswax and boiled linseed oil and Japan dryer * Boiled linseed oil burned on * Boiled linseed oil with Japan dryer If you read the ingrediants on oil based paints they include a variety of waxes, oils, solvents and solids. The difference between commercial paints and the above list is the commercial paints are professional products produced by the highly educated with access to the best materials in infinite variety and laboratory conditions to mix and test them. The above list are DIY methods that predate modern chemistry and the availability of tested professionaly based products. They are found in many books on blacksmithing. A professional smith should use professional finishes applied over clean metal. These include any of the industrial finishes and multi layer finishes. Many smiths today prefer baked on powder coatings. These are good fisishes but are difficult to repair. The finish I recommend as the best: 1) Sandblast or acid bath clean to remove scale, oil, coal. 2) Cold galvanize using 99% zinc powder paint. 3) Neutral red oxide or black primer. 4) Top coat of automotive enamel or lacquer. If you sand blast and spray a large project with zinc paint it helps to add a little color to the zinc as it matches sand blasted steel perfectly. Use very little as you want a fine close coating of zinc on the work. Hot dip galvanizing is an option and is required by many government contracts. If galvanized the work will need to age or be acid etched prior to painting. The neutral primer isolates the iron and zinc from the pigments in the paint which are often slightly chemicaly reactive. Automotive lacquer primers are designed to be easy to sand it there is a need to clean up and smooth the finish, particularly on the top of a handrail or places that might be guilded. A contrasting color is often used to assure complete coverage of the base and complete coverage of the primer by the top coat. I recommed automotive laquers for top coats if the finish is to be in glazes or sprayed on shades of various colors. If not an automotive enamel is easier to repair or touch up. The reason I recommend automotive finishes is simple. The are designed for metal, outdoors and generally hold up a long time. It is not unusual to see automobiles that are 15 years old on which the paint is perfect. These finihes take years of 60 MPH wind and water blasts, grit and insects as well as repeated washings. Where most rust out is from the inside of hollow panels that collect sand, salt and road grit that hold moisture for long periods. They rarely fail on the exterior except by mechanical action. Note that many smiths will argue that the paint will hide the carefully hammered texture of the metal. They are wrong. The only time paint does this is when heavy enamels are improperly applied in multiple coats. Properly applied spray paints will show every nuance of texture even when applied in multiple coats. Anyone with experiance applying paint knows that the paint will not repair of fill surface defects or texture. To do this heavy primers are applied and sanded off repeatedly. It is hard work to remove texture. In fact, except for heavy hammered texture, you want a smooth finish for low maintenance and long life. Rough finishes hold dirt and can be foot holds for moss and molds. As smiths we often create work that is going to outlive us by possibly centuries. The finish that you apply for the first owner may largely determine how long your work is maintained. |
| - guru - Monday, 06/05/06 08:17:13 EDT |
|
I am interested in purchasing a Hofi hammer, and wanted some suggestions. I had tried to get information on a popular farrier board, and was referred to this site. As a farrier myself, I'm looking for a good forging hammer, but am sot sure what a good weight would be for hot (and some cold) shaping of shoes. I was told that the forged hammers were not as well balanced as the cast hammer, but is it really that noticable. What is the advantage of the cast vs the forged (hardness?) Is there a particular size that farriers tend to prefer? Any info or guidance would be greatly appreciated. Thanks. -Roger |
| - Roger - Monday, 06/05/06 10:16:26 EDT |
|
Roger, Those are big questions, and there are many brands of hammers. You might check under the Pulldown "Navigate anvilfire" Menu, our advertisers and "Power Hammer Page". I am long retired from shoeing, but I used to draw tapered quarters/heels on toe weighted, Morgan, 16 ounce front shoes. The hammer would also be handy on heavier toe weights for gaited horses. Other than that, I don't know what advantage a power hammer would be in terms of turning shoes. My hammer was a 25# Little Giant, which was plenty big enough for that kind of work. If you're making farriers' tools, the hammer would be helpful. |
| Frank Turley - Monday, 06/05/06 10:34:41 EDT |
|
DEAR GURU, THE QUESTION I AM ABOUT TO ASK IS NOT RELEVANT TO BLACKSMITHING, HOWEVER I WILL ASK BECAUSE OF YOUR KNOWLEDGE OF THE WORKING FIELD. HOW WOULD I CHANGE THE DIMENSION PROPERTIES FROM (NUM.DIMM) TO (NUM.DINC) IN THE CATIA DRAFTING ENVIROMENT? (NUM.DIMM) EQUALS THE METRIC SYSTEM I WANT TO GO THE STANDARD SYSTEM AND NOT HAVE TO MANIPULATE A FILE EVERYTIME I LAY OUT A 2D DWG FROM A 3D FILE. PLEASE HELP!!! THANKS, ERNIE |
| ERNIE - Monday, 06/05/06 10:49:00 EDT |
|
Frank, I think Roger is talking about hand hammers. Roger, The US manufacturer and dealer of Hofi hammers is is Big BLU Hammer Manufacturing Co. See our drop down menu under advertisers. Big BLU makes the forged hammers in various weights and styles (see their products page). They also sell the one cast version. The cast version is a little more precision than the hand made hammers but they are very well made by professionals. Proper weight is largely related to your size and musculature. For forging most smiths have a maximum suitable weight for all day use. This is a personal weight. Then for ocassional heavy and light work you may want other sizes. However, I have found that most smiths, once accustomed to one size hammer use it for almost everything. |
| - guru - Monday, 06/05/06 11:16:49 EDT |
|
Catia: Ernie, I suggest you try http://www.catiacommunity.com/ . They have forums for Q&A about this product. In most CAD programs there are environmental settings. Some will let you select English/Metric in the Environment. In others you may have to change the drawing. If I were using the product without a manual I would click HELP, Search, Inches. . . or Units. |
| - guru - Monday, 06/05/06 11:26:29 EDT |
|
I have acquired a used fly press and would like to identify the make/manufacturer correctly and understand the numbering (size) of it. The only name that I could find is the word GA (the G in the form of a G-clamp) and a number '100' below. Had no success on the internet as 'GA' probably is an abbreviation? Will appreciate your help! Many thanks |
| Abie Bruwer - Monday, 06/05/06 11:27:16 EDT |
|
Abie, There were quite a few unknown makers of these machines. I do not know this one. Your best bet on the size rating is to compare the general size with those listed on the page below. You may need to do some measuring of the flywheel to get its weight. Ignore the spokes and hub. Flypress Manual Sizes If you can't figure it out send me as much information about it as you can. Measure the screw, flywheel, stroke and overall size. |
| - guru - Monday, 06/05/06 11:51:39 EDT |
|
Side draft hoods and how well they work: A couple of pictures to illustrate: http://www.forgemagic.com/bsgallery/bsphoto092.jpg http://www.forgemagic.com/bsgallery/bsphoto099.jpg The second is my own forge in operation, demonstrating even the relatively cool heavy smoke from a just-lit fire going in the hood. The bottom of the series shows the flame being sucked totally sideways by the strength of the draft. With a really hot fire, you can actually hear the roar of the draft! Oh, also I smoke a pipe, and if I do so while forging the smoke from the pipe gets sucked right up the chimney along with the coal smoke. I have to plug up the hood if I'm using the coal stove for heat in the shop without the forge lit, or the hood will suck the heat right on out as well! |
| Alan-L - Monday, 06/05/06 12:44:48 EDT |
|
Guru, from time of submission how long does it take for a Touchmark to show up in the registry. |
| Mani De Mers - Monday, 06/05/06 16:33:50 EDT |
|
ok.. yall talked me in to it. side draft it is../ill start making it this week. thanks luke |
| coolhand - Monday, 06/05/06 16:40:54 EDT |
|
Mani, not long if I didn't lose it on my desk. . . |
| - guru - Monday, 06/05/06 17:43:57 EDT |
|
Could someone use a bottom die from a powerhammer as an anvil? on its own, because its hard steel, and about the same face size as bladesmithing anvils thanks |
| Cameron - Monday, 06/05/06 18:57:56 EDT |
|
Ahhh my bladesmithing anvil is 500#---a fisher. Most powerhammer dies are a bit on the small size---but they would work better than a sledgehammer head. A large die out of a piece of industrial stamping press/drop forge/etc would make a dandy anvil weighing in the hundreds of pounds and being of a good heat treated steel---just use a side that is not inlet for the operation is was made for. Thomas |
| Thomas P - Monday, 06/05/06 19:33:44 EDT |
|
Guru, I suspect my application (Touchmark) got lost in the internet ethereal channel thingies. I�ll retry |
| Mani De Mers - Monday, 06/05/06 19:59:43 EDT |
|
Cameron, As long as it's big enough it will work. As far as the steel goes it's good as well. I tell you what, real anvils are just too expensive... unless you can find one used at a good price. A guy in my blacksmithing guild bought a mint 397 pound swedish cast steel anvil for $20. I almost threw up when I heard that. |
| - Tyler Murch - Monday, 06/05/06 21:19:31 EDT |
|
Power Hammer Dies: Cameron, A couple weeks ago I was at a professional knife maker's shop and he hat the top and bottom dies out of about a 1500# to a ton hammer as his workning anvils. They were about 500 pounds each. Old hammer dies are some of the best possible steel and make great anvils. I have a bottom die out of a 750# hammer and it weighs about 300 pounds. Makes a great flat hornless anvil. On the other hand dies out of a small hammer would not be heavy enough to make a very good anvil unless you are looking for a primitive low efficiency setup. Buying them new would be a huge waste of money. The new "bladesmithing anvils" are a high efficiency expediant. Even though they have a small surface area they are supported by about 300 pounds of steel directly under the face. This gives you a VERY high efficiency vector and would be equivalent to a HUGE anvil (over 600 pounds). There is no substitute for mass. |
| - guru - Monday, 06/05/06 21:34:49 EDT |
|
Helo, I've purchased a Fisher lp gas regulator type 67ch-743. I'd like to mount this regulator indoors in by shop. Question- Is this regulator safe to mount indoors with a gas ball valve upstream (also indoors)? I've read some of the literature that came with the regulator and it states that some of the other models should be vented outside- but no information either way with this one |
| Darrell - Monday, 06/05/06 21:50:01 EDT |
|
Price of Tools: Tyler, apparently you have never gone shopping for milling cutters and drill bits. It is easy to pay $1000 for 10 pounds of cutters that will only half fill a lunch box and that have a very finite life and break easily. $100/lb. and they are VERY high production, unlike anvils. OR you have never bought precision tools, simple standard quality Starrett mikes, dial indicators. . . by the pound. . . about $200. Cost about $1000 to fill the other half of that lunch box. Then there are common mechanics tools. Good quality mechanics tools run about $10/pound and UP and are VERY high production. Or standard construction digging tools $6/lb. or a NEW top quality 15 pound sledge hammer. . . $290 or almost $20/pound. Hand forged hammers (Hofi style and others) $25 to $50/lb. Euroanvils sell for $3 to $2.40/lb MFC Hollow Core $3.63/lb. Peddinghaus (future) $7.50 to $6.50/lb. Nimba (USA) 6.88 to 4.83 Delta 300 pound $3.75/lb. Vaughn (Indian) $4.92/lb. Russian Junker $1 to $2.5/lb (ebay price) Beef, good steaks, $6 to $10/lb. . a CONSUMABLE! Kellogs Cereals $3/lb. Both the above are excrement in 24 hours or less. . . New automobile (cheap) $5/lb., SUV-HD $10/lb. Cost of BigBLU 155 WITH Air Compressor $3.81/lb. Time wasted using an undersized anvil, 50%, value at $10/hr. $200/week. New anvils are not too expensive, some folks just do not appreciate the value of good tools. Those that buy new anvils usualy do not have time to waste looking for old ones as their time is worth something or they are going to put them to use earning a living NOW. As tool prices go they are a comparitively inexpensive. Good Vises cost the same or more. Everything else you use in the shop much more. |
| - guru - Monday, 06/05/06 22:36:38 EDT |
|
Jon Bryan/LPG REGULATORS: I think it is important that your regulator be right at the bottle, having a flex line presurized at 300psi+ with any kind of fuel gas can be very unsafe. |
| Leaf - Monday, 06/05/06 23:41:59 EDT |
|
Me and my brother in law have tried and tried to make some damascus steel from cable. We get the cable orange hot, flux it hammer it but with no luck. The cable flattens, black granules fall on the anvil each try at hammering. Does the cable need to be tightened in a vice and welded on the ends prior to forging ? Help ! |
| - Mike Thompson - Tuesday, 06/06/06 00:07:17 EDT |
|
Me and my brother in law have tried and tried to make some damascus steel from cable. We get the cable orange hot, flux it hammer it but with no luck. The cable flattens, black granules fall on the anvil each try at hammering. Does the cable need to be tightened in a vice and welded on the ends prior to forging ? Help ! |
| - Mike Thompson - Tuesday, 06/06/06 00:09:40 EDT |
|
Re: flex hose at 300+ psi. That is how fork trucks are set up -- running liquid through the hose, even. They explode very rarely. I would be inclined to put the regulator at the tank and run copper tubing to a needle valve, with a ball valve somewhere between the needle valve and the regulator, though. My turn for a question. Like an idiot, I've broken my bench vise by overtightening it -- the nut casting cracked, of course. Doubt I can braze it back together but may try. Has anyone cast a bronze replacement nut for a bench vise before, or can anyone make a suggestion in a similar vein? Otherwise I'll be replacing the nut/screw assembly with regular 5/8" or 3/4" threaded rod which I have around. No biggie, but I was fond of the old vise handle and would like the faster pitch of the original screw. Sunny and heating up fast in Kaneohe, Hawaii. |
| T. Gold - Tuesday, 06/06/06 04:56:52 EDT |
|
A friend of mine obtained a flypress second hand and is trying to ascertain the manufacturer. The only distinguishing featuure he could tell me about was the trademark which was a G-clamp with an A in it. Not knowing anything about this field, has anybody seen this and know who made this fly press. it would be a great help, thanks |
| Dean Addison - Tuesday, 06/06/06 05:02:29 EDT |
|
If you go to a Harbor Freight retail outlet the Russian anvils, at least locally, are $89.95. That's about $.82/lb. IMHO the best place to find a used anvil is at one of the larger blacksmiting conferences. Didn't count, but suspect there were at least 50 at the last Quad-State ranging in size and condition. I picked up three from one seller for $200 as they needed work: 70-lb cast iron, 120 lb Trenton and 140 lb early English. |
| Ken Scharabok - Tuesday, 06/06/06 06:59:24 EDT |
|
Dean, Abie already asked this question yesterday. Look UP a few posts. |
| - guru - Tuesday, 06/06/06 07:11:14 EDT |
|
Brass/bronze Vise Nut: T.G., I have seen this once and someone thought it was a factory special - may have been. If you make a wax pattern by casting it around the screw you want to pick an unworn part of the screw. The trick is going to be that the brass part is going to shrink a bunch and you are going to need to create clearance somehow. When babbiting you use soot to create a small clearance. But this is a different situatiion. The shrink rate for brass is 3/16" (.188") per foot. That is 0.015625" (1/64) per inch. So on a 1.5" screw you are going to need to allow .023" plus some operating clearance . . say a total of .030" on the diameter. I am not sure how but that is what you will need to do. Otherwise you will need to machine the nut and match whatever thread is on it. A primitive method of threading is to attach a cutter onto the end of the screw in question. The screw can be supported in a hard wood nut with brass pins engaging the threads. The cutter it a single point the shape of the screw section. It is wound in and out then fed out a few thousandths and cranked in and out again. . This is similar to the way gunsmiths cut rifeling. They used a wedge and paper shims for the feed. A screw can be used in a boring bar type arrangement. I prefer a cutter with a round shank and a flat that is clamped against from the end of the bar to prevent rotation. This means two set screws to hold the cutter. One for adjustment the other for clamping. Note that these old vices used a square thread which is different than an acme thread, however these things developed while these vises were still in production. Acme threads have a 29° angle (14.5° on each side). I would measure the threads carefully before looking for replacements. |
| - guru - Tuesday, 06/06/06 08:14:19 EDT |
|
T.G. I thought you were talking about a leg vise, not a modern bench vise. . . This will probably have a smaller screw than a leg vice. The square verses Acme still applies. Most of these have a very short nut, I would make it a little longer. A material that is almost as strong as bronze and more forgivable when casting is Zamak (Zinc Aluminum alloy). It is not unusual to cast zinc around steel parts. If you heavily sooted the thread and preheated it to prevent the zinc chilling you would get a relatively strong part. The problem with bench vises is the small cross section that supports the nut. If the screw is an Acme thread (most likely) then I would lean toward making a new steel part. Note that if the vise is imported that the thread may be metric. . . However, an acme tap should be cheaper than a new vise. OR you might find a machine shop that has one (I know. . low chance in HI). The other option would be to find a nut that fits and weld a tab to it. . . However, Acme nuts are not cheap. Bunches of ideas and no good solutions. Time to look for a lathe. . . |
| - guru - Tuesday, 06/06/06 08:31:11 EDT |
|
Well. . I was wrong. A 3/4" Acme tap costs $180 from McMaster Carr. . . About 20% cheaper from Enco but they had less selection. Neither has metric acme. A new vise would be cheaper. . . This goes back to what I was saying about the cost of tools. . . $200 for a 1" tap that weighs 1/2 pound. That is $400/lb. . |
| - guru - Tuesday, 06/06/06 08:52:58 EDT |
|
Ductile Iron, how good is it for a "drift". I've been pestered a bit lately by my black powder buddies to make them some rr spike hatchets and on ebay I see these drifts made out of ductile iron. Will it hold up to repeated use, will it mushroom excessively or crack unexpectedly? I'm sure I could make one out of mild steel, but these on ebay are cheap enough to warrant looking into. |
| Thumper - Tuesday, 06/06/06 11:53:03 EDT |
|
I'm going to do a little work with 1/4" stainless less than a foot long. How does this need to be treated after it has been forgeg? What about copper the same size? Thanks in advance. |
| Mike H - Tuesday, 06/06/06 11:57:27 EDT |
|
Guru, are old steering column shafts high carbon steel? Not that I want to make one, would it be suitable to make a sword? There's been so much discussion about it here. My transmission went a few weeks ago, got a new one put in and yanked out the gear selection rod (real hard steel). Making a nice knife from it. Also, how well would a weed burning torch work if it were to be put into a refractory type forge? IS it dangerous to even think about it? |
| - Nippulini - Tuesday, 06/06/06 12:34:23 EDT |
|
T Gold If this is a modern vise check with the manufacturer. You may be pleasently suprised. I got a replacemtn nut for less than the cost og the UPS! |
| - John Odom - Tuesday, 06/06/06 13:24:12 EDT |
|
Thumper, lots of folks use these. They are nothing like a hardened steel tool but they are what is available other than hand made. |
| - guru - Tuesday, 06/06/06 13:26:18 EDT |
|
I should be more specific. How does the stainless need to be prepared so that it stays stainless? |
| Mike H - Tuesday, 06/06/06 13:28:52 EDT |
|
Stearing shafts Hmmmm. . don't know. Junk Yard steel rules apply. I do not see any reason for one to be anything other than mild steel. HOWEVER, to lighten automobiles every part has been looked at and if it can be made smaller using a medium carbon or alloy steel then that will be done. Lots of these parts are similar to SAE 1040 or SAE 1050. |
| - guru - Tuesday, 06/06/06 13:30:53 EDT |
|
Stainless: Mike, It depends on the stainless alloy. With 304 you are supposed to anneal it (heat red and quench) for maximum corrosion resistance. But then to be really top notch it is passivated with strong acid to remove scale and free iron near the surface. This gives the stainless a sort of plated look. Copper is different. It will discolor from the heat and the best way to clean up is mechanicaly. The bare copper will oxidize and must be well laquered to prevent turning brown. |
| - guru - Tuesday, 06/06/06 13:36:37 EDT |
|
Thumper, I've made maybe 50 or more hawks with my ductile iron drift, and it's only just now starting to show signs of very slight mushrooming. Two things to do so they'll last longer: Work hot, and open the hole with a smaller shop-made drift before you use the handle drift. I've seen folks try to drift a drilled round hole to the teardrop eye shape at a low red heat. This does not work, and only stresses everything (and everyone!) involved. Heat is your friend! |
| Alan-L - Tuesday, 06/06/06 13:51:07 EDT |
|
Thanks guru, I'm creating skewers for grilling. What is a good "out in the garage" way to treat them? How strong an acid mixture are we talking? Any mixtures you would recommend? Thanks again. |
| Mike H - Tuesday, 06/06/06 13:54:34 EDT |
|
Steering Shafts: I'm fre-wheeling here, but I think it would be medium to high carbon steel, sort of like axle stock. For one thing it would have to resist twisting forces. I just had a nasty vision of what would happen in extreme conditions (like when you hit one of our fine Southern Maryland roadside ditches) if the steering shaft went all noodly and twisty on you! SPARK TEST! :-D Actually getting cooler (from 76 to 74) and the wind is backing on the banks of the Potomac. Visit your National Parks: www.nps.gov Go viking: www.longshipco.org |
| Bruce Blackistone (Atli) - Tuesday, 06/06/06 13:56:06 EDT |
|
why heat treat them? just use them. Ralph |
| Ralph - Tuesday, 06/06/06 14:12:34 EDT |
|
Hmm, investment casting from a wax pattern sounds like a really good idea. I reckon I could give the screw a good coating of petroleum jelly or similar and then pour wax over it between a pair of dams, and just unscrew it right off... the original nut was about 1-1/4" in threaded length but less than 1/4" thick at its thinnest point. Cracked lengthwise down the barrel... very grainy cast iron. John, that is worth a shot. Can't hurt. :) I will also be trying to braze the nut back together. I am a somewhat skilled brazer, but I'm concerned about brass leaking into the inside of the piece. Is there any way I can prevent this? Yellow ochre perhaps? |
| T. Gold - Tuesday, 06/06/06 14:31:21 EDT |
|
TG, You probably didn't break the vise from abuse. These parts were machined or cast steel on most good American vises. 1/4" cast iron would be too little. Rather than grease you could cast the wax on the screw then gently work it until you had the looseness of fit you wanted. I would make the nut as big as reasonably fits the keyhole in the arm. The critical point is that there usualy is a shoulder in the base of the vise that the nut bears on. Then the screw holds it down. |
| - guru - Tuesday, 06/06/06 14:58:50 EDT |
|
SS Mike, I'm with Ralph. Just use them. On something small like this small amounts of corrosion is not going to hurt. A lot depends on the finish you want. If you want a bright finish on forged stainless it is going to take very strong acid. Citric acid is now commonly used. But you could just wire brush, sand, clean and polish. A bright buffed finish is more hygenic in this case. Of course you can always heat to carbonize anything living on the metal and use as-is. This works well with the black-iron finish. |
| - guru - Tuesday, 06/06/06 15:00:11 EDT |
|
Thanks! |
| Mike H - Tuesday, 06/06/06 15:53:05 EDT |
|
Okay, I have a sort of chicken and the egg problem for you. Assume that you have all of the raw materials to build a forge, but no, or very few tools (i.e. whatever you may have made before you built a forge). So, to forge tools to use, you need your basic tools, but you need basic tools to make those tools in the first place. Another words, how did metalworking get started without metal tools that required some sort of metalwork (i.e. anvils, hammers, tongs, chisels etc.)? Another interesting spin-off of this question could be, how would you, as one of the first blacksmiths make tools with which to begin your trade? |
| Andrew - Tuesday, 06/06/06 16:39:46 EDT |
|
Blacksmithing did not evolve in a vacuum, we inherited our first methods from the bronze age smiths, who in turn learned from the stone knappers. This took place over generations. Asking how I as one of the first "blacksmiths" would make my tools is sort of a flawed question in my mind. Because I know what my tools are and should be puts me in a different mindset, and I would be reverse engineering the tools. It is an interesting question though, |
| JimG - Tuesday, 06/06/06 17:06:10 EDT |
|
Welding cable -- Colors vary with light and perception, but when I've welded cable I've heated to a high yellow, close to white. Orange sounds too cool. I TIG welded the ends together on mine -- I guess you could use hose clamps or something, but you do need to keep them from fraying before the forge weld takes. |
| Mike B - Tuesday, 06/06/06 17:24:14 EDT |
|
Andrew, The hardest part of the chicken and the egg question is where do you get your raw material? That is the hardest part. Working the iron is easy compared to getting it out of the ore. Early forges were holes in the ground and they still work well. You need a supply of air. This was provided using "wine skins" or a hide over a pit. Eventually technology developed the bellows. These are made from wood and hide so they are a stone age tool project. . spliting wood, scraping smooth but metal would help. Of course you need tacks. . or nails to hold the hide on. More chicken and the egg. But brass tacks made by lost wax casting would work. . . OR you can use lung power to blow a small forge to make nails to make a bellows to use on a larger forge. . There are Ancient Egyptian images of a group of men sitting around a forge fire with long pipes blowing the fire. . . The pipes were wood or bamboo. Early tongs were wooden tweezers. If you have steel bar to make tongs then all the tweezers are needed for is placing the rivet. Or you can place it cold and heat the whole in the fire. Due to their length, tongs are not needed to make tongs. Early/primitive anvils were stone. Same for hammers. Both are used to upgrade to bronze or iron. Once the metal was affordable to use as an anvil it was available. So, from stone age beginnings you can create a forge and have tools that work. . not great but they work. The image below was drawn of Zulu Blacksmiths in 1879. The book King Solomon's Mines, first published in 1885. Later in the classic British movie "King Soloman's Mine", staring Paul Robeson and Sir Cedric Hardwicke filmed in 1937 with the exact scene below. For all of 10 seconds a bit of ancient technology is recorded. The guys in the film knew what they were doing unlike the common actor we often see who has never held a hammer. . . The only difference from this 1879 engraving is that the guys in the film were using short wooden tongs. 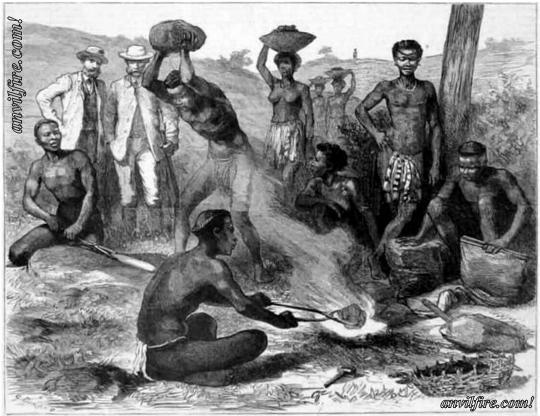 The interesting part that lets you know these guys were real (in the film) is the signals from the smith to the striker and the fact that the striker HIT the mark with the clumbsy rock. Not once but repeatedly and moved metal. These were African smiths that KNEW how to forge. So, given the metal and the technology of the blown forge, one can jump from the stone age to the iron age in one giant leap. In "what if" and chicken and the egg situations it is KNOWLEDGE that is important. Followed by the skill to apply that knowledge. |
| - guru - Tuesday, 06/06/06 17:42:33 EDT |
|
Note also that in this case wooden tongs are probably preferable to bronze ones as the copper based alloy will transmit too much heat! Thomas |
| Thomas P - Tuesday, 06/06/06 18:05:32 EDT |
|
Stainless Heat Treating: Austenitic and Ferritic and Martensitic stainless steels are all treated somewhat differently. 300 series are usually austenitic and should be heated to about 2000F and water quenched to re-dissolve Chromium Carbides. However, if it is the L grades, it does not need to be heat treated. 400 series Ferritics (does not include the 420-440 series) can be heated to about 1700F and quenched. The 420-440 is usually martensitic and should be chemically passivated since this is a martensitic grade and heat treatment will harden it. |
| quenchcrack - Tuesday, 06/06/06 19:16:02 EDT |
|
My Champion 200 1/2 drill press came with a flat belt pulley on it, and I am getting artthritic and tired of cranking it. The pulley is about 11 (36" circumf?) inches in dia. The upper and lower gears give the chuck a 1:1 AND 1:1.875 ratio to the pulley. I have a choice of 1/2 and 1 hp 1740 rpm motors. What size drive pulley should I use and is the 1hp too much? |
| Jlw - Tuesday, 06/06/06 19:39:43 EDT |
|
I NEED TO MAKE A DIE/TOOL TO MAKE V SHAPED CHISELS.IS THERE A HOW TO SOEMWHERE ANY KNOWS OF OR CAN U KINDA EXPLAIN IT FOR ME? I TRIED USEING A SMALL PIECE OF ANGLE IRON AS A DIE BUT IT BOUNCED OFF THE ANVIL . I ALSO TRIED CHISELING THE PIECE A LITTLE TO GET IT GOING BUT IT CRACKED ON ME. CRACKED AT THE V. ANY HELP WOULD BE APPRECIATED THANK YOU JOHN MYLES |
| JOHN MYLES - Tuesday, 06/06/06 20:57:16 EDT |
|
sorry about the caps lock |
| JOHN MYLES - Tuesday, 06/06/06 21:03:14 EDT |
|
For those drifting hawks etc with ductile, mild or even good tool steel, good heat and a good lube on the drift help. The fellows making the Hofi hammers here in the states use lube that leaves a high temp solid film lube. Many who have tried this stuff remark on the improvement in drifting. If you dip a cold tool in this lube it is worthless. If you dip a hot tool, let the water flash off, the remaining solid film is magic in preventing seizing, and reducing wear on the tool and lowering force requirements. I can forward the contact info to obtain single gallons of this stuff to those who email me with contact info. Put punch lube in the subject please. |
| - ptree - Tuesday, 06/06/06 21:53:20 EDT |
|
Primative forge: I saw a film showing African bushmen smiths using a simple device that looked like a pair of bongo drums with loosly fitted skins as a bellows. The skins were fastened at the center to sticks moved up & down rapidly to provide the air blast. Wood, leather & string, pretty low tech. I don't recall, this thing may have been a blast furnace, or maybee a forge, but the important thing is that they had figured out how to creat an air blast. |
| Dave Boyer - Tuesday, 06/06/06 22:02:28 EDT |
|
JIW - Drill: 1/2 horsepower is plenty, but You need to figure out what speeds You want. What size holes wil You be drilling? |
| Dave Boyer - Tuesday, 06/06/06 22:08:53 EDT |
|
John Myles, If you're a welder, weld a hardie shank onto a stout piece of angle iron. For a short-run top tool, use a square sectioned pice of mild steel on the diamond, a handling length. If you're a smith, forge the shank of the tool to fit the hardie hole, cut off a couple inches above the shoulder. Upset it hot with a sledge hammer in the hardie hole, as though it were a big rivet. Heat the resulting piece, drop it into the hardie hole and drive the corner of a room-temp, square sectioned piece of stock into the bottom tool. It will take repeated heats and the use of a flatter, as well, to take care of "suck-in". If you're neither a welder nor a smith, you should re-think the idea of making corner chisels. |
| Frank Turley - Tuesday, 06/06/06 22:17:23 EDT |
|
Have you noticed that some tractors have huge metal slabs bolted to the front end to act as a counter weight in holding the front end down ? Well, I got one of these big slabs of steel and am using it as an anvil. I think they are great, especially for a beginner such as myself. Just thought I would pass this along. |
| - Mike Thompson - Tuesday, 06/06/06 22:29:12 EDT |
|
Side draft hood: The hood made out of a propane tank works, once it starts to draw, with only 6' of 12" stovepipe. However, next time I start a fire with raw coal I think I will put a disel soaked rag in the hood and light it to jump start the draft and light the dense smoke. |
| Dave Boyer - Tuesday, 06/06/06 22:34:04 EDT |
|
I am sure someone has asked this question before but I have yet to find an answer. Can anyone tell me the general properties of most lawn mower blades and specifically their heat treating/tempering characteristics if they have those properties. Thanks, Vince Parrish The Forge at Northwest |
| - Vince - Tuesday, 06/06/06 22:59:38 EDT |
|
Hand Crank Drill conversion: These machines ran between 50 and 150 RPM when hand cranked and the gears and bearings are not good for more than that. Try hand cranking it fast and see what you get. This is the maximum speed to run if you want it to last. Then you have to check the gear ratio between the flywheel/flat blet pulley and spindle to determine the speed it turns at the correct operating speed. THEN you calculate the ratio between the 1800 PRM motor and the pulley. If the pulley turns 200 RPM then you need a 9:1 ratio. 11"/9 = 1.222". So you would need a 1.25" pulley on the motor. Needing a VERY small pulley is typical on these old machines that were designed to run off 500 to 800 RPM line shafting and not 1800 RPM motors. When motors WERE applied they used 1200 and 900 PRM motors which are hard to get and/or expensive today. |
| - guru - Tuesday, 06/06/06 23:05:51 EDT |
|
Corner Chisels: John, See Frank Turley's post above. There are many ways to make V dies but as Frank noted they need to be anchored to your anvil by a shank that fits the hardy hole or clamped on. Open V's made from angle iron are OK but you will need to grind and file the inside corner sharp as it has a radius. To strengthen the V you need to weld side plates on. The other route to go is a big hunk of steel and a hack saw. A day's work with good blades and a professional duty saw frame and you can have a very nice part. It could also be machined from solid but I assume from your question that you have no machine tools. Speaking of which, modern corner and V chisels are rough forged then machined to clean up the corners, hardened and then machine ground to sharpen the corners some more. Hand forged ones require a ton of hand filing and finishing. Many modern makers forgo the forging altogether and machine from solid. In the modern shop reducing 75% or more mass into chips is common practice to avoid forging or casting. If the steel you are bending into the die is cracking that is because it needs to be heated (to a bright red or orange) prior to bending. Also note that you are not going to get a square outside corner without a LOT of effort. With a normal bend the radius will equal the thickness of the material. 1/8" material = 1/8" radius (1/4" diameter). |
| - guru - Tuesday, 06/06/06 23:23:46 EDT |
|
Guru: I have read that forge welds in mild steel are not as strong as other welds, but how weak are they normally? Today I forge welded [2] 1 1/4"x 1/4" steel straps together, but I was able to peel them apart afterwards. The area of the weld was 3/4"x 1 1/4", there were no obvious slag inclusions. I understand that the "peel apart" is a tough test, as it loads the weld at only a line of force, but it seemed to fail easily. |
| Dave Boyer - Tuesday, 06/06/06 23:41:01 EDT |
|
Drill Press conversion: That is about what I had calculated but I wasnt sure about the final rpm. If I ran some friction tape around the shaft of the motor it will come pretty close. I have a friend who uses a lot of old flat belt tools and I will check with him about the pulley and belting. Is 1hp too big? |
| Jlw - Wednesday, 06/07/06 07:55:26 EDT |
|
Decarburized Steel: Dave, Theoretically a forge weld in mild steel should be as strong as the base metal and can be. In wrought it is. Otherwise laminated steel would be worthless. However, what normally happens, especially in gas forges but in coal forges as well is that the surface of the metal becomes decarburized. This is weaker material than the core. So when you make a weld of these surfaces the weld is not as strong as the surrounding metal. If the atmosphere of the forge is perfect or a protective gas used than there is no decarburization and the weld would be equal to the base metal. Now. . what happens in laminated steel is that the billet stack protects the interfaces within during welding so that only the top an bottom becomes decarburized. IF the maker wants to prevent this then the outside can be ground off between welds. Decarburization is one reason you want to draw out a billet from the welding heat if possible so that there is as few heats as necessary. In some cases the decarburized steel is useful. It is the reason that cable Damascus has a pattern. However, during welding and forging there is a deeper layer of decarburized steel on the exterior of the billet that should be ground off. Only the first fine layers of decarburization on the individual wire that create the pattern are wanted. |
| - guru - Wednesday, 06/07/06 08:00:07 EDT |
|
Any thoughts on using weed burning torches as propane forge burners? |
| - Nippulini - Wednesday, 06/07/06 08:04:08 EDT |
|
JLW, Yes 1 HP is too big. 1/4 to 1/3 is perfect. Big 20" back geared drill presses that can drill up to 1.5" (38mm) holes only need 1HP. When the pulley size is much too small (less than 2 or 3") then you need a back or jack shaft for primary reduction. This is like setting up an individual line shaft for the machine. Jack shafts have the advantage that you can run V-belts on the primary reduction pullies. When using two stage reduction the the total is the multiple of the two sets of reduction. 3:1 and 3:1 result in 9:1. Normally in belt reduction three to one is a good number as there is not too much difference between pullies. Larger reduction up to four or six to one is OK if the small pulley is not too small and you can get away with a single reduction. Over six to one almost always becomes problematic and should be done in two steps. |
| - guru - Wednesday, 06/07/06 08:09:11 EDT |
|
I have a client who wants me to make her a pot rack (40" X 24") that hangs from two solid bars that "disappear" into the ceiling...it is new construction, so there is access to the framing, but I am at a loss as to how to attach it and make sure the attachments are heavy enough. I have worked in another blacksmiths shop for 10 years and for the last year and a half have been trying to make a go of my own shop...all my previous pot racks have been hung from four chains or bars to two or four ceiling hooks..Thanks for any ideas, Patti |
| Patti Peake - Wednesday, 06/07/06 08:10:44 EDT |
|
TGN, sorry I did not comment on that one. Yes, people do it frequently (weed burners for torches) for very large heating jobs. They sort of work for a forge but are not designed for the back pressure. So they will work in a loose enclosure but not a tight forge welding temperature forge. |
| - guru - Wednesday, 06/07/06 08:12:23 EDT |
|
Patti, Just a quick thought here... Have you considered using 2 bars that are slightly U shaped to give the "disappearing" look at the ends? They could easily turn up at the ends and have eyes that can be bolted directly to the framing. Of course, the drywaller might not like the "fussy" work around it. Hope this helps, Paul |
| Paul Bilodeau - Wednesday, 06/07/06 08:42:12 EDT |
|
I am looking for some anvil infromation. One is a Trenton with 180 on the left front toe and a serial #? on the right one 196858. This anvil has a couple of chips on the edges and a cicular one around the prichtel hole. the face appears to be quite thin maybe 5/16 thick and thinner at the heel. The other is english pattern with no name just a TA on the front base the face is 5x16 with an ovwerall length of 27" it has three handleing holes one in the front one in the rear and one in the bottom. I have thought it to be a mouse hole but am not sure. It is my main anvil. The third is another english pattern that has been worked on some but is still quite lively 1-0-22 weight I use for demos. it has what appears to be Wrought in the lower quadrent of a cicle on the side above the weight, above that maybe ATT? Any info would be nice as I am just looking for there history. Mike |
| Mike Y. - Wednesday, 06/07/06 09:11:32 EDT |
|
Patti, I would suggest putting in two anchors to bolt the rack to, then let the folks that put in the dropped ceiling do their thing. Be SURE you have bolt and wrench clearance below the ceiling. Estimate the weight of the rack and the load applied (this could include some idiot hanging from it. Then determine the bolt size by using 10,000 PSI as a limiting factor. Example, a 1/2" bolt has a 7/16" root diameter. The area is PI * r² PI * 0.2187² = .1503 square inches. Times 10,000 pounds = 1500 pounds. Now, I would recommend a flat bar about 4 or 5" wide for the hangers with two holes and bolts in each. That 1500 pounds times four SOUNDS like a lot but it is not. The holes in the bar will be about 3" apart. The rack gives a leverage arm of 10" more. So a load on the side is multiplied by about 3.3. A 200 pound pull on the rack will put an extra 660 pounds of load on the bolts. They will not break but they could be bent. Same for the anchoring bolts on the joists above. In fact, to prevent movement you may want the end to be T shaped to spread the anchor bolts apart. You can make pretty decorative bolts and nuts to match the design. The arms to attach to the anchors could be nice arched pieces. In fact you could use four and that would cover the end of the vertical bar on both sides. If the client wants a round bar I would go with a heavy round of at least 1" and do the T shape at top. Then at the bottom the attachment could be pined with a decorative wedge OR just be threaded and have a couple very large nuts holding the weight. The 10,000 PSI rule is a general design rule that provides a safety factor and allows for bad material, short threads and other situations. Use it for everything except high performance automobiles and aircraft. Hope this helps in your design process. |
| - guru - Wednesday, 06/07/06 09:28:08 EDT |
|
Mike, You have quite a range of anvils. If you really want the history then you should get Richard Postman's books. Anvils in America and Mousehole Forge Yes, this is a blatent advertisement. The English anvils sound like Peter Wrights but could be Mousehole's. It helps to clean the anvil gently and then take a rubbing (tissue or tracing paper and the flat side of a piece of charcoal or wide pencil.). Dimensions do little good as all are similar and there were great variances in production. Always be careful not to make of lettering what it is not. Having Anvils in America in hand when looking at partial markings really helps. |
| - guru - Wednesday, 06/07/06 10:15:36 EDT |
|
Mike Y. The reference is in the guru's post, above. Trenton; 180 should be the weight. The serial # indicates the year 1929, made in Ohio. I don't have information on the TA anvil. The third one sounds like a Peter Wright, English made, weighing 134#. Sometimes, it'll say "Peter Wright Patent - Solid Wrought" on the side. The "Solid Wrought" is stamped in a circular form. The anvil may have two small, stepped "ledges" on the base's heel and toe. Probably 1852 into the first quarter of the 20th century. |
| Frank Turley - Wednesday, 06/07/06 10:53:31 EDT |
|
Jlw----DANGER---I once met a knife maker at the Guildshow with a messed up hand. He had decided to motorize his hand crank drill to save money and one day in use he was watching the work and reached up to work the advance and fed his fingers into the un-guarded gears. Said he could have bought a spiffy drill press for the cost of the hand surgery and down time from work and they will never be as good as they were. Are you sure you want to do this? TGN one problem with most weedburners is that you can't choke them vewry well and they tend to have oxidizing flame. Corner Chisels: a quick and dirty method is to find some old bedframe---the old ones were generally made from a hardenable steel and use the angle already provided for the chisel. Junkyard steel rules apply! Thomas |
| Thomas P - Wednesday, 06/07/06 11:56:37 EDT |
|
TGN - Weedburners have been used to heat gas forges for a while. Darrell Markewitz (Wareham Forge) has a gas forge heated by a weedburner from Princess Auto (sort of like Harbour Freight if I guess correctly.) I.I.R.C. Darrell has modified his by putting a 90 degree elbow onto the 'hot end'of the burner, and then having that extension go into the forge itself. Don |
| - Don Shears - Wednesday, 06/07/06 11:56:52 EDT |
|
Patti-- Are you mostly concerned about the tilt on the rack when Milady hangs the big heavy cast iron frying pan on one side and the lightweight copper souffle pan on the other? Can you use holes in the two disappearing bars or rods or whatever they turn out to be as the anchor points for your four opposing chains or rods that go down to the pot rack? That will maintain the rack at a level position no matter how off-balance the load. If the disappearing bars are the only suspension elements, can you bolt or rivet them to cross-bars on the pot rack? Some clients want you to defy the laws of physics. You heard it here first. |
| Miles Undercut - Wednesday, 06/07/06 12:01:05 EDT |
|
Sir, Where could I find instructions for making roses and such? thanks Tom |
| Tom Brasenell - Wednesday, 06/07/06 12:51:49 EDT |
|
Hey, how do i make a Touchmark, out of a punch, also, how big should the touchmark be, and should many be made? thanks |
| Cameron - Wednesday, 06/07/06 13:10:10 EDT |
|
Mike Y: Page 72 of Anvils in America by Richard Postman has an English brand of ATTWOOD. On the one he shows ATTWOOD, with WARRANTED under it, is in very small letters over the weight stamps, just above the middle number. On bringing out lettering and numbers I recommend laying on side and dusting with flour. Then brush off excess. Sometimes they jump right out at you. |
| Ken Scharabok - Wednesday, 06/07/06 13:17:23 EDT |
|
Touchmarks: Cameron, See our iForge demo #65, Matrix and Touchmark Punches. Size depends on the scale of your work. If you do large sculptural pieces they should be large, as big as an inch. If you do picky small work like locksmithing then they need to be 1/8" or less. Large letter punches are 1/4" and it is a size that will just fit on fireplace tools and such. |
| - guru - Wednesday, 06/07/06 14:05:30 EDT |
|
Forging a Rose: Tom, We have numerous step by step demos on our iForge page. A popular rose is: Rose by Bill Epps: and then there is a Lilly by James Joyce or. . One piece Flower by Bill Epps and there are many others. Then there is "Forging the Queens Rose" video by Hans Schlosser. I am working on a review of this video. All I can say here is that it is a very odd video but between all the SCA oddness they forge a one piece rose the way it should have been described in the Art of Blacksmithing (which is wrong). Bill Epps also has some fine videos. These are available from Artisan Ideas (our advertiser). |
| - guru - Wednesday, 06/07/06 15:30:12 EDT |
|
hello, i have limited knowledge of metals but this site looks great. My company etches .062 aluminum sheet on one side. because of the material removed from one side the sheet bows and rolls. I was wondering what would happen if i clamed the sheet and heating it, annealing??? I am not sure what temperature but have read 650-1000F?? So you think this will help flaten the peice? Thanks for you time |
| mjh368 - Wednesday, 06/07/06 15:39:47 EDT |
|
Hi I work for Oakland County Parks and Rec in MI. Our park system recently moved a 125 year old, 129ft long barn to one of our parks. I help with the public programming which takes place there. This fall will be our grand opening, along with a fall festival. It will be Sept. 23 from 1-4 p.m. at Springfield Oaks County Park. I am looking for someone who would be willing to demonstrate blacksmithing during that time for the public. I hope someone nearby can help me with this. Thank You! |
| kathy thomas - Wednesday, 06/07/06 16:06:56 EDT |
|
Warp due to material removal: mjh368, This is common in all kinds of metal removal methods. Rolled and drawn steel has a stretched surface in tension. When you remove part of the surface on one side you unbalance the tension and the part warps. Annealing should help. Clamping is not necessary if the sheet is annealed prior to etching. However, rolling to remove the warp would probably be cheaper than annealing. Generally in situations like this you try to purchase material that has been stress relieved by the manufacturer instead of trying to fix the problem later. |
| - guru - Wednesday, 06/07/06 16:32:26 EDT |
|
Kathy, go to "navigate anvilfire" then go down a screen or two till you see ABANA-Chapter.com and look for the Michigan Blacksmithing groups and contact them. I'd love to help---but I live in New Mexico I think your biggest problem will be that that weekend is Quad-State, the largest blacksmithing event held yearly in the USA near Dayton OH and many smiths that would help out will be there. Thomas |
| Thomas P - Wednesday, 06/07/06 19:16:56 EDT |
|
Post drill conversion: If I have an 11" driven pulley on the drill, and a 2"drive. V-belt from the motor to a 6" pulley, then a flat belt from a 4" to the 11" driven pulley is about right. Are there any pictures of a good way to make a foot operated slack or clutch mechanism so as to avoid reinventing the wheel? I am envisioning a spring lift on the axle with the 6/4 inch pulleys pulled down with a foot pedal. |
| Jlw - Wednesday, 06/07/06 22:29:02 EDT |
|
Jlw, That is what electric swithces are for. When these things had belt drives there usualy was a double flat belt pulley with one on a bearing so it spun free. The belt was shifted side to side. However, the only reason for a clutch was line shafts ran more than one machine and ran contantly. Individual motors and switches replaced all that. |
| - guru - Wednesday, 06/07/06 22:38:29 EDT |
|
Thursday AM - I am off to take someone for eye surgery. Be back in afternoon. |
| - guru - Wednesday, 06/07/06 22:39:12 EDT |
|
JIW: The idler goes on the slack side of the belt, and helps increase the ammount of wrap on the small pulley [the idler gets mounted close to the small pulley].You will probably need guides to keep the belt from jumping off, as flat belts tend to do that when they slip. It might be more satisfactory and a lot easier to just switch the motor on&off. |
| Dave Boyer - Wednesday, 06/07/06 23:00:36 EDT |
|
V-chisels: You might try folding it over on itself (legth wise), hammering a slight bevel on the edge that ends up being the bottom of the V and then unfolding it. Starting with the center thicker might help keep the center from getting thinner than edge oposite the fold. Tool steel will crack like crazy if you let it get too cold. "the complete modern blacksmith" By Alexander Weygers devotes many pages specificaly to chisel making. |
| Leaf - Thursday, 06/08/06 01:50:47 EDT |
|
|
|
|