| WELCOME to the anvilfire Guru's Den - V. 3.0 |
|
THIS is a forum for questions and answers about blacksmithing and general metalworking. Ask the Guru any reasonable question and he or one of his helpers will answer your question, find someone that can, OR research the question for you. This is an archive of posts from June 16 - 23, 2005 on the Guru's Den |
|
|
|
Edie K' copper delema: How about finding an Iron pipe that would fir insid eyour copper pipe. It would impart the strength that you would need. Sealing copper that will be in a high usage area. 1. clean it and polish to desired sheen. 2. Buy automotive tyre rim clear coat. ( the same stuff car show buffs use on their 'show car rims') 3. polish the clear coat and re apply. its also 'do able' with a wood laqure sold by Fraz-E but unless your' REALLY ' good with a spray rig don't even try. |
| - Timex - Thursday, 06/16/05 02:27:07 EDT |
|
Guess the weight of the anvil! I've just bought this big anvil, see the link below. http://imageevent.com/imagedude/biganvil?n=0 There are no weight markings so I'd like people to guestimate the weight for me. The face is 7.25" x 29", overall length is 45" height 16" width of feet = 15" |
| Bob G - Thursday, 06/16/05 07:02:09 EDT |
|
Anvil Weight: I would guess very near 450-500 pounds. Two hardy holes, two pritchel holes. . quite and anvil. Do I win a prize? ;) |
| - guru - Thursday, 06/16/05 09:14:54 EDT |
|
Timex, iron inside copper equals severe bimetallic corrosion. You'd end up with only a rusty sludge inside the copper pipe on comparatively short order. |
| Alan-L - Thursday, 06/16/05 09:19:00 EDT |
|
Bob G What a nice anvil!! My guess is around 610 +- 25lbs. If we guess it right do we win the anvil?? BOG |
| burntforge - Thursday, 06/16/05 09:28:27 EDT |
|
I'd guess somewhere in the range of 680-740 lbs, Bob. That old square/cube law can really add up, you know. Liek the others, I want to know when I get my prize for the right guess. (grin) |
| vicopper - Thursday, 06/16/05 09:51:32 EDT |
|
alan, if that railing is in a house I think it would last quite a while before galvanic corrosion is a problem. If it's outside getting wet it would be a big problem. How about copper coated steel grounding rod? I'll have to go home and measure a sample of mine to guess at tjhe anvil's weight. I used to have a file with a bunch of anvil weights, dimensions and makes in it to be able to make a guess but it was electrocuted. BTW what does the bottom look like? Very indicative of some brands. Thomas |
| Thomas P - Thursday, 06/16/05 10:30:46 EDT |
|
Based on photo #10 I'm guessing Peter Wright. According to Postman's Anvils in America they made the up to 600 pounds. An extra hardy could have been a custom order, as could double pritchel holes. Dang tape is in the way to see if there is the extra finishing hole in the front foot. |
| Ken Scharabok - Thursday, 06/16/05 11:40:59 EDT |
|
Magical Mystery Anvil: comparing it to the 500lb. Euroanvil I'd say it's about 600lbs. |
| Tyler - Thursday, 06/16/05 11:52:51 EDT |
|
Big Anvil - You could lower it (horn up) into a half-filled 55g drum and see how much the water level rises. Remove it, then add water (carefully and keeping good track of how much) until you've reached the same watermark. You then have the volume of the anvil. With that, all you need is the density of cast steel and you should be able to get pretty close to the weight. |
| Archimedes - Thursday, 06/16/05 13:23:37 EDT |
|
Or just go to any recycling yard that has a big/electric scale that will give a really good approximation on anvil weight. |
| Arron Cissell - Thursday, 06/16/05 13:32:34 EDT |
|
The 'net suggests that Cast Steel has a density of about 7.8, thus about 62 lbs for every gallon of displacement. Be cautious about exact numbers - the variation in density (I saw a variety of densities) and "significant figures" only lets you get within perhaps 20 lbs at that range. Guru - are Archimedes and I on the right track, or should Bob G. visit the local truck stop? |
| Tim S. - Thursday, 06/16/05 13:42:35 EDT |
|
I get nervous taking a nice anvil like that anywhere near such a yard. But they DO have nice scales - I visit them every so often, as I'm about 400#... |
| Tim S. - Thursday, 06/16/05 13:43:59 EDT |
|
I've got a platform scale in the shop that goes to 1,000 pounds and a crane hook scale that goes to 20,000 pounds. . . The crane scale is not too accurate in the low range but the old Fairbanks is commerce certifiable. . . I weigh myself on the Fairbanks. Displacement works but you need a good measure of the volume. Specific gravity of water = 1 (.99998) and steel around 7.8. Before I had the fairbanks I weighed a 300 pound anvil on a set of bathroom scales using a lever system to reduce the load by 50% and read the scale at 150 pounds and multiplied by two. In this case you would want a 3x or 4x divider. Then there are steel yards. The big ones are good to 1,000 pounds I think. . . Off to Paw-Paw's to get ready for the Hammer-In. Great weather forecast for this weekend. Y'all come now. |
| - guru - Thursday, 06/16/05 14:05:12 EDT |
|
I am looking to get into metal wotking and all of the things that go with it. I think it will be a fun new challange and hobby for me. Could you tell me how I would make a decent sized forge and what I need to do basic things and eventually work my way into bladesmithing? Thank you |
| Mike - Thursday, 06/16/05 17:25:38 EDT |
|
Mike your in luck, go to the navigate anvil fire box and pull down FAQ's about a third of the way down the list is info on building a gas forge. Or if your more traditionally minded go two articles down to the 'Getting started in Blacksmithing' article, in there are lots of things to get you scratching your chin thoughtfully :) |
| Tinker - Thursday, 06/16/05 18:10:15 EDT |
|
Mike, Get the books "The New Edge of the Anvil" and "The Art of Blacksmithing", they are really good books. A few good books can answer almost all of your question about beggining blacksmithing. |
| Tyler - Thursday, 06/16/05 18:16:00 EDT |
|
re large anvil: It's not a Peter Wright as its construction predates the PW method, I can clearly see were the feet were welded to the body. I'll post a photo of the large anvil next to a 3.5 cwt saw doctors anvil on Tuesday. |
| Bob G - Thursday, 06/16/05 18:32:57 EDT |
|
The earliest Peter Wrights were made by the build-up method. It was somewhere in the mid-1850s PW obtained the English patent for the two-piece body. See Anvils in America by Richard Postman, pages 102-104. According to discussions with Postman, I am awfully positive only PW and one of the Swedes and possibly Henry Wright used those steps. Are the steps there or an illusion in photo #10? |
| Ken Scharabok - Thursday, 06/16/05 19:44:55 EDT |
|
the mystery anvil has a VERY PW looking horn. the proportions do not look like a trenton. it does have "feet", it is wrought. it appears english. what country is it in?? what are your plans for it?? |
| rugg - Thursday, 06/16/05 20:23:46 EDT |
|
Bob: Bring that anvil by my place, I have a 2,000 lb HOWE platform scale. Then you can store the anvil here in my shop indefinitely, at no charge. BOG Where did you find it? For what $$ did you steal it? |
| - John Odom - Thursday, 06/16/05 21:01:08 EDT |
|
could someone send me pictures of their forges so I can get some idea of what im doing, and to get some ideas for my forge. I kind of want a forge that looks like a hut. I dont know which is better for heat, so I dont know what I want to use for heat. |
| Mike - Thursday, 06/16/05 21:16:18 EDT |
|
Big anvil, Bob? Any particular reason you want to know the weight of it? Other than for bragging rights and make us all (which your doing a good job of) envious? Hydrant pipe, Why not see if a magnet will stick to it to see if it's iron or composit? |
| JimG - Thursday, 06/16/05 21:26:25 EDT |
|
No ptree I noticed a rubber gasket that the water district guy had taken off the top of the pipe that needs to be welded so it needs to be watertight. Thats good advise I'll check to see who the manufacturer is tomorrow and see what they recommend. And I also want to talk to the plant engineer and be sure he knows whats about to happen so he don't climb down my throat about this repair job. I did find a website last night and did go into some detail about welding ductile iron pipe. It read alot like a cast iron welding job to me. It recommended things like using a nickel based rod, shielded metal arc, short arc length, preheat, etc. My gut instinct says this can be welded and I think I'm going to give it a try, that is as soon as it stops raining ......... |
| toni 1595 - Thursday, 06/16/05 21:27:07 EDT |
|
I need to make a drift for putting an eye in an ax head. What are some things made out of a heat resisting steel that I could find in a junkyard? |
| Tyler - Thursday, 06/16/05 21:27:20 EDT |
|
Tyler axe eye drift. I was told "For what that is worth:-)" that grain auger blades are S7 or some such. BUT if you are quick and use a good lubricant you should be able to do what you need with 4140, or even schedule 60 rebar (1060+:-) For that mater I have a tomahawk eye drift that is cast iron... A hole lot of axes were made by welding the butt and the blade with a nice little void in the metal where the eye would be and then shaped up on a drift. It was only in later period industrial type manufacture where the eyes were punched and drifted... If you are unwilling or unable to buy good tool steel, you can get the job done with even mild steel, it just changes how much you can abuse the tool before you have to stop and redress it... |
| Fionnbharr - Thursday, 06/16/05 23:55:03 EDT |
|
Tyler: If you are talking about an axe, rather than a hawk, I doubt they were ever manually slit and then drifted, Way, way too much metal to go cut through manually. Axes were traditionally made by forge welding a slug of tool steel in the middle of a shaped blank. The blank was then folded over, keeping the tool steel to the end and then another wedge of tool steel forge welded in for the blade. This left the eye area only needing to be dressed up. If you go to eBay auction #6185581629 you can see the general process in the third photograph there. Toni 1595. I use ductile iron bell couplers on my propane forges. For an air damper I weld in a base of mild steel to them. Stainless steel rod (312-16) seems to work nicely with it. Can you find a piece of the same material to practice on? |
| Ken Scharabok - Friday, 06/17/05 06:08:26 EDT |
|
From what I can gather, its six of one and half a dozen of the other :) Gas forges can get as hot as traditional forges that use charcoal, coke, or coal. but its isn't as easy as it is with these feuls, some gas forges struggle to get to welding temperatures but gas WILL get that hot if done right. The Gas vs Solid Feul debate is a long standing one. Think of where you are for a start... in the sticks? either...in the middle of a housing estate with neighbours 10ft away? maybe gas would be better, can you get hold of solid feul easily? Is gas cheap? its up to you based on your enviroment. Try googling Ron Reil for gas burner/forge stuff. Then try 'homemade forges' or somthing similar, you'll have lots to look at. By hut I'm assuming you mean a rectangular box and are thinking of sword length pieces for forging? A Trench Forge may be somthing to look at. I really recommend the 'getting started in blacksmithing' page. Its free, has a lot of good advise, and there are pics to peruse too. I'd send you pics of my furnace but you want to heat metal, not melt it :) Anyhow hope this helps a little |
| Mike - Friday, 06/17/05 07:13:10 EDT |
|
forgot you don't get a subject box lol :) |
| Tinker - Friday, 06/17/05 07:13:48 EDT |
|
Mike if you want some pics of gas forges go to http://www.elliscustomknifeworks.com/, click on the 'refractory and knife making supplies' button and go down to 'Forge Gallery' click and enjoy. Also a good site for knives of course ;) |
| Tinker - Friday, 06/17/05 07:55:11 EDT |
|
Hey Folks, I was at a store the other day and they sell a lot of used items and surplus aquired items. They had these bins one was filled with used drill bits. I am talking ones used for metal and ar anywere from 6"-10" long. And the other item were these shafts/bearings? long machined metall shafts with grooves machined in around the entire diameter and run the length of the shaft. These are run from 12"- 24". Anyone have an idea if these a good to forge int anything? |
| tomg - Friday, 06/17/05 08:39:46 EDT |
|
Sir: As young lad I was always attracted to the work and chores of the man who came once a week to shoe our horses, mend broken pots, knives and all sorts of things. By questions and observation I witnessed and learned about the forge, the blower, and the hot hot-soft metal tranformation into all sorts of beautiful things. His answer to my first question was,,, Sonny, you talk too much nonsense, of course it's hot.'Now either find me a SEEGGAR or go away with your silly questions. From that day on I always came with a huge cigar that cost two cents and received a great deal knowledge and satisfaction from this seemingly unlearned man. I am not a blacksmith though I love and admire the Art. A few tools and anvils that I aquired from Otis I gave away not knowing that I would miss them later, especially the ringing of the old anvil. Are anvils still being made or have they being replaced by modern tools? Is there an available source for these items? I hope that you understand my nostalgia when I ask these questions. Thank You joeL |
| joeL - Friday, 06/17/05 08:42:26 EDT |
|
TomG, The shafts you mention may be a medium carbon steel...or they may be something else entirely. Splined shafts have to be pretty tough to withstand the usual torque loading they often recieve. As with any "junkyard" steel, you have to do a bit of checking to see what you have. Spark test for general carbon content, cut off a piece and try different heat treatments on it to see how it behaves. Start with an air quench, see what that does. Then try an oil quench and see how hard it gets. Try a water quench if oil doesn't yield enough hardness. Once you find out what will harden it, then yo utry different temperatures for tempering to see what will make it hard but tough. Read the Anvilfire FAQs on junkyard steels. |
| vicopper - Friday, 06/17/05 09:30:11 EDT |
|
JoeL, You can find lots of old anvils and several makers of new anvils by checking on eBay under blacksmithing. The prices often get a bit ridiculous for anvils in pretty poor condition though, and 99% of the new ones they sell on eBay are cast iron pieces of junk fit only for use as a doorstop. Check the advertisers here on Anvilfire for new anvils; almost all of them sell high quality *real* anvils that any smith would be happy to use. Often, if you simply place an ad in a couple of local newspapers stating you are looking for old blacksmithing equipment you will get some folks answering. You'd be surprised at the number of old anvils sitting unused in sheds and garages just waiting for a good home. Just stay away from antique shops who are selling anvils as "collectors items" and charging too much money. A good anvil costs no more than a beat-up "collector's item." Yes, we understand your nostalgia. That is one of the reasons many of us do blacksmithing as a hobby. We love the smell of the coal smoke, the ring of the anvil, the fel of the steel under the hammer. Having a nice item when you're done is just a bonus for some of us, in fact. (grin) |
| vicopper - Friday, 06/17/05 09:37:41 EDT |
|
CAMP FENBY to be RESCHEDULED No sympathy or commiseration needed; just a note that I messed up my back in Omaha, and have spent the better part of the last week prone. Not answering e-mail (maybe this weekend), limited computer time, and the meds are unkind to coherrent thought. Three more weeks of light duty after this. Will reserve myself to short, pithy comments, if anything at all. Life is messy; but we'll muddle through. |
| Bruce Blackistone (Atli) - Friday, 06/17/05 09:40:50 EDT |
|
Atli: "light duty" beach inspection and test down in the VI sounds appropriate to me...don't forget the bottled muscle relaxant the sell over the bar---I mean counter down there. Keelhauling, though traditional, may not produce the results you want... Thomas |
| Thomas P - Friday, 06/17/05 11:41:36 EDT |
|
Thanks Vicopper. I have read what you mention. I was going to use that info just thought someone might know off hand. |
| tomg - Friday, 06/17/05 12:17:32 EDT |
|
Hi folks. I am a 24 year old, knows nuthin, wanna learn some black smithing skills. This is the first of what will most likely be a long line of questions yet to come. Q: Whats the bees wax cake used for? |
| Phill Pote - Friday, 06/17/05 13:47:26 EDT |
|
Beeswax is rubbed on a finished piece of work usually while it's still warm, but not too warm so it won't run of and it makes it look better and prevents rust. |
| Tyler - Friday, 06/17/05 15:24:17 EDT |
|
Thanx Tyler! |
| PhillPote32 - Friday, 06/17/05 16:23:35 EDT |
|
I find that beeswax is a bit sticky and prefer plain old paraffin wax for that use. Thomas |
| Thomas P - Friday, 06/17/05 16:34:03 EDT |
|
i have a very early witches brew pot/kettle, how can i tell age? is very old and original,however its hard to find info. on it. brenda lee |
| brenda l - Friday, 06/17/05 20:30:36 EDT |
|
Sir, Can you please tell me what lamp black is, and can it be found today or perhaps something similar? |
| Jeff. - Friday, 06/17/05 21:40:23 EDT |
|
I believe lamp black is just the soot on the inside of a lamp chimney. "An amorphous carbon obtained by burning various fats, oils, resins, etc., under suitable conditions." I'll let others chime in, but at least you get a quicker reply this way (most of the gang is probably at Paw-Paw's...) See http://shop2.chemassociates.com/shopsite/Chemassoc2/PAS-lampblack.html -Tim |
| Tim S. - Friday, 06/17/05 23:14:35 EDT |
|
Brenda I-- if it's cast iron it's going to be difficult to fix a date for it. But take care of it. Cast iron pots crack easily-- and, intact, they go for lotsa dollars on the antique market. |
| Miles Undercut - Saturday, 06/18/05 00:03:47 EDT |
|
Jeff: The other answer is corect, it is soot. I don't know a comercial supplier for it, but it is comonly used in industry, it is what makes tires black, the carbon strengthens the rubber. It is commonly used as a filler, or as a pigment. It is really messy by itself, chimneys are covered with it on the inside. |
| Dave Boyer - Saturday, 06/18/05 01:23:34 EDT |
|
Lamp Black is usually called Carbon Black today. You can buy small quantities that are packaged for colorinf cwnwnt. Industrialy there are many types and grades, but for coloring stuff black, any grade will do. |
| - John Odom - Saturday, 06/18/05 07:51:07 EDT |
|
That should read "coloring cement." Proof first, then post! |
| - John Odom - Saturday, 06/18/05 07:52:47 EDT |
|
I am in need of a machine shop or some other type place where I can have touchmark stamps made. The people that Centaur Forge outsources to are entirely too expensive. Is there another company that anyone knows of that can make these for me? |
| George Geist - Saturday, 06/18/05 08:50:34 EDT |
|
George; If you're just interested in a symbol of some kind, consider a piece of annealed high carbon steel, a file and a Dremel moto-tool, and make it yourself. If you have to have uniform lettering, you may just have to bite the bullet. Face it, the cost of setting up to make a one of a kind stamp is gonna be high, and there will be only one person, you, to pay for it. |
| 3dogs - Saturday, 06/18/05 10:20:15 EDT |
|
The prices of a whole lot of things today are entirely too expensive- but unfortunately, thats usually what they cost. I havent priced a stamp from Centaur, but I do know that custom steel stamps are pricey- I used to get a new 2 digit stamp every year for dating my work- thats just 2 numerals, in 1/8" tall letters, and it last cost me over 50 bucks for one. If you do a google search, or even better, a thomas register search, for "steel stamps" you should find quite a few places that do it. I used to live in Southern California, and we had two places down there- Paramount Stamp, in Paramount Ca., and Mercury Marking, in, I believe, Lake Elsinore Ca. But there are at least 2 dozen or so steel stamp shops left in the USA, I am sure. They will commonly have around a million dollars worth of equipment, and hundreds of years of experienced employees, with the ability to run some very complicated manual and cnc machine tools, as well as extensive heat treating and metalurgical experience. So from their standpoint, I am sure they dont think they are expensive at all. |
| - Ries - Saturday, 06/18/05 11:04:35 EDT |
|
Bob G, Hey thats a nice anvil. If you buy the Anvils in America book and call Richard Postman/pitch his book several times a week you too can be a self-proclaimed anvil expert. |
| - Robert IW - Saturday, 06/18/05 14:30:27 EDT |
|
If it was just one for me it wouldnt be a problem as far as cost is concerned. I'm trying to find a place that will make me 10 or more in order to provide them to the members of the group that I belong to. I do very much appreciate 3dogs and Ries' help thanks guys |
| George Geist - Saturday, 06/18/05 15:12:52 EDT |
|
im station in iraq and started blacksmithing. the proble im haveing is fuel for my handmade forge can grillin charcoal be used it all i can find here. ur should itry something else [any idea ] |
| william - Saturday, 06/18/05 17:02:58 EDT |
|
William, If that is all you got then thats all you got it will work. Possibly it might help to break it into smaller pieces. Be sure to have plenty of it as it is not very fuel efficient and will be consumed pretty quickly. The good part is that it will be clean and free of clinker. God be with you and your friends be safe over there |
| George Geist - Saturday, 06/18/05 17:22:52 EDT |
|
Thank you very much by the way love the site and im start my 1 project after mission tomrrow [ a candle stick that i saw here ] thanks again |
| william - Saturday, 06/18/05 17:36:40 EDT |
|
George, I make custom stamps. Mail me at castleinacorner@aol.com and we can discuss it. Of course, CSI members get a better discount... ::grins:: |
| Ano - Saturday, 06/18/05 18:21:57 EDT |
|
William, If you can't find real wood charcoal, can you find any real wood? You can either charcoal it yourself, or use it as is and it will charcoal as you use it. Either way, it will be better than "charcoal" briquettes, which have coal, wood dust, ash, some charcoal, some dirt and who knows what else in them. I tried using them once a few years ago, and they produced a 2# clinker for about 3# of briquettes, it seemed. That stuff is nasty to forge with, but it can be done. You might consider making an oil-fired forge. Basically the same set-up as an oil-fired furnace burner. I'm sure you have diesel, jet-A or something you could burn. |
| vicopper - Saturday, 06/18/05 20:46:01 EDT |
|
William: There's always dried camel poop.(BOG) |
| 3dogs - Sunday, 06/19/05 01:59:57 EDT |
|
Will and 3Dogs: 3 Dogs LOLOLOLO ROF I really gotta stop trying to drink soda while reading you comments( blew MT Dew out nose) Will any one can charr wood for fuel. Its a simpl process that has LOADS of very not so sim[le math be hind it. It pretty much boils down to the heating of a fyriable( sp) material ( wood in your case) untill it starts to ex-gas. The releasing of h2 and other cmpds in the form of 'smoke' The process is'n hard to figure out nor hard to due . See the char coaling process in the fac of this site. or email me about the process. I currently making a indepth study on the process ( bio /chem/ pyro science at UNV Las vegas) And I am starting to really understand the reason for each stp in the process. As fer the mixing of fuel oil with a wood. Watch your fums vs o2 content and keep an eye out for reflash/ fume explosin. Be safe and have fun. |
| - Timex - Sunday, 06/19/05 05:07:14 EDT |
|
sorry Will the H2 is really H2o , but H2 is present in the prcess in minor amounts |
| - Timex - Sunday, 06/19/05 05:09:10 EDT |
|
Will, ] If you can and depending on your local[ look in the local 'suke' for a cooking fule supplier. HE should be kind of to the side so take a friend with you just incase. The wood coal the yoou are looking for is called lump charcoal or 'Britania real wood coal'( as per Srgt. H. Anders, curently stationed in the same general area. ) But run the chain before going white flag. k |
| - Timex - Sunday, 06/19/05 05:18:12 EDT |
|
William: I tried e-mail you a description of the two basic charcoal making processes but the addy rejected as not valid. |
| - Ken Scharabok - Sunday, 06/19/05 08:49:21 EDT |
|
Got it done. I now have the old Champion forge on a nice sheet steel table. Got a small sqirrel cage fan with a 1/30 hp motor. I have a carefully engineered shutter made from the plastic top to a coffee can on the intake. The only peculiarity is that the motor seems to speed up as I close the shutter, but it may just be the wind noise. I have taken Miles derision to heart and will not make a catch for the Champion Drill press gear change. It takes real effort and a few taps with a hammer to move it anyway. I just like to make things complete and completely original. |
| John W - Sunday, 06/19/05 12:04:00 EDT |
|
This last winter I built a gas forge (side feed) out of a 12" piling casing and lined it w/6"s of refactory concrete. It does an excellent job of heating metal, but it sounds like a jet aircraft. My question is " Does anyone have any ideas for quite the sound down a bit?" |
| Wolfe - Sunday, 06/19/05 13:54:46 EDT |
|
Beat welding wire and bundled rods. I having problems keeping the wire together long enough to weld the sucker. Any hints or advice ( short of arc weld) would be helpfull. |
| - Timex - Sunday, 06/19/05 14:16:49 EDT |
|
Timex I wire the ends of my billets together with baling wire or rebar tie wide---not at the very end if I'm doing a basket weld. Also for bundles of round stock it helps to have a V swage to weld into---helps trap the round rods rather than let them slip away. The cutting step on a London pattern anvk can be used for this or make a swage from some angle iron. Remember to hit firmly not hard! Thomas |
| Thomas P - Sunday, 06/19/05 15:36:37 EDT |
|
Dear Guru, I have a question I hope you can answer without a picture. My husband and I found a very old,worn anvil in the basement of a house we recently bought.We were told by several people and 'old timers' in our town that it may be worth over $1500.00. If this was the case it would truely be a blessing to us now. The anvil weighs over 150lbs is about 1 foot high 8 inches wide at the base(though the middle comes in to about 4 inches )and about 20 inches long. It has a square and a circle cut out in the squared end of the top. any information you could provide along with any dealers or collectors near the state of New Jersey would be greatly appreciated. Thanks so much. |
| Cindy - Sunday, 06/19/05 15:50:28 EDT |
|
hey every one thanks for your help. the wood im going to keep an eye out for and again got the instuction from here on making charcoal. the brickettes were messy but all in all i got the candle stick [ a spiral] done its cooling now i wanted to start simple it came out ok. thanks again p.s. i fixed my e-mail its usarmy1995@yahoo.com |
| william - Sunday, 06/19/05 17:34:26 EDT |
|
Cindy: Hate to be the bearer of bad news, but your anvil is most likely worth $300-400, and then if a quality name brand and in very, very good condition. In 'old, worn' conditon, might be worth $150 or so. Go to the eBay category for Collectibes/Tools, Hardware & Locks/Tools/Blacksmithing and do a search on anvil both in the current and closed auctions. Look at the side of the anvil with the horn to the right. Do you see any writing? If so, what. At the waist do you see numbers punched in, such as 1 1 10. Are there square holes under the horn and heel? Is the base flat, have an oval depression or have an hour-glass depression? If you hit it in several places with a flat-faced hammer does it ring or just have a dull 'thud' sound? Look below the top plate. Do you see a seam to where the plate was added on top of the anvil? Look at the top of the front and back feet. Do you see a small step or ledge there? |
| Ken Scharabok - Sunday, 06/19/05 17:36:53 EDT |
|
John W-- No derision intended, just practicality as I see it. You really do not find yourself changing gears that often that a circular shim would not work just fine. Someday you will come across one that is intact that you can study and copy. |
| Miles Undercut - Sunday, 06/19/05 18:01:51 EDT |
|
Would like to know history and quality of Fisher anvils. I have three of them the largest of which is a 600 pounder. |
| Gayle Hopson - Sunday, 06/19/05 20:16:15 EDT |
|
Gayle Hopson, There are two good ways to learn the history of Fisher anvils. One is to purchase a copy of "Anvils in America" by Richard Postman; it is an excellent reference book on anvils and has a good history of Fisher and Norris. The book is available through the Anvilfire Store, just use the link on the pull-down menu at the top of this page. The other way is to contact Josh Kravett, proprietor of the Fisher and Norris Museum in (I believe ) New Jersey. I'm not sure how you would get hold of Josh, but he is definitely an authority on the history of Fisher anvils. I can tell you that I own a Fisher, and love it because it is an excellent anvil and is quiet. Unlike the wrought iron bodied anvils or the cast steel anvils, the Fisher is a cast iron body with a tool steel top plate and horn plate. Because the body is cast iron, it does not ring, a real boon to my noise-damaged hearing. |
| vicopper - Sunday, 06/19/05 21:06:32 EDT |
|
Gayle Hopson: All of the information you are seeking should be in the book, Anvil's in America by Richard Postman. It is available in the Anvilfire Store. Fisher was the first and last major U.S. anvil manufacturer. Much of their history is in Postman's book. Almost all of the Fisher anvils were of quality manufactuer. They differed from most other U.S. anvil manufacturers by having a cast iron base and steel plate top (which sometimes extended over the horn. Some blacksmiths did not like them because they did not ring and it was felt they didn't have the rebound of a wrought iron bodied/steel plate anvil. |
| Ken Scharabok - Sunday, 06/19/05 21:06:44 EDT |
|
Thank you for the info. I thought they were poor quality because they don't have the usual ring, obviously that is not the case. I am proud to say my dad was a blacksmith. Great Website! |
| Gayle Hopson - Sunday, 06/19/05 21:22:08 EDT |
|
George Geist- email headed your way. Reference steel stamps |
| Brian C - Sunday, 06/19/05 21:27:26 EDT |
|
Thomas P, Thanks for the hint and advice. i'm going to make a 'v' shaped hardy tool as per your advice. I'm just tyred of chasing hot , short iron and was looking fer a better way to control the bundle. Thank you again, and now off to hit the books. test tomorrow on bio lab. |
| - Timex - Monday, 06/20/05 01:46:15 EDT |
|
On my propane forges I bring the propane in from one end to supply two tubes. Am trying to build a custom order one by basically joining two of the 30-pound Freon bottles such that the buyer can use either two or four burners. Have propane coming in between the first and second burners. Has a shut off valve between the second and third burners. When I tested it burner #2 works fine, as do #3 & #4 when the valve is opened. However, cannot get a good supply (flame) out of burner #1. Have double checked orifice and even replaced piping with the save results. Why would coming in the middle be different than coming in from one end? Seems like the pressure should be equalized in the T. |
| Ken Scharabok - Monday, 06/20/05 07:01:11 EDT |
|
Ken, I'd have thought so too. Hmmm... Especially as you have already checked the orifice. Does that burner work on its own outside/inside of the forge when you hook it up to its own dedicated supply? How close is burner 1 to the end wall of the forge compared to the others? (especially no 4 as its the closest mirror image to 1) Is there an adequate forge exhaust window? Is it right next to it? I'm thinking maybe if the main exhaust for the forge is at the opposite end then are the other burners robbing it of air or creating a back pressure that no 1 struggles with? I'm also wondering if they are aligned to swirl the flame around before escaping, could this contribute to the above? If you can eliminate the burner itself as a problem first then its got to be either the gas supply or the how the other burners effect the atmosphere inside the forge that are causing the problem. Mind you i'm no expert mate. Ron Reil is the daddy on this one, if you can talk to him. just a few thoughts |
| Tinker - Monday, 06/20/05 08:11:52 EDT |
|
Ken, The problem is that, with the downstream valves open, that end of the supply line is seeing lower pressure than the other end, thus the gas wants to flow that way. If you throttle back the downstream burners a bit, the first burner should then work okay. One way to beat this problem is to use a section of larger supply pipe between the main supply and the burner taps. This plenum allows a pressure drop area that evens out the pressures at all the taps. Another way is to open up the orifice on the #1 burner about one drill size and see if that helps. |
| vicopper - Monday, 06/20/05 08:39:19 EDT |
|
Forge is designed with a shut-off valve between burners two and three. With it closed, burner #2 works great but not burner #1. When you open the valve and kick on #3 and #4 - some result. No effect on #1. I changed the plumbing to come in from the front so the gas his #1 - #4 in a row. #1 now works fine - used same size orifice (.0330 I believe). #1 sits in back of the front opening about 4-5". With the valve between #2 & #3 closed, #1 and #2 are isolated. Just simply don't see why #1 wouldn't work when the gas was brought in between it and #2 vs gas now coming in from the front. Doesn't make sense. |
| Ken Scharabok - Monday, 06/20/05 08:53:45 EDT |
|
Dear Ken I went out and took a very close look at the anvil using all of your instructions. Here goes. (and I must say i'm very intrigued ) there is no seam its all one peice, it rings very nicly some places louder than others but absolutely no thud. I could not see any wrighting on it but the bottom is an hour glass figure with half circles with a small circle all the way through the half circles on each end. ON the very bottom it looks like part of a circle slightly raised and on the side were you said to look for cut out numbers, only what looks to me to be part of a heart raised off the surface. I hope all this will help better identify it. Waiting anxiously for your reply and thanks again. |
| Cindy - Monday, 06/20/05 09:55:15 EDT |
|
Ken, doesn't make sense to me, either, especially since that configuration works well for me. I have the gas coming into a T between burners #1 and #2 on my two-burner. I have a valve in #2's line and usually keep that off. But when I turn on #2, I don't see any difference in #1's operation. Weird. It may sound stupid, but could the problem be in the T itself? Maybe s spider set up house in one of the legs? |
| - Marc - Monday, 06/20/05 10:29:20 EDT |
|
Hi Ken another quick note about my anvil I went to Ebay and through all my research did not find anything that even comes close to my anvil. Some more info... it is flat on the bottom with that hour glass shape with the half circles that I mentioned before, and it is all one big peice no add ons. The flat top does have a half inch step or so to the horn. Thanks again |
| Cindy - Monday, 06/20/05 10:30:26 EDT |
|
P.S my husband says it weighs OVER 200lbs. he has the hurt back to prove it. |
| Cindy - Monday, 06/20/05 10:32:40 EDT |
|
The local coal and oil guy (Burlington NC) has coal for sale but how do I tell if it is ok for smithing? I dont really know even how to tell anthracite from bituminous. I can get some and burn it, what to look for in it? GB in Winston salem seems to still be in business, now as GB Energy, I havent checked with them on their coal. They are listed as having good blacksmith coal. |
| John W - Monday, 06/20/05 10:38:12 EDT |
|
Cindy: Hummmm. It may or may not have a separate top plate. Some are so well blended in they do not show. The Hay-Budden company used the hourglass depression under the base but your description sounds different than it. Take a look at eBay auction #6188284022. Does it have a bottom like that but perhaps with a square hole in the middle? Also it would not have any raised areas, such as the 'heart' you mentioned. Soderfors (Swedish) one-piece, cast steel anvil sometimes had the logo of a crown within a shield. However, some Swedish anvils have the Trenton-type oval depression in them (although some very early Trentons also had the hourglass), but as far as I know no Swedish anvils had the hourglass bottom. One last thing check. Look at the front foot. Do you see a series of number? On the raised 'heart', could it be an upside down triangle with a C in the middle? Columbian anvils were one-piece cast steel. Pictures really, really would help. |
| Ken Scharabok - Monday, 06/20/05 10:57:51 EDT |
|
John W. If the coal supplier supplies it as home heating coat likely it is not of a high-enough quality for effective blacksmithing. Try some though. If you get a lot of smoke and large clinkers chances are it is not what you want. |
| Ken Scharabok - Monday, 06/20/05 11:00:02 EDT |
|
Which is the best and easiest way to remove rust from a wrought iron railing. |
| Carl - Monday, 06/20/05 11:03:46 EDT |
|
Carl, sandblasting is the short answer. More information would be needed to give a better answer. Is it detachable? Are we talking a few spots of rust or many yards of pitted heavy rust? |
| Gronk - Monday, 06/20/05 11:37:48 EDT |
|
Carl the best way is to have the rust removed by a professional restoration company; probably by an offsite electrolytic process. Now if you will settle for somne good ways you might be able to do yourself: wire brushing and sandblasting come to mind. Is this a historical piece? Very fancy? Real wrought iron and not cast iron? What do you plan to do with it when you are done de-rusting? Fisher Anvils; I have a 515# Fisher that was the "anvil" for a Blacker triphammer and I love it. So quiet but the hot metal squishes on it just fine...It's a bit squat in shape since CI takes more to have the strength so it's nice to have a spare anvil with a thin heel and horn to work with as well. Cindy, weight the anvil on a set of bathroom scales. "lifting" weight can be deceptive. Wire brush the sides and look for maker's stamps. Does it have holes in the sides or the base for portage bars used during manufacturing? It's really unlikly to be worth $6 a pound with the square hardy hole and the pritchel indicating that it's less than 150 years old---not a rare "antique" anvil by any means as the major makers were churning them out by the hundreds of thousands during this golden age of anvils. Many if not most of us have an anvil older than 100 years that is just a using anvil. Pictures are a must. Thomas |
| Thomas P - Monday, 06/20/05 11:41:37 EDT |
|
Marc: No, I'm using new fittings. Tried cleaning out the front burner orifice (was clear), tried using a bit larger orifice (no change), tried replacing the fittings for the front two burners (no change). When I brought in the gas from the front the front burner immediately started working as it should. When it was between the two, with the same size orifice within inches of each other, pressure should have been the same. Same air intake on both burners. |
| Ken Scharabok - Monday, 06/20/05 12:19:48 EDT |
|
For you folks looking for tools in or near York County (Glen Rock) PA, there is a HUGE auction of blacksmithing and other metal craft tools on June 25th, starting at 8:30 AM. Partial listing includes: ten large anvils, nine forge, 20 forge blowers, 12 leg vises, three large bellows, two tire shrinkers, large metal table with built-in PEXTO (?) plate, metal bending tool with various size dies, 100+ tongs and lots and lots of other tooling. I'm almost drooling reading the list. Contact Fred Shaffer at 717-235-1912 to see if he can fax you a copy of the flier. Auction company is Charles and Scott Wehrly, 717-227-0082 or 717-235-4146. |
| Ken Scharabok - Monday, 06/20/05 13:42:32 EDT |
|
Thomas P I have a question concerning hammer weight when making billets. I have been watching some people who make knives and they are using between 8# and 15# hammers. Is this due to the thickness they are trying to produce? I am asking because I am not sure I want to swing a 15# hammer if I do not have to. Oh and no my back patio would not house a power hammer, JYH maybe but not a power hammer. |
| Arron Cissell - Monday, 06/20/05 13:54:58 EDT |
|
HI again Ken i looked at the picture on Ebay and its similar but my anvil is much higher and longer. there are no steps or grooves on the horn only that one small step from the flat part to the horn. it is very smooth and flows together very nicely.I also looked again very closely and there is nothing added on no seams its all one peice. As to the bottom. Again it is similar but on the straight ends my anvil does not have the small half circles cut out,it is straight across with the half circles outward and a small circle all the way through the outward half circles on both ends---^---(the small circle being in the ^)as to the weight, after denting my scale we got a reading of 225lbs. as to the top, the square and small circle are similar to the Ebay picture. We will try to get a picture within the next few days but how or were do i send it? Thanks again |
| Cindy - Monday, 06/20/05 14:03:02 EDT |
|
Wolfe Here is a website that shows how to quiet down your burner. http://home.flash.net/~dwwilson/forge/fgpl.html Scroll down, click on plan 1 (gif), and look at the FlameHolder Design. This design coallates the air/gas mixture to keep it from tumbling, the tumbling causes he noise. Done right you should be able to carry on a conversation while standing next to your forge. Bart |
| blackbart - Monday, 06/20/05 14:50:42 EDT |
|
Candi: You can send it me (or another forum member) just by clicking on our name. It will bring up an e-mail box. Just attach it as a photo file. Would need side view, front view (to show area under horn), end view (to show area under heel) and bottom. How large is that 'heart' shaped bump out? The fact it rings indicates it is not a one-piece cast iron anvil. If there is not top plate (and it hasn't come off), then it would likely be one-piece cast steel. When you rule out cast iron (no ring), cast iron with steel plate (very minor ring), wrought iron with a steel plate (ring), and it has a step between the plate and horn (which pretty well rules out a German anvil), then you are pretty well left with a Columbian or Swedish import. I'm not positive but I believe markings on Swedish anvils were stamped in, rather than part of the casting process. Thus, back to Columbian with the 'heart' you saw possibly being the inverted triangle with the C inside. If you wirebrush the side with the horn to the right and think you see some lettering, lay anvil on side and dust with flour. Brush off leaving flour in depressions. Sometimes letters and/or numbers jump out at you. You may just end up with a 'no-namer', which significantly reduces it value. (The square hole is the hardy. The round one is the pritchel or punching hole.) |
| Ken Scharabok - Monday, 06/20/05 15:14:32 EDT |
|
Arron, You size your billet to what you can work. I've worked a lot of PW billets with a 2# hammer and a lot with a 3.3# hammer. You can tell when you've got a good weld cause the billet gets a lot "harder" under the hammer and doesn't move as easily as it did when you started. Bigger hammers move things along faster but they are not requires as long as you don't try to weld too large a billet with too small a set up (forge as well as hammer). For quiet methods you can use a rolling mill instead of a triphammer. Plans for a home built ones are available. I want to try welding with my screwpress---think it will work a treat; but then I will still have to draw it out by hand till I get power in my shop. I also want to make some patterning dies like I saw at the German Blade Museum in Solingen---also in Sachse's book on Damascus Steel I do a bunch of BSB and strapping billets 1/2" -3/4" wide and 4-6" long by hand and the 1.25" x 9" when I can "borrow" a power hammer Thomas |
| Thomas P - Monday, 06/20/05 16:47:57 EDT |
|
Thanks for the info Thomas. |
| Arron Cissell - Monday, 06/20/05 17:04:11 EDT |
|
Cindy: Is the bottom you are describing an deep oval shape. Think a long pill cut in half sideways. A photo sure would be nice. |
| Ken Scharabok - Monday, 06/20/05 20:56:01 EDT |
|
Does any one have for sale any drawings or blueprints for building a brick shop forge? Need something I can hand to a brick mason and tell him just do it. I'd appreciate anything one of you guys might have. |
| George Geist - Monday, 06/20/05 20:59:58 EDT |
|
Ken Scharabok, Have you tried more than one Tee? We made millions upon millions of fittings where I used to work, and I have seen some pretty strange goofs. As we forged solid and then drilled and tapped in automatic machines that indexed, and we made reducing fitting I have seen tap drill diameters that were off. I have seen the branch drill offset and other things that could make a bit of flow disturbance. One other question, I suspect that the fittings are too small for sanitary type drain fittings but sanitary fitting have the branch port configured to flow in one direction. |
| ptree - Monday, 06/20/05 21:00:05 EDT |
|
I saw a "pineapple twist" on iforgeiron.com. Could you elaborate on how this is done? |
| John W - Monday, 06/20/05 21:20:11 EDT |
|
Hello Guru I have in my possession a pre civil war sand cast mold labeled from Alabama foundry. Appears to be water wheel design, but I can't figure out how it works. Could this mold have historical value? |
| leigh - Monday, 06/20/05 21:56:28 EDT |
|
John W, Check out our iForge demo #11 on twists. This will give you the knowledge you seek. :-) Eric |
| eander4 - Monday, 06/20/05 23:33:39 EDT |
|
Ken-- Maybe you've already checked for obstructions, but just a little ribbon of Teflon tape dangling down out of the joint can cause a lot of poor performance. Friend of mine and I built a pair of gas forges, had terrible performance until we discovered the tape-- and it was only a little bit-- that was causing the problems. |
| Miles Undercut - Tuesday, 06/21/05 00:37:52 EDT |
|
G. Geist, Hein meist klinen Look up the black smiths mag or look in google for free blue prints , blacksmithy, shop layout and designe. But before you do this get a sheet of graph paper and draft out what you have vs what you need. My shop is small but fitts my needs well( not too big but not too small). Others would require larger shops for larger projects while most ( hobbiests) can get away with a lean-to style. |
| - Timex - Tuesday, 06/21/05 02:14:16 EDT |
|
Arron hammer weight is a hot topic( at least fer me ) I seen blade smiths use sledges( fer the inertial mass ) but I've also seen the use of lighter( 12 to 7 ounce) used. Most , including me use a miriad of hammers that variy from a hard hitting power hammer to the square flat faced stake driver style. Just let your skill level and conditioning chose the best hammer fer you. Not the other way around. If you advance in weight to soon you could end up like me and have a blood clot develope from strain and the ' over development of sholder mass'. One it is painfull to have an angio Plasiy, its worse to have to learn how to hammer left handed.( down time included). Two blood thinners are expensive, phy theropy is more so. Be careful and listn to your commen sence |
| - Timex - Tuesday, 06/21/05 02:27:15 EDT |
|
George Geist, get yourself a copy of "The Blacksmith: Ironworker and Farrier" by Aldren A. Watson. It will tell you much of what you want to know. "The New Edge of the Anvil" by Jack Andrews is very good as well. |
| Alan-L - Tuesday, 06/21/05 08:50:08 EDT |
|
Aaron: Consider using a 2 1/2 lb cross peen as your primary hammer. By using your shoulder you can do heavy work with it. By using your elbow moderate work. By using your wrist light work. My thinking it is better to use one hammer and learn how to control it than to use multiple ones. Uri's tape on hammer control is on available on eBay. I have not seen it, but have seen him demonstrate. Most smiths just stand flat footed and hammer away. He does more 'dancing with the anvil' to use his phrasology. I believe he will also be doing some classes. There was an auction on eBay for registration fees. Just go into the blacksmithing category (Collectibles/Tools, Hardware & Locks/Tools/Blacksmithing) and do a title and description search on Uri. My be in the completed item section by now. |
| Ken Scharabok - Tuesday, 06/21/05 10:06:05 EDT |
|
George: side draft, bottom draft, large, small, flush with wall, free standing, enclosed, open, charcoal, coal,....? There is no "a brick shop forge" there are thousands of variations depending on what you want to do with it and your situation. IIRC Moxon gives information on one if you like what he suggested in 1703. will you be using a commercial tuyere? If so that will be the starting point for your design (either side or bottom blast) Thomas |
| Thomas P - Tuesday, 06/21/05 11:09:54 EDT |
|
Thanks Everyone. I have been using 2lb hammers. I have a strait, cross and ball in round face and a French square. I like the 2lb feel. I have tried heaver and lighter, however I have not really had the opportunity to try lots of different hammers in one setting. I wanted to get some clarification as to why they were using sledges/heavy hammers besides the "It works" answer. I am fine with the answer but wanted to know more. I have looked into a couple hammer control videos and I have looked at the one you mention Ken but it seemed to be on the use of his hammer so I did not consider it. I will re-look at it. I am ordering the Whisper Daddy three burner today. I am looking for a kiln shelf and then I will not need to go to someone else to use a forge that can get to welding temp. So I am gearing up to working at home much more and focusing on improvements in my work. I will also start practicing pattern welding, as I want to use it as an art medium. I am looking into video of Pattern Welding techniques so any info there would be good. So far I am looking at: Forging Damascus: How to Create Pattern-Welded Blades & Damascus with Bill Moran VHS blacksmithing |
| Arron Cissell - Tuesday, 06/21/05 11:19:38 EDT |
|
Long URL's: Folks, please do not post long URL's, it breaks our page and I must edit them. If an ebay item, post the item number not the long URL. IF from another site, post the base URL and the "happy path" (EAMPLE, IronItems, Big, round). |
| - guru - Tuesday, 06/21/05 12:12:42 EDT |
|
Long URLs: Ever check into tinyurl.com? You just enter a long URL and it gives you a much more manageable one. Doesn't cost anything. Here's an eBay URL to try out: http://tinyurl.com/ccaqo It should get you to some poorly described, poorly photographed tongs. No significance to the eBay listing, just something I picked at random. --Marc |
| - Marc - Tuesday, 06/21/05 12:27:44 EDT |
|
John W., square stock, chissel all 4 sides whatever length you want (3"), twist (360 deg, or what you choose), forge the sides flat, groove the sides again, untwist until symetrical. use a wood or leather mallet and a stump to straighten, so as to not mar the diamonds. the key is for the grooves to be centered and consistant (depth and length). this can be difficult by hand, easier with a fly press. i think this was an i forge demo; check and see... |
| - bored today - Tuesday, 06/21/05 12:39:55 EDT |
|
Masonry Forges: These vary as much as the masons and smiths building them. Some work well while others are marginal. There are many variables and no one design fits all situations. Most of what we think of as a "brick forge" is someones fantasy. The earliest masonry forges were a platform with a side draft chimney or hood. When a masonry hood was used the chimney was HUGE, often having an opening as big 4 by 8 feet. When used with a side draft the opening was about 18" above the platform and there was a hole in the stack for the bellows to blow through. On the other hand in some cases where good charcoal was burnt the forge was just a platform and smoke filtered out through the loose roof and other vents. At a recently built "restoration" shop they build a beautiful dry mason stone forge that was supposed to be representitive of an 1800's farm forge. It was much too grandiose and had a cast iron fire pot that would not be available for 100 years after the period the shop suposedly represents. The "typical" brick forge was a simple single layer side draft stack coming off a forge table that was brick, stone or a commercial cast iron forge. See the detail of the image on our iForge page. I have seen similar stacks that were for dual forges. The stacks curved to the middle and joined in a "Y". This same forge had both hand crank and electric blowers feeding each tuyeer. It is in a large old city farrier and blacksmith shop in Reading, PA. Probably the classiest brick forges I have seen are at Williamsburg, VA but I think they are a bit of a fantasy operation, four all exactly alike. |
| - guru - Tuesday, 06/21/05 13:16:29 EDT |
|
Well I contacted some school folks and hopefully I will hear back from them sometime soon and maybe get a place to work from. On a side note I was wondering dose anyone have any good ideas on a portable anvil stand for a 110lb anvil? I was thinking about making one out of wood 4x4's but I am afraid the hamering will just shatter any glue or nails on it after a while. Any sugestions? Perhaps steel brackets on the wood to bolt through? |
| No Roof Overhead - Tuesday, 06/21/05 13:16:39 EDT |
|
Anvil Stands: No Roof, See our iForge page. There are all the better ways to make a stand and they all work. |
| - guru - Tuesday, 06/21/05 13:19:20 EDT |
|
Well I contacted some school folks and hopefully I will hear back from them sometime soon and maybe get a place to work from. On a side note I was wondering dose anyone have any good ideas on a portable anvil stand for a 110lb anvil? I was thinking about making one out of wood 4x4's but I am afraid the hamering will just shatter any glue or nails on it after a while. Any sugestions? Perhaps steel brackets on the wood to bolt through? |
| No Roof Overhead - Tuesday, 06/21/05 13:20:46 EDT |
|
Bladesmithing Tapes: Wayne Goddard's are very good. I learned a lot from his "Cable Damascus Hunting Knife" video. Although cable produces a random pattern the welding and finishing is the same as other types. In producing pattern welded steel you can use existing patterns OR take the time to figure out your own. |
| - guru - Tuesday, 06/21/05 13:26:34 EDT |
|
Finishes for forged cooking utensils: Can anyone elaborate on what finishing with beeswax vs. parafin imparts to the piece? I am assuming it offers some rust protection and maybe gives the piece a glossed finish? What about for forged spatulas or skewers? Will Crisco as is used to condition cast iron work as well? Will beeswax hold up on pieces like skewers that spend a while in heat? Touchmarks: I would imagine that an oil quench vs. water or air would be best. Does it matter on how you temper if you will be using it to hot or cold stamp? The steel to be used would be either flat spring steel or (ideally) a 6" in length 1" dia threaded bolt found on the side of railroad tracks (a really great place to pick up scrap steel). Does anyone know of any reason the bolt described wouldn't cut it for use as a hot or cold stamp? Thanks in advance for your help. Brett |
| Brett - Tuesday, 06/21/05 14:30:50 EDT |
|
Cease fire on the finishes question :) I found a good page on the topic at metalsmithinghow-to.com I reckon Peanut oil or crisco will be best (with no lacquer added) |
| Brett - Tuesday, 06/21/05 14:44:23 EDT |
|
Hammer Weight: IF, very BIG IF, you are the right build, have the right technique, and build up to it and work full time you can use a 6 pound (2700 gram) hammer as your regular hammer. But most people will hurt themselves using a hammer of 3-1/2 pounds (1600 grams) or up. For the part timers a 2-1/2 to 3 pound (1100 to 1300 g) hammer is a good size. I start newbies and teenagers with 900-1000 gram hammers and my regular hammer (TODAY) is a 2-1/4 pounds. When I was working full time without a power hammer I had worked up to a 3-1/2. Start with a light hammer doing small work to develope control and strength then move up to a larger hammer. |
| - guru - Tuesday, 06/21/05 14:48:43 EDT |
|
Finishes: Burnt on wax and oil finishes, then the witches brews, are all amature paint formulations. IF you are going to use a varnish, enamel, laquer or other paint system there is a gigantic industry of professionals and scientists that do an infinitely better job than you will. They have nearly 200 years of experiance and expensive testing laboratories as well as access to materials you cannot buy as an individual. Clean, zinc, neutral primer, UV resistant top coat. For cooking items use stainless steel OR oil with mineral oil (or both). Organics sour and harbor bacteria. The owner needs to know how to maintain (oil the work) if exposed to high heats or dishwasher detergents. Bolts are generaly made of tough steels but not highly hardenable steels and are not suitable for punches and chisels. |
| - guru - Tuesday, 06/21/05 15:19:49 EDT |
|
No Roof I have one stand that I used 2x12 and strapped together just like one of the ones Guru pointed out to you. I found that it is easy to move. I had strapped my anvil to it and it was still easy to move. I received a stump with my Peter Write and decided to just build the same stand as my other one as the stump is a little too short. Moving this kind of stand in a car is easy. I unscrewed the couple straps and stacked the lumber and straps in the back seat and tossed the anvil in the trunk. Went to site and re-strapped the stand back together plunked anvil back on top. Guru Thanks for the video info. I would also like to tell you about my experience with N.C. Tool Co. Just ordered the Whisper Daddy #2 forge directly from N.C. Tool (This is a gift so I had to get it from them as that is how the person likes to deal). If I had been paying for the order myself I would have gone to a different vender after trying to work with N.C. Tool Co. After the short and not so informative conversation with the person I talked to there, Name, Shipping Address and Payment Method was all she was interested in. She did not even give a total or shipping information with out being pressed and calling back. I did tried to tell lady on phone about Anvil Fire but she seemed more interested in getting me off the phone. Well happy to get the forge and learned not to deal with N.C. Tool Co directly. |
| Arron Cissell - Tuesday, 06/21/05 15:23:37 EDT |
|
Portable Stump; for about a decade my travel anvil sat on a portable stump made from some old yellow pine 2x12's. The end ones were vertical and had been sawn at a slight angle to push the base out a bit from the top. the side ones were just nailed to the end ones and I had a piece of wood on the top to spike the anvil down to. This was a *hollow* form---the "outline" base made it easier to bed into grass or gravel so it didn't wobble and being hollow meant it was a lot easier to load. I bolted a pair of large handles onto the sides so it was easy to pick up and load. Still hunting the lumber to make another one for my travel anvil out here... Thomas |
| Thomas P - Tuesday, 06/21/05 15:55:24 EDT |
|
Arron: The ones you need to make your comments on service to are the NC Tool Co. They will not know of the problem unless it is brought to their attention. I suspect they would track down whoever took your order and have a discussion with them about courteous customer service. |
| Ken Scharabok - Tuesday, 06/21/05 16:38:24 EDT |
|
John W, While "bored today" has all the essentials, I would like to add one thing: COUNT THE FLATS as you make the first twist. You must twist an EVEN number of flats because you will need to untwist exactly half that number of flats. |
| - grant - Tuesday, 06/21/05 16:59:16 EDT |
|
N.C. Tool has a feed back CGI that is not working. Only other way of contacting them is by mail or through the phone number, which has the same person answering, and I do not wish to go through her. I have a letter typed up and will mail it tonight. I always bring whatever grievances I have to the company/person. To whoever reads this N.C. Tool Co. I believe has good equipment. At least the items form them I have used seemed and felt to be good equipment. I am (((NOT))) saying to not buy their equipment. Just saying maybe use a vender for them instead of main Co. |
| Arron Cissell - Tuesday, 06/21/05 17:13:31 EDT |
|
Masonry forges: See Richardson's "Practical Blacksmithing" for a number of forge drawings. |
| - John Odom - Tuesday, 06/21/05 17:22:13 EDT |
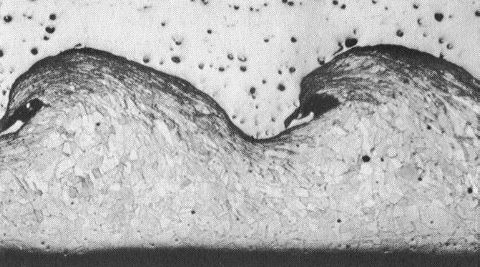 Photomicrograph of explosive welded joint - Posted by request of Grant Sarver. |
| - guru - Tuesday, 06/21/05 21:17:15 EDT |
|
N.C. Tool is a good company that has done some dumb things in recent years that upset their dealers. The first was to try to set standard list prices, then they went into direct competition with their dealers such as Centaur Forge and Kayne and Son both of who were responsible for the success of NC-Tool forges. |
| - guru - Tuesday, 06/21/05 21:24:12 EDT |
|
Blackbart, Thank you for the web site info. I looked up the page and it looks very interesting. I'm going to have to remanufactor the feed tube and I want to try this flame holder idea. As soon as I get it done I'll post on how it all works out. Thanks, Wolfe |
| wolfe - Tuesday, 06/21/05 22:39:18 EDT |
|
Thought there might be a few people interested in the above photo-micrograph. A short while back there was some discussion about forge welding and someone reckoned that explosion welding was probably the same. I assume that is probably true to some extent - that there is a molecular bonding going on. The attached photo (from �High-Velocity Forming of Metals�) shows that it is also mechanical (Velcro!). This is a phot-micrograph of the weld interface of two dissimilar metals. A shockwave frozen in time! Even looks like ocean waves doesn�t it? |
| - grant - Tuesday, 06/21/05 22:58:03 EDT |
|
Thanks for taking the time to post that, Jock |
| - grant - Tuesday, 06/21/05 23:00:58 EDT |
|
Grant, Those little wave peaks lock the two together mechanically, just like Velcro hooks, alright. Definitely a cool photo. Now can we have the same thing but of forge welds, MIG, TIG, SMAW and solid-state fusion welds as well? No good deed goes unpunished does it, Jock?(grin) |
| vicopper - Tuesday, 06/21/05 23:30:49 EDT |
|
Black Stove Polish...I've recently found that some blacksmiths use Rutland Black Stove Polish as a finish on their work. I see that Kayne & Son sells this product but I have never heard from anyone who has used it. How does it go on, does it leave a clean finish or does it leave a residue which could stain clothes, etc... |
| Louis - Wednesday, 06/22/05 00:38:43 EDT |
|
Louis' finish paint Never tried it but I've got some in my paint booth and I' do a test( temp tolorance/ humidity/ millspec... ect ) let me know what your gonna spray[ metal type and general conditions for this chem coating ]( IE general humidity and usage) |
| - Timex - Wednesday, 06/22/05 01:20:20 EDT |
|
vicopper: To see a lot of pictures similar to the one Grant sent in You can look in the "Welding Handbook"s published by AWS, or their magazine "Welding Journal" They show similar type of photo for any type of situation You could think of. |
| Dave Boyer - Wednesday, 06/22/05 01:40:25 EDT |
|
Having used Rutland's black stove polish on my stove (imagine!) I find that it is very messy and does indeed rub off on anything it touches. It's basically just carbon black in thin grease, with the grease being supposed to burn off when the stove is lit leaving behind the carbon particles in the rough sandcast surface of cast iron. On a smooth surface you can wipe it off completely with a swipe of the finger. |
| Alan-L - Wednesday, 06/22/05 08:38:23 EDT |
|
Explosive welding; what with a world famous explosives research facility about 10 minutes walk from my right elbow, I asked about the mechanical vs molecular bonding on explosive welds from the experts last year: they sait it's definitely a molecular bond as you get strong bonding even on runs that do not show any mechanical bonding when sliced and photo micrographed. The mechanical bonding is just icing on the cake... Thomas |
| Thomas P - Wednesday, 06/22/05 10:04:52 EDT |
|
grant, are you saying that if the first twist is 360, the "untwist" should be 180? i have not done more than 20 of these; now i am curious. now that i think about it, the first twist should be a multiple of 180. when the diamonds are created by "untwisting", the sides on either side of the diamonds will line up, that is, not 45 off. aggree? if you do, then i understand. will experiment. i have read that you are selling tooling for flypresses. if this is true, may i e-mail you? thanks |
| - bored today - Wednesday, 06/22/05 10:14:15 EDT |
|
how do I bend angle iron (1x1-2x2) into an angle out circle (about 48" diameter)? |
| Doug Adelmann - Wednesday, 06/22/05 11:37:53 EDT |
|
Leg Out Circle: You use a die with good support and a LOT of pressure in a bender or hydraulic press. A large Hossfeld can do it. It can be done hot or cold. Heavy bar rolls will do the job slick as a whistle. It could also be done on a weld platten using a rose bud and pry bar. |
| - guru - Wednesday, 06/22/05 12:59:25 EDT |
|
Photo Micrographs: Unless one of our metallurgists volunteers a set there are serious copyright issues involved. |
| - guru - Wednesday, 06/22/05 13:06:36 EDT |
|
High Temp Paints: The best I have used is DeRusto Barbeque Black. It is a graphite and binder paint. However even without heat it ages to where it chalks (black). I used to use it on firetools. When it started chalking I would wax the handles with beeswax. Not a great solution but it worked. |
| - guru - Wednesday, 06/22/05 13:09:45 EDT |
|
Flame Holder: If your burner needs a flame holder "tooth" or grate its a very bad burner. Go back to the drawing board. See our Gas Burner FAQ. |
| - guru - Wednesday, 06/22/05 13:12:26 EDT |
|
Bored Yesterday, Re: pineapple twist That sounds about right to me. each flat being 90 degrees, each 180 = even number of flats. A lot of the tooling I make can be used in a fly press, see Kayne and Son. |
| - grant - Wednesday, 06/22/05 13:27:35 EDT |
|
Flame holders: Flame holders shouldn't be needed - but - A friend of mine didn't know that and used that concentric pipe arrangement for his. He was running natural gas and had a blower (which you need for that low pressure). And, by the way, you would probably need a blower with any kind of "holder", other than a clear, open nozzle. One thing I noticed was how quiet his forge was. And he had four burners in this big monster of a forge. Everything got bright yellow inside, so I know there was lots of flame. Just much quieter. There's also something, called a Giberson Head, that the kiln people use, which is a ceramic nozzle with lots of holes in it. Supposedly that silences the burners very nicely. So I've been considering the concentric pipe thing for the sole reason of quieting things down. The Giberson Heads are something like $150. I've got plenty of different sized pipe laying around ($0). --Marc |
| - Marc - Wednesday, 06/22/05 13:31:35 EDT |
|
Bored, If you twist in multiples of 180, you untwist to the same # of 90, it works. I do my couts by quarter twists, and do a 2/1 ratio. It keeps the diamonds nicely lined up. |
| Monica - Wednesday, 06/22/05 13:48:42 EDT |
|
Bending angle iron into a circle is quite do-able, with the RIGHT TOOL. Unfortunately, the right tools to do this cost a lot. As the Guru said, a No. 2 Hossfeld will do this. I have done it quite a bit with the hossfeld, and the angle comes out a little tweaked from its starting 90 degree bend, but it is quite usable, and quick. To get a hossfeld set up to do this, figure about $1500 to $2000, depending on how many different diameter circle dies you buy. I also have a set of angle rolls that will do this- I have run a lot of 1/4" x 2 x 2 stainless angle into circles- but figure $6000 to $8000 for a machine capable of this. So for most people, unless you are planning on being a full time metalworker for the rest of your life, the answer is, you send it out. Big Fab shops will have a pipe roll or angle roll that will do this. Fifty or a hundred bucks is a lot cheaper than buying your own equipment, unless this is a big job, or an ongoing project. If you want to see the machine that does it, check out eaglebendingmachines.com |
| - Ries - Wednesday, 06/22/05 13:51:42 EDT |
|
bending angle iron. Get a copy of Francis Whitakers "the Blacksmith's cookbook" He has a bit in there on angle iron smithing. I can't remember exactly but he recomends bending the angle to a radius 3 times the final bend radius at 90� to the final bend. But It depends which way you bend it depending on which way your doing the final bend. And I can't remember for certain. Hopefuly this jogs someones better memory. |
| JimG - Wednesday, 06/22/05 13:57:50 EDT |
|
Just as a followup to thw weld job on the ductile iron pipe. I got it welded yesterday and I think it will be o.k. It didn't weld up as good as I would like, but after I got the edges of the vee "buttered" and the pipe warmed up some it flowed on pretty good. I did notice some pockets of , I'm assuming here carbon, that did bother some, but overall I think its good. I checked for cracks today and none noted. All I need is a leak check and I'm set. So for the record I think ductile pipe is very weldable, as long as you approach it properly. Toni. |
| toni 1595 - Wednesday, 06/22/05 15:58:17 EDT |
|
Hello everyone, I was wondering if I could get some help. I am looking to get a mig welder for hoby use and I figured this would be a good place to ask. So out of these what can you guys recomend? Or if something else please say so. Low End: http://www.mylincolnelectric.com/Catalog/equipmentdatasheet.asp?p=2515 http://www.millerwelds.com/products/mig/millermatic_135/ High End: http://www.mylincolnelectric.com/Catalog/equipmentdatasheet.asp?p=2519 http://www.millerwelds.com/products/mig/millermatic_175/ |
| - Zap n Stick - Wednesday, 06/22/05 16:00:40 EDT |
|
Gas burner noise: I didn't like the roar, and I had flame stabillity problems with my atmospheric burner propane forge. I made a concentric ring flame stabilizer and solved both problems. To me they make more sense theoreticaly, than a flare or plain cylindrical end. |
| - John Odom - Wednesday, 06/22/05 16:26:47 EDT |
|
Zap n Stick, I have the Millermatic 175 and find it to be a good machine, up to about 3/8" steel. If you get ANY mig welder, get one with infinite voltage control, rather than one with just a few taps. The advantage of mig is that you can do a variety of work with it, but that becomes limited by having only a few taps for voltage. For what it's worth, I got my Millermatic 175-Plus from Indiana Oxygen company for a third the price it would have cost me here in the Virgin Islands. I don't know where you are, or what things cost there, but it sure made sense for me to get it from them. |
| vicopper - Wednesday, 06/22/05 17:26:20 EDT |
|
I pcked up a copy of Francis Whitakers autobiography at a garage sale for 10cents it is even autographed by the writer.Man what a amazing life he had and to have worked with Yellin and in Europe very rich and full life. |
| Chris Makin - Wednesday, 06/22/05 17:42:16 EDT |
|
How big is this angle iron that's being bent, anyway? I made a pair of bending tools out of grader blade (first set was not annealed and broke) and made a trivet to hold an Indian drum off the floor, out of one-eighth by inch or inch and a half by same, heated a few inches at a time in the forge. Diameter was about a foot. The tools were essentially just big paddles which had L-shaped openings for the angle-iron to slide into, long handle on the bender for plenty of leverage. A lot cheaper than a Hossfeld. |
| Miles Undercut - Wednesday, 06/22/05 20:35:17 EDT |
|
Sorry, did not notice the 1x1-2x2, angle out spec above. Ununderstand specs. |
| Miles Undercut - Wednesday, 06/22/05 20:39:13 EDT |
|
Vicopper, I am a bit confused, what do you mean infinite voltage control, rather than one with just a few taps? |
| - Zap n Stick - Wednesday, 06/22/05 21:18:40 EDT |
|
Do you mean finite voltage control? I.E. you can just turn the dial from any percentage from 100% to 0% instead of a dial with presets like, 25%, 50%, 75% etc? |
| - Zap n Stick - Wednesday, 06/22/05 21:24:58 EDT |
|
Hi Ken I'm still working on getting that picture.,and yes the hour glass is very pronounced. THanks Again |
| Cindy - Wednesday, 06/22/05 22:06:30 EDT |
|
Zap n Stick: What vicopper is refering to is pretty much as You guessed, some low end machines offer a few voltage settings, some better ones have an infinantly variable controll, turn the dial to what You need. I have a light industrial machine with 21 settings, not infinite, but plenty of adjustment. I also have a little crapper that has the gun electrically energized at all times, this is not desirable, and a plain nusance, and somewhat of a hazzard. You want a "Cold Electrode" machine where the power is only fed to the gun when You press the trigger. |
| Dave Boyer - Wednesday, 06/22/05 22:35:35 EDT |
|
Hey guru This may or may not be the kind of question you are used to, but here goes; Do you know of any programs overseas (i.e. Europe, Australia, Asia, etc) that offer work to traveling blacksmiths? I left school years ago and have worked for a few blacksmiths. Now I am growing increasingly frustrated trying to make this metal thing work for me. I am in desperate need of 1. more knowledge and instruction and 2. an experience in another culture. Any thoughts? Thanks for your time Ben Carpenter |
| ben - Wednesday, 06/22/05 23:00:38 EDT |
|
Photomicrographs - regretfully none available at the moment, and the current job is not conducive to making any. (This may change, as I'm looking for something with more handson metallurgy). Could probably scan some photomicrographs of sintered powder metal & send them - with proper attribution to the source they should be OK to post. That is if there is an interest. Guru - if so, email me at work kevin dot haffey at nah dot com. Just remove spaces and add correct symbol replacements for the words. Also, let me know file size as I can play some with the scans - pdf, jpeg, etc. |
| - Gavainh - Thursday, 06/23/05 00:30:24 EDT |
|
Thanks for your responses a couple weeks ago when I wrote for advice to use when shopping/hunting for a post vise. Can proudly report we found a beauty with an excellent screw and no parts missing - a bent leg (now straightened) and plenty of rust. After cleaning off the rust we found beautiful decorative lines cut into the nut, screw box and even on the screw washer. That was exciting... So it's got some marks that are hard to make out. There's a large "A" clear off on one side and a smaller "PW" on the nut. There is something written below the PW that we cannot make out. Anyone know of a resource of maker's marks to start to compare what's on this to known examples? |
| sriver - Thursday, 06/23/05 01:47:09 EDT |
|
Sriver: Could the writing be Peter Wright ... ? Cindy: Unfortunately with no readable markings on the anvil you are pretty well just going to have a no-namer anvil. While Hay-Budden Manufacturing Company was best known for the hour-glass bottom, it was used by others as well. Very early Trentons (Columbus Forge and Iron Company or those imported by Boker (German Trentons) also had that bottom. Someone put out at least 50-60 pound anvils with that base which are not marked. Best you can do is a 'looks like a' from the photographs. However, the size alone does suggest Hay-Budden made, but then there is the problem of no concernable top plate. Still coming back to Columbian as a leading contender if that bump out might be more of an inverted triangle than heart-shape. Does anyone have a Columbian out in the shop they can see what the bottom looks like? |
| Ken Scharabok - Thursday, 06/23/05 06:54:08 EDT |
|
Vise Marks: Sriver, There is no reference on this subject and the data to create one is very sparse. Almost every anvil manufacturer also made blacksmith vises. However, they were SO standardized they were one of the first technical comodities and not sold by brand, they were all just "blacksmith vises". Even the country of origin is rarely marked on them. Ocassionaly the nut or one leg is stamped with the manufacturers name. The turning on the nut and heavy chamfers on the legs are an indicator that it was English made. The folks making these had done so largely by hand for centuries and kept up the hand work well after the American manufacturers were making drop forged vice parts. Although the American vices were well made they were not nearly as pretty as the English vices. |
| - guru - Thursday, 06/23/05 07:14:54 EDT |
|
Overseas Adventure: Ben, I know several folks that have tried this and it is a tad difficult. There is no one place to ask. Your best bet is to pick a country, go there, find blacksmiths (they are everywhere, particularly in Europe) and tell them directly that you are interested. Actually BEING there lets them know you are serious and ready to work NOW. Note also that like getting a green card in the US, other countries have legal processes to go through to work just as we do and many are more restrictive. Also like here the employer may hire you "under the table" at a very low rate or for room and board. As education you must look at these things exactly like going to any school, it costs MONEY. You may need to save tens of thousands of dollars for travel and living expenses IF you are lucky and find a place. You will also need to have some skill at languages. In Europe most people are bi-lingual or multi-lingual and that may not include English. In Africa and SE Asia a few people still speak French as well as their native languages. In Europe it is not unusual to meet a Czech who speaks French or Italian or a German who speaks Russian and so on. . . Aussies and Kiwi's speak English. At first you may think they are speaking another language and it could take years to become comfortable with all their linguistic differences. There is a joke world wide. What do you call someone that speaks two languages? Answer - bilingual.Also see our FAQ about Travel and note that Dean Curfman of BigBLU Hammers is organizing a trip to Israel in the Spring. |
| - guru - Thursday, 06/23/05 07:49:55 EDT |
|
Ken, I have a 100lb Columbian, and the bottom has no depression at all, it's just a slightly convex casting with a pronounced parting line. I'm wondering about that top plate, since to the uninitiated most PWs and HBs look like a one-piece object, yet we know they have a top plate (or top half, if it's a later HB) and yet the weld line can be so well blended it's hard even for us to see. My PW, for example, does not have a visible weld line. My Columbian, on the other hand, was cast to LOOK like it had a weld line for a top plate. Go figure, eh? |
| Alan-L - Thursday, 06/23/05 08:16:39 EDT |
|
Alan-L. Yup. Still need to see pictures. Could well be H-B made with the top plate. Cindy said it is 'worn' and sometimes you can tell a top plate by the pattern of wear, such as a saddle, which would indicate a softer body, such as mild steel or, more likely, wrought iron. However, a H-B shouldn't have that 'heart-shaped' bump out she initially described - but, then again, a picture tells... I'm really just guessing based on her clues. |
| Ken Scharabok - Thursday, 06/23/05 09:03:57 EDT |
|
Cutting oil and bandsaws? I've started using drops of Magic Tap oil with my bandsaw on all but small cuts. Just put a drop alongside blade and let blade motion draw it in. On pipe or rod, I let the blade put a minor mark and than a drop down the side towards the on-coming blade. Blade seems to pick up a sliverish film. Am I just wasting my time or will this make a significant difference in blade usage? A can of Magic Tap is much cheaper than a single blade. |
| Ken Scharabok - Thursday, 06/23/05 09:07:40 EDT |
|
hey its me again made the charcoal useing all 3 plans all worked great and much cleaner and easy to controll as well. thanks again all you have been a big help. Even got 3 more books coming in as well to help me along. i must say its a great way to releave stress over here and you get to learn in the process. anyway thanks again all. |
| william - Thursday, 06/23/05 09:11:43 EDT |
|
Ken No on the Peter Wright. Trust me, that was my FIRST thought when the PW appeared, but no. The writing below is 6 or 7 characters. _ I N _ S 0 _ The first character may be a W. The forth is either a D or a space depending on how you look at the hammer ding over it. Squinting, you could convince yourself it says "Windsor" but that takes alittle imagination, plus draws a blank... Mostly just very pleased to find it - it's square and tight with all its parts. The markings and all the lines turned into it are just very nice icing. I offered $50 because the guy had a barn full of cobwebs the kind of junk dreams are made of (multiple anvils, multiple old portable forges with Champion blowers, buckets of tongs, stockpiles of bar stock and sheets of many gauges) and lots more laying around outside piled up around several trees... I wanted to be invited back (grin) |
| sriver - Thursday, 06/23/05 09:42:41 EDT |
|
$50 seems low now that it's cleaned up, the leg straightened and the great detailing showing up from under the heavy encrusted rust...and all the parts, pins and wedges are accounted for, but he was thrilled, I was happy... Thanks for the responses to the initial post about the screw being key -- OTW, I might have passed it up. |
| sriver - Thursday, 06/23/05 10:15:02 EDT |
|
All the Germans I worked with deny all knowledge of Russian---especially the former East German ones who were taught in that language for 16 years or more... I'll agree that it is generally *very* hard to get a work permit for a non-european in europe they are very concerned about unemployment there and want to fill jobs from the local pool first. Thomas |
| Thomas P - Thursday, 06/23/05 10:29:33 EDT |
|
Hello, I am back again with another question about these flower sculptures that I am working on. I got a grant and one of the requirements was that I experiment in "new" materials, (materials that I have not used before), and because I want to fulfill this part of the requirement, I am thinking of adding a small amount of cast resin, concrete, SOMETHING other than steel just to say I did this part of the requirement. I have a bowl-like shape about 6" in diameter and 4" deep which I've welded 10 little 3" rods bent and leaning here and there, and was even thinking about entwining some of that thick dish scrubbing steel wool or plastic coated wire to help it stay together. I am a neophyte with this engineering stuff but usually with enough 60 year old marine varnish, my stuff stays together without chipping. SO TO MAKE A SHORT STORY LONG,will casting resin and steel rods and scrubbing wool set up and last forever. Thank you for your help (and I'd like to send a donation, Is there a quick easy way? Paypal?) Vivianne |
| Vivianne Carey - Thursday, 06/23/05 11:08:05 EDT |
|
Sriver: Well, how about Wilkinson? They were a well-known British anvil manufacturer. However, "Anvils in America" does show a Winston or Wilson though - see page 77. Richard Postman said he has gathered a good deal additional information on British anvil manufacturing and will have it in "More on Anvils". |
| Ken Scharabok - Thursday, 06/23/05 11:19:00 EDT |
|
Mixed Media: Vivianne, In the art world mixed media is always experimental. As to "not used before", pattern, model makers and Hollywood prop builders have used everything and anything. I remember my father needing to make ribs on a pattern of a machine model. The model was wood. He took and old leather belt, cut strips in the cross section then glued then on the curved surfaces. This was then puttied with lacquer bas putty, primed and painted. The ribs were hard enough to make the mold and the pattern was in good condition some 20 years later when I last saw it. Concrete and steel has been done, so has steel hand coated with brass using a torch and rod. Wood and metal has been done. Steel wool rusts instantly but the stainless steel scrubs have a very long life. Any time you mix metals (steel, copper - steel, gold - steel , aluminium = steel, staineless) you get what is known as bimetalic corrosion due to galvanic action. When you use certian resins such as epoxy in closed spaces the components are often not completely neutralized by hardening and the chemicals are very corrosive and can eat up steel. So using mixed media can be chalanging. Generally when you use resin materials with metal the metal should be sealed with a primer or paint then the entire piece painted when complete to seal out air and mositure at the boundries between materials. "New" materials can also be the condition of the materials such as sculpture from found objects (scrap auto parts, industrial pieces and so on). One of our members wives has recently done a series of sculptures using parts of old recycled kitchen appliances in very immaginative ways. |
| - guru - Thursday, 06/23/05 11:37:53 EDT |
|
Before and After Tool Values: The first heavy vice I owned was given to me. I offered to pay $25 for it even though it was heavily rusted and locked up. I spent about 45 minutes gently grinding the mushroomed slide arm and working the rusted screw loose. Once moving freely I finished dressing the large 2.5" x 4" slide arm with a file and cleaned up a bunch of dings and sputter balls on the jaws. A coat of paint and the old 130 pound Prentiss vice with 6" jaw that open to 14" was almost like new. At the time new heavy vices similar to it were selling for around $800 and I would not take that much for it today. Some TLC and a little skill can be worth a great deal in the used tool market. A locked up vice is worth very little as-is because it is a gamble, the screw or something else such as the slide could be broken. I've bought those as well. . . Life tends to even out your luck. |
| - guru - Thursday, 06/23/05 11:46:32 EDT |
|
When I said "new", I meant materials that I don't normally use which would be pretty much any mixed media piece. I'm really thinking on the lines of the resin or concrete or some concrete like mixture, but I've been told that it will crack because it expands at a different rate than the steel. Thank you! |
| Vivianne Carey - Thursday, 06/23/05 12:13:13 EDT |
|
Vivianne Carey, I wouldn't recommend using steel wool as a matrix for building up resin. Instead, Think about using those real heavy-duty scouring pads that are used on big floor scrubbers. They are a plastic, so you will need to test a small bit first to ensure that the resin comound doesn't melt it, but I'm pretty sure it won't. You can get those pads for a janitorial supply, or perhaps the cleaning service at your local shopping mall. YES, you can make a donation to help support this site. If you go to the Anvilfire Store link on the drop-down menu at the top right corner of this page, you'll find a link to allow you to make a PayPal payment to CSI (the Anvilfire support group). You can also find the snail mail address there for Dempsey's Forge, the home of Anvilfire's founder and Guru. I'm quite sure he wouldn't refuse anything you sent. And thank you for your support, it helps! |
| vicopper - Thursday, 06/23/05 12:14:46 EDT |
|
Hey I was wondering can anyone recomend a good tong or two for a blacksmiths first pair? I'm kinda overwelmed by all the choices and want to get something flexible, I hope to make any other tongs I need. Just need some advice on which ones to start with. |
| - Mike - Thursday, 06/23/05 12:46:29 EDT |
|
First tongs. My recomendation for the first 2 tongs would be flat jaw with grooves running down, and across the jaws. This lets you hold round (and square if you make the grooves V shaped)and flat. Next pair would be ratnosed. This answer brought to you by the letters C,S,I, and the colour blue. |
| JimG - Thursday, 06/23/05 13:35:35 EDT |
|
Regarding MIG welders with infinite controls: As long as the machine has at least one of its two controls infinite (wire feed OR voltage) you should be able to weld anything up to the maximum capacity of the machine. It may not be *perfectly ideal* but it won't be particularly difficult. Dave, the best MIG I've ever used had a hot electrode. I used it to trim the wire against the edge of the layout table... :) Just requires a little caution, that's all. |
| T. Gold - Thursday, 06/23/05 14:08:09 EDT |
|
You wouldn't know where to purchase these tongs would you? |
| - Mike - Thursday, 06/23/05 14:10:46 EDT |
|
Mike You do not need tongs to make tongs. You can go to the Iforge section and look at the all the tongs that can be made. The thing I liked about making my own tongs is now if I want to modify them I already know what they are and how they were made. The tongs that I will be making soon cost the same amount as all my other tongs $0.00. I also got to work on my hammer control and several techniques including upsetting. For a fist time project making your own tongs is rewarding and every time you use them you know �I made this�. |
| Arron Cissell - Thursday, 06/23/05 15:02:58 EDT |
|
Mixed media: Here's another material that might be interesting. A regular at the local flea market is selling cutoffs and cutouts from Corian countertops. This stuff, which technically is a resin-based material, comes in all colors and can be formed into different shapes by heating. I'm going to try to make a small side-table for my niece with it, but I'm also thinking of patio chairs for myself. |
| - Marc - Thursday, 06/23/05 15:06:57 EDT |
|
First tongs: I used the "Dempsey Twist" method, found elsewhere on this site to make my first tongs. No tongs needed here, either. You just work both halves from one long piece, jaws at each end. I used some scrapyard 3/8" X 1" and drew out the reigns with a 2-lb ball-pein on my 55-lb Harbor Freight "cast steel" anvil. My hand hurt for weeks, but I use those tongs regularly to this day. The total cost to make them was about $100, but that included the anvil, it's I-beam stand, and building the gas forge :-). I already had the ball-pein. I have since made more and bought more - usually from eBay and flea markets. |
| - Marc - Thursday, 06/23/05 15:18:09 EDT |
|
Corian was big for custom knife handles at one time; if you had a supply of scrap at decent prices you could stack, glue---special corian glue!---and carve bases, vases, buds, petals, etc Hmm for a "long term" mixed media project, find out which glass turns purple with uv exposure and make petal for it that will turn purple over a long term exposure outside---charge extra for it... Mike at the top of the page should be a changing series of adverts for folks selling smithing supplies---guess what? Some of them sell tongs! I once bought a postvise with a broken off leg and a broken yoke for $5 just cause the screw and screwbox were in very good condition---while the rest of it looked like a dozer had run over it. Before getting it back into shape I ended up trading the screw and screwbox, and a 125# PW for a 400# trenton that folks what will sit in the fire for a long time come the hereafter had used in a welding shop---on my project list to repair the damage, meanwhile it's the lighter anvil on my anvil baulk and used for cold work... |
| Thomas P - Thursday, 06/23/05 15:22:47 EDT |
|
Big anvil part II. I've added more photos (13 - 35) of my largest anvil next to a 4 cwt anvil. Can anybody tell me what the protrusion on the side of the anvil is used for (apart from injuring the smith! see photo no. 24 http://imageevent.com/imagedude/biganvil?n=0&z=3&c=4&x=0&m=24&w=0&p=24 |
| Bob G - Thursday, 06/23/05 15:27:27 EDT |
|
I'm new to blacksmithing. how do you move the larger anvils around when you need to? |
| Mike - Thursday, 06/23/05 15:46:13 EDT |
|
Mixed Media and Environment: A number of the facilities I'm involved with in the National Park Service are for museum storage. Mostly, the prime requirement is to "keep in a cool, dry place" and out of the sunlight or UV sources and away from the bugs. Various media and artifacts react differently in different climates; a whole lot of stuff tends to be preserved in high desert, and very little in wood, cloth, metal or wood holds up in tropical marine climates. The "vulnerability" list runs somewhat like the following: paper, leather/feathers, cloth, wood, ferrous metals, non-ferrous metals (and durable alloys), ceramics, lithics (stone). Even lithics break down under certain conditions; and bi-metallic corrosion can ruin your whole day, as has been pointed out before, when exposed to moisture. If something is going to be displayed in controlled conditions, you can plan for those conditions; if you have no control, plan for the worse. Fortunately, at Anvilfire, lots of folks have seen (or done) their worse; so you can learn from our mistakes. ;-) Sitting up a bit more on the banks of the lower Potomac; I might even get into work tomorrow! :-) Visit your National Parks: www.nps.gov Go viking: www.longshipco.org |
| Bruce Blackistone (Atli) - Thursday, 06/23/05 16:04:42 EDT |
|
how are ball bearings put into their bearing housing? Hot, cold or with some other system? When making an emulsion of oil & water to lubricate a bandsaw, it it better to pour the oil into the water, the water into the oil or doesn*t it matter? |
| - Claudio - Thursday, 06/23/05 16:50:11 EDT |
|
Moving anvils: I use hoists, always resist the temptation to use your back! |
| Bob G - Thursday, 06/23/05 16:59:12 EDT |
|
I'm making charcoal right now. I'm using an old big green egg smoker and the temperature has stayed at about 400 deg. F. will this do it? About vents- more input less output or more output less input? |
| - Tyler - Thursday, 06/23/05 17:29:05 EDT |
|
Bob looks like a carriage maker's anvil and the protrusion is for making clips. Moving anvils: daughter's boyfriends, engine hoists, comealong, pickup truck, rollers, soon to be ex-friends... in general the big anvils move very seldomly while the small anvils may jump around all over the place. When I built my new shop I drug the pallet the heavy anvils were on into the shop with my pickup truck and then used a come-along from one of the roof trusses that I had braced with two lolly columns to lift them onto the baulk and pipe rollers on the baulk to get them to where I wanted them---the 515# one at the forge end and the 407# one at the armouring end. They have not stirred an inch since then. The 91# travel anvil has been to Phoenix AZ, Edgewood NM, the 49's parade in Socorro NM, etc. Claudio---depends on the bearing. Thomas |
| Thomas P - Thursday, 06/23/05 17:33:49 EDT |
|
To pick up my 300 pound anvil, It was lowered into a pickup with a sheet of plywood in the bed. Then to unload it all I did was pull the sheet of wood out and slide the anvil down. My anvil already had a stand bolted on so I didn't have to lift it into place. But if you needed to just lift it a couple of feet you could wiggle it up a car ramp. |
| - Bjorn - Thursday, 06/23/05 18:11:40 EDT |
|
Vivianne-- how about epoxy? Or, if you want to go for bling, how about precious metal clay? |
| Miles Undercut - Thursday, 06/23/05 20:26:34 EDT |
|
Claudio, When mixing a coolant concentrate to form an oil water emulsion, always mix water into the concentrate. If adding to a tank with some coolant, it is best to premix with some water in a bucket, then try to pour the somewhat diluted concentrate into the tank as close to the running coolant pump intake as possible. The pump shear action will help to mix the emulsion. If attempting to make your own emulsion, I have no idea. Excellent coolant concentrate can be had in gallons and five gallon pails. The normal mix for most comercial oil emulsions is in the 5 to 7% range for band saws. |
| ptree - Thursday, 06/23/05 20:42:06 EDT |
|
Mike, I move my 250# anvil by sliding it and its stand together using a long pry bar. Yes, I *could* drag it, but why risk wrecking a back in which I've invested $20,000 worth of surgery? My little 100# travel anvil I just pick up and set in the truck and then go back for the stand. The 196# anvil is sitting on the floor, where it wil lremain until I get a stand made for it, then I will get my brother to come over and help lift it, if he's available and gullible. If not, I'll use the pry bar to scoot it over under the chainfall and hoick it up on to the stand with that. In the meantime, it gets moved an eighth of an inch every so often when I bump into it. :-( |
| vicopper - Thursday, 06/23/05 21:40:53 EDT |
|
Ken S -Cutting oil & bandsaws : Don't use it on a rubber tired saw, and be sure the chips aren't building up on the wheels, or hanging up in the teeth to be draged through the cut again. In the tool & die shops I worked in, We used soluable oil if anything at all. In some shops the saws were rigged for coolant, in some they were not. The last place We used coolant on everything except D2, and that was the nastist steel We had on hand. |
| Dave Boyer - Thursday, 06/23/05 22:33:37 EDT |
|
Claudio: The usual method is to put all the balls in with the inner race moved to one side, then move the balls to an equal spacing which will make the races concentric. Then the spacer device is put in to keep the balls spaced evenly. Horever therwe are other ways involving a groove in the inner and outer races to insert the balls through, and probably some others as well. There is more than one way to skin a cat, but not that same cat. |
| Dave Boyer - Thursday, 06/23/05 22:43:32 EDT |
|
Moving Large Anvils: Oh, one 14' oar, 20' of 1/2" nylon mooring line, and five crewmen will usually suffice: http://www.anvilfire.com/news3/edition_34/fenby/ren-faire_jyh_anvil_2.jpg See Anvilfire News, Volume 34, page 5, for further details. |
| Bruce Blackistone (Atli) - Thursday, 06/23/05 22:46:40 EDT |
|
Bob G Nice Kirkstall Anvil. My friend has one like it. It is a carriage makers anvil. Kirkstall and William Foster made many of them. That is a side horn for shaping a great deal of the parts on carriages, buggies and wagons. It is in very nice condition for its age. What country do you live in? Your house looks neat. Do you want to part with the kirkstall? I have an empty stump available for it. Did you ever determine the weight of the other anvil. You kirkstall is 431 lbs and it looks small next to the other one. BOG |
| burntforge - Thursday, 06/23/05 22:53:31 EDT |
|
T.Gold: I suppose I will get used to the hot electrode if I use the machine more, but all in all "little crapper" isnt 1/10th the machine that the Airco Dip-Pak 200 is. |
| Dave Boyer - Thursday, 06/23/05 22:57:06 EDT |
|
|
|
|