THIS is a forum for questions and answers about blacksmithing and general metalworking.
Ask the Guru any reasonable question and he or one of his helpers will answer your question,
find someone that can, OR research the question for you.
This is an archive of posts from May 1 - 7, 2008 on the Guru's Den
Thanks for all the replies so far. To explain a little more on what I'm dealing with, this knife is for the son of a friend so he can be properly "kitted out" when he goes to the Renaissance fair but, he can't make up his mind on what he wants. I steered him away from buying a $200. foe demascus dagger to use as a Skien Dhu but, that knife was what he had in mind so I said I would try to knock one up to approximate it. He wanted it to apear rough and crude or old looking so I said I would make one by hammer only and one by hammer and a little finish grinding to see what he liked better, after all he is offering the $200 to me for one of them.
So I relized this is not the traditional shape for this blade as soon as I started to have trouble making it hold the shape. I will take all of your good advise back to the forge and go at it again but, the Ren fair season is coming up so I think he will end up with a blade made with swaging dies and some convincing hammer marks and artifical ageing for the summer while I get this sorted out. Can't take any money for that but, at least he'll walk around fully dressed.
Thanks again for all the great advise,I will be taking it all in.
- merl
- Wednesday, 04/30/08 23:38:03 EDT
Grinder Platen: Ringer, Most of these are just a simple piece of steel plate with rounded ends to prevent snagging the belt. Many bladesmiths are picky about platen shape and make their own. Custom ones are slightly convex but some are even concave. Shaped ones are often made from wood for light use. In Wayne Goddard's $50 Knife Shop he makes entire grinders with shaped plattens from wood.
Commercial platens are just mild steel unless high production in cast iron.
Ah yes the old "I'm pretending to be in the renaissance so the knife I wear that would have been only a few years old back then should look like it's 400years old..."
Combined with "it's old so it *must* have been crudely made" (I show these folks the Sutton Hoo fittings that are on the order of 800 years older than the renaissance and very very finely made indeed!)
The customer is always riiiiiight.
As for artificial aging: horn or bone soaked in strong tea will darken, can you build in the hammer marks on your swaging die? Make the final finish on the bevels a filed one and then hone on a natural stone to put the edge on.
Yes I have done it when I couldn't talk sense into them; but still was willing to accept the commission.
Sgian Dubh (Skien Dhu): OK. . . I looked up this blade on a Scotish site. The blade itself is a dead simple one but the furniture almost always has a Celtic knot decoration.
The Sgian Dubh is listed and available as part of Scottish formal wear including the equivalent of a tuxedo as well as traditional garb. They all look very much alike in size and shape. Total length of about 6" the blade half of that or less. Worn in the stocking (for visibility) and held by the garter it cannot be very large or heavy.
The early sgian dubhs were often crudely made by local Scottish smiths. They usually had antler or horn handles and were mounted in brass, with a simple leather sheath. They were slightly larger than today's sgian dubh, with blades ranging from 3 1/2 to 4 inches. The handles were full round, with little consideration given to how the knife would fit the anatomy of the wearer. As time went on and the sgian dubh was accepted as a full partner to the dirk, it began to be decorated in the same way as the dirk, and frequently made en suite with it, kept in the same fitted wooden case with its larger companion.
www.oregonknifeclub.org/dubh.html
Where it says "primitively made" does not mean by a neolithic smith using a stone hammer and anvil. It would have been made to the best ability of a local smith who may not have been capable of inlay or fancy engraving but certainly capable of making a good utilitarian knife.
Later as part of formal attire they became small works of art matching the Dirk and including various designs such as family crests and regimental insigna. Today the dress Sgian Dubh is likely to be imported junk that is only symbolic jewelery and useless as a knife.
Aging: As Thomas pointed out there is all kinds of artificial aging. I bought a stone washed Levi jacket once and promptly returned it when I realized that the softness did not feel like natural wear and that maybe 10 years of life had been worn out it by artificially aging it with large pieces of pumice in a tumbler.
I once lost a hunting knife, sheath and all, out in the woods when I was a kid and found it again several years later. The acids in the sheath and leaves it was buried in had done a good job of blacking and pitting the surface. Mostly it was in pretty good shape and could have been restored to most of its former glory. I just polished off the coarse rust with a fine wire wheel and oiled it. It REALLY LOOKED aged. . . . I have no idea what happened to it. . . . probably lost with the rest of my Boy Scout days camping equipment raided by my brothers.
I am sure during the era of "the real thing" (Sgian Dubh are still worn as decoration) when they got shoddy looking or the fittings loose they were replaced just as we would replace a pocket knife when the rivets will no longer tighten or the tip has been broken off one's favorite blade. . . The scales are wearing on my current little Buck knife and it will need replacing in a year or so. . . The replacement will be bright and shiny, unlike the owner who is rapidly aging.
Aging bones and antlers is easily done with a solution of potassium permanganate and water. You might get this from a druggist. About 2 oz in a half gallon of water would do it. You can also order it from Dixie Gun Works under the brand name "Old Bones". Soaking bones and antlers for a day or two gives them a rich brown patina. I remember having a pan of this stuff outside the junior highschool shower and we all had to step in it to kill foot fungus. No, our feet did not turn brown. At least mine didn't.
Note that as a companion to the kilt the Sgian Dubh is not very old the earliest good documentation for the great kilt being around 1590, (the small kilt is even later being an 18th century item).
Now as a hidden "backup" blade it probably goes way back and was worn hidden, hence the dubh in the name...
You may want to check local laws to see if there are any length restrictions you want to meet---may be long or short ones depending on the local laws!
Thomas
Grizzly makes a 2"x10" contact wheel that sells for about $65. You can buy them on Amazon.com, direct from Grizzly, and many other places. It's far and away the best price I've seen for a purpose made wheel that size. Just Google the part number: G9242.
Thomas P, you have made my point exactly.
I made this exact point about the age and apperance of the blade but, what the heck! he wants what he wants and is willing to pay so he'll get it. I showed him my Gerber MkII that I carried in the field when I was in the Army. That may be what influenced him to insisting on the style he is.
I'm probably the biggest fool in this whole bit because I can think of several easy ways to make the darn thing and pass it off as "what he wants" and everyone is happy (ignorance is bliss)but, I won't allow that kind of thing in my shop and I wouldn't want my kids to think that was OK. Besides wich I realy want to learn how to do this. I make several rial road spike knives every year at our club's annule show but, they are all the typical wedge shape or maybe a "Bowie" style once in a while. I never thought it would be so difficult. Must be why you don't get called a master of somthing till you've been at it for 20 or 30 years.
Drive On!
Thanks again for all the great help, I archive all of it.
- merl
- Thursday, 05/01/08 17:37:49 EDT
Matt B-- Thanks. I have spent some time this afternoon going round the barn with their techie re: how the wheel fastens onto their grinder. Their schematic doesn't show it. She says the wheel has no internal bearing(s) and is vague re: what it rides on.
Horn and bone-- care and tteatment of-- friend brought me back a lovely navaja from Spain, with a horn handle that is showing ominous signs of resenting the dry atmosphere here in the Rockies. What do you recommend as a preservative/ crack-preventive? Mineral oil? Hair tonic? (Doctor I know says horn is similar in structure and composition to hair.) Thanks.
I'd answer that question for you if I could, but I'm afraid I haven't used one myself; I've only read of folks using them (seemingly with great success). It doesn't sound like the "techie" is much of a techie if she can't tell you how it attaches to the shaft. I hope it works out for you.
The wheel fits their G1015 grinder, which is based on a double-ended buffer motor. The wheel mounts on the arbor and acts as a drive wheel, so it wouldn't have bearings. I'm pretty sure it just mounts like a grinder or buffer wheel, with the inside against a shoulder and a nut on the outside. Their website lists a 1" arbor, so that's probably the ID. Probably.
Matt B-- upshot: another tech sent me another schematic, and a detailed description. The Grizzly 10-inch "contact wheel" mounts directly on the motor shaft, replacing the drive wheel. So, unless I want to do a search for a sleeve bearing and a fixing bolt, which I am not keen to do, the wheel won't work on my Square Wheel belt grinder. This thing spins at beaucoup RPMs, and without a high-class bearing the wheel will just burn up.
Miles, I think Rich W. mentioned using an industrial castor wheel with it's crude roller bearing on the one He built, as at the time I don't think He had the late running. I guess that would get You going untill You come up with a better solution.
- Dave Boyer
- Thursday, 05/01/08 21:11:50 EDT
lathe that is. My keeboard is getting funky.
- Dave Boyer
- Thursday, 05/01/08 21:13:04 EDT
Thanks Guru for the information on the platens and for the link to Wayne Goddard's knife information! I will be contacting him about his books and video's.....Also I was wondering if you were able to use the anvil sign we made and painted to go by the road for the hammer -in?....Yea! that was me!...My wife and I enjoyed meeting you and Josh and the rest of your friends. I wish we could have come back on Saturday, but something came up and we had to get back to Georgia....Missed the whole shebang! Well maybe next year.
Miles Undercut.....Thank you for the heads up on the Wilton website! I did some searching on there and found the Operating Instructions and Parts manual and printed it out. I sure hope that they still sell the parts I need! The grinder works great. It only has the 2x8 serrated wheel on it and I would like to be able to use it as a flat grinder also. Thanks again!
I've built several square wheel/kmg style 2x72 belt grinders using the solid AL drive wheel from www.beaumontmetalworks.com and insert bearing rollers from http://www.sunray-inc.com/custom/standard.html
The sunray wheels have a huge number of possible surface materials/patterns. I have 2"wx4"dia wheels in both 70a and 70d smooth surfaces. They work great!
Looks like the 2x8dis idler is $77 with either smooth or serrated surface in any hardness.
- MKArmory
- Thursday, 05/01/08 22:18:49 EDT
Ringer-- If you possibly can fabricate your own platen, welding or bolting a hunk of 1/8 plate onto a tee connection or some such, you will be wayyyy ahead of buying anything from Wilton. Their prices are astronomical. I paid more than $100 for a smallish contact wheel right after I got this grinder. They want almost $800 for a 10-inch serrated contact wheel, etc. On mine the hoodgie that holds the contact wheels is integral with the platen. I bet they want a mint for it. Dave Boyer, MK Armory-- many thanls, will ponder. I just dread chasing around for the bearings, sleeves, bolts, etc. Tempus fuggit.
Hello,
I've read and heard multiple times that leaf springs from American cars from the 50's and 60's are good steel to make knives out of. I've recently acquired some leaf springs from a 1939 chevy. Would these work just as well for making knives? Thank you.
I've finally set up my AO torch setup. Now here's my question, can I use this to forge weld patterne welded steel? And how?
- Nippulini
- Friday, 05/02/08 21:31:31 EDT
Nip, while You probably could, the operating costs are way too high, and the temperature is way too high as well.
- Dave Boyer
- Friday, 05/02/08 22:35:42 EDT
Miles,
I'm sorry that wheel isn't going to work for you.
By the way, I tried to send you an email last night with some further info I'd found. I just got an error message saying it couldn't be delivered, but the computer gods are going to retry for a couple days.
New, known steel is good; but who can beat the status of having a knife or other cutting tool forged the springs of a 1939 Chevy?
The risk, as the Guru points out, is wasting your time with some inferior steel that does not perform as the current blacksmithing legend has it. (Alas, we had all the old junkers towed/dragged out of the Back 90 shortly before I got into blacksmithing; so I was never able to make a true comparison.) The solution is to take the springs and experiment with some smaller, simpler sample pieces before undertaking a more ambitious project. The "coolness" factor of the source won't hold up if you end up with an inferior item because you chanced on crummy steel from the bad springs from a very old lemon. This implies more work, but better to know how things will pan out now than to be rudely surprised later when you've put hours into the primary project. The extra time is what you pay to create a neat new object from a recycled relic.
Cool and breezy on the banks of the lower Potomac.
You'll only frustrate yourself trying to forge weld using an O/A torch. The flame is too hot, causing oxidation, and the heat is too pinpoint a source to get an even heat, something essential for a good forgeweld. You'd be much better off to make a propane forge for your pattern welding projects. I'd suggest the vertical style that the knife makers use, as this avoids the flux eating the floor issue.
Matt B-- Many thanks for trying. I appreciate your help!! But don't bother sending Email. The address is a fake, like the name. Miles Undercut doesn't really exist, except as a transient configuration of pixels on this screen.
Nip
Where the O/A torch could possibly come in handy is the initial tack-welding of the billet stack for pattern welded steel, before forge-welding, in lieu of arc-welding
I have a bunch of springs from the trucks of Burlington Northern and Santa Fe RR cars. These springs are changed out frequently to avoid unsightly accidents. They make very good knives. Ptree, they quench out harder than nine dollars worth of jaw breakers, too!
Quenchcrack,
What are you using for a heat treat procedure on the RR springs? I have straightened a lenght and stopped there. May just have to make a knife or something. Thank God for powerhammers, as the cross section would be a tuff hand hammer job to reduce.
I just got an old Buffalo Forge at a yard sale and it brings up a couple of questions. The blower was froze-up, but with a lot of sweat and a little help form my "hot-wrench", everything is free spinning and noiseless....except for the bottom spiral gear which turns the blower, it's shot, completely rusted away, and I need to replace it. Can you steer me to anyone who has accesss to replacement parts, seems like Guru, you recommended someone that rebuilds blowers a while back. Secondly, the forge has a real thick round tapered ducks nest about 4-5" deep, should I clay it? I've been working on a raised nest made out of a cast iron frying pan and I had to clay that.
This spring material behaves like 5160 so I think it is nearly the eutectoid composition, ie, it will austenitize at about 1400F. Full red heat to normalize, low red heat (or non-magnetic) then oil quench. I have used water but with mixed results. With thin sections like knife blades, oil is fast enough. Temper at about 450F for an hour. As for the big springs, the 1" ones, yep, there is a lot of hand work to get a blade out of one of those. That is why I still have them! I will use the springs you gave me long before I use up the RR springs.
I bought a antique pedal stone today at the flea market in Savannah Ga. You know the kind with the metal frame and the metal seat and ball bearings at the axle!...The stone is 3"x24" white and the whole thing is in great condition....I was wondering if any one remembers the name of these things and who made them and when?
Ringer: I believe they were commonly called grinding wheels. Your model would have been used to sharpen knives, axes, chisels, etc. A much larger wheel was used in early mass anvil production to true up the top plate.
Ringer; We always called then "grindstones" or a pedal grinder. As to who made them there must have been hundreds of little mom and pop factories that made these things back in the day with only slight variations between them.
You might want to look over the early Sears Roebuck catalog reprints to see examples of what they were selling in the 1900's.
Cary, Athol was a large maker of blacksmith tools and eventually became part of Stanley Tools. Anything marked Athol has collector's value.
Currently HD bench vices are sold way under their value, especially good old U.S. makes which are infinitely superior to the imported junk available today.
I have no clue what it would sell for but as a usable tool it is probably worth more than as a collector's piece.
Cary: On eBay prices you have to take into consideration the buyer also, in all likelihood, paid shipping. For example, a vise sells for $80, but shipping is $40. They paid $120 for it, not $80.
I've also see nice large cast steel bench vises come up in farm auctions.
Big Vices / Vises: I love these old tools and have several of them. My favorites are two very large Prentiss chipping vices made in the 1930's. While of simplified style they still have the classic lines found on the jaws of old leg vices. Being chipping vices they have a plain base, not the rotating type of machinists vices. While these seem to be handy I have always had trouble with them slipping under modest loads. So the plain base is better for heavy work (which is what they were designed for).
The smaller of my two Prentice vises has about 6" jaws and weighs about 90 pounds. The jaws open to well over a foot and thus are handy for all types of things including pressing parts together and apart. It also makes a great heavy duty gluing clamp. Next to it I have several pieces of wood with a curve on one side that are the remains of cutting swage block patterns. These pieces are especially handy when clamping anything irregular or tapered. This "small" vice has always been mounted fairly high (just below shoulder height) and is very handy at that level.
When I was a kid we had what I thought was the heaviest vice in the world. It only had about 3" jaws but was mounted on a heavy duty universal pivoting mount that makes it look larger and heavier than it is. Your view of thing changes as you get older and today it looks like a relatively small vice. . . But I still remember it as being HUGE.
Bench and machinist vices have the advantage of having parallel motion and thus work well for applications that a blacksmiths leg vices do not. But you cannot substitute a good forged blacksmiths vise when heavy pounding on work in the vice is required. Note that a couple makers including Peddinghaus/Ridgid make forged steel modern pattern vices.
I also like good wood workers vices well mounted on a bench. Each craft has its preferred tools and these are better for wood working and useless for metal working. . .
Light Mounted Grinding Wheels: One popular use for the light metal frame mounted grinding wheels was the traveling itinerant sharpening man. He would carry his entire trade's tools on his back and work from neighborhood and village to village sharpening knives and scissors. This was once a common sight in the U.S. but is long gone. But the traveling sharpener still plies his trade in many other countries. Today however he is most likely to have a small battery powered motorized grinder as well as stones and strops.
Grind stones came in all kinds of sizes. Typically they were about 28 to 30" (700 to 750mm) in diameter with widths of 2" to 6" (50mm to 150mm) the larger being fairly rare. I have an old 4" wide wheel that I mounted with a foot treadle. When new it was about 30" in diameter but was run crooked on the axle. When I remounted it straight it needed many hours of grinding to reshape it closer to round again. . . .
While the old sandstone wheels need water to grind well then should not set in water. This makes the wet side heavy and soft thus it wears more and becomes out of round. Drain a trough or use a drip can.
Okay, so how feasible is a forge built to accept the OA torch head? I'm going to make it anyway, just wanted to hear some thoughts
- Nippulini
- Monday, 05/05/08 12:31:06 EDT
There still are traveling knife sharpeners, they serve the restaurant trade, I have a friend who was a chef, and the knife guy came by every 3rd Tuesday. Had his shop in a van, and also sold knives.
- Hudson
- Monday, 05/05/08 16:18:39 EDT
OA in Forge: Nip, Check the rating of your refractory against the over 5,000°F temperature of the oxygen-acetylene flame. Then look for some that will take it. Then make your decision.
The fact is, even oxy-propane is too hot and oxygen enriched air is too oxidizing. Regenerative heat (hot air) can help but forges tend to run just below the melting point of steel which is JUST the right temperature.
If you want fast instant welding heat try a heavy duty resistance circuit.
My partner, Lynda and I each have our own motorcycles. We have a tent trailer which I tow, having the larger bike. We have yet to find a tent trailer which we both like and wish to build our own. We are currently stuck on which to use for the frame....1 inch aluminum tubing or 1 inch steel. I have talked to several fabricators where I live, Vancouver B.C. Canada and seem to get many answers. For a light weight trailer.....max GVW of 450 lbs. Does 1 inch aluminum tubing have the stength?? The tent trailer will be fibreglass. I have plans for the frame. however when talking to some one in the steel industry, I am told aluminum would not be stong enough and steel is the only way to go. This is the same story I get from the Aluminum Fabricators and I am told when bolted to the fibreglass boby the aluminum would be more than strong enough.
Thank you...Bill
Strenth of aluminum, aluminum has about half the stength of steel and weighs one third as much. Therefore,1.25"x1.25" by 1/8" sq Al is about the same strength as 1"x1"x1/8" steel. Weld plates to the Al tube where you need mounting holes. Do not just drill through the tube or it will break there.
Aluminum Frame: If you can build an airplane from aluminum you can surely build a trailer. However, in both cases you are building a device that will be operated on the highways and a failure could result in serious injuries to yourself or others. You may want to consider the liability issues.
Note that when aircraft are made from aluminum the skin is part of the structural design. Small fabric covered aircraft are made with welded steel frames.
Fibreglass, unless carefully molded commercially is much heavier than aluminium or steel.
The reason most automobiles are made of steel today rather than aluminum is that properly designed the steel is both stronger and lighter at much less cost.
Strength of 1" aluminium tubing question: THIS is where you should probably backup and seriously think about whether or not you are up to this task. The question is not comparing X tubing to Y tubing but comparing X tubing of a specific alloy, wall thickness, length and joint configuration to Y tubing of a specific alloy, wall thickness, length and joint configuration. . . I can show you a piece of aluminum that APPEARS to be the same as a piece of steel but is 10 times stronger OR the reverse, by changing the alloy and wall thickness. When you do not know how to ask the right question you cannot expect the right answer.
ANYONE that has given you answers based on the basic question above is WRONG. You cannot radically substitute materials for any given design.
More considerations:
Aluminum is a great material to work with but requires highly technical welding equipment that also requires a great deal of practice. Even if you sub out the welding you will have to design the joints. This requires more skill than the welding. Many all aluminum aircraft avoid welding all together and use thousands of rivets (both common and pop type). My father is building an all aluminum ultra-light airplane. Less than 300 pounds and nearly a 30 foot wingspan. Very light, very complicated framing.
If you use aluminum for this kind of structure it should all be aircraft alloy AN certified types joined using approved and certified methods.
If you use steel for this type of structure it is less sensitive to being made of specific alloys and joining methods, HOWEVER, if you approach aircraft lightness and thus stress the alloys and methods should meet aircraft standards. Most bicycle and motorcycle frames are this type construction.
If you over-build as many DIY types do then you can get away with seat of the pants engineering but you may need a truck to pull your trailer. However, if you want (or need) light weight and high performance then every aspect of the design needs to be looked at by an engineer in the field.
Think about it. But I think you are going to need to build and test several to get what you want. Make your frame, then jump on it hard with both feet. If it takes it then you may have a suitable design. If it crushes. . . well, you need to build another one AND go back to the drawing board.
Nipp, You ought to learn how to run a bead w/ OA if you can't already, everyone at my welding supply considers me a dinosaur when I come in for supplies then they look down, shuffle their feet and admit they don't know how to do it,and could they watch me sometime?! By the same token, electric welding is alien to me.
I read an article from an 1865 edition news paper stating that a 125 tonne triphammer was being installed at the Watertown Arsenal in Mass. The arsenal has since been turned into offices and banks along with other assorted businesses and is currently owned by Harvard University. Does anyone know what happened to the hammer or if one of that scale still exists anywhere? The engineering of a device on such scale intrigues me.
- Robert Cutting
- Monday, 05/05/08 20:20:06 EDT
Bill M, While the yield strength of 6061-T6 aluminum excedes the yield point of A36 structural steel, in the as welded condition the T6 heat treated aluminum will loose about 1/2 of it's strength in the heat affected zone.
This makes designing of welded high strength aluminum structures about twice as much work as designing mild steel structures.
You could use most any material if You engineered it properly, but the question remains: Can You engineer it properly?
- Dave Boyer
- Monday, 05/05/08 22:34:08 EDT
Ringer,
My large 1894 catalog does not list pedal grindstones, but does show one "mounted grindstone" without pedals. A few "grindstone troughs" are shown which temporarily hold water and are run by pulleys. If a little water is put in the trough, it is emptied after use. Most of the stones are sandstone, mined in Ohio and designed to run at a slow
speed, primarily for sharpening.
ATHOL & ATHA
These two manufacturers have been confused. Athol [1868-1920] was in Massachusetts, and one of the founders was L.S. Starrett. He left, but bought the company back in 1913. They made calipers, dividers, levels, household tools, wrenches, and vises.
Atha [1875?] started in New Jersey and made tools for blacksmiths, stone workers, railroad workers, and farriers.
They were bought out by Stanley Rule and Level in 1913, but retained their trademark, and "A" within a horseshoe until fairly recently.
Ref: Directory of American Toolmakers, Robert E. Nelson, Editor, Early American Industries Association, 1999.
I don't mind getting flamed now and then, but I do have to say, I have built so many things from Al, that I couldn't possibly count or remember them all. From large lifting derricks to trailers to cable and chain winches. The guy has plans for the frame. His question is whether the Al is as strong as steel, same section size. the true answer is no. Yes there are alloys of Al, stronger than steel, but they can't be welded, wich is why some plane parts are not welded. Obviosly his plans call for 1" tube steel, and he can't get a straight answer from anyone, so he posted here. You should see the trailers around here that have wood frames...
After the repurchase, Starrett retained the Athol name for vises and a few other tools until fairly recently. Still in the Starrett catalogs of the 60's and 70's.
- Tom H
- Tuesday, 05/06/08 06:28:32 EDT
Bill M: Also be aware towing a trailer with a motorcycle is probably significantly more dangerous than doing so with a vehicle. Friends of mine had such a rig. Off on a trip, she riding behind him. He remembers coming to a intersection and applying the motorcycle brakes. Next thing he remembers is waking up in the hospital. Apparently gravel on road, motorcycle skid sideways, trailer jack-knived, throwing him and wife onto road. She just had abrasions and bruses. He had to be airlifted to a hospital and spend a week or so there (without a health care insurance company). Selling the motorcycle and trailer only recovered a small part of their expenses.
"If you want fast instant welding heat try a heavy duty resistance circuit." Like an induction setup?
Jock, if I could only afford one.... but a guy can dream can't he? Thumper, the first weld I ever made was a MAPP/Oxy braze weld. I did that for months before I got my first arc welder. After I made my third micro forge and tweaked it I was able to forge weld mild steel to mild steel. Now I have three machines (MIG, stick, and TIG), a medium sized OA setup, my 3rd gen. MAPP/Propane micro forge, and lots more.. too much to list. Yet all I want to do is forge weld two dissimilar metals together... maybe it's my flux. I haven't cooked the water from the Borax that I use... maybe that's it?
- Nippulini
- Tuesday, 05/06/08 08:27:29 EDT
Resistance: is different than induction but both take a lot of KW. Resistance is just a transformer like a large buzz box and you dead short the piece between the terminals or cable ends. . . If you have the KW the heat is faster than induction. The cable ends can get pretty hot as well. Low tech and it works.
Engineering Questions: John, Sorry, my response was not pointed at you. There are some folks that could build something like this in their sleep and other that could not do it with detailed plans. When someone cannot come close to asking the right question then they should ask if they should be do the one's doing the design.
We get many engineering questions here that I and others could probably answer well enough but then you have a serious liability risk. Folks that care about liability do not weld trailers or hitches unless, 1) they are certified welders, 2) they have insurance 3) the parts are standard for the job and hitches of the approved type. Engineers that care do not give free advice ESPECIALLY when they do not know how that person will apply it. Even when certified drawings are issued it is difficult to get them followed. . . But at least then the engineer has the drawing to refer to and tell the court the maker did not follow his plan to the letter and thus he has no liability. Of course the court may ignore logic and facts but that is another issue.
THEN there is the issue of trying to determine from one question the abilities of the individual asking ONE question. Most often that has to be determined by the the tone of the question and the person's writing ability. This is a lousy position to be put in but that is the way it works. Especially when some folks with reasonable intelligence write as if English is a second language AND they are morons. THEN there are engineering questions that most be carefully posed. If a full understanding of the issues is not displayed in the question then we have to assume that the person asking the question should not be taking on the project they are asking about (without a GREAT deal of study).
TGN, while O-A will have the heat necessary I think you will have a lot more trouble getting the atmosphere you need. Why not make a small blown propane burner so you can get the heat and tweak the atmosphere as you need it?
Tuyere: Bill, technically the tuyere is the air pipe and nozzle of any forge or furnace. The firepot (sometimes called the duck's nest) is where the fire is held. The hearth is the rest of the forge area and I call it the "fuel reserve area" since that is what it is used for.
Tuyeres vary according to the type of forge. The two basic types are side blown and bottom blown. Side blown are also two basic types, plain pit forge and modern with water cooled tuyere. There are some variations of the plain pit forge including the shield stone type and common masonry.
Side blown water cooled tuyere
Bottom blown forges also vary from having a grate and flat bottom to having a deep heavy iron firepot. However, most bottom blown forges have the same basic tuyere. This consists of a T construction (most often a pipe joint) with an ash dump at the bottom and air coming in from the side. Some have mechanical grates, others just a loose grate. For the best example of this see our Brake Drum Forge Plans. While this is a design for a starter forge the tuyere is as good as many currently provided on commercial forges.
As noted, firepots vary. The best are the heavy duty cast iron commercial pots. The heavier the better as they tend to get burned out. While cast iron is resistant to oxidation it has a lower melting point than steel so it is not unusual to see a hole blown through a cast iron firepot.
For a typical fabricated firepot see Firepot by Emille This is a very basic drawing. Most of us would make this a little shallower if using good coal. It is about right for charcoal. I would also add top and bottom flanges to bolt the tuyere to and to hold in the forge.
Grates: There are two types I recommend, the ball grate or a loose U-bar grate. Grates with small holes tend to clog and or burn up. Ball grates are actually semi-triangular in section. They are set between the fire pot and the tuyere on a handle so they can be rotated to clear the ashes and clinker. A U-bar is a short piece of steel or stainless bent into a U with the ends turned up to fit the sides of the firepot (1/2" x 3/4" on edge with 5/8" gap). This grate leaves a very open air flow and is easy to remove and replace when cleaning the forge.
Note that Kayne and Son (BlacksmithsDepot) and Centaur Forge both sell firepots, tuyeres and blowers.
TGN, I've seen a miniforge designed for propane that some genius decided to stick an O-A torch in since it wasn't getting to welding heat. Ever seen liquid kaowool and soft firebrick soup?
Even if you get the heat and atmosphere issues figured out, there's always the old 1:7 flow rule for the acetylene. You'll need a BIG tank or several small ones manifolded to keep from what they euphemistically call "sudden catastrophic disassociation of gas," aka KABOOM!
Forge Welding Billets in Gas Forges: TGN, There are a bunch of tricks to this that do not include a flux.
One of the common methods is to assemble the billet using clean metal, place it in a stainless tube, weld shut leaving a 1/16" vent in one end. Add a few drops of kerosene to the vent before putting into the forge. Heat to a welding heat, remove and forge (hand, power or press). Cut the stainless tube off to remove. Note that it does not normally weld to the billet due to the fact that most stainless has been passivated and has a nearly pure chrome/nickel surface with oxides. The kerosene combines with any free oxygen to leave a clean atmosphere.
The second method is similar except instead of using a stainless tube, stainless foil is used. And instead of kerosene a slip of paper is wrapped around the billet. Do not use heavy clay coated paper or get carried away with the paper. A little is all that is necessary.
Both of the above methods assume good clean metal. If using alloys or stainless be sure to mechanically clean it immediately prior to building the billet.
Both methods above are used in production situations where the number of welds is reduced by starting with many thin layers to start. Since every weld is a possibility for failure the least welds the better. Along this line many folks use hydraulic presses or rolling mills to make smooth parallel welds and long draws so that a "fold" may be 4 or more layers. Start with 32 layers and your second weld can be 128 layers. Reducing the process to 3 welding steps reduces the scale losses greatly as well as possible errors.
As Thomas noted, a small blown forge is much more controllable and almost always hotter than an atmospheric forge. This is what most bladesmiths use.
I remember my grandfather using an anvil that had the basic flat sutface and horn, but istead of being flat on the bottom, its bottom was a giant stake that you woyld pound into a log. It wasn't the biggest anvil, since he was a farmer, and only used it for very simple tool repairs, but it got the job done. Unfortunately we lost it, and i cant seem to find one like it by just browsing on the internet. Could anyone tell me what type of anvil i'm thinking of, where i might get one (preferably online) and send me some pictures. If this was a one of a kind type of anvil, can anyone recommend something thaqt is similar to it? Thanks.
Stake Anvil: Ethan, These are called a "stake anvil". They are no longer made (except for one miserable example that has insufficient stake). They are also rare as antiques but that is your most likely source. Small versions are made but I do not know who carries them.
There is a photo of a VERY old VERY classic stake anvil at the top of our Hammer-In page. Click the image for a bigger view.
Mounting Stake Anvils: While the stake LOOKS like it could be driven in most are carefully mounted by carving a hole for them. In some cases the stake was heated and burned into place. The only ones actually driven in are the little scythe anvils or DengleamboB (German). Modern stake anvils often fit metal stake holders.
I've seen heavy stakes set in plaster of Paris poured into a slightly oversize hole. If I was fitting one today I would use auto-body putty or epoxy to fit the stake in the hole. Wrap the stake with wax paper so that it can be removed.
Once in a while we get outright engineering questions that some of our members are qualified to answer and have licenses to do so in their state. However, answering this type of question is what these folks get paid to do and doing so in an open forum could put their license at risk. Sometimes they will point folks to the kind of calculations needed but in safety applications they will suggest you find a PE or Civil Engineer to work with.
I am not a PE and I will occasionally help with a machine part or lifting rigging question when someone is setting a beam to lift a load or something similar. This is usually straight forward deflection calculation that can be done with a computer program I wrote. Beams in simple loading (supported on two ends load in middle) are rated strictly by deflection, NOT stress. A beam that deflects too much will be too springy to be safe and trolleys will not stay put due to the incline. Beams rated at a maximum of 1/4" deflection at load are used for crane bridges as well as floors. In both situations there is over a 5:1 safety factor. Fix the ends of the beam by welding and all bets are off.
In my work we did a lot of rough "black-iron" engineering. In most cases stress was always limited to a maximum of 10,000 PSI. When you used an alloy shaft or grade 8 bolts this gave you an 8 or 10 to one safety factor. Occasionally even PE's will compound safety factors. We have a 10 ton crane that came fitted with a 20 ton hook. . . In engineering lifting devices a 5:1 safety factor is the norm. However, when you derate a load lifting device the safety factor becomes ridiculous. That 20 ton hook is rated to take a 100 ton or more overload. On a 10 ton crane that is 10 or 12 to one. . . But if it doesn't fly or use precious gasoline you don't need to engineer close.
And that brings us back to the lightweight trailer pulled by a motorcycle. Imagine what happens to the person following on another motorcycle when the tongue of the trailer fails due to fatigue while traveling 70 MPH on a busy Interstate. . . Yeah, it was easy to drill a hole through the tongue to attach the "safety" chains. . .
Resistance: I've got a big old buzz box welder and I've offten wonderd how well that would do to heat up work with it as you would in any other forge. I'm sure you would need to use actual screw on clamps on the leads or there would be problems with burning the cable ends.(thats usualy the first thing to fizzle if you dead short your welder too many times) There must be a rule of thumb to determin how many square inches of surface contact one would need per a given amount of amperage.
- merl
- Tuesday, 05/06/08 17:47:27 EDT
Guru,
That's a good point about metal fatigue -- I've been following this thread and hadn't even though of that. I've read (and believed, for what that's worth) that a steel structure stressed below a certain level will never be subject to metal fatigue. Supposedly there's no similiar threshold for aluminum -- any aluminum structure subject to a cyclical load will *eventually* fatigue and break.
Of course, that property of steel's only a curiosity unless your engineering's good enough to take advantage of it. And a properly designed aluminum trailer might outlive all of us.
The anvil you speak of is also called a bickern, deriving from old English "beak" (for the horn) and "iron" for the tool itself. I have one that I found in Arizona years ago, but I believe that most of them were used in Pennsylvania, Ohio, and New England. They sometimes show up at the Quad State blacksmith roundup held in September in Ohio.
The thread about trailer engineering is why I do not weld hitches or do anything structual to a trailer for anyone else. I have however built several for myself, and one or two for off road for neighbors. Steel, lots of overbuild.
But and this is an important but, my accountant/lawyer is very strict about trailers and auto's. No welding for others. "The Rock" would have my hide:)
On fatique. I believe that with a few exceptions all of the engineering materials fatique. In aircraft, most designs have an "airframe hour limit" In the military, many aircraft are taken far beyond these hour lifes. BUT again a Big BUT! the airframes are maintained, and a huge amount of engineering is expended to check and replace fatiqued parts until the point of deminishing returns. The older F-16 is an example. The RF-4C I worked on in the mid 80's were built in the early 60's. We seemed to always have a bird or two in the hanger getting a reinforcement kit installed. As cracks were found and reported the engineers would come up with a "Scab" repair. Those wings had a huge number of rivets that had been drilled out and replaced many times for each new kit.
The early welded steel tube aircraft were mild steel, but Crmo took over pretty quick. My brother had a Pitts Special that was steel tube fusalage and it was =/- 9 G's. The wings were built from a composite material that was fatique resistant but alas not fire proof. They were wood. Aircraft lost in a hanger fire.
There were many 30/40's aircraft with aluminum tube structures. Most were joined by special bolted fittings, and were often square tube.
Greetings!
I am currently expanding my blacksmithing business to include security grilles. As I understand it, code requires a means to easily open the grille from the inside in case of an emergency. To what extent should I take that into consideration in the design? Should I provide this or leave it to the individual contractor? Any assistance or other suggestions regarding this endeavor would be greatly appreciated. Thank you.
Half Pipe Mike, I needed something short to attach the fuel bracket to. Since I welded it an unthreaded area was better. It was also the shortest standard nipple I could buy and cutting it in half resulted in having two parts for the cost of one (plus the cutting). Cost of all the plumbing fittings add up quickly and it you can get two burners out of the two lengths of pipe then you are way ahead. What you are paying for is the threaded ends.
The burner also worked - as built. Make modifications as you will but your results may differ.
Security Grills: Frankly I had not looked at the new U.S. codes on these. In Central America they are EVERYWHERE and none are hinged or have latches. They are just screwed to the window frame. Doorways also have them as a seperate hinged and locked door. All those I have seen in the U.S. were the same but I have not seen any recently.
The code calls for something any child without special knowledge, tools or a key can unlock. The problem with this is that the level of security is that which any child can get past. . . So why bother? Well. . . it slows down an intruder and might make them think twice about breaking the glass to open the security grate. . . But a bold intruder is going to take a sledge hammer to your door as he laughs at your window grates.
What happens most often is that the resident puts padlocks in place of the simply removable pin and THEY break the building code and put their entire family at risk in the event of a fire. . . . People also put wood screws between windows as a security device. . .
IF you design a system that invites using a padlock then you may face a liability problem in the future.
The design that seems to meet the codes is a simple pin with a round loop handle that you pull out to release and open the grate. The grates are hinged or pivot on pins. Many are a single bar with pin and latch (two anchor points), the fill elements attached.
If I were making custom work of this type and concerned about the codes I would start with a simple frame and latching mechanism, fly it past the inspectors or fire department and then fill in the opening.
Note that many places require an ASTM approval OR UL approved (marked) devices.
John Duncan, you should first find out exactly what the code says where you live.
In writing, if possible.
It varies from place to place. Generally, the strictest laws say that there must be ONE opening grille in each room where sleeping takes place. That means, on a typical house with 6 to 10 grilles, only 2 or 3 must open.
Which is both good, and bad. I want all my grilles to look alike, so they all must have the clearance and hardware to account for the opening mechanism. But only a few need all the extra work and fussing that the openers require.
And believe me, those openers are fussy.
I think you must build the grilles from the beginning to account for openers- the way they work, with latches and hinges, is usually far beyond the ability of a contractor to add, and often require the design to accomodate it from the start.
None of the commercially available hardware is great. Its usually very cheaply made, and looks ugly and clunky on the inside.
go to the websites of places like King Architectural Metals, Classic Iron, or Jansen Supply, and you can see your options.
I have used the simple hand levers, and while large and ugly on the inside, they are simple enough to work pretty well, and, of course, you can make your own levers. But the grilles must be hung level and true, as the weight of a grille sagging on its hinges will make it hard to open, even with a lever.
The smaller, push button style, with spring releases outside, are much less obtrusive in a house, but require exact alignment to open.
One latch is always easier to get working properly than two, but many larger grilles require two latches.
Expect a LOT of addtional work on your part to make these things work right, and price accordingly.
Even with all the tools and a complete machine shop, I find these things to be a constant money loser on any job.
- Ries
- Wednesday, 05/07/08 10:29:23 EDT
In case of fire & common sense.
I had a locksmith as a student, and window grilles aside, he said that proprietary exterior door locks, keyed inside and out, have been outlawed nationwide. Gotta' at least have a turnpiece for the dead bolt inside. You may still find the outlawed ones for sale here and there, but don't be tempted.
I have looked all over the net and found very few helpful sites, so I hope you all can help. I am looking for a company in the Northern Ohio area(I am willing to travel) that can do heat treatment work on a variety of Steel Boiler Tube. Specifically, P91 3"-26" diameter, up to 40'. Please let me know if you can help. Thanks
Fatigue: steel has what is emperically determined to be a fatigue limit. It is the stress below which the material can be repeatedly (infinitely) loaded without failure. This is roughly 40-60% of the yield strength. Different metals behave differently. The presence of a notch, crack, section change, rough machining, inclusion, etc., throws the numbers way off, however. These stress risers will dramatically reduce the fatigue limit. Also, as applied load is increased, the number of cycles that can be sustained is proportionally decreased. At some point, the applied load is so great that you can only get one cycle and it fractures.
Paul, I doubt you will find many Heat Treat facilities that can handle 40 feet lengths. However, many facilities geared up to heat treat Oil Country Tubulars might be able to help. These plants are usually set up to run up to 45 foot long pipe. However, you are not likely to find one that can accommodate anything over 16" diameter. Look in the yellow pages in Houston or Tulsa.
Does anyone have contact information for the company that sells blades for the Edwards shears? I keep hearing that they are still made but can't find the actual company. I have a #5 shear with no blades.
I worked at an old blacksmith shop in Boston Mass, for five years. We were licensed by the city of Boston as light iron workers. (Security grilles, fences, rails and gates and fire escapes) Reis (as usual) is right about the difficulty involved. Guru has some good points, and all I can remember the old man doing, was to attach a long bolt to the latch side of the grill with a few links. We would drill a hole through the window casing, push the bolt through the hole as the grille was closed, and then screw a nut with a handle welded to it, on the bolt. They didn't work or look great, but it did work and pass inspection. Solving this could be some ingenious smith's niche. (hint,hint)
Have inherited a wonderful piece of Americana, circa 1803 whaling "Try Pot"(from Nantucket). It is badly weathered (after sitting in NorthEastern elements for 25 years) There are definite marking that cannot be read due to rust. What can be done and what products can be used to clean up this piece of history so the markings could be read.
I've got more questions about that burner. I'm still trying to figure out how I can mount the gas nozzle in the center. The picture shows the bracket being welded to not just the iron nipple but also to the nozzle itself. However the pipe on that nozzle is _copper_! What do you do about that?
Edwards Shears: The last time I looked Centaur Forge carried shears and blades.
Burner Details: Mike I used 1/8" schedule 40 black pipe for the center parts that were welded. When the brass tubes are used the bracket is made from a piece of 1/2" bar with a hole drilled for the tube and a set screw positioning it.
To weld the small tubes I use a wood plug that fits in the large pipe with a piece of 1/4"-20 threaded rod in the center to hold the pipe. Some shim stock needs to be wrapped around the threaded rod to make up the .019" larger fit of the pipe. A couple nuts on the threaded rod and a snug fit of the plug hold the whole together. The wood is a little singed but I have made a dozen or so burners with it.
On my later burners I have used all thread lamp tube for the center pipe with lock nut adjustments. YES, this is untapered and the pipe joints will not seal properly unless you use a LOT of pipe sealant. However, both joints are in the air flow path and any fine leak caused by the orifice back pressure (not very much) is sucked into the burner with the rest of the gas. . . So perfect seals are not a hazard. On these burners I use disk dampers also held in place by nuts on the threaded tube. This allows adjustment of both the depth of the nozzel and a damper. There is also no welding on the pipe. I think all the benefits of the design outweigh the straight thread issue.
On these I used a piece of 3/4" hex bar for the center part and drilled through on a small lathe so the hole would be fairly straight. A good drill press would work as well it the bar is cut square. The same fixture described above was used for welding with the addition of a piece of the lamp tube to shim it.
The biggest problem with this design is that the lamp thread lock nuts (1/8-27 NPT) are priced at over $2 each. . .
Rusted Lettering: Sandra, Most things to bring out the lettering are destructive so we will not go there.
Often you can clean off the loose rust and then do a rubbing using tracing paper and the side of a pencil or charcoal. This can then be read.
If the lettering is unclear do not make assumptions. Find an antique reference that lists manufacturers marks and match it up. Otherwise you will go crazy with false leads.
Steel Fatigue: There is a point for nearly every type of common steel part (springs, bearings, keys, shafts) where the life cycle is absolutely known. There is a point on the life/load cycles curve where life rapidly approaches infinity. Parts are either designed to have a finite life in hours or a nearly infinite life. Sadly the difference in cost is often only pennies. So, when a bearing fails regularly on an automobile, someone, somewhere made a conscious decision to limit its life.
The other night they had a news article on TV about the 100 year old light bulb. . . This is a shining light for the light bulb industry warning them that bulb life can be infinite and their company's finite. . . Bulbs are carefully engineered to have a very specific life LESS than what is published on the box. It is close enough that consumers will not complain but short enough that it makes a LOT more money. Do you know what the difference is between a traffic light bulb that lasts 2.5 million hours and a house bulb that lasts 1/500 of that? Almost NOTHING! The difference in the amount of materials is almost imperceptible. But the difference in profits is HUGE.
Thomas Edison designed a light bulb that does not burn out. You can see some of them still burning in his house. They do sell these light bulbs for handycapped people. Although they run about $30 US dollars each. Just my 2 cents.
If I'm not mistaken, those long-life bulbs operate with the filaments at a lower temperature and are less efficient. I 60W, 1000 hour bulb will use 60 KWH over its life. That's around $6.00 of electricity where I live. I wouldn't want to give up much efficiency to save a quarter or two on a (replacement) light bulb.
Of course, if you can live with less light, even a less efficient bulb with the same wattage will still use the same amount of electricity. But you'd probably be better off going to a standard bulb in a lower wattage. Or a compact fluorescent, of course . . .
Sandra Valenti, If it is still on Nantucket, I would be glad to look at it for you. Is it the one that was in the brick building on Washington street til a few weeks ago? If you tell us where you are it could help.
I asked this before but I guess it got overlooked. On an old Buffalo Forge w/ a cast iron fire pot, do I need to clay it, as I only burn coke. The top overlapping rim is about 1/2" in thickness, don't know about the rest.
Sandra (and John C): I have had a lot of success lately with electrolytic rust removal on cast iron. If done correctly, it should not only minimize loss of material to oxide, but may even reduce a certain amount of oxide to elemental iron. Cannot restore lost detail, but can certainly stop it. Sort of reverse anodization. Let me know if I can help.
Thumper, Generally not. Note that coke burns hotter than coal and you need to be careful with the blast. You can easily melt that fire pot burning coke.
Please consider very carefully before you do ANYTHING that alters that piece of Americana in ANY way. To do so will reduce the value as a collectors item, sometimes dripping by a factor of 100. If you cannot read the lettering by doing a simple rubbing with tracing paper and a pencil, take it to a recognized expert in the field and have it appraised and validated, before you try anything else. Ask the expert about the advisability of de-rusting it; my guess is he'll simply look horrified.
Keep it clean and wipe it with a light coat of Vaseline to inhibit rust. There is nothing you can do that will make it completely weatherproof, but good care will go a long ways.
If you don't care whether it can be sharpened or not, then you could have the blade Teflon coated. Of course, once you actually use the knife, the Teflon will get abraded, ending the weatherproofing.
Denny, the best way to weatherproof a knife blade is to put it in a glass tube and melt the ends shut. It won't deteriate much as long as it stays in there.
If You intend to use the knife, You could give it frequent coats of paste wax, but this is continual maintainance, not once and done.
- Dave Boyer
- Wednesday, 05/07/08 22:09:22 EDT
A way to seal tapered pipe fittings to running pipe thread [untapered] is to solder them. I guess the anti-aerobic compounds would work too.
- Dave Boyer
- Wednesday, 05/07/08 22:23:04 EDT
Denny, you could get it "Parkerized" by a gunsmith, then the only unprotected part would be the edge. It would still take a bit of maintainence but not nearly as much as a bare blade.
hi Im a young blacksmith prom Latvia.
I want to make a power humer, which works on electricity. I already have desing idea and sketch, but I don't know how can I control revolutions per minute of my electromotor.
could you tell me with what kind of device i can control that.
More twisting. Craig, There is also more shortening when twisting a bundle like making a basket twist. This is because there is less restraint to shortening.
There is also a considerable difference between hot and cold twisting.
In either case, when building a twisting device the shortening must be allowed to happen otherwise something will break.
Power Hammer Control: Renis, Power hammers are controlled by the clutch. The maximum speed is determined by the mechanical reduction from belts or a gear box. Speeds below that are produced by slipping the clutch.
Due to the great amount of slipping a large clutch friction area is needed. Traditionally a flat belt clutch is used. In this case the entire belt is the friction surface. Flat belt clutch pulleys need side guides or rims to keep the belt from falling off. The addition of guides means that the pulley needs to be wider than the belt so that it will not rub on the guides.
A modern alternative is the "tire hammer clutch". This uses a small automobile wheel and tire for the friction surface. A small pulley on the motor is pressed against the tire to make it turn. This combination has good control and is easy to slip for slow speeds.
Some people have put large DC motors and variable speed controllers on their hammers. This is an expensive method and requires understanding the electrical engineering and control wiring.
Weather Proofing: To keep any non-stainless steel un-plated steel tool bright and shiny requires constant maintenance. Even gun bluing and Parkerizing requires some oil to prevent rust when gotten wet especially with salt water from the sea OR sweat.
However, even if you scrupulously clean a steel tool it IS a tool and at some time the oil will be wiped off in use and will pick up some rust. Removing the rust usually requires some abrasive method and thus the finish changes. In many cases the small amounts of rust are ignored and oiled over. Eventually the entire tool will have a smooth rust finish which will hold oil better than bright steel and thus resist further rusting. A rust finish (or browning) also does not show new rust like a bright surface. Browning is just a slow natural oxide finish not much different than bluing or other chemically induced finishes.
So. . . you can continuously polish off small amounts of rust OR let it rust and oil over the rust.
A lot also depends what the "weather proofing" application is. If you are putting something in storage then it is different than carrying it in your pocket or a pack. For long term storage you can use heavier coatings of vaseline or other rust retardants. When putting something like a knife in long term storage its sheath is often the worst place to put it. Leather sheaths often contain acids or salts that will cause corrosion. When shipped many knives with sheaths are wrapped in oiled acid free paper to isolate them from the sheath. For long term storage I would seperate the two. If the storage is to be for years there are commercial sealants that harden and thus do not rub off. These are normally applied over a light oil especially if there are working parts to item being preserved. As noted above, sealing in a container is a good idea as well.
Some storage places are better than others. If there is moisture or condensation then any surface that holds the moisture is bad. Cardboard boxes and the felt lining of some tool chests will hold moisture and increase rust. Wood with an oiled surface seems to be much better than others.
On old sea going ships the tools that were not used daily were packed in barrels that were filled with oil. In a world where everything is penetrated by sea water this was the only method that prevented serious rust.
Note that many knives and small tools often have a very thin coat of lacquer or hard wax when new. This keeps them bright and shiny in the store and for a brief period after you purchase them. . .
Note, All the above is why I carry a stainless knife. The Buck knives I carry do not keep a sharp edge as well as carbon steel knives but they require almost no maintenance other than occasional sharpening. The little folders wear out from use without rusting, stains or corrosion.
Other aspects of weatherproofing knives deal with the handles. You should choose an artificial material that will not react to water or sunlight and should be bedded onto the blade so water cannot seep between the scales and the tang.
Micarta works fairly well fot he material and is available in a large number or colours and forms.
I went by the Habitat for Humanity's ReStore yesterday and picked up 2 10" diameter, 10' long, spiral, galvanized pipes to use as a chimney for my proposed coal forge addition. Cost me a whopping US$4 a piece and to a good cause too!
I'll do the bottom section from stainless steel which is next on the scrounge list.
Biggest problem getting it was to have it in stock and the money in hand and my truck in the city all at the same time.
Thomas running his hobby on a slim allowance and lots of scrounging!
Twisting-
Even though it is counterituitive, twisting solid square bar DOES NOT MAKE IT SHORTER.
I know, common sense tells you it would- but it dont.
What happens when twisting square corners twist around the core, but the core stays the same length.
I have a twisting machine, and I have twisted thousands of pieces of square bar, from 3/8" to 1", and measured em, and they just stay the same length.
The same thing applies to round bar.
What does shrink when twisted is, as guru mentioned, bundles of more than one piece, because they actually wrap around each other, hollow shapes, such as square tubing or pipe, and odd shapes like angle or T.
And how much they shrink depends on how much you twist em. So either way, there is no formula for shrinkage. Each size and wall thickness of square tubing will shrink a different amount per complete 360 twist.
I have twisted 3" square tubing, in 1 foot sections of heat, till it collapses down, and it shrinks a bit in length. Not a lot, but a bit.
But square, whether twisted over the whole length, or just in places, just doesnt shrink. We just finished a balcony rail that has about 150 linear feet of square, twisted for a couple of inches every foot or so, and there was no shrinkage on any of it.
- Ries
- Thursday, 05/08/08 12:06:59 EDT
Hmm. . . I had read that on long pieces they get shorter. . . Maybe misinformation. I'll have to measure the long pieces I twist. . . Next project after the power hammers is a HD bar twister.
Gas Burner thing again. I noticed in your reply you mentioned the use of lamp tube. I also came upon this idea as well, but how then do you make the bracket (I'd like to see a picture, ideally) to hold that in place?
Heard this story about a Francis Whitaker workshop. Someone had cut a bar exactly to fit within an area. Put a twist in it and it came up short. When Francis was asked about it he put a heat in the twist area, put one end in a vise and pulled strongly. It fit again.
Jock, in the case of twisting solid square stock there is more material that doesn't need to change [envision a circle inscribed inside the square] This would have to compress for the section to get shorter, but there isn't enough force to make that happen, so the corners elongagate.
Ries mentions that square tube does shrink. This is due to not having the mass of material in the center to resist.
- Dave Boyer
- Thursday, 05/08/08 21:48:43 EDT
mike3, The threaded tube passes through a section with a slip fit hole, and You position it with a nut on each side.
Idealy the length of the section with the hole should be 1 1/2 to 2 x the diameter of the tube and concentric & true to the burner tube bore.
If You cant make it this way, or it doesn't come out right You bend the arm conecting the guide to the rest of the burner to get them lined up as well as You can.
- Dave Boyer
- Thursday, 05/08/08 21:56:26 EDT
Hi guys,
I dont have a sandblasting equipment and I need to engraved about 1/8 " deep in Mildsteel some lettering. What is your suggestion as far as acid goes? How long would I have to let it soak etc..
Ken, if You get an "S" bend in the twist, it will come up short. Remove that bend and You will have the lenght back.
- Dave Boyer
- Thursday, 05/08/08 22:06:06 EDT
Today was a day of great frustration and elation. I did some cutting using my oxy propane setup, changed the torch head to do some welding and forgot to change gasses!!! I can say without fear of contradiction....YOU CANNOT WELD WITH PROPANE!! That brought on doubts that I still remembered how to weld along w/ tons of frustration, till I found the problem. The elation was discovering that my welding problem was only CRS and not loss of ability. Some days gettin' older really sucks!!
I have a number of pieces of antique hardware. These are mostly 18th century and include hinges, bolt latches and door handles.
I cleaned them in Evap-o-Rust and they came out looking as though they are made of aluminum, with a soft platinum color rather than the more clear, reflective iron/ steel. I'm wondering whether I can make them a more natural color again, maybe by heat-treating them??? A few of my pieces (that I didn't clean) are a nice dark color and I was told that they were heat-treated by quenching them in oil. I don't want to change their shapes or hardnesses, and don't want to make them look new. I just want to change the color and make it more natural.
A follow-up question. What is the best way to clean the old pieces? The ones I told you about were my test run. I have a number of others. Steel wool seems to do a fair job if the rust is not deeply pitted and leaves the surface a more natural color. However, I don't like wire-brushing because it leaves a lot of scratches. Are any chemical treatments better than others?
if it helps its going to be used hevily in iraq is there some knid of bake on finish that would protect the blade moderatly well an how would i go about baking it on
if it helps its going to be used hevily in iraq is there some knid of bake on finish that would protect the blade moderatly well an how would i go about baking it on
if it helps its going to be used hevily in iraq is there some knid of bake on finish that would protect the blade moderatly well an how would i go about baking it on
Cleaning old Iron: Gordon, Don't you folks out there with genuine antiques EVER watch the Antique Road Show and see the appraiser say, "Well, hmmm, if this had not been cleaned it would be worth, ah, well, thousands of dollars but now it might be worth ten"?
On the ones treated with acid the damage is done. All of what made the original finish and gave them much of their value as antiques is gone. Properly aged very old iron has mostly rust as a finish and a little original scale. Original finishes MAY have been burned oil over scale OR just oil and wax over scale but was usually black paint (lacquer) over a hand cleaned finish which may have included scale and bare steel. These painted finishes were thin, not very good and eventually were replaced with rust. To repair them now is in the realm of fakery. Paint them and call it a lesson learned. In fact, you would have been better off to paint over the old rusted finish because paint can be removed leaving the most of the original finish intact.
Cleaning antiques of ANY kind takes great care. RUST is part of the aged finish and a judge of the age. Dense tight rust only needs a coat of oil to protect the metal and darken the rust. Cleaning of black iron is done with fine soft brass wire brushes the size of tooth brushes that remove dirt, not rust. If there is original paint then you do not want to remove a single flake on a 200 year old piece. In this case even soft rinsing with water may be too much.
Old iron building hardware was often painted with the building, and unless very special then the same color. There was a lot of white and barn red hinges and door hardware. When these buildings stopped being painted the old low quality paints eventually all flaked off and rust took over. On some old hardware you can see the original finish (often bare metal) on the back of pieces where it was sealed against wood. Around the edges there may be a trace of paint. Then the exposed surfaces would often be rusted depending on the climate, exposure and type of iron. ALL of this, the traces of paint (even complete or partial paint), the original finish under protected surfaces and the RUST are all part of the antique finish.
Knife Care: Denny, if it is going to be heavily used in a combat or front line situations then light DIY finishes will not help. Clean it and oil it along with your rifle and it will hold up just as well. Fail to do the same for both and soon it will not matter. Good luck and come back in one piece.
Propane Burner: I thought I had described it pretty well in my post. I built several of these in a hurry for a friend in Costa Rica and did not get photos. Carried all the parts in my luggage. . .
To align this one you can put a long piece of the lamp tubing in the bracket and tweek things until it is centered in the far end of the burner tube. However, welded using my little wood alignment fixture it came out just fine and needed no adjustment. I prefer to look down the outlet of the 3/4" pipe through the MIG tip. If you can see down its bore and out the other end the alignment is plenty good.
While this style burner worked fine in my melting furnace we did not get a good test of these in Costa Rica. We built the forge shell using kaowool, bricks and ITC-100 I carried down one year, built the burners the next year and did not see it all running until the following year. At that time the forge was being used out doors on a windy day and the burner tubes were not well sealed. Between exhaust being intermittently sucked back into the intakes and wind constantly changing the operating conditions we never got the forge operating well. Not a fair test but typical of conditions that a gas forge will not work well in.
It helps on this design for the hole in the tube holder to be snug, straight and the ends of the bar square to the hole. As mentioned, I drilled and faced mine in a small lathe but it could be done in a drill press using some care.
Thanks for the twisting info.
Can anyone point me toward a plan for the construction of a simple twisting device? At the moment, all the twisting I do is between a vice and a spanner or pair of tongs, and it's sometimes hard to keep longer twists running straight. Especially when twisting flat bar.
If your comments on rust are directed toward the try-pot post, I think they are generally sound, but that this particular try-pot is the exception that proves your rule. Where a finish or patina has developed over years of proper or at least historically common use, then sure: removing that finish removes the history. Where a coating of anything is due to more mundane causes, however, cleaning and resotration are clearly indicated. The recent restoration of the ceiling of the Cistine Chapel and the current restoration of the Acropolis are prime examples. In the case of American cast iron, rust removal is not only considered proper but essential to restoration of value. Among collectors of iron cookware, non destructive rust removal is a much admired art. You cant tell me the 140 year old Griswold dutch oven hanging on a tripod in some guy's front yard full of geraniums, with rust flaking off inside and out is worth more than the one I found like that that now sits on my hearth, bright and shiny black, rust removed electrolytically and reseasoned, proudly displying both the pits and pattern numbers. Now this try-pot is not exactly a Griswold No. 12, but its not the mummy of King Tut either. According to the original post, the bulk of the rust is the very recent result of the pat 25 years of abuse and neglect, rather than say 150 years of storage in the hold of the Charles W. Morgan. It probably had a nice historical patina of burnt whale oil and wood smoke before it was left to weather and rust 25 years ago. That has long since been destroyed by the modern misuse. In fact, if there is any vestige of the original patina on good iron between the rust flakes, it will be preserved and revealed by proper rust removal. IF rust removal turns out to be the way to go on this piece -- and it very well may -- then electrolysis is one very good way to go.
Peter, my comment was aimed toward the fellow that has derusted various 18th century hardware using a common harsh chemical rust remover.
Yes, there are many cases of gross abuse of antique items often before they had serious antique value. In the case of almost everything over 200 years old an appraisal should be made by someone knowledgeable in the field.
Cast iron is considerably different than wrought. Generally wrought items are very carefully cleaned using methods that do not disturb the metallic surface. But a lot depends on the as-found condition and the historic value. There are new processes that electrolytically convert heavy rust back to iron often restoring items to close to their original shape. But this is only used where the value of the item is great and the damage sever.
There are many places where historical review boards require the most gentle cleaning and restoration of the original finish of old exterior ironwork where what it needs is sandblasting and a good 3 step modern paint process to preserve it. There is the ideal and the practical.
The problem is that in most cases folks ask advice after the damage is done and much of the antique value has been lost.
Twisting Fixtures: Craig, These vary greatly and are most often shop made. The most common is a rig attached to the corner of a heavy bench or part of a bending fixture that you can walk around (bolted to the floor). At the bottom, and adjustable up and down, you have a clamp, at the top a plate with a hole for the "bearing". A round block that fits in the bearing which has a through hole in it holds the work at the top end and has a handle attached or holes for a removable handle. Set screws or home made collets hold the work securely.
A hand crank twister I saw in Costa Rica was made from a small car or truck rear axle. A clamping device was made to fit one hub, the other hub was locked and a hand crank was attached to the input at the center. this could be greatly shortened by cutting off one side and welding an axle stub to a closure plate on the axle tube. The whole was on a stand or bed that had an adjustable clamp to vary the length twisted. The gear box gives you about a 1.75:1 increase in torque (not a lot).
Many shops have converted pipe threading machines to bar twisters. I am not sure of the maximum capacity but 1/2" square is commonly twisted and maybe 5/8". Old pipe threaders are often available at equipment sales without dies. The threading dies are worth as much or more than the rest of the machine so the machine value is significantly hurt by the loss of the dies.
An old 12" to 16" lathe that still has its back gears but is good for nothing else due to wear or other broken parts can be used as a twister for small stock. The advantage to lathes is the hollow spindle.
Commercial twisting machines can be bought but many smiths also build their own.
DIY Twisting Machine: The first task is to find as big of a gear box as possible. Usually you want a worm gear box. These are most often identified as right angle drives with an offset shaft. Occasionally you can find them as double reduction. These have a small worm drive attached to a larger drive. Worm gear drives commonly start at 30:1 and go up to 100:1. Double reduction drives often use two 50:1 or so reducers to produce 250:1 or more. You want a gear box with an output shaft two or more times bigger than what you want to twist.
Unless the reducer has a motor attached to it (a gear motor) or has a C-face flange on it for direct coupling then a pair of pulleys will attach the motor to the gear box with abouit a 2:1 to 3:1 reduction to start. Reduction steps are multiplied by each other so if you have 3:1 pulleys and a 50:1 gear box the total reduction is 150:1.
A commercial twisting machine with a 3HP motor will twist 1-3/8" square at about 5 RPM. If you start with an 1800 RPM motor that is 360:1. Torque is about 9 Ft/lbs. on a 3 HP motor so that is about 3200 Ft/lbs of torque. A 1HP motor would produce 1/3 of that at the same speed. OR at 2 RPM (900:1 reduction) you could twist 1.25 sq. with 1 HP (cold). You could do a lot more hot. SO, you will probably want a 1HP motor or more. A brake motor (one that stops almost instantly due to having a built in brake) is ideal.
You will need a coupling/chuck to attach to the gear box and some structural steel (I-beam) for the bed of the machine. On the bed you will need a far end clamp. IF you want to twist the middle of long bars cold you will need a hollow spindle OR a heavy tubular extension on the chuck. But you can easily bend the middle of a bar hot controlling the length of the twist by the heated area.
Normally the bed of your machine needs to be as long as the work you are going to twist. However, if you wanted to twist full 20 foot lengths of bar the far end could simply be held by a stand anchored to the floor.
Another consideration for a slow turning long twisting machines is the time it takes to twist the entire length. A typical slow twist is one rotation in 2". At 5 RPM that is 10" per minute. To twist a six foot fence picket that would take over 7 minutes. When these long times are involved you may want to do other things. In this case you want an automatic shut off. There are several ways to do this. A fine thread screw with a nut that trips a limit switch, OR a timer. The timer is not nearly as accurate due to the machine RPM not being exact using AC motors and the speed varying with load. But for long pieces this would be close enough. Adjustable delay relays can be had for around $100. However, it will need to be wired to a motor starting switch.
The screw type mechanism mentioned is quite accurate. The tricky part is returning the "nut". This needs to be a quick action adjusting nut. These commonly fit 1/2-20 threaded rod. The number of twists can be measured as 20 per inch. The length of the rod would need to made for the maximum number of twists. In that 7 minutes at 5 RPM example that is 35 rotations or only an inch and a half working screw length. A 1-10 thread could be used and only need to be a foot long to take care of 120 turns in a 20 foot bar. 18" would cover fine twists in small bar. This would also be easier to read and setup.
I drew this bar twister for Paw-Paw many years ago. It is simply a way to distance the kid doing the twisting from the hot iron. You can drop a hot piece of 1/2" square into the device and even a 5 year old can twist it.
The trick to this device is for it to be quick and easy to get the hot iron in and out (thus the vise grips). Paw-Paw did not like the vice-grips so he made some kind of set screw lock that was clumsy and slow. The result was cooled steel and flaming wood. The flaming wood was my fault for showing the bearing and clamp centers too close to the board.
A similar device can be made for the shop perhaps to clamp in the vice or on a bench. It would give you better control and nice straight twists.
There are many twisting fixtures made using adjustable wrenches. I have always just done my twists with tongs or tongs and the vice. But a well designed quick action fixture could improve ones work. However, if it is slow and heat is lost then it is of little use.
Twisting Video: While researching the above I came across a U-Tube video where a guy demonstrates a "human powered bar twister". The fellow had a bicycle frame with the chain turning a small worm gear box. In the video the fellow heat a pair of 1/2" bars, hops on the bike backwards and peddles until the twist is finished. . .
The whole trouble with this complicated rig is that the same could easily be done by hand with tongs alone, tongs and vice OR a short hand crank.
I've used my Makita drill for twisting small (under 1/4") rod or small bundles... hot of course, I've never had any luck twisting cold.
- Nippulini
- Friday, 05/09/08 12:41:09 EDT
The twisting machines shown are great. However, twisting with a standard wrench, or "spanner", in a vice, is always a problem because much of the force is offset from the center of the work due to the single offset lever, causing the work to bend to the side. By adding a second opposing lever to the wrench, you can apply force with both hands, in opposite directions. The offset leverages on each side counteract each other, centering the force on the work piece. It’s not guaranteed, but it’s much easier to control.
I have a notion to build a power hammer with a tire clutch and an air spring made from an old hydraulic cylinder. I see there’s one on the ‘Home-built Hammer” page. The cylinder I am considering is a long skinny one, and I would use trapped air @ atmospheric pressure. I thought I could create a convenient stroke adjustment by piping the two ends together with a valve between. The cylinder is about 2” od by 24” long. I have considered using this long skinny cylinder as the pitman crank, but I’m not sure about that. (I may have some other cylinders @ different dimensions available) I also have considered using a gas engine rather than an electric motor, but I’m not completely sold on this, either. That’s about as far in design as I’ve gotten so far; I’m in no rush to start this project. Thoughts, pro or con?
I've never been a fan of adjustable twisting wrenches as too much time is spent fiddling with the adjustment. I do like the simple multiple notch type wrenches such as made by Off Center Tools as they have the proper clearance for a wrench without adjusting them. For speed and efficiency (of work) I would much prefer a single size dedicated purpose wrench.
During my smithing days I made thousands of twists, most between two pairs of tongs and occasionally in the vice with tongs simply because less tools is often the most efficient way to go. However, if I had ever needed to make a hundred or so similar twists I would have built a dedicated fixture to do so. Its just too easy to do. But if you want REAL efficiency then doing it cold in a machine is the way to go. Heating work when you don't need to costs in fuel, time waiting for the heat and clean-up afterwards. It all depends on what your needs are.
So I will be off in a few weeks to pickup a huge gear box with a 3.5" output shaft. . .
Power Hammer Design: There were some commercial attempts at single cylinder air cushion hammers. All were short lived. The idea looks simple but then you have to find a way to let in make up air due to seal losses and the worst part is the fact that you are not exchanging the air it gets REAL hot in a short time. That is why self contained hammers work, they breath fresh air and exhaust hot air. In both cases all that heat is inefficiency.
The ideal linkage for a mechanical hammer will always be the Dupont (LG and Champion type) linkage or the Beaudry cam type.
A number of folks have fitted small internal combustion engines to Little Giants in years past. Seamed to work OK. A centrifugal clutch (like used on a go-cart or mini bike) was used on one I read about. You just have to limit the top speed by reduction to what the max the hammer was designed for.
I have a big old gasoline powered screw air compressor. The idea was to run a 350 pound Niles-Bement hammer with it. This avoids needing to be on an expensive commercial duty electrical service to run a 30HP or more compressor.
In both cases a better than normal muffler could be fitted to the engines to reduce the noise. There is no reason these engines make a lot of noise. Automobiles do not.
IF a small engine is to be fitted on a machine then it is nice to have it low for maintenance and filling the on-board fuel tank. I'm not crazy about an overhead fuel tank on a machine that tends to shake and thrash about.
i would really like to build a sword, my purpose of it is for training, u know like in the movies yup... if u tink i'm some punk well i am and have only taken two metals classes so ya.. i really want to stop buying those 60 copy crappy versions of the blade. that just fall apart while in use and i practice alot so i have some meaning and no i don't practice with any other people i do it in the fields of my town alone seculded and well i really want it because i kinda sleep with them like their my teddy or something... ya i'm weird but i really want a special teddy if you catch my drift, yup i don't mind paying for the material and i wouldn't mind paying for teaching i just would like TO FREAKIN DO SOMETHING WITH MY OWN HANDS AND SAY TO my grandchildren see cabron i did that when i was your age why r u waisting your life playing video games!!!!!!!!!!!!!!!! yup i guess i want it to represent my Familys honor or mine but ya.
IF you don't read this complete then i've lost all hope for finding a master and you'll have a very angry mexcain whos dreams you've just crushed ... meaniIIIIIIiiiiiiiii.....
OZ, If you would look at our swordmaking article resource list there are a bunch of good books on metalworking AND sword making that will help you complete your task.
There are NO secrets to the job other than hard work. While many of my compatriots say I'm wrong a sword is nothing more than a BIG knife. First learn to make good small knives then move up. Swords have the exact same parts and are assembled the exact same way. What is tricky is heat treating the whole. IF what you are looking for is a good practice blade then it can be pre-heattreated steel like 4140HT or a slightly softer non-hardening stainless. The pre-heattreated steel must be worked by cold methods (stock removal) while the stainless can be forged.
Blades that fall apart are poorly designed and constructed. A good blade should have as large a tang as possible to prevent breakage. Good Japanese swords have a tang the same size as the blade without taper, thus it is stronger.
The most durable grips (next to solid metal) are wire wrapped hardwood. Properly fitted and installed they are almost indestructible. On the other hand, a Japanese blade has well fitted furniture that is easily changed from hard working every-day parts to classy and expensive dress occasion parts.
No secrets, just lots to learn, design decisions to make. And like using the blade, practice, practice, practice.
Denny, from an old soldier, Your brother will use any knife he carries for any and every task that comes to hand, from opening packages from a little brother, to useing as a screwdriver. I do not know of any finish that will take the abuse of a working soldier's knike and stay intact. Any soldier worth his salt cleans and oils and maintains his equipment just a little more often than needed to keep it in first class usable condition.
If you are picking a knife for him, or making one, go for a simple, tough design with a relatively small blade. Probably not over 4" is most handy. If he is a walking grunt, he will not want one once more than required to achieve the job of any tool he carries. A good sheath that will not allow the blade to rattle, that retains the knife when one runs, jumps and dives, and probably a lanyard hole as well is needed. Matt finish with no shine is pretty critical. A handle with a style that allows a good grip when wet, and when wearing gloves is also important.
I hope this helps. Please pass this old guys thanks for his service on to him.
A washing machine timer could be adapted to control a pipe twister. And it couldn't be *that* hard to modify the control panel from an old microwave for the purpose (I guess the simplest way way would be to disconnect the magnetron and hook up a relay in place of the light). I think it would be cool to punch in the minutes and seconds and watch the twisting start.
Junkyard Twister: Mike, I hadn't thought of appliance timers. These are probably better than the typical ice cube timer that is hard to calibrate. I hate the digital timers but there are still some of the old turn knob types on old devices. I still kind of like the screw and limit switch as it is purely mechanical.
The gear drive does not necessarily need to be a worm gear drive. They just happen to be the most used and are often available as scrap/junk. Big old spur gears would work IF you can find a matched pair. The goal is to find something designed for HIGH TORQUE. A large output shaft is a good indication.
A hollow spindle is handy but requires larger bearings and a thick wall tube for the spindle. I plan on making an extension tube "attachment" that allows four or five feet of work to slip into the attachment. The problematic part is making a large diameter bearing for the tube. ONCE in a great great while you are lucky to find a big ball bearing pillow block. . . but I am not counting on it.
That 3HP may be hard for some to come up with but I found that a multi-motor drive works great. Two 1.5's would work or two ones to make up 2HP.
Well I'm going to say you're wrong. There are a lot of swords out there that we built like they were a big knife and most of them are not very good. Way too heavy and they try to jump out of your hand when you hit something,
One of the design criteria for a good sword is to have a vibration node right where the hand grips the hilt---when was the last time you had to worry about vibration nodes in a knife? It can save your life in a sword!
James Hrisoulas books: "The Complete Bladesmith, The Master Bladesmith and the Pattern Welded Blade" deal a lot with swordmaking as that is Dr Hrisoulas's day job so to speak. get them and read them.
Now I had a student who was an ex-seal and he wanted to forge a knife. I expected a Rambo-death-Zapper-kill-kill-kill knife; but what he actually wanted was a 4" blade as he told me "I have never run into anything I couldn't handle with a 4" blade"
So make him a 4" blade to take and the heirloom sword as a coming home gift.
Twister controll: a cam operated micro switch controling the motor starter is a good way to go.
The cam is driven with a reduction allowing as many turns as You want to make to give less than 1 turn on the cam.
Friction drive the cam so You can easily hand turn to reset for the next piece.
The cam could be a fairly large disc made from plywood driven by a small rubber roller to gain reduction.
- Dave Boyer
- Friday, 05/09/08 22:57:37 EDT
A guy I used to work for decided he woukld trade me some old blacksmithing bellows he has for some of the things I've made in my blacksmith shop. I can tell they are double chamber of good quality. My question is can you date a bellows by the style? Did manufacturers ever put there part on them and where can I find lots of additional info on bellows.
- john L.
- Friday, 05/09/08 23:28:11 EDT
Bellows: John, There was a factory that made bellows in Chicago (one of very few). They quit making them in the 30's I think but it was reported that inventory made by them and held by other companies was for sale as late as the 1970's.
As far as I know the answer is No, and No.
Real bellows were used a very long time and many smiths preferred them until the end. I've used them a LOT and good bellows setup correctly are a pleasure to use. But I have used bellows in numerous shops that were difficult and a down right pain to use.
Those on my shop trailer were wonderful to use. I had very carefully placed the fulcrum so that you could easily stand to one side of the forge holding work with tongs and pull the bellows a long smooth stroke. On one of the rebuilds after I sold it the people putting on the new roof thought the handle should be moved and repositioned the fulcrum 6". This made it a stretch to reach the forge and placed the handle directly over the vice so a second worker would be hit by the handle. Then Paw-Paw replaced the oak handle I had made with a heavy steel thing that had no flex, no warmth and added mass that made it more difficult to pull. These little changes took a lot of the ease and pleasure out of their use.
At a Virginia historic site they built a new blacksmith shop and put in an old bellows. They sent the bellows to another famous historic site to be releathered. . . The bellows was shorted leather and did not work well. They sent it back, had it releathered again and it was short again (by about 50%). It was hung as-is. As hung the middle valve was flopped over and twisted so that the top half would not close. Now the bellows was short leather AND acted as a single action. The museum would not have it repaired a second time. It gets worse.
There was no handle for the bellows, just a chain. It was located behind the forge just far enough that the operator could not see the fire and way too far to reach work with tongs. . .
At another local history park another amateur hung another old bellows with the original leather. Old leather gets stiff and shrinks a LOT. While still pliable from oiling the bellows was short leather about 30%. Again the bellows was mounted high and a rope was used to pull the bellows. The levers were arranged so that it took two or three times the necessary pull to operate the bellows, thus a VERY short hard stroke was required (a jerking motion). The brick forge was quite short and the rope immediately at one edge of the forge. To operate the bellows you had to almost stand in the forge. THIS was a working demonstration shop. . .
The point? Think carefully when you place your bellows and especially the handle. A long smooth stroke is better than a short stiff one. The stroke and the location of the handle and where that makes you stand is entirely up to YOU.
When releathering bellows with old dry leather you cannot use it for a pattern. Each half of the bellows should open almost as far as they are wide. Thus a fully open bellows (top and bottom at the same time) is between 1-3/4 to 2 times its width.
While ropes and chains are common connections to bellows a lever is much more user friendly. Even when the bellows is some distance away a lever can be connected to it in a comfortable position to use.
LAST, While they are wonderful to use they are not so good for doing production work or large jobs. You need a helper to pull the bellows for these tasks. Otherwise an electric slave is much more efficient.
I was thinking of a cam and microswitch too, but driving a counter. Only problem was I couldn't think of a common device with a counter that could be salvaged to trip a relay after a given number of revolutions.
I'm sure there's a simple IC you could build one around, if you felt ambitious (I'd need to find a specific schematic in order to do that). But as the Guru alludes, home-built electronics may not really be rugged enough to use in a shop.
Bellows. My big, old 1894 catalog shows manufactured blacksmiths' bellows from 18" to a 50" length, probably indicating the length without the tuyere cone. They sold three qualities: standard; extra; and double extra or custom. The differences are not spelled out. One would've probably made inquiry.
Add me to the list who say a sword is nothing like a big knife. If you build most swords like you would a knife, you open yourself to a world of troubles with balance, function, and durability.
Denny, that sounds too big to me. Do you know why there are so many surviving Confederate bowie knives from the American Civil War? The new soldiers would commission the biggest, meanest-looking knife they could afford. After the first month of marching, they found ways of losing as much unnecessary weight as possible. There are eyewitness accounts of the vast numbers of blankets, extra boots, canned goods, tents, and yep, big knives left alongside the road during the early days of the war.
Twistng, Have to throw this out there; When twistng in a vise, I cut a piece of pipe, the length of the twist, slide over the end of the work, tight to the vice, and support the other end of the pipe with a jack stand. this keeps the bar aligned well, hot or cold.
Also, The best way to stop a twisting machine, would be with a clutch, after the gearing mechanism, because of the inertia of the gear train. Credit goes to vicopper.
Shop Electronics: A lot depends on how you house the equipment, but you definitely need a motor starter (relay) even for fractional HP motors if they are to be controlled by timers or micro switches. Take the timer out of a small toaster oven or old microwave and put it in a NEMA 13 enclosure with a heavy relay and you have an industrial control.
I like rugged HD switches but they can be expensive. On my big forge I used an industrial duty Square D limit switch with a heavy sliding bar arrangement that you can slap on and off with a hammer, pair of tongs or even hot iron. The bar has a big ring on the end so it is easy to hook something into it but not have it snag. Way overkill but I think forge controls need to be in the durability range of anvils and vices.
The same type of mechanism I described above can be used on a much lighter switch such as a common household toggle switch.
I also like either water tight conduit or good heavy SO cord for wiring on machines. Industrial duty push buttons and selector switches are also good. But all of this can be expensive.
On my twister I will probably use two small motors (probably 1 or 1.5 HP each). Using a selector switch I can run it on one or both. Twisting 1/4" or 1/2" bar only requires a small amount of HP but twising 1" and up would need both motors. At one point I considered three motors, 3/4, 1, 1.5 and running them in various combinations. You could conceivably have 3/4, 1. 1.5, 1.75, 2.25, 2.5 and 3.25 HP. Too many choices and a very complicated switch. . . But an interesting idea.
I've also put drum reversing switches on single phase motors. It works but it is a trick to figure out.
Stopping a twisting machine: That is why I mentioned a brake motor as they are fairly intantaneous. But they are also quite expensive and do not come in large sizes. For larger HP you use a seperate brake (clutch to earth).
Knives and Swords: MY point is that they have exactly the same parts and use the exact same skills to make. Most sword guards, pommels and grips are no larger than those on a "hunting" knife an oversize redneck Bowie. Once one learns to make all the pieces for a knife they have the skills to make the same for a sword. Yeah, yeah its a MUCH bigger project. . . but that it the POINT of starting small. Once someone has actually made a couple knives they will (should) know what kind of trouble they are going to have making something 5 to ten times longer. . . Start too large and you are doomed to fail and not learn anything.
YES, there is a huge difference in proportions but that should be obvious. The parts are all the same. The assembly techniques are all the same.
Combat Utility Knife: This is a place where durability comes first, then utility. As mentioned by others I would not want anything too heavy but I would like utility. A hardened steel guard with a screw driver ending on one side and maybe a can opener on the other. I would go for a flat (sandblasted) then blackened or blued blade with only the sharpened edge bright. Black anodized and skelotonized scales for light weight, low visability and good durability.
Consider the Buck knife I carry. It is one of their small "gentlemen's" knives. A single blade folder with only a 2-1/4" blade. It has as thin of sides as you can make so the total is only 1/4" thick or a little less. It is thin enough to carry in dress pants without making a lump. It can be opened with one hand and the stainless blade needs no maintenance other than sharpening.
There are times when you might need a bigger knife (butchering a large animal) but this is all you need for 99% of all knife jobs. The biggest problem I have had with them is that they are small enough that I have lost two. But that is in 40 years of carrying the same knife.
For other situations a more durable (fixed blade) a little larger would be best. But this is often a personal decision.
Controlling three motors doesn't sound that hard. I'd think you could just use an individual switch for each motor, and then a single main switch or relay to send power to all three. Maybe not the greatest design, but I think the the worst that could happen is nothing (if you threw the main with all three motors switches off). The three motor switches wouldn't normally be thrown under load, so ordinary light switches should be adequate.
I've got a three-speed furnace blower that delivers outside air just above my anvil. I control the motor speed with two daisy-chained three-way light switches. (The motor requires only one winding powered at any given time).
Re Swords: Skills to make it, maybe; but not the skill to design one to be made and design is usually where the sword fails. I usually tell folks that if they don't know *why* they made something that way it might be best to copy it as best you can rather than strike out into the unknown.
Timers: I once picked up a nice old mechanical timer that would either open contacts or close them just because it had such a nice ticking sound. Unfortunately nowdays jokes like that are generally a very bad idea!
My twisting machine has a simple PLC that runs the 3hp brake motor.
PLC's in this day and age are the appliance timers of the past- cheap, flexible, and common.
If I was building a machine from scratch, I would look at em.
All the features that make a machine useful, in my opinion, are the ones that are hard to make- if it was easy, everybody would be doing it.
Mine has a hollow spindle, so that I can twist 20 footers in the center, only, if I want. A great feature.
Mine has a electronic braking on it, controllable by the PLC to one degree of rotation. Very useful.
As Ken mentioned, the best way to twist, especially cold, is to overtwist by 5 or 10 degrees, and then twist back the same amount, to end up with your desired degree of twist. What this does is deal with springback in the material- when you twist a piece cold, the stresses in the material are somewhat unpredictable, but usually result in a bit of springback, meaning if you twist something cold exactly 360 degrees, it doesnt end up 360 degrees. It moves a bit on its own. But if you twist to 370, then back to 360, it is stable and accurate.
Of course, with the PLC, its easy to program this in.
One thing that is essential in any machine tool, and useful in a twisting machine, is MASS. The more the merrier. Just as a 500lb milling machine is pretty whippy, just bolting a headstock to an I beam is not going to be the best twister- an I beam is remarkably flexible, and everything will move where it shouldnt.
My twister weighs close to a ton, with a 1 1/4" thick plate tabletop, and all that mass really helps when you are cold twisting 1 1/2" square.
My machine is also set up to run other functions, all of which benefit from the power, torque, and mass- for instance, I have made mandrels to roll coils of rings in sizes ranging from 1" up to about 9"- I can feed in a 20 footer of 3/8" round, and get a coil of rings ready to cut off and use.
I also have a scroll head on it, that will easily scroll 1/2" round or larger, into quite large scrolls.
So the cost of the heavy machine, the motor and controls, and gear reducer, is amortised over a whole range of tools.
Those Germans- they are always thinking.
- Ries
- Saturday, 05/10/08 18:04:29 EDT
Sprirals iForge demo: This method can be converted to a simple computer program but it is easy to do on polar graph paper or make your own as suggested.
Note that those forcing spirals into fitting golden rectangles are religious fanatics, their religion being that everything beautiful fits that rectangle.
PLC Controls: These start fairly cheap but the total interface to anything with high HP or torque gets pricey. While they are robust and can control almost any machine their programming requires learning the language as well as the tools to do the programming (which can cost more than the control being built). They also have rather primitive user input systems that require most of the programming to write the user interface. Logic to run the machine is usualy dead simple, logic to deal with humans who will input every possibility is a trick.
I've designed and built a number of these systems and the big cost is programming tools and extra modules to use while doing the programming. I just finished a job this winter where the budget was limited and there was no money for duplicate hardware. The result is that I had to do all the programming with the hardware on my desk which held up installing it, then final changes on the live machine in the shop which meant moving the programming operation into the shop. Any future changes will require the purchase of that duplicate hardware. . .
Building something for your own shop is a different thing but much of the initial overhead still exists.
You CAN use a PC for PLC applications by the use of IO cards. However, you are stuck with the Microsnot OS which is as we all know very buggy and slow to start. Back when this stuff ran on DOS 3.x the systems were relatively reliable and boot times reasonable. Customization was fairly easy. SOME hardware supports Linux but not all. . .
Unless a truck load of money falls on me I will stick to the screw and limit switch control.
Magnetizing: NRobertB, This is done in a large electric coil which is pulsed one time very quickly. The rapidly collapsing magnetic field magnetizes the part.
I could explain how to do this as a DIY project but it is quite dangerous if you do not know what you are doing so I will have to decline.
Small magnets can be created by rubbing them quickly in one direction against a strong magnet.
The harder the steel the more permanent the magnet. Unhardenable iron cannot be magnetized. Low hardenability steel holds a weak magnetizim for a short time. A highly hardened magnet holds a stong magnetizim for a long time. The best magnets are made of special alloys.
I have a small, fat, stubby, powerful horseshoe magnet I bought out of a trader's bin on Canal Street in NYC in the late 1960s which has maintained its strength, probably because I have always had a keeper, a steel piece, across the poles.
There are a number of real-time oporating systems on the market that can be used in place of MS. Also available are "industrial hardened" PC's with the I/O racks built in. A little on the expensive side no doubt.
Twisting: I was an interesting approach to twisting this weekend at the Houston Area Blacksmith Association meeting. One member had a tap wrench that would hold up to 1" tap shanks. It was about 36" long. He could easily twist up to 1/2" square COLD. Makes for a very uniform twist as the steel is at a uniform temperature.
Denny, sorry for the late post as I was out of town. The lenght and size of the knife you mention would be too big for me. If I wanted one that big I would carry the bayonet that is issued with the M-16. A bayonet id however still pretty big. I would want a nice, handy small knife. Say about 3 to 4" blade, and Probably a utility shape. I usually carried a Swiss army knife as it had the handy things a guy a ways from civilazation needs like a tweezer, can and bottle opener and a nail file and so forth. I had one that fit a nice Buck knife sheath, so It did not fall out of my pocket.
Denny, sorry for the late post as I was out of town. The lenght and size of the knife you mention would be too big for me. If I wanted one that big I would carry the bayonet that is issued with the M-16. A bayonet id however still pretty big. I would want a nice, handy small knife. Say about 3 to 4" blade, and Probably a utility shape. I usually carried a Swiss army knife as it had the handy things a guy a ways from civilazation needs like a tweezer, can and bottle opener and a nail file and so forth. I had one that fit a nice Buck knife sheath, so It did not fall out of my pocket.
I saw this in an earlier posting:
"One of the design criteria for a good sword is to have a vibration node right where the hand grips the hilt---when was the last time you had to worry about vibration nodes in a knife? It can save your life in a sword!"
Am I missing something? How can anything in a sword save your life?
Regarding a knife for a soldier I used a small bowie with a leather sheath and a folding pocket knife. The folder had a blade on one side and a general tool on the other with which I could open cans, bottles and do a host of other things with. There was a screwdriver on the end of the body of the knife. I was never tempted by a multibladed knife as the more blades etc. had to be thinner unless you had one that was very thick and bulky. A lanyard ring is also very useful- then you can keep a couple of other things on the same cord.
Don't be tempted by a big knife. A knife is a knife , a machete is a machete and an axe is an axe. The attempts to combine 2 in 2 are never, in my experience, a success A good quality folder or a small bowie would be very welcome. Remember not all a man's time, even in a theatre like Iraq, is spent on patrol and we tended to have kit we carried when we needed it and another set of items for use when doing other things. So a brass brush, like you use on sparkplugs, and a cleaning rod are too big to carry in your cleaning kit in the field but when you get back to base is a great help in cleaning up your rifle!
Quenchcrack.. I've never done it, nor will I go out on the line and say it's 100% positively true... BUT I have read this "myth" numerous times since middle school science class all the way into college. If it's in the textbooks, it has to have SOME validity. (let's not have a debate about the US history books).
- Nippulini
- Sunday, 05/11/08 19:35:14 EDT
Nip, my meaning was that metals do not have molecules. They have crystals and they cannot be polarized. They must be magnetically neutral or balanced or the material would fly apart. Molecules can be polar or non-polar but are more commonly found in organic materials. The alignment of magnetic domains in a metal grain can be influenced by physical impact but the piece need not be pointed north. The effect is usually to de-magnetize rather than magnetize. Magnetism is a function of electron spin direction and metals have an abundance of valence electrons which affords them the ability to become magnetic. Ain't science grand?
Bamboo: Butch, It can be made of solid OR pipe. In both cases a power hammer is the most economical route to go.
When forged from pipe the joints can be heated with a torch to create a localized heat and then upset to get a more pronounced joint. When reducing the pipe you need V-dies with a low angle and good round edges.
Forging from solid takes less skill but ends up being more work due to the overall weight and extra power needed to forge solid. Upsetting as suggested above does not work.
Note that there are thousands of kinds of bamboo and great variety of joint style and spacing. On some the joints just barely show and on others they are quite pronounced.
There are bamboo joint dies available from BlacksmithsDepot.com (look under spring swages). But I would use these for small sections (pickets and such) and do something on my own for the top rail.
Knives for military duty...
My son has completed one tour in Iraq and is on preparing for his second tour.
Prior to leaving for the first, he asked me to make him a knife. After discussing how he intended to use the knife, I decided against making one (I'm only a nivice bladesmith) and instead let him pick through my knife collection (all users) and take what he wanted.
He took my Swiss Army knife and an old Western Cutlary drop point stainless skinning knife with a molded rubber handle. The blade was maybe 5 inches?
Anyway, both worked well for him and he beat both of them up pretty good...and the sand storms took out the digital camera we baught him.
Philip in china: The reason thinking about vibrational nodes in a sword blade could save your life is as follows: Poor design can make impact sting your hand to numbness at best, and can cause the sword to snap at the guard (or elsewhere) at worst. In modern sword use that can be merely embarrassing, not to mention potentially dangerous if not deadly to bystanders. When swords were used in battle it could be catastrophic to the wielder.
The most common error in making a sword like a big knife (besides making it too heavy) is to solder or pin the guard, in effect putting a clamp on the blade and interrupting the vibrational nodes. On historical examples from any culture, the guard is not in any way rigidly affixed to the blade.
thank god for yard sales!!! After much searching for a good older copy of Machinerys Handbook, I was able to find an almost mint 11th edition and purchased it from the original owner (dated 1942) for a paltry $2.00!!Also 2 brand new, never used Nicholson files, $2 each. One thing that caught my eye and I bought was a set of 6 fairly solid "pate" knives, about 5", but made of pure nickel/bronze. I polished up a small area and this stuff looks like gold!!I was thinking knife furniture or such. Does anybody have any experience with this alloy and how I should handle it?? Is it forgable?? Special precautions?? thanks...Dan
hey i was just wondering how do become an eligiable apprentice like how can you become a apprentice what are the requirments???
- OZ
- Monday, 05/12/08 14:39:00 EDT
Bellows: For our Glen Haven shop we used a 1898 releathered 40" double chamber bellows mounted about thigh high with the pipe connected to the side of the forge. We cut a small ironwood tree and pivoted it from the ceiling on a piece of chain. Another piece of chain goes from the end of the tree to the bellows. It has a nice comfortable pull stroke and the wood feels good in your hand. As I've mentioned before, a great resource is: Heath, Robert M. How To Make A Blacksmith’s Bellows. Privately printed, 25 pp, 1965. I got a copy from Centaur Forge.
IF you are looking for a position in a blacksmith shop it helps to have a range of modern metal working skills (layout, welding, machine operations) that are all taught at various trade schools. There are also blacksmithing schools that you can attend to get you started. AND like many trades a smith might be judged by his tools. Not how many or how expensive but how appropriate, how many made by the smith and how well they are made.
Self education is a big part of modern blacksmithing and showing up well versed in the trade is a plus.
Oz it totally depends on what country you live in, hint hint.
In the USA there are no formal blacksmithing apprenticeships, and so becomming an apprentice is totally up to every smith---so there are thousands of ways.
Remember that as far as apprenticship goes you should expect to *pay* the person taking you on unless you have skills that will help them out. (And the fact that you will often be asking them to risk their livelyhood and posessions by taking you on)
Quotes: Vincent, On what subject area? A New York Times author picked probably my best wisdom on the site for a quote. From Getting Started:
"Start to look for equipment and scraps of steel to experiment with or to build equipment. Be imaginative. Don't get stuck on setting up a classic 19th-century shop!"
And along the same vein under Making and Inexpensive Anvil:
"Don't let preconceived ideas about what an anvil should look like get in the way of having a good usable tool."
I'm not sure about impact (though I'm inclined to believe quenchcrack), but heating a magnetic material above critical will cause its magnetic field to align with the earth's.
Our real archaeologist just posted on something else, but one dating technique is to find a piece of magnetic material (such as clay with magnetite in it) that has been heated and has cooled in place. You determine *where* the piece's magnetic field is pointing, and then figure out *when* the magnetic north pole was *there*.
I think geologists use a simliar technique for dating strata. But over the time periods they're dealing with, the magnetic poles have flipped between north and south. Archeaolgists are dealing with more subtle differences in direction, since they generally study the time period after the last flip.
Mike, I'm assuming I'm the resident archaeologist? (shy grin...)
If so, the dating techniques we use that involve electron energy levels (aka valence) don't worry about magnetism. We use a few diffent things that involve particle accelerators and so on, but usually what we're looking for is the last time an organic object was heated above a certain temperature. Ceramics and stone tools are the usual suspects here.
Google Thermoluminescence and optical thermoluminescence for far more than I'm willing to print here. The short version for pottery is that when you fire clay (or any organic material) to a temperature above a certain point, the electrons of the atoms in the specimen will drop to their lowest energy level or valance.
As time goes on, as it resolutely does, these electrons absorb energy from cosmic background radiation, sunlight, and other photon sources. In the lab, we can force those atoms to give up the energy they gained since the last time they were heated. This energy is released in the form of photons anywhere in the spectrum from visible light to gamma radiation.
We leave electron spin resonance (the magnetic stuff) to the folks working past a few million years ago. ;-) Once you pick up a piece of magentic material, after all, you no longer have access to which way it was pointing when the poles flipped. That's why archaeologists really get annoyed with folks who dig stuff up without proper records. We truly couldn't give a flip about the stuff itself, we want the information that comes with context. Once it's dug up, it's of very little to no value to us.
Archaeomagnetism is one of the (few) things I remember from my school days. (I did google it to make sure I retrieved it from my memory and not my imagination, but I have to doubt there are many places it can actually be used). About my only hands-on archaeology was a semester in a lab measuring tree rings.
Mike, heating a ferrous material above critical will form austenite. Austenite is non-magnetic so it cannot align its magnetic field with the earth. I first learned of the impact thing when old rig hands told me about demagnetizing a kelly bar (the square drive shaft that turns the drill string) by hitting it with a sledge hammer. I was skeptical but I have been assured it works.
a sure way to reduce the residual magnetism in a part just off a magnetic chuck is to drop it on the floor(not too good for the part though) I don't know if this has any affect on rare earth magnets
- merl
- Monday, 05/12/08 22:26:33 EDT
Hand Ctanked Blower Question -- How far back in history do they go? I work in a demonstration "pioneer village" and
am often accused of "cheating" because I'm not pulling
on a bellows rope.
Vincent p - quote: "The future of a nation depends on what a man makes with His hands." By Karl Scheifley. He was My uncle. What does that tell You about where America is heading?
- Dave Boyer
- Monday, 05/12/08 22:34:48 EDT
merl- An even more sure way is to use a demagnetizer, and it is easier on the part and the floor.
- Dave Boyer
- Monday, 05/12/08 22:43:36 EDT
Har Fisher - I would guess they date to the late 1800's, atleast the oldest ones. The pioneer era depends on where You are. In some places in the US this would be mid 1600's, in other places it could be late 1800's or anywhere in between, so it depends on location.
- Dave Boyer
- Monday, 05/12/08 22:48:44 EDT
Blowers: The earliest Champion Blowers were manufactured in 1875. Buffalo Forge was also making blacksmith blowers starting 1878. So these could have been available during much of the western expansion and the period of the Indian wars. However, there was a lot of resistance to them and most smiths preferred the classic bellows.
It is possible that some hand built blowers were available earlier. Wooden mill dust blowers date to the late 1700's and smiths have been known to build them with a belt step up system.
IF your historic shop was built say in 1850 but was in operation until 1920 then there is a very good chance that the worn out bellows would have been replaced by the new all metal blowers. . .
Okay... with the exception of rare earth magents and lodestones, before the advent of electricity striking (cold) iron was the ONLY way to create a magnetic field. I'm not trying to get into a giant debate (and accept my sincerest apologies for mistakinig molecules for crystals), we were talking about how to acheive magnetism and I am simply saying "this is how it was done"... kind of like how you guys point kids in the right (historic) area when they want to make a sword.
- Nippulini
- Tuesday, 05/13/08 09:02:44 EDT
Philip in China:
I sincerely hope that all is well with you following that tragic earthquake. My thoughts are with those affected by both this and the cyclone in Myanmar.
Dujiangyan, China: Where Phillip and his wife reside
"In Dujiangyan, television images show a town that looks like it was hit by an airstrike. Bodies dug from the rubble are being lined up on the road. The air is filled with sirens and dust. Rescue teams have been trying to reach a woman who is eight months pregnant, trapped beneath a seven-story apartment building." ABC NEWS
"Premier Wen Jiabao and two vice-premiers, including his heir-apparent Li Keqiang, are directing relief operations from the stricken city of Dujiangyan. . .
Schools collapsed in at least two cities - Dujiangyan and Beichuan" The Australian
Phillip teaches at the Guangya IB School, Dujiangyan, Sichuan, China.
Quenchcrack, what he meant was that as the piece cools down through the curie temps the magnetic domaings take on the natural magnetic field orientation---to a degree. It's not the going up but the coming back down.
Quotes for a school paper "Mit der Dummheit kampfen Gotter selbst vergebens", Schiller is a favorite of mine. as it "Don't look at it--hit it!" From the first time I was welding up a billet and a friend's "You hold the *cold* end and hit the *hot* end---please get it right next time!"
ok thanks Tom i live in Provo UT, US and ya i don't mind paying i don't expect nothing for nothing
- OZ
- Tuesday, 05/13/08 15:56:18 EDT
Um TOm do you know of any good Black Smiths that have Patience because i've taken two metals classes and i wanna go for an intership in a shop who will accept me and yes i know basic
- OZ
- Tuesday, 05/13/08 15:58:02 EDT
Its the Apprentice who must have patience not the Master. -guru
In applying for ANY job neatness, spelling and punctuation count. Correct writing may not seem to be a needed skill for a blacksmith but communications is, and spelling is part of that.
When posting in a public forum consider it a job application (every time). Will your manner of speech inspire confidence in a prospective be employer? How will they feel about an employee that may be required to take messages on the phone or leave notes for customers?
Does anyone have any recommendations on fabricating a safety screen for a 100lb Little Giant hasmmer? I would prefer not to alter the existing frame/casting in any way. A link to some photos would be really nice.
OZ, have you attended any ABANA chapter meetings or been to any hammerins? You need to start networking to see what's local. I had a student who spent one summer forging at an amusement park in the mid west that had a forge there.
If you can't turn up anything fast think of taking a vo-tech welding class. Most folk I know that hire people for smithing also do Fab work and welding is a necessary skill!
Andy- Check and see if the studs in the top of the front babbit cup are long enough to catch some angle iron and another set of nuts to hold it on. The ones on my 25# LG were, and I hooked a frame for a guard to them. Not ideal because if a failure jams the guard I run the risk of damaging more of the hammer but I figure I can get another hammer and there is only one of me.
Andy, There are several models of 100 LG, the early with wrap around guide and late with dovetail guides.
At the top you can attach brackets to the bearing cap bolts and at the bottom it will depend on the hammer type. On wrap around guide hammers most folks drill holes in the upper section of the guide plate. However, you COULD run brackets from the top guide bolts. Actually on a dovetail system it is the same, the top guide bolts.
I have seen guards fitted to the wrap around guide plate alone. They were creased to fit around the center V and one had a repouse' face on it. . .
For breaking springs the guard needs to be primarily between you and the spring. For flailing arms it would have to be on the sides.
The Dave Manzer Little Giant tune up video has a guard clearly shown on his 100 pound LG.
Mine's a new style so no wraparound guides to grab, old style would have been easier to guard. Guru's ideas are as always on the money. I also have a chunk of big truck radiator hose cut to length and slipped over the spring on all my hammers to try and contain smaller chips from a spring failure. Rubber hose flexes with the spring.
There is something I just thought of. I know the packing of blades is an idea which few bladesmiths agree with, but are some pistons and crankshafts not forged for the same reason, with better results? Perhaps this is only because they are compared to cast components. There is probably an easy answer to this, but it was just something that popped into my head.
- Hollon
- Tuesday, 05/13/08 21:46:18 EDT
Communication skills and trades jobs: While it may seem like good communication skills would have little aplication in trade jobs, it can be extremely important even if You never deal with a customer.
Some industrial jobs I had were on the night shift. A message had to be left for the person coming in on days to let tham know where the job stood, where parts were, problems encountered, information needed from engineering etc.
In a larger shop, work orders had to be written complete with instructions and shop drawings, as much of the work would be done by others in an ajoining department. The work mightbe asigned on a different shift than I worked, so the instructions and descriptions had to be complete and easily understood because I might not be there to give a better explanation in person.
- Dave Boyer
- Tuesday, 05/13/08 22:38:02 EDT
Hollon, the best way to achieve grain refinement in steel is through proper alloying.
The comparison in crankshafts is against cast parts, or parts machined from the solid.
In the case of a forged blade the grain will run the length of the blade, particularly if You start with appropriate bar stock [not from a wafer cut perpendicular from a bar].
Tool steel wil have fine grain, better than can be achived from forging an inferior steel.
- Dave Boyer
- Tuesday, 05/13/08 23:04:21 EDT
Hollon, The packing of blades is somewhat of a myth. If the blade is heat treated afterward then the recrystallization removes the little benefit of the "packing" (working the steel at low temperature).
Now, packing MIGHT have some benefit if the blade is not heat treated after forging. In effect you would be compressing and work hardening the steel. But this is not particularly good technique now that modern metallurgy is understood better than when the packing myth came about.
As a myth some bladesmiths like to continue to promote it to their customers as a form of hype. But it is bad science.
Forging in general can improve the grain structure into the direction of the bar and around corners such as a tang or in your crankshaft around the turns. My opinion on forgings vs. castings is that a forging is well proven in the manufacturing process while a casting with defects must undergo expensive testing to be as well proved a product.
Machine and Power Hammer Guards: I just removed guards from an old flat belt drill press in my shop. The reason is that the guards were typically poorly designed and did not allow the normal operation of the machine (changing speeds, engaging back gears). In general flat belts have an undeserved bad reputation. Exposed flat belts do not bother me. However, I did replace the part of the guard that covered the V-belt drive that would be easy to get snagged on.
Many guards on old machines were just thrown on with no design consideration by workers told simply to "put guards on those belts so OSHA will go away". They were given no guidance, time or much of a budget. The results were terrible messes.
I recently setup an overhead drive on an antique lathe. I need to make a guard for the V-belt primary drive on it but again the flat belt drive will be exposed, largely for ease of machine operation.
Good guards must be well thought out and have hinges and latches making them convenient to open for machine adjustment and maintenance. On a Little Giant the work height adjustment is regularly used (IF you know how to operate the machine) and should be easy to access. There are also numerous lube points on the the linkage that need oiling every time the machine is operated.
I've never seen belt guards on a Little Giant except those put on by the factory on late model motor driven hammers. . .
Wire guards are often put on LG's. If you are worried about a spring failure than you should be worried about the spiral sliver with razor edges traveling at bullet speeds toward your face. Only a solid guard will do.
I like Lexan guards for visibility but they get oil stained and are expensive. One reason for the visibility when covering a linkage like on a Little Giant is so that you can keep an eye on proper spring operation and adjustment, link ends and such.
On power hammers in general OSHA does not require guarding the die area because the forging industry convinced them that access was needed in all directions for normal operation. This is not true in production operations but is true in all open die or "blacksmith" work. However, similar machines such as punch presses come with 100% enclosure around the operating area forcing the owner to modify the guards to usefulness. This puts all the liability on the owner/user.
Design your guards so that the machine is easy to maintain.
Communication skill: take some time every day to practice sketching!! The finest smiths I know-- and it has been my great good fortune to know a few-- all have the ability to sketch in draftsmanly and artistic detail accurate renderings of what they plan to make. With good shading and perspective this can be a powerful sales tool. And it serves to pin down more or less precisely what you are going to try to give the client for his money. Keep ALL copies.
Grain refinement and grain flow may go hand in glove. I'm not sure. I've read that grain flow does exist as a longitudinal micro structure where trace elements and slag inclusions are "trapped" between grains, causing a lengthwise grain flow. It is not nearly as gross as the stringy structure in wrought iron. Some bladesmiths get downright mystical about it, talking about forging the point of the blade and gathering the grain flow to a "still point." Comments, anyone?
Drawing and lettering. I sometimes advise my students to take a community college drawing class before they take a welding class.
Drawing is something that prospective "artist blacksmiths" often forget is a necessary skill. This category of blacksmith is everyone including bladsmiths with the one exception being the industrial blacksmith. If you do decorative or creative smithing of any kind then you must learn to draw. AND, if you are an industrial smith with your own shop you may need some drawing skills to design new products.
"I can't draw" is often the response. But drawing is like any skill, it CAN be learned. It is a manual skill just like using a hammer. If you can do one, you can do the other. So called "natural" talents most often just started early, then practiced. I started drawing in Kindergarten and never quit. I took every available art class as well as drafting (mechanical drawing) classes. I also spent every free moment as well as time that I should have been doing other things in school drawing. . .
Hand lettering is different than writing. It is an art form similar to calligraphy. Every character is carefully drawn. Many draftsmen cannot letter because they cannot draw. . . These are two seperate skills.
Like all skills you need continuing practice. While I can still draw quite well I can no longer whip out a pencil portrait in 30 seconds like I could when I was 18.
Learning to LOOK at things is a big part of drawing. If you do not train yourself to follow edges, look for lines, see their relationships then drawings will not look like the objects they should be. I have clients that send me photographs that have never learned to LOOK at what they photograph or the results afterward. . . I just fix them the best I can.
Dean Curfman of BigBLUhammers told me that one of the best things he did as a smith was take a life drawing class at a local school. It helped him see differently and learn to use line better than he had in the past.
When a smith creates panels using forged elements, scrolls or other parts the goal is a balanced composition. The elements of composition, centering, fill, attention centers and track are parts of fine art that apply to any creative work.
You CAN teach yourself or go to school for drawing. There are DIY kits (Jon Gnagy Learn to Draw was the TV and DIY kit artist when I was a kid), Bob Ross is a more recent public instructor and today even web sites such as learn-to-draw.com.
Best drawing how-to books I have seen are Drawing on the Right Side of the Brain and its sequel (only sequel I know of in any genre that's even better than the original!)Drawing on the Artist Within, both by Betty Edwards. She is much in demand by companies that hire her to come talk to employees about creativity, and her course, which basically deals with seeing things, people in terms of masses and voids, or spaces, and their relationships, is shamelessly imitated.
Hollon, I think what folks are saying is that packing at temps below normal forging temps is no way equivalent to forging at forging temps and so the piston/crankshaft comparison fails.
And the old idea that you were making the steel denser does not hold up at all under modern ideas of how steel works.
Back in the olden days grain growth was a much bigger problem and packing before heat treat could result in a finer grain; however modern alloys were developed to avoid such problems through proper heat treatment and we can abandon what worked with the simple steels of 200 years ago with a sigh of relief.
Course if you are using 200 year old steel you might want to remember all the little tricks they had back then.
Lexan� polycarbonate and other polycarbonates are just fine for machine guards where they WILL NOT be in contact with any aromatic solvents or many common lubricating compounds, such as ATF. After repeated contact with these compounds, polycarbonates often become embrittled and have little or no impact resistance.
This is one reason that air line lubricators that utilize polycarbonate bowls are a joke, regardless of how many are sold by discount places. Sudden and catastrophic failure under pressure can result is plastic shrapnel being flung in all directions at high velocities, resulting in injury. Stick with quality lubricators like Norgren or Parker, or similar, is my advice after having one of the cheapies blow up.
Lexan, like many materials has places it should and should not be used. Many machine guards are made of Lexan.
Clear Lexan is used for safety glasses and automotive headlight lenses as well as bullet proof glass.
Both Lexan (polycarbonate) and Plexiglass (acrylic) have their own problems but they are the best thing when you need viability and glass cannot be used. There are also different grades of Lexan that must be selected for the application.
Where solvents are used all bets are off for any plastic. Each type will have resistance to one thing but not another. Take the case of the GM plactic carburettor floats. The worked great with gasoline and a variety of other petrocarbon based solvents but absorbed alcohol. . . Folks using gasohol in their GM vehicle's were suddenly faced with failed carbs. Repairs were short lived unless all the alcohol was gotten out of the system. . . Eventually replacements became available that worked.
Where visibility is not needed and solvents are a problem then Delrin (acetal homopolymer) is often used.
I've got yet another question about that gas burner I've been trying to make (it's that one in the FAQ called "Guru's burner"). Does the gas nozzle need to be *exactly* in the center of the big pipe or can it be off a bit? The reason I'm asking is because making that bracket is not an exacting science and there's only one shot (once it's welded you're stuck with that location in the pipe).
Mike, centered within +/-1/32 is probably good enough. What is more important is that the nozzle is pointing at the center of the burner discharge within +/-1/4".
Lexan (polycarbonate) Is indeed good stuff for guards if used in the right environment. It also is weakened/attacked by some chemical substances. Per Vicopper's mention many of the oiler/filter bowls are polycarbonate, even Norgren etc. In fact, that is why most companies require a metal guard over polycarbonate bowls. At the valve shop we had thousands of filter and lubricator bowls. Most Norgren. ALL with the metal guards. All were replaced in a year period. After the then powerhouse super substituted a Phosphate Di-ester compressor lube for the previous turbine oil. The oil lasted for 6000 hours in the compressor VS the 1000 hours for the plain turbine oil. The new oil crazed every polycarbonate bowl in the system, and turned the high quality rubber air hose to slime.
Polycarbonate has an interesting feature many are not aware of. In the thinner thicknesses, it can be bent in a plain sheet metal brake like sheet metal, making some guards much easier to fab up. It does not stay optically clear in the bend, but it is not bad looking either.
Another little know thing is that there is a grade that has a ceramic hard coating that is optically clear and makes the sheet very scratch resistant. In the GE brand it is LEXAN MR. In the offbarnds, not that big a cost add, worth every penny if vision is needed through the guard.
If making guards with Lexan or Plexiglas remember that it expands/ ontracts much more than steel with temp change. Use somewhat oversize holes and fenderwashers to mount to allow movement.
- ptree
- Wednesday, 05/14/08 18:24:07 EDT
I just picked up an old 148lb colonial anvil at a flee market. It is in good condition but has no markings that I can see. it has no table and just a 1/2" harty hole at the very rear of the face. There are three handling holes one on the very bottom and one on eather side of the waist. If anyone on this site is interested in making me an offer for it before I post it on ebay, I can provide some photos.
When mounting Lexan or other plastic for guards, I like to use rubber grommets in oversize holes to both allow for thermal expansion and to provide vibration isolation. Acrylic, in particular, doesn't like vibration at all. The same concept is sometimes handy for mounting thin sheet metal guards on equipment with high vibration, like small gas engines and the like. The rubber washers do have a finite life, but are cheap and easy to replace every few years.
Sorry to do this Jock. We are in the middle of the quake. Linna and I are both OK and the forge is being used for making rescue tools and also for boiling water. Nobody dead at the school but there are thousnads dead in our smnall city. Jock the bronze statue is still standing.
We need diesel, water sterilising equipment and tents.
It is worse than anything I have seena nd I am no chicken. Chinese troops are working hard to clear up but this one is BAD!
Philip
I am just a lurker here. I don't know you or your family. I have been greatly worried about you. I am glad to hear you survived. I will pray for you, family and folks in China.
This is the fixture and parts used to make my burners. The threaded rod is 1/4-20. A washer and wing nut was used to hold the center tube in place. The bracket was held with a pair of pliers. Tape was used to shim the tube but made a mess. . .
The same fixture was used to make the lamp tube burners by using a scrap piece of the lamp tube, nuts and metal shim stock to better fit the thinner wall tube.
Metal disks between nuts could replace the wood. If I was making these in quantity it would have been a more permanent better fitting fixture. As shown on the drawing posted a couple days ago the bracket can be 3/8" round or square bar. Made with the bar stock instead of flat plate the whole could be adjusted after welding.
Is is possible to put twists in 1/2 inch hot rolled square steel using a regular propane torch or would it require an acetylene torch? Also, to fuse two pieces of 1/2 inch HR square steel would arc welding be the way to go? I am a newbie. I plan to create a stand out of the steel to support a 45 pounds sculpture I carved out of Indiana limestone. Thanks in advance!
Frank - grain - There were 2 aplications in My tool & die experience where We were concerned with grain.
1) When making punch & die segments for motor lamination dies [small fragil parts, punches were rather long for the cross section] We ALWAYS made sure the length of the punch was parallell to the length of the rolled stock, Think grain orientation like a hammer handle.
2) We made rivet yokes ["C" shape, envision a C clamp powered by a 17 ton hydraulic cylinder] from forged billets, rather than bar stock. Forged to near net shape may have been slightly better from a strength standpoint, vbut not enough better to warrant the cost, so said the engineeres.
- Dave Boyer
- Wednesday, 05/14/08 23:39:20 EDT
Twisting, Welding: George, A common propane torch will not do the job. A weed burner, which is similar to a gas forge burner will do the job. 1/2" can also be twisted cold with about a three foot long tap handle or twisting wrench and a good vise. Heating to a low red you can do it with a shorter wrench and at an orange by hand with tongs or 8" Cresent wrenches. The weed burner will need one or more 20 pound (preferably larger) propane bottles.
Arc welding is much more efficient than gas welding. Gas welding requires oxy-acetylene and is considerably more expensive per weld OR to set up than an arc welder. On the other hand, if you are butt welding the 1/2" bar gas welding will be neater. If you are T or lap welding where there is a place for fillets then arc welding is much more efficient. As a newbie to welding you will need an angle grinder to clean up the welds OR to cut them out and re-weld.
Unless you plan on continuing in metal work or metal sculpture then your best bet is to have a blacksmith do the job for you. But it does not sound like too difficult a project for a newbie.
Thanks guys. Things are getting better by the minute. We are all OK. That includes Sean in China from this forum as well.
The chimney to the forge is cracked but that is the least of our problems! Diesel now available for the generator. So we have water upto a point. Mains fractured though so a lot of it is from standpipes.
Really things are much better but thanks for your good wishes.
Philip in China,
Thanks so much for taking a moment to let us know about your welfare. Sitting here in New Jersey, it's hard for me to imagine the dreadful thing that has happened to your part of the world. You, and those around you are very much in my thoughts. If best wishes count for anything, you have mine in abundance.
- Charlie Spademan
- Thursday, 05/15/08 07:14:49 EDT
Two parts of the world China and Myanmar both have serious problems at the same time and both need help. The difference is that China has given up the kind of secrecy and refusal of help that is going on in Myanmar. Sadly due to China's new openness they may get more international aid while much poorer Myanmar where the estimates are of twice the fatalities may get less.
Time is an important factor in these situations. Many people survive being trapped or injured but after 48 hours very few survive. Every moment a government stalls can mean thousands lost.
It is amazing how much difference a day makes in these situations. Simple things, fuel to run generators, tents and water make a huge difference. But transportation routes have been destroyed and normal distribution and production of food will take longer to reestablish.
Phillip are there any international aid groups that are really helping over there. Most of us can't ship tents or diesel; but we can contribute to groups that are!
Pugs, what continent is this anvil on? Makes a big difference on shipping charges and we commonly get postings from Australia, South Africa, China, South America, Canada, etc. I myself have bought items in fleamarkets in Spain, Germany, Indonesia and Chile.
So unless you plan to ship for free giving the general location is pretty much a must when selling blacksmithing stuff.
Thomas
Blacksmith sculpture-- that's an ad for an orthpaedic surgeon, right? The posture looks like a disk, L4-L5, maybe, getting ready to herniate any minute now.
Sculpture Posture: The only time I have seen someone standing this far back are newbies that are scared of the hot iron. It is a common stance. I tell them to step up to the anvil and take possession of the anvil. Act like someone is trying to take it away. The model was most likely not a smith. . .
While the pose is terrible the anvil and tools are traditional Chinese styles that are rarely seen in the West and may be disappearing in China where change is very rapid.
Anvil's a bit low, too, no? Like maybe half a foot or so. I try to position mine so the horn gets me midway up the quadriceps when I walk into it. Ewwwww! But means no tiring and hazardous bendovers such as as our Asian colleague is experiencing.
Hi
I have a canedy otto hand cranked blower, and I need some information about it is a Tiger 990 it also has the # 5001 and 5002 on it. It is sitting on a three leg stand, and is very heavy. Any information you can give me will be much appreciated, price, year manufactured etc.
It is in very good shape and works very well.
Thank you.
Richard Geary
The Tigear Blowers were a quality step down from the Royal Western Chief blowers made by Canedy Otto. In catalog number 11 (no date) they sold for $20. as apposed to $28 for the better blowers.
I need to know how feasible it is to sell a 3cwt Massey Pneumatic Power Hammer into the USA. I am based in Sydney Australia. I have had one in parts for the last 10 years and half restored. It is a hammer that was in very low use and passed to a local museum and "Stored" in the weather. I can pass information and pictures if anyone is interested. If not I will sell it in Australia. This exercise is more to get this hammer back where it should be WORKING!! Thank you I am reachable on +61 416 218 324 Mobile. alanfwheeler@gmail.com
I am asking this question for my husband. Do you know of any spiritual or esoteric wisdom/practices that were historically attached to forging/sword smithing? Specifically, we are trying to find spiritual/esoteric relevance/meaning/practices from Northern Europe and surrounding countries. Any and all assistance is greatly appriciated!

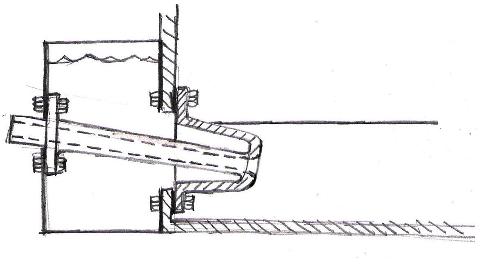
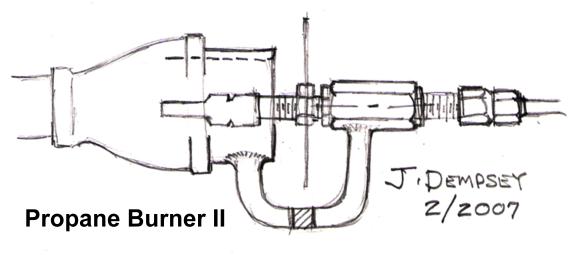
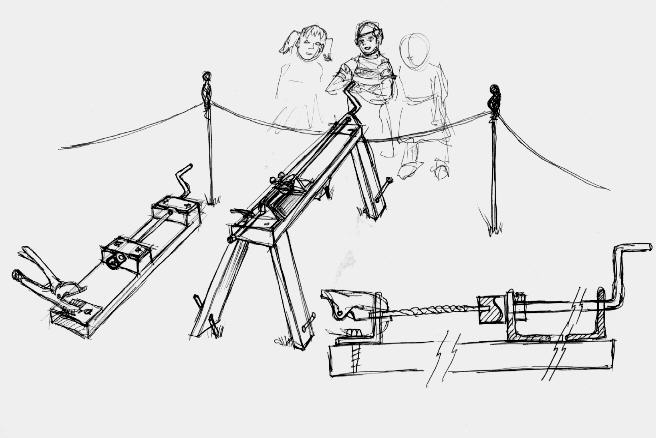


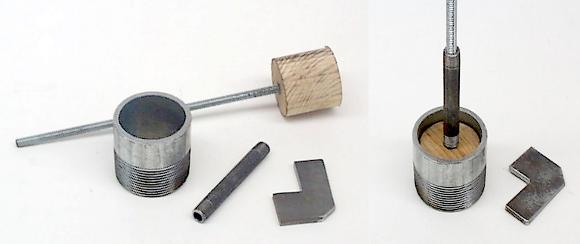
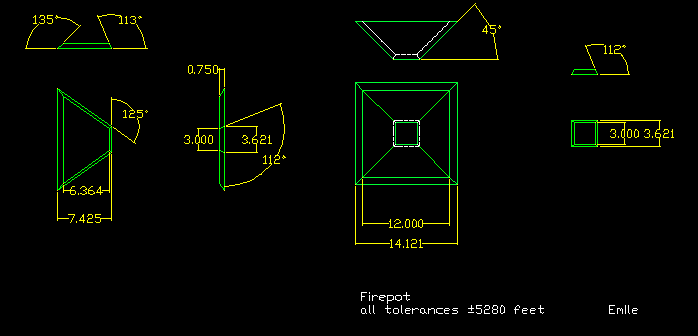