I am looking for a good school which, offers a degree of some sort, or at least a comprehensive education in blacksmithing, preferably in the northwest. if any one has information on one i would appreciate it a lot.
|
|
Trevor
- Monday, 04/16/07 02:42:54 EDT
|
Temperatures: Brian, Coal burns at 3,200°F and will melt almost anything. Coke is preferred because it burns cleaner and does not settle as much as coal. In small melting furnaces propane is used. While it burns at 2950°F most propane forges and furnaces are only rated at 2,800°F. Due to back pressure and with a proper mixture they can burn a little hotter. Oil furnaces operate a little hotter than propane.
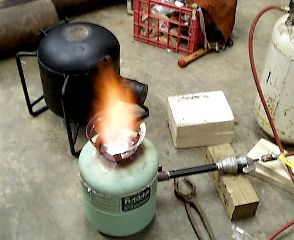
The maximum temperature of a furnace depends mostly on its design, not the fuel. For convenience and cleanliness most folks run small propane melters. Those built with good refractories and sized for the crucible can melt a crucible full in a 5 or 10 minutes depending on the size. The little furnace above will melt 3 pounds of brass in about 5 minutes or 10 minutes from a cold start.
For details about building a number of different melter see our book review page and the books by Stephen Chastain.
The more serious question about melting metals is killing yourself from metal fume fever. The fumes from melting most metals (copper, zinc, lead, nickel. . .) are quite toxic and proper ventilation is very important.
Then there are the technical problems. Some metals do not being melted in open air and must be covered with flux and then degassed before pouring. there is a lot more to know than just how to melt the metal. I highly recommend the books by C.W. Ammen as well as those on our book review page.
|
|
- guru
- Monday, 04/16/07 07:44:14 EDT
|
Coolhand, Run a tenon through the hole and peen it up with an intermediate tool of transmission, while the shank is held in the vise. Can be done cold or you can heat with the torch. You can also run from the forge to the vise. Gotta hustle.
|
|
Frank Turley
- Monday, 04/16/07 10:58:11 EDT
|
I was trying to find information about a trip hammer called Perfect made by Mccowan & finnegan manufacturing co. St. Louis MS. Any information would be appreciated.
Thanks
Lex Johnson
|
|
Lex Johnson
- Monday, 04/16/07 15:27:46 EDT
|
Hi I was looking for information on a trip hammer called a Perfect made by Mccowan & finnegan Manufacturing St. Louis MS. Any info would be appreciated. If you received this twice I apologize didn't seem to take the first time.
Thanks
Lex
|
|
- Lex Johnson
- Monday, 04/16/07 15:36:26 EDT
|
Dear Guru,
What oil do you recommend for an old Royal Western Chief brand hand-crank blower? My gal's uncle, who gifted it to me, suggested a 50-weight oil.
Thanks and truly,
Jim Tomlinson
Old Hand Forge
Prospect, CT
|
|
James
- Monday, 04/16/07 16:12:58 EDT
|
Guru`s, How much do you think the anvil weighs minus its base, ebay item #140107954031
I`ve seen many large anvils but don`t remember any with the measurements the size of this one, thanks.
|
|
- Robert
- Monday, 04/16/07 16:37:47 EDT
|
I have contacted the Guru by phone, The power is out at his place right now. So he will be delayed in answering questions until the power is back on.
|
|
daveb
- Monday, 04/16/07 16:45:08 EDT
|
Does he still live out in the old grist mill? If so how lucky can a person be.
|
|
- Robert
- Monday, 04/16/07 16:54:10 EDT
|
i would like to get into blacksmithing. i live in chautauqua ny and was wonder how and where to seek an apprenticeship?
|
|
Justin
- Monday, 04/16/07 17:33:55 EDT
|
ok i just seen the "getting started in blacksmithing" link and was reading it. Ok so im artistic, enthusiastic, determined, good with my hands, enjoy manual laber, i have a passion for the old ways, some knowledge of machineing and drafting also carpentry and architectual drafting, and horable string of luck which leads to have little income to speak of among other things. How dose someone like me get into a trade school or a journyman program?
|
|
Justin
- Monday, 04/16/07 18:01:51 EDT
|
Justin, see our FAQ on apprenticeships. In the age of slavery it was a legal contract. Today you cannot even voluntarily sell yourself into slavery. So expect to pay for lessons. Cash has replaced the slave economy of the apprenticeship.
Folks also have problems bringing workers into their shops with no skills whatsoever. To be a labor trade you have to have skills of some value in the shop, welding, machine work, design. Many smiths are glad to train a worker that already has good skills in a related field that can be used in the shop.
|
|
- guru
- Monday, 04/16/07 18:03:29 EDT
|
sorry i dont mean to sound rude or anything. any answers you have would be great thank u.
|
|
Justin
- Monday, 04/16/07 18:04:14 EDT
|
wow u guys r quick to respond...wow!!!u even said my name and everything!...ive been trying to contact the nysdb but have yet to get any answers from them..
|
|
Justin
- Monday, 04/16/07 18:07:38 EDT
|
thats another thing i dont know any blacksmith to speak of i know an 86 yr old machineist, but hes to the point he has a hard enough time doing things for himself.
|
|
Justin
- Monday, 04/16/07 18:10:13 EDT
|
Anvil Weight: It is hard to tell by dimensions but this is a big one (ebay item above). Could be 400 to 600 pounds.
Both Ken and I were asked to look at this one to ID it.
Things to note about this anvil. The face has been machined down a LOT. Note the angle of the step where it meets the face, it has been lowered because the face has been taken down for most of the step. The far side has also been machined and the face machining is not square to the horn (notice the wedge shape slope when viewed from the front).
I have bought some crummy worn out anvils over the years but when they have been wrecked by machining then you don't know what you are getting into. This one was made into yard art for a reason. It probably will sell high and then be back on the market all cleaned up with crack in the face welded. But there is no fixing that tell-tale angled step that says most of the face was removed in a machine shop.
|
|
- guru
- Monday, 04/16/07 18:17:34 EDT
|
to add to my exploits im dedicated, iv served in the army and army national guard and have worked things rangein from 70 ton tanks to hum-v,s to mark19 automatic grenad launcher to a 9mm pistol...i dont know if im qualified to be in the blacksmithing profession but id like to find out...ya know?
|
|
Justin
- Monday, 04/16/07 18:23:12 EDT
|
allright i donkt think u missed me kuz im about he only person that has been posting the last ten minutes. do to my lack of reaing skills iv missed your guidlines page and have just read it so im going to tell u everything agin. ok im a 23 yr old male who lives in chautauqua county NY. i am married. My grammer and spelling suck. im currently a machinist I'v been in the practice for about a year, i manufacture diesle engin parts, i used to be a carpenter (i build and remodled homes) iv had some schooling in drafting (mechanicle and architectural)iv also studied art( my family and friends think im quite the little artist)iv also worked as a landscaper if that counts for anything...Iv served 5 yrs thus far in the army i was a 19k(a tanker) now im a 19d(scout). im dilligent, dedicated, determined. i love to work with my hands and im good at working with my hands, and a passion for the "old days"(from befor the romans to the pioneer days) and a deep desire to learn a trade.
|
|
Justin
- Monday, 04/16/07 18:42:18 EDT
|
please help me!
|
|
Justin
- Monday, 04/16/07 18:50:14 EDT
|
Trade Schools: Justin, Locations of trade schools vary. Sadly the whole of the North East U.S. has become part of the "rust belt". It is where all the great manufacturing industry WAS before it moved South to where there were no Unions and then EAST to China. . . . It might have been better if it stayed in the Unionized North because they might have shook some sense into congress.
Back to topic. Trade schools today are usually part of the local community college program. They are usually based on what the local industry (IF there is any left) needs. If you have manufacturing plants that need welders or machinists then the community college will be training folks for them. IF all your local industry wants is people with secretarial or accounting skills than THAT is what they will be teaching. So you may have to look outside of your locality.
Just to APPLY for an "apprentice" position in most U.S. plants you need to successfully complete the local community college courses OR they will send you there then look at your grades afterwards. They hire only the best. THEN you go to work as an "apprentice". This means you get low pay while you learn on the job. You may become a journeyman or master after many years of employment. Note however, that these terms only apply within the particular employer or Union. Move to another state and all it will mean is that you have XX years experience. But the point IS you can go to a local school and get an introduction to these skills. And that is all it is, a very general introduction.
For a future artist blacksmith I would recommend taking all the courses in welding, machine shop and CAD-CAM available at your local community college. You MAY need to negotiate a non-certificate course program to meet your needs. Art, design and accounting courses don't hurt either.
To make a living as a blacksmith, forging is less than 10% of what you do in the shop. The rest are things applicable to any machine shop. How to setup and operate a big saw, drill and bore holes in production setups, operating a machine torch, welding (of all kinds) and how to do layouts from blueprints. So all that machine shop stuff applies including the high tech.
Blacksmithing schools are everywhere today. In fact there are too many as most are having trouble filling classes. The ABANA site has a long list. We recommend Frank Turley's (see "about the gurus" at the top of this page), then John C. Campbell Folk School in N.C., the Power Hammer School in N.C. will teach you WHY you must have a power hammer and how to move metal. There are many others.
The blacksmithing schools teach ONE thing, forge work. That thing that is only 10% of what you will do in the shop. And like the trade schools they are only an introduction. If you want to be good you must practice, practice, practice. So you are going to need your own small shop or set of tools and work at it.
One thing to know about blacksmithing schools, they are not cheap. However, almost every blacksmith association has scholarships available. All you have to be is a member and apply and most go begging for someone to apply. Most of these are only in the hundreds of dollars but they are at least 10 times your dues. . . Some have strings attached such as write an article for the group newsletter and others that you spend the money at a certain school. An enterprising young person would join a number of groups, hitch hike to meetings if he had to and apply for multiple scholarships. . . Besides, the groups have demos and classes worth much more than the dues in the first place.
To be a blacksmith requires one to be an enterprising go getter. If you can't figure out how to get the education you need one way or the other then you probably don't have what it takes. Research, self study, ask questions, find answers.
|
|
- guru
- Monday, 04/16/07 18:56:19 EDT
|
which is better to use when designing a forge...firepot or sideblast...is it possible to combine the two styles? how large can the firepot or sideblast be and still be effective?
|
|
Justin
- Monday, 04/16/07 19:05:30 EDT
|
well guru my friend that is what im doing researching, studying, asking questions, and trying to get answers...thanx to you some of my questions are being answered.
|
|
Justin
- Monday, 04/16/07 19:14:22 EDT
|
Justin; this is not a chat room. Answers get posted as the various people get time to read and reply from their own jobs and lives---it can be over a day or more before a question gets answered if it's a specialized one and the person that's good at that is offline.
I will say this: Patience is a blacksmithing necessity as you need to forge *only* when the piece is at the correct temperature; no more---no less. I would be a tad hesitant to have someone in the shop with me that can't wait when it's required. They are too likely to do themselves, the equipment; or the work an injury.
Thomas
|
|
Thomas P
- Monday, 04/16/07 19:15:55 EDT
|
oh i got what it takes allright...i have the will..i just gotta find a way.
|
|
Justin
- Monday, 04/16/07 19:16:15 EDT
|
Justin, On the spelling and grammar issue, many of us are handicapped this way. However, most blacksmiths are self employed entrepreneurs. THAT means writing proposals, contracts, letters of introduction. . .
Your customers (if you plan to make a living) will be the rich or near-rich or their contractors. They all will have good educations and even if they cannot spell they will speak perfectly. But most will be able to spell OR have someone do it for them.
One of the all time great stories is Pygmalion which was made into a WONDERFUL movie called My Fair Lady. It is about class distinctions and spoken language. It is also a about a large part of what is required to be successful in life, ESPECIALLY when dealing with the rich. Find a copy, STUDY the message, consider it a first lesson in becoming a successful entrepreneur.
Note that while most forums do not have spell check FireFOX does. It does not help fix errors but it highlights them.
Computers help but when you make those plans for a customer and spell gazebo "gazeeboe" they are going to think. "Do I really want to hire an illiterate?". Same goes for common punctuation.
Occasionally I break down into colloquial English (slang, abbreviations, odd spelling) but then I realize that a large part of our readership speak other languages and English is a second language to them. Good grammar in any language is difficult enough but bad grammar is impossible. It is something to think about and applies to dealing in business.
See My Fair Lady, no its not a "chick flick". There it is . . . colloquial English.
|
|
- guru
- Monday, 04/16/07 19:18:27 EDT
|
like i said earlier i do appoligize if i seem rude or impatient..and i do realize this is not a chat room...you are the ones who put out the invite to ask whatever questions one may have...myself personally has alot of questions...i dont mind waiting for an ancer. agin im sorry if i may have inconvenienced you and perhaps i am not the one being impatient
|
|
Justin
- Monday, 04/16/07 19:24:45 EDT
|
thanx guru it wouldnt bother me if it was a "chik flick" i watch "christy" and "little house on the prairy" for hevens sake
|
|
Justin
- Monday, 04/16/07 19:29:01 EDT
|
Justin, See, now you have prefaced your questions with a frame of reference. It makes a HUGE difference. You are not Justin the junior high school dreamer, you are a young man with some means (at least a driver's license and a wron out pickup truck).
Note that your local blacksmithing organizations are volunteer non-profits and their web sites are done by volunteers and rarely is mail answered. You just have to look at their schedule, find a phone number, make a call. THEN go to a meeting. You can go as an uninvited guest FREE but you will probably get more than your dues worth from the first meeting so pay up.
ABANA has a long list of schools but many are simply folks with shops that give lessons of various quality. Go to a meeting and ASK.
On our calendar page there is a long list of events going on every month. Most cost less than what a tank of gas is going to cost to get there. All the regional events are a great education even if all you do is look. Some are worth traveling hundreds of miles to see. Look at the events and then look up past news about them in our NEWS pages. Coming up in a few weeks is the big Southeast Regional Conference in Madison Georgia. Its a long ride for you but will be worth the trip. Then in September they will have the SOFA-Quadstate event. If you are a tool junkie this is THE PLACE TO BE. They also have demos and classes.
There are many more and may be some closer to you. But you are not a teenager without means to travel. It makes a big difference. AND, even though blacksmithing has seen explosive growth in the past few years, traveling to find other smiths is still the rule.
|
|
- guru
- Monday, 04/16/07 19:34:46 EDT
|
Hey there, how's everyone? Picked up three 55gal. barrels to try out making my own charcoal. Two are to become bbq grills. There are remnants of oil in all three. To avoid blowing up the barrels when I cut into them, should I first purge with argon? That's the direction my mind is taking me. Really don't want to end up jackass of the day by offing myself with an oil drum. Secondly, when I add wood to the barrel that is to become charcoal, is it to be dry wood or fresh cut or does it even matter? Thanks!
|
|
Bill
- Monday, 04/16/07 19:41:27 EDT
|
Jim Tomlinson-- I have that same blower (best ever built in my opinion, have not used it since I built a gasser in 1991), used to use SAE 30 motor oil in it, seemed to work fine. Fifty should be okay. Those oldies leak like sieves, so keep an eye on it, make sure it has plenty of lube.
|
|
Miles Undercut
- Monday, 04/16/07 20:10:54 EDT
|
Oil in Drums: Where the problem comes in is excess oxygen from the cutting torch which is impossible to avoid mixing with vaporized oil from the heat. A purge has to be greater in volume than the high pressure oxygen jet. That is a lot of purge. Compressed air or a blower is just as good if you have a vent. In the good old days they used the exhaust from the nearest available vehicle. However, if you have the choke on or stuck you can produce an explosive situation just as well. The fumes are also bad for your health but not as bad as getting blown up.
To avoid the richly oxygenated contents you can use a welding tip to melt a path in the thin metal. It is not as pretty but it is safer.
Filling the drum with water reduces the explosive volume so that if any is created then you just get a pop or whoumph, no big boom. However, the water will float the oil and make a mess. Cutting oil drums is not a pretty business.
I would fill with water, cut about a 6" diameter hole in the middle of the lid using a welding torch for venting , then use a cutting torch around the edge with as little oxygen as possible.
If you had a lot of these to do I would rig a small blower on a 2" pipe nipple to fit the bung hole, then cut a small vent hole then a large vent hole so the air can flow freely.
I've cut drum tops several times and was always nervous. Water works. High volume air works. An inert gas would be best but you are talking about a LOT of expensive gas.
Note that completely dry empty steel drums can blow up while cutting them. Its the oxygen and unburnt fuel gas or even soot from the torch that builds up to the right level. . .
|
|
- guru
- Monday, 04/16/07 20:36:37 EDT
|
Jim Tomlinson,
I too have one of those blowers and it is still in use. When I got it it was stuck. Dirt doober nests in the fan. Cleaned those out and drained the dirty oil. I then flushed with a 50:50 of oil and kerosene. Turned slow and easy to agitate and drained a lot of gunk and som metal. Flushed with some ATF, and filled with ATF. I prefer ATF over straight oils as it has a better anti wear package than motor oil, and a lower pour point and slower viscosity increase when the temp drops. That translates into an easy to crank blower in my unheated shop. And the ATF is available cheap everywhere.
By the way, there is a manual drip hole oil spot on the boss the hand crank runs in. Mine was filled with dirt and I had to find it by cleaning.
|
|
ptree
- Monday, 04/16/07 21:01:24 EDT
|
Outages: Wind has been the big weather in the East today and our power has been out three times today. Just about the time we got the candles out the power came back on this last time. . . DaveB has been without for almost 2 days so we are lucky.
I will be on-the-road Wednesday to Monday. Going to our Hammer-In in Tennessee. Will spend tomorrow making tools and getting ready to travel. . . Supposed to have a connection when we get there.
|
|
- guru
- Monday, 04/16/07 21:29:34 EDT
|
OIL DRUMS:
I've seen auto shops weld on gas tanks (safely??), by inserting a tube from the exhaust pipe of a running car, into the tank. I know there is some unburned gas in the exhaust, but the carbon monoxide/dioxide, seemed to negate the combustability of the gas in the tank and exhaust fumes and the welds were made. The pipe wasn't removed till the tank was cool enough to touch.
|
|
Thumper
- Monday, 04/16/07 21:37:41 EDT
|
Thankyou for the insight. It is very greatly appreciated!
|
|
Bill
- Monday, 04/16/07 21:57:47 EDT
|
Hi everybody,
I've just had an idea that some of you in the colder reaches of the world might be able to do something useful with... Has anyone ever considered devising a way of harnessing the waste heat from your forge to run a sauna? Bashing hot metal is dirty work, after all, and a nice hot sauna might be just the thing after you finish whatever it is you were working on...
|
|
Craig
- Monday, 04/16/07 22:16:51 EDT
|
Charlie Sutton in his book talks about using a "busting Chisel" for cutting up oil drums. It is made by forging a couple inches of the end of the chisel to parallel flats about 3/16ths of an inch thick. Then a shallow concave curve is ground across the width of the blade (3 inch radius or so) leaving nice sharp edges. Heat treat as normal.
|
|
JimG
- Monday, 04/16/07 22:20:47 EDT
|
What kind of hammer is best to start out with?
|
|
- Allen
- Monday, 04/16/07 23:09:23 EDT
|
I am sorry i just checked out the Getting Started in Blacksmithing page and had over looked the hammer part. Sorry.
|
|
- Allen
- Monday, 04/16/07 23:14:46 EDT
|
This link shows somebody using a simple 'cutlass' to cold cut a steel drum which would seem to mitigate the safety issues of cutting torches etc
http://hotpans.se/pan/tuning/building.7.html
|
|
andrew
- Monday, 04/16/07 23:33:59 EDT
|
Easiest way I have found to cut 55 gal drums is an air chisel. The v shaped ones used for cutting off old exhaust systems cut through the steel drums like butter.
|
|
- Bernard Tappel
- Tuesday, 04/17/07 00:13:42 EDT
|
Sauna heating with waste heat,,,
This is something I should know about. 'Ya sure ya betcha...
At a hobby shop, Its certianly possible but not real practical within an economic scope. Unless the forge were metal enclosed and built within a shared wall between the smithy and sauna, To capture enough heat fron the stack and/or a heat exchanger from the fire its self would be alot of bothersome equipment.
Maybe at an industrial shop is more practical since there is a tremendoud waste could be tapped, Still the sauna would need to be right adjacent to the fires.
BTW, My first job (small metal stampings factory, about 45 employees dayshift only)was a communal sauna and showers for the workers. Mixed gender no less, Yahoo!!!
But what they say about liberal Sweden is mostly fantasy of people who never been there.
Maybe 1/4 of the workers regularly used it.
|
|
- Sven
- Tuesday, 04/17/07 01:02:01 EDT
|
Yahoo, indeed there, Sven!
My wife is from Finland, hence the idea. We live in Sydney (Australia, not Canada, N Dakota, or Miami), so there's not much call for it here. If we ever move over there, then maybe...
Thanks for the reply.
|
|
Craig
- Tuesday, 04/17/07 03:23:13 EDT
|
Hi, I hope this is not a stupid question, but my google searches have turned up little of comprehensive use to me:
So, micaceous iron oxide- as a finish (in this case for outdoor railings) is it better as a paint or powder? Should I galvanize first? Is the application an operation that is done professionally (as per galvanizing)?
I ask because I was admiring the finish on a large set of gates that I understand was MIO. They had a slightly "dry but greasy" texture, like graphite, that I really liked. The application was also very fine and close to the forged finish. Does this sound familiar to anyone?
I'm grateful for any help.
-Dan P. (in the UK)
|
|
Dan P.
- Tuesday, 04/17/07 04:47:48 EDT
|
Why waste 55 gallons of water and still run the risk of fire or an explosion when you can purchase the PROPER TOOL to the job for under $50 !!!
MSC Industrial Supply (page 2975 item #09782822) for under $60 or Northern Tool (Item #1550) for less than $50.
Your personal safety should be worth that much.
|
|
- Ntech
- Tuesday, 04/17/07 05:53:24 EDT
|
Justin, the Guru has given sage advise. I first thought you were an illiterate lout, but after reading more about you, it is obvious you are a person of some accomplishement. Perhaps it is not possible for you to go back to school just to learn better reading writing skills. I would recommend the next best thing: READ! Go to your library and check out whatever interests you but READ. Learn how the language is used, how words are spelled. As a bonus, you will enjoy some fine, inexpensive entertainment and maybe learn something. There is simply no better way to learn a language than to read it as written by an accomplished writer. Communications skills are extremely important in business!
|
|
quenchcrack
- Tuesday, 04/17/07 07:25:26 EDT
|
Waste Heat From Forges: Note that even in a busy small shop that there is not really that much heat wasted. Forges have small intense fires and often just enough heat going up the stack to keep a good draft. As noted, in industrial shops its a different story.
One forge that can make a significant amount of hot water is a side draft forge with water cooled tuyeer. Even in a small shop this will make a lot of hot water. The one plan in Rishardson's shows the tank well above the forge (maybe second floor) so that convection moved the water. However, this is not heating a sauna. It also presents problems with temperature control and needing a vented tank to prevent over pressurization.
The general problem with using waste heat from a forge is the location of the forge and the place where the heat is to be used. If you back your sauna up against the forge and have a large heat sink in the wall then you might get the effect you want. But I would think you would find yourself wasting a lot of forge fuel just to get the sauna hot.
|
|
- guru
- Tuesday, 04/17/07 07:41:17 EDT
|
Bill: There is another type of 55-gallon metal drum which has a lift-off lid held on by a rim clamp. Has nice rolled edges on it. I am familiar with two basic types of 55-gallon drum charcoal burners. In one a fire would be lit in the bottom of an upright drum. Then drum is packed with wood and the lid put on, leaving an air vent. Charcoal burn is controlled by the vent. In the other the lid is left on (with a vent), but a fire built under the drum so the firewood cooks (doesn't burn directly) inside. On the latter I have seen one design in which a pipe ran from the top vent tube to under the drum so the initial (combustible) gasses add to the fuel.
I believe the rule of thumb is you will get between one and two bushels of charcoal from a 55-gallon run. When forging constantly this is likely a couple of hours supply.
When all is taken into consideration, including obtaining and preparing the wood and wood smoke wafing through the neighborhood, you may find it simply more practical to purchase prepared charcoal. It is typically available not at places which sell charcoal grills or perhaps through a restaurant supply outlet.
If still intent on your own production I would recommend going to your local library and inquiring about their inter-library loan program. Assuming you are a member, they can obtain many of the books they don't stock on a loaner basis for a nominal fee (which covers their cost).
|
|
Ken Scharabok (Poor Boy)
- Tuesday, 04/17/07 08:06:16 EDT
|
Waste Heat: I worked in a foundry when I got out of college in the Denver area. As the castings were shaken out of the sand, they were still red hot. They were conveyed along a steel belt, over which was a series of serpentine pipes that carried water. It heated the water to heat the office buildings. That was 30+ years ago.
|
|
quenchcrack
- Tuesday, 04/17/07 08:42:27 EDT
|
Communications: It was not too many years ago that a business letter was written by hand or rough typed, then marked up for typos and re-typed by hand on a manual typewriter by someone who could type. This usually meant that the spelling and grammar were checked twice, maybe even three times on a business letter. They were also usually sparse and to the point.
Today folks rip off an email and away it goes at the speed of light. . . They often use web chat or phone text jargon on top of bad spelling and grammar. Nobody checks them. The result can be pretty sad. I still get mail that is ALL CAPS or all lower case with no punctuation. Hard to read.
Today there is no excuse for misspellings in almost any business correspondence or work. However, it happens. We recently used a spread sheet program to catalog a tool collection. No spell check in the spread sheet and we were working in the field where time was limited. These were then transfered to another document where spell checking was spread across 100 individual files in an environment that had a spell checker but not a very friendly one. The result was that it took a lot of work to correct spelling. It was mostly abbreviations but short hand and jargon as well. We did not think that our cataloging notes would be cut and pasted directly into the final work.
These forums are the same. While
FireFOX does highlight spelling errors, it does not indicate improper punctuation nor provide suggested correct spellings. It is a big leap forward (IE doesn't have it). E-mail programms also have internal spell check (at least Eudora does).
So while computers have made communications faster AND they can make them more accurate that is not always the case. And it still takes education or a proof reader to determine the proper use for there or their, two, too or to. . . and many others.
|
|
- guru
- Tuesday, 04/17/07 09:11:54 EDT
|
Just came back from Vegas. This was my 5th trip there. Haven't been there in years. Amazed at how fast this city is growing. If I ever lose my situation here at home I know I could get plenty of employment in metalworking. The hotel I stayed at was right next to a constuction site. I could see miles and miles of rebar while peeking through the fences on the strip and hear/smell the crackling of welding. The ornate iron work in and around all the casinos must have been worth as much as the fine crystal and 4 foot blown glass flowers decorating the lobby of the Bellagio. People think I'm crazy because everywhere I go I am touching metal and looking at the craftsmanship.
|
|
- Nippulini
- Tuesday, 04/17/07 09:36:57 EDT
|
Actually firefox does provide spelling suggestions. If you right-click on a spelling mistake (indicated by the red squiggly underline) spelling suggestions appear at the top of the pop up menu.
For what it's worth, I'm a highly educated lousy speller with barely passable grammar. I just learned to forge a decent leaf though, so I'm happy;)
|
|
andrewa
- Tuesday, 04/17/07 09:42:58 EDT
|
Andrewa, THANKS! I had been trying to spell check whole fields and there was no suggested replacements. . . Help was no help. . .
Nipp. . . SHHHHHH. . . that is probably the big secret among Nevada smiths. . . You also have to know that you are dealing with folks that build big things on a schedule. No fooling around.
|
|
- guru
- Tuesday, 04/17/07 09:56:55 EDT
|
Can anyone tell me more about Foxfire? A program you download or purchase? Does it spell check everthing you type?
|
|
Ken Scharabok (Poor Boy)
- Tuesday, 04/17/07 09:57:29 EDT
|
Ken click the link in my post above.
Firefox is the new replacement for Netscape. For those of us that hate anything Microsoft it is THE browser. Its spell check works in all kinds of form fields like on chats and forums and just plain old forms.
Firefox is an open source project which means a lot of folks work on the code and improvements and flaws are fixed by a dedicated user base. This is the complete opposite of Microsoft where if you point out a flaw in their security they deny, then threaten to sue you for hacking (reads their terms of use), then they bury it and MAYBE, just MAYBE a patch will come out in some distant future.
|
|
- guru
- Tuesday, 04/17/07 10:46:24 EDT
|
Oh, and I forgot, Bill Gates calls those flaws "features". "Features" that have created the epidemic culture of email viruses and furtherance of spam.
|
|
- guru
- Tuesday, 04/17/07 10:49:57 EDT
|
People often comment on how nice it must be to work around the forge in the winter---I point out that during the summer I'm working with valuable parts of my anatomy 12-18 inches away from the fire and am not uncomfortable; so why would my feet 3 *feet* away be expected to be warm in the winter.
Now a gasser puts out a lot of hot gas; but in general I'm trying to get that out of the shop as fast as possible!
Thomas
|
|
Thomas P
- Tuesday, 04/17/07 11:53:58 EDT
|
Ken,
My day job is data entry for an online Stock Photography website. The department I am in works on a platform based off a website, so every time I update it goes live directly to the website. We use exclusively Firefox BECAUSE of the spell check feature. It cut out a whole step, and allowed us to update live without worrying about misspellings. I like it so much that now I am using it at home also. Try it....you'll like it!
-Aaron @ the SCF
|
|
thesandycreekforge
- Tuesday, 04/17/07 11:55:06 EDT
|
About that large anvil on e-bay: I have a 407# Trenton (we believe due to the recess in the base) It is about 1" shorter in all dimensions than the one that was posted.
As a point of interest I measured the top of the cutting step to top of the face distance as about 1.25" so mine has a lot of forging left in it!
Thomas
|
|
Thomas P
- Tuesday, 04/17/07 12:05:12 EDT
|
Machined Anvils: I have seen a lot of old anvils, particularly big ones over 200 pounds that obviously had the tops machined to where there was no or little step. Because the step is a feature used by a lot of smiths the repair shop put the step back in by grinding down the table. But since the table is flush to the top of the horn the table cannot be just lowered, it must be sloped. There is a big anvil in Paw-Paw's shop that is this way. The face was perfect until it saw some use. It is quite soft and every blow marks it. That is the result of taking 1/2" of the top of the anvil.
At the beginning of the 20th century the anvil was a very important tool in small shops and industry alike and numbered in the millions. Thus there was a considerable trade in "reconditioning" anvils. A big part of that trade was machining the faces down.
Just because an anvil is old and beat up looking does not mean it was not once reworked and then worn out again. Not every repaired anvil looks like new.
|
|
- guru
- Tuesday, 04/17/07 12:54:15 EDT
|
Forge heat: In the dead heat of mid summer, it is recommended to take HOT baths and showers. The idea is to raise your body temp, so when you exit the bath the ambient air temp actually feels cool and soothing. Forge heat is dry heat, but this works in Turkish and Russian bath houses where dry saunas cleanse the body as well.
|
|
- Nippulini
- Tuesday, 04/17/07 13:52:07 EDT
|
I have dug a hole to make my ground forge with but I live in a rocky mountainous area, so I don't know if I should line the wall of the hole with something like a steel sheet? Sorry about the hammer question last night I was pretty tired and was looking at hammers on that web site you told me about when I got confused with all the different types and asked that question even though you had already answered it.
|
|
- Allen
- Tuesday, 04/17/07 14:05:03 EDT
|
Hi Guru
I live near Canterbury Kent do you know any company or person that could make me a cremation urn for ashes in copper brass or bronze or a combination
|
|
mark howard modley
- Tuesday, 04/17/07 14:27:11 EDT
|
whats better a sideblast forge like the brits us or a firepot
|
|
Justin
- Tuesday, 04/17/07 14:41:24 EDT
|
Justin---it depends!
Thomas
|
|
Thomas P
- Tuesday, 04/17/07 14:48:48 EDT
|
well in order to practice i need someting to practice with...and id lilke to wich is better unless its more of a personal prefrince thing like alot of blacksmithing stuff is. books will tell u about both but they dont tell u whats better...it helps to know
|
|
Justin
- Tuesday, 04/17/07 15:08:32 EDT
|
Urn in Britian: Mark, I recommend you contact www.BABA.org.uk They are blacksmiths but modern smiths often work in mixed metal and bronze. They should be able to put you in contact with the right person.
|
|
- guru
- Tuesday, 04/17/07 15:15:35 EDT
|
I (personally) find side blast seems to work better with charcoal, while bottom blast works better with bituminous coal (or even, upon occasion, anthracite). All the above fuels will work in both side and bottom blast forges, but the heavier fuels seem to work better in the bottom blast. This does follow the historic curve, with both the bottom blast and mineral coals becoming prevalent (in North America, anyway) in the later period.
Your reality may vary.
Shoveling out the bureaucratic stables on the banks of the Potomac. Is there no end to this stuff? ;-)
Visit your National Parks: www.nps.gov
Go viking: www.longshipco.org
|
|
Bruce Blackistone (Atli)
- Tuesday, 04/17/07 15:19:20 EDT
|
i herd brakedrum forges are no good because they are not deep enough so im thinking i dont want to go that route
|
|
Justin
- Tuesday, 04/17/07 15:19:45 EDT
|
Lining Pit Forge: Some kind of clay is the best way to go. Ask about local clay pits (usually near water) or in the worse case purchase 10 pounds of clay from a local pottery supply. You want hi fire stone ware clay. Our friends in India mix the clay with a little waste from the "holy cow" as the fellow put it, to act as binder. You can also add a small amount of portland cement but this results in a mix that you must use NOW. You cannot store it.
When mixing clay keep it as dry (stiff) as possible. Removing extra moisture is hard work and requires more tools you probably do not have. The simple way is with plaster vats (a thick slab of plaster, usually extra from mold making). You work the clay on the plaster and it absorbs the moisture.
If your pit is mostly stone the problem is that many type of rock spall (explode) when heated to high temperature. A good thick layer of clay will insulate the rock and prevent it from overheating.
Doing things the primitive way means knowing YOUR locality and sources of materials. Just because people lived in huts and had few tools did not mean that they did not know every type of rock and soil and tree or bat cave or natural resource for many miles around. Their "backyard" may have been thousands of acres. They would also know who to trade with for many of the things they needed such as clay for dried cow dung. . .
|
|
- guru
- Tuesday, 04/17/07 15:30:56 EDT
|
ok so my question is whats better than a brakedrum but still is simple enough for a beguiner
|
|
Justin
- Tuesday, 04/17/07 15:37:06 EDT
|
Working clay-
Allen,
As the guru said, too moist of a clay body is no good. Also, though, too dry of a clay body will not always do what you want either.
Should you happen to get it too damp, another effective method is to roll the clay into a coil about 2 inches in diameter and make an arch with both ends stuck to a working surface. Let it set a bit, but don't forget about it as its like steel in a fire, forget it and you might as well start over;) Once the outer surface has dried up some work it back down to conglomerate it and voila, drier clay.
For what you are doing you could either pack the clay in in clumps or , with the aid of a rolling pin (don't use your wife's) roll the clay into slabs about 1/2 to 3/4 in thick, drape them over the fire pit, and then work the sheet into the nooks and cranny's a bit. Also, if you buy your clay, try not to overwork it, as this will add air pockets which, when fired, might blow out. Although this wouldn't be too huge of a problem for a fire pit lining.
-Aaron @ the SCF (who had four solid semesters of ceramics classes in college and STILL didn't even begin to scratch the surface of it all!)
|
|
thesandycreekforge
- Tuesday, 04/17/07 15:44:34 EDT
|
Forges: Justin, what works is to do what you can. Then there are brake drums and there are brake drums. . . I have two sitting my yard that are 16" in diameter and 12" deep. . . My first forge was a big old 15" wheel off a 1964 Ford station wagon.
In his Public TV series Alan Rogers showed how to build a forge using a steel wheel barrow pan and common plumbing fittings. He built up the fire pot and insulated the thin pan from a local clay cement mix. Even at the cost of a new wheel barrow the price is not bad. The extra parts can be used to repair another wheel barrow. See our book review page.
One of the fellows in the AFC builds forges from the metal from old hot water heater tanks. He torches them up and makes all the parts from the same source. You can even use the outer shell as a light smoke break.
You can also just spend the money and buy a fire port from one of our advertisers. They are in and out of stock but you can buy the fire pot, blower and misc then all you need is whatever you want for the rest of the forge. This is the most fool proof way to go short of buying a complete forge.
THEN some folks use a torch for heat. A tad expensive and inconvenient but it works.
|
|
- guru
- Tuesday, 04/17/07 15:44:35 EDT
|
Side Blown vs. Bottom: See Atli's posting first. The side blown forges the British use have complicated water cooler tuyeers. These have a double wall closed at the fire end. The other end has the outer shell open to a water reservoir and the inner tube passes through the water tank and out the back where the air connects. You have to keep the tank full of water and it steam off into the shop. You also have to drain them in the winter because they freeze.
The "traditional" or archaic side blown forge was just a hole in a wall or the pipe feeding a pit forge from the side. They hole in wall type was popular in brick forges and with Norse "shield stone" forges where a piece of soap stone with a hole was the fire back which protected the bellows from the heat. Brick forges more often did not have an edge than those that did.
Some "table forges" are little different with the tuyeer simply a hole in the flat surface.
Lots and lots of variations in forge designs and they all work. Forced air and fuel.
|
|
- guru
- Tuesday, 04/17/07 16:30:34 EDT
|
Justin, "Go not to the Elves for advice for they will say both yea and nay" T
o know which is better for you we need to know what *you* plan to make with it, what tools and skills *you* have, and how *you* like to work. Unfortunately my aluminium foil hat keeps me from reading *your* mind on this.
I built a brakedrum forge once that was one of my best billet welding forges---(I put in a sheet metal fence to get greater depth, leaving the ends open and cutting a mousehole across from the open ends for long pieces); but it was not so good for doing scrollwork (actually it worked better for scrollwork by pulling the fence out).
One thing I would suggest do not consider your first forge as your last forge; think of it as a learning forge and be ready and willing to change it as your wants and needs change. Shoot I'm itching for the 4th or 5th rebuild of my travel forge to put in some bells and whistles I think I'd like and make it a bit easier to break down for moving.
For knifemaking a washtub/adobe forge works well especially with charcoal. I built my first forge from an old drysink from a 1930's abandoned farm in OK. Shaped the interior with creek gravel and coated it with creek clay, used it for several years. My current solid fuel forge uses an axle cover from a 1937 "banjo" rear end that someone had made into a set of jackposts---I ground out the bearing ring and droped in a cast iron drain grate and it was ready to go---I've used it for 20+ years and it's still going strong though I have the other one as a backup...
I never lined my hole in the ground forges save with a bit of dirt mixed with wood ashes and plastered on the sides.
Thomas
|
|
Thomas P
- Tuesday, 04/17/07 18:32:06 EDT
|
Atli: Didn't we send you a nice storm so you could use the Augean Stables method?
Wasn't that how the vikings knew when it was time to move on---when the stables needed cleaning out?
Thomas
|
|
Thomas P
- Tuesday, 04/17/07 18:34:25 EDT
|
Justin,
Depending on just who you listen to, you can hear that ANY type forge is either the best or the worst. Yes, there is a lot of personal preference involved, but there are a few constants you should keep in mind:
1. All solid fuel forges require some means of getting air to the fuel in a controllable fashion.
2. There is NO "perfect" depth for a forge; there are many variables that affect how well a particular depth forge will work with a particular fuel when used for a particular purpose.
3. Accepting absolute statements at face value will almost always get you into trouble.
As an example let's examine the rumor that brake drum forges don't work well because they're too shallow. Just *which* brake drum are we referring to? A 1992 Chevy Sprint or a 1944 Dodge deuce and a half military transport? The difference in the two brake drums is dramatic.
Just how shallow is *too* shallow? Commercial firepots are between four and eight inches deep, while common passenger car and light truck brake drums are between three and four inches deep. Some smiths use a bottom-blast forge that is nothing more than a steel or firebrick table with a hole in it for the air to come through, and they do perfectly fine work. At the other end of the spectrum, I have seen forges with a firepot so deep (around 12") that it took twenty pounds of coal just to build the fire up to a high enough level where a piece of steel could be stuck through the sweet spot in the fire. What I'm getting at here, is that knowing how to build and use the fire properly is more important than the size and shape of the firepot or forge.
As for side vs bottom blast, that's a matter of preference and custom as well as the type of work one might be doing. As noted, some places/people customarily use pit forges, which are nearly always side-blown, and the British have favored side-blown table forges for years. Most US smiths seem to use bottom-blown forges, but those who do "traditional" Japanese edged weapons tend to use a side-blown design, as that has been the tradition in Japan for a few centuries.
No matter which style, size and shape of forge you wind up with, you MUST learn to use it to the best advantage. That means proper fire management techniques and planning your forging sequences to accomodate your particular forge. If yo're planning to try to teach yourself fire management and forging, then I'd suggest you either buy a commercial firepot and blower or build a tried and proven DIY design such as the brake drum forge. Trying to learn fire management and forging when you have no idea whether your failures are the result of error on your part or inevitable due to inadequate or inappropriate equipment is impossible.
Without a doubt, the best way to start out is to find a forging group or instructor in your area and go learn from them. They'll have equipment that is tested and proven, and they'll know how to use it. Until YOU know how to build and maintain a fire, and use it, you have no basis upon which to judge the merits of ANY forge.
Alternately, you can look at websites and/or books and follow the dogma they preach, but you'll be several steps behind where you would be if you took just one beginner's green coal class from almost any forge group or decent instructor.
|
|
vicopper
- Tuesday, 04/17/07 19:44:56 EDT
|
Justin, What Vicopper siad.
I have built 3 solid fuel and two gassers. All different. All had pluses and minuses. My current travel forge, has a boat trailer rim for a fire pot. Works well enough to demo from. I have a real, factory made firepot. Works well enough that I use it. I have the original forge made from a condensor shell hemi end. Works, and I have not thrown it away. It is up in the field of future opportunities, and will be given to the first biginner to ask and show up. It is in S. Indiana. Needs a blower and bingo.
What Vicopper said.
|
|
ptree
- Tuesday, 04/17/07 20:45:40 EDT
|
The Other thing they say about brake drum forges, is that they are great for a beginner, anywhere they talk about them they say , beginners forge, not bad forge, just maybe not large enough for a commmercial forge, but not bad, i have one, perfect for welding billets as Thomas said, and its a brake drum, welded to a peice of piping, with another pipe leading to it, with a threaded ash dump, and is mounted to a metal stool that i found in a garbage bin at my school, took about 2 hours to assemble everything, ive had it for 3 years, use it just for welding, all my billets are done in it, and i did 2 and a half years of forging in it, i chose a table forge now because i dont have space for a side blown, and i was tired of tools falling on the ground, and work falling off the forge, BUT, as a beginner , those things are good, Builts Charactor, and good habits, if you work with a dificult forge and can perfectly manage a fire, then think how good and easy it will come to you when you start to use a forge that you have made to change things YOU dont like about the brake drum forge, and to accentuate things YOU like about the brake drum forge,
technically you can do perfectly good work with a bike pump and a roaring wood fire, but more effort is involved,
at this stage, you should be more worried about hitting some hot metal, than worrying how your gonna heat it,
go with the easiest cheapest way to make a forge and WORK WITH IT,
|
|
Cameron
- Tuesday, 04/17/07 20:50:11 EDT
|
Ah ha! Success with the 55 Gal drums. Made a 'cutlass' with 1/4 inch bar (mild steel). Using Master Gunter's Super Quench to hardened the working end. About halfway around the barrel it started to warp. Bent it back like you would a bent nail and drove on. The edge stayed suprisingly sharp. Probably make a sweeter cutlass out of some 5160 later. I've had a blasty blast so far with this project! You guys rock and roll. Anvilfire all the way!
|
|
Bill
- Tuesday, 04/17/07 22:15:56 EDT
|
Forge Size: There is an article somewhere on the net where the guy says "no professional" would use a brake drum forge, anyone that uses one is stupid . . . too small, don't hold enough fuel. . . To that I respond that MANY professionals started with one. AND for small work such as miniatures, doll house furniture, jewelery box size hinges and jewelery they are a HUGE forge. . . Jeweler's forges used to melt silver and brass in a small crucible used a bellows smaller than most fireplace or "moulders" bellows.
I stole parts off my first forge (a double auto wheel forge) to build my second. The second was a failure and I still wish I still had the first. . . I may build a replica one day. It was very portable and it WORKED. I still have a couple of the parts. It had a blower 10x larger than it needed but you use what you have. I forged a lot of things with it including my first pair of tongs and the control lever FOR THE FORGE! Both were forged from RR-spikes and I used a common pair of pliers for tongs. The tongs were TERRIBLE but they worked better than pliers.
Back then I knew very little about forging and how to boot strap from primitive tools to better tools. Although starting that way then, today it would frustrate me no end. However I know how to do it better than I did then.
I consider a blacksmith making their own forge and first pair of tongs akin to the fictional StarWars Jedi Knight making his own light saber. It is part of the process in a real trade.
|
|
- guru
- Tuesday, 04/17/07 22:16:04 EDT
|
I wasn't sure of my commitment to the craft & so used a table of thin steel sheet. In the middle I had a thicker steel plate with a hole in it & a simple tuyere - no ash dump, just a piece of wet cloth stuffed in the end. My fire was simply a pile of coke. I used a vacuum from hard rubbish.
It was terrible - hard to light & coke would fall off & need to be picked up. But after I'd built my fire tools & a set of tongs I had the bug. I also knew what I wanted in a forge and built a better one. That first forge cost nothing & I learned a lot. My latest forge is built from furnace bricks on a table. The blower is 3m away in a brick bunker. After a year of noisy vacuum cleaners, I have come to love total silence (aside from the gentle roar of the forge) on the cool nights that I forge.
|
|
andrew
- Tuesday, 04/17/07 22:23:12 EDT
|
I've slowly been gathering materials to make a small gas forge (based on Ron Reil's freon-bottle forge), and I finally got to the point of building my first Ron Reil style burner. It works ... I think ... ! Two questions:
1) The flame appears to be starting from the "step" where the 3/4" pipe ends inside the flared nozzle. Is this normal?
2) It seems to require a good bit more pressure to run really stably than I had expected. I don't know exactly how much pressure, as one of the bits I am still gathering is a pressure gauge. (Once I acquired the regulator, I couldn't wait to give it a try!) There seem to be three stages: A) low pressure, at which the flame sometimes wants to pop back up and burn up inside the 3/4 pipe (definitely not good). B) medium pressure, which is stable with a clear blue inner flame and a very light blue outer flame. C) higher pressure, where the inner/outer flame suddenly becomes a unified "bulb" of blue flame. Does this sound right?
I thank you for any answers you can provide. I did some searching on the site, but wasn't successful in finding answers to these particular questions. For background, I am middle aged, with about 25 years of woodworking experience, 5 years of (arc) welding experience, 18 months of machining experience, all of this as a hobbyist -- oh yes, and a long-standing desire to get into blacksmithing!
|
|
Andy
- Tuesday, 04/17/07 22:33:08 EDT
|
Thanks for answering all my questions and tolerating me as someone new to something. What metal is it best to build tongs out of? I thought steel but there were several kinds so I figured it best to ask.
|
|
- Allen
- Tuesday, 04/17/07 23:18:03 EDT
|
Speaking of forges and firepots; my eldest daughter has decided that she needs a forge for her new digs, something relatively light that she can wheel in and out of the garage. I gave her some instructions on a wood forge (like mine), or metal alternatives, and suggested that she buy a cast tuyere. She, being a talented welder, suggested that she could weld one up.
So...
I know I've seen plans for a welded-up firepot somewhere. I checked the iForge page, and most of my books (the ones that have escaped packing for the move or loaning to friends) and a few other sites, and for the life of me I have not come across the plans. Maybe I've missed something! (The home computer still has the slooowws, which limits my searching and posting.)
Any leads will be graciously accepted, and I'm looking for a Mankel 70# anvil for her too. (She's a light woman, working light stuff; if she needs to work on something heavy, she can come down to Oakley Forge and beat it out. ;-)
Cold and a little less windy on the banks of the lower Potomac. At least the streams are back in their banks, but all of the exposed tar paper was blown off the windward side of the roof on the new house. 8-0
|
|
Bruce Blackistone (Atli)
- Tuesday, 04/17/07 23:20:53 EDT
|
Thomas:
The wind may have been meant for the stables, but it still got my roof. It was even worse up North, so we dodged the damage (mostly) in the tidewater.
|
|
Bruce Blackistone (Atli)
- Tuesday, 04/17/07 23:29:54 EDT
|
Bruce, we do not have welded firepot plans. I should draw some up. Pretty simple if you know the shape.
Wind was terrible here. Left a lot of folks without power. The end wall of Paw-Paw's tin shed shop would not have taken a couple more days of it. Needs reinforcing. More things to do. I need to see how things are at home. . .
ON THE ROAD TOMORROW (Wednesday)! Long drive to Kens. See ya'll there.
|
|
- guru
- Tuesday, 04/17/07 23:53:15 EDT
|
Side blast tue comments, for general interest; While in the long run a water cooled tue is desirable, and really quite easy to make, they do require a certain amount of basic fabrication know how and a fair amount of metal. The tools required might also be beyond the means of a beginner, i.e. gas axe, grinder/disk cutter and welder (and preferably a big cropper for the plate that makes up the tank, though the cutter or gas axe could be used for that, too).
There is another version, however, which is the "solid" or "dry" tue, which consists of a pretty chunky piece of cast iron, and is very rare. I know of only one smith using one in the UK.
My very first forge was side blown, and made up of a piece of iron with a hole in it, covered with clay, pilfered from my mothers flower bed, to stop it burning away. The clay turned to glass, but it worked fine until I was in a position to a) know any better and b) make something better.
I am not convinced that there are any huge benefits, other than personal preference, to side blast, except possibly clinker extraction.
|
|
Dan P.
- Wednesday, 04/18/07 04:49:38 EDT
|
Allen,
I'm a newby too, but I've been told that you can get by with 1/2 inch square mild bar, but 1/2 inch rebar will lessen the tendency of the handles to bend under strain.
|
|
Craig
- Wednesday, 04/18/07 06:12:25 EDT
|
Guru,
I noticed in your book reviews that you have looked into one called "the Blacksmith's Craft". I have bought a copy of the same title, but with an apparently different author. My copy was written by a bloke by name of Charles McRaven. Are they the same book?
|
|
Craig
- Wednesday, 04/18/07 06:27:24 EDT
|
Craig, No, the McRaven book is different than the COSIRA book.
|
|
- guru
- Wednesday, 04/18/07 07:54:13 EDT
|
Tongs Material, Sizes: Before the modern era tongs were made of soft wrought iron and worked fine. Steel and alloy steel tongs can be made lighter but can suffer from cracking if quenched while red hot. However, most tongs manufacturers avoid too high of carbon in steel.
Mild steel (usually not so mild A36 structural grade) works fine and is what most tongs are made of. See our FAQ about re-bar.
Size of the tongs depends on the work. I have some small tongs with 1/4" round reins that I use for making small hooks.
Good hand made tongs have tapered reins. This allows them to spring (an absolute necessity) and have a strong joint. Common tongs often have round reins welded on just at the end of the joint taper and some factory made tongs are the same pattern. This works well as long as they have the necessary springiness.
See the Tongs Dimension Chart from our Machinery's Handbook review.
The worst tongs are those overly heavy tongs with no spring to them made by trade school students. Keep your joint heavy and the reins tapered and light. The MACHINERY'S patterns are a good place to start.
|
|
- guru
- Wednesday, 04/18/07 08:13:40 EDT
|
Starting Size Tongs Stock: If you do not want to have to draw out the reins by hand you weld on round bar. 3/8" round is fine for short tongs for small work like horseshoes, 7/16" is about right for heavier work and 1/2" is good for power hammer and heavy work tongs. When it comes to having the right feel these are large increments.
When you weld on the reins you make the joint and bits from heavier stock. 3/4" to 1" round works well. 5/8" or 3/4" square also works. IF you are making tongs in one piece then this is the size you start at.
Other methods of making tongs use flat stock like my twist method. These require less forging than from round or square stock and are a little easier to see the shape develop when you are learning. Be careful not to fuller too deeply.
Most ancient and semi-primitive tongs do not have an offset step in the joint. These just taper up to a tall section at the joint and then back down again. They work fine and take less forging skill.
The most primitive tongs were tweezer type and evolved from wood tools. These work but do not provide a tight grip. But they ARE dead simple and can be used to make a good first set of tongs with a riveted joint.
If you start with long stock you can make tongs without tongs.
|
|
- guru
- Wednesday, 04/18/07 08:27:59 EDT
|
Gas Forge Burners: Andy, Yes, the step in the burner acts as what some folks call a "flame holder". When the burner fires back then you are running it too low. I am not sure about your stage 3 (C). Note however that forge burners work differently in forges where there is some back pressure and lots of reflected heat than they do in open air. Many "burners" that won't operate at all in free air will fire a forge fine once it is heated up.
Pressure is just a vague point of reference on these things since the manufacturing varies so much and small gages cannot be trusted +/- 3PSI when new and +/- 10PSI when used.
|
|
- guru
- Wednesday, 04/18/07 08:40:01 EDT
|
I have recently acquired an old beer keg that I plan to turn into an oil quench barrel. It is empty but I am pretty sure there is still some residual pressure as is with most pressurized containers. I do not have a tap and would like to know the best way to bleed the rest of the pressure off before I cut the top off. Thanks guys!
|
|
Rhordae
- Wednesday, 04/18/07 08:29:18 EDT
|
Rhordae, You should be able to just open the valve. . . .
Otherwise you use a small punch and make a hole. Where gloves and a face shield in the event the pressure makes the punch fly. .
|
|
- guru
- Wednesday, 04/18/07 08:44:45 EDT
|
Rhordae:
Is it a newer keg with the ball valve in the top? If so, put on your face shield and a raincoat with hood and use a steel rod, big screwdriver, or whatever to carefully push the ball into the keg. If there's pressure left, you will be showered in stale beer. Thus the raincoat.
There is a spring under the ball, so it will not stay depressed. Just keep pushing on it until it stops hissing, then drill your starter hole. Alternatively you could just drill a hole without bleeding the valve. You'd then add metal chips to the potential shower of stale beer, thus the face shield.
Have fun!
|
|
Alan-L
- Wednesday, 04/18/07 08:53:39 EDT
|
Ahhhh. . a skunky beer bath. . .
|
|
- guru
- Wednesday, 04/18/07 08:57:08 EDT
|
old cast iron sinks make nice forges and are easy to come by. you can attach a brake drum to the bottom for a fire pot.you can cut the hole with an arc welder 6011 works well marlin.p.s, take the beer keg out in the woods an shoot it with a 22
|
|
- marlin
- Wednesday, 04/18/07 09:22:10 EDT
|
Bruce
I emailed you the URL for the Bob Patrick fabricated firepot plans.
|
|
Bernard Tappel
- Wednesday, 04/18/07 10:01:49 EDT
|
Bernard?
Could you please post the URL for that firepot here? I use to have it and was looking for it to send Bruce, but can't find it. Thanks.
|
|
JimG
- Wednesday, 04/18/07 10:17:16 EDT
|
Jim
I emailed the URL to you also. I thought there was a problem with posting URLs here. I will wait for Jock to chime in on that before posting it here.
|
|
Bernard Tappel
- Wednesday, 04/18/07 10:40:39 EDT
|
It is one with the ball valve which leads me to another question. Which end should I cut for the top? Should I cut the end with the valve and use that for a handle? It has plastic handles on both ends so I suppose either would work...maybe I should leave the valve as the bottom so I can have a way to drain it if that is ever necessary. I am having some difficulty getting the plastic part off from around the valve. I think I just answered my question.
|
|
Rhordae
- Wednesday, 04/18/07 11:00:44 EDT
|
I grew up shooting and hunting (first .22 for my sixth birthday, etc.), and have continued to do into this, my thirty-sixth year. That said, I'm very loath to recommend firearms as field expedient hole punchers, as someone did in a post earlier today. It'll *probably* work out fine, but it only takes one fluke to ruin your whole day. I've seen weird and scary things happen with richochets, including .45 and .38 bullets ricocheting off hardwood bowling pins (!) with enough retained energy to cause injury. (This is not just theoretical. I've seen the resulting injuries, too.)
If you *insist* on using your firelock to punch holes in stuff other than proper backstops or legitimate targets (game, etc.), I'd suggest a light, high velocity bullet like .223, and plenty of standoff (i.e., stay a goodly distance back from the target). They penetrate surprisingly well, and if they don't penetrate they generally blow up into hundreds of small fragments, none of which alone is likely to have sufficient energy to do serious bodily harm.
Better yet you could use the proper tools (drills, punches) and avoid the risk altogether.
Sorry if this is a little O/T, but this is a subject near and dear to me. Every person who hurts himself or someone else doing something silly with firearms makes things just a little bit harder for the rest of us.
|
|
Matt
- Wednesday, 04/18/07 11:09:21 EDT
|
Matt, well said.
Rhordae, I've never seen one with handles on both ends, but the usual technique is to use a recip saw (sawzall) or a plasma cutter to cut out the whole top end of the keg just inside the handles. How big is your keg? Does it also have a bung on the side? That may change things.
Bernard Tappel: The problem with URLs is that very long ones such as a full ebay auction are too wide for the page and can cause problems. I'd say Jock is on the road until late tonight on his way to the CSI hammerin.
|
|
Alan-L
- Wednesday, 04/18/07 11:56:49 EDT
|
Long URLs:
If you want to post a link, but the URL is one of those long, complicated, ones, try tinyurl.com. They convert long URLs into a nice, compact, one.
It's pretty easy. The first time you go there, you can have a TinyURL button placed on your browser's toolbar. After that, whenever you're at a site you want compacted, you just click on that button and you get to a page with the compact name. Copy and paste that wherever you'd like.
--Marc
|
|
- Marc
- Wednesday, 04/18/07 12:35:38 EDT
|
Rhordae,
My guesstimate would be that the oil would be kind of thick to drain out of the valve. Also (depending on amount of beer left in keg and amount of pressure left) pushing down on the valve can result in anything from a light spray to a gale force torrent, so be ready.
-Aaron @ the SCF-----who has forgotten to pull the handle up BEFORE twisting off the tapper fitting while changing kegs at a restaurant once or twice :)
|
|
thesandycreekforge
- Wednesday, 04/18/07 13:28:29 EDT
|
i have a question, can u make a anvil?
thanks, tom
|
|
tom
- Wednesday, 04/18/07 15:25:26 EDT
|
Tom, this question comes up about once a month, so you might want to search the archives- but the answer is, yes, but if you do it right, it wont save you much money, if any. The whole reason industry exists is that when you make 100 of something a day, you can justify the cost of very expensive machines and do it right, and still get a reasonable per piece cost.
Making one of something is always more expensive per piece than making 10,000.
A good anvil these days is cast steel, in a decent medium carbon alloy, which is then milled or ground flat on a massive machine tool, and then professionally heat treated.
Can you cast tool steel?
Do you have a really large milling machine or surface grinder?
Precision controlled heat treating ovens?
If not, then the anvil you make will probably be an anvil shaped chunk of mild steel.
Which is not a bad thing, and better than many of the anvils used by smiths for thousands of years. But it is not comparable to a decent modern anvil, or even a nice 100 year old used anvil.
Mow some lawns, sell some used video games, or weld a few railings for somebody, save your money, and buy a new or used anvil.
$500 will buy you a great starter anvil, and it will be much better than anything you can make unless you happen to have a couple hundred thousand dollars worth of machine shop and fab equipment in your garage.
|
|
- Ries
- Wednesday, 04/18/07 15:49:34 EDT
|
Tom, your question has already been answered here -- and it's not even in the archives! Scroll up to the entry on Thursday, 04/12/07 at 16:47:44 EDT.
|
|
Matt
- Wednesday, 04/18/07 15:51:13 EDT
|
Oops. I see that while I was hunting down the most recent making-an-anvil post, Ries was restating it.
|
|
Matt
- Wednesday, 04/18/07 15:54:38 EDT
|
You mean I don't get to re-post my "Yes I can make an anvil; can you?"
Thomas sneaking it in anyway.
|
|
Thomas P
- Wednesday, 04/18/07 16:25:18 EDT
|
Thomas P: Arm & Hammer and one Swedish brand (Soferfors I believe) also had that oval depression in the bottom. According to Postman about the only way to really tell between a A&H and Trenton, if all of the letters and numbers are gone, is to feel under the heel. For whatever reason A&H usually left that area a bit rough forged.
|
|
Ken Scharabok (Poor Boy)
- Wednesday, 04/18/07 17:25:14 EDT
|
Craig: The Blacksmith's Craft by Charles McRaven was orignally published as Country Blacksmithing. The second is the original content plus a couple of new chapters or add-ons. Likely a new publisher wanted a new title.
|
|
Ken Scharabok (Poor Boy)
- Wednesday, 04/18/07 17:34:02 EDT
|
Anvilfire/CSI Hammer-in, April 21st. We are good to go. Indications are about twice the attendance of last year. No idea on number of tailgate sellers, but I do know of several coming specifically to look for anvils, equipment & tooling.
Event will be on my farm near Waverly, TN (West-central, TN about six miles east of KY Lake and about 14 miles north of I-40). For event details and directions just click on my name and request them.
|
|
Ken Scharabok (Poor Boy)
- Wednesday, 04/18/07 17:43:38 EDT
|
CSI Hammer-in. I am planning to leave S. Indiana in the wee hours of Saturday morning to arrive at a reasonable hour at Ken's. I may bring a homemade anvil for sale. I will bring a box of some really nice safety glasses donated to CSI for the iron in the hat, by our friends at Hagemeyer.
I plan to demo the demo trailer, then demo wizard heads much as it was taught to me by Kenny Detmmer of the IBA. I also will demo garden trowels from RR spikes if I can get a little powerhammer time. I may sneak in a suprise demo as well. Be there or be square.
ThomasP, I have arranged for a 24 hour armed guard at my shop so that no cleaning activities are allowed.
|
|
ptree
- Wednesday, 04/18/07 19:30:19 EDT
|
Need help identifying this anvil, marked, "MULTI-Pr........." Woudl like to know maker, age origin/country of manufacture. tks, Ron PS: would inculde pic but unable to do so. If anyone familiar with this site can advise or email me at electron@garlic.com I can send pics.
|
|
Ron Latronica
- Wednesday, 04/18/07 21:29:27 EDT
|
Multi-Products started by Dick Cropper of Chatsworth, California, in 1955. Anvils sold until 1985. They were of cast steel, made in Japan and imported. They came in weights of 85, 125, and 135 pounds. Cropper also had horseshoes and hoof nippers manufactured as part of the Multi Products line.
|
|
Frank Turley
- Wednesday, 04/18/07 22:51:58 EDT
|
Thanks Frank!
Well. . . . We are here in Hurricane Mills TN. Took me until noon to finish one of the special tools tools I'll be demoing. Need to handle it yet. . . so have work to do at Ken's then practice a little!
See ya'll here Friday-Saturday
|
|
- guru
- Thursday, 04/19/07 00:06:51 EDT
|
I recently puchased a 50 lb little giant power hammer. It has an old style sow block and appeared to be in good shape except needing new dies. I found out after that the dove tails had been completely worn out. After talking to Sid Sudemeyer, he recommended refilling the dove tails to the proper angle and then shimming. However, I am afraid that the space is too large for a shim. It is at least 1/2 an inch larger even with the key in place. Any suggestions on building up the sow block?
|
|
Lee
- Thursday, 04/19/07 08:19:47 EDT
|
Bernard:
I might have missed your e-mail in the spam flood. please try to resend to asylumATearthlinkDOTnet and put "Anvilfire" in the subject line.
I appreciate the help.
|
|
Bruce Blackistone (Atli)
- Thursday, 04/19/07 09:13:30 EDT
|
I want to apolige for making the suggestion to shoot the keg.I value my right to bear arms as well. Being a year shy of 70 i was amazed that someone couldnt figure out how to get the air out.
|
|
- marlin
- Thursday, 04/19/07 09:22:14 EDT
|
No need to apologize to me, Marlin. No hard feelings, I hope.
|
|
Matt
- Thursday, 04/19/07 09:47:17 EDT
|
50 lb. Little Giant: Lee, First, not all Little Giants are equal. There are many variations that are not recorded thus so called "factory" parts often do not fit. Second, you are talkiing about a machine that may be 80 yeas old and have been abused, used, rebuilt and repaired with a big hammer.
So you have oversized dovetails OR an undersized die. If the hammer has aremovable saow block it may have been removed and remachined. In that case the dovetail angle may not be "standard" which varies from 10 to 12 degrees.
As long as the sides are smooth and straight then you have a good dovetail. Fitting dies often requires shims. On some hammers the oversize is used to install parallel sided dies using two matching wedges. The wedges can bear against themselves or be placed on opposite sides of the dies. When on opposite sides of the dies this twists the dies. In this case the die is machined with the dovetail offset to that angle. When I do it I use the wedge to set the angle thus getting a perfect match.
There are a LOT of variations to this theme and it requires careful precision measurement of both upper and lower dovetails, how the line up, what fits. Then you make drawings and have dies made to fit as needed.
When dealing with old machinery this is normal. It is also why blacksmiths need to be aquainted with machine tools there operation and construction as well as use of precision measurment tools. This is 20th century blacksmithing, not basket weaving.
|
|
- guru
- Thursday, 04/19/07 10:28:21 EDT
|
Ken; I've had "Anvils in America" since it came out, even signed by the author and have talked with him a number of times at Quad-State. I even offered to buy a copy of his research papers when he wasn't sure he was going to get A&A finished.
My anvil was abused at an Arizona copper mine and had the side ground flush, it has the pill underneath and does not have a rough forged underside of the heel---whey we decided it was most likely a trenton.
It is 39" long with the face being 6" wide and 23.5" long with a 1.25 drop to the cutting plate---which is flat and not dressed down at the face end. Foot is 15" x 12.75" and the total height is 15". 1.5" hardy hole.
It was marked as 407# with a paint pen when I traded for it and I have not weighed it. (IIRC I traded a 125# PW, a screw&screwbox for a post vise and a bit of cash total was under 50 cents a pound. The face is very nice and flat---between areas of air-arc gouging from the #$%^ welders at the mine. Good ring and someday it will be redone but it's not needed right now except for a hardy tool holder---I have 3 anvils that use 1.5" hardys.
Thomas
|
|
Thomas P
- Thursday, 04/19/07 10:44:21 EDT
|
Lee-- I have a Mayer Bros. 50 pound trip hammer, clone to their family's Little Giant, and it has recently taken to spitting out the bottom key as soon as it has decided it has hammered enough for the moment. I have had this beast since 1991 and it has always been crotchety and cantankerous. I would not dream of throwing any heat into the sow block to build it up by brazing or welding. Get some bigger dies made, or fashion some shims-- and if you figure out a way to make them stick, let me know. Bronze, maybe, or wrought iron, perhaps. But the last thing in the world you want to do is weaken or embrittle the front lip of the sow block in any way, which heating the cast iron or machining might well do!!! If you have a removable/replaceable sow block that's a whole 'nother story. Mine is one piece.
|
|
Miles Undercut
- Thursday, 04/19/07 11:17:10 EDT
|
Thanks, that is the general advise I am getting. I try to use the shims or make some bigger dies.
|
|
- Lee
- Thursday, 04/19/07 11:51:57 EDT
|
Coal question though I think I already know the answer... I have some softer coal that lights easily, burns well with less sulfur than I am used and doesn't clinker-up but it also will not coke up. Run the forge for an hour and a half or so and I have a firepot full of corn kernel sized pieces that just dance around when you apply air. I can add more coal but the efficiency just keeps dieing off and I am left whaling away on the blower and blasting my fire all over the place. I can't get any heat because I have to back off on the airflow. Is there a way to get it to clump and coke or am I SOL? If I am SOL who would like to buy several hundred pounds of bad coal... anyone?
|
|
Ken
- Thursday, 04/19/07 14:00:27 EDT
|
im looking into making a anvil how exactly do i do that??
thanks, tom
|
|
- tom
- Thursday, 04/19/07 15:46:56 EDT
|
Tom; can't tell you *exactly* since I don't have time to type in several hundred pages of details but there are several methods:
melt several hundred pounds of good tool steel and cast it into an anvil shaped mold.
forge weld a number of chunks of wrought iron together and forge to shape and forge weld on a tool steel face
use wire EDM to "carve" an anvil shape out of a large billet of good steel and heat treat. (actually in this case you could heat treat before the wire EDM if you wanted)
use a large forging hammer and forge one to shape from a large billet of good steel and heat treat
weld one uo using full penetration welds on all pieces including the face of good steel and heat treat.
Note that most of these methods require skills and expensive equipment such that one could probably buy over a hundred excellant anvils for the cost of making one.
Thomas
|
|
Thomas P
- Thursday, 04/19/07 16:38:17 EDT
|
Some people never learn....
Okay Tom- after everybody tells you its going to cost you more money than buying one, and you will end up with an inferior anvil, if you absolutely must, then go to google, and type in "make your own anvil".
The first link that comes up will be Ernie's page on metal web news, in which he describes cutting an anvil out from a piece of 4" plate.
At current prices, new, this slab of 4" plate would run about 520Lbs, and cost you somewhere around $400 to $500 dollars.
Then you need a cutting torch big enough to cut 4" plate, and some big tanks of gas- figure another $400 to $800- big torches need big acetylene tanks, as they draw so much.
Then, a couple of good grinders- $200 minimum. A couple dozen grinding wheels, and then flap discs- another hundred bucks or so.
Hard surfacing rod, and a stick welder. Ernie says minimum 300 amps. Or a beefy mig machine. A couple hundred more, minimum.
A week or two of your time, which I assume, is free.
Add it up, and if you dont already have the equipment, maybe $1500 to $2000. Without labor.
If you have the tools, and are just buying steel, consumables, and hardfacing rod- Maybe $700 to $1000.
(Ernie says less, but his prices are dated, steel has gone up most places- plus, hes a pro, who knows the best place to get everything cheap, and he has all the tools)
So, for double the money, plus a huge amount of very unpleasant labor, (trust me, I have spent the equivalent of several years grinding, and it aint no fun)
You will end up with an inferior anvil, with a simpler design, less features, a lower quality of steel, and no resale value.
Sounds good, huh?
Buy a Euroanvil, or a Nimba, or a used Peter Wright. Spend your energy and time learning to forge, not grind.
Or not, as you wish.
|
|
- Ries
- Thursday, 04/19/07 16:38:48 EDT
|
Now for a simpler method do a search on Marco-Krieger Armory and go to their anvil link which will show how they had one made for a very reasonable cost.
Thomas
|
|
Thomas P
- Thursday, 04/19/07 16:40:22 EDT
|
To add to the above, when Thomas says a "large" forging hammer, he's speaking of something on the order of a 1/2 ton or bigger power hammer. They go for $6000-60,000 depending on condition. Then there's the foundation work and rigging costs to move it into the garage...
|
|
Alan-L
- Thursday, 04/19/07 16:42:43 EDT
|
Actually over across the street, at forgemagic, Bruce Wilcox from the UK just posted pictures of forging an anvil- of course he is one of the best industrial smiths on the planet with 30 plus years of experience, a crew he works with all the time, and the equivalent of a couple of hundred grands worth of equipment.
So he makes it look easy, and he did indeed forge his own anvil.
Not sure how big the hammer was- it looks like at least a 300lb er to me.
|
|
- Ries
- Thursday, 04/19/07 16:50:42 EDT
|
ok i dont want to sound ignorent, im sure i do (thomas) but, i would like a charcoal forge that i can fit various sizes of material in. small to larg projects...not like crazy-large but you know good sized. what would be a suitable firepot, or what size firepot should i be looing for?
|
|
- Justin
- Thursday, 04/19/07 18:14:59 EDT
|
ok i dont want to sound ignorent, im sure i do (thomas) but, i would like a charcoal forge that i can fit various sizes of material in. small to larg projects...not like crazy-large but you know good sized. what would be a suitable firepot, or what size firepot should i be looing for?
|
|
Justin
- Thursday, 04/19/07 18:15:52 EDT
|
sorry bout the douple postcomputer had a little fit.
|
|
Justin
- Thursday, 04/19/07 18:17:51 EDT
|
Reis, you left out the most fun two ways to "Make" an anvil.
You forgot explosive forming. Make a big mold, place it in a large pond, set a good piece of steel above it with a large hunck of explosive stuff and set it off. And you can have a fish fry to celebrate,
And there is always the Viking method, hop in you boat, sail to England and steal the darn thing. And on the way home you can enjoy the beverages that were liberated with the anvil
:)
Buy an anvil its cheaper, and you get a better anvil, says the guy with the little used homemade anvil outside the shop, but a unbelievablly nice to work on Trenton in the shop.
|
|
ptree
- Thursday, 04/19/07 18:41:35 EDT
|
Isn't that the same "Tom" who posed the SAME question last week?! And I notice nobody suggested the good ol' railroad track bit.
|
|
- Nippulini
- Thursday, 04/19/07 19:13:38 EDT
|
Making an anvil and the "Geodesic Dome Story." In the days of counterculture hippiedom, a 'family' of hippies decided to build a geodesic dome for a home. This was in New England, and it was little known at the time that the domes were notorious for water leakage. When the dome was completed, it did indeed leak, and it was in a fairly sad state. Each day, an ol' time jack-of-all-trades would walk by the dome on his way to his machine/blacksmith/woodworking shop. The hippies found out about the old man, and they approached him during one of his morning walks. They were in earnest and asked him what could be done about the faulty structure that was frequently leaking. He inspected the site and thoughtfully rubbing his chin with one hand, said, "Effen I was you, I'd build a house over it."
One more. A hippie was hitchhiking, and got a ride. The driver noticed that his passenger only had on one shoe. The driver snickered and said, "Did hippie lose a shoe?" The passenger replied, "No, hippie FOUND a shoe!"
|
|
Frank Turley
- Thursday, 04/19/07 19:25:55 EDT
|
hi
|
|
Jobe
- Thursday, 04/19/07 19:26:07 EDT
|
I got another hippie geodesic dome/anvil story.
I knew these two hippies, brothers, as fate would have it, who bought a book about how to build a geodesic dome.
The frame was made from EMT- electrical conduit.
And in the book, the author flattened the end with a sledge hammer, on an engine block.
So my friends, figuring the book could not be wrong, went out and bought an engine block, to use for an anvil to flatten their EMT.
The dome leaked.
But mine didnt- I built a small one with a Canvas reinforced PVC cover, all one piece, like a giant teapot cozy, that slid over the frame. My dad had a friend with a awning company, and they had a big electric seam welding machine- kinda like a spot welder for plastic bags- 4 feet long. I cut out all my plastic fabric pieces, and welded em together into a big dome shaped condom. Hauled that thing around for a couple of years, sleeping in it at various farms and backyards, even had it in the Evergreen State College parking lot for a month or two- and it never leaked once.
It was only 9 foot diameter, eliptical dome, so it was 8 feet tall inside- quite a handy nomadic home, way back when.
|
|
- Ries
- Thursday, 04/19/07 19:42:28 EDT
|
hi
|
|
jobe
- Thursday, 04/19/07 20:02:23 EDT
|
Making Anvils: Everything is a matter of scale. Small anvils to nice sized stake anvils can be forged on a small 100 to 200 pound hammer. However, steel prices today are such that nothing is cheap unless you are lucky finding scrape of known pedigree.
The advantage to making stake anvils is that the two piece welded design allows for making the working part from good tool steel and the body from cheap structural grade steel or steel of unknown pedigree. These can be forge welded or arc welded.
With some imagination and design skills a very functional anvil can be made by fabrication with all the features of any anvil on the market. The suggestion to use hard facing is exchanging labor with no value attributed to it, instead of starting with a good grade of steel to start wih. This is false economy.
In correspondence with a fellow in China I have learned of one Chinese method of making an anil. A steel box with the desired face shape (they like a bread loaf shape) and then cast iron/scrap iron is poured to fill the anvil.
|
|
- guru
- Thursday, 04/19/07 22:18:49 EDT
|
What are the most dangerous things for a blacksmith to watch out for? I am not being lazy, I've read the three safety i forges. I am just wanting to be EXTRA EXTRA CAREFUL.
|
|
- Allen
- Thursday, 04/19/07 23:03:27 EDT
|
hey guys, Im working on making stainless steel cones for a martini set. I can get the cone shape with the proper angle cut out of a circle, but the inside gets all banged up while bending it over the horn, are their soft plastic maybe type hardy tools for an application such as this... if not can anyone think of something solid but non scuffing to bend steel over? ill link pictures when its done! i promise =)
|
|
Sebastian
- Friday, 04/20/07 01:38:48 EDT
|
Allen, watch out for people who want metal work done, but who dont really want to pay you to do it. when someone finds out you're a smith, they'll ask ya to do all sorts of stuff! For reference materials... see "If you give a mouse a cookie" by Laura Numeroff.
|
|
Sebastian
- Friday, 04/20/07 01:41:34 EDT
|
Allen: I would say to learn good hammer techniques from the start. If you develop what is commonly called Blacksmith's Elbow (akin to Tennis Elbow) you can expect about a six-month recovery time.
|
|
Ken Scharabok (Poor Boy)
- Friday, 04/20/07 02:28:54 EDT
|
Is there a general consensus on Caulking to stop the anvil ring? I found some old posts saying it holds the anvil in place & some more recent posts suggesting that it helps dampen the ring. Assuming it does dampen the ring, is there any suggestion for how thick the layer should be?
I added a thin layer to no avail & it did nothing. I added a thicker layer & it definitely helped. I suspect there is only very little under the contact points. However, the void from the concave bottom of the anvil is filled & this seems to be good. Should I keep going & try to get a few mm betwwn the base and the low points of the anvil?
|
|
andrew
- Friday, 04/20/07 04:18:26 EDT
|
Caulking and anvil ring:
Regular caulk doesn't quite do it. It must be the 100% silicone stuff. A nice thick layer, say 1/4-1/2 inch thick applied over the whole bottom of the anvil should do it.
Firepot size: I have a standard Centaur firepot, 8x10 inches at the top and 4" deep. I can make just about anything I want in it, from nails to hammerheads. Remember, you only need to heat as much length as you can work in one heat. It does you no good to heat a 10-foot bar if you can only hammer on eight inches of it before it cools off. Of course, if you're Ries, you can tie that 10-foot bar into a pretzel in one heat. (grin!)
|
|
Alan-L
- Friday, 04/20/07 08:13:43 EDT
|
Hey Frank, ever build one a those "magical pyramids" too?
|
|
- Nippulini
- Friday, 04/20/07 08:15:41 EDT
|
Nip, No, but I've made a few sky hooks.
Slim Spurling ran a blacksmithing school in Colorado in the 1970's, and he was into Scientology. I gave a workshop there, and he had each student visualize a pyramid around their anvil/forge/vise area. This pyramid would supposedly exclude all distractions and allow the student to better focus.
|
|
Frank Turley
- Friday, 04/20/07 09:18:45 EDT
|
Hey Allen,
Check this out.
http://www.horseshoes.com/advice/prentice/cntwywr.htm
I learned about this in a theater class I took in college (I had to have at least one theater class, liberal arts school and all) The class dealt mainly with poise, posture, and how to move about the stage. After reading the website, go to the library and ILL a book on the subject. I recommend "Body Learning: An Introduction to the Alexander Technique" by Michael J. Gelb. I wish I had known about this when I started smithing and before I developed any bad habits, because the technique makes it so much more comfortable to work around the anvil, not to mention saving on health problems later. Try it....you might like it!
-Aaron @ the SCF
|
|
thesandycreekforge
- Friday, 04/20/07 10:04:46 EDT
|
Tom, get the largest sledge hammer head you can find at the flea market and weld a slab on each side or weld it to the inside of a railroad track stood on end. Makes a good anvil for blades.
|
|
Ron Childers
- Friday, 04/20/07 10:55:59 EDT
|
Body Position Work Posture: This is one of the most important things to watch for. Being humped over the anvil reduces your effectiveness and will hurt your back. As Aaron, mentions above moving about the shop should be thought of as a dance. It is a series of pirrouets, steps and turns. Efficient working is a series of smooth motions. If you cannot move smoothly from forgr to anvil, forge to vise, forge to power hammer, anvil to vise. . then you are not working efficiently. And when you are not moving smoothly you are not working healthy.
Posture at the bench filing or at the vice hammering, sawing and filing is important. Feet should be firmly planted in a fighting pose and the body erect.
The only savings grace in this is that most leg vices are made the correct height for the average person. But I also have vises mounted much higher that are better for detailed work or work requiring close examination. Where the problems lie are with anvils. They are low for forging effectiveness and people tend to hunch over them due to the low height. When you are forging you should not be standing at attention but close to it. It takes practice and once you slip into that bent over old man posture it is hard to get out of it.
For the newby this is hard to think about when nothing else is going right. But it is more important than the work. The work will improve with time. Bad posture just gets worse and worse.
|
|
- guru
- Friday, 04/20/07 10:59:56 EDT
|
Off to the Hammer-In. . . Yall come!
|
|
- guru
- Friday, 04/20/07 11:00:41 EDT
|
Body Position Work Posture; More.
Having watched many students go from holding-mouth-right-struggling to relaxation, I've become interested in the
subject over the years. Aaron is on the right track. I'm not sure whether he studied Stanislovski's acting method or not, but that method requires self study, self visualization, and self remembering. A similar self study is part of the Alexander Method. Moshe Feldenkreis has developed a system of exercises to enhance the body's posture and movements. Personally, I have been doing a short form of Tai Chi for about 25 years. In any event, you must be your own best critic.
Presently, we throw around a fairly recently coined term, "ergonomics." This is a study that can become quite involved, but essentially, it is a study of how we posture ourselves to any artifact that's been made.
Some people appear to be "naturals" in terms of relaxation and bodily movement. However, many of us need to be coached. When seeking a method and a teacher, be picky. Make sure you get along with your teacher psychologically, and do some research on his or her background. There are many charlatans out there.
|
|
Frank Turley
- Friday, 04/20/07 11:26:53 EDT
|
Safety: accidental fires---say a piece slips out of the tongs and finds the *only* flammable items for 100'. Using plastic for oil quench tanks, etc.
Putting the wrong stuff in the forge; generally *any* plated metal and old painted metal produce toxic fumes.
Thomas
|
|
Thomas P
- Friday, 04/20/07 11:33:15 EDT
|
I think the most commonly overlooked safety concern is simply wearing safety glasses and ear plugs. I know I tend to forget them more often than not, but as soon as a piece of slag flies up and hits me in the face I remember real quick.
|
|
Rhordae
- Friday, 04/20/07 11:49:32 EDT
|
To Miles Undercut and ptree,
Thanks to both of you for your experienced advice on my Royal Western Chief! The ATF was a thought prior to my query here. I'm leaning that way.
I appreciate all of the helpful cleaning and de-bugging advice too fellas!
I've got her cleaned up pretty nicely now so that she turns real easy and sounds real smooth without the oil in yet. Ol' Uncle Butch sure has an eye and a feel for the good stuff when he finds it.
Ptree, that drip hole you sighted was plugged with an old broken off cork on mine. It's been replaced with a brand new cork.
Thanks and truly,
Jim Tomlinson.
|
|
ealdhand
- Friday, 04/20/07 12:03:46 EDT
|
Mr. Turley,
No, we never did get as far as Stanislovski's methods. It was mentioned in passing and then left up to us to research if we wanted to. I believe it was more thoroughly covered in one of the upper level classes, but I was only a writing major/3-d arts minor and was not privy to such high forms of acting:) I'm off to the first demo for the year. Everyone have fun at the hammer-in, and wish me luck that I don't bash any of the "make me a sword" kids over the head:).
-Aaron @ the SCF (who's still trying to get the image of the Guru pirouetting around a shop out of his head:) )
|
|
thesandycreekforge
- Friday, 04/20/07 13:21:53 EDT
|
Aaron: I thought I was the only one still shking his head trying to get it out. How did that apitong work out?
|
|
ML
- Friday, 04/20/07 13:38:21 EDT
|
Anvil ring:
Is there any particular type/brand of silicone caulk that works best for dampening the anvil ring? And where can it be found?
|
|
Rhordae
- Friday, 04/20/07 14:09:31 EDT
|
I studied Alexander Technique with a lady in Kansas City for a few months. When I forget the stuff I learned from her, I quickly find myself at the chiropractor's getting my back put back together. . .
The biggest deal with Alexander Technique is learning what good posture feels like: Contrary to common opinion, it isn't ramrod straight. Ramrod straight requires a great deal of effort to maintain. In a good posture, your head is balanced on your spine which is balanced on your pelvis. . . Almost effortless.
|
|
John Lowther
- Friday, 04/20/07 14:57:43 EDT
|
"who's still trying to get the image of the Guru pirouetting around a shop out of his head"
It will linger
now to do a pas d' deux with him with me in my lederhosen and aloha shirt with my beard braided.
(Do you think he'll read this what with being on the road?)
Thomas
|
|
Thomas P
- Friday, 04/20/07 15:10:42 EDT
|
Caulking the anvil:
As long as it says "100% silicone" on the tube it'll work. Most hardware stores, even (gasp!) the big box stores will have it.
Personally, I've never had to resort to that method. I just bolt the anvil down so tight it can't ring at all. That has the added bonus of making your anvil and stump close to a single unit. If your stump is properly set in the ground/bolted to the floor, that's even better.
Thomas: Gee, thanks! (rolls eyes...)
|
|
Alan-L
- Friday, 04/20/07 15:26:11 EDT
|
The best silicone caulk I've found so far is one called Geocel. It is slow to harden and always remains very flexible, helping to dampen the ring. It worked miracles with my Nimba.
|
|
vicopper
- Friday, 04/20/07 17:35:38 EDT
|
ThomasP,
For shame sir! I need to arise at 4:15 on the morrow, to drive to Waverly TN, and now the thought of you and Jock in a Blacksmiths ballet will most likely keep me up all night! :)
Jim Tomlinson,
The drip hole I spoke of on the Blower is on the little boss that the crankshaft runs in on the side of the blowercase. It is on the top side to allow a drip of oil from time to time on the crankshaft next to the hadle. On my blower, there is a pipe threaded port on top with a oil can port and at about a 45 degree angle from the bottle a drain cock. I suspect the drain cock is really a "try cock" IE open the valve when the blower is upright and mounted, and if it drains oil, the case is properly filled.
|
|
ptree
- Friday, 04/20/07 20:06:50 EDT
|
Anvilfire Hammer-in Update: Good to go. Really hard to project attendance, but I'm starting to get vibes it will be more than double the first year - perhaps 60+. Folks calling asking if there will be sellers of blacksmithing equipment there. None yet, but will see what the morn brings.
Jock has Internet access in his motel room so likely will pop in and out.
For ptree: I ordered 100 new RR spikes from McMasters-Carr. Shipping really not bad. $25 or so for over 80 pounds from the West Coast to TN. About $1.30 per spike delivered.
|
|
Ken Scharabok (Poor Boy)
- Friday, 04/20/07 21:09:50 EDT
|
Thomas P: My apologies. I wasn't questioning your having a large old Trenton, merely trying to document it wasn't only Trenton which used the oval 'pill' in the base. There is a listing now on eBay for a 30-LB Kohlswa with one. First I've seen as I thought only Soderfors used them in cast steel anvils.
|
|
Ken Scharabok (Poor Boy)
- Friday, 04/20/07 22:04:11 EDT
|
Im a beginner and i dont know where to get the right supplies. So do you know where to find a shop that would sell blacksmithing tools near rapid city, SD
PS: Im bobbitybob cause i dont want to say my real name.
|
|
bobbitybob
- Friday, 04/20/07 22:44:12 EDT
|
Bobbitybob: At one time your typical Mom & Pop hardware store carried blacksmithing and farrier supplies as there was a local demand for them. Now you might find a crosspeen hammer. My local Farmers' Cooperative carries horseshoes, but no other farrier equipment.
You can start by clicking on the box at the upper right for NAVIGATE anvilfire. Scroll down the list of advertisers. You can purchase pretty well a full range of blacksmithing-related tools and equipment through them. Be sure to mention you were referred by Anvilfire.com.
Visit your local flea markets and check out the tool sellers. However, even locally not many blacksmithing-related items can be found.
eBay has a category for Collectibles/Tools, Hardware & Locks/Tools/Blacksmithing. You can also do a keyword search on particular items.
Occasionally you can find anvils listed on www.craigslist.com.
In the drop-down menu find the one for ABANA Chapters. You can very likely find one or more groups which hold meetings/hammer-ins within a reasonable driving distance. You will find them a wealth of knowledge and support and typically one or more members sell used blacksmithing tools and equipment on the side. Several of the groups hold very large annual conferences which typically draw tail-gate tool sellers. There is The Southeastern Regional Conference coming up next month in Madison, GA and the Quad-State Conference in Troy, OH the last full weekend in September. At least the CA, MO and AL groups hold annual conferences as well.
A good place for you to start would be introduction to blacksmithing books. One I highly recommend is The Backyard Blacksmith: Traditional Techniques for the Modern Smith by Lorelie Sims. It is available on eBay and through on-line books sellers.
Once you are set up you can make a lot of your own tools, such as purchases and chisels out of vehicle leaf or coil springs.
Towards the top of this page click on the link for Getting Started in Blacksmithing. Lots and lots of good information there. From the ABANA home page go to iForge. About 300 small projects illustrated there.
My recommendation would be to only purchase what you need to get started. Then add to your tooling/equipment as jusitified.
|
|
Ken Scharabok (Poor Boy)
- Saturday, 04/21/07 05:53:16 EDT
|
I am a young (adult), wannabe, upstart metalworker. I'm enrolling in some blacksmithing courses, a welding course, talking to my very good-with-hands family to help me learn, buying the books, all that jazz.
I was wondering if you had any recommendations on how would be best to tackle creation of an arrow-head? A for-use arrow head (haven't heard of a "for display" arrow, personally). Would this be something you'd want to forge from steel, or would you weld cut sheet metal, or what would you recommend?
I have no children around me and I am familiar with the dangers of having and creating weaponry, and my interest in the topic is more than just a passing "ooo, cool" buzz, I'd like to fletch arrows for hunting use. Make hunting more of a holistic experience by making my own arrows.
|
|
Tony
- Saturday, 04/21/07 15:57:03 EDT
|
Tony: the Guru & others are at a hammer in this weekend. I have some vaque ideas however you would be better off waiting a couple days and receive a professional answer.
|
|
ML
- Saturday, 04/21/07 17:08:30 EDT
|
Guru, can you reccommend a good book/video about stair rail construction? I had the opportunity to bid on a stair railing. It was 20 feet, with a quarter turn at the top done with three straight sections of 36 inches each, each having a seperate slope, and then a fourth section of 11 feet at another slope. The house was painted, new carpets, the rail was to be powder-coated. I did not bid on it because I did not want to try to weld inside the house. I thought if I could make a perfectly precise full-scale model of the wall that the railing would sit on, and build the rail on that, and then take it off, powdercoat, and carry it in in one piece with a gang, that would be the way to do it. But, I decided that that would be too risky for the rewards involved in this case. I would like to be able to do that though, technically. I thought if I goy a digital level and or protractor I might be able to take off accurate enought measurements that I could be confident that I had re-created the wall of the jobsite back in the shop. I don't presently have a crane, hoist, or forklift at my disposal either. So retreat seemed wise this time but I would like to be able to confidently do something like this. What do you suggest?
|
|
- brian kennedy
- Saturday, 04/21/07 17:18:38 EDT
|
Guru, can you reccommend good educational material about stair railings. I just passed a chance to do one because iy seemed like it needed to be done in one piece because the house was very new and clean and fastidiously kept so I did not want to try to deal with welding grinding heating in there, plus it is to be powder-coated. So the way it seemed to do it ideally was to make an accurate model of the surfaces the railing will rest on, build on that modeled surface in the shop, then carry all 20 feet into the house,test the fit, take it out, hopefully not need to adjust it, but if so, do so, and bring it in again, then powder coat it an bring it in again for final placement. Aside from not wanting to deal with lifting/carrying logistics, I am not confident about mapping the existing surface accurately enough to make an accurate mock-up. I think getting a digital level/protractor might allow me to do this part of it confidently. Is this how people do this? Then I guess after welding it together one could heat up points to relieve some stresses so it did not spring out of place too badly when one removes it from the model wall. Any illuminations you can offer are very welcome.
|
|
- brian kennedy
- Saturday, 04/21/07 17:39:49 EDT
|
Hi all,
I just tried turning a piece of 12mm square bar into a letter opener, and taught myself that I know very little, so I wonder if anyone can tell me where I went wrong?
Firstly, I have ended up with the mother of all blisters on the inside of the knuckle of my thumb. Is this due to a lack of proper hammer handling technique, or a need to stop whining and toughen up?
Secondly, I found it very difficult to control the shape of the blade. I wanted the back to stay more or less straight, with a natural curve to the cutting edge, but this turned out to be too difficult. I am using RR rail for an anvil, and I expect this didn't help matters.
And lastly, I drew the "pommel" of the handle ino a cylindrical taper, but found that the end kept dimpling over to the point where I ended up with a long and narrow tunnel right through to base of the taper. How do you keep this from happening?
This would be SO much easier if I could find an experienced smith to assist for a few days to learn basic techniques! I think I need to find one... (sydney)
|
|
Craig
- Saturday, 04/21/07 19:26:44 EDT
|
Brian Kennedy,
Most of my commission work has been on a small order, as door hardware, branding irons, etc. However, I have done some straight run stair railings with landings. On one job, I had to weld indoors, so we put heavy tarps down and had water handy. I used a 110V mig that I could plug into the house current. We had minimal spatter and cleanup.
I have a large ironworking library. In combing it, I don't find too much on our subject. "The Blacksmith's Cookbook" has a section, pp 58-63, showing Whitaker's layout method using a straight wooden plank laid edgewise along the tread nosings and drawing the verticals and spacing on the wood. He also used a magnetic torpedo level attached to a large homemade bevel gauge.
A 2006 book from England has some material on stair railings, a brief section on "Surveying the Site" and a chapter titled, "Balustrades", pp 75 through 87. "Forged Architectural Metalwork", by Peter Parkinson, Crowood Press, Ramsbury, Marlborough.
As for your approach to the powder coating problem, it sounds like a solution that anyone might come up with. Sometimes, we have to talk a customer out of what they THINK they want, like powder coating. If that doesn't work, move on to the next job, as you did.
Whitaker was presenting a workshop one time, and he said that he usually used 3/8" x 2" or 2 1/2" for the cap rail itself. He said he liked to forge a chamfer lengthwise on either side. A young man raised his hand and wondered what would happen if the customer insisted on having a manufactured hand rail with an "ogee/ogive molding" kind of cross-section. Whitaker held up one thumb vertically and gave out with a raspberry sound. I think he wanted to hold up another digit, but he held back.
|
|
Frank Turley
- Saturday, 04/21/07 19:45:09 EDT
|
Is there a good recipe for homemade punch lube? If not I'll just buy some Puncheize. All my punched holes have been 5/8" or smaller and if the punch sticks, I upend the piece on the anvil and drive the punch back down through the hardie with brass mallet. I want to do some larger punching both round and square and this method just won't cut it.
|
|
Thumper
- Saturday, 04/21/07 20:58:49 EDT
|
Thumper,
Punch Lube,
the oldest form of punch lube is coal powder, sprinkle it on a few times while punching through, works great,
|
|
Cameron
- Sunday, 04/22/07 01:19:11 EDT
|
CSI Hammer-in: Our thanks to Ken Scarabok for hosting the 2nd Annual CSI Hammer in. It was an absolutely perfect day for it: cloudless and 70F. The Alpha Guru shared some insights on Power Hammer Techniques, Ptree showed us how to make Wizard Heads, and we made some new frieds. Hope to see even more people there next year.
|
|
quenchcrack
- Sunday, 04/22/07 07:41:50 EDT
|
On coal powder I experimented with offering it on eBay. I put some coal in a bucket and kept smashing it with a large ledge hammer head. Works, but it took quite a bit of time to reduce enough down for one pound of powder. However, one pound should last someone a long time.
|
|
Ken Scharabok (Poor Boy)
- Sunday, 04/22/07 08:53:26 EDT
|
Thumper, I googled punch lube and found this--2 #beeswax +
1/2 qt 90 wt gear oil +2 cans STP+ 4 tubes graphite-- boil it-- said it was an old blacksmith recipe
|
|
- ptpiddler
- Sunday, 04/22/07 09:23:53 EDT
|
Well, I have made more stair railings than I care to admit.
As Frank said, careful measuring on site is the first, essential thing. I usually measure everything, including every steps rise and run- they arent always the same, thats for sure.
Then, I do full size drawings, on 4 foot butcher paper, taped together to make it big enough.
I do sometimes build a jig in the shop to represent the site, if its tricky enough- probably wouldnt in your case, as, relatively speaking, its not too complicated.
I always tig weld on site- no sparks, no smoke, very little chance of fire- but I also always use a fireproof blanket- these are rubberised things available at the welding supply store- and I dont do it alone- you want a spotter, with water or a fire extinguisher, ready, just in case.
But, there is an old stagehands maxim-
Never lift anything you can drag
Never drag anything you can roll
And Never roll anything you can leave where it is.
as applied to site work, this means never weld if you can avoid it, on site. So I often use mechanical fasteners, like nuts and bolts, to do site attachments, if I possibly can.
A few years ago I did a 3 story railing, it had 12 separate pieces, the bottom one curving around into a big newel post, some angled, flats on the landings, and so on- we bolted it all together on site with 3/8" flathead screws, so there was no site welding, and it all went together quite nicely.
It helps to make a design with a bit of "slop"- thats a technical term meaning places where gaps dont show, like covering them with a corner piece, or some similar trick.
As far as geometry and layout goes, there really arent too many books on it.
Nomma, the national ornamental metals guys (google Nomma) have some booklets on it.
Metal Fabrication, A Practical Guide, by O'Con and Carr, Prentice Hall Pub. does have a section on stair layout, including spiral stairs, thats pretty good.
|
|
- Ries
- Sunday, 04/22/07 09:58:37 EDT
|
Craig's letter opener:
First, the blister: What is your hammer handle made of/how is it finished? The best blister preventative handle is wood sanded very smooth with either no finish or just a very light coat of boiled linseed oil. I prefer the no-finish handles, as they will build up a nice patina from skin oils over time. A thick varnish wil rip the skin from your hands in no time unless you have serious calluses. Rubber on fibreglass won't let the handle slide when you want it to.
Blade shape:
Starting with square bar, you need to flatten it by drawing out, assuming you want to keep the width at around 12mm. If you have a crosspein or straight pein hammer, on each heat pound a series of dents crossways to the bar and immediately pound the dents out with the face of the hammer. This will stretch the steel out along its length while leaving the width about the same.
When it comes time to put the point on, with flat stock like you will have after flattening the square bar just drive one corner of the end back into the blade, flattening as you go. Once you have that taken care of, hammer the bevels in by holding the steel with the edge-to-be on the anvil with the back of the blade slightly raised off the anvil. This allows you to bevel both sides evenly.
Now we come to a choice of method for keeping the blade back straight: Some folks bend the blade towards the edge in hopes that when they hammer the bevels in it will straighten back out, others just go to the bevels and straighten the back each heat by lightly hammering on the edge-up blade with the back flat on the anvil. Both method work, but I prefer the hit-the-edge way because it's hard to predict how much to prebend the blade so it comes out straight when you're done.
As for your pommel, that's called a birdsmouth. to prevent it, make a steep square taper at the handle end, then draw the taper to the length you want making sure to keep it square. Only then do you start to round it up. Hammer the corners in to make it an octagon, then a 16-sided thingy, then round. If you try to go directly to a round taper from square bar, or even from round stock, you get the birdsmouth in the end. Oh, and use hard blows when you start the taper. Light blows only move the surface of the steel.
|
|
Alan-L
- Sunday, 04/22/07 10:23:22 EDT
|
PTpiddler, I doubt you would find any old blacksmiths using STP! New ones, maybe. Ken S has some punch lube concentrate for sale on his eBay shop. Very reasonably priced and it works very well. Go check it out.
|
|
quenchcrack
- Sunday, 04/22/07 13:17:06 EDT
|
Thumper. Powdered coal and all of the old oil and graphite mixes have some issues. My background in industrial forge shops, where die life, ease of moving the hot metal, and safety are important leads me to the following issues
1. powdered graphite and powdered coal are combustible dusts. Powdered caol is one of the two things that blows up in underground coal mines. If used alot, the dust ends up everywhere, and is a safety issue. It also ends up IN you. Also a safety issue
2. The coal dusts, and the oils and tars etc all burn. That means smoke and flame when used. Again a safety issue.
3. Some use never-sieze in their concoctions. Metals in these include copper and nickel. Metal fume fever raises its ugly head!
In the industrial area, newer water based lubes are almost the rule. The new alkaline salts in a water base are so much better at lubrication in the forgeing arena, that the fact that they don't smoke, don't burn, don't leave dust everywhere etc is just a wonderful bonus. I can say that I have worked in shops that hot punched millions and millions of holes. None used coal dust, and they have all moved from graphite to the new style lubes.
As Jock notes about homemade paint and varnishes, why recreate the wheel, use the stuff that has had millions in R & D spent to get the very optimum results. The issue till recently has been obtaining these mordern lubes in blacksmith shop sized quanties. Ken Scharabok of poorboy is going to be offering the best lube I have ever seen in the industrial market in pints through his on-line store. Small amounts for a reasonable price. Remember to apply this stuff to a hot tool. It leaves a solid film, and the film does the job. Wet does not work.
I demonstraed this lube at the CSI hammer-in yesterday.
|
|
ptree
- Sunday, 04/22/07 13:29:49 EDT
|
Your chance to support the anvilfire.com treasury. I have placed the items I won in the iron-in-the-hat drawings on Saturday on eBay. The net proceeds from the auctions will go to the anvilfire.com general treasury.
They include a 220 volt, 3 PH, 3-Phase motor (condition unknown, but I may be able to get it checked out locally), several lots of laser cut outs with the potential to me made into arts & crafts or ornamental pieces and four pair of shop safety glasses. To find these go to www.ebay.com and find Advanced Search. Then do a By Seller search on scharabo, asking for newly listed items.
Please note only the listings mentioned above are included in this deal.
It will be a couple of days before I get the punch lube listed. I need to find a suitable shipping container. Sort of a question of whether or not to ship it in a pint soda bottle and make the buyer find a suitable use container or buy such a container and pass on cost of buyer.
|
|
Ken Scharabok (Poor Boy)
- Sunday, 04/22/07 15:23:49 EDT
|
Thanks, Frank and Ries, that was very helpful. Home-made bevel, marking on a board laid on the risers, tig, stealth mechanical connections (I guess making lap joints on the top-rail?)all good ideas. I try to make extensive measurements, but sometimes confuse myself with the possible complexities when I try to read my notes later. Lately I got a digital camera which saves me thousands of words. Ries, you must have a pretty portable tig set-up, what do you use? I don't know how to tig yet, sounds like a good idea to learn. I do have a 110 volt mig that I have welded 2" by 5/8" handrail with, I was amazed that it could do it without adding a little auxilary heat with a rosebud but after one pass it really started to get red and adding metal was no problem. I had tarps down and a helper holding a shroud of fireproof canvas around the action as best we could but still had to surgically remove a bit of fused mig wire from the carpet below. It was a bit like the old Yosemite Firefalls back in the Fifties.
I read about a project in The Fabricator in which someone had built a large pipe lattice that curved aronnd a stage in a concert hall up high where lights and equipment could be attached. It was very big and 3D and needed to be fairly precise and I wondered how they kept it under control from warpage, etc. because it didn't look like it was going to be very easy to fix it if it was off course. I have been wanting to investigate layout inventions/technology for quite a while so that I could find a way to be more comfortable/efficient making things the right size with one try if possible. I did see a "Smart Level" for $150 that reads angles digitally to .1 degree.
|
|
brian kennedy
- Sunday, 04/22/07 16:09:02 EDT
|
Ken,
Suitable containers are hard to find one at a time. I think most of us would pay a little extra to get a good metal container with the lube.
|
|
quenchcrack
- Sunday, 04/22/07 16:14:09 EDT
|
ptree: You were correct regarding the weapon used that we discussed yesterday. 40 mm cannon from a Spectre Gunship at 2.5 miles. Good Guys = 3, Raghead Terrorists = 0
|
|
quenchcrack
- Sunday, 04/22/07 16:45:51 EDT
|
For on site tig, I go one of three ways. If 220 volts is available, I take my inverter welder- the welder weighs around 50 lbs, plus the High Frequency Unit, radiator for the torch, and argon tank- its all mounted on a cart, about 18" x 30", that rolls thru standard doors.
If its a small project, I sometimes rent a Thermal Dynamics or Miller Maxstar 110 volt tig welder- these are a bit bigger than a lunch box, and will weld thin material on site with power from a wall outlet. In my area, they rent for about 30 bucks a day.
On bigger projects, I rent a Miller Trailblazer gas drive welder and put it in the back of my pickup. I have 100 feet of leads, so I can leave the truck outside with the welder running, and all you need inside is the torch and argon tank. Again, about 30 bucks a day rental around here, for a $5000 machine.
Tig welding on site has saved me thousands, as well as much time and aggravation. I have tig welded in 80 foot manlifts, at the top of ladders, and lying on my belly like a reptile.
I often work with stainless steel, where mig welding is a big pain- the dingleballs really stick, lots of smoke, and cosmetic results are not great.
But we tig mild steel constantly as well- no cleanup afterwards, no smoke, no sparks, its quiet and pleasant to do. Especially with things like powdercoated or painted parts, where you need to weld quite close to prepainted stuff, you can get away with the absolute minimum of sanding on painted parts with tig. I dont use powder coating outside, myself, as I cannot warranty it, and it cannot be touched up, but inside I do use it occasionally, and touch up with custom mixed model airplane paints or one shot sign paint.
I once welded a series of pieces inside an almost completed library, with very sensitive smoke detectors- and we were working right next to a $10,000 custom made wood handrail, above newly installed carpet. With tig, nary a burn or bit of damage- I would shudder to think of trying that with stick or mig.
And another time, up 80 feet on the outside of a brand new mirror finished windowed curtain wall office building, where one weld spark would ruin a $5000 plus mirrored wall panel- well tig was the only way to go.
|
|
- Ries
- Sunday, 04/22/07 16:51:02 EDT
|
A thought on stair railings -- if I took a bid for one, I would take a bunch of 2x2s (!) and a 2x4 (!) and my compressor and air brad nailer to the jobsite. I would then cut a bunch of 2x2s to the lengths of the horizontal parts of the treads and lay them on there, hang the 2x4 off the side of the stairs, and *thok thok thok* nail all the 2x2s onto the 2x4. Take a good angle measurement and presto, you have a reference for all the tread heights.
Of course, this would pretty much only work on straight runs... and I've never done it. YMMV.
|
|
T. Gold
- Sunday, 04/22/07 18:14:54 EDT
|
Allan,
Thanks a lot for the info. It's like you were there with me, because everything you said makes sense. I DID round the taper as a first step! Even the handle of the hammer was spot on! I have a square-headed stoning hammer for the heavier blows, which has a rubber handle, but I think the real culprit was my ball peen, which has a full gloss finish (which I will now sand off as soon as I get home from work). I did most of the work with that. Do you think it might help to powder the raw timber with some talc after sanding?
|
|
Craig
- Sunday, 04/22/07 18:23:11 EDT
|
Craig,
An old blacksmith sez, "Don't sand." Sanding raises a "nap" and leaves grit on the wood. Scrape with a piece of glass. Finish with 1/2 boiled linseed oil and 1/2 turpentine. Rub it in well and polish with a soft cloth.
|
|
Frank Turley
- Sunday, 04/22/07 18:43:51 EDT
|
Craig,
It won't matter a whole lot what sort of finish you put on your hammer handle if you use a "death grip" on it. The hammer should be held just tightly enough to allow you to control it, but not so tightly that you destroy your tendons and hide.
That said, my personal preference for hammer handle finishes is nothing more than sweat and grime, worked into freshly scraped smooth wood. I use broken beer bottle glass (with great care) to scrape the handle, being very careful to always scrape down the grain so I'm not raising any fur. One pull with the glass will tell you if you're going the right direction or should go the other way. Wear gloves, okay? Blood isn't a bad finish for wood, but it's sticky until fully dried and turns black with age. (grin)
|
|
vicopper
- Sunday, 04/22/07 19:09:18 EDT
|
Quenchcrack, From a Spectre that 40mm is a cannon. Grenade launcher would be from a hummer etc. Still a 40MM autocannon is pretty awesome!
Craig, if you get your hammer handle nice and smooth and finished, to help prevent the death grip, especially when your hands get sweatty, rub a little natural beeswax on the handle. It warms, and gets just a little sticky, and you can hold the handle with a much lighter grip. I have some issues with my hammer hand and basiclly grip the hammer with my ring, and little finger and thumb. The beeswax is very helpfull
|
|
Ptree
- Sunday, 04/22/07 19:23:59 EDT
|
ptree: 40mm is 40mm; whether it explodes is irrelevant. A hole in your body that big will make you very sick. Send me your email and I will send you the video clip. quenchcrack at hotmail dot com.
|
|
quenchcrack
- Sunday, 04/22/07 20:27:50 EDT
|
Quenchcrack: I'm looking at two possibilities. One is a 16-oz jar used by pharmacies. Other is a 16-ounce PET clear jar. Catalog for US Plastic Corp. says they are 'virtually ungreakable'.
|
|
Ken Scharabok (Poor Boy)
- Sunday, 04/22/07 20:53:17 EDT
|
Ken. just be sure that's its not a metal container or that it has a metal lid. you'd have to ask ptree but over time it might spring a leak.
|
|
- dale
- Sunday, 04/22/07 21:19:31 EDT
|
Thanks all for the input, I just emailed Ken for some of his private stock. Seems easier than grinding up coal then blowing myself up.....although, like Nipp, I like a good adernaline rush now and then.
|
|
Thumper
- Sunday, 04/22/07 21:22:39 EDT
|
I just got a gas forge burner, a friend used to use it, but doesnt now, and we are wanting to build a forge to house it :)
anyways,
i keep seeing freon tank forges, and like the look,
what about a propane tank forge?
i only have 1 burner
what is the difference between a freon tank and a propane tank,
notable the one in ron reils mini forge page,
thanks
|
|
Cameron
- Sunday, 04/22/07 22:32:32 EDT
|
Cameron, the 20# propane tank is a little bigger [2"?] than the commonly used 30# freon tank, or pretty close in size to a 50# freon tank. The propane tanks are a little thicker.
|
|
- Dave Boyer
- Sunday, 04/22/07 23:38:32 EDT
|
will i be able to use a regular barbecue sized propane tank for a 1 burner forge, or should i try to find a 30 pound freon tank?
|
|
Cameron
- Sunday, 04/22/07 23:54:04 EDT
|
|
|
[
CSI - anvilfire MEMBERS Group |
Getting Started in Blacksmithing ]
|