| WELCOME to the anvilfire Guru's Den - V. 3.0 |
|
THIS is a forum for questions and answers about blacksmithing and general metalworking. Ask the Guru any reasonable question and he or one of his helpers will answer your question, find someone that can, OR research the question for you. This is an archive of posts from April 9 - 16, 2003 on the Guru's Den |
|
|
|
Work Hardening Brass: Jim, Patrick is right about the surface. However, if you start with material with a cold drawn surface and machine it you are removing the part with the most work hardening so the results of machining will be a softer surface. The only time machining produces a work hardened surface is if the tool is dull or has significant negative rake. |
| - guru - Tuesday, 04/01/03 00:01:31 GMT |
|
PPW I know that cast was readily avalible, I was just thinking that a young fellow (I know I am making a major assumption here) might not have the $$$ to get a ci pot.... Young, use the pipe as is.. pipe was around back then.... tho I would probably paint it black if it were me..... |
| Ralph - Wednesday, 04/09/03 00:07:12 GMT |
|
hello anyone there? |
| young blacksmith - Wednesday, 04/09/03 00:12:04 GMT |
|
Young BS. Did you READ Paw-Paw's message before posting? If you do not slow down, read, and try to comprehend then your posts will be ignored. I repeat what Paw-Paw said, THIS IS NOT A CHAT ROOM Fire pot and tuyeer material like ALL blacksmithing technology have remained in use after newer advances. Smiths in the 21st Century use ALL previous methods including bag bellows and pit forges. In Colonial Era American shops horizontal bellows of either double or single action were the rule. In Colonial Spanish shops the vertical single action pair was the rule and still is common. Tuyeers were mud, mud and clay pipe or brick/masonry. Blowers were not common the early 1800's and commercial cast iron models were not widely available in America until the Civil War Era. At that time older Colonial Era bellows and forges were the most common and continued to be so until the after the Cival War. Bellows and brick forges were still preffered except for portable break down use. It was not until the 1880's when small steam engines were common, gasoline and electric motors were coming into use that blower type "pattent" forges became more common than old style forges. However, wood and good leather bellows were commercialy made well into the early part 20th century. If you want to be an accurate reinactor in the blacksmithing field, earlier technology than that of the period was always available and commonly in use. It was not until the 20th Century when most of the old wood and leather bellows had rotted away that it seemed that cast forges were the rule. See my story, "Blacksmith of 1776" for a description of the typical clay pipe and mud forge that has been in use for thousands of years and is still used in many parts of the world. |
| - guru - Wednesday, 04/09/03 01:59:25 GMT |
|
Jock, The military forges of the Civil Ware, both Cavalry and Artillery had cast iron blowers and packed into their own "footlocker". Pictures are available at the LOC. Young Blacksmith asked specifically about the Civil War era because he re-enacts the Civil War. |
| Paw Paw - Wednesday, 04/09/03 02:13:31 GMT |
|
Still the vast majority of forges at that time were brick with bellows. "Civil War era" does not mean "military only". The military would have had the latest in portable technology for field use. But most SHOPS of the time were using earlier technology. Only large manufacturing plants would have been using all metal forges and pipe ducts at that time. Besides. . . WHO'S Civil War? French, English, Russian. . . ? On bellows, the double action "Great Bellows" was invented in the 1600's but did not become popular until the late 1700's. After that it was the most common bellows in the West and is still used by many today. So for the most part you are always safe using a double action bellows. |
| - guru - Wednesday, 04/09/03 02:59:28 GMT |
|
guru, > Besides. . . WHO'S Civil War? French, English, Russian. . . ? Come on, Jock. You're quibbling, and you know it. When some one in the US says the Civil War, he means the War of Northern Aggression. How many Civil War re-enactors do you know that re-enact as civilians? |
| Paw Paw - Wednesday, 04/09/03 03:12:40 GMT |
|
Those that work in parks and historic sites (federal, state, private) where there were permanent forges. . . at least as many as those that re-enact battlefield conditions. :) |
| - guru - Wednesday, 04/09/03 05:43:56 GMT |
|
There is a big difference between historical interpretors for parks and re-enactors. |
| Paw Paw - Wednesday, 04/09/03 06:00:05 GMT |
|
pre test POST test toast taste test testimonial |
| - Pete F - Wednesday, 04/09/03 06:47:49 GMT |
|
Welcome back! :) |
| - guru - Wednesday, 04/09/03 07:24:24 GMT |
|
David; Just saw Tom Clark demo at the CBA spring conference and he was selling the Hoffi style hammers. Look like elbow hammers to me , at first look. |
| - Pete F - Wednesday, 04/09/03 08:21:59 GMT |
|
I've got a vocabulary question - what's the difference in a die and a swedge? Is a swedge just a one-sided die ? |
| Mike the Red - Wednesday, 04/09/03 08:30:21 GMT |
|
And one other question... How do ya'll make such pretty spring tools? Or do you just draw them pretty? I just made my 2nd spring tool, and the spring bend looks nothing like the ones in Guru's drawings (ex. iForge #88). I can either get a smooth circle and arms that don't come off parallel, or arms that are parallel with three random bends rather than a smooth circle. The three bends work, but I'd just assume not be embarassed by my tools. Is there a technique I'm missing here, or do I just need more practice? (or both) |
| Mike the Red - Wednesday, 04/09/03 08:37:45 GMT |
|
Mike the Red: I think you mean "swage"? The Gurus can correct me if I'm wrong as so frequently occurs, but my understanding of this matter is that a "die" is usually something vaguely similar to a punch, used to impress shapes on metal. A swage (block) is basically a chunk of steel with ruts/grooves/raised areas that you can hammer metal cold or hot on. In the context of smithing, usually the metal is hot, and the swage is sometimes a hardy tool. Hope I've been helpful. |
| T. Gold - Wednesday, 04/09/03 08:44:35 GMT |
|
T. Gold- So a swage is used to change the shape of the metal, whereas a die is used to impress a shape on the metal? ..wanna make sure I'm reading what you wrote correctly. |
| Mike the Red - Wednesday, 04/09/03 08:50:58 GMT |
|
Mike the Red: Yeah. You could look at it like this, too: you hammer metal on/in a swage, and you hammer a die into metal. And I have a question of my own: I've seen the term "clinker breaker" used in reference to coal-fired forges, particularly older cast-iron firepots. What is a clinker breaker? |
| T. Gold - Wednesday, 04/09/03 09:05:22 GMT |
|
Swage, Punch and Die These terms can be confusing and are confused. Swage can be a noun OR a verb. Generally "to swage" means to make something smaller". A swage is the tool used make that thing smaller. Swages are often confused with fullers. A die can be many things. A die can be a part with a hole in it to punch a hole through. Thus you have a punch and die. Note that the die controls the size of the hole, not the punch. A die can also be any impression into which something is forced into to shape it (similar to a mold). However, molds are dypicaly used with liquids or pastes and dies are used with solids. Dies can also be the contacting part in any machine such as power hammer dies and threading dies. Dies can be used singlely or in sets. A punch is normally a device for making a hole but also can be used to make an impression OR to bend something. A "die set" is a ridgid metal frame used to support and guide punches and dies and often includes return springs, pressure or stripper pads or plates or any sort of mechanical parts needed to guide and feed or index material in and out of the die set. A swage block is a universal tooling block made of cast or ductile iron that includes various impressions like dies as well as holes similar to a bolster plate. It is rarely used for swaging. A dapping block is a smaller version of a swage block used by jewelers and usualy has polished or finely finished surfaces and is often made of hardened tool steel. Late "Industrial" swage blocks have holes of various sizes and shapes (usualy round, square and rectangular) and grooves on the edges in various half sections (round, vee, hex). Early Blacksmith swage blocks were usualy made from personal patterns and had various shapes on the sides, few holes (due to the skill required to make core boxes and core prints) and bowl or spoon depressions on the faces. Modern swage blocks are a combination of styles. A bolster plate is a piece of metal with one or more holes in it and is used similarly to a swage block OR a monkey tool. |
| - guru - Wednesday, 04/09/03 11:28:29 GMT |
|
More A swaging machine can have dies that do the swaging. . . |
| - guru - Wednesday, 04/09/03 11:29:13 GMT |
|
Clinker breaker: Some firepots have these and some do not. A clinker breaker is a device used in coal forges and furnaces to clear the grate or tuyeer of coal ash and clinkers. In patent fire pots there are several types. Buffalo forge fire pots had a "T" shaped device that was rotated by a handle and the ends of the "T" crossbar fit into spacs in the grate to clear clinkers. Other forges has a "ball" clinker breaker that is slightly triangular in cross section and is used both to clear clinkers and to direct the air. When the narrow side of the ball is UP the air is directed to the center of the fire pot. When the flat is up the air is spread side to side making a larger wider fire. Some forges have a butterfly type valve that is rotated to clear clinkers. They are normally used in the vertical position and not used as a valve. |
| - guru - Wednesday, 04/09/03 11:36:31 GMT |
|
More Clinker Breakers: Note that these are used in vertical blast firepots and not the sideblast type. Check the Kayne and Son web-site. They have photos of a fire pot and the ball type clinker breaker. |
| - guru - Wednesday, 04/09/03 15:24:45 GMT |
|
Jock the double lunged bellows was a bit earlier than the 1600's though the goldsmiths were the first to use it and the blacksmiths beefed it up and started using it slightly later (1400's-1500's IIRC, I believe that "Cathedral FOrge and Waterwheel" mentions this, I'll check) Of course the twin single action bellows remained in use as well. Thomas |
| - Thomas Powers - Wednesday, 04/09/03 15:01:29 GMT |
|
Jock, Can you tell me how and if one could smith a "tin" whistle out of a peice of 1/4, or 3/8 inch black iron pipe or copper or brass. I haven't been able to find any instructions on the web. Do you know where I might look? Thankyou very much, Larry |
| LARRY SUNDSTROM - Wednesday, 04/09/03 13:50:36 GMT |
|
Tin Whistle Larry, There are a couple books on making musical instruments that cover the subject but I cannot remember making flutes from pipe. I'll check my library (I have MOST of the available books) and get back on it. Your best bet is to have an example. The basics are that the end of the tube is plugged with a wooden piece that has a cut that slopes up to create a directed high velocity air stream. There is a notch cut in the pipe that slopes in the same direction creating a sharp edge. The stream splitting on the sharp edge forms an eddy and a vibration in the air column and thus a "whistle". Open finger holes in the pipe shorten the air column. Closing them with your fingers lengthens the air column. Long air columns result in a low not and short a high note. The physics of the air column are the same in all wind instruments. The mathematics of pipes have been well defined since the 1300's and the building of the great cathedral pipe organs. However as with anything else there has been great improvements over the years. The most complete modern book on the subject is a two volume set written in French titled Instruments a Vent (Wind Instruments). I have the set if you read French. But I expect you are looking for something more on the level of a how-to crafts book with dimensions. Again, give me a chance to check my library this afternoon. The BEST collection of musical instument books in the world (it is a fact) is in the nearby University of Virginia Music Library. I know you are just over the hill from there so you may want to try them. |
| - guru - Wednesday, 04/09/03 15:22:22 GMT |
|
Thanks Jock, I want to make a working model of a tin whistle that I could use to double as a letter opener sheath. Thanks for your interest and help. Larry |
| LARRY SUNDSTROM - Wednesday, 04/09/03 17:06:27 GMT |
|
RE: Champion 400 blower dissassembly blues Dear GURU (or Bill Lynch), I thought the 400 was all ball bearings, but it isn't so: 1/2" ID bronze bushings are used on the mid-speed gear spindle. I managed to get the middle gear shaft bushing keeper caps off with a forged and fabbed pin wrench. Q1: I can't figure out how to separate the ~5" brass gear from the small ~1.5" steel gear which are keyed onto the middle gear shaft. There's no room for a gear puller to reach through the 3/4" diameter bushing holes with captured 1/2" shaft-only a 1/8" gap for gear puller arms... Do you make a wedge tool to separate the two gears? I've tried burning incense and muttering, uh, incantations. This is a delicate situation as the thin cast fan housing sides won't withstand hammering. It appears that one should move the brass gear towards the spindle end, remove the key, then maybe the spindle would ease out to the right (crank side)? Q2: I also can't loosen the nut holding the fan on. It's not rusted, just tight and 100 yrs old. There's nothing to grab at the back end of the worm gear spindle, just the bearing cone nut which is also right hand threads so it just unwinds. Should I make some real thin nuts to jam onto those rear threads? Or make a tool to grip the cast spider element of the fan (and hope to not break it)? You'd think they'd have put a hole into the shaft somewhere so you could insert say a 3/16" or 1/4" rod to lock it up for tightening/loosening... Thanks for any feedback you might have. |
| Black Rock Brian - Wednesday, 04/09/03 17:19:18 GMT |
|
Spring for fullers etc: Mike indeed there is a trick. Doug Merkl showed us this when he demo'ed for SWABA. Center punch two marks about 9" - 12" apart in the bar you are using for the spring. Heat at the center punch and bend a sharp right angle so that the end of the bar bends AWAY from the center punched side. Do the same for the other end. Now chill the ends and heat the entire section between the punch marks (which are now the locations of the right angle bends) but dont heat the corners. Bring it to a uniform bright red heat heat - uniformity is the key. A torch works well for this. Grab hold of the two ends and bend them towards you until they are parallel. You can use the horn to help. You should end up with a nice nearly perfect circle and two straight arms that you can trim to the length you want. If you want a flat side - so that the spring sits on the anvil face - then do a similar procedure with just one corner |
| adam - Wednesday, 04/09/03 17:28:51 GMT |
|
Hey all, I was wondering if there is anyplace to buy hand powered blowers like everyone talks about. I imagine that you could find an older one like Black Rock Brian has gotten his hands on. I've seen the electrical ones for sale on some of the web sites, but havent noticed any hand crank ones. Is this something that is a real pain to make? Im a newbie so dont really know. Also, I've bought a Russian anvil already, but waiting till the Ironfest coming up in Texas before I try and get a forge. I've never been to one of the meets before and not sure what to expect. Is it possible I might be able to find a forge there? I would prefer to get a propane forge, to avoid complaints with the neighbors, and coal isnt a common commodity in Texas anyways. Also going to try and take a welding class this summer. Im itching to start smacking some iron, hehe. Only gotten a few arched eyebrows from the wife. |
| nuked - Wednesday, 04/09/03 17:47:43 GMT |
|
I've got a single speed Delta jigsaw. I've been trying to use it to cut copper and brass sheet. The metals I want to cut are between 1/32 and 1/16 inch thick. I'm using metal cutting saw blades. I've found that when I try to cut these sheets the blade catches and sometimes breaks. I'm wondering if I shouldn't be running the saw at a slower speed. There are speed controls available for running routers at slower speeds. Could I use one of these on my jigsaw? Any other advice you can offer on cutting thin metals like this? Thanks! |
| - Kyhm - Wednesday, 04/09/03 17:51:58 GMT |
|
Nuked: Welcome to the group. I am in NE Texas, where are you? Browse through the FAQ's and other areas of this site for information on how to build your own gas forge. You will find many folks here ready to answer questions you may have when you get started. I bought a commercial gas forge when I started and it has performed well, but you can make one for 1/10th what you pay for commercial rigs. However, I have been lead to believe that there will be a lot of stuff for sale at IronFest. |
| - Quenchcrack - Wednesday, 04/09/03 18:19:13 GMT |
|
Quench, I am in San Antonio. I would consider making one of my own but dont have a welding machine yet. At this point it might be easier to just buy a commercial gas forge for now, and plan on making a larger gas forge when I have a clue what im doing, and the materials/know how to do it with. I think ive read this site up and down once or twice, and still learn something new. Thanks for the welcome :) |
| nuked - Wednesday, 04/09/03 18:30:54 GMT |
|
Safety Reminder- To emphasize Paw Paw"s safety demo once again. Today I was cleaning up a 10 inch piece of 1/4" round stock with about 3/8" of the end flattened and turned down to make a foot. The wire wheel on my pedestal grinder grabbed the piece and drove the turned down end about 8" into a 1/2" sheet rock wall. Glad it went that way! |
| Brian C - Wednesday, 04/09/03 18:38:20 GMT |
|
nuked. You dont need a welder to make a basic gas forge or a basic coal forge either. My first forge was a Ron Reil type mini forge which I made with ordinairy hand tools that can be found in most garages. Check out Rons page and the links to other forge designs. |
| adam - Wednesday, 04/09/03 18:55:07 GMT |
|
I have a small # 21 Addis short bent chisel(actually a flat carving gouge) that someone had heated and rebent the edge towads the handle.Would you know of anyone who could rebend to approximatly the origional shape ,and would.they be able to retemper? The tool worth abt.25 bucks as a worker,since I make my starving as a carver,there are times when I could use it,,thank you for your time,nad |
| larry nadwodney - Wednesday, 04/09/03 19:23:23 GMT |
|
Jigsaw: Kyhm, I'm not sure of the style saw you are talking about. However, most tools designed for wood working run much too fast for metal work. For steel the blade should move a maximum of about 100 to 120 FPM (feet per minute). There is also the matter of the blade type. When sawing there should always be 2 or 3 teeth on the work. That means very fine teeth on that 1/32" thick stock (40 TPI). Currently what you are doing is shearing out little chunks, not sawing. I've sawed thin metal of this type using a Jewelers saw but have not had much success with power tools. Thin stock is usualy sheared or punched |
| - guru - Wednesday, 04/09/03 19:49:15 GMT |
|
Thanks Adam! I got to the shop today and, lo and behold, the shopkeeper had seen my spring fuller. I just love it when he makes fun of me - makes me feel so skilled. = ) Hopefully I can re-work it tonight and redeem myself. |
| Mike the Red - Wednesday, 04/09/03 20:33:25 GMT |
|
Kyhm: When you say you are trying to cut brass and copper with a jig saw are you talking about the bench tool or are you referring to a hand held tool. You probably won't have any real success with a hand held reciprocating tool as there is usually almost no support right next to the blade and no rigidity to the tool position. Your best bet for thin soft stock is probably a set of offset aviation snips which are reasonably inexpensive and keep your hands above the work. (Buy the set- there is a reason for the left and right hand versions!) If you are talking about a bench type jig saw using a reciprocating blade attached at both top and bottom you can at least improve your chances of success by making sure that your blade tension is correct and you leave no extra space around the blade at the table. If your saw does not have a replaceable insert to close the gap try using a piece of plywood under your workpiece to support the cut edge. Feed very slowly so you don't fully load the gullets of your saw blade and use a lubricant to keep the blade clear of chips. I like to use a stick wax called Edge Lube from LPS Tapmatic. If your material is soft and gummy you may need to actually clamp it between two pieces of wood and then cut it. If you really want to SAW this easily try a bandsaw with a hook tooth blade rather than a jig saw. Slow material feed still applies. |
| SGensh - Wednesday, 04/09/03 20:34:36 GMT |
|
More on tongs: What do ya'll find is the best tong type for holding plate and/or wide stock (4"+)? |
| Mike the Red - Wednesday, 04/09/03 20:41:27 GMT |
|
Larry our local smithing group would probably be happy to do this for you for a couple of bucks tossed in the newsletter kitty. Just show up at the next meeting. Thomas |
| - Thomas Powers - Wednesday, 04/09/03 21:15:06 GMT |
|
adam, re the "swage" spring technique, you start with a right angle "U" shape before you heat between the right angles or punch marks and bend the spring part into a circle?? if that is not what you meant, i will try it anyway; it sounds like it would work well. i am working on a header tool and will need to fashion the spring soon. thanks! flagstaff, AZ: will be there this w/e. i know that the ABANA conference was held there. where can i go to see some impressive iron/steel work or anything related to smithin'??? thanks much.... |
| rugg - Wednesday, 04/09/03 22:19:23 GMT |
|
an acquaintence of mine is seeking a BS who is familliar with flintlock rifles and can forge soem butt plates and trigger guards. Anyone who can do this please send me a note so I can pass it on to him. Many thanks. Jerry Crawford |
| - Jerome Crawford - Wednesday, 04/09/03 22:40:20 GMT |
|
Greetings this morning i traded a 45 minute welding job for a edwards #5 shear. I need to make two new dies, each .5x2x7 inch. Can anyone recommend a good tool steel that i can machine to fit, and perhaps oil harden? Does the Good Guru have a match in the on-line steel store? Also, does anybody know the capacity of this thing? Thanks, Mike |
| mike-hr - Wednesday, 04/09/03 22:57:01 GMT |
|
Black Rock Brian- the shaft on the brass gear is tapered on my #400. take a brass punch and drive the shaft out, away from the brass gear.dont forget the set screw on the brass gear. a 7/8" socket fits on the fan casting end, i think when i dis-assembled it, i used aluminum soft jaws to hold the shaft. |
| mike-hr - Wednesday, 04/09/03 23:25:04 GMT |
|
Mike-hr S-7? or D-2? I think Guru has S-7 and perhaps D-2..... I also am fairly certain that Pacific Machinery and Tool has both (actually they have almost everything) Here in the Portland area.... road trip? |
| Ralph - Wednesday, 04/09/03 23:40:11 GMT |
|
mike-hr: Nice trade. Unless you really want to make the blades yourself why not get in touch with Edwards- they still make ironworkers and Centaur used to list the #5 shear as well as replacement blades which were about $95. Since Centaur has changed (and stopped advertising here) you might want to find a different distributor to purchase from. |
| SGensh - Wednesday, 04/09/03 23:52:02 GMT |
|
swage spring. Rugg - yes like a U but with sharp corners. And then open up the legs until they point in the opposite direction. |
| adam - Thursday, 04/10/03 01:24:47 GMT |
|
Hacksaws: thinking of making myself some hacksaws - it would be nice to have several with different tooth pitches. What is the right amount of tension to put on a blade? Is there a spec? |
| adam - Thursday, 04/10/03 01:48:17 GMT |
|
Adam, No spec that I know of, just tight enough to keep them from flexing. Have you seen the picture of the hacksaw the guru made? It's a pretty thing, and works well, too. |
| Paw Paw - Thursday, 04/10/03 02:07:31 GMT |
|
Nuked, go to the web site"www.balconesforge.org". We are a blacksmithing organization, from San Antonio, Austin, Marble Falls, etc mostly the balcones escarpment. We meet the last saturday of every month. A lot of our members will be at the Iron Fest as demonstrators, selling stuff and all around helping the North Texas club. Our membership is very inexpensive. $10.00 from Jan 1 to Dec 31 of each year. You can also put your request for a forge in the buy and sale part of the web site, also I'm from San Antonio. Hope to have you as a member. JWGBHF |
| JWG Bleeding Heart Forge - Thursday, 04/10/03 05:17:38 GMT |
|
bought a large leg vise awhile back it is perfect condition, threads are good, all parts are there, cross hatchs on jaws, it is a 6 inch model, love using it because of the size and weight of the tool, however do not know who made it, could find the stamp 100 on several parts, no trade marks , any ideas, |
| martin - Thursday, 04/10/03 05:41:19 GMT |
|
Just wanna wave my new white cast at you all,and encourage you to keep your fingers out from under the Treadle hammer. Dr. smiled and said " you keep that cast nice and clean". Probably shouldn't have laughed that loud in a Dr's office. Pretty good CBA meet in Hanford. Imagine, those guys were actually razzing me about having broken bones with my TH!!...um..well........again. |
| - Pete F - Thursday, 04/10/03 08:40:36 GMT |
|
Guru and others: Thanks for the previous help received on this site. I have additional request for identification help. I have a series of various sized "domes" ranging from about 2" across to about 4 " across. These have a round hole on the bottom as if they were to be set on smoe kind of stake. I use them to form spoons, but wonder what they really are? I also have acquired a Green River foot vise and am not sure what it was made for. It has a swae block with a series of angular swages cut into it. It also has an adjustable block on the vertical backside with a long range of adjustments. The jawsw have been dressed sso they come together square in one section and there is section where the jaw slopes in toward the other jaw with about a 1/4 inch drop?? Thanks for the help Don agostine |
| Don Agostine - Thursday, 04/10/03 13:02:03 GMT |
|
Foot Vise: Don, These vises were made in a couple styles. This one is known as a "heading caulking" vise. The block with the grooves in the back is to help forge caulks on horseshoes. The jaws you have sound customized. Normally these vises came with several sets of jaws with grooves to fit standard fractional inch round bar. Usualy each jaw had two sizes of groove (3/8, 1/2, 5/8, 9/16). The combination of the gripper jaws and the bucking block was for upsetting heads on bolts. It is common to find these vises without the extra jaws or with the bucking block missing. I had one that had "V" grooves cut in the one pair of jaws to hold 1/4" square for heading spikes. The return spring and bucking block was missing but it was in good condition otherwise. However, since parts are not available and the jaws are complicated to machine these vises are of very limited use when they do not have all the original parts. |
| - guru - Thursday, 04/10/03 13:49:06 GMT |
|
Nuked, you can also check out my forge at http://www.ironringforge.com/ForgeSaga/Forge_Building.html No welding at all to put it together and it's still going strong after over two years of use. |
| - Marc - Thursday, 04/10/03 14:29:57 GMT |
|
Leg Vise Markings ans Styles: Martin, Leg or "Solid Box" Vises were so standardized a commodity that few makers put any type of mark on them and no brand was listed in tool catalogs. Occasionaly you can tell early and late English vises by style and English from American by the style of the nut or "box". American vises often have a model number on them that translates to weight. If you weigh your vise it probably weighs almost exactly 100 pounds. These vises were often sold by jaw size but the weight is the best designation as they were sold in 10 pound increments up to 250 pounds and the jaw size increments were quite small. All these vises are forged wrought iron and later mild steel. The jaws were a forge welded piece of hardened tool steel. Cross hatching was very light and for most decorative work is best ground off if not worn off. Early English vises had a small rectangular hole punched through the back jaw and spring for a tennon on the bench bracket. A round pin through the tennon held the vise together. The spring had a slight arc at that point to put tension on the pin so that all the parts stayed together. This same model had a rectangular pin to hold the pivot pin in place. The box and sometimes the head of the screw on English vises had decorative turning lines on them and the acorn ending was machined quite crisply. Some of the earliest English vises had a flange on the box that was forge welded made from a piece of bar wrapped around the nut. These English vises also had heavy chamfering on the upper rectangular section of the arms and leg. Sometimes the forging goes beyond octagonal and makes a square turned diagonaly with flat corners. I have a Brooks and Cooper vise of this style (rectangular tennon, turned box and screw, heavy chamfers). It is stamped Brooks and Cooper in an oval logo on the box. Marking of this type is unusual. Later (supposedly after 1838?) vises had a wrap around bench plate mounting that was held in place with a wedge. The bench plates were a heavy forging or casting. The strap that wraps around the leg also held the spring in place. These vises used a nut and bolt for the pivot pin rather than pin and wedge. English vises continued to have the turned box and chamfered arm and leg American vises did not have the decorative turning on the box or screw nor did most have the heavy chamfers on the legs. When chamfered it was lighter and often at a 30 degree angle rather thann 45. Most American vises tend to be the wrap around bracket type. They are also more likely to be marked or numbered. Usualy the only marking is on the underside of the bench bracket and consists of a model/size number. As closed die forging on heavy steam hammers became more common numbering of parts and additions of markings became more common. Some solid box vises were made vise manufactured by vise manufacturers but most were made by anvil manufactures. |
| - guru - Thursday, 04/10/03 15:21:08 GMT |
|
Leg Vise My first leg vise, which I still use regularly, was made by the Trenton Vise works in NJ. It is stamped with the patent date and date of manufacuter on the movable jaw. If I recall corretly, is was made in June or July of 1867. It has many of the features of the English vises, but is also marked with the weight (57). One of the neatest things about this vise is the mounting plate. In this case it is a plate rather than the two straps that are also seen. The section that the wedges pass through was made by drawing out a tang and forge welding it back on itself. It really is a neat vice. My other vise is and Indian Chief, my by the same company who made the Trenton anvils in Columbus Oh. Patrick |
| Patrick Nowak - Thursday, 04/10/03 16:22:41 GMT |
|
Hack Saw: Adam, Making blades or frames? I use the best HSS coarse tooth (14 TPI) blades I can get. I used to use "all hard tungsten HSS" blades but they do not make them any more. These were very hard and would shatter like glass. But you could cut a 1/2" bar in two in 10 strokes. These very hard blades are still available for reciprocating saws and I have seriously thought about about making frames to accept the smallest of them. (About 1" x 14" x .040). Most hacksaw frames (even the tubular type) cannot generate enough tension to meet the minimum spec on tension for band saw blades. The frames deflect instead of putting more tension into the blade. This is why most available blades are the soft flexible type. For most applications in blacksmithing you want hacksaw blades as coarse as possible and with SET teeth, not the wavy type blades. The wavy type are fine toothed and are designed for thin metal. As Paw-Paw mentioned you may want to look at my hacksaw frame. There is a photo of it on the Getting Started page. It is made of 5/8" (16mm) square stock. Tension comes from a nut on a 3/8" NF stud. The blade fits in sawed slots and is held by small rivets as pins. I made this saw after trashing 3 standard Craftsman saws in one week. At the time I was doing a LOT of hand sawing as I did not yet have a power saw. I still do a lot of hacksawing but not nearly as much. The saw is heavy but this just means that you do not push down on it, just back and forth. If I were to make another I would make a deeper frame and as mentioned probably use heavier blades. I have made drawings of a similar design with a large arch to the frame. Most of the other details would be the same, just stretched to fit. When I made this saw I started with a full scale drawing and matched the parts to the drawing so that the standard length blades would fit. |
| - guru - Thursday, 04/10/03 16:24:39 GMT |
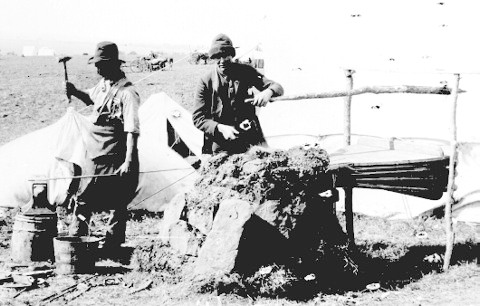 First Blacksmith Shop in Guthrie OK 1889 Blacksmithing in 1889 I found the photo above while searching for something else. It was taken during the 1889 land rush in Guthrie, Oklahoma. The bellows is a standard commercial type that was commonly available at the time (identifyable in the original image) and shows how long after hand crank blowers were available that many smiths still preferred the bellows. The anvil appears to be a Peter Wright. The interesting thing is the make-do forge made from sod and stone roughly stacked. Everything this fellow brought with him including household goods came by wagon in the land rush the day this photo was taken. That included anvil, tools and materials. |
| - guru - Thursday, 04/10/03 17:07:13 GMT |
|
Guru, have had the opportunity to look at the Mastermyr book? I ask as your hacksaw frame is very much like the one found in the 'Find'. Yours is a tad more ornamental. We have a smith made hacksaw frame in the Ft Vancouver shop that folks comment on how it is not right for the period. I started bringing the Mastermyr book and showed the non-believers that hacksaws have not changed on over 1000 years... other than materials. |
| Ralph - Thursday, 04/10/03 18:45:27 GMT |
|
Smithing on the road.... That picture just goes to show how little you need if you want to do it...... |
| Ralph - Thursday, 04/10/03 18:46:14 GMT |
|
Mi nombre es Ricardo Ramos, soy ing. aeron�utico y estoy intentando producir perfiles de aluminio 6061 T6 para aeronaves experimentales. Carezco de experiencia en el temple de metales. En la zona de Argentina en la que vivo no hay una estructura industrial que me asegure la calidad del temple. La pregunta es: tengo pensado controlar la temperatura mediante una fuente de corriente, haciendo que el perfil a templar se caliente por efecto Joul, que precausiones debo tener para evitar distorsiones y lograr un temple uniforme? Sorry but my english is very poor. My name is Ricardo Ramos, I`m aeronautical engineer. I wont make extrusion of 6061 T6 aluminium alloy. I haven`t experience in metalworking, I think heat the extrusion by Joul effect, with a source of current, I wont know what special careful will I have for don`t distortion or discontinuities over de profile. Thanks in advance |
| Ricardo Ramos - Thursday, 04/10/03 19:19:08 GMT |
|
Hacksaws: I plan to make frames. I have been using Lennox blades which I find superior even to Starret. Although Starret makes four different grades of blade and comparisons are confusing. Most of the others are junk IMO useful for PVC pipe or crusty bread. I have one good frame from Starret - the others, like you say are too flimsy to tension the blade. Indeed I had looked at Jock's design and also at a design in the Blacksmith's Journal. Mine will be based on these ideas. I use a hand hack a lot. I can get through a 1/2" sq bar with my hacksaw in less time than it takes to set up the cut on the bandsaw. I can make deep cuts in 1/4" plate and stay true to a scribed line. I also prefer hacksawing to splitting with a hot cut. Frank Turley once offered to race me - hot cut vs hacksaw - I chickened out :) I may yet take him up on it. I use mostly 14 tpi for heavy stock. This too is not easy to find on the shelf. I had to special order. Both Lennox and Starret make straight blades with a set up to some pitch (18 or 24) and then beyond that they switch to wavy. I would like to find a decent straight blade with a fine pitch. I had also been thinking of making a 24" or 36" hacksaw with a bow frame like the common bow saws. I would love to try some of those tungsten blades - where can one find them? The hand hacksaw is a much undervalued tool and the support for them is fading away. Partly this is due to power tools but also I blame all those cheapy frames and blades. Many workers have never tried a decent saw. There is a similar situation with wood saws. |
| adam - Thursday, 04/10/03 20:28:12 GMT |
|
use for ASO: I had picked up one of those 5lb CI "anvils" for a few bucks to use as a doorstop but instead I put next to the bowl of nuts together with a very small ball pein hammer. It does a terrific job of cracking nutshells w/o crushing the nut inside and of course its a cute conversation piece |
| adam - Thursday, 04/10/03 20:31:23 GMT |
|
Adam, My grandfather's machinist's hack saw is in the drawer of the portable forge. It's what I use "on the road". With a good Lennox blade it works as well or better than my horizontal bandsaw. And it looks a LOT like the one found in the Mastermyr chest. |
| Paw Paw - Thursday, 04/10/03 20:32:18 GMT |
|
Hacksaw blades: I buy my bandsaw blade material in bulk (100' coils) and make hacksaw blades from it -- as well as bandsaw blades. It's far superior to the ready-made blades available at most industrial/home improvement suppliers. My favorite is 3/4" x .050" 14/10 bi-metal blade stock. I built a hand punch to cut the holes in the blade ends, but a carbide masonry bit works well too in a pinch. Any good industrial supply store will carry bulk blade stock, and sell it by the foot (unwelded). My $0.02 worth... ;-) |
| Zero - Thursday, 04/10/03 21:40:00 GMT |
|
i m researching blacksmiths. What do blacksmiths do? |
| meredith - Thursday, 04/10/03 23:01:52 GMT |
|
I've heard and read a lot about clinker lately. I used to burn only charcoal in my forge but making it took so much time and it didn't last long enough that I recently went over to coal. I don't know why but I have had no clinker build up at all. I'm using a variation of the brakdrum forge with an insert I welded together from scrap quarter inch plate and half inch rebar that keeps the fire above the blower vent about two and a half inches. I think what is happening is that the clinker falls through the grate and then disintegrates from the heat. Does this sound likely or is there a more plosible explination for it? This is not a crucial question just something I'm wondering about. Thanks for all your help in the past. Have a good one. |
| Will - Friday, 04/11/03 00:25:38 GMT |
|
Meredith, We get iron hot in a forge, beat it with hammers on an anvil till it's the shape that we visualized in our minds eye. Will, Not sure, but it's an interesting hypothesis. |
| Paw Paw - Friday, 04/11/03 00:47:48 GMT |
|
Honest guys, I do NOT work for Microsoft! |
| Paw Paw - Friday, 04/11/03 00:48:58 GMT |
|
I am contemplating using an electric motor to drive a hand crank blower (with the handle removed of course). Are there problems doing this? More to the point is it detrimental to the blower to be run continuously for long periods of time at a constant speed and use a valve to control air flow to the forge? The apropriate pulley sizes would have to be used to reduce the speed on the pulley at the handle end of the blower as I don't see running it at 1800 rpm and then have the blowers built in gear ratio increase that again by 1 to 45 as I have read here. I'm having problems here in this part of the Great White North scrounging an industrial blower for a fixed forge. I have a portable lever forge already and can purchase at auction a hand crank blower and am conidering this conversion to electric. Thanks the Duck |
| the Duck - Friday, 04/11/03 01:17:24 GMT |
|
Hello is any one on line.. |
| Jay - Friday, 04/11/03 01:30:34 GMT |
|
Jay, this is a message board, not a chat room. |
| Paw Paw - Friday, 04/11/03 02:00:04 GMT |
|
Duck: Why not a squirrel cage blower with a gate valve to regulate the air to the Tweer? That's GOT to be easier that converting a hand crank to electric, not to mention throttling-down a blower like that could be hard on a motor. Jay: No, no one is on line... please leave a message. ;-) FYI: Paw Paw DOES work for Microsoft (that's why he's so evil!!) [Very Big Grin]... |
| Zero - Friday, 04/11/03 02:11:34 GMT |
|
Blower Conversion Good hand crank blowers are worth a lot more (cash value) than an electric blower. Kayne and Son has a nice line of electric forge blowers to chose from that all sell less than what hand crank blowers are selling for at blacksmith meets. And YES there is a problem with the conversion. The gears and bearing in these things are designed for intermitant use and almost universaly they are poorly lubricated. Running constantly on a motor is very hard on them. They are also designed to SPEED UP the fan. . so you have to slow your motor down to 15 to 30 RPM (120 or 60 to one) and then the gear box speeds it back up. . . very inefficeint. It will work but is not a good way to go. |
| - guru - Friday, 04/11/03 04:13:24 GMT |
|
No Clinker: Will, It sounds like you have some very good coal. Don't complain! However, clinkers take time and a volume of coal to produce if the coal is low ash. If you keep a small coal forge fire very clean (no ash from previous fires) you may never see a big clinker. On the other hand, some coal makes light ash that blows out of the fire. The result is no clinker but lots of fly ash in the air. Since ashy exhust is considered to be bad, coal that has just enough silica to consolidate the ash into clinker is considered better than coal that has no silica. |
| - guru - Friday, 04/11/03 04:20:56 GMT |
|
Extruding Aluminium: Ricardo, I am afraid this is a subject I know very little about. This is a rather specialized field. Extrusions are made of both low alloy and high strength alloys like 6061. They are generally very straight but that may be due to the use of straightening rolls as part of the process. As this is a rather specialized process that takes heavy machinery I would think it best to contract a commercial extruder to do the job unless you want to setup a large scale opperation. Most of the companies that do this work will give you a quote based on your cross section drawing. I can provide a list of US companies if you need. |
| - guru - Friday, 04/11/03 04:32:24 GMT |
|
JYH Question - I just found the Power Hammer Page... great stuff. Fun reading. I've got a question about the EC-JYH, though. I don't understand how the hammer speed is controlled. It appears as though the motors (via belt) are directly linked to the axel that drives the hammer. I would think that would make the speed of the hammer fixed, though this is obviously not the case. What am I missing? Also, I was planning on building a treadle hammer for our shop over the summer. With the similarly low cost of a JYH, though, I'm wondering if I shouldn't build one of these, instead. Can you (briefly) go over the advantages of each over the other? Or is there nothing you can do with a treadle that you can't do with a power hammer? |
| phiertas - Friday, 04/11/03 08:37:29 GMT |
|
Still hunting for an anvil... my makeshift one is on hold for the moment. Right now, I'm looking at anvil vises; found one, it seemed like an interesting concept, then found another that was basically a 30lb anvil with a vise, found a third... and I got pretty interested! But it occurred to me that it would be a good idea to ask the Resident Gurus their opinions of anvil-vises. So: what say? Also: does the Guru's Den support HTML? If so, which codes? I wanted to put an image link up but wasn't sure if it would work... |
| T. Gold - Friday, 04/11/03 09:54:13 GMT |
|
Adam I use a 3' hacksaw made using a bow saw frame---I like the sandvik frames as they seem to tension better---I make the blades from bandsaw blades. It's nice to have in the truck for scrounging where you don't have access to O-A cutting. Thomas (didn't get a chance to check CF&W, it's in the smithing bookcase in my study, I'll check it over the weekend but won't be on-line till Monday) |
| - Thomas Powers - Friday, 04/11/03 12:54:23 GMT |
|
CI ASO's: Adam, ASO's have many uses. I use two of them to hold odd shaped pieces of wood I am gluing up. They will hold a door open, and cracking nuts is a great idea. They make passible Treb amunition. I occasionally use one as a counterweight. I have never successfully used one for its intended purpose, however. |
| - Quenchcrack - Friday, 04/11/03 12:55:16 GMT |
|
Aluminum Extrusions- I have an aluminum extrusion made for one of my door operator products from 6063. The heated material (a captured slug) is pushed through a die and the end is pulled out along a roller table for support. I was surprised to find that the straightening process is actually a stretch- not the rolling I would have expected. The ends of the extruded part are each grabbed in a tong like clamp and a controlled tug straightens the part. My parts are coming out with cross sectional variances of less than .001 from the designed dimensions over 14 foot lengths! That sure makes me happy with my supplier. If any one wants the extruders name let me know- I wouldn't want to give away free advertising on Jock's pages. |
| SGensh - Friday, 04/11/03 13:09:45 GMT |
|
Thomas, Thanks. Was thinking the same thing. My local landfill used to look the other way when I dragged my OA rig in to slice up I beams etc. Now that its fire season again they have gotten more vigilant. A large hack with a deep throat would be very handy. |
| adam - Friday, 04/11/03 13:58:05 GMT |
|
Quench; Trebuchet ammo! Next time my neighbors @@$%! dog barks at 2 am he will be sorry! :) |
| adam - Friday, 04/11/03 14:05:33 GMT |
|
Wondering if someone might be able to help me. I am looking for a for a supplier for cast iron spheres. Ideally, they would be hollow about 8" in diameter with a skin thickness of about 1/16". Thanks in advance for any info. |
| txhoyb - Friday, 04/11/03 14:49:42 GMT |
|
Meredith, This blacksmith has too many hobbies to deal with. I smith, I shoot blackpower cannon, I ride my Harley, spend time with wife, read, Oh yeah work to pay for all of that... Oh, You mena that is not what you wanted to know... (grin)..... Blacksmiths were the promary iron workers form the begining of the iron age till fairly recently. He(she) will heat the iron( or steel) in a forge using one of several fuel types coal or charcoal and also now days Natural gas or propane. After the metal is hot enough they will form it as PawPaw said with a hammer and anvil until it is in the shape that they envisioned for the job being done |
| Ralph - Friday, 04/11/03 15:18:56 GMT |
|
Adam, remember to punch the holes a bit closer than the wood saw blades have so that they tension a bit more. Been using one like this for about 15 years now. Txhoyb---cast iron at 1/16" thick will be as fragile as glass balls---are you sure you don't want cast steel? Look in the MSC catalog for "floats" spheres used in tanks to indicate level, etc. Thomas |
| - Thomas Powers - Friday, 04/11/03 15:41:22 GMT |
|
HTML: T Gold, No, HTML is filtered out of posts except the ones I make. Leaving off a single closing code can blow up the entire page. I have enough trouble fixing MY mistakes much less a bunch of amature hackers. . . |
| - guru - Friday, 04/11/03 16:17:50 GMT |
|
EC-JYH: Phiertas, Like most hammers the speed is varried via the clutch. In the case of the EC-JYH the clutch is the rearward brake. However the big auto brake is overkill and hard to feather. The EC-JYH was an experiment to prove a point but it is not the best way to build a JYH. Using the car axel makes a HUGE machine that is a tad top heavy. The shock absorber linkage works but is very inefficient and must run slower than other linkages. The hardest hitting hammers are those with toggle linkage like the South African JYH. The bowspring linkage has been used by many manufacturers and is a good proven design. The simplest JYH to build is the Appalachian "Rusty". It is a spring helve which a prefered design in Sweden. |
| - guru - Friday, 04/11/03 16:24:58 GMT |
|
Cast Iron Spheres: TxHoyb, I doubt that you will find that large a ball with that thin a wall. Small CI balls are mostly solid and larger balls in the 8" range are usualy spun steel. Contact Pieh Tool Co. They represent a supplier of architectural iron that probably has metal spheres of that size. |
| - guru - Friday, 04/11/03 16:29:00 GMT |
|
Thanks, guru. I'll check out those other designs you mention. I wasn't planning on re-building the EC-JYH, just trying to understand it so I have more info for my own deisgns; I appreciate you telling me which are best to look at /design after. Do you have an opinion (better stated: would you care to express your opinion) on treadle hammers vs. power hammers? Our shop isn't tiny, but it's probably the best equipped University shop in the state. Hence it's very full; we don't have room for a treadle and a power (if there's even a reason to build both). Thanks in advance. |
| phiertas - Friday, 04/11/03 16:50:10 GMT |
|
Phiertas, Power vs Treadle Hammer Envision standing on your left foot, holding a piece of red hot iron in your left hand, a tool in your right hand and pounding up and down with your right foot. That's a treadle hammer. Now envision standing on both feet, hot iron in left hand, tool in right hand, while a power hammer does the pounding. Which approach looks more comfortable. BTW, the NC JYH is also pictured on the power hammer page. It's completely home made, and the builder spent less than $50 buying parts. Be advised however that the builder has a very well equipped shop and a huge scrap pile. |
| Paw Paw - Friday, 04/11/03 16:59:07 GMT |
|
Ya answered my first question, but not my second! (Grin) Has anyone had any experience with anvil-vises that they'd like to share? |
| T. Gold - Friday, 04/11/03 17:55:39 GMT |
|
Tredle vs. Power They both have a place in the shop. A treadle hammer is not suitable for large changes in stock size or for drawing out long tapers. Treadle hammers are used for detail work and that requiring hand held tooling. However, a GOOD power hammer can be used to do almost everything a treadle hammer can do PLUS do the heavy forging, long drawing, die work. . . The best power hammers are controlable enough to do detail work using hand held tooling. But many power hammers do not fall into the category of having this kind of control. Most JYH hammers certainly do not. |
| - guru - Friday, 04/11/03 18:08:48 GMT |
|
What do you mean "Anvil Vises"? Many vises of the 1940's and 50's come with an anvil horn appendage behind the jaw and a flat work surface. They are cast iron and only suitable for the lightest work, not hot forging. They are mostly art begging to abuse or break the vise. Then there are the old universal vise/anvil/drill devices. These too are worthless for forging. They are cast iron junk and none of the features work well. These were sold to hobbiests and home owners that THOUGHT they might use them one day. . . Anvils and Vises are two different tools that serve different purposes and should be seperate items. I just looked at a series of heavy duty forged steel vises. The manufacturers pointedly left off anything that could be mistaken for an anvil surface. . . |
| - guru - Friday, 04/11/03 18:29:33 GMT |
|
Anvil vises: To repeat what someone else said recently, these are mostly vise. The anvil is useful for straightening nails but wont stand up to forging. Mostly vise bodies are made of cast iron which is not a suitable material for a blacksmith's anvil. A piece of RR track would be far superior |
| adam - Friday, 04/11/03 18:33:32 GMT |
|
Anvil Vises NB: A good, well mounted post vise can serve as an anvil for LIGHT forging. When I do this I am careful to work on the back, fixed jaw |
| adam - Friday, 04/11/03 18:36:49 GMT |
|
Jock, You've operated the NCJYH. How do you feel about it's control? |
| Paw Paw - Friday, 04/11/03 19:07:24 GMT |
|
Hi, I am in Central Texas. About 18 years ago, I made a trip to Oklahoma to buy 4 tons of coal at a privately owned mine (was $35/ton then). I am running low but all of those sources are now out of business plus that coal left a lot of clinker. I would like to locate a high quality source as close to Texas as possible and would be willing to buy a few tons at the right price. Thanks, H |
| HWooldridge - Friday, 04/11/03 19:50:57 GMT |
|
In search of structural bands/straps (designs and blacksmith shops that produce them) that allows multiple posts to be fastened together. |
| Ed - Friday, 04/11/03 23:53:59 GMT |
|
Wooldridge I came across several coal sites on the Appaachian Blacksmith Assn web site. You might have some luck looking there. http://www.appaltree.net/aba/coal.htm |
| - Jerry Crawford - Friday, 04/11/03 23:59:24 GMT |
|
I just purchased a 5th edition Machinery's handbook printed in 1915. I've seen an ad for a first edition printed in 1914. They printed five editions in less than a year? Do you have any info on this? Thanks, Byron. |
| Byron - Saturday, 04/12/03 00:10:00 GMT |
|
Byron, See our book review of Machinerys and the link to their history of the book. Yes there were that many editions. The publication was new and the engineering trades were changing rapidly. This was the climax of the industrial revolution. New alloys and materials were being developed daily. Tooling was just standardizing. War was upon us. AND the book was new and there were many contributions. My 5th Edition says Copyright 1914, Tenth Printing, 1919, one-hundred thrity fifth thousand. The preface includes a history. . . . Nearly the whole of the first edition, 10,000 copies, was sold before publication in January 1914; the second edition, 5000 copies, was exhusted in April; the third edition, 6000 copies, in December; and the fourth edition, 5000 copies in May, 1915. Since then ten printings have been made of the fifth edition, a total of 135,000 copies. Please drop me a note about the number of printing and date of your 5th Edition as well as the quantity printed. Industrial Press used to have this information in their history but no longer. I'll add it and the above to my ongoing (incomplete) review of the book. |
| - guru - Saturday, 04/12/03 01:37:43 GMT |
|
Jock, I don't remember whether you have a 10th edition or not, but mine says TENTH EDITION FOURTH PRINTING TOTAL ISSUE:370,000 Dated 1941 My 17th Edition is second printing, no number of issue, dated 1964 |
| Paw Paw - Saturday, 04/12/03 02:09:29 GMT |
|
Bryon, if you decide you don't want that first edition, let me know, PLEASE! |
| Paw Paw - Saturday, 04/12/03 02:18:23 GMT |
|
One last power hammer question (promise!): I understand (now) how the speed of the blows is controlled by the brake. If this is the only thing controlling the speed, how can a hammer deliver both slow, light blows AND slow, hard blows ? Or is the strength of the blow directly related to the speed of the blows ? (i.e. the slower the speed the lighter the blows, the faster the speed the heavier the blows) Once again, thanks in advance! |
| Phiertas - Saturday, 04/12/03 04:13:11 GMT |
|
I just read the heat treating FAQ and wanted to ask about a method not mentioned in it. The FAQ basically says heat treat in three steps: Anneal, Harden, Temper I've heard, though, about a bladesmith who uses only two steps: Annel, Harden+Temper His method is to use a large steel bar to pre-heat the oil to a certain temperature (somewhere in the 300-500* range, can't recall specific figure). He then puts the steel (glowing red) in the oil, and lets the whole thing cool. I heard about this method from a friend who took a Demascus/Knifemaking class at Penland last summer - he said that this is the way the instructor (a professional bladesmith) heat treated all his blades. Have you heard of this method? Any comments on it? |
| Mike the Red - Saturday, 04/12/03 04:26:25 GMT |
|
Power Hammer Dynamics: Phiertas, On first class mechanical hammers like Fairbanks, Bradley, Beaudry and Champion you can adjust the stroke, spring tension and speed. A short stroke allows the hammers to run very fast and not hit very hard. A long stroke allows the hammer to hit very hard while going slow OR fast. Loosening the spring action on some hammers such as the Fairbanks allows very hard blows at the lowest speed. Tightening the spring tightens up the stroke so the blows are less sloppy. Knowing how to adjust these hammers for the kind of work you are doing at the moment makes them very flexible machines. Notably the popular Little Giant does not have a stroke adjustment other than changing the spring tension which also effects the timing which is very critical on Little Giants. Lack of this adjustment makes these hammers very difficult to use hand held tooling for fine work. Air hammers have completely different characteristics compared to mechanical hammers and the two type of air hammer (standard and self contained) also have very different charteristics. The slower a standard hammer runs the lighter the blows. On a self contained hammer the stroke is retarded by the throttle and the shorter the stroke the lighter the blow. Self contained hammers run at the same striking rate because they run the same speed as the directly linked compressor cylinder. |
| - guru - Saturday, 04/12/03 04:33:40 GMT |
|
Heat Treating: Mike, There are many different temperature ranges for hardening and tempering different allow steels. The method you described is generally not recommended for most steels. Without knowing the alloy you know nothing. Many oils are at or above their flash point at tempering temperature so it would be very dangerous to attempt this method with common oils. Agian, without knowing the material you know nothing. Many steels do not require, nor is it recommended to anneal or normalize them prior to hardening. However, all steels benifit from tempering after hardening. Generally the mark of a quality hand made blade is selective tempering. The middle and back of the blade are tempered softer then the edge in order to achieve maximum toughness. Uniform tempering is generally industrial mass production method. There are many methods of hardening and tempering. But not all methods apply to all steels. Most of the hot work and many of the tool steels are air hardening in blade thicknesses. No quench other than a slight breeze of fresh air is required. Some of these same steels require tempering at temperatures that are near red heats and are impossible to anneal without a temperature controled furnace. |
| - guru - Saturday, 04/12/03 04:50:47 GMT |
|
Thanks, Guru! |
| Mike the Red - Saturday, 04/12/03 06:07:40 GMT |
|
Questions, questions, everywhere... I was just re-reading IForge #65 (Matrix Punches & Touchmarks) as I prepare to make myself a touchmark punch. I'm going to try something a little more complex than the demo discusses, and wanted to see what you thought and if you had any suggestions. I want to try to make a "small" (1") punch of my family coat of arms. The coat is too complex for me to do a matrix punch as you suggest in the demo. My thought was to acid etch the crest into a piece of mild steel to make a die (like the demo talks about for the heart with the 'Y' in it). If the etched lines aren't thick/deep enough, I'll deepen/widen them before I try to make the positive punch from the die. The only specific question I have is how deep and how wide you think the lines on the die need to be to get a usable positive punch. (I'll be doing hot punching only) If you have any other thoughts/comments/suggestions/words of warning, please let me know so I can take them into consideration before I begin the project. |
| Mike the Red - Saturday, 04/12/03 06:22:13 GMT |
|
Matrix punches are not necessarily a single punch. Several of different shapes are often used. Dies for this type of punch need to be as deep as you can cut them. The reason is that definition is lost both in how well the tool steel conforms to the die AND due to scale. The trick to getting a good punch is steady alignment and one quick HEAVY blow. It helps to use some kind of quide to hold the punch and to use a sledge to hit it. Double striking almost always causes a messed up double impression. |
| - guru - Saturday, 04/12/03 06:49:51 GMT |
|
Guru, have you ever used steel instead of wood handles for a hammer? I'm going to make a couple sometime in the next couple weeks. I was thinking about our shopkeeper's hammers, though, on which the handles get loose after extended use. I was thinking that a welded-on pipe would avoid this problem - not sure what it would do for the feel of the hammer, though. Speaking of hammers, is there a hammer-making demo on iForge? I don't think I've seen one, but there's a lot of demos there - maybe I missed it ? |
| Mike the Red - Saturday, 04/12/03 20:06:33 GMT |
|
Steel Handles Mike, Ever hit something solid like a concrete wall or a steel post with a baseball bat? Hands sting? Every blow from a solid steel handle is like that. Its worse striking an anvil. Some one-piece carpenter's hammers have been made with steel handles. They have thick padding on a thin light "tang". I've had one like that for 40 years. The padding rotted off long ago and Sears will not replace it. It has its second hand made plastic handle on it. Other hammers have tubular steel shank handles. They are cushion mounted in the head. To keep the weight down the tubing is thin and does not hold up to a missed blow as well as wood. You can tape up or repair the roughed up place on a wooden handle but kinked steel tubing is permanently damaged. . . The best non-wood handles are the fibreglass ones. However, there are GOOD designs and BAD ones. I've had both and my good one has walked off. Good ones are shock mounted and have adequate flex in the shank. Then they have rubber grips. The one good hammer I had of this type was superior to wood. But the one that was too stiff and heavy was not as good as wood. . . So it would appear that wood is the standard to beat. The make smithing hammers with fibreglass shanked rubber grip handles but I have never used one. They may be OK but I couldn't say. I suspect that I would not like one because I constantly change my grip on the hammer sometime sliding from the neck to the butt in every stroke. Handles with breaks between rubber and fibreglass would make this difficult. The other synthetic handled tool I have is a wood splitting maul that came with an "indestructable" fibreglass and polyethelene handle. I wish my sledges were like that. Someone is always using them and overshooting the work and tearing up the handles or breaking them. Wood is generally the best. AND even though it often needs to be replaced it also often lasts for decades. Yes there is a hammer making demo. Handle Day: We recently did something that I had intended to do for 20 years or more. We had a "Handle Day". We found every hammer, punch, fuller, ax, shovel, rake, broom. . . and sanded the handles, tightened the heads and varnished the handles. Many of my tools have been in unheated shops that are pretty close to being out in the weather and they needed lots of attention. Many of my hammers had loose heads and many also had splintered shanks. . . same helper that broke my sledge handle. I've wanted to make it an annual tradition for many years. This was the first year. Handles were sanded and scraped as needed. Those with minor cracks had carpenter's glue worked into the cracks and bound with wire or string while the glue set. Hammers with lossened heads had linseed oil applied to the eye to swell them back up. Wedges were driven in with a punch when needed. Varnish was applied with a rag. Two coats on most. Now that the varnish is dried a few of the handles will be taped up near the head where they had previously been damaged. I generally do not need to do this but I have had too many "helpers" over the past few years that have made a mess of my hammer handles. Many of the struck tools will also need to be dressed. Mushrooming needs to be ground off before pieces start to spall off and possibly hurt someone. Mark a day on your calendar. Late winter or early spring before you start doing lawn work is a good time (have you LOOKED at your shovel handle lately?). I had handles on tools that have needed attention for a decade or more. . . and some that I bought used that were in rough condition. It took more than a "day". But next year it should only take a few hours. Handle Day, make it a new blacksmith shop tradition! |
| - guru - Saturday, 04/12/03 21:16:47 GMT |
|
More about Hammer Day. . . Somehow my set of different sized ball peen hammers have walked off. . . And I hadn't noticed. . . I guess it pays to take inventory once in a while. Now. . the thing about these hammers was that like many ball peens the ball and faces were originally not a very good shape. All of these had been ground, filed and polished to very smooth pleasing curves. So now I am collecting ball peen hammers again. And I will again spend a day dressing the replacements. In my collection of hammers there are now several new small hammers that I bought for doing the Boy Scout workshops. NEW they had terrible sharp edges on the faces. I dressed them some before they were used but they need more work. Years ago I never paid much attention to the peens on cross peen hammers. Probably because I do not use them as much as I should. Peens need the corners radiused and blended. Then according to your need the peen can be made to have an arc or be thinned. Some people like them blunt and round while others like them thin with a tight radius. Or perhaps you want several hammers with several different radii on the peen. More things to do on Hammer Day. . . |
| - guru - Saturday, 04/12/03 23:13:37 GMT |
|
Guru: More questions about hammers. I have broadened my scope and some of my projects require dishing (ladles, spoons, garden trowels, etc). My one good ball peen is a Craftsman 1 lb. but it tends to leave dimples when I use it to sink the dish. I have heard of a rounding hammer but don't really know what one looks like. Is this the right hammer to sink with? Can I make a serviceable hammer from a good ball peen? |
| quenchcrack - Saturday, 04/12/03 23:48:36 GMT |
|
Whoops. . HANDLE day. . . Good time to dress hammers and struck tools. . QC, Sinking is done with a long cylindrical hammer with a radiused face. The reason the the body of the hammer is long is so that it reaches into the thing being dished without nicking the handle. A ball peen has much too tight of a radius for large sinking/dishing and the faces are too close to the handle. A rounding hammer has one face that is radiused but the overall head length is too short. Look at the Helm making articles on our Armoury page and look at the Kayne and Son page under hammers. The doming and raising hammers are the style you are looking for. See also repoussetools.com. The chart there has repousse hammers but nothing long enough for heavy dishing. Occasionaly you will find auto-body hammers at the flea market. Otherwise it is cheaper to buy them from Kaynes. Pieh Tool will also be carrying a line of artists raising and sheet metal tools. Note that dishing or sinking stretches and makes the metal thinner. Raising upsets it so that it is thicker. |
| - guru - Sunday, 04/13/03 00:21:14 GMT |
|
what is borox ? the soap ? or what is it some unknown that smiths put in water to prevent scaling ? |
| - smitty - Sunday, 04/13/03 03:36:50 GMT |
|
hello... |
| - smitty - Sunday, 04/13/03 03:46:35 GMT |
|
Handle Day: This would also be a good time to carve/stamp/woodburn your runes/touchmark/initials into the handles. This will help you sort the sheep from the goats when a batch of smiths work on a mutual project, delight collectors and historians in the future, and tell the police what to look for if anyone ever makes off with your tools. Back from Denver and the banks of Bear Creek. If anyone is interested, I ran across a rivet/farm forge in half-decent shape (blower was STIFF) for $100 (before haggling). If your in that neck of the woods, e-mail me for details. I didn't need another one, and it wouldn't fit in my luggage, anyway. ;-) Spring is back on the banks of the lower Potomac. Visit your National Parks: www.nps.gov Go viking (updated): www.wam.umd.edu/~eowyn/Longship/ |
| Bruce Blackistone (Atli) - Sunday, 04/13/03 03:58:10 GMT |
|
Smitty: Borax, or Sodium Tetraborate, is a compound used as a flux when forge welding. It is sprinkled generously onto the ends to be welded during heating to prevent the oxidation and scaling of the metal, thus keeping it "clean", so a good weld can be formed. Most smiths I know just use the 20 Mule Team borax that you can buy at the grocery store in the cleaning supplies section. It is marketed as an all-purpose cleaning additive. Don't confuse this with with Boraxo, which is a soap by the same company. Boraxo will keep your clothes fresh and clean, but won't do a thing to help you forge welding :) Eric |
| eander4 - Sunday, 04/13/03 07:19:43 GMT |
|
Guru, I know you're a busy man and this takes time, so if I need to keep waiting I'll just practice my patience.... I filled out the registration form for the Slack-Tub a couple weeks ago; wanted to see were you are in processing them - I >think< I put in the correct email address, but typos do happen. |
| Mike the Red - Sunday, 04/13/03 07:25:45 GMT |
|
Another question on the touchmark punch: You mentioned that scale is often a problem, even after wire brushing the piece before sledging into the die. Do you think it would be helpful (vs. wasteful) to flux the piece that will become the punch, to prevent (or at least minimize) the scale? |
| Mike the Red - Sunday, 04/13/03 07:28:25 GMT |
|
Hi! which answer would be the most appropriate coveralls for Machinists should be: a)long sleeve coveralls of good quality b) short sleeve coveralls c) coloured coveralls of branded quality d) yellow coloured coveralls Thanks, Panda |
| panda - Sunday, 04/13/03 10:31:20 GMT |
|
" Hardie Hole" I was asked by a friend of mine, Why is the hardie hole called Hardie Hole. Well I did not know. I didn't even guess... You all have a nice day. Still some snow on the ground up here.... |
| Barney - Sunday, 04/13/03 14:03:20 GMT |
|
Barney I remember a long, drawn out conversation about a month or two back on the origins of Hardie Hole. The end conclusion was that noone realy knew the origins of the name. |
| Monica - Sunday, 04/13/03 14:38:17 GMT |
|
Barney, Conjecture seems to indicate that it was developed by some guy named Hardy, and became known as "Hardy's Hole". But no one knows for sure and there's no way to research the question that I know of. |
| Paw Paw - Sunday, 04/13/03 15:22:35 GMT |
|
Thankyou very much for the quick answer... I am refreshing my teaching skills and they ask that question..3 workshops this summer.... |
| Barney - Sunday, 04/13/03 16:12:09 GMT |
|
Hardie, I have also heard it is derived from "hack iron" and the word "hardy" an in stout or strong. Hardy's hole sounds like a Paw-paw-ism. . never heard that one before. . . It is old English, therfore is could be derived from any European language and then corrupted. . . Simple answer "THIS is a hardie" THIS is the hole it goes in. OR THIS is the hardie hole, a HARDIE goes in the hole. . . . (avoiding the question). However, be SURE that you indicate that a hardie is a square shanked chisle NOT just anything that goes in the hole. . . Other tools are anvil tools or set tools. |
| - guru - Sunday, 04/13/03 16:25:15 GMT |
|
Eric, Thank you very much. |
| - smitty - Sunday, 04/13/03 16:42:55 GMT |
|
Okay question #2 Say I've made a bayonet... How does on harden it ? at the end..? |
| - smitty - Sunday, 04/13/03 16:46:05 GMT |
|
By dipping it in water will cure it but does that harden it ? |
| - smitty - Sunday, 04/13/03 16:47:46 GMT |
|
Coverall, Bibs and Such: Panda, It depends strictly on local custom and the current style. In the past some businesses dictated dress. In the 1950's a shirt and tie was mandatory even in many of what we think of as "blue collar" jobs today. At work a heavy cotton "lab coat" was worn over street clothes. Men working around machinery would tuck their tie into the second button gap in their shirt to prevent it from getting caught in the machine. This is still standard shop dress in many places. In the 1960's many tradesmen including service station attendants and appliance repair people and the milkman wore military style uniforms. A few do to this day. In American machine shops, garages and factories where shop clothing gets heavily soiled many companies use a uniform service. There is a choice of work shirt and slacks. The blue grey slacks are pretty universal as they do not readily show grease stains and they are a semi neutral color. Where uniforms are not specified or available the common work dress is currently a shirt and jeans. Shirts vary with the season and the occupation. T-shirts are common warm weather wear in a vast part of the working population. Long sleaved cotton work shirts are worn by welders year round and sometimes suplemented with leather aprons, gauntlets and such. Any place fire is present clothing is generally 100% cotton and then supplemented with Nomex fire resistant gloves, jackets, spats. The job of machinist varies quite a bit. Many run small automated machines and are protected from coolant and chips by various guards. Others may be running large old fashioned machines big enough that the machinest climbs on the table to adjust or measure the work. On average the majority of machinists wear rental uniforms consisting of shirts and slacks OR personal clothing that is similar to the rental uniforms. Some wear bib overalls and often a Rail Road style cap to protect the face and hair from dripping or splattering oil. A few people wear coveralls but usualy only when the work is very dirty as coveralls are often hard to move in and inconvienient. When there is a choice of color it is either a uniform or "company" color or it is selected for either showing or not showing dirt. On most greasy jobs around machinery dark grey or blue hides black grease stains. Painters wear white so that paint shows up and is not accidently transfered to other things. In recent years I have been wearing Carhartt bib overalls all the time but that is because I do not fit into jeans anymore. . . :( The only color available in my size is the yellow-brown. Black would be best for not showing oil, coal and metal stains with dark blue following. There is no right answer to your multiple choice question but "a" is the closest IF coveralls are to be worn. |
| - guru - Sunday, 04/13/03 19:19:55 GMT |
|
Has anyone got any information on the Lost Jackson-Hardie Wagon Train, last seen in the area of Jacksons Hole, Wyoming? I understand there was a terrific squable between the Jackson and Hardie factions over who to name the large square Hole after. |
| Txfarrier - Sunday, 04/13/03 19:21:45 GMT |
|
Borax is properly covered on our FAQs page. Bayonett See the Heat Treating FAQ. Cure is not a word applied to heat treatment of steel. |
| - guru - Sunday, 04/13/03 19:23:52 GMT |
|
Pub registrations are backed up and on hold until I finish my taxes. . . :( |
| - guru - Sunday, 04/13/03 19:34:50 GMT |
|
= ( Everybody has their priorities ; ). Thanks for letting me know - hope you've not been getting inundated with questions about it. Here's hoping you get a huge return = ) |
| Mike the Red - Sunday, 04/13/03 20:07:15 GMT |
|
Txfarrier, According to "The Improbable History of the American West", the Jackson faction won and named the large square lake basin after themselves. Of course the Hardie faction correctly predicted that the square lake basin would eventually erode into a more circular shape and to forever remind the Jacksons of their folly, proceeded to make a square hole in an anvil and named it the Hardie Hole. Recent archeological digs in the area have uncovered the original anvil with the square Hardie Hole and found that a second hole had been drilled near the Hardie Hole. It is presumed that the Jackson Faction abducted the anvil and drilled the round "Jackson Hole" for spite. Interestingly, the leader of the Jackson Clan was named "Pritchel Jackson". |
| Quenchcrack - Monday, 04/14/03 00:41:48 GMT |
|
QC, When are you starting your book of tall tales??? (grin) |
| Paw Paw - Monday, 04/14/03 01:25:51 GMT |
|
Guru : Carharts does put out a black bib front... its my prefered mode of dress... but SHE makes me wear other stuff when dining out... no sence of humour I guess :) they make them upto XXXL if you can't get them in your neck of the woods let me know and I'll ship some for you |
| Mark P - Monday, 04/14/03 01:37:20 GMT |
|
Tall Tales? Me? I can assure you, sir, that historical accuracy is sacred in the great state of Texas! |
| Quenchcrack - Monday, 04/14/03 01:53:47 GMT |
|
QC, is that why they have an annual Liar's Contest? (grin) |
| Paw Paw - Monday, 04/14/03 02:02:33 GMT |
|
Guru, did you miss the fluxing question, or do you have no suggestions on it? With a bit of luck and some motivation to get other things done tonight, I want to give it a try tomorrow. (Fluxing question is just below the question about Slack Tub registrations - wanted to know if I should flux before making a punch from a die to reduce scale.) I know I ask a lot of questions - let me know if I begin to seem impatient or become a bother. |
| Mike the Red - Monday, 04/14/03 02:22:32 GMT |
|
Mike the Red: When making a touchmark or other punch by striking it into a die, there is no need to flux. Simply wire brush the scale off the punch before sinking it into the die. Fluxing will only cost you more heat and accomplish nothing. A little bit of Nev'rSieze on the die will aid in getting a clean impression and an easy release. To avoid scaling the punch when heating it, you can make a tube of stainless steel foil to heat it in, but it really isn't worth the trouble in my opinion. |
| vicopper - Monday, 04/14/03 03:17:07 GMT |
|
What can firing pins be made from and what advantages and disadvantages are the with each metal? |
| - allen - Monday, 04/14/03 04:52:30 GMT |
|
I am looking for some advice or steps on tempering some metal. I haven't did this before. We had a blacksmith where I work but that was before my time, and the people that was their can't remember how he did it. I am building some gun parts for a old gun. I need to temper some of the trigger parts where they make contact together. They don't have to be real hard but little harder than normal. I am using T-1 steel. I have some oil that they use to temper things at work. Hope this explains enough for you. |
| Steve Wooster - Monday, 04/14/03 05:00:43 GMT |
|
I think some of the young people and new people are getting confused when visiting this page, mistaking it for a chat group instead of a message board. My thought is that they are perhaps looking at the Slack-Tub script in the upper left hand corner and think that when it says there are X number of people online, they think they are in here. Just a thought. And as for Texans versions of history, Im shocked. I personally dont make anything up, I just fill in the gaps a tad. Oh, and want to thank JWG and Marc for advice :) Nuked. |
| nuked - Monday, 04/14/03 07:00:21 GMT |
|
Quenchcrack take a look at the end of your ballpein and note the "curve". It wants the metal to match that curve and when it doesn't it will leave a ding to show it's annoyance. Take a look at the item you are dishing. What curve do you *want* it to have? Do you have a hammer to match? You can grind the hammer end of ballpeins to a nice smooth curve, or you can forge them out to a curve and then grind smooth---makes for a larger face. "The complete Modern Blacksmith" goes into this in detail. I like to take dome headed RR *bolts* (*not* spikes) and make hammers from them. The have a range of curves--different manufacturers?---are cheap and tough. My favorite has the handle offset all the way to the screw end and is curved to boot so it works real well on deep dished items. I'm going to try taking a BP and welding a bolt on either face to get a double faced dishing hammer (different curves) with some depth and that takes a standard handle. Spent the weekend making armouring stakes so it will come in useful. Thomas |
| - Thomas Powers - Monday, 04/14/03 13:47:56 GMT |
|
I have a 1885 PETER WRGHT Anvil in good condition. The weight is appromialtey 125 to 200 pounds. I am willing to sell it and was wondering the value of it. Thanks, Jarry Shelby |
| Jarry Shelby - Monday, 04/14/03 14:19:22 GMT |
|
Hardening and Tempering: Wooster see our FAQ (Frequently asked question) on the subject on our FAQ page. |
| - guru - Monday, 04/14/03 15:03:27 GMT |
|
Steve - there is a FAQ on tempering metals. It's pretty detailed. I do hope, for safety's sake, that you are limiting your replacement parts to trigger assembly, etc., and not to the breach or bore. Those should be acquired from a professional. |
| Monica - Monday, 04/14/03 15:49:36 GMT |
|
Peter Wright: Jarry, Anvils are sold by the pound so "approximately" does not cut it. The weight is probably marked on the side in old english hundred weights. See our anvil series on the 21st Century page for details. Good condition can mean many things and actual condition makes a big difference. You may sell it sight unseen but only fools buy anvils without seeing them OR several good well lit photos. You may think 1885 is OLD but in the world of anvils that is a relatively new anvil. There is no "antique" value in it. Anvils become antiques when about 200 years old. However, Peter Wright used to be a popular brand considered to be of high quality. I've seen too many with serious defects to believe that. . . The English "Mousehole" was better. But Peter Wright is still a recognized "brand" name. Pristine Peter Wrights sell for $5 to $8 USD a pound depending on size. 100 to 125 pound anvils are VERY common and thus do not fetch as high a price as smaller and larger anvils. This price is greater than or equal to NEW anvil range and the buyer has to really WANT a Peter Wright. Excellent condition anvils can have obvious use, slight rounding of corners, horn level (not sloping upward as new), face not quite perfectly flat. Put no marking of the face (the table MAY be marked). These sell for $3 to $6/pound in the US. In "good" condition they sell for $2 to $4 a pound. A lot depends on buyer, seller, and location. In some parts of the country good used anvils are harder to come by so demand a higher price. Good includes some edge chipping but should retain some original edges although many do not, the face should be fairly flat but MAY be swayed as much as 1/16 inch (1.5mm). The face can be rusted but not pitted to the point that it cannot be cleaned up with light sanding/grinding. "Extra Good" condition would have clean edges without serious wear and a smooth face. Overall condition is a combination of factors or can be the result of one defect. In "OK, usable" condition they sell for $2 to $3 a pound. These are anvils with seriously chiped edges, shallow face marking, dinged up horns and even occasionaly small pieces of the face missing. OK includes some arc or torch marking. These anvils can usualy be cleaned up with a grinder/sander and be used by working around the remaining defects. Lots of folks use anvils like this but are embarassed to admit it. I keep pointing out that the quality of the work does not suffer and THAT is what is important. Damaged anvils sell for anything from $0.25/pound to $1.5/pound. These are anvils where the face is seriously marked or rusted, pieces broken off (horns, heels), or heavy torch cuts in the body. Sadly there are many folks that will weld up and repair (poorly) this type of anvil and turn around and sell them as being in good to excellent condition. And no matter what the condition of the anvil there STILL are bargains out there that sell for $0.50/pound (1/10th of new) and many folks are looking for bargains or are unwilling to pay more than bargain prices. I don't have an anvil in my shop that I spent much more than $1/pound for but that was many years ago. But there WERE bought at auction where the prices were run up higher than most attendees wanted to pay. On the other hand, I would not part with any of them for less than $3/pound today IF they were for sale and they are not. In the end it depends on how good a salesperson you are and how big a hurry you are in. Top prices often take months to find a buyer and you will probably need to arrange for shipping by truck. If it IS in good condition you could probably turn it over immediately for $250 to $300 US by running an ad in a local paper. |
| - guru - Monday, 04/14/03 15:56:55 GMT |
|
Gun parts: Steve and Allen, Gun parts vary from high carbon alloy steels to soft but case hardened parts. A single gun my have three or four different steels in it. Each steel AND each part will have its own specific heat treatment. There is NO general rule. There are numerous books on gunsmithing that include everything from detailed drawings and materials specs to heat treating. I suggest you study several before you start making parts. Gunsmithing by Roy F. Dunlap is a good start. You also need to find a general reference on heat treating steel. Our FAQ is a start. MACHINERY'S HANDBOOK is a good reference but not as detailed as you may need (see our book review page). Most folks dealing with numerous alloys also have a copy of ASM's ASM Metals Reference Book. In the end, which steel to use and how to heat treat it was an engineering decision originaly made by the manufacturer. To second guess them you need to know as much or more about the product and engineering as they did. |
| - guru - Monday, 04/14/03 16:14:51 GMT |
|
Anybody have a source on black "block" brooms for use on fire tools? Thanks! |
| Butch - Monday, 04/14/03 16:28:08 GMT |
|
Hello I registered to get on the slack tub pub a week or so ago was wondering when i could expect to get registered or if i had submitted it wrong Thanks, Andy |
| AndyB - Monday, 04/14/03 16:38:20 GMT |
|
Brooms: Butch the type of thing you are looking for is a standard industrial brush. There are many types. I haven't bought any in years. After making a few fire sets with them I switched to brooms hand tied on my handles. Some commercial types like "3 knot brushes" come with thread ed holes for the handle others come with handles you have to saw off. Osborne is a big brush manufacturer. You can also purchase their products through McMaster-Carr. |
| - guru - Monday, 04/14/03 16:50:50 GMT |
|
Pub Registrations are way behind and will not get caught up until I am finished with taxes and other paper work this week. . . :( |
| - guru - Monday, 04/14/03 16:51:49 GMT |
|
Thomas, Good idea on those RR bolts. I pick them up all over the plant. I bought a cheap set of 3 ball peen hammers to experiment on (HF HSO's)and ground the face and peen to a large radius. It worked very well except after about 10 minutes, the hammer head was loose. I just didn't want to ruin a good hammer by grinding on it only to discover I had the wrong idea. Texans and History: You must understand that in Texas, History is like a religion. We can all read the same book and come away with a different interpretation. However, re-telling of history has been elevated to an art form. Paw-Paw, these are not lies! Just embellishments of the variations in the differences of the latitudes in the interpretations based upon a large number of eye-witnesses. |
| - Quenchcrack - Monday, 04/14/03 17:10:18 GMT |
|
"Cathedral Forge and Waterwheel", pp88-89 "Chinese waterwheels...were typically horizontal. The vertical wheel was known, however, and used to operate triphammers, a single large wheel often turning several shafts; widespread in China by the 3rd or 4th centuries A.D.....Both triphammer and edge runner [mill] arrived in Europe in the 12th century" "The Mills of Medieval England", pp 149 "Hammer mills were recorded at Issoufun in France in 1116, in Catalonia in 1138 and in Sweden by the early years of the 13th century. By 1400 they were to be found throughout Europe. In England a waterpowered forge for hammering blooms, found at Chingley in Kent, has been assigned to the first half of the 14th century, and the earliers dated reference to a water powered forge is to the hammer mill or OLIVER recorded at Warley in the west riding of Yorkshire in 1349." Thomas |
| - Thomas Powers - Monday, 04/14/03 17:42:02 GMT |
|
QC If you say so! (grin) |
| Paw Paw - Monday, 04/14/03 17:45:21 GMT |
|
Thanks for the info AndyB |
| AndyB - Monday, 04/14/03 18:41:49 GMT |
|
Guru, I am building my first forge and have everything i need to make it except a blower what i would like to know is what size blower do i need and should i go electric or hand crank? I found a site with lots of blowers from 30cfm to 900cfm electric but havent found any hand cranked blowers. I would appreciate any imput you may have concerning this. thank you, AndyB |
| AndyB - Monday, 04/14/03 18:50:33 GMT |
|
I got a set of Carhart bibs that are black. I like wearing them, but some of the older smiths in the guild ask if I am trying to show off by wearing my dress bibs to those events. ;-)} I just say that I got a special date afterwards. I think they go up to a 54" waist and at least a 34" inseam. Fleet Farm. |
| Escher - Monday, 04/14/03 20:51:02 GMT |
|
Forge Blowers AndyB, Electric blowers are much easier to come by and also easier to use. Both bellows and hand crank blowers assume that you have a helper. I much prefer a bellows to a blower. The cranking motion is hard on my elbows while pulling a bellows is a much more natural motion. Blower capacity depends on the forge size. Small forges can run on as little as 150 CFM. Big forges top out at around 500 to 600 CFM. But then there are forges big enough to forge anvils and anchors. . . 1000CFM is not unusual for these. Hand crank blowers have not been made in the US since the 1960's and those were made for short use bomb shelter ventilation. Vaughans of England still makes a hand crank blower and you should be able to get a price from Pieh Tool Company. |
| - guru - Tuesday, 04/15/03 00:54:41 GMT |
|
i'm a raw beginer and i am wondering how is chainmail made just some basics please |
| ben - Tuesday, 04/15/03 00:59:07 GMT |
|
Mail Ben, Simple steps. Obtain soft iron wire. Wind wire on mandrel into a coil for desired diameter. Mandrel is a round steel bar. Some folks turn them with an electric drill to make it easier. Snip rings off coil with heavy snips (or saw - non-traditional) Link rings together (there are dozens of patterns and it gets quite technical). Close rings. Real mail had the ends of the rings flattened and overlapping. They were punched for a very small wire rivet or "brad". Each ring was riveted closed after assembly. Some rings can be closed "loose" as other rings attach them to the assembled mail. Some mail makers sell rings AND there are suppliers of commercialy made rings. But most mailers make their own. There are web sites devoted to nothing but making mail. |
| - guru - Tuesday, 04/15/03 01:09:13 GMT |
|
Just a little FYI: C.F.M. is only one part of the story. Static pressure is the other part. Some blowers put out great C.F.M., but with a little resistance don't put out much at all. Coal needs good static pressure in my experience, that's why forge blowers are rather narrow but have a large diameter OR high R.P.M. Some have both and put out really high static pressure. |
| - grant - Tuesday, 04/15/03 01:10:08 GMT |
|
Ben, Chain mail starts as wire. The wire is wound on a mandrill to form a tight spring. Each link is cut from this spring with a little over lap. The ends of the link (or in the better patterns the entire link) are flattened. The ends are then pierced. Each link is fitted through four other links and then a rivet is placed through the hole and peined over. For strength each link must be riveted. After you have done this several hundred times you will have enough material to create a simple shirt much the same way that my mother used to knit sweaters. If you are just making it for show you can leave out the rivets and there is no need to flatten the links. I hope you have plenty of spare time. I gave up on my shirt when I discovered girls. Good luck. |
| Will - Tuesday, 04/15/03 01:16:55 GMT |
|
Guru, You're quicker on the draw than I am. Sorry, Ben, I didn't mean to double up on you. |
| Will - Tuesday, 04/15/03 01:20:04 GMT |
|
It's me again... with yet another weird, wild question. I've come across lots of steel scrap in many forms, and a great deal of it is zinc-plated. I have access to a sandblaster and have used it on metal before, but is a good blast enough to take the zinc off so I can hot-work the scrap? |
| T. Gold - Tuesday, 04/15/03 06:16:53 GMT |
|
T. Gold Yes, a good sand blast is enough. Though, in our shop, we typically use Muriatic Acid - it's a little less work. |
| Mike the Red - Tuesday, 04/15/03 06:22:36 GMT |
|
Posted too soon... I just got a new issue of Harbor Freight, and their anvil offerings have expanded. They now offer heat-treated, tempered carbon steel 55# anvils, in addition to cast steel 22# and cast steel 110#; the cast steel have hardies and pritchels, the carbon steel have only hardies. Pretty reasonably priced if they perform anywhere near spec for their size. What say? |
| T. Gold - Tuesday, 04/15/03 07:12:34 GMT |
|
how do i successfully aneal aluminium |
| gav morris - Tuesday, 04/15/03 10:02:16 GMT |
|
sorry aneal shouild be anneal! |
| gav morris - Tuesday, 04/15/03 10:27:02 GMT |
|
I've just started out and use the forge space at a local museum. I need some ideas for quick projects that I can complete while people are watching - ideally something that can be given away or sold as a momento of thier visit. Other than my own inexperience, my biggest problem is finding a way to treat the metal to prevent rust. I've got designs for small things like coathooks, bottleopeners and keyrings but how do I stop these things rusting ? |
| Roger Bennett - Tuesday, 04/15/03 12:15:01 GMT |
|
well, for demo pieces (especially ones for inside the house), you can run a block of beeswax over the surfaces at a black heat. Then people can see the smoke and shiny finish, and you can point out that they just have to re-wax every few years to keep in unrusty. Demo wise, it is the solution I like the best, but there are many others. |
| Escher - Tuesday, 04/15/03 14:25:08 GMT |
|
I'm getting started in black smithing/metal working and i've seen the picture of yoy're forge made from junk.Could you give me plans for an easily made forge? Something simple to make and easy to use and maintain. |
| joe - Tuesday, 04/15/03 14:40:24 GMT |
|
Junk Forge Plans: Joe see our plans page. Easy to maintain. . . ? There is not much to go wrong with a coal forge but they DO rust out. Coal ash is full of sulfur compounds that when combined with water make some of the most corrosive stuff in the shop. Forges left outdoors in the rain or in damp climates with ash in them will rust out in no time. Tools (like tongs) left in the forge will likewise be eaten up. In use ALL coal forges require some skill in fire maintenance. The best way to learn is just DO it. Every grade of coal acts diffeently and how you maintain the fire with that coal in a specific forge is different. Note that Kayne and Son have some really nice forge blowers (supplied by Grant Sarver) at reasonable prices. Use one of these on your junk parts forge and it will work GREAT. Later you can use the blower on another (better/bigger) forge. |
| - guru - Tuesday, 04/15/03 16:35:23 GMT |
|
Annealing Aluminum: There are about 100+ aluminum alloys and their heat treatment varies slightly. Usually, it is heated to about 900F and water quenched. Aluminum does not harden by phase transformation like steel does and quenching it prevents precipitation of any second phases. This will leave it as soft as it is likely to get. Aluminum is also about the same color all the way to melting and gives no hints that it is about to go liquid, which is around 1100F, so you really need a way to accurately tell what the temperature of the metal is. A temperature crayon can be purchased at a welding supply store that will melt when the aluminum is at 900F. |
| - Quenchcrack - Tuesday, 04/15/03 16:56:18 GMT |
|
Will any wax do? Why is beeswax better? How clean / hygenic a finish does beeswax leave ? Is it good enough for a knife ? I'll have a go with it this weekend and see what happens. Does anybody have a design for bookends ? |
| Roger Bennett - Tuesday, 04/15/03 17:02:12 GMT |
|
Demo Forging: Roger, I spent years doing this full time and I still ocassionaly do public demos. What you make should be relative to the museum context but here are some general pointers. MOST IMPORTANT - The public WILL NOT watch you long enough to finish any complex project. 5-10 minutes MAX. Make something they can see start to finish. Ocasionaly you will have an individual that came to spend some time with the smith, but that is rare. Adjust your demo as needed. Have all your stock precut. Sawn or sheared. On a busy day you may make 50 hooks or 30 horseshoes. Nobody want to watch you saw stock. HOOKS - J-hooks, S-hooks, drive hooks can all be made quickly and almost always sell. They also do not take much material. 1/4" square x 4" works for small J-hooks with a twist. 1/4" round x 4-1/2" works for round hooks. Stock for S-hooks best starts at 8" in small sizes. Having graduated stock on-hand (8, 9, 10, 12") to make graduated length sets is handy. PRACTICE making a pretty tight scroll on your hooks. Many smiths get sloppy here and the hooks are not very pretty. It takes no more forging effort to make good hooks as to make ugly throw-away hooks. On a busy day with lots of folks passing through you will just barely be able to make a hook start to finish for any given group. Souvenir horse shoes. These take a LITTLE longer than the hooks but go fast if the forge keeps a good hot fire. Because of the size and the big bend people will watch a little longer. . . Yeah, WE DON'T MAKE HORSESHOES. But that is what the public expects and even the most jaded city folk that have never seen a LIVE horse thinks they know what a horseshoe looks like. See my iForge demo on these and the Rich Hale demo on real shoes. When making souvenir shoes to make initials on I usualy did not put in the creasing. My rule was that the folks that wanted souvenir shoes with initials HAD to stay and watch them being made. Otherwise you can become inundated with orders from grandparents ordering one for each of their grandchildren and spend days filling the orders with no-one to demonstrate for. Camp fire sets. Tripods and spits. The parts for these are simple. Even though the full set goes over the time limit you can make individual pieces to hand around. Point, loop, optional twist. These are made from 1/2" square bar and the forging is a little heavier than hooks. The nice thing is that all those S-hooks you have made are good accessories to go with the fire set. FORGED LEAF: These go fairly fast if you practice. If you are demonstrating for the public you usualy get lots of pratice at whatever you do. But that may depend on you. MY idea of demonstrating for the public is to work constantly so there is never a dead time. It is hard to do when you are not used to it. . . . Leaves require making a point, necking down the stem, making the stem octagonal and then round (you can explain this to the public as they watch). I call the resulting leaf blank a "bud" and hold it up to show the audiance. Now watch the leaf come out of the bud. . . Flatten the leaf. OPTIONS: At this point you can do several things while making leaves. Most demo leaves must be made fast and I often just flatten them and get as wide a leaf as I can then add the curves that "give it life". You can also incise viens with a chisle OR use a leaf viening tool. Another style practice you can make (with practice) a leaf with a triangular section and rippled edges by working it with the pien of you hammer. This results in a leaf with a lot of mass and nice texture that is quick to mkae. You can also make folded leaves but generally the public will not watch this to completion. For hook making I finally made a set of special tongs to hold the little short pieces of 1/4" square. They have a "T" shaped groove in them so that when you need to hold the bent hook is still fits the groove. These really make hook making much easier. At some museum shops such as a Williamsburg, VA they have orders for goods from the operating foundation to use in the reconstruction of many buildings and for use in the shops. Most of the time they work on these items and ARE NOT putting on a show for the public. It is not unusual to hit a dead spot where all the workers are filing, finishing, cutting stock, cleaning shop. . . Yep, it is reality but it is NOT an exciting demonstration. Somewhere, Sometime, Someone is going to spend the money to open a demonstration blacksmith shop in a mall or major tourist destination and work it RIGHT. There will be raised stands to give a good view and protect the audiance from sparks and scale. The lighting will be low so that the HOT iron shows up best. There will be a power hammer for heavy forging and at least two forges. It will be manned by blacksmith demonstrators hired to ACT, FORGE and keep hot iron moving constantly (at least during scheduled demonstrations). These folks will be like every other actor spokesperson, they will be hired for looks and personality THEN trained to do the job. What they forge will be immaterial. The "gift shop" will be stocked with products made by smiths from all over the world and the demonstrators goal will be to put on a SHOW, not produce inventory. IF satisfactory finished product is produced that is FINE but should not be expected. . . Maybe it is just a dream. I'd like to THINK that it could be profitable. And I'd love to be hired to run the place! |
| - guru - Tuesday, 04/15/03 17:47:06 GMT |
|
Beeswax: Roger, I have used it. It is OK. But it leaves a sticky finish. Parrafin is not good because it makes white chalky places. One of the best fast wax finishes is liquid floor wax. It is designed to be hard, clear and to dry fast. I used to know which brand was best but that was many years ago and I am not sure if is still sold. But there are others. |
| - guru - Tuesday, 04/15/03 18:06:54 GMT |
|
Roger/Guru- Our professors, some of whom have been working for over 27 years, insist that the best liquid floor wax is Future. Many of the sculptors here use it regularly, and it seems to work well for them. Used at a blacksmith demo, the metal would most likely already be hot, but if you're waxing a cold piece, remember to "burn it in" - warm the metal to let the wax penetrate. I personally have yet to use it, so I can't tell you what to look for while burning in the wax. Perhaps Guru can. |
| Mike the Red - Tuesday, 04/15/03 18:31:55 GMT |
|
Future can be found in most stores that sell cleaning products; if you can't find it in the supermarket or a Walmart, go to Lowe's/Home Depot. It comes in a clear bottle with a colorful label on the front. |
| Mike the Red - Tuesday, 04/15/03 18:33:51 GMT |
|
Roger; Pure beeswax is a natural, edible substance. Ask any country kid who ever lopped off the corner of a piece of comb honey and called it candy. Woodworkers, when making wooden spoons, bowls, platters and related utensils use it to seal and polish their work. The edible kind, in my opinion, could best be obtained from a beekeeper or a health food store. Paraffin wax is a petroleum product, and the stuff commonly used for candlemaking can be a mixture of beeswax, paraffin, scent agents, hardeners and God only knows what all else. Bear in mind that the Brits call kerosene "paraffin oil". Besides, beeswax smells good when it's hot, and it's handy around the shop for lots of other things. Use it! Best regards, 3dogs |
| 3dogs - Tuesday, 04/15/03 18:36:05 GMT |
|
Mike; Future IS a great sealer for a lot of things, I've used it to pretty up tools for tailgatin', to seal forged items, and I don't think there's anything better for finishing off leathercraft jobs if you want a high gloss surface on them. But, bear in mind that it is not a wax product, it is an acrylic, so I don't think it would be too advisable to apply it to a hot surface. Just wipe it on with a damp rag and let it dry. You can get it at just about any grocery store. Best regards, 3dogs. |
| 3dogs - Tuesday, 04/15/03 18:46:10 GMT |
|
How was blacksmithing necesary in medievil times? |
| Daelric - Tuesday, 04/15/03 19:06:42 GMT |
|
Rodger, re waxing etc.... As said elsewhere on anvilfire iron/steel will rust to dust no matter what, over time. With that said I uses either beeswax as stated by others. I also use a spray on Hard Shell Car wax.. specifiacally Turtle Wax but brand probably does not matter. The wax does. It is Carnuba wax. Dries clear and hard. |
| Ralph - Tuesday, 04/15/03 20:03:33 GMT |
|
Hi, we have been using spot welding (3 spots) on mild steel products ( tubular poles and flat plates) and up to recently never had any problems. However, because we changed the plate (larger hole-less steel) we got a few welds breaking where the pole meets the flat plate. we solved this by doing full welds. Our problem now is we have a thin plate that is too thin for a full weld and using larger spot welds gives us distortion. About 25 years ago I worked for Certanium Alloys from the US and they had some great products and I think probably low temperture ones to do this job. Do you know how I could contact them? Are they still in business? I've searched the net but can't get a site for them. This is how I found you and I'm certainly glad about that. Do you have any advice on our problem, I would be grateful to hear from you. Best regards from Ireland, Kieron. |
| kieron - Tuesday, 04/15/03 20:31:14 GMT |
|
3dogs- whew! Glad you caught that! I use johnson's paste wax and sometimes parrafin on some of my metal items and always burn it in. Confused myself with Future. Wouldn't want to be responsible for someone burning that stuff. |
| Mike the Red - Tuesday, 04/15/03 20:31:53 GMT |
|
Mike the Red, It has happened to all of us. Anybody can have a momentary brain seizure. That's why we back each other up. Of course, we all try to avoid it, but when it does happen, it's not a big thing. |
| Paw Paw - Tuesday, 04/15/03 20:40:22 GMT |
|
Hi friends, I'd be very happy if you tell me which book to purchase known as "the bible" for those who are begining blacksmithing, particularly knives and swords. Thank you so much Brazil |
| Barcus - Tuesday, 04/15/03 20:47:25 GMT |
|
Barcus, At either the top or the bottom of the page, click on the "Getting Started in Blacksmithing" link. There is a list of books in that article. |
| Paw Paw - Tuesday, 04/15/03 21:22:01 GMT |
|
Wax and Oil finishes: I have used boiled linseed oil very effectively and, on a lark, used cheap olive oil. Can't say I am too fond of the olive oil as it does not seem to char to a deep color. Shop smelled like an Italian Bistro afterwards, too. As the guru has stated several times, you are creating a coating of charred oils and waxes. Once they are burned to a crisp, the differences probably don't make a lot of difference. Guru, any further comments? |
| - Quenchcrack - Tuesday, 04/15/03 21:39:17 GMT |
|
Daelric. sounds a lot like a schoolwork question. First you need ot understand what a blacksmith did/does. Then with just a small amount of thought you will see why. I will ask you this in return. Why was a person who knapped( worked stone by flaking off pieces.. like arrowheads etc)so important in the stone age. medievial times were definately in the iron age and so the smith was needed to work iron into the various tools and equipment used |
| Ralph - Tuesday, 04/15/03 21:44:11 GMT |
|
wow the chainmail thing is really just as hard as i thought thanks for the info |
| ben - Tuesday, 04/15/03 22:06:07 GMT |
|
Guru- have you ever heard of a "cookie-cutter" type punch? I was wondering if it was possible to use a single punch to cut a shape out of a piece of sheet/plate. My specific thought is about the blanks for "rivet-type" roses (the ones where you mount 3 or 4 cut-outs on a tenon and then fold the petals up). I'm a bit of a purist and don't relly want to cut those shapes out with a saw - feels like cheating. Do you think a punch could be made to cut these out ? |
| Mike the Red - Tuesday, 04/15/03 22:35:49 GMT |
|
Ben - It's more time consuming than hard. Once you get the tools together, and they are relatively easy and cheap, all it takes is time and patience... or a lack of patience. I am ADHD, unmendicated, and can't sit still for any length of time, so I spin wool while watching Discovery, do chainmail during meetings, or bead work, or anything else I can cart around and do on my lap. Most of the folk I know who knit chain do so while doing something else, like watch TV. All agree that, once they learned the patterns, it would drive them nuts to just sit and focus soley on the chainmail. |
| Monica - Tuesday, 04/15/03 22:35:55 GMT |
|
Waxes- The stuff I like the best is some hard red carving wax I got 30 years ago for jewelry making. Back then 5 pounds only cost ten or so bucks. I have no idea if it is still available, but it would be worth looking at a jewelry/sculpture supply for it. It melts on at a black heat, rubs out nicely to a good dark shiny surface, and the stuff I'vew used it on hasn't rusted in more than six months of sitting around outside (under cover) in a strong ocean air environment. A bonus is that it smells kind of piney when it burns or vaporizes. |
| vicopper - Tuesday, 04/15/03 22:58:25 GMT |
|
Going through some postings from the last week or so (I've been out of town a few days) I came across some Q&A's about blacksmithing and Civil War reenacting. I just got back from a wonderful weekend of smithing at Ft. Pillow, TN., my first event as a civvy rather than field artillery. It was really cool...camping with a group of civilian reenactors, eating cornbread and beans cooked on an open fire, complete with fresh-churned butter. In addition to the cooking, folks where making candles, spinning wool, etc, etc. The civilian side of reenacting isn't quite as large or well-organized as the military stuff, but it was great to interact with other folks working to keep some of the so-called "lost arts" alive. |
| Chris W. - Tuesday, 04/15/03 23:20:52 GMT |
|
Daelric: Tools for the farm and the wagon, weapons and armor for war, cookpots and spits for feasting, hinges and hasps for chests and doors, rivets and anchors for ships... I could go on and on. The smith made them all. There were specialists, too, working on swords and armor and locks and cutlery, but the local smith was expected to make and repair almost everything of iron necessary for daily life. In early medieval societies the smith was frequently a person to hold the place of honor at the king's table. It may have been a wooden world, but the smith made the tools to work the wood, and stone, and soil, and cloth. The smith was the cornerstone of the medieval infrastructure, and advanced in skill, scale, and knowledge throughout the period. (Oh, and it's medieval: literally "middle age". Nothing "evil" about it {or at least no more "evil" than any of the other ages that preceeded or followed it.}) ;-) Visit your National Parks: www.nps.gov Go viking: www.wam.umd.edu/~eowyn/Longship/ |
| Bruce Blackistone (Atli) - Wednesday, 04/16/03 03:17:45 GMT |
|
Whee'd my color go? |
| Bruce Blackistone (Atli) - Wednesday, 04/16/03 03:18:53 GMT |
|
Bruce, Looks like it just "whizzed away" for a while there! (LOL) |
| Paw Paw - Wednesday, 04/16/03 03:29:43 GMT |
|
Machinist's or Metalworkers 'Bible' Barcus the only book I know of that has been given this distinction in more than one metalworking field is MACHINERY'S HANDBOOK. See our book review page for more information. |
| - guru - Wednesday, 04/16/03 03:43:00 GMT |
|
Punch: Mike, Donald Streeters book discusses using a punch in the way you mentioned. Its not a trivial job to set up a punch and make the dies. A a coping saw with a birds mouth table is likely more "traditional" than a punch. I dont know which method is "purer" :). Another basic method is to incise deeply with a cold chisel and then "worry" the metal apart by wiggling it at the cuts. Personally I like the Beverly shears which I got to use at Frank Turley's. I since bought the HF copy and after some work it cuts beautifully. Very clean cuts of unlimited depth. Easy control - can turn very tight corners. And best of all it has a smooth QUIET action which is always a welcome break when metalworking. Whatever you may think of using a Beverly, using a crude Chinese knockoff is definitely impure :) |
| adam - Wednesday, 04/16/03 15:21:28 GMT |
|
coping saw: Since we raised this topic :) - what do people like in the way of coping saw blades? |
| adam - Wednesday, 04/16/03 15:23:08 GMT |
|
Barcus, there's a problem, the best books for smithing blades in my opinion are "The Complete Bladesmith", "The Master Bladesmith" and "The Pattern-Welded Blade" all by James Hrisoulas *BUT* they are not the best book to learn to blacksmith from and a good background in blacksmithing will save you a *lot* of grief when trying to follow the instructions in his books. Your question is like saying what is the best book to teach you how to drive a race car---when you don't know how to drive a regular car... So learn to walk before you run it really will help you in the long run! Also learning by a book or even worse a web page, is not the best way to learn smithing. 1 Saturday afternoon spent with an experienced smith at their forge can save you a good 6 months of trying to learn it on your own. The American Bladesmiths Society has an actual school for bladesmithing located in SW Arkansas (near Texarkana). If you are really wanting the fast lane to bladesmithing taking courses there will *really* help! Thomas |
| - Thomas Powers - Wednesday, 04/16/03 15:27:15 GMT |
|
Cutting Sheet Metal - Blanking: As little as 15 years ago making a special shaped punch and die set was a competive method for making several thousand parts. It is still the best way if making tens of thousands of parts and need clean edges. TODAY however, you can have parts cleanly and accurately cut via computer guided plasma torch or laser (depending on local availability). The shapes are also not constrained to structural issues involved in making a blanking die. It is MUCH cheaper than making dies, die sets much less setting up a punch press or hydraulic press to use them with. If you have access to this forum then you have the equipment to make the necessary CAD drawings and convert to a DXF for the computer guided torch. TALK to the folks at your local steel service center or torch shop about the file format and disk type. Some may take them by e-mail but ALL will require you to setup an open account before doing special cutting for you. When making CAD drawings be sure to learn to use the "gravity" commands which set points on the nearest end point. NEVER try to set points visually. Machines need a continous line to follow otherwise they can stall. This is a numericaly continous line NOT a visualy continous line. |
| - guru - Wednesday, 04/16/03 16:34:04 GMT |
|
Traditional Sheet Metal Cutting: Cold chisles were used a lot and still are. However, big bench shears became common at the same time as sheet metal. The old shears just looked like BIG snips and were commonly 3 to 4 foot long but were made bigger. They were anchored to a heavy bench or stump set into the earth. This anchoring of shears is still important today. Most large shears (any long lever tool) need to be attached to a sturdy bench that is bolted to the floor unless it weighs a half ton or more. If applying your full weight to a 5 foot lever moves or tips the bench it is not sturdy enough or anchored well enough. |
| - guru - Wednesday, 04/16/03 17:00:42 GMT |
|
|
|
|