I am a retired fireman. I have been forging and smithing for 14 years and the Doc says no more coal. So A very close friend of mine who travels in Europe says that a lot of the smiths in Europe are now using ceramic marbles and gas to get that coal effect, localized heat and a quicker heat. Do you or any of your guruetts know anything about this? I have googled and searched but like most old farts computers seem to not like the questions I ask.
Thanks for any info you might come up with. thms_laman@yahoo.com
Tom Laman
|
|
Tom Laman
- Monday, 03/08/10 13:51:44 EST
|
Tom,
Check out http://www.flamefast.co.uk/forging.html
|
|
- Richard
- Monday, 03/08/10 14:27:29 EST
|
Tom,
Check out http://www.flamefast.co.uk/forging.html
|
|
Richard
- Monday, 03/08/10 14:33:32 EST
|
Mike, most folks making fillet knives I know of have used a piece of *LARGE* bandsaw blades---like the 6" wide 2 story high ones used to saw logs into lumber. Trying to get an alloy that will both hold an edge and be flexible. The grinding is a bit tricky though!
Heavy Loads: much can be accomplished with free beer and pizza *HOWEVER* the beer must not be accessible until *after* the heavy loading is done!
Thomas
|
|
Thomas P
- Monday, 03/08/10 14:53:09 EST
|
Tom, "FlameFast" in Great Britian makes a ceramic chip forge. Contrary to the popular beliefs it is still a gas forge and much different than a coal forge. Among the differences is the large mass of heated chips gives off a huge amount of radiant heat. They also require constant maintenance screening and replacing the chips which burn out.
The "chips" used come from the U.S. They are the coarsest available synthetic Mullite (a common refractory aggregate used in refractory cement and brick).
Your best choice is a common gas forge (or two). While gas forges work well they are only efficient at their full capacity. Small work needs a small forge, large work a large forge. . . That is the huge advantage of a coal forge (size flexibility).
Gas forges are clean but they should be vented. Most give off a lot of heated fuel fumes, CO and CO2. They take less venting than coal but still need good venting.
You could burn charcoal (real wood or lump charcoal) in your coal forge and cut back on the smoke and fumes that are giving you trouble. A lot of shops run them ventless (like gas) but if you want clean air in your shop, vent it.
|
|
- guru
- Monday, 03/08/10 15:51:00 EST
|
Flamefast: looks nice.. does anyone know a good way of making one on your own?
|
|
- Nippulini
- Monday, 03/08/10 15:52:55 EST
|
Nip, I did a lot of research on these and they are not simple. The refractory "firepot" is also your burner nozzles. The fuel/air mixture is made up below then blown through the dozens of holes in the pot. The chips set in the pot and are heated. The blower and gas maniford must be sealed to the firepot. The best idea I could come up with is that it was one piece with a gap between it and the refractory liner which sat on the rim. Any fuel mixture that leaked at the edges would ignite in the forge. The refractory liner is an regularly replaced part.
To purchase the chips you are looking at industrial quantities and most of this material is ground and screen MUCH smaller than it can be used in this forge. You have to get first pass crushed material.
Part of the problem with the chips is that scale sticks to them and they degrade. As they degrade and break up you have to screen them (daily) to remove the dust and fines that would clog the burner holes. The removed material must be replaced. As some point the whole becomes too trashy and you scrap the whole and start with all new chips.
|
|
- guru
- Monday, 03/08/10 18:17:38 EST
|
Serious Blacksmithing:

Estate Gate by Josh Greenwood
The frame of this gate is made of 2" square and 2" x 1/5" bar mortised and tenoned together. At the joints the 2" bar was upset to 3" square.
The vertical bars are 1/2" and 5/8" alternating on the diagonal.
Between them there are scrolls made to fit on the edges of the diagonal bars.
These are a small detail but a real trick to forge. All the joints in this gate are classical joinery and forge welds, no arc welds anywhere.
|
|
- guru
- Monday, 03/08/10 22:58:42 EST
|
with regard to coal smoke would an alternative to charcoal not be hard coal? It requires a constant air supply to keep going but what other disadvantages are there.Im a rank beginner and hard coal is all Ive used as its all thats available(for heating )
|
|
wayne
- Tuesday, 03/09/10 07:15:27 EST
|
The problem element in most coal smoke is sulfur and all coal has some sulfur content. Coal fires also tend to generate more CO than charcoal. No smoke of any kind is good to breathe but coal is one of the worst. Another alternative fuel is coke but this also contains some sulfur.
|
|
- guru
- Tuesday, 03/09/10 07:34:40 EST
|
Alternatives to smokey forges. Don't forget that induction heater.
|
|
JimG
- Tuesday, 03/09/10 09:07:06 EST
|
Guru, is this what I saw Josh and one of the Wilson grandaughters working on in A recient video?
I couldn't imagin what he wanted with a upset on a bar that big but, now I begin to see the the depths of his madness...
Beutiful work. I hope you deliverd the gates BEFORE you got rid of the crane...
|
|
- merl
- Tuesday, 03/09/10 10:16:48 EST
|
Guru,Good work on the gate, makes us appreciate how hard it was for the old timers.
|
|
Carver Jake
- Tuesday, 03/09/10 10:31:06 EST
|
All I did was drive the truck from Petersburg, VA to Annapolis, MD. Josh's web site has some detail parts on the home page. But here is the picky little one. He thinks it is original shape but that is hard to prove in iron work.
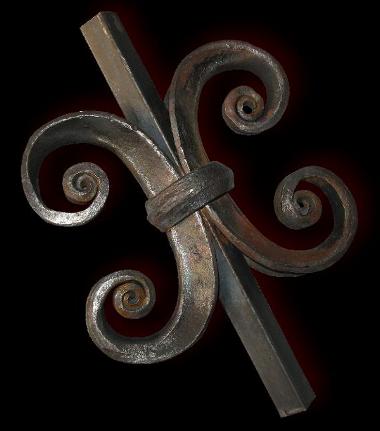
There are 12 pairs of these in each leaf of the gate (48 V scrolled parts). Each is collared in place on the diagonal bars, and each is riveted to the square bars in between. Some of these were still being riveted the day before delivery. . .
|
|
- guru
- Tuesday, 03/09/10 13:06:04 EST
|
Hey I just found a johnson no 118 furnace. its for smelting, tempering, case hardening and heat treating it says from what I found. it has a nossle to connect to gas. my question is, do I just connect it to propane and what does anyone know about it. Oh also how should I replace the fire brick on the bottom, by the bag or buy it already hardened.
|
|
matt M
- Tuesday, 03/09/10 13:16:56 EST
|
Matt, Johnson is still in business. BlacksmithsDepot.com sells them and I think Johnson has a web site.
They were made primarily for natural gas but also run on propane. They recommend changing the burner orifices when changing gases but I've known folks to just hook them up. They are a bit of a gas hog due to the large fire chamber and open slot design. If the swinging adjustable door/lid is there it helps keep the heat in. But you can't choke it down to save fuel.
I would not mind having one in my shop but I would not want it to be my only gas forge. Small work needs small forges and the little bread box blacksmiths forges are much more efficient for the work that fits.
|
|
- guru
- Tuesday, 03/09/10 14:07:12 EST
|
If the coal forge drafts well the coal shouldn't be a big issue should it ????? i'm 33 had cancer when i was 19 and my kids and wife stay in the shop with me was just kinda wondering
|
|
Pat
- Tuesday, 03/09/10 14:47:17 EST
|
one more quick question, i am just picking this up my self i always just jump right into it neck deep then figure it out lol!! my son is 14 and wanting to learn to blacksmith and i was wondering if anybody has a idea on what i should start him learning first and the best first lesson, i am so differant than most people . I see it done then i just do it and really don't no how i do, he is the oppsite of me , and i have a hard time with that, anyhelp would be nice on what to start him on, to get a good foundation going Thanks
|
|
Pat
- Tuesday, 03/09/10 15:54:13 EST
|
Mat; most of the Johnson's I have seen have a mixing and blower box that goes with the furnace and the air/fuel mix then goes to the furnace. If you are missing the box you will need to figure out how to replace it---I had an extra; but I traded it to a smith who had the furnace but not the box.
Thomas
|
|
Thomas P
- Tuesday, 03/09/10 16:14:09 EST
|
Teaching Kids: Kids will pick up blacksmithing pretty quick if given the chance AND they have the drive. Working metal is a stubborn thing that you need to be equally stubborn about. I've seen 8 year olds that positively WILLED the material to shape and 14 year olds that could care less.
You can make money making simple hooks and that will often spur a kid to learn. Making a hook has a bunch of basic processes, tapering, scrolling, twisting, flattening, punching. S-hooks are the easiest to make because they do not require a hole and longer ones do not require tongs. However, I recommend properly fitting tongs to prevent getting burnt. Tong use is an easier skill to learn on small light stock than on heavier stock. 1/4" V bit or Chain makers tongs will work for 1/4" square and round stock. In making hooks small size increments make a big difference. 5/16" stock is good for medium hooks and 3/8" for large hooks. Lots can be done with hooks including flames, leaves, scrolls and animal heads. Small items with infinite possibilities.
|
|
- guru
- Tuesday, 03/09/10 17:32:56 EST
|
Coal Smoke: I have yet to see a shop with a coal forge that didn't have some smoke at one time or another. It is probably possible to have a good flue AND a good non-interfering vent system and have a smoke free shop. However, putting flat stock in the forge often sends jets of smoke and flame out the sides of the forge and occasionally coal sticks to the work as it is pulled from the fire. Errant drafts will stop the flue from working or blow smoke out of the forge. . . Smoke free is difficult to maintain.
|
|
- guru
- Tuesday, 03/09/10 17:39:10 EST
|
Jock
what was the starting material in the scrolls shown in your 13:06:04 post? Looks like something that could be made from angle, but i doubt that would be historically accurate. Also, what was the finish on the gates (if known to you)?
|
|
- Dave Leppo
- Wednesday, 03/10/10 07:43:22 EST
|
Same question, but about the collar on the scroll. Not that I could care less about historical accuracy, but more so wanting to know Howie Diddit.
|
|
- Nippulini
- Wednesday, 03/10/10 08:36:15 EST
|
Making the V-scrolls: Dave, I am not sure of the exact dimensions but I know it was not angle (I asked Josh). Some special dies were made for the angle section which has a raised ridge the same as the collars. Special tools were also made for shaping and supporting the collars. The forging sequence for these would be to make a flat tapered blank, form the V in a die, then scroll keeping the V from flattening. They are not easy parts to make. If they were it would be a common motif.
The finishing process on this gate was not the best. However, the customer provided the lifting equipment (a tractor with front lift) to place the gates and even with padding and soft rigging the paint was torn up pretty bad during the install.
The individual parts were descaled with acid, neutralized, primed and painted prior to assembly. This left a lot of rivets, collars and upsets without proper cleaning and priming. While Josh's ironwork is always the best his finishes have never been up to modern standards. On this job the final painting was on the customer.
|
|
- guru
- Wednesday, 03/10/10 08:53:08 EST
|
V-Scrolls and Collars: Josh uses a power hammer for a LOT of his forging, more so as he gets older. He currently has a very controllable small mechanical hammer for detail work. When forging leaves and scrolls he starts with making a flat or tapered blank with the right profile for the part. Often these "flattened" shapes are not what you would expect. For these V-scrolls the flattened part would be fairly wide curving in to two long narrow points. Sometimes these shapes are quite ugly and do not look like the beginnings of a graceful element. The starting material is often close in cross section but is not critical when power forging.
The collars are forged in a die made for this job only. Round stock is forged to create the raised section then short pieces cut and tapered. The tricky part is a bending and backup die needed to be made to make the front side of the collar. On the back side the tapers overlap the top wrap having the ridge like the front.
Cross section forging dies are usually made by hot setting a sample or several bars into a block. This can be done by hand but a power hammer (or striker) makes it much easier.
Design like this starts on paper or as an idea, then you have to work out the patterns and tooling to make it. When the finished product doesn't look like special tools were required then you've done the job right.
|
|
- guru
- Wednesday, 03/10/10 11:51:59 EST
|
Pat Smith's Trellis (detail):
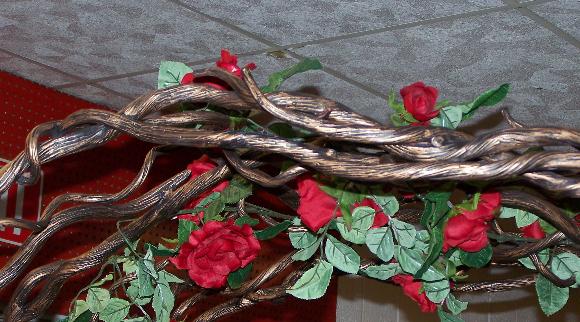
The roses are props. The finish is multiple colored hand rubbed guilder's paste over a primer base coat.
|
|
- guru
- Wednesday, 03/10/10 15:30:09 EST
|
Pat's other photos:
http://www.anvilfire.com/gallery/pat_smith/110_3605.JPG
http://www.anvilfire.com/gallery/pat_smith/100_4375.JPG
http://www.anvilfire.com/gallery/pat_smith/100_4376.JPG
http://www.anvilfire.com/gallery/pat_smith/100_4377.JPG
|
|
- guru
- Wednesday, 03/10/10 15:56:40 EST
|
thanks for the picture post guru , i learned what i do know through people like yourself that truly love to help people learn the trade, alot of people dont have the time or money to go to school's to learn how, i would love too but i have a full time mechanic job and this on the side, a 14 year old and 3 year old, hard to find time or money, so it is with help from all of you on this site that really help . So thanks to everyone on this site
|
|
Pat
- Wednesday, 03/10/10 16:03:56 EST
|
Great work all around.
|
|
- Tyler Murch
- Wednesday, 03/10/10 18:46:08 EST
|
thank you for responding to my requests for making fillet knives. I sprained my leg and was out of commission for a few days ( still sore ). As always Anvilfire is the best site. I might also make a comment about some other sites I have been involved with. They claim to teach certain skills and have question and answer sections, but it is obvious that the owners of these sites have one objective and that is to tout their own products. I don't involve myself with these sites anymore.
|
|
Mike T.
- Wednesday, 03/10/10 21:58:03 EST
|
I am working on a clock. The mainspring is no longer sold so I bought the correct thickness and width and cut the sping down (only works at the correct length because of a guard). I needed a rivet 1/16 inch thick and the metal being riveted was about 1/16th as well. They don't sell rivets like that so I chose some nickel silver stock and made two rivets. I annealed them (heat and dunk...opposite to steel)but then I had trouble getting a clean mushroom. In the process of hammering I think the small rivet became work hardened and the result was poor. I put the clock together and it works great but I can't send the piece out with the sloppy rivet job.
I am now wondering if copper or brass would make better rivets (stay malleable longer). What do you think?
|
|
- deloid
- Thursday, 03/11/10 12:27:20 EST
|
About that gorgeous gate...
"All the joints in this gate are classical joinery and forge welds, no arc welds anywhere"
Does that mean welding with flux, hammer and torch? Is this done to avoid the extra seam of metal?
|
|
- deloid
- Thursday, 03/11/10 13:29:51 EST
|
The Gates: Deloid, No torch welding either, all forge welds done in a coal fire. Yes, Josh DOES use borax for flux. A torch was used for heating the rivets.
Riveting: Brass rivets are just as much a problem as the "nickle silver" which is usually a form of Inconell which is also used for rivets.
To make pretty rivets you need a "rivet set" (or production crimping tools). A rivet set is a tool with a correctly sized rivet head depression. These can be bought but the availability is very low. There is a drawing of one in our iForge riveting article. Grant Sarver makes a rivet bucking block that goes down to a 1/8" rivet.
Besides striking or compression, rivets are also set by spinning. This is how rivets are commonly set on knife scales where hammering would break the bone, wood or plastic. In this case the rivet set is a tool held in a drill press and is pressed down on the rivet while turning.
Rivet depressions can be machined or hot set. Hot setting is pretty easy for a blacksmith. First you make a round end punch then you drive it into a hot piece of steel. Deeper is better as you can grind the face of the setter to the correct depth.
Work hardening and or splitting of the rivet is caused by multiple blows on rivet corners. To do a good job with a had hammer the first blow need to be hard and true. This will make most of the upset then the rest is dressing the corners. When using a rivet set it is easier but as few as possible blows should be used. You can also use a set and bucking plate in a press or vise to get smooth even controlled compression.
|
|
- guru
- Thursday, 03/11/10 14:39:57 EST
|
Rivets. . I meant to say "Monel" a product trade name of the same company as Inconell.
|
|
- guru
- Thursday, 03/11/10 14:41:21 EST
|
Cold Riveting. I use the ball of a ball peen hammer for the upset. If the rivet looks like it want to bend, I use angle blows to correct the bending. It seems like the ball is easier to use that a regular hammer face, especially when using correction blows. There is also less chance of hitting the workpiece itself. I use the rivet-set "domer" as more of a finishing tool after the ball peen work. It will get rid of your hammer marks. Sometimes, we leave the hammer marks which gives a nice look if you're careful. It depends on what you're after.
I have found that prior to hammering, it helps in preventing work hardening cracks on the sharp corners, if I cold file a chamfer all around the shank end. It is a blunt taper, appearing as a short tapered truncated cone. By so doing, this also confines the upset centrally, because it keeps the thin edges from coming out sideways right away, a "golf tee" "valve head" appearance, which I don't care for.
|
|
Frank Turley
- Thursday, 03/11/10 15:52:17 EST
|
The right diameter and length of the rivet and a good rivet set makes a critical difference. Somebody was looking at on of my "practical art pieces" ("The Armored Purse") and accused me of using "special pop rivets". When everything is done right, you can get a very clean head.
|
|
Bruce Blackistone (Atli)
- Thursday, 03/11/10 15:53:57 EST
|
Pure copper or pure nickel rivets should work harden less than brass or nickel silver. As others have pointed out, though, the solution is probably changing technique rather than material.
|
|
Mike BR
- Thursday, 03/11/10 16:28:15 EST
|
Thanks all!
Now a simple question. How did Josh Greenwood get that sick skill? :)
I wonder if he teaches?
|
|
- deloid
- Thursday, 03/11/10 18:13:31 EST
|
As the Guru notes spinning is an option. A rivet spinning tool for a few rivets can be as simple as mild steel bar with a drill point in the center of the end. Put it in a cheapo drill press, run it sorta fast with a tiny bit of oil applied to the drill point depression and rivets are perfectly headed with surprising speed and ease. Takes little down force.
|
|
ptree
- Thursday, 03/11/10 18:14:21 EST
|
deloid,
I don't know Josh Greenwood, but sometimes a skilled worker will take the time to get it right. This means making sure the jigs and test pieces are right. Of course, it helps if you're a visionary.
Perhaps, time IS money, but if that is one's only criterion, then it leads to "getting it all put together somehow." Coach John Wooden is reported to have said to his basketball players, "Be quick, but don't hurry."
It all takes inordinate patience, and as one of my mentors, Al Kremen, said, "Practice doesn't make perfect; perfect practice makes perfect."
One of my students told me, "Ya' know, 90% of my work is done while I'm taking a heat, because I'm trying to figure out what the hell to do!"
|
|
Frank Turley
- Thursday, 03/11/10 19:52:57 EST
|
An Unauthorized Biography of Josh Greenwood: Josh, started smithing in the early 1970's (72 I think). He had a degree in English and education and spent a time (six months I think) in Italy studying art. He found teaching in the inner city a depressing and hopeless task so he decided to go into blacksmithing after a number of years working odd jobs.
He made it a point to find other smiths and learn from them and would travel great distances to do so. His family lived near Philadelphia for a time and knew the work of Samuel Yellin. When he setup shop he located in Petersburg, VA an old southern town with a very depressed economy. It was cheap to rent and live there yet close to Richmond, VA. Both cities had a lot of historical ironwork to study as well as customers for restoration and repair work. He met and traded with the late Wild Bill Gishner who at the time traveled all over the country in a heavy van buying, selling and trading blacksmithing tools, machinery and other antiques. The Gishners were an old ironworking family and have a considerable amount of work in the Washington National Cathedral. I believe Bill introduced Josh to power hammers, weld plattens and other tools unheard of by the majority of the new smiths of the time. In fact "power hammer" wash almost a dirty word among many of the purists of the time. Josh, in turn is also a "finder" much like our Thomas P. He was constantly finding and trading old blacksmithing equipment. I never knew his shop without three of four power hammers and they changed often. When I met him in 1978 he had a 100 pound Little Giant as his "main" hammer a 50 pound LG for small work and a 300 pound Bradley Compact which was not setup.
Josh could get good work out of the worst old worn out power hammers you ever saw. He started with Little Giants and then graduated to Bradleys and then Nazels. Currently he has several Fairbanks hammers, a 500 pound Chambersburg Utility and a Niles-Bement 750 plus smaller hammers that come and go.
Josh was a purist and has never relied on arc welding in any of his work. He took on large jobs early in his career that forced him to learn production smithing relative to architectural ironwork (50 scrolls at a time and hundreds of identical pickets IS production work). It also taught him the value of large platen tables.
While Josh is not a fine artist in two dimensional work he CAN draw fairly well and is good at three dimensional work. Some of his ironwork has used castings where appropriate and he has made the patterns. Too many smiths forget the ART in Artist Blacksmith or confuse the "Decorative" in Decorative ironwork with mere craft or simple decoration. Unless you are an industrial smith this is a job for folks with artistic skills or those willing to learn them.
Josh currently lives half the year in Costa Rica (see FincaIsla.com) and half the year in Virginia 90 days at a time. He works as much or more today with heavy equipment (track hoes, graders) as in blacksmithing. Heavy equipment work generally pays better and he is an artist at that as well.
|
|
- guru
- Thursday, 03/11/10 20:01:06 EST
|
I have been asked to straighten a cast iron part for a wood stove. If I heat it in the forge, gently persuade it back into it's proper position and slowly cool in lime (as I have done after welding CI)should I expect success ? A replacement part for this stove is no longer available.
Thanks ,
|
|
Harley
- Thursday, 03/11/10 20:26:12 EST
|
Greetings - I have built an air hammer, but the bottom seal of the air cylinder has failed in a short time. How to I connect the cylinder rod to the ram in a way to avoid stressing the seals? My ram is 200 pounds.
Thanks, George
|
|
George Blackman
- Thursday, 03/11/10 20:37:13 EST
|
Guru,
Thanks for the bio on Josh. He does interesting artistic work...it's not surprising to find out he has an interesting background to go with this. This world needs more people like Josh.
|
|
- deloid
- Thursday, 03/11/10 22:04:57 EST
|
Guru,
Didn't you say you are moving to Costa Rica? If so, will you be near Josh?
|
|
Carver Jake
- Thursday, 03/11/10 22:46:15 EST
|
George, The problem with most lightweight air cylinders is they are not designed for heavy reciprocating masses. Even with perfect alignment the seals will fail. Folks like BigBLU have special heavy duty cylinders built with double seals and heavy guide bearings. Larger than "standard" duty rods are also used. The BigBLU 150's rod is over an inch.
Some of the seals in air cylinders are not rated for the speeds that air hammers run. This can cause rapid failure. Check the ram speed, consult with the cylinder supplier.
A cylinder with too small a rod will have flex and vibration in the rod on impact. This will trash seals pretty fast.
In the ABANA Simple Air Hammer plans they recommend a flexible coupling between ram and cylinder (a standard aie equipment part). However, the rod should be flexible enough if the alignment is good.
If you look at industrial duty air hammers like the old Chambersburg Utility hammers their 100 pound hammer had a 4.5" cylinder with about a 2" rod. The V-groove guide system was precision machined and had a fine adjustment.
I suspect alignment issues OR alignment issues due to flexing of the frame or rod. Just a guess.
|
|
- guru
- Thursday, 03/11/10 22:49:03 EST
|
CR, At one time I was looking at real estate next to his. But it was sold. . (you snooze you lose). But I like the general area on Volcan Plantanar. Far from the general tourist areas and at altitudes where 70 to 80F is the normal year round.
7 years ago I had a 3 year plan. . . I haven't completed stage one and complications have arisen (as they do in life).
|
|
- guru
- Thursday, 03/11/10 23:04:27 EST
|
Well, I will add a post that I think is interesting. I was watching Modern Marvels on TV tonight. A company had a contract to dismantle an old ship, cut it up and truck it out. They had a 250 ton crane as close to the ship as they could get it. If the crane had to extend all the way out there was a possibility it could topple over lifting a big load. The computer on the crane let the operator know when the load and lifting power was over the limit. If the load was over limit, they had to cut around the parts with a torch, lay beams down and push the parts closer to the crane. In order to push the parts across the beams, they laid bunches of bananas on the beams and the parts would slide on the bananas. When winter came and it was cold they switched from bananas to Ivory soap. I thought that was interesting.
|
|
Mike T.
- Thursday, 03/11/10 23:34:53 EST
|
One of Frak Tabor's stories tells of using condensed milk for cutting oil. I suspect it works pretty well except for spoilage as he noted.
Most cranes have charts with maximum loads at given distances. However, most of the time loads are not marked xxx pounds and the crane operator is left to guess. . . A lot of cranes and lift trucks tip over due to bad judgement.
|
|
- guru
- Thursday, 03/11/10 23:49:19 EST
|
I have a question about the anvil for a power hammer. I'm going to build a tire hammer but was wondering what your thoughts were on using a pipe filled with rebar and concrete then caped off on the ends for an anvil? The reason I was thinking about using this method is a big chunk of metal for the anvil has been hard to find or very expensive, but I wasn't sure how well this would work. Thanks.
|
|
- Shane
- Thursday, 03/11/10 23:59:30 EST
|
What about Harley's 20:26:12 question on Cast iron. I'm curious how cast iron can be manipulated, IF AT ALL.
|
|
Dave Leppo
- Friday, 03/12/10 07:10:27 EST
|
I am not sure the part in question IS CI. The owner of the wood stove wrote to me and said he had a CI wood stove part that had slightly warped. I have never seen warped CI , I have though seen burned out CI stove parts. I wrote back and asked if he was sure the part was Cast Iron. I am guessing the warped piece is steel. So, is it possible for Cast Iron to warp?
|
|
Harley
- Friday, 03/12/10 07:23:32 EST
|
Cast Iron Sorry I missed your question.
The problem with cast iron is that it comes in many grades and often ductile iron is used in place of cast iron due to the number of foundries dealing with it. I've never bent ductile on purpose but I HAVE tried to break parts made from it. It will bend quite a ways before breaking. SO, you may have a cast part or a fabricated part, but not know the material.
As to warping, I have seen very old stove parts that probably were NOT ductile very misshapened. This probably occurs at close to the melting point of the metal. However, practically all metals become weaker at elevated temperatures and I'm sure CI parts under load will deflect.
I would look at the part and see if it is something you could fabricate from steel. If so, tell the customer that you will TRY to straighten the part but if that fails a replacement part will be so much.
Heating such a part should be done equally all over and then the straightening load applied while very hot. If it cools while handling heat it again. With care I suspect it can be done.
|
|
- guru
- Friday, 03/12/10 07:58:17 EST
|
Power Hammer Anvils: Shane, concrete is very low density compared to steel. If you have the rebar I would cap the top of the tube with a heavy plate of at least 2" thickness. Then fill the tube from the bottom so that the bars are pushed hard against the cap. I would use bars shorter than the tube and weld the bars in as you fill the tube.
Alternately you could weld the bars to the cap and each other starting at the middle and stopping when there is plenty of room to attach the tube. Then drive in pieces of rod to fill the gap and weld them to the tube and the other rods.
If you don't have the rebar then any other steel bar would work better.
I would not use any concrete in this construction unless it is a large above ground base for the hammer. This can be 10 to 12" thick and help anchor the parts to each other. Use an angle iron frame and flanges where the parts meets the concrete. This will add cheap low density mass to the hammer but does NOT replace a good solid compact anvil.
|
|
- guru
- Friday, 03/12/10 08:16:34 EST
|
Thanks Jock,
My plan was to tell the customer I would be willing to try to make the fix but that there is a possibility for failure. Yes I also planned to see if it is possible to fab the piece from steel. Since replacement parts are no longer available (according to the customer) it seems if the part is now not useable then it seems to me there is nothing to loose.
Thanks
|
|
Harley
- Friday, 03/12/10 08:24:17 EST
|
On air/hydraulic cylinders in machines.
One of the mistakes often made in using cylinders is not designing for protecting the rod. First mistake, no matter how big the rod, if there is misalignment, the bearings/seals will fail. Make too much side load, and not only will the bearings and seal at the head fail, the piston will scrub the barrel wall and trash the entire cylinder and usually throw metal that will trash the valve as well. If the cylinder is heavily loaded, and the rod is extended to near maximum extension, the rod will often buckle sideways since the two points tht locate the rod become almost one point. The rod is located by both the bearing and the piston. A couple extra inchs of stroke, that keep the piston away from the head will both prevent jack knifing and piston slap on the head from occuring. Of course you have to have room for those extra inchs.
When buying a cylinder for a hammer or press, buy the biggest rod that is standard on that cylinder. Not much more expensive, but oh so much better from a bearing and strenght consideration. Also, if you get the 2X rod the cylinder retracts faster for the same oil flow, and in pnuematics less air consumption.
Choose a "Jewel" type gland when buying if available, as these bearing/seal combo's can be replaced without total disassembly of the cylinder, and while not "Cheap" ar inexpensive enough to have on YOUR shelf for that Saturday evening repair when the work is due on Monday morning.
The red couplings suggested by ABANA plans are somewhat expensive, and usually very short lived in use like a power hammer. If you expect some slight misalignment make a flex coupling that has the same bearing surface and meat as the pivot mountings on the cylinder from the factory.
I like to design this type mechanism with the rear pivot on the cylinder making one degree of freedom, and the rod mount being a factory clevis mounted in 90 degrees so I now have two degrees of freedom.
Ptree, who in another century spent two years destroying pnuematic and hydraulic cylinders and valves in a mojor manufacturer of sames R&D labs:) Odd, In 21 years of R&D, I never found ANYTHING I could not break.
|
|
ptree
- Friday, 03/12/10 09:09:07 EST
|
Thanks for your info on my failed seals for the air hammer. I will research a stronger replacement. This hammer is built like a Kenyon, but the limit switch is replaced by an adjustable "occilator valve" to give variable speed control and an easy single blow option. If you would like more info, please e-mail for details.
George
|
|
George Blackman
- Friday, 03/12/10 11:12:00 EST
|
Blacksmiths in Europe: My wife are going to visit Venice, Rome, Munich, and Paris this Sept. I'm looking for blacksmiths to visit while in these cities. Would appreciate any contacts that I might stop in and see their shops. I've checked the internet with little help.
|
|
David
- Friday, 03/12/10 12:07:19 EST
|
David, you DO know that dragging you wife around to old industrial sections of the great cities of the world is the first step to a DIVORCE?
There are many smiths with web sites overseas. You just have to kick google into searching overseas and in other languages.
Several of the big "coffee table" books sold by Artisan Ideas have listings for all the smiths featured in the book including phone numbers and ocassionally e-mail. The Italian books in our book reviews and Hephaistos Metal Design International list smiths. The Italian books do a better job but primarily list Italian smiths.
I would start with a snail mail letter writing campaign as many e-mail addresses change rapidly. Send self addressed envelopes - anything to help get a response.
Generally ONE contact in a region will keep you busy for days as you may get "le tour" from your host.
On the other hand, searching for the local smith by asking in your broken German or Italian is a lot of fun. . .
|
|
- guru
- Friday, 03/12/10 12:29:11 EST
|
Thanks for the info on the power hammer anvil.
|
|
- shane
- Friday, 03/12/10 12:34:40 EST
|
Supposed to flood here this weekend. Was in the middle of forging when a news crew knocked on my door for a man-on-the-street interview about the rain. Told them I was blacksmithing at the time, they insisted on getting footage. Did some demos, told them I was the Great Nippulini... freaked them out, man! Took them out back to see my sculptures and the creek. All the while, I was wearing my Anvilfire.com t-shirt. Yeah, that's right... Nippulini represent! Suppposed to air either 4 or 6 PM at http://www.nbcphiladelphia.com/news/
What an amazing morning!
|
|
- Nippulini
- Friday, 03/12/10 13:39:48 EST
|
Just went to the on line store. link seems to be broken. Anyone else have problems getting to the Anvilfire store?
|
|
Harley
- Friday, 03/12/10 15:02:06 EST
|
Harley, works for me. We've been making sales. What browser are you using? Which page did you go to it from?
|
|
- guru
- Friday, 03/12/10 15:14:05 EST
|
Harley, It seems to be broken from the CSI members page for some reason but works everywhere else.
|
|
- guru
- Friday, 03/12/10 15:16:55 EST
|
Munich: I was astounded at the beautiful pattern welded gun barrels that were on display at the Hunting and Fishing museum in Munich. Up by Nuremberg there were several blacksmith shop museums run from water power (Lauf an der Pegnitz) I was lucky enough to see it when they were running a demo. (I taught a demo at the smithy at Bad Windsheim open air museum; however the smith would be close to 100 now so I don't know how that one's being handled.
(and of course the German Blade Museum in Solingen near Koeln)
Thomas
|
|
Thomas P
- Friday, 03/12/10 16:17:52 EST
|
Nip, Thanks!
|
|
- guru
- Friday, 03/12/10 18:49:54 EST
|
Nip, If I had been on line sooner, I would have looked for You.
|
|
- Dave Boyer
- Friday, 03/12/10 20:03:12 EST
|
nippulini, Looks like I'll be watching the news tonight. COOL!
|
|
- Wallace
- Friday, 03/12/10 20:36:51 EST
|
I have a casted brass steam whistle that got bent at the base just after where the reciever pipe screws into it and I need to bend it back its about 1/4" thick. Should I heat it like you would steel and bend it while its hot?
|
|
Scott
- Saturday, 03/13/10 11:02:43 EST
|
Scott, No. A simple straightening job in brass is best done cold. The trick is to do the bending as straight forward as possible, not working back and forth. Repeated working will harden the brass and may cause problems with both hard and soft soldered joints.
The problem with heating brass is that the point where it becomes more easily malleable is just a little cooler than the melting point. So it is very easy to overheat and melt the part. Heating also oxidizes the surface and is hard to clean up.
|
|
- guru
- Saturday, 03/13/10 17:48:09 EST
|
I had a thought about making a power hammer avvil. In the above posts, concrete and rebar in a large pipe capped with heavy steel was mentioned. The downside apparently is the eventual break down of the concrete. Ok, here is an unconventional thought. Use the size pipe you want, cap it with the heavy steel plate, THEN force the pipe with fluid at so many hundreds of pounds a square inch ? This then would provide enough upward pressure to make the anvil solid. :)
|
|
Mike T.
- Saturday, 03/13/10 23:05:22 EST
|
Solidity and mass are two different things. While it would be very rigid (hard) it would not absorb the kinetic energy of the ram any more that its mass no matter the consistency.
Folks have also pressurized hammer frames with air and water the results of which were a tremendous ringing noise. Increasing the tension on the steel increases the pitch of the ring.
|
|
- guru
- Saturday, 03/13/10 23:18:17 EST
|
Just as a thought experiment, I wonder what would happen if you connected such a "hydraulic" anvil to a 1000 gallon tank under the floor? With the whole thing filled with high-pressure water and *all* the air purged out (somehow).
|
|
Mike BR
- Sunday, 03/14/10 08:53:16 EDT
|
Hydraulic anvil.
First air is in water, and is nearly impossible to remove as it is disolved. Second, getting every bit of trapped air bubbles out of a piped system is nearly impossible. One of the standard tests I did in the R&D labs was burst testing of products. Since the products at Vogt were forged steel high pressure valves and fittings this involved pressures to 33,500psi. In burst testing, you try to get every single air bubble out as this reduces the energy release when the item fails. I was dealing with a lab environment, where I could invest the time in removing air, and I still did not get it all.
Many are under the impression that when a high pressure fluid fails a device that as soon as one drop of fluid is released the pressure falls to zero with no big noise or energy. WRONG! I have burst tested several thousand high pressure devices and when you get a rupture at 19,000 psi you have a bang similar to a 1/4 stick of dynamite. You also occasionally get flying hunks of the device.
Second assumption is that fluids are incompressible. At the pressures available and with the measuring devices availbe when the hydraulic law that fluids are incompressible was written, the were right. In modern days with higher pressures, it has been documented that fluids do indeed compress. Water, even deaireated, will store quite large amounts of energy when compressed.
Last, the shock waves from a "Hydraulic anvil" would travel into all nooks and crannies in all directions and the weakest link in the entire system would fatique fail.
Water hammer shock valves can be very awesome. The shock waves from a ram inpacting the anvil top would I think mimic water hammer. In water hammer, the pressure increase is a function of the velocity of the moving fluid, the closing time of the valve and the line lenght.
Since the "Closing time" of the valve would be the impact deformation time when the ram hits, the time would be very small. In water hammer, as the closing time approachs Zero, the pressure increase approachs infinity.
I have personally tested water hammer pressure spikes and destroyed pressure transducers. The transducer was rated to 10,000 psi. I had 1000 psi water flowing, and used a solenoid valve with about 20 milisecond closure time. The spike went off scale.
I think an anvil of adaquate mass of steel is the answer.
|
|
ptree
- Sunday, 03/14/10 09:52:54 EDT
|
They don't call them the "Generally Good Ideas of Physics", do they? They are the Laws of Physics and you only waste time trying to evade them. When it is mass you need, use mass.
|
|
- visitor
- Sunday, 03/14/10 10:09:54 EDT
|
I would have thought that hammering on a pressure vessel whilst it was pressurised is the height of folly, besides breaching rules on heath and safety. Expensive, potentially hazardous and pointless. Just get a large enough lump of metal. Why? Because it works.
|
|
- Chris E
- Sunday, 03/14/10 15:17:46 EDT
|
Blacksmiths In Europe: Guru, as I have learned thru the years, balance is the key. Not to many blacksmith shops, and she can go strolling thru the shops of a town while I venture off to a blacksmith shop. I will check out the Hunting Museum in Munich. Thanks everyone for the advise.
|
|
David
- Sunday, 03/14/10 16:30:46 EDT
|
Large pieces of steel are expensive, hard to come find, hard to cut, hard to handle. I've got pieces of steel that weigh TONS but they were expensive and difficult to obtain. They are also not easy to move. One piece, a 16" round needed to replace a steam/air hammer anvil, was part of a large shaft that cost thousands as scrap and hundreds to have cut to length. In fact, one cut was made too close to an arc gouge cut and it broke a $250 saw blade. . . The cut was not finished. So I have to do it. Nearley 6" short of complete its going to be fun. . ..
At the same time I also collected (via a traveling scrap man) several lengths of 7" steel round. I was looking for 8 to 10". The scrap man who traveled all over several states only found two pieces at "scrap" prices in a year of looking for me. I paid about 50 cents a pound for 1600 pounds of "scrap" steel. Scrap has gone up considerably since then.
A couple years ago I paid a couple hundred dollars to have that same steel sawed into power hammer anvil lengths and into a number of 1-1/4" "cookies" for machine hubs. I had to truck the 1400 pounds 30 miles to and from the shop that did the cutting.
After all this work these pieces of steel only weigh about 300 pounds. A little light for a power hammer anvil but fine for a treadle hammer. For a power hammer we are welding 16 feet of 2" square to these rounds adding another 217 pounds bringing them up to 500 pounds. Still light for the hammers we are building. And the cost per pound has increased significantly.
Sometimes we are lucky and sometimes not. Some scroungers do much better than I do. But heavy steel is always hard to find so it is natural that folks would look for alternatives. The problem is, the alternatives are few and expensive unless you are very lucky or in the just the right place at the right time or situation. So, we offer these alternatives. Both of which we are using on our hammer project.
|
|
- guru
- Sunday, 03/14/10 17:35:58 EDT
|
Odd that big hunks of steel are hard to find for a power hammer anvil. I took 454# axle forgings to Quad State about 4 years ago. These were prime material, 4140, and had a useful flange on one end. Asked $75 each. Not much interest and I ended up traded the two I took as well as the approx. 250# smaller versions.
Later one guy did stop by and buy 2 at my house. I put one as a sledging anvil outside the shop door and have a little one in the woods yet. Sice I don't have good access to these any longer mine arn't for sale. I intend to use the big one if I build another power hammer.
|
|
ptree
- Sunday, 03/14/10 19:03:24 EDT
|
Yes I appreciate that.But the cost of all the welding up is not insignificant. One of the sources of this size of stock is the manufactures of tractor mounted post drivers. Several use 250mm (10") dia material for the hammer and one at least uses 10" square which would work out at nearly a tonne per metre. The manufacturer that I spoke to at an agricultural show was quite willing to cut a billet longer than they normally use and pallet freight it. His purchasing power made it more economic than a normal stockholder.
|
|
- Chris E
- Sunday, 03/14/10 19:24:48 EDT
|
Hey folks I'm back popping in again one with a statement two with a question.
I will start with my question. An affordable anvil has been the bane of my existence out on the end of the island. The few inexpensive ones i find are far away and would require great shipping cost. NOw I am hand working not using a power hammer so I was wondering if the design above would be able to be built out of white oak beams bound with maybe a 6 by 12 striking plate about 2 inches thick secured on top would work?
TO my Statement. Water is the last thing you want to use in any pressure system. Simple example of that is well an act of foolishness by myself and a friend a few years ago. It had been a slow 4th of July and we had a bunch of left of m80s and cherry bombs and such. MT friends property had this really deep gully in it and we had been throwing them in a steel trash to prevent setting the grasses on fire. (well also it made a VERY satisfying BOOM that echoed wonderfully.) So we had some fun making noise for a while. Well that little vacation ended and we went back to NY. Several heavy rain storms later we returned. And thinking nothing of the water in the can we lit a cherry bomb and tossed it in. Yeah we where a little stunned by the rain of water that befell us. We where more stunned by the fact that the trash can was now laying almost flat with just a little curling at the edges Blown apart at the seam. I was later told after relating that story that Water carries force very well and that is why its not used for many "hydrolic" purposes. whether or not the explanation was scientifically accurate i have never verified but it seems to fit thte facts for my encounter.
|
|
- SHiloh
- Sunday, 03/14/10 19:33:38 EDT
|
$75 for 450# of 4140?!?!? Holy cow! If only I'd known! I'm currently going bald because I'm pulling my hair out and now have a headache due to forehead slapping. It would take a lot of stamps to get them here thou... But on a more serious note, if you ever fall into a deal like that again let me know as there are several trucking companies around here that serve the granite and marble industries who ship all over the country and will back haul for very reasonable rates as they often have trucks returning empty. Nobody wanted to buy them at Quad-state? I'm shocked!
|
|
Judson Yaggy
- Sunday, 03/14/10 19:36:14 EDT
|
I made my first bowie knife really worth looking this weekend. The only downside is that even with sanding there are still severeal pits from the scale. I dont want to sand the knife any thinner. Do I need to work on a less oxidzing forge?
|
|
- Jacob Lockhart
- Sunday, 03/14/10 19:44:08 EDT
|
Jacob,
If your forge is too oxidizing, it will certainly cause more steel to scale away than necessary. But that would probably be more-or-less even across the knife. I'd guess that pits were caused by driving scale into the surface of the steel. Or just plain hammering it too thin in places.
So check your forge, but also try to scrape any heavy scale off the surface before hitting it. Above all, forge thick and grind thin. . .
|
|
Mike BR
- Sunday, 03/14/10 21:15:28 EDT
|
Jacob, When working things that are to have a fine finish and you are going to have to finish by hand you wire brush at every heat to prevent driving the scale into the work as MikeBR noted.
If the forge is too oxidizing the other problem with working to close to finished is decarburizing of the surface. This can be as deep as 1/32" or all the way through a 1/16" edge. . . Therefore the old saying, "Forge thick, grind thin."
Making knives requires a LOT of grinding weather making them by stock removal OR forging. Belt grinders can be made primitively using lots of wood.
Some bladesmiths leave rough finishes as a "primitive" forged surface but it is generally just bad workmanship. Just nail it to the wall to remind yourself how much better you have gotten a dozen or so blades later. . .
|
|
- guru
- Sunday, 03/14/10 22:59:25 EDT
|
Anvils: Shiloh, "design above"? If you posted something in angle brackets (HTML) then it was removed from your post.
Look at our Anvil Making page, particularly the RR-rail anvils. Note that the majority of RR-rail anvils are made wrong and are too springy as well as a waste of material (we have a gallery page full of them).
Many bladesmiths are using something nearly like my long vertical RR-rail anvil. They are using a piece of 5 to 6" cylindrical steel a foot or more long either going to the floor or with a tubular base about the size of the anvil diameter. The mass on end is VERY VERY efficient and for forging this type of anvil is equal to a regular anvil two or three times their mass.
There is nothing wrong with a good wooden base but the more steel the better. STUDY our anvil making ideas. Clear your brain of preconceived ideas of what an anvil looks like. MASS is the important factor, followed by some flat surface and followed last by various features.
|
|
- guru
- Sunday, 03/14/10 23:19:40 EDT
|
Judson, thats right, little to no interest is those perfect for a small power hammer forgings. Made from aerospace grade 4140.
These were a somewhat hard to make forging, and we got a lot of under fill on a critical area, and weld repair was not allowed. So when we rana batch, we often would scrap 20-30. We also had a limit to reheats so the billets went into the scrap fairly often as well, and I have a few of those as well.
Pretty neat to see a 3" thick, 22 " flange upset back on a approx 6" od billet in 5 hits in the 10" upsetter.
|
|
ptree
- Monday, 03/15/10 13:30:25 EDT
|
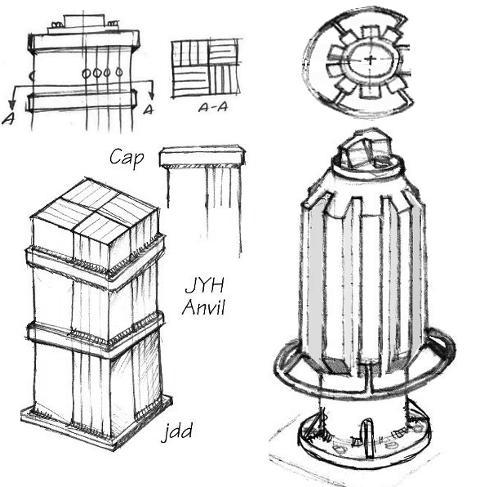
Jock, Whats the rational behind the somewhat unconventional shape of the 'anvil' to the right on your sketch? All power hammer anvils I have ever seen have been 'bell' shaped (for want of a better description). I would have thought you design had a lot of in-effective mass?
|
|
- John N
- Monday, 03/15/10 16:40:38 EDT
|
Jacob: keep the scale off the anvil face too! Wipe it after *every* heat! Hammer control is the second issue many people have making them to need thicker blades for grinding thinner.
For your first blade: do as good a job as you can and make it as B#1 and carry it and *use* it! All of which will help B#2 be a bit better than #1 and so on down the line. A knife on a wall doesn't teach you if your heat treat is too soft or too brittle, if your handle is slick when wet or doesn't "fit" your hand. *LEARN* from each one!
Thomas
|
|
Thomas P
- Monday, 03/15/10 17:26:59 EDT
|
Looks like a really nice big spline shaft :D
|
|
- Tyler Murch
- Monday, 03/15/10 18:04:20 EDT
|
Bad Blade. . . Thomas, you are right. My statement about nailing it to the wall was wrong. . . finishing and using it is a much better teacher.
Power hammer anvil shape: John, It is a result of the materials at hand (cutting 20 feet of bar into 2 foot lengths) and the result allowing the smith to get closer to the work. It makes a LOT more sense than the Chinese scaling a large machine down to quarter scale (or less) and not taking allowance for workers normally standing at such machines (at least in the West). In fact, the standard heights used for old machinery long ago is much higher today. For some reason turn of the (19-20th) century machine designers must have thought metal workers were all trolls and never taller than five feet. This included machine tools as well as power hammers.
When I built the original EC-JYH the ram was too light and I used that weight adding solution because all I had in the shop that late night to donate to the cause was some 1" square bar. We cut it, welded it on and the results looked kind of Star Trek modern. . . SO, when we needed to add cheap mass to another undersize cylinder I suggested we do the same. Something many miss is that this is an add-on that can be applied to any fabricated hammer (power or treadle) with an underweight anvil. If they want the pieces to run to the base plate there is no reason not to other than toe clearance.
But toe claarance is part of what it is about. Being able to get close to the hammer with a good stable stance. High dies that you can get close to are better for fine detailed work (IE, better for Artist Blacksmiths). The ergonomics of industrial forging and gross drawing are different than that of the artist blacksmith.
That "bell shape" was also the result of cast design, a cone being much easier to remove from the sand than a cylinder.
Many two piece hammers had anvils that had a cap (or sow block) that was larger than the hole in the anvil frame they passed through. This had nothing to do with where it was best to put the mass but making a larger part that had more resistance to damage from die and attachment wedges and also reducing the size of the hammer frame that usually surrounded the stem of the anvil.
|
|
- guru
- Monday, 03/15/10 19:20:41 EDT
|
Jock in our shop we have a number of Japanese machine tools made for the Japanese market. We have them all on risers to get them up to US height, and little platforms for our Japanese workers that may need to use them:)
|
|
ptree
- Monday, 03/15/10 21:21:18 EDT
|
I'm going to attempt to make a katana. My question is about clay quenching the blade. Do you allow the clay to dry before you heat the blade for quenching? If yes can you use the heat of the forge to dry the clay? I have obtained both Satanite and AG #36 type clays which do you think is better?
Thx
|
|
Rick
- Monday, 03/15/10 21:39:00 EDT
|
Also was wondering if I use 5160 steel for the katana when I clay quench it do I use water or oil? I know 5160 is supposed to be quenched in oil but I thought katanas are supposed to be water quenched.
Thx Again
|
|
Rick
- Monday, 03/15/10 21:53:24 EDT
|
Rick, These are questions you should probably ask on the blade forums.
The clay should be dry. You may force dry the clay care should be taken not to overheat the thin blade edge. It must be dry to shave it and create the shape of the hammon line.
Yes, the original bladesmith made straight carbon steels are water quenched. But, as soon as you mix modern alloy steels and ancient techniques then you are in the unknown. In thin sections 5160 is an air quench steel. When edge hardening the body of the blade can also act as a heat sink and help quench the edge.
However, others may have tried it. Try blade forums.
|
|
- guru
- Monday, 03/15/10 22:51:15 EDT
|
Been trying to find info on the web about blades but I've been having a hard time finding a good sight with knowledgeable people. (Came here because you always provide excellent info)
Any suggests on a good blade forum site?
Thx Rick
|
|
Rick
- Tuesday, 03/16/10 01:23:38 EDT
|
|
|
[
CSI - anvilfire MEMBERS Group |
Getting Started in Blacksmithing ]
|