| WELCOME to the anvilfire Guru's Den - V. 3.0 |
|
THIS is a forum for questions and answers about blacksmithing and general metalworking. Ask the Guru any reasonable question and he or one of his helpers will answer your question, find someone that can, OR research the question for you. This is an archive of posts from January 1 - 8, 2005 on the Guru's Den |
|
|
|
I was wondering if a scroll attachment will make the swirl bends I am looking for using round stock. I am looking to make swirls that look like a question mark, only they have 3-4 swirls, if that makes sense. Thank you in advance |
| Alan - Friday, 12/31/04 23:54:57 EST |
|
Scrolls: Alan, see our 21st Century page on benders. There are photos and drawings. We also have several iForge demos on spirals and scrolls. There are two types of bender that will make an overlaping spiral. One is built conicaly so that as you wrap the steel around you must move down. The result in a cone shaped spiral which can be flattened. Another of this sort is a steped bender. You bend about 240° and then shift down and complete another near circle. The second type is a crank type bender. It has a scroll end with one or more hinged sections that close around the work as it is turned. There is a photo of a Hossfeld bender with one of these on top in part II of the bender article. Almost all scroll benders are custom made. There are a few stock ones made by bender manufacturers but you will find that there is an infinite number of scroll shapes and sizes and that if you want to make YOURS then you will need to make your own bender. It is not hard. See our article and build a couple. |
| - guru - Saturday, 01/01/05 00:45:10 EST |
|
Sharon, forging H13. Yes, it's certainly possible to do by hand. The local forge chapter made slitters and drifts in H13 and S7 a couple summers ago, all by hand and certainly not all experienced smiths. In addition to the slitters and drifts I have a couple other chisels in H13. Don't get it too hot. Don't forge it too cold. Remember it's air quench, so don't dunk it. It doesn't move very easy, but it does move. I recommend a gas forge, just for less risk of burning, but have done one in coal, too. Hmm... the biggest I've used is 3/4 round. I'd certainly rather do it with a power hammer... Steve |
| Steve A - Saturday, 01/01/05 00:59:25 EST |
|
Steve A, Sharon asked about forging 30mm which is about 1 3/16". |
| Frank Turley - Saturday, 01/01/05 04:44:25 EST |
|
I have a question about oil quenching. After steel reaches the critical temperature and you have quenched it in oil, do you wipe off the oil before returning it to the fire for tempering or allow it to burn off in the fire? |
| Blackhammer - Saturday, 01/01/05 10:09:12 EST |
|
Excess Oil: Blackhammer, It depends on how you are tempering. If you are judging the temperature by temper color the steel must be clean and dry. To judge these colors you normally need to grind or polish an area near the edge or working end where you want to judge the color. Temper colors are thin surface oxidation and oil would prevent their formation or burn making it hard to see. If you are tempering in a controled temperature furnace it will not matter. |
| - guru - Saturday, 01/01/05 10:42:46 EST |
|
Back of propane bottles and psi if I can. What is the maximum regulator-released psi which can be expected from a 20-pound bottle with one of the new safety valves? |
| Ken Scharabok - Saturday, 01/01/05 10:50:39 EST |
|
Thanks Guru. I will be judging temperature by color. I appreciate the help! Blackhammer |
| Blackhammer - Saturday, 01/01/05 11:03:24 EST |
|
Propane Bottles: I might be mistaken but I thought the new valves were to prevent over-filling? There is a float inside that rises as the LNG level rises until it shuts the intake line and will not allow more LNG to be put into the bottle. I don't think it affects the output PSI. I have run my gasser at 20 psi according to the cheapo guage I got with the forge and I was not at full open. |
| quenchcrack - Saturday, 01/01/05 11:15:47 EST |
|
Happy new year, y'all. Propane: As I understand, the new valves don't restrict PSI but rather have a limited rate of flow per unit volume, which is independent of PSI. Alan without the L: not fussing at you, but please add another letter or two to your screen name! You confused me for a minute there, as I didn't remember posting anything last night. Not that it isn't possible, you understand... (big grin) We who spell the name correctly must stick together! |
| Alan-L - Saturday, 01/01/05 11:42:23 EST |
|
Propane Valves Again: I guess I should put a FAQ together on this one. As QC noted they are to prevent over filling but also limit flow. However, the flow is supposed to only be limited to what the bottle can normaly produce without freezing up. THIS is less than what many forges need as many smiths run with the bottle in a heat sink such as a tub of water. ALSO note as I stated in my previous post, MANY bottles with the new valves have cheap underrated valves for smaller bottles. PRESSURE is limited by the evaporation rate of the propane and the amount being drawn off. Static pressure is about 90-170 PSI on propane bottles. Max operating pressure from a regulator is about 65 PSI at LOW flow. The higher the flow the lower the pressure. Normaly a 20 pound propane bottle can produce about 10 PSI (70 kPa) going through a flow limiting orifice of about .040" (1 mm) until the bottle runs out. This will run a small forge continously. At higher flow rates using a larger orifice OR at higher pressure the bottle will freeze up due to evaporating the fuel faster than the surrounding air can warm the bottle and fuel. THIS is highly sensitive to the ambient air temperature. The boiling point being -44°F (-42°C) for propane at atmospheric pressure and much higher at cylinder pressure means that it is possible in cold weather for the delivery rate to be VERY low or none at all. As the fuel is used up two things happen. It has less mass and thus less stored thermal energy (not fuel energy), and it has less surface area in contact with the bottle to absorb heat. So when freeze up occurs at low volume it is hard to cure. It also occurs MUCH faster when you start with a half full bottle. At room temperature (70°F) a 20 pound propane bottle can vaporize 1/5th of its contents in an hour. However when half full it can only vaporize about 2/3 of this amount. At 0° these values are one third. SO. . with the proper draw rate you can use up a 20 pound bottle in about 8-10 hours in warm weather. SO, generally when pressure is a problem you need a bigger container. If you get a 40 pound or larger bottle they do not have the new valves. |
| - guru - Saturday, 01/01/05 12:04:12 EST |
|
hello, my question is about comparisons of power hammers. ive been researching air vs mechanical hammers for quite a while and havent found and good comparisons. what im looking at is their ability to move metal (pound for pound), the overall cost to run them (1hr of mechanical use vs 1hr or air hammer use), how much 'tweeking' and stuff youd need to do to get them to run properly, and in regards to different air hammers, their duty cycle (how long before they drain an 80gal air tank)? thanks -john |
| john - Saturday, 01/01/05 13:12:46 EST |
|
This is a question for the guru`s group. My great grandfather was a blacksmith and i have this burning desire to pound iron.I love to work with metal and have the basic tools. welder/torches grinders steel bench anvel and hammers.My problem is i live in northwestern ontario canada very close to the manitoba border i would like to visit a shop or take some courses on metal work. Is there any close to me any info is of great help. I am 44 years old 45 in march never to old to start. thanks Hammy. |
| dave hamlyn/hammy - Saturday, 01/01/05 13:50:07 EST |
|
Hammer Comparisons: John, These are difficult comparisons and are so complicated that the industry gave up on force ratings except for hydraulic presses. In the end the rating comes down to ram weight and THAT is it. Operational costs must be compared to productivity and there are so many variables that it makes this too very difficult. However, in general a mechanical hammer is MUCH more efficient in energy requirements and HP than an air hammer. BUT, there are no new mechanical hammers on the market other than one now being made in Italy that is not available in North America. In general the biggest difference is in operating characteristics. Self contained air hammers run at one steady unchanging beat no matter how hard they strike or if they strike at all. This gives some users a comfort factor. They are noisey when running. Standard air hammers make no noise unless striking and can run at variable rates. Mechanical hammers strike at varying rates but are often hard to control compared to an air hammer. The quality of mechanical hammers varies greatly. The most common, the Little Giant, is an "OK" hammer. Bradley's and Fairbanks were much better machines. Both their work height and stroke could be adjusted giving a great advantage over the Little Giant were only the work height is adjustable. The others also do not have the Little Giant clutch problems. Most users will tell you that air hammers are easier to control and take less time to learn to use than a mechanical hammer. However, they all take practice to do really nice work or anything sophisticated. The best way to shop for a power hammer is to visit shops with various types and try them out. Most of the manufacturers and dealers will let you try one out on their premisses if you can get there. Then look at the price per pound, ran to anvil ratio, installed cost (including shipping, foundation, auxillary equipment) and your needs. |
| - guru - Saturday, 01/01/05 14:03:25 EST |
|
Ontario and Manitoba: Dave, check the Canadian blacksmithing organizations listed on our ABANA-Chapter.com page. Then post you notice on our V-Hammer-In page. It stays posted for a month where this one is archived weekly. We have a lot of Canadians frequent anvilfire and one may be near you. You may also want to Check out the CanIron website. They have a big conference coming up next summer that you might want to attend. See our Calander of events page for other events that you may be able to attend and meet other smiths. |
| - guru - Saturday, 01/01/05 14:13:49 EST |
|
Gas forges: I don't use them but I read the postings in case I decide to do so. In the postings I have noticed there has been no mention of the units that are used to regulate gas flow and pressures on trucks that I see out here in the farmlands that run on propane. Does anyone know if they are forge friendly? |
| Jerry - Saturday, 01/01/05 14:56:11 EST |
|
Still on propane tanks: OK, I think I have it now. If someone is having trouble getting a propane forge as hot as it should get, and they have a good sized regulator (say 5-35 or 0-60), then the problem likely is the size of the tank. They would need to use a 30-pound or above tank. (I've never claimed to be the sharpest tack in the pack.) |
| Ken Scharabok - Saturday, 01/01/05 17:24:59 EST |
|
Ken, The size of the regulator is not in PSI. The size is rated in flow. It should be rated at or greater than the flow requirements of the forge. If you know the orfice size and rated pressure of the forge then you can look up the BTUs/hr. The flow rate of regulatore is usually given in BTUs/hr. If the tank gets cold enough to collect frost on a humid day, it is too small for your application. I use a 100# tank on my forge. In summer it will run on a 20# tank, but only about 8 hrs. |
| John Odom - Saturday, 01/01/05 17:32:17 EST |
|
I wonder if there is any collective or personal knowledge to be shared on the subject of hammers. Perhaps there is even a "hammer review page" stashed away somewhere in the electronic either? My two cents; I have a MOB franch pattern hammer, and find it quite rubbish. It has a selectively hardened face (bad, in my opinion), and is also very poorly balanced.By extension (as they are part of the same business conglomeration) I am wary of peddinghaus hammers. Although these hammers come closest to blacksmith hammers in form, they do not seem to be made primarily for that purpose, but rather for general industry and agricultural markets. I have an ancient and gnarled 3lb ball pein which is excellent, however. She's hard faced and fast (insert your own smutty joke here). I have managed to persuade my girlfriend to buy me a farrier's hammer for Xmas. Cliff Carrol Champion 2lb. Any body have one? It seems the farriers rounding hammer is the only one that is, these days, made expressly for use in forging. PS I am also fully aware that i should make my own. And I will. PPS Is this the right board for this type of post? |
| Dan P. - Saturday, 01/01/05 18:34:58 EST |
|
John Odom: Now I have gone and gotten confused again - surprise - surprise. If the regulators are in flow and not psi, then why is a psi gauge used to measure output? Are the two not related in some manner? |
| Ken Scharabok - Saturday, 01/01/05 19:18:27 EST |
|
Dan P, perfect board for this post. I have 3 Peddinghaus hammers and they are good for me, I have a rounding hammer as well, and it is good for it's, but I use the Peddinghaus Swedish style more. I regrind the faces on most of my hammers to get them to do what I want......the edges come too sharp and they mark the work. They also need to be "tuned" up periodically. I use my post vise, an angle grinder and lap type of wheel so metal comes off more slowly. |
| Ellen - Saturday, 01/01/05 19:50:18 EST |
|
Dan P., Your post about hammers is in the right place. The subject of hand hammer styles and weights has come up on numerous occasions. Not too long ago, we found that the Alpha Guru and I use the same hammer for much of our work: the 2� pound Channellock cross peen with a round face, as opposed to a squarish or rectangular face. Unfortunately, they are no longer manufactured. Channellock also made a 3 pound and aa 4 pound cross peen. I doubt whether either Jock or I would say that the Channellock is the end-all and be-all of hand hammers. A lot of it is what you get used to. A 3 pound ball peen is good, the face being dressed a little like the crystal of a pocket watch, the rim radiused, not chamfered. On the Continent, they normally like the square face and shorter handle. The "Czech hammer" is an extreme example. I like at least a 15" handle, and I slenderize it at the neck and I make it fit my hand. I don't want to take Carrol's business away, but there is a old Heller rounding hammer on eBay at present: 6139907901. It would weight about 2� pounds. Heller Brothers made good hammers. You might check our advertisers such as Pieh Tool Co., Blacksmith Supply, and Blacksmith Depot. Re the French hammer, I suggested to a French student once that if he took the hammer head off and reversed it, the hammer would look better. He became incensed. (lyao) |
| Frank Turley - Saturday, 01/01/05 19:54:21 EST |
|
Thanks for the ebay heads-up, Frank Turley! Has there ever been talk of an indexed review page for the littler things, ie non-anvils, of blacksmithing. I think there should be one. |
| Dan P. - Saturday, 01/01/05 20:20:02 EST |
|
A regulator takes the high (tank pressure) and reduces it to a low pressure. They often have one or more gauges on them to enable the outlet pressure to be set. Many appliances are intended to use some fixed, standard (for that kind of thing) pressure, and it may have no gauge. A small regulator may have the same gauges as a big one, or none at all if it is pre-set for some standard outlet pressure. The small Regulator will pass only a certain flow before the outlet pressure rapidly drops for a given setting. A big regulator will pass a much larger flow. Your kitchen faucet and the fire hydrant on the street are both connected to the same source of pressure, the city water system. The faucet will pass only a couple of gallons per minute, while the hydrant may pass a thousand or more, because it and the pipes connecting it are bigger. I have a set of medium sized Acet. and Oxy. regs. They will not pass enough gas for me to use my new rosebud tip. When I buy new, larger, regulators they will have gauges in exactly the same ranges as the old ones. BUT the internal passages in the new, larger, regulators will be larger and pass more flow of gas. For a given system (or appliance), the flow is related to pressure, and increasing the pressure will increase the flow. The flow to pressure relationship may be totally different in a different system (or appliance). For burners, the orfice size is the biggest factor in determining what that relationship is. Does this help? |
| John Odom - Saturday, 01/01/05 20:39:15 EST |
|
Dan P. There is a great deal that is archived, q.v. the choices on the left of this page. It takes patience sometimes to scroll to what you are seeking. At the upper right, there is a pulldown menu which is fairly extensive. Under FAQs, I found a hammer weight table, for instance. Your suggestion is good, and these things take time. |
| Frank Turley - Saturday, 01/01/05 20:47:30 EST |
|
What! Channellock hammers are not made any more? I shoulda bought a spare when I bought my main using hammer 10 years ago. Grumble grumble, now I might be forced into finishing one of any number of hammer head starts over the years. |
| Ralph - Saturday, 01/01/05 20:59:22 EST |
|
Ralph- Not to rub it in, but I got a nice channellock hammer shortly after discussing them with Jock 2 yrs ago at Quad State. Price was $10 American. (VBG) |
| Brian C - Saturday, 01/01/05 21:19:49 EST |
|
On regulators. Working in a pnuematic manufacors R & D lab about 25 years ago I got quite a bit of inside info on regulators as we made them, and tested them against the competetion. A regulator is more correctly a pressure reducing valve. The supply pressure is set to a lower delivery pressure that is required by some downstream device. The pressure is controlled by a diaphragm and pilot orifice to respond to changes in the downstream pressure. Flow of most regulators is restricted to quite a bit less that the pipe size the ports would tend to indicate. In pnuematic practice, if a device uses a large, pressure regulated flow, a regulator of at least one port size bigger than the port size of the using device is installed. A few regulators are "full port", but are pretty rare.(valves are mostly reduced port, with full port being a more rare and expensive type) As most people are not reporting that the regulator is freezing, but rather the tank is freezing is certainly proof that the Guru's statements on vapor production for a small tank are correct. Typically, in any system with gas going across a restriction in flow, the area of the restriction becomes cold. To my knowledge, the excess flow valve on propane tanks is a shut off valve that slaps shut if the flow is typical of a failed line. A 100# tank does not do more than frost a bit when low in the moist cool air I have in the winter. I have never seen a bit of frost on the propane regulator I purchased from an advertisor here on Anvilfire, and I often run at 4-6# per hour at 9 psi. The 100# tank is a bit cheaper to fill at the welding supplier than a 20# at the gas station. |
| ptree - Saturday, 01/01/05 22:38:07 EST |
|
My preference in a general purpose forging hammer is an old no-name crosspeen hammer I've had for a few decades now. It has the sort of squarish head, which I have radiused generously as I did with the "corners" of the face. Frank's analogy of a watch crystal is a good one, and that is pretty much what this hammer has for a face curvature. The peen end was too sharp when I first acquired it(as most are), so I ground a lot off of it to get it to where it has roughly the same radius as a nickel (9mm). I also put a slight "rocker" on the peen end, about 3/32" drop at the ends or thereabouts. This particular hammer is only about 1-3/4 pounds and has a fairly short (~10") handle that is flattish on the sides as I prefer. It moves metal as fast as my heavier 3# crosspeen because the heavier one still has the factory dressing which is less efficient. |
| vicopper - Saturday, 01/01/05 22:59:21 EST |
|
Uri Hofi and tendonitis. I've come down with a couple cases of tendonitis. The funny thing is (well, not all *that* funny) is it started in my tong arm. I rested, stretched, iced, until it mostly went away and now a new case as come on with a vengeance in my hammer arm. I've read both in the archives and other places on the 'net that the Uri Hofi grip can be beneficial. Some time ago I found a good description, but can't find it now. Would anyone know where I could find a good description of the Hofi technique (with pictures :-)? I also noticed that Blacksmith Supply had a "Czech style" hammer that looks pretty much like the Hofi hammer. The real thing from Tom Clark looks like a great tool, but is just too expensive to try out. Has anyone tried the Czech hammer? It looks like it would need some dressing to of the edges, but that's not a big deal. I would prefer a rounding hammer, but that's not a big deal, either. Thanks. |
| - MarcG - Sunday, 01/02/05 00:37:39 EST |
|
What is the best best alloy or aluminum for hand bending.I dont now much about metal.Which is harder or softer? can u give me any good refrences,so i can learn about metals. Than you Chad |
| Chad - Sunday, 01/02/05 00:39:40 EST |
|
Chad this is like asking "What is the best dirt, as I want to farm" What is it you are considering on making? Are you wanting to actually forge it. Probably not as you asked about hand bending, but if you gave us a short idea of your desired results we can be more helpful |
| Ralph - Sunday, 01/02/05 01:00:25 EST |
|
MarcG, The tong rein holder/keepers help with wrist and tendon problems, unless you're changing tong grips all the time like a horseshoer. The tong hand and arm are in a constant state of tension, which is "killer". The Czech hammer is like the Hofi hammer, because Hofi worked with Alfred Habermann, and Alfred was originally from Czechoslovakia. All new hammers need dressing. Rounding hammers are sometimes sold at feed stores. The Hofi grip for drawing out metal. Shake hands with the handle; rotate the head a few degrees clockwise. When you swing, the far, lower, edge of the square face should hit the metal first, acting like a fuller. It is a quick drawing method that creates a little more friction heat than a flat blow. You stand a little toward the heel of the anvil. Flat blows are used also, so that you can nicely hammer-finish your work, hit tool heads, etc. Sorry, I don't have pictures, and I don't know whether swinging this way would help to relieve tendon problems. Chad, There is much information within anvilfire.com. A good book is "Metalwork Technology and Practice" which you might be able to order on the internet. I like www.abebooks.com. |
| Frank Turley - Sunday, 01/02/05 01:32:54 EST |
|
MarcG- I have one of the "czech" style hammers. SO far I have not been able to reshape the squareish handle to where it suits me. Your mileage may vary. :) |
| Brian C - Sunday, 01/02/05 08:40:01 EST |
|
Thanks, guys. Frank, I noticed that I was choking up on the reins and using a death grip on my tongs. I don't know why, maybe I felt more in control with my hands closer to the work. Relaxing my grip and using the leverage of the tongs has help quite a bit. The keeper is a good idea, too. I'll have to play with that. I was hoping to find a Czech hammer with a rounding pein instead of the cross-pein. I've got a "farrier's" rounding hammer and find it very useful. Maybe it's time to try making my own. I'll invite my son over for a pizza and striking day. Only I'll call it pizza and football. Wasn't there something else to the Hofi grip besides drawing out? I seem to remember it was a slightly rotated grip, like you mentioned, and something about a "snapping" of the wrist as the hammer hit. And there was something different about the finger positions holding the hammer. Why are things so much harder to find when I'm actually looking for them :-)? Brian, I saw that square handle from the pictures. I'm thinking that just replacing it would be best. |
| - MarcG - Sunday, 01/02/05 09:14:34 EST |
|
MarcG, Uri Hofi spent a day and a half in my shop and yes, there is a "snap", but if you're doing any kind of hammering, there is a whip like action. My analogy is in the throwing of a ball or rock. The body is used from the feet to the fingertips. Hofi says, " See, I dance with the hammer." Hofi is a good showman. I have tried to follow Edward Martin of Scotland and Francis Whitaker in their hammer use. The idea is to hit the metal fair and square with a slight draw-back feeling as you make contact. This "feeling" probably comes from the arc of the swing. Nearly all smiths will use a cross peen hammer for much of their work, because the metal will move at right angles to the peen length. For instance, you can spread stock into a fishtail on the end of a bar; you can spread a bean shape for a hinge finial; you can widen metal for a latch cusp or thumbpiece, etc. |
| Frank Turley - Sunday, 01/02/05 10:46:40 EST |
|
Czech Hammer I have one,and like it,at 800grms its a little light,still dressing it as I go along.The handle is very comfortable for me and I have taken to dressing my other handles with sqaure sides now,I seem to be able to roll the hammer as needed without losing my grip.I guess like anything whatever feels right. |
| crosspean - Sunday, 01/02/05 10:56:38 EST |
|
Soft Aluminium: Chad, For extreme bending you want SAE 1000 series aluminium which is pure or nearly pure aluminium. It is very soft. However, it is gummy making it hard to machine. It cuts and drills fine but it is hard to get a smooth surface. It is also not very strong. In machine shops they like the hardest alumininum alloys like 7075PH. These zinc alloy aluminums machine like butter at high speed and you can leave a glass smooth finish at the same time. But 7075 is too hard to bend and will crack if you try. There are alloy grades like 2024 (aircraft grade) that are bendable and much stronger but this is an expensive grade. My father says you want SAE 3000 series architecural grade for decorative work. It is ductile enough for bending but nearly as strong as SAE 6061. I've never tried this material but I usualy trust my father's advise on engineering questions. |
| - guru - Sunday, 01/02/05 13:36:22 EST |
|
Hammer Styles: We all tend to like what we use and adapt to what we have. I started using carpenter's hammers to build tree houses when I was about ten pounding nails into 1" oak boards that a friend's dad had given us to build a tree house. . . some gift. Ever try to nail cured oak? We did it, but I drove all the nails. After that I got into the soap box dearby, sculpted cars from solid laminated fur and press board. Had the wrong tools, a 3" wide all steel chisel and my steel shanked 16 oz. Craftsman carpenter's hammer. . . But I got the job done. At the time I also used a axe a lot to fell trees. I also did some wood and stone sculpture with the same tools when I was in high school. When I started smithing I used a small 24 oz. cross pien that I dug up out of the yard near our old carriage house. I suspect a farrier had his kit spill there 50 years prior and the tools got burried in the sycamore leaves that accumulated there. I handled it and used it for about 10 years along with an assortment of ball piens for riveting and small jobs. It was not until I went into smithing full time and realized I needed a heavier hammer that I bought new hammers. The first was a 4 pound which I eventualy gave away because it was just TOO heavy. So I went back and bought a 2-1/2 and 3 pound ChannelLock crosspien from the local hardware supply. I used the smaller one for quite a while then started using the 3 pound and stuck to it. However, I did not have a power hammer at that time. If I had I probably would have stuck to the 2-1/2 pound hammer. Today, due to lack of shop time and being out of shape I will use my OLD worn out 24 oz. hammer for as much as possible and only pick up the 3 pound to do heavy work. NOW. . . the point of all this is that I have used many hammers and handle styles and most are all the same TO ME. The only time a hammer handle bothers me is when it is too thick for my small hand. This seems to be more of a problem with the rectangular Czech or Hofi style hammers. Most of the standard oval factory handles are just FINE by me. When I handled my old hammer I had a semi rectangular handle that I hand carved to what I liked but when it was replaced it was with a factory oval hammer. It felt DIFFERENT at the time but now it is just a another hammer. I have not spent enough time with hammers other than my round faced cross piens to have a definite opinion about them. I DO use different specialy hammers for different jobs but for forging I use what I am used to. There MAY be a better hammer out there but I doubt I will have time to use one long enough to appreciate it. The advantage to old American made hammers like the Channel Lock and many other brands of the time is that they came factory dressed. These were shaped to a tight specification determined by the engineers and designers. Most were machined to shape and a few had some hand dressing. But they were ready to use AS-IS. Today many hammers, especialy the European manufactured hammers come rough dressed and are NOT suitable to use as-is. This means the buyer has to grind the hammer to their preference which is difficult when you have no preference or have not been taught how to dress a hammer. I have also found that the shapes are so subtle that many people just can not see the proper shape or do not know it when they see it. But that is what you have to learn to use many modern hammers. SO, Use the hammer that suits you. We are all diferent in our working methods and likes and dislikes. And it helps to start out with a hammer that is factory dressed or professionaly dressed. I have recently found that I am more sensitive to anvil height and weight than to the kind of hammer I use. Paw-Paw has a small colonial anvil well under 100 pounds that I have used at demos with him and it is just TOO small. I can easily tell it is moving too much and I am working much harder than I would on a slightly heavier anvil. It is also mounted a little high for me which makes the work uncomfortable. One problem or the other is not bad but both make for long days. |
| - guru - Sunday, 01/02/05 14:30:56 EST |
|
Still can't get into the chat room so I'll post here. I have an old "miner" style Champion blower/forge with bad bearings on the crank (as in parts missing, worn out and totally un-rebuildable). Also need to replace the bearing cover where the crank handle comes through. Any suggestions on where I could go to get these parts? Thanks. |
| Roland - Sunday, 01/02/05 14:49:57 EST |
|
Roland, Champion made their own gears and bearings as well as castings. They are all specials that have not been made for over 50 years. IF the bearing races are OK and all you need is the balls you can purchase them from bearing suppliers or McMaster-Carr. For all other parts you will have to reverse engineer the bit and pieces and have them made. OR seach until you find another blower for parts. You are more likely to find on in good condition than one that is broken and has the parts you need. These little prospector blowers are probably pretty rare. |
| - guru - Sunday, 01/02/05 15:18:05 EST |
|
Hi does any body have any information on casting a horse plow. Or another way of making one Thanks |
| ReyGzz - Sunday, 01/02/05 15:19:39 EST |
|
I have been commisioned to do 4 trident's (pitchfork looking weapon from the middle ages). Do you know of any good resources I could check out for various different designs? |
| dunchadh - Sunday, 01/02/05 16:03:28 EST |
|
Roland: Can you e-mail me a photo of the plate you need replaced? Might be able to cobble something together for you. |
| Ken Scharabok - Sunday, 01/02/05 16:42:44 EST |
|
Thanks for the input guy's. I was hoping for a used parts source. Ken, there's nothing to send a pic of. One side had three bearings left in it (out of a possible 12 or so), and fell completely to pieces when I got it out and the other was a homemade job of metal washers and a hard rubber insert. It looks like the side plates of the blower were the loose bearing retainers (meaning each ball bearing was inserted individually, with an inside shim over the crank and a nut and washer system to retain everything in place. I've been a jeweler and inventor for the past 30+ years so I'm familiar with the "by-guess and by-gosh", process of making things work. Open to any other ideas, and I'll let you all know how it turns out. Roland |
| Roland - Sunday, 01/02/05 17:50:22 EST |
|
Dunchad, do you have proof that the trident *was* used as a weapon in the middle ages? There is documentation on it's use in the Roman Arena; but I don't recall any for medieval times. In the renaissance there was an explosion of polearm forms; but some of them were probably purely ceremonial. Would something like a "Bohemian Earspoon" work or do you need the "classical trident". When I get comissions for stuff that I'm a bit doubtfull about I ask that *they* provide the documentation. BTW Stone's Glossary ("A Glossary of the Construction, decoration and Use of Arms and Armor") shows 5 examples with the watered steel persian one probably the closest to your time and place. Thomas |
| Thomas P - Sunday, 01/02/05 18:34:52 EST |
|
hello, i just found a 200lb bradley power hammer for $2500 (or a bit less), infact i have a choice of standard or the compact version at that price. i had a few questions tho: it needs a new timber, what kind of timber is that? do these machines have ram guides, or do they hit like a person hand hammering? what is the smallest and largest stock one of these hammers can do? (can you work as small as 1/2" under it?) i know these are -heavy- hammers, how would someone move one of these? what 'maintainance' do these hammers usually need? thanks -mike |
| mike - Sunday, 01/02/05 18:38:19 EST |
|
Thomas P I do think that forms of tridents were used..... Mostly for frog and eel gigging. ( grin) |
| Ralph - Sunday, 01/02/05 19:03:30 EST |
|
Ralph: You beat me to it! I agree with Thomas- research first unless you're doing a fantasy piece. |
| Bruce Blackistone (Atli) - Sunday, 01/02/05 22:10:55 EST |
|
ReyGzz, No, I don't. I can only comment briefly, as this is not my forte. My father-in-law, now passed away, used horse drawn plows at Taos Pueblo, New Mexico in the 1930's through the 1950's, and I'm looking at one of the shares. It is about 10�" long, whereas tractor shares are much wider and longer. It is probably drop forged of steel and has an illegible stamping on the reverse, perhaps "PON??". It has one countersunk hole for the moldboard attachment, and where the moldboard met the share at the top is a straight edge of only 6 3/8" in length. I am told that the horse walking plow shares were more difficult to dress than tractor shares. If not given the correct curve on the share bottom and point, the share would either go too deep or want to jump out of the ground. I've dressed two used plowshares in the time I've been smithing, and neither was returned, so I guess I did all right. In the early days, they cast iron shares which were "chilled". See www.centerforhistory.org/ocpw.html. In the early 1970's, I visited Nichols Tillage Tools in eastern Colorado. Mr. Nichol had a large building with drop forging equipment for making his shares, etc. If memory serves, the shares were oil quenched to harden. Today, I don't think shares, jointers, and moldboards are hand forged. A guy would go broke. Getting back to your question, you say, "a horse plow", and that could mean the beam, handles, gauge wheel, clevis, jointer, and share with moldboard; in other words, the whole shootin' match. I assume you did not mean the entire walking plow. As an aside however, the large beams were often of medium to high carbon steel, hardened and tempered, to prevent torque and breakage in use. |
| Frank Turley - Sunday, 01/02/05 22:54:28 EST |
|
I think JimG does a fair bit of plow forging, doesn't he? You might want to try looking for him in the Pub. |
| - HavokTD - Monday, 01/03/05 03:45:03 EST |
|
Mr. Turley: Do you know the process by which the cast iron share were 'chilled' to harden them? Richard Postman commented to me he thinks some cast iron anvils were also hardened. As I recall it was by placing some type of plate, perhaps brass or copper, in the bottom of the mold before the anvil was poured. This somehow made the plate harder than the rest of the body. |
| Ken Scharabok - Monday, 01/03/05 05:18:09 EST |
|
Ken Scharabok, As you may know, gray cast iron has a high carbon content which can be from 1.5% to 6%, but the carbon is in the form of graphite, sometimes termed a "mechanical mixture" of iron and graphite. That is why it is machinable and you can drill holes in it. You don't get chips; you get "powder". The rate of cooling will affect this mixture. Rapid cooling will allow the iron and carbon in the melt to "chill" as the metal "freezes" and to remain as a "chemical mixture", an iron carbide. The iron carbide is hard, wear resistant, and is also termed, "white cast iron". At the same time, it has low impact resistance and low tensile strength. Tiemann* says that iron plates were judiciously placed in the mold to cause the chilled effect. On plow shares, I assume they were shooting for a duplex effect, where the chilled surface layer of the share (or anvil face?) would be hard from the rapid cooling, yet the interior of the piece would be retained as the more ductile gray cast iron, all done in the same pour. *Hugh P. Tiemann, "Iron and Steel: A Pocket Encyclopedia" Brady & Clauser, "Materials Handbook" |
| Frank Turley - Monday, 01/03/05 09:39:24 EST |
|
Ralph, Bruce---noticed I said "as a weapon" I would consider a frog, eeel or fish gig to be a tool... I would also not consider gray cast iron to be "ductile".... Didn't John Deere get his fame for forging a steel plowshare that would turn the heavy sticky plains soil? There was a fellow who was involved in the recreation of that for the JD anniversary not too long ago you might want to look around for his contact info... We had a demo on repointing a plow share at SOFA once---used to be the bread and butter of the rural smith and one of our members actually had experience doing it. The local rural smith was able to "tune" the plow to work in the local soils as the attack angle was different for various soils. You would also temper it for the local conditions---sandy soils with no rocks could profit from being a touch harder for wear resistance, rocky soils needed a bit tougher plow points. Thomas |
| Thomas P - Monday, 01/03/05 11:23:45 EST |
|
Bradley Hammers: Mike, the two hammers you are talking about are very different machines. The first thing to know about repairing and restoring this type of machinery is that it is all pretty simple, everything is standard mechanics requiring a well versed mechanic or machinist. If you have no experiance rebuilding machinery then it is quite a challange. The helves were rock maple. The shapes varied from hammer to hammer. Some were straight rectangles and others tapered. Bradley made three hammers with wood helves all different. One had no guides the other two did. Depending on how these hammers were used and cared for they may need little maintenance or a complete rebuild. Typicaly the babbit bearings wear and need to be replaced. IF the shafts are in good condition this may be simple but you may need to repair the shaft THEN rebabbit. Poured in place babbit bearing methods are covered in a variety of older Machinists manuals and early editions of MACHINERY'S HANDBOOK as well as the new CD version. Hammers that are heavily used, abused or ill adjusted can wear the guides and dies. Guides with simiple wear can usualy be adjusted but if worn curved must be removed and machined straight OR replaced. Although there is a company that owns what is left of Bradley they custom make all the parts as needed in a machine shop. ONE part can cost as much as you are paying for the hammers. The most important maintenance is OILING. Every day. Sometimes several times a day. The second most important is adjustments. If something is loose and noisy STOP and adjust it NOW. Loose parts cause wear that can be expensive to repair. These machines were designed to last FOREVER. However, many have been abused beyond belief. Properly adjusted and with practice you can forge almost ANY size stock up to the maximum capacity under a power hammer. Although it is tricky to keep under control you CAN forge stock as small as 1/4 square under a 200 pound hammer and draw tapers and such to long thin points easily. MOVING DAMAGE: Is the MOST common damage to all types of machinery. Tipping machinery over, droping, rough handling with a crane or forklife and bad rigging are the most common causes of broken parts on all machinery (old and new) including power hammers. A pristine machine with all the parts can have just ONE lever, pulley, gear or casting broken and end up costing more than the entire machine OR totaly destroying the machine. The lighter Bradley 200 pound hammers such as the Compact weigh around 7,000 pounds. The guided helve weighs a little over 10,000 pounds. IF you do not know how to move heavy equipment of this nature safely then hire a professional rigger or machinery mover. Be sure they know that the smallest part may cost thousands of dollars. Be sure YOU are ready to position the hammer. Foundation plans are available. You can also run these machines on a heavy concrete floor. Just be sure to be ready. Setting them on the ground outside your shop will cost you another moving fee. |
| - guru - Monday, 01/03/05 12:00:51 EST |
|
Thomas P. I used ductile in a comparative sense. I did not call gray cast iron "Ductile Iron", the latter being a nodular iron that emerged on the scene about 1948. I quote another comparative statement...for comparison. "Castings so made [nodular iron castings] have relatively high strength and better ductility than ordinary gray iron."* This indicates to me that gray iron has some ductility. Let's not forget that although gray cast iron can be brittle, especially if designed improperly, many engine blocks and heavy machinery bases were and are made of it. There needs to be some shock absorbability in the metal, considering its end use. The ordinary dictionary definition of ductile is not the way it is used in the steel industry. * "The Making, Shaping, and Treating of Steel", Ninth Edition, Ed. Harold E. McGannon, United States Steel, 1971, page 1073. |
| Frank Turley - Monday, 01/03/05 12:06:49 EST |
|
Forged John Deere Plow: There was a recreation or restoration of the first John Deere plow at the last ABANA conference. There is a photo in our NEWS coverage of the 2004 conference in the gallery photos on page 37 (the last page). The gallery photos were taken by 13 year old Shane Curfman son of Dean Curfman the maker of the Big BLU hammer. Cast iron plow shares date back to the earliest Iron Age. The famous mould board plow was developed in the mid 1700's. I believe Thomas Jefferson had something to do with it. Or at least that is what they will have you believe here in Virginia! |
| - guru - Monday, 01/03/05 12:15:33 EST |
|
Trident: I am curious. Was this ever used as a standard battlefield weapon? Seems like it would not have been suitable. Perhaps one of the historians or SCA people could comment? |
| adam - Monday, 01/03/05 13:03:20 EST |
|
Adam, We've had a couple of comments already. Stone's Glossary says that Roman gladiators used it, but shows no pictures of same. He shows pictures of five non-European ones. |
| Frank Turley - Monday, 01/03/05 13:35:28 EST |
|
Trident, I think of the mythological sea gods first, then Roman Gladiator movies. . . |
| - guru - Monday, 01/03/05 13:38:25 EST |
|
Hi all, I just bought an new anvil. I haven�t made a picture yet, but it�s almost exactly the same shape as this one : http://www.kropot.nl/archeon/image24.htm , only smaller. It weights 44kg (97lbs). From what I can tell it is wrought iron with a steel face welded on. There are some markings on the back, but I can�t read what is says yet, need to remove some more of the primer a previous owner painted on. Are you guys jealous yet? matthijs |
| matthijs - Monday, 01/03/05 13:46:17 EST |
|
SGensh, thanks for the TIG comments. this welder has "lift arc" arc starting. i didnt think that it was a useful feature at first, but after playing with it, there is no advantage in using the high freq start for what i was doing at the time. there is also a post flow timer. if the electrode shows oxidation as it cools, setting the post flow "longer" took care of that. i started on stainless. i found that as the puddle formed, moving the electrode back slightly gave the filler rod a little more room, with less chance to contact the electrode. hand position and nomex gloves were also important. what have you done with it?? what applications do you prefer TIG over other methods?? thanks again.. |
| - rugg - Monday, 01/03/05 13:49:14 EST |
|
Torch Question: I have a Smith cutting torch handle, but no tanks, regulators, hoses etc. I would like purchase those items and I can get "package" deals on regulators hoses and a torch handle of generic make, but I would like to keep and use the existing Smith that I have. What should I look for in hoses and regulators-Do I need Smith products or are generic/other brands just as useful? Does anyone know whats going on the the site accross the street? Thanks for your help. Patrick |
| Patrick Nowak - Monday, 01/03/05 14:39:36 EST |
|
Patric: keenjunk was taken down by Niel. Many of us are over here now. The Brand of the regulators and hoses does not matter, However I would get a brand name product US made for which repair parts are available. That means Smith, Victor, Harris etc. They cost more but are worth it. If you get a Smith kit, with parts that fit your handle, then you have two torch handles which is good. I keep one with the cutting attachment and one with weelding tips. I know some people who have had good service out of Harbor Freight or other cheap sets, but I knoe more that have had nothing but grief from those sets. |
| John Odom - Monday, 01/03/05 15:17:32 EST |
|
This is my first post so try to work with me. I live in richmond and am quite close to henrico high school, I would like to know if there are any blacksmiths that are close that could teach me alot about it and possibly help me start blacksmithing if its not too much trouble for them. I just turned 16 and have been interested in blacksmithing for about four or five years. Please reply soon... thanks |
| Kyani - Monday, 01/03/05 15:17:49 EST |
|
Patrick, Keenjunk closed down for good on Dec. 31st. Discussion about that and other things by many of the former Keenjunkers on the "Hammer In" forum here at anvilfire. You can get there via the pull down menu at the top right of your screen. |
| Ellen - Monday, 01/03/05 15:18:04 EST |
|
I have a Smith torch setup that I bought in the 1960s that I use all the time. Recently I tried to get a "rosebud" tip for it and the dealer said that it was obsolete and the "rosebud" was not available, he also said that he could not sell me parts for it since it was obsolete as it was against the law, he could not even sell me o-rings. Just passing info along--I don't know if this is correct info or just my dealer |
| ptpiddler - Monday, 01/03/05 15:20:13 EST |
|
Thomas has never seen the Southern Maryland Giant Chicken-Eating Toad! I can still feel its cold, wet tongue whiplashing around my ankle, and those greedy eyes staring at me like I was a really big mayfly. A good thing I had my axe to fend off this invasive species... (We will now return to our regularly scheduled blacksmithing content.) Oddly enough the John Deere plow shown in the "Anvilfire News" photo doesn't look like the one that I remember from a Smithsonian exhibit about 22 years ago. of course, it may have been a more developed model, or I may be misremembering. I do know that John Deere sponsored the exhibit, and that was supposed to be the plow that made the reputation, so maybe it was the fully-developed model. Matthijs: Yep! That anvil would be the envy of anybody doing any middle top late medieval blacksmithing or armoring, and at 44 k. it's just the right weight to lug about to demonstrations. Use it well! Warm enough to picnic and mostly sunny on the banks of the Potomac. Visit your National Parks: www.nps.gov Go viking: www.longshipco.org |
| Bruce Blackistone (Atli) - Monday, 01/03/05 15:32:40 EST |
|
Richmond, VA Kyani, Goto CVBG.org and write our president about the next meeting. I know the February meeting is up at Daniel Boones near Charlottesville. VERY worth while going. See you there? See our schedule page and the CVBG schedule page for details and directions. There are quite a few professional and amature smiths in the Richmond, VA area. Many are members of CVBG. There is also a group in Tidewater and up in the Valley as well as BGoP up North. See ABANA-Chapter.com for their sites. |
| - guru - Monday, 01/03/05 16:50:48 EST |
|
Matthjs: Your anvil, at least in the U.S., would be known as an Austrian Style Anvil. The indents on the sides are 'church windows'. Sometimes these have steps on the front and back which represented the steps of a catheral. Harkens back to the days when blacksmithing was almost considered black magic with the blacksmith a sort of priest having command of earth, wind, fire and water to produce his work. There is more information on this in Postman's Anvils in America. |
| Ken Scharabok - Monday, 01/03/05 16:57:16 EST |
|
Matthijs' Anvil Those are very rare in the US but fairly common in Europe. It is an old style dating from the 1600's or earlier and common in the early 1700's but probably made into the early 1800's. The problem with European anvils is that they are like French wines. Every region had one and they were all good and all distinctively different. Many have tried to talk Richard Postman into doing a book on European anvils but he says it would be a monumental task. In England and then the US the fact that they both dominated world trade and both supplied North America with anvils the result was a few large well known manufacturers. The fact that they were large and did business world wide also meant that there was a considerable amount of sales and advertising literature created and much of it can be found. Richard IS doing a book titled "More About Anvils" that will include MANY European anvils. But do not expect the historical detail on every manufacturer like the first book. |
| - guru - Monday, 01/03/05 17:00:31 EST |
|
German Anvils |
| - guru - Monday, 01/03/05 17:07:48 EST |
|
ptpiddler: I think it is your dealer. I can get parts and stuff for most torches except Airco, which are very limited. A few models of other makes are hard too. Is there an outfit near you that does torch and regulator repair for a main business? The welding dealer wants to sell you a new one! Supplying parts is NOT AGAINST THE LAW! |
| John Odom - Monday, 01/03/05 17:11:26 EST |
|
Regulators: Here is a link to a catalog that contains a lot of fittings and regulators. Note that regulators come with the same inlet and outlet and the same gauges but are rated for different FLOW. These are rated in SCFH. |
| John Odom - Monday, 01/03/05 17:49:16 EST |
|
Links:, John the guru page does not allow embedded HTML except by the guru. I can do it but I also have to fix my own screw ups. We DO alow all users to post links in the Hammer-In via the input form but not via embedding HTML. Anything you put in <> brackets will be stripped out. There are a number of reasons for this. One is that errors can crash the page. The other is that folks could link to anything including images. It is common for public forums that allow HTML to end up with porn banners and all kinds of unwanted content. I spend enough time cleaning up my messes without that. . . Links you add as plain text will show, they just will not be hot. If you have really nice data that needs to be in a table or a very good link I will often edit the page if I have time. |
| - guru - Monday, 01/03/05 18:49:20 EST |
|
Hi Patrick, I guess you missed my post across the street about the pink pegboard in my new shop...Folks Patrick N has been around a while, works as a metallurgist for a large open die forging company; just doesn't post often. Bruce: *don't* drink mead "green" let it age a while first and mayhap you won't be seeing any more chicken eating toads... Ken can you cite me a reference to what the "steps" meant? I've heard a lot of guesses but have never seen proof... Thomas |
| Thomas P - Monday, 01/03/05 19:00:21 EST |
|
Steps on Anvils: If you study the construction of early anvils (much earlier than the examples above) you will easily see that they were built up from various size merchant bar. The feet on early anvils were the result of forge welding on a piece of retangular bar and then a piece of square bar. Typical merchat bar was 1 to 1-1/8" by 2 or 2-1/2". If you study the old anvils and keep this slab size in mind you can easily see how they were built. 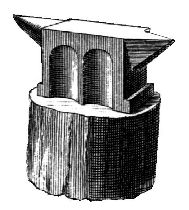 Examples can be seen in Diderots Encylopedia. Even though this work was written and illustrated in the mid to late 1700's many of the anvils pictured were hundreds of years old just as they are in modern shops. There are enough examples to see the progresion of the techniques. The body core was typicaly made of amalgamated scrap OR merchant bar all forge welded together in a large lump. At a very early stage the lump became to much to forge under the current trip hammers. So the lump was kept hot and pieces added on. This was done with hand sledges and the best that could be done was to get a good weld. Early "church windows" were the result of forging three slabs on the side with spaces between them and then a cross bar fullered out to make arches. There was nothing symbolic about this, it was arches to support the face and use less material in the body. Then the stepped feet were added to increase the foot print and stability. The design parameters of 1400 AD being no differnt than 2000 AD. Form follows function within the confines of tradition. As iron became more common and the tools to work it had more power anvils started to be forged all over. All kinds of large items were created by the build up method using small bar and scrap. The capacity to blend it altogether allowed a greater range of products including things like ships anchors. Anvils were still pieced together but with increased forging capacity the entire anvil could be shaped. The body fullered to create a waist and the "church windows". Styles had already developed and symbolism attached to features of the anvil. So as the shapes evolved they retained some of the earlier lines. The classic shapes such as Matthijs' and the "Armour's" anvil in the link above retained the church window look in shapes that were probably functional. Most of these anvils have a completely flat back opposite the "church window" side. This allows tipping the anvil and working in the handy depressions. Hammer and wear markings on many old anvils indicate this was common practice. By the mid 1700's the symbolism of the fith foot which had originaly been the column between two arches was so strong that they were a added on piece welded on the flat side of a nearly finished anvil. Then in the late 1800's and early 1900's the steps that created the feet on the Austrian anvils such as Otto Schmirler's became decorative OG moldings similar to furniture and architectural elements. These kind of details were found on forged anvils but are VERY easy to produce on cast anvils. However, most of the modern pattern makers reproducing this design don't have a clue about the history or design of anvils and put misshapened purposeless steps in place of what had been a difficult to forge molding. I find it interesting that today, when most anvils are cast and you could have ANY feature you want on the anvil at no extra cost there is only one maker that has used any decorative elements and that is Rat Hole Anvils. See page 12 of the 2004 ABANA Conference NEWS. |
| - guru - Monday, 01/03/05 19:55:39 EST |
|
FWIW, I have a Harris torch setup, and it says proudly "made in Ireland." I don't mind that a bit, but it is hard to find exact parts for, in that pre-1990 or so Harris parts don't interchange. If I ever end up really needing a torch again, I'll buy Victor. Everything is interchangeable as long as it says Victor on it. |
| Alan-L - Monday, 01/03/05 19:56:14 EST |
|
Thanks, Jock. I'm sorry. I understand. I didn't realize that if I cut and pasted it would show up as a hotlink. The link is posted in the V Hammerin. |
| John Odom - Monday, 01/03/05 19:57:10 EST |
|
John, I don't think it was the cut and paste problem. But you may have put it between arrow brackets. Ocassionaly people try to use arrow brackets for emphasis. It all dissapears. I cannot even recover it from the server. Beside the reasons given above it also prevents hackers from embedding code in a page. Some forum software convert all the code characters to visible text which is not executable. However, this is almost as bad because there is still a mess for the webmaster to clean up (if they care, and I do). |
| - guru - Monday, 01/03/05 20:06:59 EST |
|
Rugg, What tig machine did you buy? Lots of guys don't wear gloves when using one but I think that is foolish given the intense sunburn you can receive from the arc. I prefer the light leather gloves myself. I use mine for most of the delicate or decorative welding in the shop. I still find the mig best for production assembly of tubing and solids where lots of fillet welds are involved but the tig is the method of choice for anything which requires a finished appearence or a non filer fusion weld. I often weld steel tubing into steel plates and discs for museum mounts with mine. Fusion weld from the bottom and no grinding required. I fillet weld aluminum thrust brackets for outboard racing boats for one of my customers- don't rest your arms or hands on any aluminum you are welding! I also weld a lot of aluminum brackets with it for the motor drive systems I manufacture. You will find it's great for welding bronze and copper after you work with it for a while. You will also find that you can use it to perform cast iron repairs with bronze rod in much the same way as the old braze welded torch repairs. |
| SGensh - Monday, 01/03/05 20:48:37 EST |
|
I think the oddest attribution for the use of "church windows" on an anvil is that it allowed the smith to forge "goblets and chalices". Every illustration and description I've seen of gold or silversmiths forging said items had them raising them over a stake. I guess some anvil dealers are like some reporters: What they don't know they will make up. Unseasonably warm on the banks of the lower Potomac. Visit your National Parks: www.nps.gov Go viking: www.longshipco.org |
| Bruce Blackistone (Atli) - Tuesday, 01/04/05 00:20:09 EST |
|
PTPIDDLER: I've also used Smith Torches since the 60s and they are good stout equiptment. I have one 1920s Smith aircraft torch that still works just fine, though I must scour swap meets for tips. There are both genuine Smith tips available as well as a couple of aftermarket companies last time I bought some. The Smith cutting attachments are especially good with a wide variety of tips available. I'm speaking of torch models that sport O rings to seal the tips...no tips available for the earlier ones. I have a rosebud for mine..... Don't do this at home dept!! I took a big victor rosebud and hacksawed it off just above the bottom joint, then braized a big Smith rosebud stem butt to it very carefully and screwed it into a big Smith mixer. Have used it for years without trouble. You shouldn't do it. |
| - Pete F - Tuesday, 01/04/05 01:32:27 EST |
|
Thomas P: I thought I read the reference to steps in Postman's book, but do not see it there. I waive to the authorities, but I disagree elements weren't added to anvils with more of a religious than usage aspect. A blacksmithing was almost a high priest of the metal workers and, as such, I strongly suspect elements of the old Continental anvils did have religious overtones, much like the anvil being an altar of sort. Just my opinion. |
| Ken Scharabok - Tuesday, 01/04/05 07:42:53 EST |
|
Hmmmm; "Anvil as Ritual Object" Sounds like a possible thesis there. ;-) Actually, fashion and tradition may well play a part, as well as practical factors. I've seen some renaissance tools decorated to within an inch of impracticality to show off either the skill of the maker, the wealth and good taste of the owner, or both. The line between decorative and practical is frequently fuzzy so I certain wouldn�t rule out purely decorative or even symbolic features from the design of older style anvils. Such items as nibs on old-style wood saws or various decorative/symbolic/religious features on swords and weapons illustrate this trend; however, due to its heavier use an anvil probably didn�t get too fancy. Warmish and dark on the banks of the Potomac. Visit your National Parks: www.nps.gov Go viking: www.longshipco.org |
| Bruce Blackistone (Atli) - Tuesday, 01/04/05 09:18:11 EST |
|
I posted once yesterday about blacksmiths in my area I would now like to ask about an anvil I was given, the face (if that isnt the word then the part used for hammering on) is about 8" by 5" and it has a vise on the end opposite the horn of the anvil, the vise also doubles as a drill, as you tighten the vise you would turn the second rod to turn a drill bit to cut out the hole, I think the anvil/vise/drill is made by sears & roebuck. could you help me find the manufacturer? |
| Kyani - Tuesday, 01/04/05 10:14:14 EST |
|
Kyani: These anvil/vise combinations were apparently very common in the early part of the 1900s. Some were just an anvil with a vise on the rear and some were quite fancy, with a number of accessories. Probably much like a Swiss Army Knife. Useful as an all-purpose tool, but not as functional an any individual element used separately. There are several examples on eBay now. Do a search on anvil vise in both item title and description. However, the anvil was cast iron and hollow inside to accommodate the vise screw. The vise jaws were cast iron also and apparently broken fairly easily with heavy use. It is unusual to see on undamaged in any way. The multi-purpose ones are frequently missing accessories. |
| Ken Scharabok - Tuesday, 01/04/05 10:44:09 EST |
|
P.S. If you find one with just the anvil portion left, they can be made into somewhat nice small anvils by adding on a U-shaped mild-steel heel with the hardy hole in it. Then support the back of the heel to the base. This would be welding mild steel to cast iron. |
| Ken Scharabok - Tuesday, 01/04/05 10:46:49 EST |
|
Combination Tool: Kyani, These "patent" combination tools were made by dozens, maybe hundreds of manufacturers. Often they were just one of the MANY small manufacturing foundries found in almost every sizable town. They were not made by anvil manufacturers and the anvil part is usualy just cast iron. These are more of a collector's item than a useful tool. That is NOT to say it does not have value. If it is in fairly good condition and most of the peices there it COULD be traded for a good anvil in the 125 - 150 pound range. If you plan to sell or trade it be sure the person that gave it to you knows you are trading up. They may have sentimental attachment to it. |
| - guru - Tuesday, 01/04/05 10:55:38 EST |
|
The status as a smith rises the farther in time you go back; by the renaissance he was more of just a respected craftsman---easy to see by looking at the status of the various guilds of the time. In the migration period we see more of the smith as "magician" with the legends of Weyland and the Voulsong "saga" and going further back with the greek and romans both having "smith" gods. That whole thing about marrying over the anvil in Gretna Greene has nothing to do with the smith and all to do with the scottish law that a marriage could be made between two people by *publically* making their vows before witnesses and the Smithy was a convient place just over the border on the main posting road... Thomas |
| Thomas P - Tuesday, 01/04/05 11:09:21 EST |
|
SGensh, synchrowave 250; it should handle most of the aluminum that i would come across. the SS that i practiced on was 16Ga, using about 40amps. i was surprised how much heat my hands were getting; had to use nomex gloves. question for you: tube to steel disc; what thickness was the plate and what were your parameters? #2: i have a cracked blower cover of an otherwise perfect champ 400. preheat it? should i bolt it to the "base" to minimize distortion so the holes line up? should i V groove the crack? is the filler (bronze) specific for TIG use, or will brazing rod work? i have some similar scrap cast iron to practice on. #3 for delicate work, what size electrodes/collets should i try; what do you use? i have read as much as i can. the guys at the welding shop are very helpful. i am ready to practice and use this unit. your input is very much appreciated. PS for delicate work, do you use a magnifying lense in your helmet? one more(cant help myself)do you ever use electrode positive? thanks!!! before anyone throws hammers at me, i am a member...(CSI that is) |
| - rugg - Tuesday, 01/04/05 11:44:21 EST |
|
Early Anvils. When I was a fledgling smith-cum-farrier, I ordered a 1966 "Made of Iron" exhibition catalog from the University of St. Thomas, Houston, Texas. Three decorated anvils are shown: a 16th C. Italian with columns and an octagonal base; a 17th C. French anvil with a mascaron on the side; and a 16th C. German anvil with a big "threaded" column for a waist and hexagonal base. A 17th C. vise is pictured and has a mascaron and foilage in relief on the movable jaw. The workmanship on all pieces is exquisite. Franz Boaz, who is sometimes called the "father of modern anthropology", authored a book titled, "Primitive Art". I believe the first sentence reads, "Man always elaborates beyond necessity." So lest we go off the deep end on this ritual, ceremonial aspect of the early period anvils, I'm minded of a science fiction book titled "The Weans". The gist was that archeologists in the far distant future found sites of OUR present "civilization", but the only thing remaining in their digs were many, many toilet bowls. They couldn't identify their purpose, so they assumed of course, that they were objects of worship. As a post script, "Made of Iron" was put together by the U. of St. Thomas with help from many lenders. Dominique de Menil was head of the Art Department at the time, and was instrumental in getting the objects organized and exhibited. It is a wonderful, scholarly catalog that lists 515 items, many of them pictured, and dating from B.C. through David Smith. |
| Frank Turley - Tuesday, 01/04/05 12:24:53 EST |
|
Rugg, Tube to disc- 1/8" thick disks 1" dia 11 ga welded seam tubing; set flush at bottom of hole and fusion weld electrode negative; h.f. at start; panel at app. 150 use foot control. Cracked cover- Practice first for sure! Dependng on how thick the cover is you should probably make a shallow vee groove but make sure you retain enough material to insure alignment. You can always come back and groove from the other side after it is welded on one side. I'd assemble it with a dummy shaft in place for allignment which can be removed so you don't take any chances of damaging the original. You shouldn't need to preheat a small piece like this but it won't hurt either. (I can already hear the comments, guys!) If you have an oxy acetylene torch set it for an oxidizing flame and sear the edges you will be welding to burn out any oils or excess carbon. Now use the tig torch and your filler metal to deposit a bead along the crack being sure to get all the way out to the edge of your vee and build continously. Don't try and loop back and forth just start at one end and work your way along. You want the base metal red and hot just like you were brazing with a gas torch and flux but not so hot that it melts away. Work with a torch angle that will continue to provide shielding gas coverage to the fresh material as it is deposited. When you are finished wrap the whole thing in Kaowool and let it sit for a few hours to cool down slowly. I tend to use silicon bronze rods for this since I always have them on hand. You can use a brazing rod also but don't use anything with zinc in it or with a flux covering. Delicate work- I tend to use a 3/32" electrode for most work going to a 1/8" for heavy amperage Alu welding. Once in a great while I use a 1/16" when I'm welding really thin material. Keeping a sharp tip when running electrode negative is a key to good control. As I think I said before a typical length of taper is three times the diameter of the tungsten. I forgot to say that you want to grind or sand the tungsten along its length not across it. It will actually make a difference in your arc. Aluminum is typically welded with a balled tungsten on AC with continous high frequency. About the only time I use electrode positive is to ball the tungsten against a piece of copper. Steve Rutterbush may be able to give you more or better advice as he is a welding instructor and inspector so hopefully he'll jump in here. I'm just another guy with a few hours of field experience. |
| SGensh - Tuesday, 01/04/05 14:15:43 EST |
|
Frank: Is that the S.F. story where they exhibit the toilet bowls upside down because "...they're obviously more stable that way."? David McCaulley's (sp?) Motel of the Mysteries is another good cautionary book for over-reading the significance of artifacts. |
| Bruce Blackistone (Atli) - Tuesday, 01/04/05 14:18:19 EST |
|
Cap'n Atli; You just reminded me of a situation wherein the local Sears, Roebuck store finally gave up on displaying toilets in the plumbing department, because little boys kept using them. |
| 3dogs - Tuesday, 01/04/05 15:02:48 EST |
|
Made of Iron: Frank, I just happen to have a copy of the same! I bought it at a local library sale. Also an Oxford University history of James Watt and the steam engine. Was a one of those very lucky days. Fifth Foot: There are various explanations for these that I will not repeat but it has to do with having 5 points. Some anvils this is just the result of the shape of the sides but on 1700's English anvils the fith foot was a seperate piece welded on to the side of the anvil on purpose with no physical function. It is purely symbolic. |
| - guru - Tuesday, 01/04/05 15:21:37 EST |
|
Hi all. Just received a hammer purchased off of Ebay and was curious as to what it's original use may have been. It's 6.5 lbs. Basically it looks like a straight peen, but the handle is mounted closer to the flat face with a fairly long taper to the fuller (overall head length is 10.5"). The fuller seems too sharp to be a fuller and too wide to be a cutter. I haven't seen anything that matches it, just curious. I'll be grinding it into a nice fuller here shortly. |
| MikeA - Tuesday, 01/04/05 16:35:20 EST |
|
Mike, It sounds like a blacksmiths cold chisel. The cutting end on many of these is pretty blunt just curving off the 60° edge. If it is thin and "axe" like then it may be a hot cutter. See the tools shown on the catalog pages like BlacksmithsDepot. |
| - guru - Tuesday, 01/04/05 16:52:39 EST |
|
Not thin, definitely beefy, a little bit of taper from the top and bottom too, which is why I didn't think it was a cutter or fuller but the cold chisel hadn't occurred to me. That sounds like the right one. Thanks guru. Hmm, I think it's the only actual blacksmithing hammer I own! Finally got my tongs done as well, apparently the raising turorial by Eric Thing stuck in my head because after getting the tongs sorted out I checked this site out again and found I had duped his almost perfectly (though mine have decorative twists and notches for the ring!). Thanks again for all the good info. |
| MikeA - Tuesday, 01/04/05 17:44:34 EST |
|
Toilet bowls and Archeology - Off topic I know, but I seem to recall a theory that a depression that archeologists found by the entrance of stone-age huts was of some unknown religious or cultural significance. It wasn't until a "living history" town was made in England that the truth came out. Picture a light (or even heavy rain). The chickens would enter the huts to get away from the rain, and scratch out a little depression to settle down in to wait out the rain. The longer the village was in operation, the deeper those little depressions got, til they mirrored those found in archrological digs. It was interesting reading, but I cannot find my source on that. |
| Monica - Tuesday, 01/04/05 17:49:17 EST |
|
id like to know some metal suppliers that are near richmond international raceway and if the home depot or lowes can provide me metal for blacksmithing. i would also like to know if there are any salvage yards that would have any old mill saws that arent used and just laying around collecting rust |
| Kyani - Tuesday, 01/04/05 19:33:04 EST |
|
Frank: But I have worshipped at the base of the Porcelan God! Anbd I am sure I am not alone! |
| Bob H - Tuesday, 01/04/05 19:57:33 EST |
|
Kyana; Richmond VA, IN, ????. Lowes, HD, etc generally carry small sections of A36 at outrageous prices; some hardware/lumber stores stock real metal---in 20' lengths; but I find that my local Lumber store is still high priced. What did the yellow pages tell you? If you can find a small welding or ornamental iron shop sometimes they will sell you metal, let you have the scrap of maybe let you piggyback an order on theirs as the big suppliers usually give a discount for larger orders---besides which you want to have a good relationship with the other metalworkers in the area so they will let you know about jobs, tools, local scrapyards, etc. We had a local ornamental iron that used to give us hundreds of pounds of *new* metal, usually fairly short drops; but 200 18" long 1/2" square stock pieces come in pretty useful at times! Bob H, next time try to worship *inside* less mess to clean up... Thomas |
| Thomas P - Tuesday, 01/04/05 20:09:30 EST |
|
Questions about arc welding: I'm going to make a T-stake; crossbar (working part, that is) will be 2"x1.5" fork lift tine, probably 1050 steel or some such. Shank will be 1.5" square generic A36 trash. I'll arc them together with many passes of 7014 rod, AC, from standard Lincoln red buzzbox. The questions -- should I preheat these pieces before welding, or can I just zap them together cold, with no extraordinary stress? If preheating is indicated, how high? Say, 400 degrees F or so? And should I back off on the amps if the work is hot (maybe 100 amps instead of 120-150)? Thanks, ET (Raining! It's actually RAINING in Arizona!) |
| - Eric Thing - Tuesday, 01/04/05 20:17:08 EST |
|
Bob H., "Que alivio!" |
| Frank Turley - Tuesday, 01/04/05 20:22:53 EST |
|
Stake welding: Eric your preparation is probably more important than the weld on this item. You want a 100% penetration weld. This means cutting the shank to a 90° point (sides at 45°). Weld these with the fillets to the sides of the stake. Clean between passes. While hot you may want to heat to a low red and straighten as the welds are going to pull the arms DOWN. Then weld your fillets in-line with the stake, heat and starighten. The heating and straightening (with associated hammering to dress some) will stress relieve the joint. The post weld "heat treat" to relieve stresses prevents future cracking or warping. With this big a joint on steel less than 60 points it will heat itself as you go. If you are worried about it warm it until spit sizzles before the first passes. As the work heats you ocassionaly need to reduce the amps. Do this by feel. If the puddle is too fluid at the end of passes and runs off then slow down and let the work cool SOME then continue. When welding HOT work it helps to weld level. Also in a big joint a couple graphite or refractory brick end blocks to prevent that puddle from running off can help. Once the work is really hot you would be surprised how fast it will go. |
| - guru - Tuesday, 01/04/05 20:37:15 EST |
|
Kyana Note Thomasas query (Richmond VA, IN, KY. . .?). Always give your state or province and if not in North America you country. This is an International forum. You want to go to BMG metals in Richmond VA. |
| - guru - Tuesday, 01/04/05 20:40:07 EST |
|
sorry about the confusion its Richmond VA... My apologies |
| Kyani - Tuesday, 01/04/05 20:50:43 EST |
|
Kyani: Avoid buying steel stock from any place where it is not their normal line of business, such as hardware stores, Lowe's and HD mentioned above. Look in the Yellow Pages under Steel Suppliers and call a couple of them. You will eventually find one who will sell in small lots and perhaps by the foot. That is how I found my main supplier. I call in an order and they have it ready the next AM, cutting long lengths in half at no charge. Normally I take a full length, but have bought just a couple of feet of some stock. I also, by chance, found a steel supplier/scrapyard. I first cruise the back lot for what scrap I might be able to use. Current cost is $.25 pound for steel and $1.00 pound for SS, aluminum, bronze and brass. For example, they have a fairly good supply right now of 3/8" rod 38" long. A bit rusty, but significantly less than new at retail. A couple of weeks ago a gang was tearing down an old garage in town and the truck said they were a recycling company from a nearby town. Stopped and asked the crew chief if they sold to the public and was informed it wasn't their intent, but they do. Funny part is I have driven by their company a number of times and never realized they were there. Now have them down as a source of bronze scrap. On mill saws you are on your own. |
| Ken Scharabok - Tuesday, 01/04/05 20:59:40 EST |
|
Kyani: Large circular saw blades are in whit some decorators and the price has been driven sky high. There are some bargains to be had, but not many and they are hard to find. Yhanks again, Sparky! |
| John Odom - Tuesday, 01/04/05 21:51:41 EST |
|
Bob H, and ThomasP, Would you be referring to the worship of the pagan god Ralpf? As in "oh my goddd...Ralpf"? VBG |
| ptree - Tuesday, 01/04/05 22:21:58 EST |
|
Monica: It was the Butser experimental iron-age farm. It's one of the stories I've repeated many times to illustrate that things "ain't necessarily so." Sounds like it�s come full circle! ;-) |
| Bruce Blackistone (Atli) - Wednesday, 01/05/05 00:15:58 EST |
|
"Fifth Foot: There are various explanations for these that I will not repeat but it has to do with having 5 points. Some anvils this is just the result of the shape of the sides but on 1700's English anvils the fith foot was a seperate piece welded on to the side of the anvil on purpose with no physical function. It is purely symbolic." About a year ago a lady friend was thumbing through AIA and saw the photogrpahs of the anvils with the fifth foot. She asked if anvil's were male. I asked why and she said it looked like this one had taken Viagra and was ready for a night out on the town. |
| Ken Scharabok - Wednesday, 01/05/05 07:20:29 EST |
|
Hahahah |
| - guru - Wednesday, 01/05/05 10:25:23 EST |
|
Buying Steel: For a teenager like Kyani this is one of their most difficult tasks. Most steel suppliers are INDUSTRIAL suppliers. They expect: 1) For YOU to know exactly how to specify your order. 2) For the minimum ($25 to $100 US) cash purchase to be of no concern OR for you to have credit and have opened an account with them. 3) For you to have a truck that can haul 20 foot (6 meter) lengths of steel. Item one means you ask for Mild steel or A36 HR bar in commonly available sizes at steel suppliers and SAE-1018-20 CF bar in small sizes. In INDUSTRIAL plumbing supply houses this means knowing pipe sizes are nominal and the difference between a red and bush and that the maxiumum nipple length is 6". You CAN muddle through but it is intimidating and the counter people will often ignore you or be much less than helpful. So be forewarned. If you act like you know what you are doing and don't wimp out eventualy they will deal with you like a customer. Item two varies from place to place. Just expect to buy enough to make the minimum and don't grouse about it. With steel prices these days it is not hard. These are INDUSTRIAL suppliers that normally deal with open accounts of many thousands of dollars. It costs money to shuffle the paperwork. Not just by the sales person by the accountant and wharehouse folks. To prevent being surprised ASK what their cash sale policy is. I had a weird situation where a supplier would take my check for up to $250 but not over and then complained when I brought in CASH in hundred dollar bills to pay for a $1,135 order. . . they couldn't make the change. I delt as a cash customer with all my steel suppliers to avoid having bills I could not pay at the end of the month. This is common amoung small businesses and I still do it with many of my suppliers. This works when you are a REGULAR customer and the supplier knows you. Doing business with the smallest supplier in your area is often the best way to be able to work up a relationship with the sales people. Item three: Stock length is a problem for everyone with a small shop and a truck less than 20 feet. To make it worse MOST suppliers will NOT pre cut cash orders. If you call it in on the phone you will still have to wait for the stock to be cut until AFTER you pay for it. Depending on your vehical ask for the stock to be cut in half or thirds. I would often have it cut 8/12 so I had some longer than 10 feet. DO NOT ask for specific lengths to be cut. Most steel wharehouses WILL do this for regular customers or customers with and open account in a production setup (lots of steel). When you ask for steel to cut for hauling just specify rough feet and let them understand that you know steel comes in RANDOM lengths (+/- foot). The exception is steel plate. All plate is cut for most users. Many steel suppliers will deliver if you are on or close to their regular route (to bigger fish). They WILL NOT deliver to residential neighborhoods AND they will expect you to have the capacity to unload what you order. For typical blacksmith stuff this is not a problem but for plate it can be. Often an option is to find a local welding shop or machine shop and buy steel from them. They usualy have steel delivered and may add your order to theirs NEXT WEEK. If they offer then rush down and pay them for what you have ordered. Don't be surprised if they mark up the steel. They have costs too and delivery is often a cost to them. Their cutting fee may be higher than the wharehouse or none at all. As a small buyer you have to learn to research your sources, sound like you know what you are doing, make friends, try to be a good regular customer and above ALL do NOT be a pest. Being a pest includes calling for prices or a quote over and over and not buying. Being a pest includes asking to buy less than full lengths of materials. Sometimes being a pest includes asking to scrounge in the scrap OR expecting scrap for free. It is often best to wait on the scrap question until you are a regular customer. Due to years of inactivity in my shop most of the folks I formerly did business with in the past are gone or accounts closed. I now drive a mini-van so hauling is also a problem. But I still buy steel buy following the rules above. After a couple purchases at a NEW local supplier they now cut steel before I get there. But they would not at first. It takes time to establish a business or a customer relationship. |
| - guru - Wednesday, 01/05/05 11:16:54 EST |
|
Given how most of the smiths nowadays refer to their anvils as female, I doubt that was the intended effect. It's amazing how strong the gender-typing can be in society, and how long they last. For instance, how far back did ships get to be female? |
| Monica - Wednesday, 01/05/05 11:34:45 EST |
|
Fork Tine: The piece of fork lift tine I picked up at a SOFA raffle was marked 4140. If that is a possibility I would definitely go with at least a 400degF preheat to avoid any brittleness in the HAZ. It won't hurt to preheat 1050, just a bit more of a pain to weld with all that heat around. I once packed a large tine 200#? out of the woods where some folks had retired an old forklift by driving it over a steep enbankment and leaving it half embedded in the slope below. I wanted for a neotribal anvil as the vertical part had a nice sized face and it was mounted on a 2" rod rust welded in place providing a "horn" to use as well. I had to cut it free with my 3' hacksaw which was a bit tedious and drag it a long way to the car. The other one is still there unless one of the MOBsters have scrounged it...after all the effort I did move it to NM. Thomas |
| Thomas P - Wednesday, 01/05/05 11:36:54 EST |
|
Would you be able to send everything you know on how to smith any swords. Japanese swords general. |
| Mike Sanderson - Wednesday, 01/05/05 12:04:16 EST |
|
At the scrapyard I picked up some slightly used horseshoes to make objects out of. Each has a small pile near the ends (boron or something?) which is incredibly H-A-R-D. All my angle grinder can do to get it off, eating disks as it goes. Any suggestions on how to get this stuff off? |
| Ken Scharabok - Wednesday, 01/05/05 12:14:51 EST |
|
Mike, Do a little reading and searching on the net. That is too big a question and insults our GURU implying that "all he knows about Japanese swords could be placed in a quickie message. I have been studying Japanese swords for 8 years now and am still a rank ignoramus on the subject. |
| John Odom - Wednesday, 01/05/05 12:32:27 EST |
|
Ken: Both tungsten carbide and Boron Nitride have been used for that. If it was put on with a torch in a bronze matrix you can heat and scrape. If, as is usually the case it was applied with an arc in a ferrous matrix, it is there. Hang them up somewhere for good luck! |
| John Odom - Wednesday, 01/05/05 12:35:13 EST |
|
SWORDS Mike, see our FAQs page and the swordmaking article. See particularly the swordmaking resources page. Depending on your metalworking level you may want to start at the beginning of the list. We also have reviews of most of the books listed and they are ALL in print and redily available. Just a scant couple decades ago there was very little in print about many of these subjects. Today you can fill a small library with metalworking, blacksmithing and bladesmithing books. After studying a few then you will know enough to ask a reasonably formed question. Note I said STUDY, not read. |
| - guru - Wednesday, 01/05/05 12:58:45 EST |
|
Ken, if you find horseshoes, without the raised ends (some call them lugs, caulks, or other terms) you should have uniform hardness thoughout. One variable is that if the shoes were hot forged to shape, quenched and then nailed on the hoof they will be harder than a shoe which has not been hot worked.....others here know a lot more about horsehoes than I do so......but I do find they can be used to make all sorts of nifty items and the price is right. Old hoof rasps are quite useful also. |
| Ellen - Wednesday, 01/05/05 13:13:11 EST |
|
Anvil Gender: I always thought anvils were a phalic object and thus male. This goes with the whole "mine is bigger than yours" thing which tends to be a male attribute and often appled to anvils. On the other hand there is the tendancy of men to refer to all ojects as female and think they own "their" women. . . I don't think anvils were refered to as female until recently when someone refered to their "harem" of anvils. But then I could be wrong. . . |
| - guru - Wednesday, 01/05/05 13:15:01 EST |
|
Hello Everybody I need to make a stand/base for my anvil. I am thinking of making a stand out of standard lumber and would like to know if there is a rule of thumb for the face size of the stand (where the anvil will bolt) to the footprint of the anvil? The wood will go from the anvil directly to the floor as one length but possibly several sections depending on how large of a face I am making. I am going to use retractable wheels for mobility. Thanks for any help. Aaron Cissell |
| Arron Cissell - Wednesday, 01/05/05 13:50:22 EST |
|
Ken, Odom is correct. The trade name for the tungsten carbide chunks in a mild steel matrix, a kind of thick rod, is "Borium". It is for traction when the horse is in street parades or rough going. I used to apply it with an oxyacetelyne torch. The turned heels on a shoe are termed "calks" by U.S. farriers, "corks" if you're a cowboy, and sometimes "caulkins" if you're from Great Britain. Arron, I have not made a stand like the one you envision, but I believe the top should be rectangular to fit your anvil base measurements. The big, round stumps you see in romantic paintings will get in the way of your feet. |
| Frank Turley - Wednesday, 01/05/05 14:32:00 EST |
|
Arron, "big enough to be stable during use" and that seems to depend on the smith and anvil size as well as geometry. My "portable stump" was hollow in the center so it would bed well on grass or gravel and not rock though it was common for me to fiddle with it's orientation till I was happy. Thomas |
| Thomas P - Wednesday, 01/05/05 15:05:02 EST |
|
Aaron, My personal preference is that the top is sufficient to rest the entire anvil base on, and very little more. The ground side is slightly wider in all dimensions for stability. It the top of your stand is too big, you lose the ability to work the full surface area of your horn and you can't stick long stock through the hardy hole. |
| eander4 - Wednesday, 01/05/05 15:56:41 EST |
|
Thank you. I was not sure if the Anvil needed a larger base then its foot print or not. I didn't even think of clerance for the hardy. |
| Arron Cissell - Wednesday, 01/05/05 16:07:57 EST |
|
Arron, We have a good iForge demo that shows various stands. Those I build have a larger base than top, more so in the anvil's long direction. You do not want to go too far the other because you want to be able to stand close to the anvil. On some large heavy anvils the foot print of the anvil is sufficient. Smaller anvils need more base because the stand is proportionately taller. |
| - guru - Wednesday, 01/05/05 16:24:00 EST |
|
Wheels: Years ago my Father-in-law had a table saw that had ONE wheel underniegth. It was on a lever that when you put your foot on it the saw lifted off the floor about 1/2" and then it caught by pushing it slightly to the side. Then you moved the saw by balancing it on the one wheel. Simple, worked great and there was no wheels or parts sticking out in the way as a trip hazzard. That said, I "walk" my anvils all over the shop on their stands. No need for wheels. No need to bolt down the anvil either, they are just captive between the D shaped boards between the legs. If I am going a long distance then I just use a hand truck. . . (or the shop hoist). |
| - guru - Wednesday, 01/05/05 16:58:19 EST |
|
Hahaha Thanks Guru I had not gotten that far down the iForge list yet. I have only read down to number 100 I have 85 more demonstrations left to go. I really like the iForge section and it is one of the main reasons that I joined CSI. I have found 5 demos of items that I have always wanted to forge and of those items 2 of them are ones that kept me thinking of blacksmithing for years (Dragonfly and Humming Bird). The price of CSI is well worth the print, learn and do in a well-put together lesson step plan. Thanks |
| Arron Cissell - Wednesday, 01/05/05 17:14:03 EST |
|
I wrote to you about where to purchase a good cheep Mechanical Press for forming. You told Me that I sould look into a Getting a Rolling mill for putting the same design on long peaces of metal.so I went & Bought One But a 2 Hi Manual Rolling mill 5"X3", Now I want to ask where can I get the dies or spindles Made up for my machine. I Got a Hell of a deal . Thanks to E -bay I have only had one bad out come on e-bay. I have allways Gotten Good deals through the auctions . If you can give me a few Places I would really Be Gratefull. I still ned a Punch Press Bu, I am going to save Up & get a Mechanical 45 ton Bliss C-frame . To do all the Punch work with . Thank you very Much sincerely,yours John M. Carter |
| John M Carter - Wednesday, 01/05/05 19:42:33 EST |
|
John- what you want are called embossing dies, or rolls and they are a pretty specialised machining product. They used to be made with special setups on engraving machines, but nowadays many are made by using a CNC process called EDM. Expensive machines, one of a kind custom products, so high prices. Some simple dies could be made using just a milling machine and a rotary table, so a small local machine shop might be one place to talk to. And you should see if any machine shops near you do EDM. A lot depends on how complicated your designs are. The german company HEBO makes embossing dies and machines to emboss 20 foot lengths of steel, cold, but as I understand it their dies run close to $1000 per pattern. You can check some of their patterns at www.heboe.com. Glaser, www.glaser.de, another german company, also makes machines and dies to do this. Neither stocks machines here in the US, but both have US reps you could talk to. Most american companies that do this kind of work have in-house tool and die departments that make their own dies for them. You might call the Frank Morrow Co., in Rhode Island- www.frankmorrow.com- they are one of the biggest companies left in the US making rolled decorative metal products- they might be able to refer you to a die shop. |
| - Ries - Wednesday, 01/05/05 20:29:55 EST |
|
Aaron, unless your anvil is small, say less than 200#'s,a stand say 1" wider than the base width wise, and 2" length wise should be sufficient. Also you should not need wheels, unless you are going a long distance. I use a 600#er, and rarely move it but I can by tilting and walking it.Also I cut out a 3"H x 3"D section along the floor, leaving 3" at each end for stability. this was done length wise at the base of my block so I could get right up next to the anvil when necessary.I have a solid block, but have seen several made from 2x4's nailed in a square, alternating the end pieces,so that every other layer tied together, also the ends were half lapped.This worked out well.I have a friend who is a hobby smith, his is like this, and he has used it for over ten years. Hope this info. helps you! |
| - Big Ol` Anvil - Wednesday, 01/05/05 21:26:32 EST |
|
I am interested in a 150 lb. Beaudry Champion and would like to know what it weighs overall? Anvil weight? I know from past experiance that estimating old `iron' can be a hit or miss thing. From I can see (guess) I am wondering if the anvil makes the 15 to 1 hammer to anvil rule of thumb? Thanks! |
| - Maurice - Wednesday, 01/05/05 21:40:57 EST |
|
Re: The gender of anvils. The German word is "Amboss", a masculine word. All you language majors feel free to jump in with your own particular specialty. (I think the Spanish word is "yunque", but I'm not positive.) |
| 3dogs - Thursday, 01/06/05 01:33:17 EST |
|
Anvil Gender Monica and our Good Guru; It all depends on wether you are looking at the horn or the hardy hole. In either case, I'd suggest that in winter, you warm the anvil up first. |
| - Pete F - Thursday, 01/06/05 04:14:19 EST |
|
Will a common atmospheric propane forge work properly at 8,000 feet elevation? |
| Ken Scharabok - Thursday, 01/06/05 07:51:21 EST |
|
Hi.....I want to make 4 ice blades for a skateboard. i have been told that a high carbon steel will make the best blades. Can you point me to common high carbon metal products that can be made into ice blades. Thank you Rob |
| Rob Campbell - Thursday, 01/06/05 08:15:01 EST |
|
Ice-Skateboard; Rob: I would think that a medium carbon steel, such as you would find in car leaf-springs, would be more than sufficient for the runners. Enough carbon content to keep them strong and stiff, but not too much so that you have to worry about brittleness (especially in the cold). Tempering would be important too, probably to a "blue" or spring temper. I certainly wouldn't expect all that much abrasion on the edge, and iceskate blades aren't meant to "cut" the ice like a knife blade, but to apply enough pressure over a small enough area to melt the ice. The water provides lubrication, which anables the skate to glide over the ice. You also may want to "rocker" each blade slightly, so that you can maneuver; but I'll leve that part to others who are more familiar with skating as opposed to sittin on the ice with the skates elevated above my head. ;-) Cold and drizzley on the banks of the Potomac, which has yet to freeze up enough to iceskate upon. Visit your National Parks: www.nps.gov Go viking: www.longshipco.org |
| Bruce Blackistone (Atli) - Thursday, 01/06/05 09:27:40 EST |
|
Rob; Why dontcha go to the Goodwill Store and get 2 pair of old skates, and then figure out how to mount them on the wheel trucks so's you can steer the thing. (Grin) |
| 3dogs - Thursday, 01/06/05 09:42:12 EST |
|
('course you'll want to remove the shoe part first) |
| 3dogs - Thursday, 01/06/05 09:44:18 EST |
|
Thanks Bruce....the best spring shop in town is just a few doors down the road...I slapped 4 blades on a cheap skateboard and with a kite on frozen lake I had a blast...now I going to build a propper one...The plans call for a 45� bevel to a point as normal skates use the curve on edge to turn...I am making more of an ice boat type blade... Is sequence as follows....cut to shape....sharpen...then temper or is it shape...temper...sharpen? THANK YOU Rob |
| Rob Campbell - Thursday, 01/06/05 09:45:40 EST |
|
The Spanish "yunque" or anvil is masculine. Ken, No, we all expire up here. This is out of my field, but my shop is at 7,000 feet elevation. I have one little venturi gas forge, and I'm fairly certain that the drilled orifice size changes slightly from that used in lower elevations; then you're OK. Other "experts" will chime in. Rob Campbell, Sharpen last. |
| Frank Turley - Thursday, 01/06/05 10:21:28 EST |
|
Blades: Rob, These type blades are normally dressed with a file and finished with a stone and do not want to be too hard. I would use common mild steel or a very tough heat treatable steel like 4140. Order of operations: 1) Shape, Including drilling and taping holes if need be. Form rough edge but do not sharpen. 2) Harden by heating to a little over non-magnetic and quenching (4140 is oil quench). 3) TEMPER by reheating in the range of 400 to 650 F depending on hardness desired and type of steel. 500 F would leave 4140 very tough and harder than mild steel but soft enough to dress with a file. 4) Finish grinding and sharpening. Heat treating often scales the steel so that many operations are left until last. Note that this sequence can vary a little. IF you protect the part during heat treating so that it is not exposed to air and does not scale then the part can be finished except the final sharpening and polishing. |
| - guru - Thursday, 01/06/05 10:55:42 EST |
|
Anvil Gender: Since the English "anvil" is derivitive from the German 'der Amboß' then the English should also be masculine. You guys with anvil "harems" had better reconsider what you call them unless you fly the other way. |
| - guru - Thursday, 01/06/05 11:01:47 EST |
|
Guru; you can spend all your time beating on male anvils you want; *my* anvils are ladys that I get all too little time playing slap and tickle with! The gender of terms is a bit odd anyway "female" tables? Is your nose male or female and if so what about your SO's? IIRC the term "Harem" was applied to anvil stacks by a MOBster friend of mine due to how folks felt about theirs and it just stuck. I visited the town Yunquera up in the mountains of Spain. It was a fortified pass and probably was named for the battles between the Moors and Visigoths that went on there. Thomas |
| Thomas P - Thursday, 01/06/05 11:31:24 EST |
|
John Odom: Thank you for the information on removing the small piles at the end of the shoes. I used an oxy/ace torch to blow most of it off. Man, that is some hard material!!! I am making hot pan trivets from these by putting on four horseshoe nail legs. Look rather nice and the 'horsey' folks love them. Piel Tool Co. has a book on "100 Things to Make From Horseshoes" (or similar title). Have ordered one. |
| Ken Scharabok - Thursday, 01/06/05 13:14:21 EST |
|
FE and male: I have had a life long connection with "things" that many others apply genders to and it just never made sense to me. Cars, boats, anvils. . inanimate lifeless objects. Femininity is a real attribute of living things. Little girls (as well as most young female animals) ACT feminine well before they consiously understand that they are in any way different than their brothers. You can see it in their eyes at an early age. As much as parents try to avoid treating their daughters stereotypicaly in order to try to give them better opportunities in the world they will find their daughters wanting dresses and playing with dolls and makup. It is nature and a wonderful part of it. So I have a hard time applying feminine traits to things that don't share that spark of nature that is femininity. If anthomorphic traits are to be given anvils then let them be androgenous. Some have their slender waists and their phalic horns. While others have no waist OR horn. . . ;) On the other hand, all the names for groups of things such as a "gaggle of geese" were made-up as an English parlor game in the 16th and 17th century (I think, maybe earlier?) so they are a contrived addition to our vocabulary. In that case a harem of anvils works as well as any. . . |
| - guru - Thursday, 01/06/05 13:26:40 EST |
|
I have a question on building a forge, after much reading in forge design i am going going to go with a gas forge, the question is what to coat the Kaowool with ITC-100 or satinite? Thanks for the site and all the advise Guru. |
| Mike - Thursday, 01/06/05 13:56:04 EST |
|
Satanite and ITC-100: These are two distinctly different materials. Satanite is a refractory mortar made of alumina and silica with binders, color white. ITC-100 is a surface coating containing zirconia and binders, color grey until fired then tan. Satanite is rated for 3200°F and ITC 4000+°F. The ITC-100 is highly IR reflective and more resistant to chemical attack. Satanite is less expensive than ITC-100 but it does not do exactly the same job. However, both are be used to coat Kaowool. We sell the Kaowool and ITC-100 in our on-line store. |
| - guru - Thursday, 01/06/05 15:35:33 EST |
|
Until recent years, "Gender" Was dictionary defined as a technical gramatical term,which Was NOT equivalent to "Sex". It used to be incorect to state that a person's gender Was male or female. It was correct to state that a given WORD was masculine or feminine. The new political correctness destroyed that fine distinction. |
| John Odom - Thursday, 01/06/05 15:35:36 EST |
|
No, if we're going to apply venery (check out: http://www.kith.org/logos/words/upper/V.html ) I would propose "an androgeny of anvils" On the other claw, the Old English word for Dragon in Beowulf is also gender neuter, so amybe we could have an "androgeny of dragons" too. I like my women robust, but a "harem of anvils" is a little hefty for me! As for naming one's tools and weapons, it's an old custom, partly affection, partly animism, partly sympathetic magic. What if Davy Crockett had named his rifle "Old Thedagunda"? Not quite that same as "Old Betsy", who would never let him down. My anvils stand has the Cyrillic lettering for Kuznets, or "The Smith". Whether it applies to the anvil or the user is left ambiguous. ;-) |
| Bruce Blackistone (Atli) - Thursday, 01/06/05 15:36:37 EST |
|
I was hoping someone could help me in finding some information on how to make wood augers. I'm making a set of tools for a historical fort in Louisiana, and I can only find pictures. I do have some expeirence with forging (about 3 yrs.) and have yet to figure it out on my own. These tools need to match 18th century style and be fully functional. They will be used for everyday maintenance an the fort. There are 2 main questions I have 1.Would I be able to get away with mild steel for a wood cutting tool(I'm guessing not)? 2.I can't seem the horizontal cutting edge to properly coinside with the rate of twist in the upper portion of the auger,or the vertical bit....Hoe do I get this right? All the auger seems to do is chip a few pieces at a time it doesn't cut!! I'm at the end of my rope, please any information at all would be GREATLY appreciated. |
| - David - Thursday, 01/06/05 16:04:00 EST |
|
Twist Bits: David, I would have to do some research on 18th century tools but I think the spiral bit is a newer invention OR may be transitional during your period. The big difference is between being factory made and hand made. The two earlier bit styles are the flat bit which looks a lot like a modern flat wood bit, and the spoon bit which looks like a gouge and is sharp on the end and boths sides. The spoon bit works in either direction so it is better for pump drills. I have never seen a REAL hand made twist bit that was old. Mild steel will cut wood but the edge does not hold up long. A medium carbon steel works best (40 to 60 points carbon). It sounds like you are twisting a flat piece and trying to get the shape to continue to the end. This is done by careful hand shaping on the corner of the anvil, or a swage. Alternately you can twist the stock, leave some extra then saw and file the end shape in the portion that has a nice continous twist that is unspoiled from holding it. To create the edge spurs, cutting edge relief and point requires a LOT of careful filing. It helps a LOT to have a commercial bit as a guide. However, note that the commercial bit is not a flat cross section, it has a thick center and edges so the final form will be different than yours. As a demo I used to make faux flat bits. Starting from round I would flatten the stock, then with a chisel cut the point leaving the side sloping downward slightly. One side was cut then the other so that the angle of the chisel cut formed the edge angles. THEN the twist was put in using two pair of tongs. The point was also twisted to make a feed screw. I forged a tapered square shank on the opposite end. The results were not a tool I would try to use but it was impressive AND something folks recognize other than a horseshoe. The old flat bits were wrought iron that was steeled with and end of crucible or blister steel. |
| - guru - Thursday, 01/06/05 16:26:20 EST |
|
sorry to bother ya'll again, but I forgot to ask what a good thickness would be for the flat part of the auger. Would 1/4" inch be too thick? |
| - David - Thursday, 01/06/05 16:32:30 EST |
|
David, it depends on the size of the bit. 1/4 would be about right for 1-3/4" to 2-1/4" as a guess. . . But it also depends on the material. Wrought would need to be heavier than steel and mild steel heavier than medium to high carbon. |
| - guru - Thursday, 01/06/05 16:37:52 EST |
|
David, I don't recall off the top of my head when the auger bit came into use. Diderot's encyclopedia might be a good place to check for it. I do remember one of my reference books mentioning them I will try to sneak off to the stufy tonight and see if it's one of the ones unpacked---ran out of bookcases and still about 80 boxes of books to go! It does require careful filing to get the attack angle to match the hand filed screw and this may differ depending on what type of wood you are using just like you take a deeper cut on a lathe for some materials compared to others. Another problem is that folks may expect your tools to look like the ones in the museum with several hundred years of weathering whereas they should look as if you made them recently! (an on-going problem with LH items) Thomas |
| Thomas P - Thursday, 01/06/05 16:43:49 EST |
|
Thanks everyone for the input on the Anvil Stand. I am working outdoors and everything will be going in and out of a shed instead of my little wood shop. I do not like the idea of having a forge and a wood working shop in the same space. I only have the 110# and I do not mind carrying it around, but when my friends come over they cannot lift it. I was thinking retractable wheels so they could use the equipment with out me being there and so the center post that the anvil is sitting on can connect firmly with the concrete slab where we will be working. |
| Arron Cissell - Thursday, 01/06/05 16:45:24 EST |
|
variable speed belt grinder question: any advantage of variable speed over fixed speed?? thanks |
| - rugg - Thursday, 01/06/05 17:07:55 EST |
|
Wheels on anvils: How about just getting a good 2-wheeler, one with big tires? Mine was $10 from the flea market. I need one anyway to move lots of stuff; buckets of sand, refrigerators, and occasionally my anvil. |
| - MarcG - Thursday, 01/06/05 17:15:46 EST |
|
Bruce: names. I named my flintlock rifle "Lightning" on account of it never strikes twice in the same place. VBG! Actually, if I do my part it has impressive accuracy, a man sized target at 200 yards is duck soup. |
| Ellen - Thursday, 01/06/05 17:32:30 EST |
|
Two things: Aaron Cissell: My forge is in a dual-purpose shop. You just have to be very careful about where the hot stuff goes. Forging steel does not produce sparks, but it does produce little bits of hot stuff that are still capable of causing fires, but not as much as sparks. The forge itself can spark and/or pop bits of coal/charcoal around. You must also have very good freinds indeed if you let them use your shop without you being there! Rugg: Variable speed is nice for grinding things like wood, bone, horn, ivory, and so on. A set of step pulleys can produce this effect. I have a set on my grinder that will produce belt speeds of 850, 1600, and 3200 feet per minute. I have yet to use anything but 1600. That said, the variable-speed units are nice! I just didn't have the extra bucks, so I'm waiting on someone to toss a treadmill so I can scavenge the motor and drive controls. I do sometimes burn the tip of bladelike objects because I forget to slow down the grinder. |
| Alan-L - Thursday, 01/06/05 17:37:22 EST |
|
I build a lot of belt grinders for fellow knifemakers and most of them are used at high speed for grinding all materials. The slow speed is required however if your belt grinder can be converted to the small wheels such as 3/4 diameter. The bearings in these small wheels cannot take the high rpm's produced by the high surface speed of the belts. A 8" dia drive wheel running at 3450 rpm produces a surface speed of over 8000fpm and would turn a 3/4 dia roller at over 36000 rpm = burned out bearing |
| ptpiddler - Thursday, 01/06/05 17:52:40 EST |
|
My friends and myself are old (not age wise) Carnies and we have always borrowed each other�s tools and or equipment. I do not have a problem with them using anything, just not comfortable with someone using the forge to make release pins and someone sanding or staining a new countertop at the same time in the same one car garage. Personally I am much more comfortable with the forge being outside. Don�t like working in the rain anyhow =) Question: Do metal rods need to be stored horizontally or does it really matter? Asking due to a remark from the guy I am planning on buying metal through. I think he is yanking my chain. |
| Arron Cissell - Thursday, 01/06/05 19:13:42 EST |
|
Storing Steel: Arron, If it is not aligned corectly to magnetic Notrh everything you make will warp. . . Hahahaha. . Yeah, He's yanking your chain. Horizontal is safer but you can also make vertical racks or lean stock in the corner. Whatever is convienient works. Horizontal racks just above the feed rolls of your cutoff saw is a near perfect arrangement but that requires at least a 30 foot clear run for steel and stock in the saw. Plate is handier stored in vertical racks rather than lying flat but the racks have to be heavy duty to withstand the plate. This also assumes you have a way to grab and move the plate in and out of your rack. Organizing storage is always a problem. I am afraid I have more steel lying on the ground outside my shop than on racks or indoors. |
| - guru - Thursday, 01/06/05 19:26:10 EST |
|
2 wheeler and anvils---depends on your anvil. We used a 2 wheeler with top pressure in the tires (the 2 wheeler was rated for 600 lbs) to move my fisher---looked like it was on a tracked vehicle the bottom of the tires was *flat*. Used an engine hoist to lift it in the pickup and had to stand on the back end to keep the hoist from nose diving. "She" is a lovely brute! (And doesn't sing). Thomas |
| Thomas P - Thursday, 01/06/05 19:43:55 EST |
|
Storing Steel: Actually, heavy steel stored in a N-S alignment will become magnetized enough that when it is machined, the chips will not fall off. This is not an urban legend or an old wives tale. Steel is ferromagnetic and the earths magnetic field will induce the magnetism in only a few weeks. All of the big pipe yards that store steel pipe for the drilling industry store their pipe E-W. |
| quenchcrack - Thursday, 01/06/05 20:26:28 EST |
|
Ken Scharabok, Re: Your question on high altitude gas forges. Kind of tough to give you an absolute answer on that one, since there is room for a lot of variables. In general, a given volume of propane mixed with the proper ratio of air will give off so many Btu's of heat. As the altitude increases, the amount of oxygen in the air decreases so it takes more air to burn the same amount of gas. i.e., a leaner mixture. That leaner mixture means you're pulling in a lot more cold nitrogen than you would at sea level, so you have more thermal deficiency to overcome. If your forge volume to burner efficiency is marginal at sea level, you won't develop as much heat at higher altitude. Add another burner, and you should be fine. (grin) I lived for years at 5400' elevation and made a few forges and foundries using blown propane burners that worked just fine. I don't recall that I ever tried to forge weld in one of the forges, though. The foundries would develop more than enough heat to melt bronze for casting and the forges were capable of burning up a piece of high carbon steel. On a side note: When you get up much above 10,000' it becomes difficult or impossible to use gas-fed propane backpacking stoves, I know. You have to use the kind that use liquid feed. Of course, the boiling point of water is lowered enough that you can't cook much without a pressure cooker, either. |
| vicopper - Thursday, 01/06/05 20:30:47 EST |
|
Arron: Fair enough! I woudn't do wood finishing in the same garage someone was forging in, either. My shop is a two-car garage, BTW. |
| Alan-L - Thursday, 01/06/05 20:55:38 EST |
|
Re: N-S Alignment. That's also why steel mills always orient their rolling mills East-West. Bob |
| BobinMich - Thursday, 01/06/05 23:40:59 EST |
|
vicopper: Then I take it a two-burner atmospher propane forge should be OK at 8,000' elevation as long as forge welding isn't a requirement? |
| Ken Scharabok - Friday, 01/07/05 00:17:15 EST |
|
I'm part of a role-playing group. Assuming halfway decent conditions, about how long using medieval techniques only would it take to make a sword of average quality? I'm thinking at least five days for a single blade(what my SCA sources tell me), but a few guys insist it can be done in a single day. |
| Frank Rozum - Friday, 01/07/05 01:09:11 EST |
|
The pressure available from a propane bottle is dependent on the VAPOR PRESSURE of the "propane". The vapor pressure of the "propane" is in direct relation to the TEMPERATURE OF THE LIQUID "PROPANE" in the bottle. As well as the actual mix of gasses in the "propane". Not all "LP gas" or "propane" are the same. There are other gasses mixed in that can affect the vapor pressure and thus the pressure you can get out AT A GIVEN TEMPERATURE OF THE LIQUID PROPANE IN THE BOTTLE. Propylene, Butanes, Methane, etc. can be mixed with propane in LPG. (Liquid Petroleum Gas) The liquid propane in the bottle cools because you are using some in gas form and evaporation of the liquid propane to gas requires heat energy. The heat energy for evaporation in a tank comes from the liquid propane. As the propane cools from your using some, the temperature is lowered and as the temperature is lowered, less can evaporate. Unless.... the tank wall is warm and replaces the heat in the liquid that is being "used" when evaporating the liquid to gas. Small bottles cool down faster for a given flow rate because they cannot add heat to the cooled liquid as well as a bigger bottle. Less surface area in contact with the liquid. When the LIQUID IN THE TANK is 110 degrees F, the pressure in the tank will be about 200 psig. When the liquid is 60 F the pressure is 90 psig. When the liquid is 0 degrees, you get about 20 psi and when the liquid is about 40 degrees below zero, you will get NO pressure. So if you want pressure, you need to keep the liquid in the tank warm. By warming the tank safely. Or using a bigger tank that is not empty as has been said. Tipping or shaking a propane tank that is not full puts more of the liquid in contact with the tank wall and warms the liquid some, thus giving higher vapor pressure. DO NOT tip a tank over and get liquid propane in the line. If the liquid does not vaporize before it gets to the burner orifice, you will have BIG FLAME like VIC said. Some new tank valves are more flow restrictive. They are not pressure restrictive but the pressure at the valve outlet will go down if you try to use too much through the valve. This is PRESSURE DROP DUE TO FLOW through the valve. Pressure available to the burner is only controlled by the temperature of the liquid in the tank and the pressure drop due to flow between the gas in the tank and the burner. If it says made in China on the valve, it is likely to give less flow before pressure drops off. If the valve says Rego or Sherwood, it is more likely to give higher flow. This is not an exact rule, but is as good as you are going to get unless you know the btu per hour rating of the valve at a given outlet pressure. As John Odom said, Regulators are sized by btu's per hour also. Just like the tank valves. The pressure output is not the same as flow output. You can have a very small flow capacity regulator that puts out high pressure as has been said. Outlet pressure will drop below the setting if you exceed the flow capacity of the valve. Raising the pressure output on your regulator gives you more flow since your gas piping between the regulator and the burner has a given pressure drop for a given flow rate. Raising the pressure at the inlet of your piping allows more gas FLOW to go through your piping to the burner and still give enough pressure at the burner for the burner to function. If th eregulator outlet gage says 20 psig, you DO NOT have 20 psig at the burner if the burner is running. You have 20 psig minus the pressure drop in your piping. The confusion generated by using pressure readings to control or define FLOW is exactly why I continue to recommend a needle valve FLOW CONTROL instead of a regulator. In addition, neglecting chemical energy, the only energy available to mix the gas and air in a non blower burner is pressure energy. The pressure energy in the fuel gas. Using a regulator to reduce the pressure available to the burner reduces the energy available to mix the gas and air. So using a regulator far upstream of your burner is shooting yourself in the foot. But it is what you have been told and what is "easier". Using a regulator is NOT better. For those not paying attention to their forge, a regulator and lower gas pressure is marginally safer. Less pressure in a given piping system neans less gas flow in the event of a leak. A regulator does reduce the pressure that is at it's inlet to a preset pressure at it's outlet. Assuming of course that the inlet pressure available is above the outlet setpoint. However, a regulator should be thought of as an AUTOMATIC FLOW CONTROL VALVE. The handle sets a spring pressure. That spring pressure acts on a diaphragm. On the other side of the diaphragm is the outlet gas pressure. The valve is connected to the diaphragm. When the outlet pressure drops, because you are flowing more gas, the spring pushes more on the diaphragm since the gas is not balancing it. When the spring pushes the diaphragm, the valve opens more and more gas flows which raises the pressure in the outlet which raises the pressure on the diaphragm which then closes the valve if the outlet pressure setting is met. A regulator is a flow control device that robs pressure energy from the gas. That pressure energy can be used by a good non blower burner to mix the gas and air better. Thus allowing your forge to run hotter, better, with less scaling and more efficiently. You can achieve the same function as a regulator by using a properly sized and designed hand valve and not lose the pressure energy. AND it's easier for a one or two burner forge. Everyone who brags about how low a pressure their burner can run at is doing a disservice. They should instead be saying how low a GAS FLOW RATE their burner runs smoothly at. There would be far less confusion if Flow instead of pressure were understood. Gas has energy content per unit volume. So many BTU's per cubic foot. Not "so many BTU's per PSI". John Odom deserves mention in teaching me some of this propane gas mix info in the past. The more you learn, the better you can do. But if this is not making sense, PLEASE Stick with what others have told you and you are familiar with. I sure hope this helps somebody because it took long enough to type! Grin. |
| - Tony - Friday, 01/07/05 01:13:40 EST |
|
Guru, Thank you for answering my earlier question on swirls and how to make them. I made my own jig, and made the swirl I wanted, but it has some flex to it, being as it looks like a question mark with a couple of extra swirls in it. I wanted to make it the back of a chair, and my question is if I heat it up and then quench it, would that harden it enough to use for a chair back? If not, how can I make it more rigid? Thank you Alan |
| Alan - Friday, 01/07/05 01:25:02 EST |
|
Ken: The Sandia forge was designed to work at higher altitude Rob G said. Frank: It depends on the ability of the smith, the quality and availability of the tools and equiptment and the nature of the materials...also, what era? What context? Any of these factors could cause the time to vary wildly. I could forge a blade to shape with the right equiptment in a day, but that's the quick part of the job. 5 days with modest equiptment and a great deal of skill might get you a basic blade, then it has to be heat treated, ground to shape and the furnature has to be made before you can begin finishing. Thanks Tony: Nice clear run down, I'll abandon my forge regulator and dig out a needle valve. Alan: In theory, the rate of deflection is something you are stuck with. To stiffen it you'd need to use heavier steel, or more of it, or tie the elements together more rigidly, or add triangulating elements.....or thousands of tiny wires all twisted tightly together around your scrolls ( they're called scrolls in the venacular) |
| - Pete F - Friday, 01/07/05 03:59:50 EST |
|
Sword Manufacture; Frank: It depends. It depends on the period, on the size and resources of the shop, on the country and size and style of the sword. You may want to read some of our sword articles, especially the one on the history and development of the sword, in the Anvilfire Armoury (check the pull-down menu on the upper right). Let�s go to extremes. If we suppose an early medieval period, and the swordsmith going from charcoal and iron ore to a completed weapon (which would have been extremely rare) with an elaborate pattern welded blade, and working with an apprentice to pump the bellows, hold stuff and maybe swing a small sledge, than it could take weeks or maybe even more. If, on the other claw, we�re talking about a high medieval, well manned shop, starting with steel bars from the hammer-mill down the road, and with the hilt smith and the scabbard maker next door, then the production rate might be several per day, or even more. So both answers are right, it would depend on the circumstances of time, place, resources and talent. The sun�s is just breaking through on the banks of the Potomac. Visit your National Parks: www.nps.gov Go viking: www.longshipco.org |
| Bruce Blackistone (Atli) - Friday, 01/07/05 09:13:03 EST |
|
Scrolls in Chair: Alan, NO! do not quench furniture components to stiffen. This will also make them brittle. If one breaks the brittle fracture is often very sharp and someone could be injured. You want soft and flexible. The solution is design or weight of material. If you want a very simple open design then you are going to need to use heavier material. The option is to use more pieces connected to each other producing diagonals and braces. Often light open furniture is springy, it flexes when someone sits in it. This is common for some organic materials as well as steel. The important thing is that it is not uncomportably springy (in that it feels like it is going to fail). Always remember that chairs need to support TWO average adults or one heavy adult (about 300-350 pounds). You may be surprised after assembling the pieces you have now at how stiff they will be assembled where individualy they seem too weak. Design of this type is often trial and error so have patience, build one and test. |
| - guru - Friday, 01/07/05 10:49:17 EST |
|
NOTE TO ALL: I will be changing my e-mail address in the next week or so. IF mail to me bounces then use our contact form (bottom of the menu). My SPAM level is up to some 350-400 pieces a day. This costs me at LEAST an hour a day. The other day I realized I had a cramp in my mouse button finger from clicking delete, delete, delete. . . Who would have thought that the 1960's comic routine of George Jetson having his button finger bandaged from over work would be come real life in the 21st century! The problem has become so accute that I know I have filtered or deleted honest correspondance (I reply to ALL of my mail). And even with several levels of virus filters I still get a dozen a day (proving the worthlessness of filters). They DO help catching about 80%. I brought much of this on myself by putting my address on almost every page of anvilfire. If you have your address in the open on a web page you do not even need to correspond with someone to be sent virus mail. I have removed or replaced my address on many pages but it is a monumental task. I am getting ready to take a trip to Costa Rica for a couple weeks and there is no way I can continue to handle nearly 3,000 pieces of spam mail a week while traveling. So, if future mail to me bounces, then use the contact form. Also note that I will be using numerous replacable (temporary addresses) over time. So the contact form will always be the best first contact. Happy New Year. . . |
| - guru - Friday, 01/07/05 11:18:06 EST |
|
thanks for the belt grinder replies. tony, excellent piece on gasses. what is your opinion of the following: at 10K elevation, the percentage of O2 in air is the same as at sea level, but the partial pressure of O2 is less. an atmospheric forge will not come up to temp like one at sea level without a forced air system. gas flow, i think, would not be significantly different. have you thought of using a sensor that would switch a valve to increase flow when stock is in the forge and decrease to a baseline level, keeping the forge hot but saving fuel? you can do this manually, but it would be slick if it would do it automatically. the sensor could be positioned on the outside of the forge and should not see very much heat. a garage door sensor?? thanks |
| - rugg - Friday, 01/07/05 11:40:43 EST |
|
On quenching chair parts: note also that the alloy used is a factor some mild steel alloys cannot be hardened by a simple water quench there is not enough carbon in them to harden. If you are using A36 it may differ in it's properties from one piece to the next or even from one end to the other. It's spec'd by yield strength and so content can be variable. One method of "hardening" would be to cold hammer the parts to work harden them---again what will you do if this promotes catastrophic failure? Sword making: as has been pointed out---in medieval times you don't get a sword made by *1* person or even *1* shop there are a variety of seperate crafts involved in making a sword and they are *specialized* crafts. The local village smiths did not make swords and a noble rich enough to afford a sword would expect it to be imported from quite a distance---many viking swords were actually forged by the Franks in Europe! Unfortunately so much fantasy in books and moovies have people wander into a small town and go to a local appliance repair man with a backback of rocks and ask him to take the rocks and make a computer from them...and 3 days later a mini-cray is sitting on the counter. David, "Country Blacksmithing" by Charles McRaven has a brief discussion on making auger bits. "Practical Blacksmithing" a late 19th century book has a couple of methods of replacing the lead screw when it breaks off but no more info. I have a book called "The Carpenter's Toolchest" (IIRC) that is a tertiary if not quaternary source of info on woodworking tooks that place the auger bit as an outgrowth of the gimlet and sets the early ones in Germany in the 1600's IIRC. I don't have a good set of books on Williamsburg; but I would suggest using some of their *recent* research as the best place to start. I had a quick skim through Moxon's "Mechanicks Exercises" but the smithing part didn't mention augers in what I skimmed---have to review the woodworking part tonight. It's possible that there is a mix of spoonbits, gimlets and augers at that time and location and woodworking "tradition" may control what was used there. If there is any French background I would suggest Diderot's encyclopedia---the full set not the dover subset as a great resource. Thomas |
| Thomas P - Friday, 01/07/05 11:48:51 EST |
|
HIGH ALTITUDE FORGE: (From a Y2k post) The ABANA recuperative gas forge plans from the SANDIA Labs in New Mexico were designed to make up for the 5% heat loss per 1,000 feet of altitude that a gas forge suffers. They achieved measured temperatures of 2300-2600�F (1315�C). This is done by preheating the intake air to aprox 800-1000�F (480�C) and thouroughly mixing the gas/air.Since then many of the new burners are much more efficient and even though the 5% loss per thousand feet is still there it is not so critical. Also note that the Asheville and Flagstaff ABANA conferences were both held at high atiltudes and forge welding was not an extreme issue. However, the Daryl Meier demo was on low temperature forge welding. . . As to Tony's comments about using needle valves they carry it to the extreme in Europe and some primitive places by not using a regulator at all and just using a needle valve OR in the most primitive case the cylinder valve (NOT RECCOMENDED). |
| - guru - Friday, 01/07/05 12:00:18 EST |
|
Hand hammer design: I'm going to try my hand at making a hammer. The problem is the engineer in me tends to over-analyze things. So my questions is - Is there some rule of thumb to the size of the face? This is a normal hammer face, not any special-purpose or pein. When I get into over-analysis mode I tend to look at outrageous limits to decide if a practical in-between solution is best. In this case, let's say a 3-lb hammer, one limit would be if I used 3lbs of 1/2in plate. That would give a really large face. And even if I were hammering on steel that big (this is a limit, remember), that size is obviously useless. The other limit would be a real tiny, say a 1/4in, face. That punches holes and doesn't move metal. So somewhere in-between is right. So, for a general use 3-lb hammer, what is the optimum area of the face? Can it actually be reduced to a simple PSI ratio of hammer weight to face area? That seems logical to me. But since I count bits, bytes, and nano-seconds for a living, that might not apply all that well to hammer design. Thanks. --Marc |
| - MarcG - Friday, 01/07/05 12:03:49 EST |
|
Time to make a SWORD again. . At the Asheville ABANA conference in 1998 Scott Lankton made a Medieval sword as a demo in the time available (See our NEWS vol 2 p.8). Most of the time went into forging starting from commercialy available steel which is infinitely better than what was available during Medieval times. AND he was using a 300 pound Chambersburg Utility hammer which is about 10 times faster than any water powered trip hammer ever built, much less available to a Medieval swordsmith. However, the forging WAS historicaly sped up by the use of many strikers. . . up to 15 at one time on a large piece but generaly just a couple. However, in order to make the sword in 3 days he spent long hours at night grinding using modern high speed grinding equipment and abrasives, AGAIN infinitely better than what was available during Medieval times. And THIS is the crux to the time question. Hand forging a blade CAN be done in a day or two providing an experianced smith and strikers. But grinding with the soft sandstone abrasives was SLOW SLOW SLOW. In a village shop the wheels would be turned by hand. In a big city shop by water power. But in both cases the natural abrasives are very slow cutting. Grinding time is also related to design and technique. If all that is being done is cleaning up a well finished blade it may have only taken a few days. BUT if the job was to produce a pattern welded blade (fairly common in Medieval times) the amount of stock to remove in the various steps is HUGE. The final blade may only have 10% of the original material, the rest all turned to dust. If you have never done any grinding using a foot powered sandstone grinder you have no clue how SLOW this process is. Scraping was often used because it was faster than than grinding, but not by much. The problem with scraping is that it is done 100% by the man holding the scraper. The grinder can be powered by a slave, apprentice or mechanical means (animal, wind or water power). And when all this grinding was done the blade still required etching and or engraving and fitting the hilt. I had a letter yesterday from a fellow that just did not get our sword making FAQ and insisted that sword making was a necessary skill to bring back civilization from some unknown disaster. I pointed out that the FILE CUTTER was much more important because the sword smith and many other crafts people could not do their jobs with him. I suspect many smiths made files at one time but this and saw making have been specialized skills from the beginning of the metalworking era. |
| - guru - Friday, 01/07/05 12:29:06 EST |
|
Engineering Hammer Shapes: Marc, You left out slenderness ratios and stability factors. . . IF you talk to many of the hammer experts they will have a very stong logic for why their shape is better than all others. And this ranges from the Old European and Japanese style hammers with all the mass in front of the handle to the Czech/Hofi style where all the mass is very close to the handle with central balance. I don't believe ANY of it! The Czech/Hofi school says theirs is more stable but the Japanese/blademaker school says theirs is better. Some call the Czech/Hofi hammer a knuckle buster and the Japanese style IS the best for many classes of work needing high clearance. Polar oposites but both sworn to be the best. I believe in the thousands of years of hammer making that resulted in our slightly front heavy common smithing hammer. These all have roughly the same proportions even when the shape is that of a German, American/English, French or Swedish. I do not know the mass to area (PSI) ratio but the proportions are all similar. Where the REAL functional difference comes into play is the shape of the face. Square faced hammers let you work to edges better and into corners. Round face hammers concentrate more energy into the smaller area and are less prone to marking the work. Both can be dressed with a wide range of crown to the face and corner radius. THIS is where the performance differences really lie. I find it best not to deviate from traditional forms unless you have a really good reason based on experiance. Tool making has a VERY long history of form following function and slow deliberate development. The worst tools today are those designed by people with no experiance or understanding WHY things are made they way they are. To answer your question mathematicaly would require applying your factors to the empirical by measuring every hammer style and comparing the differences. You would start with PSI but then you need to factor in CG, crown and other aspects of the design. Somewhere in there would be the norm and the limits within a use contraint. Maybe there IS a perfect hammer. . . |
| - guru - Friday, 01/07/05 12:59:56 EST |
|
Any hammer I don't hit my thumb with is a good hammer. Grin! |
| Ellen - Friday, 01/07/05 13:46:34 EST |
|
My current "main" hammer has quite a lot of face but it is rockered/crowned so that face only comes into play in smaller ammounts and as a hit is applied as the metal in the center gets deformed out. I do switch hammers sometimes as the 'type" of hammer blow needed is changed---squish vs nudge. Shoot sometimes I used wooden mallets on hot steel. Thomas |
| Thomas P - Friday, 01/07/05 14:23:47 EST |
|
Ellen, I tell people that when using a hammer and chisel the LEFT hand of a righthanded person is doing the picky skilled work guiding the chisel, but the RIGHT hand is doing the more important job by NOT HITTING the other hand. . . I tell newbies that your hammer hand should be able to find and hit a chisel in your other hand with your eyes closed or behind your back. Try it, practice it. Then LOOK at the work, not the end of the chisel! |
| - guru - Friday, 01/07/05 14:55:35 EST |
|
Dear Guru, I'm a novice b/smith in southern Ontario, Canada. I recently finished a propane forge, ITC 100, T-Rex burner and all. Briefly, 2 questions: (1) is oxidation and scale identified on the forging piece almost immediately by what looks like rust? and (2) if this is oxidation (because I don't know what else it could be unless maybe it's too much propane), why do I have so much blue flame coming from the chamber door and exhaust end? Thankyou, Ken |
| Ken Millson - Friday, 01/07/05 15:02:28 EST |
|
Ken, You need to refer to your T-Rex literature or his web site and properly adjust the burner. It sounds like you have things cranked up too much. Scale, is blue-black iron oxide. It normally flakes off while forging. A thin permanent layer is called "tight" scale. HEAVY scale flakes off without forging, it just falls off. This is the result of soaking in the forge too long. The bright red oxide is pure iron oxide that resulted from the reduction of regular rust or from scale dust. This is commonly seen in small patches on almost any work heated in a gas forge. |
| - guru - Friday, 01/07/05 15:27:15 EST |
|
Last night I was centerpunching some marks for drilling. I was in a bit of a rush and grabbed the firsthammer at hand, which happened to be a medium ball peen. It wasn't until I had finished punching all but the last center that I happened to look and noticed that I was using the peen end to hit the punch. Practice does pay off, apparently. |
| vicopper - Friday, 01/07/05 15:29:57 EST |
|
I was carving a dragon's head at a demo one and noticed that folks were looking at me funny only to find out that I was using the crosspein to drive the 3/8" chisel---never looking at the chisel butt or the hammer but concentration on what the working end was doing. Practice Practice practice. Thomas |
| Thomas P - Friday, 01/07/05 15:37:36 EST |
|
MarcG, In hand forging a "Western hammer", one often uses square-section stock for practical reasons. It sits flat on the anvil, and it's easier to forepunch and backpunch the eye that if one uses round-section stock. I've made hammers out of round stock, but the work needs to go go in a bottom swage to help prevent distortion and it's a little harder to gauge where to backpunch. Forging the peen taper is a little easier to judge on square stock. Traditionally, for a hand hammer, it seems that the old timers often used 1 1/2" or 1 5/8" square, ballpark. In the U.S., we have inherited a style of cross peen hammer, in the main, because of our way of hand forging the hammer head. Later, when hammers were drop forged, the manufacturers used pretty much the same idea or style. In addition, some of our hammer design comes from the side cheeks which are made wider than the face in some instances, especially on farriers' rounding hammers. Rounding hammer cheeks are a rough round or a true round to give more length of "grab" for the wooden haft going through the eye. Ball peen hammers are like this, as well. The same idea of extra eye length was and is used on claw hammers which have the "adze eye", apparently thought up by a New York state tool maker, David Maydole, in the 1840's. I'm guessing that some of hammer design was pragmatic because of ease of forging, and some of it was because it was good enough for grandpaw. |
| Frank Turley - Friday, 01/07/05 15:49:06 EST |
|
Thomas: Since you were doing it at a demonstration you probably have several folks who are convinced that the secret to making dragons' heads is to use the cross peen on the chisel. I can just imagine them thinkin: "Hmmmm; that would help concentrate the force,and the radius of the peen against the softer chisel head may keep it from slipping..." After all, who are you going to believe; your own common sense or the expert at the demo? ;-) As I remember, Charles McRaven in his out-of-print book The Country Blacksmith, avocates a double faced hammer for welding so you don't waste time flipping it about of the wrong face if pointed at the weld. He was speaking from experience. (Yes, I know we should all have our tools ready at hand and properly oriented for the weld; but we should also write a lot of thank-you notes, too. :-) |
| Bruce Blackistone (Atli) - Friday, 01/07/05 16:57:00 EST |
|
"...if the wrong face is pointed at the weld..." PTP! |
| Bruce Blackistone (Atli) - Friday, 01/07/05 16:59:09 EST |
|
I have a question about upsetting tool steel. I want to upset a piece of 1" tool steel a few inches from the end. I know you can use local cooling with mild steel to define the area to be upset. Is there a similar procedure that can be used with tool steel without damaging the metal? |
| Blackhammer - Friday, 01/07/05 17:06:02 EST |
|
Thanks Guru. Actually, my first experiment with my new forge was with a rusty railroad spike. ken |
| Ken Millson - Friday, 01/07/05 17:12:45 EST |
|
I am inquiring about the use of a Shaklee product used in blacksmithing. I was told that some blacksmiths use something Shaklee sells in their trade. My source didn't know which product it was. Just a curious Shaklee rep. |
| Paul - Friday, 01/07/05 17:12:50 EST |
|
Paul, what you're describing is Shaklee Basic "I". It is used by some blacksmiths in a recipe called "Superquench". You can find detailed information about on this website in the FAQ section. Look under "Quenchants" and you will find a recipe there. |
| - Blackhammer - Friday, 01/07/05 17:33:40 EST |
|
Upsetting: Blackhammer, you are right to question this. Water quenching the end of a piece of tool steel at forging heat to localize the heat may crack it. To do what you are attempting is difficult. In heavy industrial practice the part is gripped in dies that cool and contain the steel while the upset is being made. In light industrial practice (and the small shop) it is easier to start with a big piece and forge DOWN the smaller areas rather than upset. One thing that might work for you is to draw down slightly to fit a bolster plate or swage block THEN upset using the shoulder you have created. |
| - guru - Friday, 01/07/05 17:53:34 EST |
|
Bruce I have designed a *4* faced hammer to deal with that very problem that I will trade you for some swampland in NM; of course next year I will introduce my 5 faced hammer to be followed bu the *6* faced hammer USW... Must be a Friday Hope it's sunny enough tomorrow to work in the shop. Thomas |
| Thomas P - Friday, 01/07/05 18:25:51 EST |
|
Thomas P. Beat your many faced hammer, as I have a forging that is an unbreakable handle, all face hammer! :) Its an axle forging that only got three of the five hits in the upsetter. A 2" dia. shaft with a 8" biscuit on the end. Just haven't figured what to do with a neat shape. Weighs about 30# |
| ptree - Friday, 01/07/05 18:54:27 EST |
|
Upsetting steel: What I usually do is just yell at it, or say something nasty about is ore-igen! :] |
| Bob H - Friday, 01/07/05 19:00:56 EST |
|
Bob I find that if you let things cool off a bit you can usually iron things out... Thomas |
| Thomas P - Friday, 01/07/05 19:09:12 EST |
|
hey guys i just got my first anvil (woohooo!!!!!!!) but i have a question about it. using the english wieght its should be about 200lb or so( it reads 148) but the guy who sold it to me said that it was about 150. now mind you i dont care ether way i was just curious. also if it helps ita a hay buddie(sp?). thanks for the help. |
| - John S - Friday, 01/07/05 20:05:24 EST |
|
Wrong face and welding etc. This is why my hammer handle is slightly modified so that just by touch I know when end is about to hit. I often during forging will rotate from pien to face and back several times in one heat. |
| Ralph - Friday, 01/07/05 20:10:04 EST |
|
John S, Hay-Budden anvils, manufactured in Brooklyn, NY, are marked in pounds actual weight, NOT in the English system of hundredweights. So, your anvil should weigh 148 pounds just like it says. Hay-Buddens are reputed to be about the best American anvil ever made, so treat it with care and use it a lot. |
| vicopper - Friday, 01/07/05 20:15:30 EST |
|
Just stick a 3" ball bearing on a stick and use that. No faces to align, no corners to mar things, no problem with magnetic polarity. What more could you ask of a hamnmer than all that? Patent pending. (grin) |
| vicopper - Friday, 01/07/05 20:17:36 EST |
|
Vicopper, too late, see post above about all face hammer. No patents for you today :) |
| ptree - Friday, 01/07/05 20:45:51 EST |
|
Storing steel. We store maybe 50 million pounds of steel, outside, horizontal, with 80% located in N-S orientation. Have not heard of any magnetic problems. 3 of 9 upsetters are in a N-S orientation, and no reports of any problems over many years. On the other hand, at my previous shop we stored forge steel in N-S orientation, no problems from that forging stock, yet much stock from the east west orientated piles were magnetic enough to require demag prior to machining. I suspect it was magnetic from the mill. |
| ptree - Friday, 01/07/05 20:53:00 EST |
|
Rugg, I'd have to dig out the books to look at the partial pressure thing. As far as the sensor goes, I'm sure it would work. Personally, I'm a simple guy looking for low maintenance solutions. I have no regulator feeding my forges. Just a needle valve right at the burner inlet. Within 3 inches of the MIG tip orifice. From high fire rate to very low fire rate is about a half turn on the needle valve. Since it is so simple, I wouldn't mess with a sensor. Electrons and I don't get along well. Grin. The needle valves I have found to give best control are Alkon brand JN1. 1/8" pipe size. JF1 will also work, but have a reverse free flow check built in that you do not need. I have tried many others and the Alkon's give the best control by far. Some needle valves do not work at all on the low end. The Alkons have a multi angle needle. This gives the good control. A single angle needle end will not be good. There may be others out there that work as well or better, but I have not found them. Price Engineering is a distributor and I payed $14 each the last time I bought some. See (www.alkoncorp.com/html/flow_controls_3.html) Using a needle valve does eliminate the safety issue that can occur when a regulator diaphragm fails. The diaphragms are frequently reinforced rubber and eventually get hard and can crack. A cracked diaphragm can let lots of propane out of the regulator vent hole. You may never know it until it collects in a low spot and it blows up. This is why you should ALWAYS turn off the propane at the tank valve when you walk away. No regulator, less parts to fail. As the Guru said, using the tank valve as a flow control is not recommended. For safety reasons as well as the fact that it is not a good flow control. If you had a huge burner, it may be usable. But still not a good idea. Again, using a needle valve does result in higher pressure propane at the burner and in the line to it. Leaving a forge unattended is not a good idea any time and with higher pressure propane in the line, it is less of a good idea. To counteract the minor pressure safety issue, I only open the tank valve as far as I have to to get enough flow to do the job. In that case, if there is a line break, the gas flow is limited somewhat. I also use wire braid hydraulic hose THAT I KNOW HAS A LINER COMPATIBLE WITH PROPANE for the runs that are not copper. The hydraulic hose is far safer around hot iron than typical propane hose and costs no more. Others have mentioned using flexible metallic conduit around the propane hose. This is a better idea than not using it, but does hide the condition of the propane hose. I have no more than 4 feet of flexible propane line. Just enough to allow turning the forge 90 degrees for different work. The rest is hard or soft copper and only copper close to the hot forge and it's dragon breath. |
| - Tony - Friday, 01/07/05 21:05:25 EST |
|
Magnetic Storage: ptree, when you heat it to forging temperature, you take it over the curie temperature which will destroy the magnetic domains. When the steel cools, the Magnetic Domains are oriented mostly in a random patterns which results in no discernable magnetism. Also, it is probably a time-related function and if you turn the inventory 4 times per year, it may not have time to become magnetic. Or, your storage area could be in a space-time warp....be very careful. |
| quenchcrack - Friday, 01/07/05 21:43:10 EST |
|
I found a nice little primer on why to keep propane tanks outside: http://www.newenglandblacksmiths.org/Burner_Workshop.html |
| habu - Friday, 01/07/05 23:12:29 EST |
|
For upsetting you want a short heat, if using coal this isn't too hard with a little practice (and the reason they had big coke forges, as well as gas forges in the big industrial shops) but in a gas forge is a little tougher. Making a hinged bolstering clamp to use in the post vice is a good idea. For riveting and upseting with a vice you want as much surface area being clamped as you can get, round is easy, square stock should be done on a diagonal, so that all four faces are bearing. On certain tool steels, especially in smaller sizes any clamping will result in a "quench" because it will draw the heat so quickly, and I would thermocycle the tool steel to try and normalize the 'quenched' area you put in the vice. After you have your area upset, heat up to a working temp, and then allow to air cool till no color shows, then repeat with a little soak time, not enough to get too much scaling or grain growth, but the air cooling should refine the grain somewhat, or that is what the knifemakers like to do:-) |
| Fionnbharr - Saturday, 01/08/05 00:35:17 EST |
|
John S: I have a Hay Budden 200# anvil, and it is a treasure. Postman says it was the first factory American anvil to equal the quality of the Peter Wright and other top european brands. Lock it up at night! |
| Ellen - Saturday, 01/08/05 01:06:36 EST |
|
Peening a forge weld: I'm working on my forge welds, and can get them to stick well enough, but when I test the weld, it "peels" apart. When I examine the steel, I find that its a solid gray, and rough in a crystalline kind of way. This was after peening the weld until it cooled to a dark weld. How do you get a weld to be close to the same strength as that of rolled stock from whence it came? |
| - Tom T - Saturday, 01/08/05 04:08:41 EST |
|
Tony, just curious -- what kind of hydraulic hose is that (brand, model?), where'd ya get it, and how do you know it's propane compatible (besides experience)? I wouldn't mind getting some of that to replace my regular fuel gas hose. |
| T. Gold - Saturday, 01/08/05 04:45:43 EST |
|
One of the reasons I thought there was some rule of thumb to face size was after looking at a picture of a Czech-style, or Uri Hofi-style hammer. They have that bulge in the middle to get the mass in there, but the face is quite a bit narrower. I guess just measuring one of my hammers is plenty fine. I probably will be stuck with round to start off with, though. But I think I can figure out how to make it square :-) I don't know of any "found" steel good enough for a hammer that comes in square. Without a power hammer, this project may cost me a pizza to have my son come over. But a four-faced hammer, huh? I could have a flat face for one, cross-pein on another, straight pein, then rounding. And maybe a twisting wrench pointing out the top, a bending fork out the bottom, and a rasp on the side. The Swiss Army Hammer! |
| - MarcG - Saturday, 01/08/05 09:33:04 EST |
|
Tom T: Don't peen forge welds! If you have to work them after you make them, do so at a welding heat or nearly so. Continuing to beat on a forge weld as the temperature drops into red, especially on the first welding series, will almost always make it do exactly what you describe. |
| Alan-L - Saturday, 01/08/05 09:50:49 EST |
|
Rule of Thumb: MarcG, The fact that they are all proportionaly alike DOES indicate a rule could be developed, or has existed, however I have never seen such a rule. These are the kinds of piciune data that engineers in manufacturing plants collect or research (as I suggested), then they use to design dies for in-house use. Ocassionaly these kinds of things are published such as the tongs dimensions chart from Machinery's Handbook (see our review), but most of the time the data or rule dies with the engineer OR is considered propriatary and not released. Over the years as a machine designer building nuclear shielded machines I have developed dozens of such "rules of thumb" and special formulaes specific to jobs I have done. But I can no longer find the majority of it and most is hiding on my now dead old PC. Nor would many people be interested in it. Many were simple discoveries that anyone with a mathematical mind might see instantaly. One such thing I worked on for a long time was the optimum ratio of imbalance for a device that rotated with and without a load on one side. It turns out the it is EQUAL. The best you can do is have the same imbalance in either direction. This breaks down to a 2:1 ratio or 1/3 - 2/3. For some it would be simple algebra but I started by trial and error and made a lot of mistakes before I found that rule. Is it worth publishing? No. But it was an important design rule for me for about a decade. The best place to gather this information to formulate rules are the better catalogs with full dimensions. These are mostly older catalogs since modern ones do not give as many details. The only place I can think of that has hammer dimensions on-line is our repoussetools.com. I may have books or catalogs with the same but cannot think of one specificly. |
| - guru - Saturday, 01/08/05 13:17:47 EST |
|
T.Gold, what I am using is unbranded general purpose medium pressure hydraulic hose from the local farm supply. This particular store has used many different hose suppliers in the past. The SAE(Society of Automotive Engineers) spec is 100R1-A or 100R1-AT. I typically use 1/4" ID. Use the same ID that works for you now or larger. Since it is general purpose hydraulic hose, I am quite certain it has a nitrile liner. Nitrile is compatible with LPG. You would not want to use hydraulic hose that is for other than petroleum oil hydraulic service. There are special hoses with different liner elastomers for fire resistant and other kinds of hydraulic fluids. Rubber is a generic term and is typically used to describe "natural rubber" now. Elastomer(Elastic polymer) is a better term to use. There are many different elastomers for different applications. Chemical compatibility is a primary factor when selecting an elastomer. I do hydraulics among other things for a living. Evaluating and selecting seals and seal materials is a daily task. Elastomer selection CAN be VERY tricky. Actual testing in actual operating conditions is the ONLY sure way to prove you have a good combination. There are well over 100 different compounds just in the "nitrile" family. Buna-N is another term for nitrile. Neoprene is not the same as nitrile. Nor is Viton(fluoroelastomer) or EPDM(Ethylene propylene diene monomer) or Butyl, or Silicone, or Teflon, or Vinyl, etc. I may have spelled some of those wrong. Truthfully, as I have posted before, I do not know that ALL nitriles are compatible with LPG. If the liner tube in a hydraulic hose would fail, it would probably give off particles that would plug the burner orifice. If that clue was not available, and the liner would fail completely, there would still be little chance for a big leak due to the tight wire braid layer outside the liner tube. The cover material would also have to fail. You can see hydraulic hose construction at (discounthydraulichose.com) The hydraulic hose is far stiffer than typical LP hose due to the wire braid and heavier construction. The wire braid is the primary reason I use it. Even if inappropriately placed hot iron burned through the outer cover and melted the innner liner through the wire braid, the wire braid would still keep large flow leaks from happening since it is so tight. If you go to a typical shop that sells parts for off road construction or agricultural equipment and/or does hydraulic repair, they probably have this hose. Ask for the SAE 100R1-A or -AT spec. Disclaimer... I cannot guarantee that all hydraulic hose will be compatible with LPG. YOU must do the work and assure yourself that it is right for you. I have not had any problem with multiple different brand hydraulic hoses in many years. |
| - Tony - Saturday, 01/08/05 13:43:51 EST |
|
Heavy Hose for Propane: They make and sell a specific heavy wall high pressure hose for propane. It is required for all liquid applications and thus is required in camper and vehical use do to the possibility of turnover. Many propane appliances come with stingers made of this hose. Contact your propane dealer. |
| - guru - Saturday, 01/08/05 14:10:46 EST |
|
Magentic storage -- It's been almost 20 years since I studied this, but there's an archaeological dating technique called archaeomagnetism. Basically, if you find a fire site with a piece of iron or other magnetic material in it, you record the exact orientation of the magnetic field generated by the material. You then compare this to known information about the historic orientation of the earth's magentic field. Find the time when the earth's field was oriented the same way as the field in the material, and you've dated your fire. This wouldn't work if magnetic fields in iron kept changing after they cooled. |
| Mike B - Saturday, 01/08/05 14:31:41 EST |
|
During the war (WWII) we measured the magnetism of sunken enemy ships to determime which yard they were built in. Each yard and in some cases each way of a yard had a specific directionam magnetic signature. |
| John Odom - Saturday, 01/08/05 16:17:10 EST |
|
To Guru and his assistants. I was wondering what tool steel would be best for a knife (S7, H5, etc.) thank you for your response. |
| Oil quench - Saturday, 01/08/05 18:17:02 EST |
|
Interestingly, (though not surprisingly for a long-term resident of the islands), the local propane suppliers don't carry propane hose. Neither do the plumbing supplies. For high pressure propane hose, the only source locally is on of the paint suppliers. He's the only guy with the machine for crimping the fittings, (for airless sprayers), so he's the guy that carries the propane hose as well. Island life. |
| vicopper - Saturday, 01/08/05 18:45:37 EST |
|
Oil Quench, There are a great many good knife steels. I assume you are a beginner, and if so and if you can forge the steel, I would begin with junkyard coil or leaf spring steel which will have about 0.60% carbon content, enough to allow for a cutting edge. Most of them are oil quenched and then tempered. Then you might progress to W1 drill rod which has about 0.95% carbon content. Beyond that, you have O1, D2, 440C, etc., etc. Get a catalog. As an example, Texas Knifemakers Supply sells various steels out of Houston. For each steel that you work, you need forging and heat treating specifications. |
| Frank Turley - Saturday, 01/08/05 19:23:49 EST |
|
propane hoses. I have had a lot of success with the local BBQ store. All they do is propane grills and fireplaces, etc |
| Ralph - Saturday, 01/08/05 19:38:32 EST |
|
Tony, Many years ago, while working for the Fluid Power Division of Westinghouse Air Brake co(WABCO), I broke my wrist. As I was working in the test lab they cast about for testing that I could do one handed, and low and behold, elastomer/fluid compatibility was it. I tested more O-rings against more fluids than Carter had little liver pills. We tested against the standard ASTM shrink and swell oils, and also againt the various hydraluic oils. It was amazing to see the effects of many of the "patent medicine" penetrating oils etc had on the O-rings. The wildest was Marvel mystery oil. A neoprene O-ring would swell about 300% and be soft as mush overnight. Some oils will swell the material, some will shrink the same material. I never did see any materials crumble, but the materials that shrunk , if flexed like hose, might indeed fail that way. The whole point of all that summers work for me was to pick the material that would be the choice for standard valves and cylinders to resist the most common fluids. End result? Nitrile, same compound that we were already using! |
| ptree - Saturday, 01/08/05 19:57:29 EST |
|
Thanks Frank. Will follow your advice. |
| Oil quench - Saturday, 01/08/05 20:09:51 EST |
|
Oil quench, I forgot to tell you about the menu in the upper right of this page. Under FAQs, there is a section on heat treatment and junkyard steels. |
| Frank Turley - Saturday, 01/08/05 21:44:05 EST |
|
I'm back. Sorta. I've got over 2,000 messages in my trash can, and 50+ to answer in my inbox. If I've missed something important, please remind me. |
| Paw Paw - Saturday, 01/08/05 22:15:37 EST |
|
I was wondering if there was going to be a convention this year at the Helfstyn Castle in the Czech Republic and if so does anyone know the date (or at least the month) when its happening? Thank you for your time, INsmithy |
| Indiana Smith - Saturday, 01/08/05 23:07:49 EST |
|
ptree, I'll add Marvel mystery oil to the list. My list is only about 30 fluids long. Mostly lubricants since we also make and sell lubricating equipment. Thankfully beer is one of them. Yup, shrink and get hard or swell and get soft and maybe gummy or sticky. I'm thinking if a hose liner would shrink and get brittle, some would break off. Can you imagine what would happen if a liner would get soft and gummy like your neoprene o-ring? Tar running into the burner orifice? Yuck. The RV liquid stuff would certainly be tougher than the standard propane hose. Does it have wire braid? Cost? Toughest compatibility issue I've had was a gasket for clear plastic tubing. Most nitrile compounds have plasticisers that keep the correct durometer(softness). The plasticisers in very many nitrile compounds would migrate into the plastic over a long time and cause the plastic to craze and crack. We had quite a few elastomer chemists working on that one. Eventually, we changed the plastic instead. |
| - Tony - Saturday, 01/08/05 23:34:17 EST |
|
Clifton Ralph Videos: Does anyone know where I can aquire DVD versions of Clifton's video series? My employer had the full set on VHS at one time, but now can only find tapes 1, 2, and 5. A friend copied these to DVD, but this was not completly successful and I would really like to get the full set. Patrick |
| Patrick Nowak - Sunday, 01/09/05 00:03:18 EST |
|
Patrick & Clifton Ralph:-) Try your local blacksmithing association, they should have it in their library to loan, that was where I got to see them. :-) Clifton is a crusty old gem;-)but manages to teach me something almost everytime I talk with him. |
| Fionnbharr - Sunday, 01/09/05 00:28:27 EST |
|
Hey my name is chelsi and im young as in a kid I am like in love with ancient EVERYTHING like Greek and Roman times and I am expecially interstid in the weaponry I want to be able to make swords and stuff. i need your help with just about everything tell me what are the basic things i need to know before starting? also where can i find a site to build your own forge yes im a girl but i build stuff i built mydoghouse im building a ramp in my back yard so building isnt a problem... Please help me out! |
| chelsi - Sunday, 01/09/05 01:46:58 EST |
|
|
|
|