Making a Norman Helm
Part 8: Grinding, and Making a Decorated Nasal
Forward to Part 9: Final
Finishing and Assembly
Back to Part 7: Rough Trimming and Bouging
Back to Table of Contents
| Grinding: | |
 |
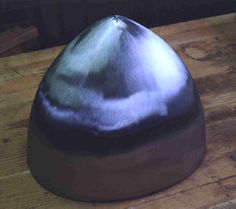
The bouging is done; the worn belt left only a few pits behind. Now I mount a brand-new 36 grit ceramic belt, and grind the helmet for real. I take off just enough to get rid of the tiny divots and pits left by the worn belt. The photo shows the helmet after the 36-grit course is done. Weight is now 4 lb 11 oz; I took off 8 oz in the coarse grinding. |
| I do rough grinding with moderate pressure and even passes. I have to be careful! I use Norton Hogger™ red ceramic belts for the first couple of grits, and they tear off steel as if it were chalk. In fact, I may start the grinding process with 60 grit, instead of 36, in the future; it would take longer to get the pits out of the helmet skull, but would require one less finishing step, and might conserve some metal. | |
| Now the tedious process of finish grinding begins. The 36-grit ceramic is followed by a 60-grit, stroking at right angles to the previous grind, until the 36-grit marks are gone. Weight now 4 lb 7 oz; I took off 4 oz in this grinding course, only half of what the 36-grit course did. |
 |
 |
Next, 120-grit ceramic, again at right angles to the last belt. Weight: 4 lb 6 oz. Only lost another ounce, which is kind of a relief; I want the skull to stay over 4 lbs. |
| Next, 220-grit ceramic. Weight now 4 lb 5 oz. |
 |
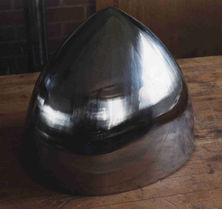 |
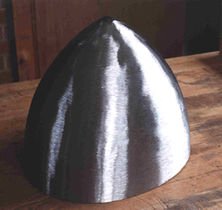
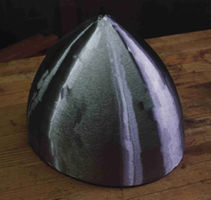
I've skipped a step in the photo sequence. I followed the 220-grit ceramic with an A30 Trizact™ (3M Corp.) belt, equivalent to about 400 grit; then used an A16 Trizact (about 800 grit), producing the surface shown here. Weight is now 4 lb 4 oz; the two fine belts together only took an ounce off the skull. |
|
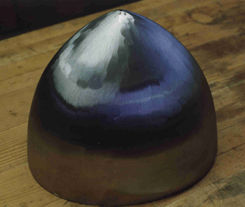
The Trizact belts are pretty smooth, although a bit slow cutting. The finish is looking good, but somewhat streaky. The streaks will come out in the finish buffing, but I'm not going to do that now; it's time to start attaching accessories, like a helmet liner, nasal, etc., and I will be handling the helmet a lot, so it will get scratched and fingerprinted. The final buffing will be done just before all the attachments are riveted on. Firescale, trimming, and grinding combined to take 2.25 lb off of the original material weight, a loss of about 35%. This level of loss is not unusual. I expect my finished helmets will weigh about 2/3 of the starting blank weight. |
|
Making the Nasal: |
|
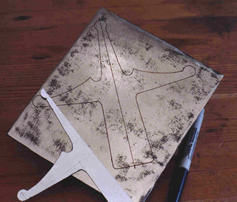
| I sketch and cut out a paper template ("half" template, in this case) for a decorative crucifix-shaped nasal, and trace the pattern in ink on a piece of 10-gauge mild steel. This stock is about .130" thick (over 1/8"), so it will make a very strong nasal. Even on a Beverly B3 shear, it is a bear to cut! |
 |
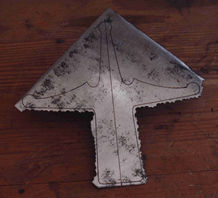 |
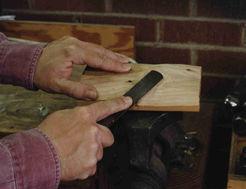
I make a few straight cuts to chop the form out of the stock, leaving large margins. Then I trim to the line using a punch and chisel. I punch a line of holes very close to each other, but not touching. I then knock the webbing out with a very small (3/16" or so width blade) sharp cold chisel, using a scrap piece of flat mild steel for backing. |
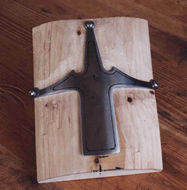
| After the nasal is cut out, it is ground and filed to profile, and holes for the future affixing rivets are punched in it. It is then gently curved to fit the helmet front by delicate hammering in several of the dishing forms. I then pause to consider decoration on the nasal, if any. | |
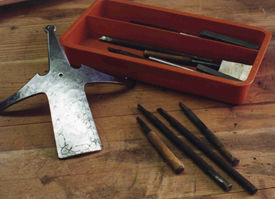
| I'll do a simple inlay accent in silver wire. Shown are some of the chisels and punches I use for inlay and engraving. Most are ground and hardened 1/4" O1 drill rod. The nasal is still "rough from the hammer" here; it will be ground smooth before inlaying starts. |
 |
| A confession: you can probably see faint marks of a more complex knotwork design I was doodling on the nasal, in ink. I have done a bit of inlay knotwork, but I chickened out in this case, and opted for a simpler borderline. I wanted to get this helmet done as soon as possible, with minimal chance of error! | |
 |
The nasal has to be held firmly while the inlay is cut and punched in. For simple shapes like this, wood works fine. I use a chunk of scrap 2x6, and shape it to fit the nasal back by eye, using a drawknife and rasp, and some trial fits. (Rest assured, if I can do this, you can...my woodworking skills are next to nonexistent.) A small piece of 2x2 screwed to the back provides a "handle" to grip in the vise. |
| The nasal is ground to the same fineness as the helmet, then screwed to the holding block through its convenient rivet holes, and the line for the inlaid border is drawn on it with a fine marker. It's ready for cutting. |
 |
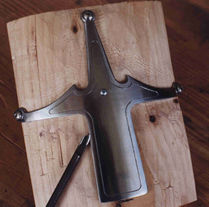 |
Here is shown the inlay groove, cut with the V-tip chisel lying next to the nasal. This chisel cuts a V-shaped gouge in the metal, which I prefer because the chisel is much easier to guide around curves and corners than a straight-bladed one. The cut is somewhere between 1 and 2 millimeters wide and deep, I reckon. I will now use a tiny straight-bladed chisel to make a small undercut on the cut's edges, making the cut's profile a rough "dovetail" to receive the wire. |
| After the undercut is done, the wire, 20-gauge fine silver, is then carefully punched into the cut with a hardened steel punch. I go over it once to set it, then make 2-3 passes around with the punch, using rapid, overlapping blows with a small hammer. The wire "flows" down into the cut, and conforms to the dovetail shape, locking firmly into place. | |
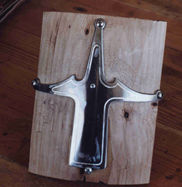
| I then file off the excess silver (I've just finished filing in this picture -- you can see some of the file marks.) The whole nasal is now carefully fine-sanded and buffed. By the way, be sure to use only fine silver for this type of work! Sterling silver is hard and tough, and does not set well. Fine silver also makes a handsome white contrast with steel. |
 |
Forward to Part 9: Final Finishing and
Assembly
Back to Part 7: Rough Trimming and Bouging
Back to Table of Contents